1
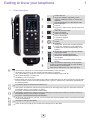
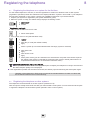
First First Alcatel-Lucent 8232 DECT Handset OmniPCX Office User manual 8AL 90861 USAB ed01 11/2012 CoverPage 2 Contents Precautions for use . . . . . . . . . . . . . . . . . . . . . . . . . . . . . . . . . . . . . . . . . . . . . . . . . . . . . . . . . . . . . . . p. 5 Toc 1. Getting to know your telephone 1.1 Phone description . . . . . . . . . . . . . . . . . . . . . . . . . . . . . . . . . . . . . . . . . . . . . . . . . . . . . . . . . . . 1.2 Status icons . . . . . . . . . . . . . . . . . . . . . . . . . . . . . . . . . . . . . . . . . . . . . . . . . . . . . . . . . . . . . . . . 1.3 MENU icons. . . . . . . . . . . . . . . . . . . . . . . . . . . . . . . . . . . . . . . . . . . . . . . . . . . . . . . . . . . . . . . . 1.4 Call icons . . . . . . . . . . . . . . . . . . . . . . . . . . . . . . . . . . . . . . . . . . . . . . . . . . . . . . . . . . . . . . . . . . 1.5 Accessing the MENU and navigating . . . . . . . . . . . . . . . . . . . . . . . . . . . . . . . . . . . . . . . . . . . . p. 7 p. 7 p. 8 p. 8 p. 9 p. 9 2. Getting started 2.1 Installing the battery in the telephone . . . . . . . . . . . . . . . . . . . . . . . . . . . . . . . . . . . . . . . . . . . . 2.2 Charging your telephone battery . . . . . . . . . . . . . . . . . . . . . . . . . . . . . . . . . . . . . . . . . . . . . . . . 2.3 Switching on your telephone . . . . . . . . . . . . . . . . . . . . . . . . . . . . . . . . . . . . . . . . . . . . . . . . . . . p. 10 p. 10 p. 11 p. 12 3. Using your telephone 3.1 Making a call . . . . . . . . . . . . . . . . . . . . . . . . . . . . . . . . . . . . . . . . . . . . . . . . . . . . . . . . . . . . . . . 3.2 Calling from your personal directory (Individual number) . . . . . . . . . . . . . . . . . . . . . . . . . . . . . 3.3 Calling your correspondent by name (company directory) . . . . . . . . . . . . . . . . . . . . . . . . . . . . 3.4 Receiving a call . . . . . . . . . . . . . . . . . . . . . . . . . . . . . . . . . . . . . . . . . . . . . . . . . . . . . . . . . . . . . 3.5 Redialing . . . . . . . . . . . . . . . . . . . . . . . . . . . . . . . . . . . . . . . . . . . . . . . . . . . . . . . . . . . . . . . . . . 3.6 Requesting automatic callback if internal number is busy . . . . . . . . . . . . . . . . . . . . . . . . . . . . . 3.7 Activate/deactivate voice frequency . . . . . . . . . . . . . . . . . . . . . . . . . . . . . . . . . . . . . . . . . . . . . 3.8 During a call. . . . . . . . . . . . . . . . . . . . . . . . . . . . . . . . . . . . . . . . . . . . . . . . . . . . . . . . . . . . . . . . p. 13 p. 13 p. 13 p. 13 p. 14 p. 14 p. 14 p. 15 p. 15 4. During a conversation 4.1 Placing a call on hold (hold). . . . . . . . . . . . . . . . . . . . . . . . . . . . . . . . . . . . . . . . . . . . . . . . . . . . 4.2 Make a second call . . . . . . . . . . . . . . . . . . . . . . . . . . . . . . . . . . . . . . . . . . . . . . . . . . . . . . . . . . 4.3 Receiving a second call . . . . . . . . . . . . . . . . . . . . . . . . . . . . . . . . . . . . . . . . . . . . . . . . . . . . . . . 4.4 Switching between two calls (Broker call) . . . . . . . . . . . . . . . . . . . . . . . . . . . . . . . . . . . . . . . . . 4.5 Transferring a call . . . . . . . . . . . . . . . . . . . . . . . . . . . . . . . . . . . . . . . . . . . . . . . . . . . . . . . . . . . 4.6 Transfer a call to the voice mailbox of an absent party . . . . . . . . . . . . . . . . . . . . . . . . . . . . . . . 4.7 Three-way conference with internal and/or external correspondents (conference). . . . . . . . . . 4.8 Placing an outside call on hold (parking) . . . . . . . . . . . . . . . . . . . . . . . . . . . . . . . . . . . . . . . . . . 4.9 Store a number . . . . . . . . . . . . . . . . . . . . . . . . . . . . . . . . . . . . . . . . . . . . . . . . . . . . . . . . . . . . . p. 16 p. 16 p. 16 p. 16 p. 17 p. 17 p. 17 p. 18 p. 18 p. 18 5. Sharing 5.1 Answering the general bell . . . . . . . . . . . . . . . . . . . . . . . . . . . . . . . . . . . . . . . . . . . . . . . . . . . . 5.2 Call pick-up . . . . . . . . . . . . . . . . . . . . . . . . . . . . . . . . . . . . . . . . . . . . . . . . . . . . . . . . . . . . . . . . 5.3 Hunting groups . . . . . . . . . . . . . . . . . . . . . . . . . . . . . . . . . . . . . . . . . . . . . . . . . . . . . . . . . . . . . 5.4 Diverting hunting group calls . . . . . . . . . . . . . . . . . . . . . . . . . . . . . . . . . . . . . . . . . . . . . . . . . . . 5.5 Sending a written message to an internal correspondent . . . . . . . . . . . . . . . . . . . . . . . . . . . . . 5.6 Send a voice message copy . . . . . . . . . . . . . . . . . . . . . . . . . . . . . . . . . . . . . . . . . . . . . . . . . . . 5.7 Sending a recorded message to a number a distribution list. . . . . . . . . . . . . . . . . . . . . . . . . . . 5.8 Modify the automated attendant welcome message remotely. . . . . . . . . . . . . . . . . . . . . . . . . . p. 19 p. 19 p. 19 p. 20 p. 20 p. 20 p. 21 p. 22 p. 23 6. Keep in touch 6.1 Selecting calls to be diverted . . . . . . . . . . . . . . . . . . . . . . . . . . . . . . . . . . . . . . . . . . . . . . . . . . . 6.2 Diverting calls to your voice mailbox . . . . . . . . . . . . . . . . . . . . . . . . . . . . . . . . . . . . . . . . . . . . . 6.3 Consulting your voice mailbox . . . . . . . . . . . . . . . . . . . . . . . . . . . . . . . . . . . . . . . . . . . . . . . . . . 6.4 Activatingdeactivating the personal assistant . . . . . . . . . . . . . . . . . . . . . . . . . . . . . . . . . . . . . . 6.5 Personal assistant: reaching you with one number only . . . . . . . . . . . . . . . . . . . . . . . . . . . . . . 6.6 Diverting calls to another number (immediate diversion). . . . . . . . . . . . . . . . . . . . . . . . . . . . . . 6.7 Different types of diversions - Example of diversion on busy . . . . . . . . . . . . . . . . . . . . . . . . . . 6.8 Cancelling all diversions . . . . . . . . . . . . . . . . . . . . . . . . . . . . . . . . . . . . . . . . . . . . . . . . . . . . . . 6.9 Consulting messages left while you were away . . . . . . . . . . . . . . . . . . . . . . . . . . . . . . . . . . . . p. 24 p. 24 p. 24 p. 24 p. 25 p. 25 p. 26 p. 26 p. 26 p. 27 3 Contents 7. Programming your telephone 7.1 Initializing your voice mailbox. . . . . . . . . . . . . . . . . . . . . . . . . . . . . . . . . . . . . . . . . . . . . . . . . . . 7.2 Customising your voice greeting . . . . . . . . . . . . . . . . . . . . . . . . . . . . . . . . . . . . . . . . . . . . . . . . 7.3 Modifying your personal code . . . . . . . . . . . . . . . . . . . . . . . . . . . . . . . . . . . . . . . . . . . . . . . . . . 7.4 Adjusting the audio functions . . . . . . . . . . . . . . . . . . . . . . . . . . . . . . . . . . . . . . . . . . . . . . . . . . . 7.5 Activating headset mode . . . . . . . . . . . . . . . . . . . . . . . . . . . . . . . . . . . . . . . . . . . . . . . . . . . . . . 7.6 Adjusting your telephone functions . . . . . . . . . . . . . . . . . . . . . . . . . . . . . . . . . . . . . . . . . . . . . . 7.7 Selecting language. . . . . . . . . . . . . . . . . . . . . . . . . . . . . . . . . . . . . . . . . . . . . . . . . . . . . . . . . . . 7.8 Programming your personal directory (Individual number) . . . . . . . . . . . . . . . . . . . . . . . . . . . . 7.9 Modifying a card in the personal directory . . . . . . . . . . . . . . . . . . . . . . . . . . . . . . . . . . . . . . . . . 7.10 Programming an appointment reminder. . . . . . . . . . . . . . . . . . . . . . . . . . . . . . . . . . . . . . . . . . . 7.11 Identify the terminal you are on . . . . . . . . . . . . . . . . . . . . . . . . . . . . . . . . . . . . . . . . . . . . . . . . . 7.12 Locking your telephone . . . . . . . . . . . . . . . . . . . . . . . . . . . . . . . . . . . . . . . . . . . . . . . . . . . . . . . 8. Registering the telephone p. 34 8.1 Registering the telephone on a system for the first time . . . . . . . . . . . . . . . . . . . . . . . . . . . . . . p. 34 8.2 Registering the telephone on other systems . . . . . . . . . . . . . . . . . . . . . . . . . . . . . . . . . . . . . . . p. 34 9. Using the telephone in GAP mode 9.1 Making a call . . . . . . . . . . . . . . . . . . . . . . . . . . . . . . . . . . . . . . . . . . . . . . . . . . . . . . . . . . . . . . . 9.2 Receiving a call . . . . . . . . . . . . . . . . . . . . . . . . . . . . . . . . . . . . . . . . . . . . . . . . . . . . . . . . . . . . . 9.3 Make a second call . . . . . . . . . . . . . . . . . . . . . . . . . . . . . . . . . . . . . . . . . . . . . . . . . . . . . . . . . . 9.4 Receiving a second call . . . . . . . . . . . . . . . . . . . . . . . . . . . . . . . . . . . . . . . . . . . . . . . . . . . . . . . 9.5 Calling from your personal directory . . . . . . . . . . . . . . . . . . . . . . . . . . . . . . . . . . . . . . . . . . . . . 9.6 Calling your correspondent by name (company directory). . . . . . . . . . . . . . . . . . . . . . . . . . . . . 9.7 Redialling the last number dialed (redial). . . . . . . . . . . . . . . . . . . . . . . . . . . . . . . . . . . . . . . . . . 9.8 Sending DTMF signals. . . . . . . . . . . . . . . . . . . . . . . . . . . . . . . . . . . . . . . . . . . . . . . . . . . . . . . . 9.9 Immediate forward to a number . . . . . . . . . . . . . . . . . . . . . . . . . . . . . . . . . . . . . . . . . . . . . . . . . 9.10 Diverting your calls to your voice message service . . . . . . . . . . . . . . . . . . . . . . . . . . . . . . . . . . 9.11 Deactivate forward . . . . . . . . . . . . . . . . . . . . . . . . . . . . . . . . . . . . . . . . . . . . . . . . . . . . . . . . . . . 9.12 Consulting your voice mailbox . . . . . . . . . . . . . . . . . . . . . . . . . . . . . . . . . . . . . . . . . . . . . . . . . . 9.13 Sending a calibrated cut-off . . . . . . . . . . . . . . . . . . . . . . . . . . . . . . . . . . . . . . . . . . . . . . . . . . . . 9.14 Programming your personal directory . . . . . . . . . . . . . . . . . . . . . . . . . . . . . . . . . . . . . . . . . . . . 9.15 Deleting a card . . . . . . . . . . . . . . . . . . . . . . . . . . . . . . . . . . . . . . . . . . . . . . . . . . . . . . . . . . . . . . 9.16 Customizing and adjusting your telephone . . . . . . . . . . . . . . . . . . . . . . . . . . . . . . . . . . . . . . . . 9.17 read incoming text message . . . . . . . . . . . . . . . . . . . . . . . . . . . . . . . . . . . . . . . . . . . . . . . . . . . 9.18 Sending text message . . . . . . . . . . . . . . . . . . . . . . . . . . . . . . . . . . . . . . . . . . . . . . . . . . . . . . . . 9.19 Sending predefined message . . . . . . . . . . . . . . . . . . . . . . . . . . . . . . . . . . . . . . . . . . . . . . . . . . p. 36 p. 36 p. 36 p. 36 p. 37 p. 37 p. 38 p. 38 p. 39 p. 39 p. 39 p. 40 p. 40 p. 40 p. 40 p. 42 p. 42 p. 44 p. 44 p. 45 10. Accessories 10.1 Phone package . . . . . . . . . . . . . . . . . . . . . . . . . . . . . . . . . . . . . . . . . . . . . . . . . . . . . . . . . . . . . 10.2 Chargers . . . . . . . . . . . . . . . . . . . . . . . . . . . . . . . . . . . . . . . . . . . . . . . . . . . . . . . . . . . . . . . . . . 10.3 Characteristics of the mains power adapter. . . . . . . . . . . . . . . . . . . . . . . . . . . . . . . . . . . . . . . . 10.4 Presentation of the battery pack . . . . . . . . . . . . . . . . . . . . . . . . . . . . . . . . . . . . . . . . . . . . . . . . 10.5 Headphone / external microphone . . . . . . . . . . . . . . . . . . . . . . . . . . . . . . . . . . . . . . . . . . . . . . . 10.6 Cleaning your telephone . . . . . . . . . . . . . . . . . . . . . . . . . . . . . . . . . . . . . . . . . . . . . . . . . . . . . . 10.7 Transporting and protecting your telephone . . . . . . . . . . . . . . . . . . . . . . . . . . . . . . . . . . . . . . . p. 46 p. 46 p. 46 p. 47 p. 47 p. 47 p. 47 p. 47 11. Glossary p. 48 p. 28 p. 28 p. 28 p. 29 p. 29 p. 30 p. 30 p. 31 p. 31 p. 32 p. 32 p. 33 p. 33 Declaration of compliance . . . . . . . . . . . . . . . . . . . . . . . . . . . . . . . . . . . . . . . . . . . . . . . . . . . . . . . . . . p. 49 4 Precautions for use Coverage area The DECT functions provided by your Alcatel-Lucent system allow user mobility management via DECT cordless telephones. Radio coverage of the Alcatel-Lucent system is ensured by a network of radio terminals. The coverage area of a radio terminal is called a cell. howtoc • Mobility: A user can make or receive calls in any cell. • Radio transfer: This function enables the user to move during a conversation and go from one cell to another. The transfer takes place automatically and has no effect on the conversation. In some cases, slight crackling may be audible at the moment of transition. Use of approved DECT equipment This DECT telephone is designed to be used with a private automatic branch exchange (PABX) without an AlcatelLucent wire. The CE symbol means that this product is compliant with current Community directives, more especially the following directives: 89/336/ Electromagnetic Compatibility CEE 73/23/CEE (Low voltage) 1999/5/CE (R&TTE) Pursuant to directive 1999/5/CE (R&TTE) published in the Official Journal of the European Community of April 7, 1999, these items of equipment use the DECT harmonized frequency spectrum and can be used in all the countries of the European Community, in Switzerland and Norway. No guarantee is given concerning possible interference affecting DECT equipment, due to other authorised utilisation of the radio frequencies concerned. 5 Precautions for use Operating conditions This approved DECT telephone is intended to be used with an Alcatel-Lucent cordless PBX. The following conditions must be respected, notably concerning the use of radioelectric frequencies: Changes or modifications to the equipment not expressly approved by the party responsible for compliance could void the user’s authority to operate the equipment. To limit the risk of interference, people with pacemakers must keep the wireless telephone away from their equipment (minimum distance of 15 cm/6 inches) It is recommended to follow the standard acceptance procedures before using this equipment in human safety critical areas (hospitals...). DECT equipment can only be used to establish links between fixed points if these links are temporary and the equivalent isotropically radiated power at the antenna is less than 250 mW. The conditions of access to a DECT equipment telepoint network shall be stipulated by contract with the operator of the authorized telepoint network concerned. Do not expose your telephone to severe conditions (rain, sea air, dust, etc.). Switch off the telephone before changing the battery. You must not switch on or use your telephone near gas or inflammable liquids. The handset includes magnetic elements that may attract sharp metallic objects. To prevent injury, before each use ensure sharp metallic objects are not stuck to the earpiece. There is a danger of explosion if the battery is replaced incorrectly. Use only recommended battery: AlcatelLucent 3BN67332AA (China Shenzhen DRN Battery Co. Ltd. RTR001FXX / China Effort Limited CE-MB2065C-XX - Li-ion 3.7V 1100mAh 4.1Wh). The mains power socket used must be close to the charger/holder and easily accessible, so that it can be used as an "on/off" facility. Battery charge: Charge the battery for about 16 hours before initial use. Use only 8232 DECT Handset charging units: 8232 DECT Handset Desktop charger (3BN67331AA), 8232 DECT Handset Desktop charger PSU (SALOM SSW-2374, Friwo FW7712-/FW7713/XX, Ten Pao S005SV0500100 / S005SB0500100). You can charge the device by connecting it to a USB 2.0 port (type A). Use only the cable provided with the 8232 DECT Handset Desktop Charger (USB "A" plug). The labels and icons presented in this document are not contractually binding and may be modified without prior warning.The labels and icons displayed on your phone depend on the system to which you are connected and may differ from those specified in this document. 6 Getting to know your telephone Other 1.1 Phone description LED • • • • • • • answer the call • long press (feature depending on the system): redial last number or access the redial list • switching between two calls (Broker call) • switch off ringer • hang up • long press: Switch on the phone / Switch off the phone • return to previous menu • erase a character • delete an entire field • back to homepage • Lock/unlock keypad • access menu • confirm • navigate • short press: access the company directory • Long press: Customizing your telephone ; Telephone ID (Features depending on the system ) • short press: access the ringer and vibrate adjustment feature • long press: Activate vibrate only • short press: activate/deactivate the loudspeaker • long press: Activate/deactivate the mute feature • long press (features depending on the system): access to personal speed dial / access the dtmf feature during a conversation • GAP mode: Switch from one call to the other green steady: the phone is on the charger and the battery is fully charged red steady: the phone is on the charger and the battery is charging slow yellow flashing: telephonic event such as unread message, missed call, etc. rapid yellow flashing: incoming call red flashing: out of coverage flashing when the phone is plugged into the charger means the same as when the phone is not plugged into the charger; however, the LED will display red or green in between the yellow flash depending on the charging status. • 3.5 mm jack plug for headset and maintenance • short press: decrease the volume of ring tone during an incoming call (4 steps) or decrease volume of loudspeaker during a conversation (8 steps). • long press: activate/deactivate the mute feature. • short press: increase the volume of ring tone during an incoming call (4 steps) or increase volume of loudspeaker during a conversation (8 steps). • long press: activate/deactivate the loudspeaker. • clip to hook your phone on your belt. you can remove the clip and instead use the cover that is provided in the phone package. • usb plug for charging the battery • press on this key to light up the screen when the phone is in idle state 7 1 1.2 Status icons The status icons are displayed on the welcome screen and indicate the status of the telephone. Battery charge level Received messages voice mail and callback request texts and unanswered calls Appointment programmed Call diversion activated Vibrator active Ringer active Ringer disabled Radio reception quality Loudspeaker on (in conversation) Mute on (in conversation) Economy mode activated and used (green) Economy mode activated (gray) You can obtain details on the status icons from the tooltips that appear on the welcome screen when you use the navigator: 1.3 MENU icons The MENU is accessible from the welcome screen by pressing the OK key. (OK:) It provides access to all the functions available on your system. Directories: manage your personal directory and access the company directory. Redial call back the last number dialed. Divert divert your calls to another number. Mailbox: consult and send voice and text messages. Call pick-up: answer a call intended for another telephone. Appointment: program a call-back time. System lock: prohibit outgoing calls and modification of the programming. Guide: programming, list of functions,... Adjustment: adjust contrast, activate or deactivate the beeps, lighting, etc. System selection Installation Manager/Assistant Choice of language Ringing setting 8 1.4 Call icons Making a call Receiving a call Call on hold Accessing the directories Transferring a call Switching to DTMF signals Setting up a conference Diverting your calls to your voice message service Putting on common hold Parking an external communication Call duration and cost Additional options (Features depending on the system ) In the event of a multiple call, the icons are given indices to represent the different correspondents 1.5 Accessing the MENU and navigating The MENU is accessible from the welcome screen by pressing the OK key. Access Select a function in the MENU MENU You can move horizontally along the various icons within the function 9 Getting started 2 Other 2.1 Installing the battery in the telephone • Installing the battery in the telephone If the belt clip is installed, you must lift it up and maintain it in this position during the battery installation or replacement. You can also turn the belt clip counterclockwise. Position the battery connectors side as shown in the drawing (A). Terminate the installation of the battery in its compartment by pressing as shown in the drawing (B). Replace the cover. • To remove it If the belt clip is installed, you must lift it up and maintain it in this position during the battery installation or replacement. You can also turn the belt clip counterclockwise. Lift up the cover. 10 . Remove the battery from its compartment as shown in the drawing. 2.2 Charging your telephone battery • How to dock your phone on the desk support Put your phone on its support. Plug the USB cable into the 5V socket of the desk support. Plug the other end of the USB cable into the AC/DC adapter. Plug the adapor into the mains power supply. • How to dock your phone with the USB cable Plug the USB cable into the USB port of your phone. The other end of the USB cable can be plugged into the AC/DC adapter or into a computer USB port. You can also charge your phone from any USB plug, such as a computer USB plug. However, the charging time is longer than charging with the AC/DC adapter. LED • Green steady: the phone is on the charger and the battery is fully charged. • Red steady: the phone is on the charger and the battery is charging. Recharge your telephone battery regularly. The telephone can be on or off when recharging the battery. If the telephone is to remain unused or out of its charger for several weeks, remove the battery and store it separately. The battery charging time is less than 3 hours. The charging time is longer if charging through the USB plug from a device other than the AC/DC adapter. Autonomy of your telephone On standby in the radio coverage zone: up to 200 hours In continuous conversation: up to 20 hours Switch off the telephone before changing the battery. 11 2.3 Switching on your telephone Your telephone is switched on Press the switch on/off key (long press) If the display fails to light up or the battery icon is flashing, recharge the battery. ; If the radio reception icon doesn’t appear on the telephone display: • Check that you’re in an area covered (if you’re not, move close to a radio terminal). • Check that the telephone is properly installed in the system (consult the PABX manager). If the display indicates: "System 1 Auto install ?", see paragraph "Registering the telephone" or contact your installation technician. Switching off your telephone: Press the switch on/off key (long press). 12 Using your telephone 3 Other 3.1 Making a call • dial • send the call You are in communication • hang up To make an external call, dial the outside line access code before dialing your contact number 3.2 Calling from your personal directory (Individual number) • access menu • contacts • persspdial validate access to the personal directory • select the name of the person you wish to call • send the call The call can be sent directly from the list of names by dialling the number of the card. quick access: 3.3 (Long press) Calling your correspondent by name (company directory) • access menu • contacts • directory validate access to the personal directory • enter the first letter of your correspondent’s surname* • select the desired name • send the call en.txt excel2pt-mv-lg.sh lg8082.txt If several names come up, you can refine the search by entering the successive letters (second, third, etc.) of the name you are looking for. Press 1 when you do not know one of the letters of the name. For fast access to this function from the home screen page, press the directory key. 13 3.4 Receiving a call You are receiving a call • long press more information on the caller: successive presses for name and number • answered incoming calls • disabling the ringer:press the hang up key when your telephone rings: it is still possible to answer by pressing the unhook key. Speak • hang up The ringer does not ring if: . the vibrator is active, the vibrator active icon is displayed on the screen saver. . the ringer is disabled, the ringer disabled icon is displayed on the screen saver. Long press = Guide key: (i) Depending on how the system is configured, the name or number of the caller is displayed on the screen. Pressing the ’i’ key displays the name or number of the caller on the screen. If the number is displayed by default, pressing the ’i’ key displays the name. If the name is displayed by default, pressing the ’i’ key displays the number. 3.5 Redialing • access menu • call log • select the no. in the last 8 issued • send the call 3.6 Requesting automatic callback if internal number is busy The telephone of the internal correspondent you are trying to contact is busy, and you want the person to call you back as soon as they are free. • callback To cancel the automatic callback request, enter the "Cancel automatic callback" function code. 14 3.7 Activate/deactivate voice frequency During a call, you sometimes have to send DTMF signals, for example, for a voice message service, an automatic switchboard or when remotely consulting an answering machine: • you are in conversation with one caller • ¤mfcode • to activate • sending dtmf signals • to deactivate The function is automatically cancelled when you hang up 3.8 During a call During a call and without losing the connection, there are several ways to access the options offered by your system, using: • the list of icons at the top of the screen • the list of items at the bottom of the screen 10 10 Call in progress Slot for second call (reception of a call ou call waiting ) Contacts transfer Put through a second call Voice frequency Conference ManualHold Parkcall TrfVMU 15 During a conversation 4 Other 4.1 Placing a call on hold (hold) You are in conversation with one caller • the first call is on hold • Recover the correspondent on hold • hang up Your telephone rings • recover the correspondent on hold 4.2 Make a second call You are in conversation with one caller • dial the number • send the call • the first call is on hold • Recover the correspondent on hold • hang up Your telephone rings • recover the correspondent on hold You can also initiate a second call by first validating the Other call option and using the personal directory or the company directory. 4.3 Receiving a second call You are in conversation and a correspondent is trying to contact you: The caller’s name is displayed for 3 seconds, and a beep is sent • long press more information on the caller: successive presses for name and number • answered incoming calls • the first call is on hold Over 3 seconds, move with the navigate-left-right key to the receiving a second call icon, to see the identity of the second caller (and off-hook if necessary) Long press = Guide key: (i) Depending on how the system is configured, the name or number of the caller is displayed on the screen. Pressing the i key displays the name or number of the caller on the screen. If the number is displayed by default, pressing the i key displays the name. If the name is displayed by default, pressing the i key displays the number. 16 4.4 Switching between two calls (Broker call) • During a call, to recover the correspondent on hold: • recover the correspondent on hold • You can establish the identity of the waiting call without taking it by using the navigate-left-right key. • display the correspondent’s identity • recover the correspondent on hold 4.5 Transferring a call During a conversation, to transfer the call to another number: You are in communication with a first correspondent • call the recipient of the transfer • send the call You are in conversation with the destination number • transfer the two correspondents are connected After dialling the number of the recipient, you can transfer your call directly without waiting for your correspondent to answer by selecting "Transfer". You can initiate the transfer by using the "Transfer" icon or text. The transfer between two external correspondents and the transfer action by the onhook key depends on the system configuration 4.6 Transfer a call to the voice mailbox of an absent party During the call, you want to transfer your correspondent to the voice mailbox of another correspondent. You are in communication with a first correspondent • trfvmu • apply • number of second correspondent • apply 17 4.7 Three-way conference with internal and/or external correspondents (conference) During a conversation, a second call is on hold • conference • you are in conference mode cancel conference and return to first correspondent (if conference is active ) • conference 4.8 Placing an outside call on hold (parking) You can park an outside correspondent in order to take the call on another set. You are holding an external conversation • parkcall Your correspondent is parked and hears the hold melody. To recover your parked call: • access menu • contacts • parking • apply • dial the number of the set that originated parking You are on a call If the parked call is not recovered within a preset time (by default 1 minute 30), it is directed to the operator. 4.9 Store a number To store the displayed number in the personal directory while a communication is in progress: • access menu • contacts • persspdial validate access to the personal directory • select the chosen card • enter the name * • apply (twice ) *To key in the name: the keys in the keypad include letters that you can display by pressing them successively. Example: press "8" twice to display the letter "U". 18 Sharing 5 Other 5.1 Answering the general bell When the operator is absent, incoming external calls are diverted to a general bell. You can answer these calls: • access menu • contacts • ansgenbell • confirm to take the call You are on a call 5.2 Call pick-up You hear a telephone ringing in an office where no-one can answer. If authorised, you can answer the call on your own telephone. • access menu • contacts • pick-upind • enter number of ringing telephone • apply If the telephone ringing is in your own pick-up group: • access menu • contacts • pick-upgrp • apply The system can be configured to prevent call pick-up on certain telephones. 19 5.3 Hunting groups Hunting group call: Some extensions can be associated to form a group. You can contact any one of them by dialling the group number. Belonging to a group does not affect the management of direct calls. A specific telephone within a group can always be called by using its own number. Temporary exit from your hunting group: • code of the "group exit" function • your group number Display of exit acceptance Return into your group: • code of the "return to group" function • your group number Display of exit cancellation 5.4 Diverting hunting group calls You can divert your own group calls: • code of the "group call diversion" function • no. of diversion telephone • diversion acknowledgement is displayed To cancel this function, refer to chapter 6 "Cancelling all diversions". 5.5 Sending a written message to an internal correspondent • access menu • messages • textmails • Confirm • • • • • • sendamsg Confirm dial the destination number Confirm select the message to be sent apply 20 The following 27 predefined messages exist: 1 2 Call me back Call me back tomorrow 15 16 MEETING ON xx.xx.xx (*) MEETING ON xx.xx.xx AT xx: xx (*) Out for a while Absent for the rest of the day ABSENT, BACK AT xx: xx (*) ABSENT, BACK ON xx.xx.xx AT xx: xx (*) ON VACATION, BACK ON xx.xx.xx (*) External meeting EXTERN MEETING, BACK ON xx.xx.xx (*) I am in room nr __ (*) In a meeting - do not disturb At lunch Indisposed 3 4 5 6 CALL ME BACK AT xx: xx (*) CALL BACK xx.xx.xx (*) Call the attendant Call the assistant 17 18 19 20 7 I will call back at _:_ (*) 21 8 9 Use paging Please fetch your fax 22 23 10 11 12 13 14 Please fetch your mail Please cancel your forwarding Visitors are waiting You are expected at reception MEETING AT xx: xx (*) 24 25 26 27 (*) Messages to be completed using numeric keypad If selected message has to be completed: • confirm access to the message to be completed • complete the message • apply When editing a message to be completed you can use the delete key to delete any characters key ined. 5.6 Send a voice message copy • access menu • messages • • • • voicemail Confirm access to the voice mailbox personal code Confirm • select the message to copy • sendcopy • number or name of the recipient or list • confirm • confirm • Confirm 21 To record a comment • sendcopy • number or name of the recipient or list • confirm • reccomment • confirm • confirm • Start recording Recording in progress • stop • ok confirm While recording a comment you can select other functions using the navigate-up-down key 5.7 Sending a recorded message to a number a distribution list • access menu • messages • • • • voicemail Confirm access to the voice mailbox personal code confirm • sendamsg • no. or name of the recipient or the list (000 - 050) * • apply • select the message to be sent • confirm * Distribution lists: • 000: the message is sent to all voice mailboxes • 001 to 050: the message is sent to a group of voice mailboxes 22 • To record the message • reccomment • Confirm • confirm • Start recording Recording in progress • stop? • ok confirm • send message While the message is being recorded, you can select other functions with the navigate-updown key. 5.8 Modify the automated attendant welcome message remotely This feature enables a user with the appropriate rights to modify the automated attendant night or day-time message. • voice mail call number • send the call • number of your voice mailbox • personal code • access the "personal options" menu • access the "welcome messages customisation" menu • follow the instructions of the voice guide 23 Keep in touch 6 Other 6.1 Selecting calls to be diverted This function enables you to select the calls to be diverted. These can be: external calls, internal calls (local) or all calls. • access menu • forward • select the "list of calls" icon • select the type of call to divert • confirm • return to idle 6.2 Diverting calls to your voice mailbox • access menu • select the "diversion" function • fwdimmvmu • confirm 6.3 Consulting your voice mailbox When you have received a message, the Message icon is displayed on the welcome screen. • the number of new vocal messages is displayed in the phone notification area ; OR • access menu • messages • voicemail • Confirm access to the voice mailbox • personal code • confirm Display number of new and old messages • playnew 24 • To access voice mail functions You can move horizontally along the various icons. Listen to the messages Delete the current message Call back the person who left the message Send a copy of a message Pause while listening to message Go back 10 seconds Go forward 10 seconds 6.4 Activatingdeactivating the personal assistant As well as leaving a message in the voice mailbox, the personal assistant directs the caller to an extension number, an outside number, a mobile or the switchboard • access menu • services • persoassist • forwardon: to activate personal assistant • ForwardOFF: to deactivate personal assistant • Confirm If the personal assistant and immediate forwarding are activated simultaneously the personal assistant functions are deactivated for as long as the forwarding function remains active. 6.5 Personal assistant: reaching you with one number only • access menu • services • persoassist • menu • To select the type of forwarding • internalnb enter the name of a colleague or your assistant or any other name • externalnb key in an outside number • mobilenb key in the number of your mobile • choiceon, choiceoff activate/deactivate the transfer to the switchboard • dial the number (if necessary) • apply 25 6.6 Diverting calls to another number (immediate diversion) The number can be your home, portable or car phone, voice mailbox or an internal extension (operator, etc.). • access menu • forward • fwdimm • dial the destination number • confirm You can continue to make calls while your telephone is diverted. General remark concerning diversions: you can only activate a single diversion on your telephone. Programming a new diversion will cancel the previous one. 6.7 Different types of diversions - Example of diversion on busy •Different types of diversions You can initiate different types of forwarding from the call forward list. FwdBusy When you are in conversation, all your calls are diverted to the number you choose. FwdDND Your telephone is momentarily inaccessible to all incoming calls. FwdFollow Your calls follow you when you are at another set. FwdtoPag Your calls are diverted to your portable radio paging receiver. FwdTextAns When a correspondent tries to call you, the text message you will have selected will be displayed on his or her phone screen • Example of diversion on busy • access menu • forward • fwdbusy • dial the destination number • confirm 6.8 Cancelling all diversions • access menu • forward • select the "diversion cancellation" icon • confirm 26 6.9 Consulting messages left while you were away When you have received a message, the Message icon is displayed on the welcome screen. • the number of new vocal messages is displayed in the phone notification area OR • access menu • messages • textmails • Confirm • select the desired message • confirm to read it • read the message • from the options menu, you can erase the message, callback the message sender, answer the message or read the next message 27 Programming your telephone Other 7.1 Initializing your voice mailbox You can use the Message icon on the welcome screen to initialize your voice mailbox. • the number of new vocal messages is displayed in the phone notification area • enter your password and record your name in accordance with the spoken instructions • Your password has 6 digits Your personal code is used to access your voice mailbox and to lock your telephone. A weak personal code with 6 identical digits (000000, 111111, etc.) or a simple sequence of 6 digits (012345, 123456, etc.) will be rejected by the system. After a system upgrade, the password may still have only 4 digits. For security reasons, we recommend you use a password with 6 digits. Contact your installer for more information. 7.2 Customising your voice greeting You can replace the greeting message by a personal message • access menu • services • mbxgreeting • apply • record • start recording Recording in progress • stop • ok confirm While recording the message you can select other functions with the navigate-up-down key. 28 7 • To go back to the default message • access menu • services • • • • • 7.3 mbxgreeting apply default Yes apply Modifying your personal code Your personal code is used to access your voice mailbox and to lock your telephone. • access menu • services • • • • • • • useroptions Password apply enter the old password apply Enter the new password (Your password has 6 digits) apply • apply Until your voice mailbox is initialized, the password is 151515 Each digit of the code is symbolized by an asterisk. A weak personal code with 6 identical digits (000000, 111111, etc.) or a simple sequence of 6 digits (012345, 123456, etc.) will be rejected by the system. After a system upgrade, the password may still have only 4 digits. For security reasons, we recommend you use a password with 6 digits. Contact your installer for more information. 7.4 Adjusting the audio functions You can choose the ring melody of your telephone (6 options) and adjust the audio volume (4 levels). A progressing ringing tone (meeting mode) can be used. • Choose the tune • access menu • services • phoneset 29 • Choose the tune • ring.melody • select the melody of your choice • apply • Adjusting the ringer volume • ring.level • select the volume of your choice • apply • You can adjust the buzzer/ringer mode according to your needs • press on the ringer/vibrate key • off:ringer and buzzer are deactivated • Ring only:rings only • Vibrate then ring:vibrates before ringing • Vibrate only:vibrates only • Vibrate and ring:vibrates and rings simultaneously This key can be used to switch rapidly from the ringer to the vibrator and vice-versa. 7.5 Activating headset mode This mode allows you to answer calls automatically (without doing anything) and to direct the call to the external headset. • access menu • services • phoneset • autoanswer • apply • select active/inactive as you wish • apply 7.6 Adjusting your telephone functions • access menu • settings • select the function* you want to activate or disable • activate / disable • return to idle 30 *You can activate or disable the following functions: Handset name Status Ascending ringing Coverage warning Keypad tone Headset mode ECONOMY mode Vibrator / Ring Security Reset settings Silent charging 7.7 you can enter a name for your handset to find out the software version of your phone activate or deactivate the ascending ringtone activate or deactivate the coverage warning activate or deactivate the keypad tone activate or deactivate the headset mode activate or deactivate the economy mode to adjust the ringer and/or the vibrate function to activate the automatic keylock or change the PIN code to reset the setting and go back to the default settings Deactivate ringing and/or vibrate when the phone is on its charging holder. Selecting language • access menu • services • • • • • useroptions languages apply select the language of your choice apply The initial language selection is made automatically by the system. 7.8 Programming your personal directory (Individual number) Your personal directory can contain up to 10 numbers. • access menu • contacts • persspdial • select the chosen card • confirm (long press) • • • • enter the name apply enter the number apply To key in the name: the keys in the keypad include letters that you can display by pressing them successively. Example: press "8" twice to display the letter "U". To delete a character, briefly press the delete key. 31 7.9 Modifying a card in the personal directory • access menu • contacts • persspdial • select the card to be modified • confirm (long press) • move onto the letter to be modified • modify the name • apply • move to the digit to be modified • modify the number • apply To delete an index card, delete the name and the number by holding down the delete key for a few seconds. To delete a character, briefly press the delete key. 7.10 Programming an appointment reminder • access menu • alarms • select the "permanent appointment" or "temporary appointment" icon: permappt, tempappt • enter the time of the appointment • apply • Temporary appointment: call back within the next 24 hours • Permanent appointment: call back every day at the same time At the programmed time, your telephone rings: • press hang up or off-hook to confirm the answer. If you are in conversation, the display flashes, a tone is sent and you will hear a beep. After a third unanswered call, the temporary call request will be cancelled but the permanent call will remain in memory. If your line is diverted to another number, your call will not follow the diversion. To cancel your appointment call-back request: Select the meeting to be cancelled and press the delete key to delete the preset time. 32 7.11 Identify the terminal you are on The identifier or telephone number are displayed permanently when the telephone is within the radio coverage zone and is not being used (when standby screen not displayed). 7.12 Locking your telephone This service enables you to prohibit outside calls and any programming changes on your telephone: • access menu • lock • enter your password • apply Follow the same procedure to unlock your telephone. Each digit is represented by an asterisk. To select or modify your telephone interlock code, see paragraph "Modify your password" 33 Registering the telephone Other 8.1 Registering the telephone on a system for the first time For the mobile telephone to function, it must be registered on at least one Alcatel-Lucent or GAP system (registration operation).If when first switched on the display indicates: "System 1 Auto install ?" your telephone has not been registered on any system; consult your installation technician or proceed as follows: 1. Prepare your system for registration (see system installation guide). 2. When the system is ready, the station always displays the starting screen: • auto install? • confirm • Registration can begin a- If the system does not use an AC code • launch subscription b- If the system uses an AC (authentication code) • register • enter the pin code (the default is 0000) • apply • select a system (it is recommended that the first empty system is selected) • • • • • enter park code apply enter access code apply select power mode (your are advised not to select the 50 mw power mode unless required. the "50mw power mode" is intended for hazardous sites such as nuclear plants where it is requested that emissions do not exceed the maximum value.) The registration operation can last up to 2 minutes. If the operation has been done correctly (subscription accepted), the telephone is ready to be used and the radio reception quality icon is displayed. If the registration operation has not been successful, the station proposes launching the subscription again. Utilization of the telephone in GAP mode can lead to functional limitations for which no claims will be considered under the terms of the warranty. 8.2 Registering the telephone on other systems The telephone can be declared on several systems (maximum of 5). Note: the input is usually reserved for use with your main Alcatel-Lucent system. You can select the other inputs to register the telephone under another system (Alcatel-Lucent or other system). 34 8 To make a new registration, when the telephone has already been registered on one or more systems, proceed as follows: 1. Prepare your system for registration (see the system installation manual or consult your installation manager). 2. When the system is ready: • access menu • install • register • enter the pin code • apply • select a system • • • • enter park code apply enter access code apply • select power mode Launch subscription • return to idle If the registration operation runs correctly (Subscription accepted), the telephone is ready for use, and the radio coverage icon appears. If the registration operation has not been successful, the station proposes launching the subscription again. Depending on the type of system concerned, registration may require one or more additional operations on the system. Selecting your telephone system Your telephone can be programmed to function on 5 different DECT systems (Alcatel-Lucent or GAP). • access menu • install • select network • select the desired input (the chosen option is indicated by the radio button with a central dot) • return to idle The selection is retained even after switching the telephone on/off. The selection of a specific system (SYSTEM...) forces operation on a specific system. This selection must be changed if one wishes to change system. Selecting "Lock to any" enables the telephone to connect automatically when it enters a system coverage zone. If the systems programmed in the telephone have common coverage zones, the telephone selects the first system found. 35 Using the telephone in GAP mode Your telephone complies with the GAP standard and can be used in simplified mode Unless otherwise specified, the functions described below are available on your telephone in combination with the mandatory functions provided by your fixed GAP system. Automatic transfer between radio cells: This telephone function enables you to move around between radio relay units, without any break in communications. However, this facility depends on the inherent limitations of the fixed system, notably its ability to manage several radio relays. Display function: When a call is made from the telephone, the digits dialed are displayed. When you receive a call, the display indicates the caller’s number or name, if this function is provided by the fixed system. Other The feature descriptions and feature codes are dependent on your system. For more information, contact your installer or administrator. This utilisation may involve functional restrictions outside the coverage of our guarantee. 9.1 Making a call • dial • send the call You are in communication • hang up 9.2 Receiving a call You are receiving a call • answered incoming calls Speak • hang up 9.3 Make a second call When you are on a call, you can initiate a second call. You are in conversation with one caller • press the off hook key • dial the number • send the call • the first call is on hold • Switching between calls (Broker call) • switch from one call to the other • Connect your two callers (Transfer ) • hang up 36 9 9.4 Receiving a second call The operation of your phone depends on its single or multi-line installation. Contact your installer to know which feature description must be used on your installation. You are in conversation and a correspondent is trying to contact you: • single-line set • enter the feature code • multiline set • answered incoming calls • the first call is on hold • Switching between calls (Broker call) • single-line set • enter the feature code • multiline set • switch from one call to the other • Recover the correspondent on hold • hang up 9.5 Calling from your personal directory • access menu • contacts • contacts access your personal directory • select the name of the person you wish to call • choose the number to call (select from mobile, work or home) • send the call 37 9.6 Calling your correspondent by name (company directory) • access menu • contacts • central directory access to the company directory • enter the first letter of your correspondents surname* While writing, you can: • symbol: add symbols • Clear: clear characters • select the desired name • view you can see the caller’s number if required • send the call (call) *If several names come up, you can refine the search by entering the successive letters (second, third, etc.) of the name you are looking for. For fast access to this function from the home screen page, press the directory key. 9.7 Redialling the last number dialed (redial) • long press OR • access menu • dialed • select the name of the person you wish to call • send the call 38 9.8 Sending DTMF signals During a call, you sometimes have to send DTMF signals, for example, for a voice message service, an automatic switchboard or when remotely consulting an answering machine. To do this: If DTMF is activated by default on your system • press the keyboard keys If DTMF is not activated by default on your system • press the star key (hold down for a few seconds). • press the keyboard keys Depending on the system configuration, the DTMF can be activated by default. 9.9 Immediate forward to a number You are not connected. • enter the feature code: immediate forward • enter the destination number Depending on your system and its configuration you may hear a specific tone after hanging up the receiver when you set call forward. Code to associate to a speed dial key: Immediate forward + No. of diversion telephone. Your set allows you to program other types of forward depending on the entered code: Forward duration noreply , Selective forward. 9.10 Diverting your calls to your voice message service You are not connected. • enter the feature code: enter the desired forward code • enter the voicemail number When the set is forwarded, you hear a specific tone after hooking off the set. Code to associate to a speed dial key: Forward + Voicemail number. 39 9.11 Deactivate forward You are not connected. • enter the code of the forward to cancel If you have defined a forward on a speed dial key, you can cancel this forward by a long press on this key A diversion can also be cancelled by programming another type of diversion. 9.12 Consulting your voice mailbox When you have received a message, the Message icon is displayed on the welcome screen. To listen to your voice messages, dial your voicemail number and follow instructions given. For more information, contact your installer or administrator. 9.13 Sending a calibrated cut-off The calibrated cut-off activates functions such as transfer to another telephone set.To make a calibrated cut-off: Press the 0 key (hold down for a few seconds). 9.14 Programming your personal directory Your directory can contain up to 12 numbers • access menu • contacts • contacts access your personal directory 40 • Add new contact • more • add contact • apply • name: • enter the name (24 characters maximum) • apply • select the type of contact work: / mobile: / home: / other: • enter the number • save • ring • edit • select the ringtone to use when this contact calls you. • save • Yes • return to idle To key in the name: the keys in the numeric keypad include letters that you can display by pressing them successively. Example: press twice in succession on 8 to display the letter "U". To insert a pause in a number, press the 1 (hold down for a few seconds). To insert a measured break, press 0 (hold down for a few seconds). • Modify a contact • select the card to be modified • edit OR • select the type of contact work: / mobile: / home: / other: • edit contact • name: • enter the name (24 characters maximum) • apply • select the type of contact work: / mobile: / home: • enter the number • save • ring • edit • select the ringtone to use when this contact calls you. • save • Yes • return to idle To delete a character, briefly press the delete key. ; to erase a field full of characters, hold down the erase key (long press). 41 9.15 Deleting a card • access menu • contacts • contacts access your personal directory • select the card to delete • apply • delete contact • apply • yes • return to idle To delete all contacts, select: Delete all cont. 9.16 Customizing and adjusting your telephone Choosing your melody: • access menu • ring • off-site ringing / on-site ringing • apply • select the melody of your choice (you can play/stop and select the ringtone ) • apply • return to idle Adjusting the ringer volume • access menu • ring • ring volume • apply • increase / reduce the volume • apply • return to idle Set time and date: • access menu • settings • time & date • enter date and time • apply • return to idle 42 Selecting language: • access menu • settings • languages • Select the language of your choice • apply • return to idle Other features: Ring • access menu • ring • • • • • • • vibrator: to adjust the ringer and/or the vibrate function Keypad tone: activate or deactivate the keypad tone Confirmation sound: Activate or deactivate a signal when you confirm an action Coverage warning: activate or deactivate the coverage warning Charger warning: Activate or deactivate a warning when the phone is charging Ascending ringing: activate or deactivate the ascending ringtone Headset mode: activate or deactivate the headset mode • select off / on • return to idle Other features: Settings • access menu • settings • • • • • • • • ECONOMY mode: activate or deactivate the economy mode Security: to activate the automatic keylock or change the PIN code Handset name: you can enter a name for your handset Reset settings: to reset the setting and go back to the default settings Auto answer: the phone automatically answers the call Status: to find out the software version of your phone 2s key repeat Silent charging: Deactivate ringing and/or vibrate when the phone is on its charging holder. • select / off / on • return to idle 43 9.17 read incoming text message A new text message is notified to the user by a beep, an LED signal and indicated by the new text message icon in the phone’s status bar. • select the incoming message icon OR • access menu • messages • incoming txt messages • Confirm • unread messages are highlighted with an incoming arrow. • select an unread message • message status display (sender, date and time, number of messages) • message content display • message display if the content is longer than one screen • from the options menu, you can erase the message, callback the message sender, answer the message or read the next message 9.18 Sending text message • access menu • messages • new message • write the message While writing, you can: • symbol: add symbols • Clear: clear characters • send You can send the message to your caller by entering their number, selecting them from the contacts list or by selecting them from the call log. 44 9.19 Sending predefined message You can send predefined messages to your correpondents. These messages are: In a meeting, I am absent for the moment, Please call again. • access menu • messages • select the predefined message option ((icon on the right side) ) • select the predefined message to send You can send the message to your caller by entering their number, selecting them from the contacts list or by selecting them from the call log. • send 45 Accessories 10 Other 10.1 Phone package When you purchase your phone, it is equipped with a belt clip on the back. You can remove this belt clip and replace it with the cover provided in the box of your new phone. • turn the belt clip by doing a counterclockwise quarter turn • remove the belt clip by pulling it towards you. Put on the cover instead of the belt clip as shown in the picture. Push the cover towards the back of the phone until the cover is clipped on. 10.2 Chargers Your phone charger is supplied with the following equipment: An AC/DC adapter made of a body and a separate plug head that clips onto the AC/DC adapator body. A USB cable A desk support for docking your phone • How to dock your phone on the desk support Put your phone on its support. Plug the USB cable into the 5V socket of the desk support. Plug the other end of the USB cable into the AC/DC adapter. Plug the adapor into the mains power supply. • How to dock your phone with the USB cable Plug the USB cable into the USB port of your phone. The other end of the USB cable can be plugged into the AC/DC adapter or into a computer USB port. 46 10.3 Characteristics of the mains power adapter Input: 100/240 V - 50/60 Hz Output: 5V - 1A The mains power socket used must be close to the charger/holder and easily accessible, so that it can be used as an "on/off" facility. 10.4 Presentation of the battery pack Autonomy of your telephone On standby in the radio coverage zone up to 200 hours In continuous conversation up to 20 hours Initial charge: Place the telephone in the charging holder On charge (3 hours) Battery icon flashing The battery is charged Maximum battery performance is only reached after around 10 charge/discharge cycles. These batteries contain polluting substances: do not dispose of them in a dustbin - take them to a specialized collection point. 10.5 Headphone / external microphone The side of the telephone features a 3.5 mm jack connector for headphone / external microphone. Contact your retailer for information on the various headphone models available. 10.6 Cleaning your telephone Your telephone does not require any particular servicing. However, it may be cleaned using a soft, damp cloth. Do not use soap or detergent that would risk altering the colours or damaging the surface of the telephone. 10.7 Transporting and protecting your telephone To avoid losing your telephone, get into the habit of clipping it onto your belt. Your telephone can also be carried in a protective case. Various models of carrying case are available. Ask your installation technician for information. It is vital to use the special protective carrying case if your telephone is to be used in an industrial environment (presence of dust, filings, vapours of diverse origins and risk of being dropped). If the telephone is used with a carrying case, the belt clip must be removed. 47 Glossary 11 Call transfer Function enabling a call to be transferred to another telephone within the system. Common directory: This directory contains all the speed-dial numbers accessible to the users of the France Télécom diatonis system. Conference: The conference function allows the user, in contact with two correspondents, to set up a three-way conference. DECT: European cordless telephone standard: Digital Enhanced Cordless Telecommunication. DECT telephone: Cordless telephone complying with the DECT standard. GAP (Generic Access Profile): Specific operating mode defined in the European DECT standard. The telephone GAP mode is a basic and simplified form of operation compatible with other DECT GAP systems (other PBX or indoor relay). Hunting groups: Several telephones grouped under one directory number. A call to this number is directed to one of the free telephones within the group. Intrusion: Function allowing intrusion into a conversation between two correspondents. Personal assistant: This facility enables the caller to avoid having to leave a message in the voice mailbox and directs him/her to an extension number, an outside number, a mobile or the switchboard. Parking: This function places an outside call on hold, for subsequent recovery on another "authorised" extension within the system. Password This directory contains all the abbreviated numbers that can be accessed by users of the Alcatel-Lucent installation Personal directory: This directory contains the personal numbers of the user of a terminal. Pick-up group: This function enables you to answer a call ringing on another terminal. Calls can only be picked up within the pick-up group. Broker call During a conversation, DTMF codes are sometimes required. These codes are used when a user wants to consult a voice server, access a PABX or remotely consult an answering machine. Other 48 Declaration of compliance howtoc Regulatory Statements EU/EFTA This equipment is in compliance with the essential requirements of R & TTE Directive 1999/5/EC. The Declaration of Conformity may be obtained from your installer. USA and Canada Handset: This device complies with Part 15 of the FCC Rules and with RSS-210 of Industry Canada. (FCC ID: T7HCT8111, IC: 4979B-CT8111). This device complies with Part 68 of the FCC Rules and with IC CS-03 Part V of Industry Canada. The ACTA registration number is US: T7HW4NANCT8111. Chargers: This device complies with Part 15 of the FCC Rules and with RSS-210 of Industry Canada. Operation is subject to the following two conditions: (1) this device may not cause harmful interference, and (2) this device must accept any interference received, including interference that may cause undesired operation. Exposure to Radio Frequency Signals. This device has been designed and manufactured not to exceed the SAR (Specific Absorption Rate) radio frequency power transmission limits established by the different countries concerned. The SAR value measured is equal to 0.061 W/kg (the globally accepted maximum limit being 1.6 W/kg). User Instructions Only use the handset in temperatures between -5° C to +45° C (23° F to 113° F). (10 - 45 - 18 - 113) This apparatus is Hearing Aid Compatible (HAC). This device complies with Part 68 of the FCC Rules and with IC CS-03 Part V of Industry Canada. Acoustic shock protection The acoustic level of the signal generated by the handset earpiece is less than 130 dBspl for a transient signal (123 dBspl for Australia) and less than 118 dBspl (rms) for a continuous signal (120 dBA for Australia). Directive 2003/10/EC specifying the risks inherent in noise at work The ring contributes towards overall daily noise. To reduce the level, the following is recommended: reduce the setting, program a progressive ring. Privacy Privacy of communications may not be ensured when using the Bluetooth handset or any additionnal Bluetooth device Disposal The equipment must be returned to a collection point for electronic equipment waste disposal. Defective batteries must be returned to a collection point for chemical waste disposal. Alcatel, Lucent, Alcatel-Lucent and the Alcatel-Lucent logo are trademarks of Alcatel-Lucent. All other trademarks are the property of their respective owners. The information presented is subject to change without notice. Alcatel-Lucent assumes no responsibility for inaccuracies contained herein. Copyright 2012 AlcatelLucent. All rights reserved. 49