Transcript
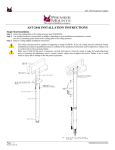
PP-STKR
PP-STKR INSTALLATION INSTRUCTIONS
WARNING:
The wall/ceiling should be capable of supporting a weight of at least five (5) times the
projector(s) or monitor(s)weight. If it cannot, the ceiling must be reinforced. Proper installation
procedure by qualified personnel as outlined in the installation instructions must be adhered
to. Failure to do so could result in serious personal injury.
1.
2.
3.
4.
5.
6.
7.
8.
Install the stacker to the ceiling using commercially available suitable hardware.
Make sure the receiving portion of the coupling is suitable to complete the installation.
Connect the upper 1½" coupling to the threaded pipe already installed.
Secure pipe and coupling with set screw (supplied).
Invert the projector and place it on a soft, flat surface.
Locate the mounting points on the bottom of the projector.
Remove or raise any feet if necessary to fit the mounting bracket.
Align the mounting bracket to the mounting points found on the projector and secure using the
hardware (supplied). Insert the rotation plate tabs to the receiving tabs found on the mounting bracket.
9. Once fully inserted, rotate the projector 180° and align and screw down the red safety screw.
10. The screw must go past the arrow shaped slot below to prevent further rotation.
11. Screw the remaining stabilizer screws. Do not overtighten the screws.
Figure 1
Page 1
Installation Instructions