1
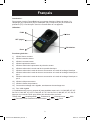
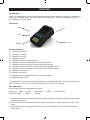
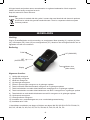
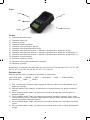
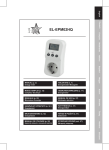
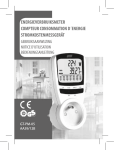
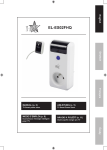
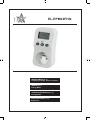
EL-EPM02FHQ MODE D'EMPLOI (p. 2) Compteur lectrique Version Franaise MANUAL (p. 7) Energy Meter GEBRUIKSAANWIJZING (p. 10) Energiemeter NÁVOD K POUŽITÍ (s. 13) Elektroměr 1 Français Introduction : Prise secteur (version France/Belgique) et compteur électrique. Mesure la tension (V), l’ampérage (A), la puissance (W), le voltampère (VA), la fréquence (Hz) et le facteur de puissance (FP). Il est idéal pour savoir la consommation de vos appareils. Utilisation : FUNC Haut SET (régler) Réinitialiser Ecran Fonctions générales : 1) Affiche l’heure courante 2) Affiche la tension secteur 3) Affiche le courant secteur 4) Affiche la puissance secteur 5) Affiche et mémorise la puissance de pointe du secteur 6) Affiche et mémorise le cumul total de la quantité électrique 7) Affiche et mémorise le total de mise en sous tension et le total de la charge électrique 8) Affiche et mémorise le total de mise en sous tension et le total de la charge électrique au prix 1 9) Affiche et mémorise le total de mise en sous tension et le total de la charge électrique au prix 2 10) Affiche la fréquence secteur 11) Affiche le facteur de puissance 12) Courant de surcharge max. réglable, avertissement de surcharge max. 13) Prix / kWh réglable 11 combinaisons de jours ou groupes de jours possibles comme suit : LU/ MA/ ME/ JE/ VE/ SA/ DI/ LU, MA, ME, JE, VE/ LU, MA, ME, JE, VE, SA/ SA, DI/ LU, MA, ME, JE, VE, SA, DI Appuyez sur la touche FUNC pour afficher les données dans cet ordre : Tension VAC Ampérage AMP Puissance W Puissance max. Prix total; Durée totale de mise sous tension Prix 1 Prix 2 KWh 2 Corrections EL-EPM02FHQ_A5.indd 7 2009.6.10 6:03:05 PM 1) Le compteur affichera l’heure courante et la tension secteur, la fréquence, s’il est branché dans une prise secteur après l’insertion de la batterie et sans effectuer aucune manipulation 2) Appuyez une fois sur la touche FUNC, le compteur affichera l’heure courante et la tension secteur, le facteur de puissance 3) Appuyez à nouveau une fois sur la touche FUNC, le compteur affichera l’heure courante et la puissance réelle, le facteur de puissance 4) Appuyez à nouveau une fois sur la touche FUNC, le compteur affichera la puissance secteur max. et l’heure à laquelle est apparue, le facteur de puissance. Appuyez et maintenez enfoncée la touche FUNC pendant 5 secondes pour que le compteur efface la puissance secteur max. 5) Appuyez à nouveau une fois sur la touche FUNC, le compteur affichera l’heure courante et le facteur de puissance cumulé 6) Appuyez à nouveau une fois sur la touche FUNC, le compteur affichera la durée totale de mise sous tension et la charge électrique totale 7) Appuyez à nouveau une fois sur la touche FUNC, le compteur affichera le montant total au prix 1 de la durée totale de mise sous tension et de la charge électrique totale 8) Appuyez à nouveau une fois sur la touche FUNC, le compteur affichera le montant total au prix 2 de la durée totale de mise sous tension et de la charge électrique totale 9) Appuyez à nouveau une fois sur la touche FUNC, le compteur retourne à l’affichage heure courante et tension secteur. Appuyez et maintenez enfoncée la touche FUNC pendant 5 secondes pour que le compteur efface la quantité électrique cumulative et la charge électrique totale durant l’état de charge électrique totale au prix 1 ou de charge électrique totale au prix 2 10) Ecran LCD Lorsque la quantité électrique totale, le dépassement de charge électrique total, OVER (surcharge) se mettra à clignoter Réglage de l’heure courante : 1) Appuyez sur la touche FUNC jusqu’à ce que l’écran LCD affiche CLOCK (Horloge). 2) Appuyez sur la touche SET, le jour de la semaine se mettra à clignoter, l’horloge passe en mode SET (régler), vous pouvez alors régler l’heure courante 3) Utilisez la touche Haut pour régler le jour de la semaine 4) Appuyez sur la touche SET, l’heure se mettra à clignoter et le jour de la semaine s’arrête de clignoter et reste affiché 5) Utilisez la touche Haut pour régler l’heure 6) Appuyez sur la touche SET, les minutes se mettront à clignoter et l’heure s’arrête de clignoter et reste affichée 7) Utilisez la touche Haut pour régler les minutes 8) Appuyez sur la touche SET, l’écran retourne à afficher l’heure 9) Utilisez la touche Haut pour changer le format 12 ou 24 heures d’affichage de l’heure. Pour rectifier l’heure vous devez répéter toutes les étapes ci-dessus. Une fois ce réglage terminé, branchez le compteur dans prise secteur normale 230/240 V, branchez l’appareil que vous souhaitez utiliser et mettez-le en marche. A présent le compteur commence à mesurer la consommation de l’appareil et permet de signaler tout appareil qui consomme trop d’électricité 3 Corrections EL-EPM02FHQ_A5.indd 8 2009.6.10 6:03:05 PM Régler le prix du coût/Kwh et le courant de surcharge : Appuyez et maintenez enfoncée la touche FUNC pendant 5 secondes en mode affichage de tension ou courant ou puissance. Régler le prix 1 : 1) Appuyez sur la touche FUNC, SET (régler) sera affiché, le premier chiffre du coût/Kwh se mettra à clignoter, utilisez la touche Haut pour le régler 2) Appuyez sur la touche FUNC, le second chiffre du coût/Kwh se mettra à clignoter, utilisez la touche Haut pour le régler 3) Appuyez sur la touche FUNC, le troisième chiffre du coût/Kwh se mettra à clignoter, utilisez la touche Haut pour le régler 4) Appuyez sur la touche FUNC, le quatrième chiffre du coût/Kwh se mettra à clignoter, utilisez la touche Haut pour le régler 5) Appuyez sur la touche FUNC, la séparation fractionnaire du coût/Kwh se mettra à clignoter, utilisez la touche Haut pour la régler 6) Appuyez sur la touche FUNC, le jour de la semaine se mettra à clignoter, utilisez la touche Haut pour le régler 7) Appuyez sur la touche FUNC, l’heure de mise sous tension se mettra à clignoter, utilisez la touche Haut pour la régler Régler le prix 2 : 1) Appuyez sur la touche FUNC après avoir réglé le prix 1, et pour régler le prix 2 répétez les étapes ci-dessus Régler la surcharge de courant (OVER LOAD current) : Appuyez sur la touche FUNC après avoir réglé le prix 2 1) Appuyez sur la touche FUNC, SET (régler) et AMP seront affichés, le premier chiffre de MAX. LOAD se mettra à clignoter, utilisez la touche Haut pour le régler 2) Appuyez sur la touche FUNC, le second chiffre de MAX. LOAD se mettra à clignoter, utilisez la touche Haut pour le régler 3) Appuyez sur la touche FUNC, le troisième chiffre de MAX. LOAD se mettra à clignoter, utilisez la touche Haut pour le régler 4) Appuyez sur la touche FUNC, le quatrième chiffre de MAX. LOAD se mettra à clignoter, utilisez la touche Haut pour le régler Le message d’avertissement de surcharge (OVER LOAD) se mettra à clignoter si la valeur définie est dépassée. La touche ne fonctionnera plus. Vous devez débrancher l’appareil ou régler à nouveau la valeur de surcharge (OVER LOAD). 4 Corrections EL-EPM02FHQ_A5.indd 9 2009.6.10 6:03:05 PM Mode veille L’écran s’éteint au bout de 10 secondes d’inactivité. Appuyez sur une touche pour l’allumer. Caractéristiques : • Alimentation • Charge max. • Gamme de tensions • Gamme de courant • Précision d’alimentation • Gamme de quantité électrique cumulative • Gamme de fréquences • Précision de l’horloge • Consommation • Température de fonctionnement • Batterie 240 V CA 50 Hz 16 A, 3680 W 200 – 276 V CA, précision +/- 0,5% max. 0,005 – 16 A, précision +/- 0,5% max. +/- 0,5% max. 0-9999,9 kWh 45-65 Hz +/- 1 minute max. par mois < 0,5W -10°C à + 40°C Batterie rechargeable NI-MH 3,6V Consignes de sécurité : ATTENTION RISQUE DE CHOC ELECTRIQUE NE PAS OUVRIR Des mesures de sécurité élémentaires, dont les suivantes, s’imposent lors de l’utilisation d’un dispositif d’économie électrique pour télé, afin de réduire les risques d’incendie, de choc électrique et de blessures : Comprendre toutes les directives avant d’utiliser l’appareil. Pour réduire le risque de choc électrique, ce produit ne doit être ouvert que par un technicien qualifié si une réparation s’impose. Débranchez l’appareil et les autres équipements du secteur s’il y a un problème. Ne pas exposer l’appareil à l’eau ni à l’humidité. Cet appareil ne devra être branché que sur le type de source d’alimentation indiqué sur la plaque signalétique. Si vous n’êtes pas certain du type de source d’alimentation dont vous disposez, contactez votre revendeur. Ne surchargez pas la prise; cela peut entraîner un risque d’incendie ou d’électrocution. N’essayez jamais d’insérer un objet à l’intérieur de l’appareil par l’intermédiaire des orifices, car vous pourriez toucher des pièces sous tension ou provoquer un court-circuit entraînant un incendie ou une électrocution. Entretien : Ne nettoyez l’appareil qu’avec un chiffon sec. N’utilisez pas de solvants ou de produits abrasifs. Garantie : Aucune garantie ou responsabilité ne sera acceptée en cas de modification et/ou de transformation du produit ou en cas de dommages provoqués par une utilisation incorrecte de l’appareil. Généralités : Le design et les caractéristiques techniques sont sujets à modification sans notification préalable. Tous les logos de marques et noms de produits sont des marques déposées ou immatriculées dont leurs détenteurs sont les propriétaires et sont donc reconnues comme telles dans ce documents. Ce manuel doit être conservé pour toute référence ultérieure. 5 Corrections EL-EPM02FHQ_A5.indd 10 2009.6.10 6:03:05 PM Attention : Ce symbole figure sur l’appareil. Il signifie que les produits électriques et électroniques ne doivent pas être jetés avec les déchets domestiques. Le système de collecte est différent pour ce genre de produits. Copyright © 6 Corrections EL-EPM02FHQ_A5.indd 11 2009.6.10 6:03:05 PM ENGLISH Introduction: Plug-in (French/Belgium version) mains power and energy monitor. Measures voltage (V), Ampere (A), Watts (W), Volt-Ampere(VA), Hertz (Hz) and the power factor (PF). Ideal to check how much power your appliances are consuming. Operation: FUNC UP SET Master clear Display General features: 1) Display current clock 2) Display line voltage 3) Display line current 4) Display line power 5) Display and memory peak line power 6) Display and memory accumulative total electric quantity 7) Display and memory total on time and total electric charge 8) Display and memory total on time and total electric charge of price 1 9) Display and memory total on time and total electric charge of price 2 10) Display line frequency 11) Display power factor 12) Adjustable max. overload current, max. overload warning 13) Adjustable price / kWh 11 combinations of day or blocks of days available as follows: MO/ TU/ WE/ TH/ FR/ SA/ SU/ MO, TU, WE, TH, FR/ MO, TU, WE, TH, FR, SA/ SA, SU/ MO, TU, WE, TH, FR, SA, SU The data base: Press FUNC button the data displays as follows: VOLTvac AMP TOTAL ON TIME WATT PRICE1 MAX WATT KWh TOTAL PRICE; PRICE2 1) The meter will display current clock and line voltage, frequency, if plug in socket after insert battery without any operation 2) Press FUNC button once and release, the meter will display current clock and line current, power factor 3) Press FUNC button once again and release, the meter will display current clock and real power, power factor 7 4) Press FUNC button once again and release, the meter will display max. line power and the appear time of max. line power, power factor. Press and hold FUNC button for 5 seconds will clear max. line power display during this state 5) Press FUNC button once again and release, the meter will display current clock and accumulative power factor 6) Press FUNC button once again and release, the meter will display total on time and total electrical charge 7) Press FUNC button once again and release, the meter will display total on time of price 1 and total electrical charge of price 1 8) Press FUNC button once again and release, the meter will display total on time of price 2 and total electric charge of price 2 9) Press FUNC button once again and release, the meter will come back to display current time and line voltage. Press and hold FUNC button for 5 seconds to clear accumulative total electric quantity and total electric charge during display state of total electric charge or total electric charge of price 1 or total electric charge of price 2 10) LCD display when total electric quantity, total electric charge overflow, the OVER will flash at the same time Setting current clock: 1) Press FUNC button until the CLOCK displays in LCD 2) Press SET button once time, the WEEK DAY will flash at the same time, the clock change to SET mode, you can set the current clock 3) Press UP button to set the WEEK DAY 4) Press SET button once time again and release, the HOUR will flash the WEEK DAY will stop flashing and keep display 5) Press UP button to set the HOUR 6) Press SET button once time again and release, the MINUTE will flash, the HOUR will stop flashing and keep display 7) Press UP button to set the MINUTE 8) Press SET button once time again and release, the time come back to CLOCK display mode 9) Press UP button during the CLOCK display state, change 12-24 hour mode. To reset incorrect time, repeat all above steps. After finish setting, plug the meter into a regular 230/240V power outlet, plug in an appliance that you want to use and turn the mains power on. Now the meter begins to measure the consumption of the appliance and detect the equipment that uses too much electricity at once Setting price of cost/kWh & over load current: Press and hold FUNC button for 5 seconds during display state of voltage or current or power. Setting price 1: 1) Press SET button once and release, SET display, the first digital COST.kWh flash, press UP button to set it 2) Press SET button once and release, the second COST/kWh flash, press UP button to set it 3) Press SET button once and release, the third COST/kWh flash, press UP button to set it 4) Press SET button once and release, the fourth COST/kWh flash, press UP button to set it 5) Press SET button once and release, the radix point COST/kWh flash, press UP button to set it 6) Press SET button once and release, the weekday flash, press UP button to set it 7) Press SET button once and release, the hour of ON TIME flash, press UP button to set it Setting price 2: 1) Press FUNC button once and release after finish Setting price 1, setting price 2. repeat above steps 8 Setting OVER LOAD current data: Press FUNC button once and release after finish setting price 2 1) Press SET button once and release, SET and AMP display, the first digital MAX. LOAD flash, press UP button to set it 2) Press SET button once and release, the second digital MAX.LOAD flash, press UP button to set it 3) Press SET button once and release, the third MAX. LOAD flash, press UP button to set it 4) Press SET button once and release, the fourth MAX. LOAD flash, press UP button to set it The OVER LOAD WARNING will flash when load overtop the setting data. The button function will failure. You must draw out the appliance or set the OVER LOAD data again. Stand by mode Display of LCD will disappear without any operation after AC power off 10 seconds. Press any key come back to display. Specification: • Power supply 240V AC 50Hz • Max. load 16A, 3680W • Voltage range 200-276V AC, accuracy +/- 0.5% max • Current range 0.005-16A, accuracy +/- 0.5% max • Power accuracy +/- 0.5% max • Accumulative electric quantity range 0-9999.9kWh • Frequency range 45-65Hz • Clock accuracy max +/- 1minute per month • Power cost <0.5W • Operating temperature -10°C to +40°C • Battery 3.6V NI-MH, rechargeable battery Safety precautions: CAUTION When using the TV smart power saver, safety precautions should always be practice to reduce the risk of fire, electric shock and injury, as following: Understanding all instructions before using this device. To reduce risk of electric shock, this product should ONLY be opened by an authorized technician when service is required. Disconnect the product from mains and other equipment if a problem should occur. Do not expose the product to water or moisture. This device should only be operated from the type of power source indicated on the label. If you are not sure of the type of power supply to your home, please consult your dealer for more information. Do not overload the socket; this can be a risk of fire or electric shock. Never push objects of any kind into this device trough cabinet as they may touch dangerous voltage point or short out parts that could result in the risk of fire or electric shock. RISK OF ELECTRIC SHOCK DO NOT OPEN Maintenance: Clean only with a dry cloth. Do not use cleaning solvents or abrasives. Warranty: No guarantee or liability can be accepted for any changes and modifications of the product or damage caused due to incorrect use of this product. General: Designs and specifications are subject to change without notice. 9 All logos brands and product names are trademarks or registered trademarks of their respective holders and are hereby recognized as such. Keep this manual for future reference. Attention: This product is marked with this symbol. It means that used electrical and electronic products should not be mixed with general household waste. There is a separate collections system for these products. NEDERLANDS Inleiding: Plug-in (Franse/Belgische versie) netvoeding- en energiemeter. Meet spanning (V), ampère (A), Watt (W), Volt-Ampere (VA), Hertz (Hz) en vermogensfactor (PF). Ideaal om het vermogensverbruik van uw apparaten te meten en controleren. Bediening: FUNC UP (OMHOOG) SET (INSTELLEN) Master clear (alles wissen) Display Algemene functies: 1) Huidige tijd weergeven 2) Lijnspanning weergeven 3) Netstroom weergeven 4) Lijnvermogen weergeven 5) Pieken in lijnvermogen weergeven en in geheugen opslaan 6) Totaal cumulatief elektriciteitsverbruik weergeven en in geheugen opslaan 7) Totale inschakelduur en totale elektriciteitskosten weergegeven en in geheugen opslaan 8) Totale inschakelduur en totale elektriciteitskosten van tarief 1 weergeven en in geheugen opslaan 9) Totaalverbruik en totale elektriciteitskosten van tarief 2 weergeven en in geheugen opslaan 10) Lijnfrequentie weergeven 11) Vermogensfactor weergeven 12) Instelbare max. overbelastingsstroom, max. overbelastingswaarschuwing 13) Instelbaar tarief / kWh 11 beschikbare combinaties van dagen of blokken van dagen: MA/ DI/ WO/ DO/ VR/ ZA/ ZO/ MA, DI, WO, DO, VR/ MA, DI, WO, DO, VR, ZA/ ZA, ZO/ MA, DI, WO, DO, VR, ZA, ZO 10 De database: Druk op de FUNC-knop; de volgende gegevens worden getoond: VOLT ac AMP TOTAL ON TIME WATT PRICE1 MAX WATT KWh TOTAL PRICE; PRICE2 1) Na het plaatsen van de batterij toont de meter automatisch de tijd, de lijnspanning en de lijnfrequentie. 2) Druk eenmaal op de FUNC-knop en laat hem weer los; de meter toont de tijd, de netstroom en de vermogensfactor. 3) Druk nogmaals op de FUNC-knop en laat hem weer los; de meter toont de tijd, het werkelijke vermogen en de vermogensfactor. 4) Druk nogmaals op de FUNC-knop en laat hem weer los; de meter toont het max. lijnvermogen en de tijd waarop het max. lijnvermogen aanwezig is geweest, vermogensfactor. Wanneer u in deze status de FUNC-knop 5 seconden ingedrukt houdt, wordt het max. lijnvermogen gewist. 5) Druk nogmaals op de FUNC-knop en laat hem weer los; de meter toont de tijd en de cumulatieve vermogensfactor. 6) Druk nogmaals op de FUNC-knop en laat hem weer los; de meter toont de totale inschakelduur en de totale elektriciteitskosten. 7) Druk nogmaals op de FUNC-knop en laat hem weer los; de meter toont de totale inschakelduur en de totale elektriciteitskosten van tarief 1. 8) Druk nogmaals op de FUNC-knop en laat hem weer los; de meter toont de totale inschakelduur en de totale elektriciteitskosten van tarief 2. 9) Druk nogmaals op de FUNC-knop en laat hem weer los; de meter toont weer de tijd en de lijnspanning. Houd de FUNC-knop 5 seconden ingedrukt om het cumulatieve totale elektriciteitsverbruik en de totale elektriciteitskosten te wissen tijdens weergave van de totale elektriciteitskosten of de totale elektriciteitskosten van tarief 1 of 2. 10) LCD-display wanneer het totale elektriciteitsverbruik of de totale elektriciteitskosten worden overschreden, gaat OVER knipperen. De tijd instellen: 1) Druk op de FUNC-knop tot KLOK wordt weergegeven op het LCD-scherm 2) Druk eenmaal op de SET-knop, WEEK DAY zal gaan knipperen. De klok staat nu in SET-modus en u kunt de klok instellen. 3) Druk op de UP-knop om de dag in te stellen (WEEK DAY) 4) Druk nogmaals op de SET-knop en laat hem weer los. Nu gaat HOUR knipperen en WEEK DAY stopt met knipperen. 5) Druk op de UP-knop om het uur in te stellen (HOUR) 6) Druk nogmaals op de SET-knop en laat hem weer los. Nu gaat MINUTE knipperen en HOUR stopt met knipperen. 7) Druk op de UP-knop om de minuten in te stellen (MINUTE) 8) Druk nogmaals op de SET-knop en laat hem weer los. De KLOK keert terug in weergavemodus. 9) Druk op de UP-knop in weergavemodus om de weergave te veranderen in 12 of 24 uur. Om de tijd te veranderen herhaalt u bovengenoemde stappen. Na het instellen kunt u de meter in een normaal 230/240V stopcontact steken en er een apparaat op aansluiten dat u wilt gebruiken. Schakel daarna de netvoeding in. De meter begint nu het energieverbruik van het apparaat te meten en detecteert de apparatuur die teveel elektriciteit verbruikt. Het tarief van kosten/kWh & overbelastingsstroom instellen: Houd de FUNC-knop 5 seconden ingedrukt tijdens weergave van spanning, stroom of vermogen. 11 Tarief 1 instellen: 1) Druk eenmaal op de SET-knop en laat hem weer los. SET wordt weergegeven en de eerste digitale COST.kWh begint te knipperen. Druk op de UP-knop om het tarief in te stellen. 2) Druk eenmaal op de SET-knop en laat hem weer los. De tweede COST.kWh begint te knipperen. Druk op de UP-knop om het tarief in te stellen. 3) Druk eenmaal op de SET-knop en laat hem weer los. De derde COST.kWh begint te knipperen. Druk op de UP-knop om het tarief in te stellen. 4) Druk eenmaal op de SET-knop en laat hem weer los. De vierde COST.kWh begint te knipperen. Druk op de UP-knop om het tarief in te stellen. 5) Druk eenmaal op de SET-knop en laat hem weer los. Het radixpunt COST.kWh begint te knipperen. Druk op de UP-knop om dit in te stellen. 6) Druk eenmaal op de SET-knop en laat hem weer los. De dag van de week begint te knipperen. Druk op de UP-knop om de dag in te stellen. 7) Druk eenmaal op de SET-knop en laat hem weer los. De ON TIME (inschakelduur) begint te knipperen. Druk op de UP-knop om dit in te stellen. Tarief 2 instellen: 1) Druk eenmaal op de FUNC-knop en laat hem weer los. Herhaal de bovengenoemde stappen voor het instellen van tarief 2. De OVERLOAD (overbelasting) instellen: Druk eenmaal op de FUNC-knop en laat hem weer los, nadat u tarief 2 hebt ingesteld. 1) Druk eenmaal op de SET-knop en laat hem weer los. SET en AMP worden weergegeven en de eerste digitale MAX. LOAD begint te knipperen. Druk op de UP-knop om dit in te stellen. 2) Druk eenmaal op de SET-knop en laat hem weer los. De tweede digitale MAX. LOAD begint te knipperen. Druk op de UP-knop om dit in te stellen. 3) Druk eenmaal op de SET-knop en laat hem weer los. De derde MAX. LOAD begint te knipperen. Druk op de UP-knop om dit in te stellen. 4) Druk eenmaal op de SET-knop en laat hem weer los. De vierde MAX. LOAD begint te knipperen. Druk op de UP-knop om dit in te stellen. De OVER LOAD WARNING (overbelastingswaarschuwing) gaat knipperen wanneer de ingestelde waarden worden overschreden. De functieknoppen werken niet meer. U moet het apparaat loskoppelen of de OVER LOAD opnieuw instellen. Stand-by modus Het LCD-scherm gaat automatisch uit als de meter niet bediend wordt en gedurende 10 seconden geen voeding krijgt. Het display gaat weer aan door op een willekeurige toets te duwen. Specificaties: • Netvoeding • Max. belasting • Spanningsbereik • Stroombereik • Vermogensnauwkeurigheid • Bereik cumulatief elektriciteitsverbruik • Frequentiebereik • Kloknauwkeurigheid • Energieverbruik • Bedrijfstemperatuur • Batterij 240 V AC 50 Hz 16A, 3680W 200-276V AC, nauwkeurigheid +/- 0.5% max 0.005-16A AC, nauwkeurigheid +/- 0.5% max +/- 0.5% max 0-9999.9kWh 45-65Hz max +/- 1 minuut per maand <0.5W -10 °C tot +40 °C 3.6V NI-MH, oplaadbare batterij 12 Veiligheidsmaatregelen: LET OP: Tijdens gebruik van de slimme energiebespaarder voor TV moet u altijd de volgende veiligheidsmaatregelen in acht nemen om het risico op brand, elektrische schokken en letsel te verminderen. Zorg dat u alle instructies begrijpt voor u dit apparaat gebruikt. Om het risico op elektrische schokken te voorkomen mag dit product ALLEEN worden geopend door een erkende technicus wanneer er onderhoud nodig is. Koppel het product los van de elektrische voeding en van andere apparatuur als zich problemen voordoen. Stel het apparaat niet bloot aan water of vocht. Dit apparaat mag alleen aangesloten worden op de voedingsbron die op het label staat vermeld. Als u niet zeker weet welke soort elektrische voeding u thuis heeft, raadpleeg dan de verkoper. Overbelast het stopcontact niet; dat kan gevaar op brand of elektrische schokken opleveren. Steek nooit voorwerpen in dit apparaat, omdat ze in aanraking kunnen komen met delen die onder spanning staan of kortsluiting kunnen veroorzaken. Dit kan leiden tot brand of elektrische schokken. GEVAAR VOOR ELEKTRISCHE SCHOK NIET OPENEN Onderhoud: Uitsluitend reinigen met een droge doek. Gebruik geen reinigingsmiddelen of schuurmiddelen. Garantie: Voor wijzigingen en veranderingen aan het product of schade veroorzaakt door een verkeerd gebruik van dit product, kan geen aansprakelijkheid worden geaccepteerd. Tevens vervalt daardoor de garantie. Algemeen: Wijziging van ontwerp en specificaties zonder voorafgaande mededeling onder voorbehoud. Alle logo’s, merken en productnamen zijn handelsmerken of geregistreerde handelsmerken van de respectievelijke eigenaren en worden hierbij als zodanig erkend. Bewaar deze handleiding voor latere raadpleging. Let op: Dit product is voorzien van dit symbool. Dit symbool geeft aan dat afgedankte elektrische en elektronische producten niet met het gewone huisafval verwijderd mogen worden. Voor dit soort producten zijn er speciale inzamelingspunten. ČESKY Úvod: Zásuvný elektroměr (verze pro CZ/Francii/Belgii). Měří elektrické napětí (V), proud (A), činný příkon (W), celkový příkon (VA), frekvenci sítě (Hz) a účiník (PF). Vhodný pro kontrolu spotřeby elektrické energie vašich spotřebičů. 13 Popis: FUNC UP SET Vynulování Displej Funkce: 1) Zobrazení aktuálního času 2) Zobrazení napětí sítě 3) Zobrazení proudu 4) Zobrazení příkonu spotřebiče 5) Zobrazení max. Dosaženého příkonu 6) Zobrazení celkově spotřebované energie 7) Zobrazení celkového času provozu a nákladů za spotřebovanou elektrickou energii 8) Zobrazení celkového času provozu a nákladů za spotřebovanou elektrickou energii sazby č.1 9) Zobrazení celkového času provozu a nákladů za spotřebovanou elektrickou energii sazby č.2 10) Zobrazení síťového kmitočtu 11) Zobrazení koeficientu výkonu 12) Nastavení max. proudu a indikace jeho dosažení 13) Nastavení ceny/kWh K dispozici je 11 kombinací dnů nebo bloků dnů: PO/ ÚT/ ST/ ČT/ PÁ/ SO/ NE/ PO, ÚT, ST, ČT, PÁ/ PO, ÚT, ST, ČT, PÁ, SO/ SO, NE/ PO, ÚT, ST, ČT, PÁ, SO, NE Zobrazení dat: Stiskněte tlačítko FUNC a následujícím způsobem se zobrazí data: AMPÉR VOLT (STŘ. NAP.) ČAS CELKEM CENA 1 WATT MAX. WATT KWh CENA CELKEM; CENA 2 1) Poté, co elektroměr s vloženou baterií zapojíte do zásuvky, zobrazí se na něm aktuální čas a napětí sítě, kmitočet. 2) Stiskněte tlačítko FUNC (jednou), na elektroměru se zobrazí aktuální čas, proud a koeficient výkonu. 3) Znovu stiskněte tlačítko FUNC, na elektroměru se zobrazí aktuální čas, skutečný příkon a koeficient výkonu. 4) Znovu stiskněte tlačítko FUNC, na elektroměru se zobrazí maximální dosažený výkon, délka trvání a koeficient výkonu. Stiskněte a držte tlačítko FUNC po dobu 5 sekund a dojde k vymazání údaje o maximálním dosaženém příkonu. 5) Znovu stiskněte tlačítko FUNC, na elektroměru se zobrazí aktuální čas a kumulativní koeficient výkonu. 6) Znovu stiskněte tlačítko FUNC, na elektroměru se zobrazí celkový čas a celkově spotřebovaná energie. 14 7) Znovu stiskněte tlačítko FUNC, na elektroměru se zobrazí celkový čas v sazbě 1 a celkově spotřebovaná energie v sazbě 1. 8) Znovu stiskněte tlačítko FUNC, na elektroměru se zobrazí celkový čas v sazbě 2 a celkově spotřebovaná energie v sazbě 2. 9) Znovu stiskněte tlačítko FUNC, na elektroměru se znovu objeví aktuální čas a síťové napětí. Stiskněte a držte tlačítko FUNC po dobu 5 sekund a budou vymazány hodnoty maximální spotřebované elektrické energie a celkových nákladů, při zobrazení sazby 1 nebo sazby 2 dojde obdobně k vymazání celkových nákladů a spotřebované energie v sazbě 1 nebo sazbě 2. 10) LCD displej Údaj OVER se rozbliká, je-li překročena hodnota max. zobrazení displeje pro množství spotřebované energie a celkových nákladů. Nastavení aktuálního času: 1) Tiskněte tlačítko FUNC a vyčkejte až se na displeji zobrazí nápis CLOCK. 2) Jednou stiskněte tlačítko SET, rozbliká se nápis WEEK DAY (den v týdnu), zapne se režim nastavení hodin a můžete nastavit aktuální čas. 3) Tlačítkem UP nastavte aktuální den v týdnu. 4) Znovu stiskněte tlačítko SET, rozbliká se nápis HOUR (hodina), nápis WEEK DAY přestane blikat. 5) Tlačítkem UP nastavte aktuální hodinu. 6) Znovu stiskněte tlačítko SET, rozbliká se nápis MINUTE (minuta), nápis HOUR přestane blikat a zůstane zobrazen na displeji. 7) Tlačítkem UP nastavte aktuální minutu. 8) Znovu stiskněte tlačítko SET, nastavený čas se vrátí zpět do režimu zobrazení CLOCK (hodin). 9) V režimu zobrazení CLOCK stiskem tlačítka UP nastavíte režim zobrazení 12-24 hodin. Pro vymazání nesprávného času opakujte výše uvedené kroky. Jakmile dokončíte všechna nastavení elektroměru, zapojte jej do běžné zásuvky (230/240 V) a připojte Váš spotřebič. Od tohoto okamžiku elektroměr začne měřit spotřebu energie připojeného spotřebiče a snadno tak identifikujete přístroje s největší spotřebou proudu ve Vaší domácnosti. Nastavení ceny/kWh & maximálního proudu: Stiskněte a držte tlačítko FUNC po dobu 5 sekund V okamžiku, kdy se na displeji zobrazí napětí, proud, nebo příkon. Nastavení sazby 1: 1) Stiskněte tlačítko SET, rozbliká se první číslice COST.kWh, pro nastavení stiskněte tlačítko UP. 2) Znovu stiskněte tlačítko SET, rozbliká se druhá číslice COST.kWh, pro nastavení stiskněte tlačítko UP. 3) Znovu stiskněte tlačítko SET, rozbliká se třetí číslice COST.kWh, pro nastavení stiskněte tlačítko UP. 4) Znovu stiskněte tlačítko SET, rozbliká se čtvrtá číslice COST.kWh, pro nastavení stiskněte tlačítko UP. 5) Znovu stiskněte tlačítko SET, rozbliká se desetinná čárka COST/kWh, pro nastavení stiskněte tlačítko UP. 6) Znovu stiskněte tlačítko SET, rozbliká se WEEKDAY (den v týdnu), pro nastavení stiskněte tlačítko UP. 7) Znovu stiskněte tlačítko SET, rozbliká se hodina zapnutí elektroměru (ON TIME), pro nastavení stiskněte tlačítko UP. Nastavení sazby 2: 1) Po dokončení nastavení sazby 1 stiskněte tlačítko FUNC, pro nastavení sazby 2 opakujte výše uvedené kroky. Nastavení údajů pro OVER LOAD (překročení proudu): Po dokončení nastavení sazby 2 znovu stiskněte tlačítko FUNC. 15 1) Stiskněte tlačítko SET, zobrazí se SET a AMP, rozbliká se první číselný údaj MAX. LOAD (maximální prousd) pro nastavení stiskněte tlačítko UP. 2) Znovu stiskněte tlačítko SET, rozbliká se druhý číselný údaj MAX.LOAD, pro nastavení stiskněte tlačítko UP. 3) Znovu stiskněte tlačítko SET, rozbliká se třetí číselný údaj MAX.LOAD, pro nastavení stiskněte tlačítko UP. 4) Znovu stiskněte tlačítko SET, rozbliká se čtvrtý číselný údaj MAX.LOAD, pro nastavení stiskněte tlačítko UP. V případě, že dojde k překročení nastaveného max. proudu, rozbliká se na displeji nápis OVER LOAD WARNING. V takovém případě nebude ovládání tlačítky funkční. Musíte spotřebič odpojit a data pro OVERLOAD nastavit znovu. Provozní režim Není-li do zařízení přiváděn elektrický proud po dobu 10 sekund, LCD displej se vypne. Stiskem jakéhokoli tlačítka displej znovu zapnete. Technické údaje: • Napájení • Max. zatížení • Rozsah napětí • Rozsah proudu • Přesnost • Rozsah zobrazení spotřebované el.energie • Frekvenční rozsah • Přesnost hodin • Vlastní spotřeba • Provozní teplota • Baterie 240 V stříd. napětí 50 Hz 16 A, 3680 W 200-276 V stříd. napětí, přesnost +/- 0,5 % max 0,005-16 A, přesnost +/- 0,5 % max +/- 0.5 % max 0-9999,9 kWh 45-65 Hz max +/- 1 minuta/měsíc <0,5 W -10 °C až +40 °C 3,6V NI-MH, nabíjecí baterie Bezpečnostní opatření: UPOZORNĚNÍ Při použití chytrého spořiče energie pro TV vždy dodržujte bezpečnostní opatření, aby se tím snížilo riziko požáru, úrazu elektrickým proudem, a to následovně: Před použitím si pečlivě přečtěte celý návod k použití tohoto přístroje. Aby se snížilo riziko úrazu elektrickým proudem měl by tento výrobek v případě potřeby otevřít POUZE autorizovaný technik. Pokud došlo k problému, odpojte zařízení od elektrické sítě a ostatních přístrojů. Výrobek nevystavujte vodě nebo vlhkosti. Tento přístroj lze použít pouze v typu napájecího zdroje uvedeného na etiketě. Jestliže si nejste jistí tím typem napájecího zdroje, který máte doma, obraťte se pro další informace na vašeho prodejce. Nepřetěžujte zásuvku, vzniká tak riziko požáru nebo úrazu elektrickým proudem. Do tohoto přístroje nikdy nezasunujte cizí předměty, neboť by se mohly dotknout nebezpečného vysokého napětí nebo zařízení zkratovat a to by mohlo vest k nebezpečí vzniku požáru nebo úrazu elektrickým proudem. NEBEZPEČÍ ÚRAZU ELEKTRICKÝM PROUDEM ÖPPNA INTE Údržba: K čištění používejte pouze suchý hadřík. Nepoužívejte čisticí rozpouštědla ani abrazivní prostředky. Záruka: Jakékoli změny, modifikace nebo poškození zařízení v důsledku nesprávného zacházení se zařízením ruší platnost záruční smlouvy. 16 Obecné upozornění: Design a specifikace výrobku mohou být změněny bez předchozího upozornění. Všechna loga a obchodní názvy jsou registrované obchodní značky příslušných vlastníků a jsou chráněny zákonem. Tento návod uchovejte pro budoucí použití. Upozornění: Tento výrobek je označen tímto symbolem. To znamená, že se s výrobkem musí zacházet jako s nebezpečným elektrickým a elektronickým odpadem a nelze jej po skončení životnosti vyhazovat s běžným domácím odpadem. Pro lidkvidaci těchto výrobků existují zvláštní sběrná střediska. Déclaration de conformité / Declaration of conformity / Conformiteitsverklaring / Prohlášení o shodě Nous/,We, / Wij, / Společnost Nedis B.V., De Tweeling 28, 5215MC, ’s-Hertogenbosch The Netherlands / Nederland / Nizozemí Tel.: 0031 73 5991055 Email: [email protected] Déclarons que le produit / Declare that product: / verklaren dat het product: / prohlašuje, že výrobek: Marque / Brand: / Merknaam: / Značka: HQ Model: EL-EPM02FHQ Description : Compteur électrique – Version Française Description: Energy Meter Omschrijving: Energiemeter Popis: Elektroměr est conforme aux prescriptions des normes suivantes : Is in conformity with the following standards: / in overeenstemming met de volgende normen is: / splňuje následující normy: EN 61326-1:2006, EN 61326-2-2:2006, EN 61010-1:2001 et satisfait aux exigences des directives de l’Union Européenne / EU Directive(s) / EU richtlijn(en) / Směrnice EU: 2004/108/EC, 2006/95/EC. ‘s-Hertogenbosch, 20-05-2009 Mme. / Mrs. / Mevr. / Paní : J. Gilad Directrice des Achats / Purchase Director / Directeur inkoop / Obchodní editelka 17