1
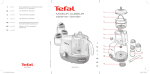
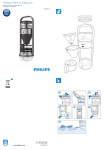
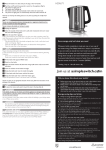
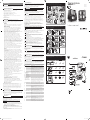
nEDErlanDs
introductie
Gefeliciteerd met uw aankoop en welkom bij Philips! Als u volledig wilt
profiteren van de ondersteuning die Philips biedt, registreer uw product dan
op www.philips.com/welcome.
1
2
3
4
5
6
7
8
9
10
11
12
13
algemene beschrijving (fig. 1)
Vast deksel van koffiezetter
Verwijderbare filterhouder
Opening om verwijderbaar waterreservoir te vullen
Waterniveau-indicator
Verwijderbaar waterreservoir
Deksel van geïsoleerde kan (alleen HD7698)
Geïsoleerde kan (alleen HD7698)
Deksel van glazen kan (alleen HD7689, HD7688)
Glazen kan (alleen HD7689, HD7688)
Frame van apparaat
Kanplateau (alleen HD7698) of warmhoudplaat (alleen HD7689,
HD7688)
Aan/uit-schakelaar
Netsnoer met stekker
Belangrijk
Lees deze gebruiksaanwijzing zorgvuldig door
voordat u het apparaat gaat gebruiken. Bewaar de
gebruiksaanwijzing om deze zo nodig later te kunnen
raadplegen.
gevaar
- Dompel het apparaat nooit in water of een andere
vloeistof en spoel het ook niet af onder de kraan.
Waarschuwing
- Controleer of het voltage dat wordt aangegeven
op het apparaat, overeenkomt met de plaatselijke
netspanning voordat u het apparaat aansluit.
- Gebruik het apparaat niet indien de stekker, het
netsnoer of het apparaat zelf beschadigd is.
- Raak de hete oppervlakken van het apparaat niet aan
wanneer het apparaat in werking is.
- Indien het netsnoer beschadigd is, moet u het
laten vervangen door Philips, een door Philips
geautoriseerd servicecentrum of personen met
vergelijkbare kwalificaties om gevaar te voorkomen.
- Dit apparaat is niet bedoeld voor gebruik door
personen (waaronder kinderen) met verminderde
lichamelijke, zintuiglijke of geestelijke vermogens, of die
gebrek aan ervaring of kennis hebben, tenzij iemand
die verantwoordelijk is voor hun veiligheid toezicht op
hen houdt of hun heeft uitgelegd hoe het apparaat
dient te worden gebruikt.
- Houd toezicht op jonge kinderen om te voorkomen
dat ze met het apparaat gaan spelen.
- Houd het netsnoer buiten het bereik van kinderen.
Laat het netsnoer niet over de rand van de tafel of
het aanrecht hangen waarop het apparaat staat.
let op
- Plaats het apparaat niet op een heet oppervlak en
voorkom dat het netsnoer in contact komt met hete
oppervlakken.
- Haal de stekker van het apparaat uit het stopcontact
als er tijdens het koffiezetten problemen optreden en
voordat u het apparaat gaat schoonmaken.
- Wacht tot het apparaat is afgekoeld voordat u het
opbergt, met name als u het netsnoer in het apparaat
wilt duwen. Het kanplateau en de geïsoleerde kan
(alleen HD7698) of de warmhoudplaat en de glazen
kan (alleen HD7688) kunnen heet zijn.
- Gebruik de kan nooit in een magnetron.
- Verplaats het apparaat niet tijdens het koffiezetten.
- Verwijder het waterreservoir met filterhouder niet
uit de behuizing tijdens het koffiezetten, aangezien er
heet water in de filterhouder zit.
- Geïsoleerde kan: dompel de kan nooit in water of een
andere vloeistof, omdat er hierdoor water tussen de
wanden van de geïsoleerde kan zou kunnen lopen.
- Geïsoleerde kan: haal de kan niet uit elkaar.
- Geïsoleerde kan: om lekkage te voorkomen moet u
de geïsoleerde kan altijd rechtop houden wanneer
deze gevuld is.
- Glazen kan: de kan is zowel tijdens als na het
koffiezetten heet. Pak de kan altijd vast bij het handvat.
- Dit apparaat is bedoeld voor huishoudelijk en
soortgelijk gebruik zoals:
- in keukens (voor personeel) in winkels, kantoren en
andere werkomgevingen;
- in boerderijen;
- door gasten in hotels, motels en andere
verblijfsaccommodaties;
- in Bed & Breakfast-achtige omgevingen.
- Gebruik voor het schoonmaken geen alkalische
schoonmaakmiddelen, maar gebruik een zachte
doek en een beetje afwasmiddel om schade aan het
apparaat te voorkomen.
naleving van richtlijnen
Deze machine voldoet aan alle richtlijnen met betrekking tot
elektromagnetische velden (EMV). Mits de machine op de juiste wijze en
volgens de instructies in deze gebruiksaanwijzing wordt gebruikt, is deze
veilig te gebruiken volgens het nu beschikbare wetenschappelijke bewijs.
Als de machine is uitgeschakeld, is het energieverbruik lager dan 0,5 watt.
Dit betekent dat deze machine aan EU-richtlijn 2009/125/EG voldoet,
waarin de eisen inzake ecologisch ontwerp voor energieverbruikende
producten zijn vastgelegd.
Voor het eerste gebruik
Zorg ervoor dat u het apparaat op een vlakke en stabiele ondergrond
plaatst. Steek de stekker in een geaard stopcontact.
Spoel het apparaat uit hygiënisch oogpunt door het waterreservoir te vullen
met koud vers water en plaats de kan. Plaats geen filter met gemalen koffie
in de filterhouder. Laat het apparaat werken totdat het waterreservoir leeg
is (zie stap 1 t/m 9 aan de binnenkant van de omslag).
Druppelstopfunctie
Dankzij de druppelstopfunctie kunt u de kan uit de koffiezetter verwijderen
voor het koffiezetten beëindigd is.
Let op:Verwijder het waterreservoir met filterhouder niet uit de
behuizing tijdens het koffiezetten, aangezien er heet water in de
filterhouder zit.
,
,
HD7698
HD7689
HD7688
Opmerking: Als u de kan langer dan 30 seconden verwijdert voordat al het
water door het filter is gelopen, kan het filter overstromen.
schoonmaken
Dompel het apparaat en de geïsoleerde kan nooit in water of andere
vloeistoffen, en spoel ze niet af onder de kraan.
1 Maak de buitenkant van het apparaat schoon met een vochtige doek.
Opmerking: Sommige onderdelen van het apparaat zijn
vaatwasmachinebestendig. Controleer de schoonmaaktabel om te zien welke
delen in de vaatwasmachine kunnen worden schoongemaakt.
Ontkalken
Regelmatig ontkalken verlengt de levensduur van het apparaat en en
garandeert langdurig een optimaal zetresultaat en een constante zettijd.
Ontkalk het apparaat ten minste:
- Eens per twee maanden als u zacht of gefilterd water gebruikt (tot 18
dH);
- Eens per maand als u hard water gebruikt (meer dan 18 dH).
Neem contact op met uw waterleidingbedrijf voor meer informatie over
uw kraanwater. Als uw apparaat meer stoom begint te produceren, kan dit
een indicatie zijn dat er sprake is van kalkontwikkeling in uw apparaat.
U kunt de koffiezetter ontkalken met blanke azijn met 4% azijnzuur of met
een vloeibare ontkalker.
Opmerking: Als u niet op de hoogte bent van de waterhardheid in
uw woongebied en u bent niet in de gelegenheid om contact met uw
waterleidingbedrijf op te nemen, raden wij u aan om het apparaat iedere
maand te ontkalken.
Gebruik nooit azijn met een azijnzuurpercentage van 8% of hoger,
natuurazijn, een ontkalker op poederbasis of een ontkalker in tabletvorm
om het apparaat te ontkalken, omdat dit schade kan veroorzaken.
Ontkalken duurt ongeveer 30 tot 60 minuten.
Using the appliance / Sådan bruges apparatet / Käyttö / Utilisation de
l’appareil / Het apparaat gebruiken / Bruke apparatet / Använda apparaten /
Modalità d’uso dell’apparecchio
User manual
1 Vul het waterreservoir met ongeveer 0,8 liter blanke azijn (4%
azijnzuur).
Opmerking: U kunt ook een geschikte vloeibare ontkalker gebruiken.Volg in dat
geval de instructies op de verpakking van de ontkalker.
2 Neem een filterzakje (type 1x4 of nr. 4) en plaats het in de
filterhouder.
3 Druk op de aan/uitknop om het apparaat in te schakelen en laat
het apparaat een hele koffiezetcyclus afmaken (zie hoofdstuk ‘Het
apparaat gebruiken’).
4 Schakel het apparaat uit.
5 Giet de kan leeg in de gootsteen en gooi het filterzakje weg.
Opmerking: Herhaal stap 1 t/m 5 om het apparaat extra grondig te ontkalken
en om er zeker van te zijn dat er geen kalk achterblijft in het apparaat.
6 Laat het apparaat nog twee keer met vers, koud water werken om
alle resten azijn/ontkalker en kalk weg te spoelen.
Opmerking: Laat het apparaat circa 3 minuten afkoelen voordat u het
ontkalkingsproces voor de tweede keer uitvoert.
7 Maak de kan en het waterreservoir met de filterhouder schoon.
accessoires bestellen
Ga naar onze website www.shop.philips.com/service om accessoires
voor dit apparaat te kopen. Als u problemen hebt met het vinden van
accessoires voor uw apparaat, neem dan contact op met het Philips
Consumer Care Centre in uw land. Contactgegevens vindt u op www.
philips.com/support .
-
Milieu
Gooi het apparaat aan het einde van zijn levensduur niet weg met
het normale huisvuil, maar lever het in op een door de overheid
aangewezen inzamelpunt om het te laten recyclen. Op die manier levert
u een bijdrage aan een schonere leefomgeving (fig. 2).
garantie en service
Als u service of informatie nodig hebt of als u een probleem ondervindt,
bezoek dan de ondersteuningspagina op de Philips-website (www.
philips.com/support) of neem contact op met het Philips Consumer
Care Centre in uw land. Het telefoonnummer vindt u in het ‘worldwide
guarantee’-vouwblad. Als er geen Consumer Care Centre in uw land is, ga
dan naar uw plaatselijke Philips-dealer.
Cleaning / Rengøring / Puhdistaminen / Nettoyage / Schoonmaken /
Rengjøring / Rengöring / Pulizia
4222.200.0644.2
Problemen oplossen
Dit hoofdstuk behandelt in het kort de problemen die u kunt tegenkomen
tijdens het gebruik van het apparaat. Als u het probleem niet kunt oplossen
met de informatie hieronder, ga dan naar www.philips.com/support
voor een lijst met veelgestelde vragen of neem contact op met het
Consumer Care Centre in uw land.
Probleem
Mogelijke oplossing
Het apparaat werkt
niet.
Steek de stekker in het stopcontact en schakel
het apparaat in.
1
Controleer of het voltage dat is aangegeven op
het apparaat overeenkomt met de plaatselijke
netspanning.
Vul het waterreservoir met water.
Neem in alle andere gevallen contact op met het
Philips Consumer Care Centre.
Het koffiezetten
duurt lang.
Ontkalk het apparaat (zie hoofdstuk ‘Ontkalken’).
Het apparaat
produceert veel
lawaai of stoom
tijdens het zetproces.
Ontkalk het apparaat (zie hoofdstuk ‘Ontkalken’).
Het filter stroomt
over wanneer ik
de kan tijdens het
koffiezetten uit het
apparaat verwijder.
Als u de kan meer dan 20 seconden verwijdert
voordat al het water door het filter is gelopen,
kan het filter overstromen. De koffie krijgt
pas de gewenste smaak aan het einde van de
koffiezetcyclus. Daarom raden wij u aan de kan
niet te verwijderen om de koffie voor het einde
van de koffiezetcyclus uit te schenken.
Er zit koffiedik in de
kan.
Gebruik het juiste formaat filterzakje (1x4 of nr.
4).
Controleer of het filterzakje niet is gescheurd.
Doe niet te veel gemalen koffie in het filter.
Plaats de kan recht onder het waterreservoir met
de filterhouder.
Maak het waterreservoir met de filterhouder
schoon door het te spoelen met koud water. Giet
het water weg na het uitspoelen.
De koffie is te slap.
Gebruik de juiste verhouding tussen koffie en
water.
2
Controleer of het filterzakje niet naar binnen is
geklapt.
Gebruik het juiste formaat filterzakje (1x4 of nr.
4).
het apparaat gebruiken
Koffiezetten
Opmerking: Zorg ervoor dat de kan goed is geplaatst. De tuit van de kan
moet richting het apparaat wijzen. Als de kan niet goed is geplaatst, wordt de
druppelstop automatisch geactiveerd.
Before first use / Før apparatet tages i brug / Käyttöönotto /
Avant la première utilisation / Voor het eerste gebruik /
Før første gangs bruk / Före första användningen / Primo utilizzo
Controleer of er geen water in de kan zit voordat
u gaat koffiezetten.
De koffie is niet heet
genoeg.
Geïsoleerde kan: spoel de kan met heet water
voordat u gaat koffiezetten.
Glazen kan: plaats de glazen kan goed op de
warmhoudplaat.
Ontkalk het apparaat (zie hoofdstuk ‘Ontkalken’).
Glazen kan: u kunt de kan op de warmhoudplaat laten staan om
de koffie warm te houden en de smaak te behouden. Het apparaat
schakelt na 120 minuten automatisch uit.
Geïsoleerde kan: na het koffiezetten schakelt het apparaat
automatisch uit. De kan houdt de koffie warm.
Opmerking: Spoel de kan om met heet water voordat u koffie zet om de koffie
warm te houden.
, Als u direct nog een tweede kan koffie wilt zetten, laat het apparaat
dan eerst 3 minuten afkoelen.
4222_200_0644_2_DFU Leaflet_A6_v4.indd 1
8/20/13 2:10 PM
English
Introduction
Congratulations on your purchase and welcome to Philips! To fully
benefit from the support that Philips offers, register your product at
www.philips.com/welcome.
General description (Fig. 1)
1 Fixed lid of coffeemaker
2 Removable filter holder
3 Opening to fill removable water tank
4 Water level indicator
5 Removable water tank
6 Lid of insulated jug (HD7698 only)
7 Insulated jug (HD7698 only)
8 Lid of glass jug (HD7689, HD7688 only)
9 Glass jug (HD7689, HD7688 only)
10 Frame of the appliance
11 Jug tray (HD7698 only) or hotplate (HD7689, HD7688 only)
12 On/off button
13 Mains cord with plug
Important
Read this user manual carefully before you use the
appliance and save it for future reference.
Danger
-- Never immerse the appliance in water or any other
liquid, nor rinse it under the tap.
Warning
-- Check if the voltage indicated on the appliance
corresponds to the local mains voltage before you
connect the appliance.
-- Do not use the appliance if the plug, the mains
cord or the appliance itself is damaged.
-- Do not touch the hot surfaces of the appliance when
it operates.
-- If the mains cord is damaged, you must have it
replaced by Philips, a service centre authorised by
Philips or similarly qualified persons in order to avoid
a hazard.
-- This appliance is not intended for use by persons
(including children) with reduced physical, sensory
or mental capabilities, or lack of experience and
knowledge, unless they have been given supervision
or instruction concerning use of the appliance by a
person responsible for their safety.
-- Children should be supervised to ensure that they do
not play with the appliance.
-- Keep the mains cord out of the reach of children.
Do not let the mains cord hang over the edge of the
table or worktop on which the appliance stands.
Caution
-- Do not place the appliance on a hot surface and
prevent the mains cord from coming into contact
with hot surfaces.
-- Unplug the appliance if problems occur during
brewing and before you clean it.
-- Wait until the appliance has cooled down before
you store it, especially if you want to push the mains
cord into the appliance. The jug tray and insulated
jug (HD7698 only) or the hotplate and the glass jug
(HD7688 only) may be hot.
-- Never use the jug in a microwave oven.
-- Do not move the appliance while it is brewing.
-- Do not remove the water tank with filter holder from
the housing during a brewing cycle, as there will be
hot water in the filter holder.
-- Insulated jug: Never immerse the jug in water or
any other liquid, as this could cause water to enter
between the walls of the jug.
-- Insulated jug: Do not dissemble the jug.
-- Insulated jug: When the jug is filled with coffee, keep it
in upright position to prevent leakage.
-- Glass jug: The jug is hot during and after brewing.
Always hold the jug by its handle.
-- This appliance is intended to be used in household
and similar applications such as:
-- staff kitchen areas in shops, offices and other working
environments;
-- farm houses;
-- by clients in hotels, motels and other residential type
environments;
-- bed and breakfast type environments.
-- To prevent damage to the appliance, do not use
alkaline cleaning agents when cleaning. Use a soft
cloth and some washing-up liquid.
Compliance with standards
This machine complies with all standards regarding electromagnetic fields
(EMF). If handled properly and according to the instructions in this user
manual, the machine is safe to use based on scientific evidence available today.
The energy consumption of this machine in off mode is less than 0.5 watts.
This means that this machine complies with European Directive 2009/125/
EC, which sets the ecological design requirements for energy-using products.
Before first use
Make sure you place the appliance on a flat and stable surface and put the
mains plug in an earthed wall socket.
For hygiene reasons, flush the appliance by filling the water tank with cold
fresh water and put the jug in place. Do not put a filter and ground coffee
in the filter holder. Let the appliance run until the water tank is empty (see
steps 1 to 9 on the inside of the cover).
Using the appliance
Brewing coffee
Note: Make sure the jug is properly placed.The spout of the jug has to face
the appliance. If the jug is not properly placed, the drip stop function is
automatically activated.
Caution: Do not remove the water tank with filter holder from the
housing during a brewing cycle, as there will be hot water in the filter
holder.
,, Glass jug:You can leave the jug on the hotplate to keep the
coffee warm and to preserve its flavour. The appliance switches off
automatically after 120 minutes.
,, Insulated jug: The appliance switches off automatically after brewing.
The jug keeps the coffee hot.
Note:To keep the coffee hot, rinse the jug with hot water before brewing.
,, If you want to brew another jug of coffee right away, let the appliance
cool down for 3 minutes first.
Drip stop function
The drip stop function enables you to remove the jug from the coffeemaker
before the brewing process is finished.
Note: If you remove the jug for more than 30 seconds before all the water has
passed through the filter, the filter may overflow.
Cleaning
Never immerse the appliance or insulated jug in water or any other
liquid, nor rinse it under the tap.
1 Clean the outside of the appliance with a moist cloth.
Note: Some of the parts of the appliance are dishwasher-proof. Check the
cleaning table to see which parts can be cleaned in the dishwasher.
4222_200_0644_2_DFU Leaflet_A6_v4.indd 2
Descaling
Regular descaling prolongs the life of the appliance and guarantees optimal
brewing results and a constant brewing time for a long time.
You should descale your appliance at least:
-- Every two months if you use soft or filtered water (up to 18dH);
-- Every month if you use hard water (over 18dH).
You can contact your water board for more information about your
tap water. If your appliance starts producing more steam, this can be an
indication of scale building up in your appliance.
You can use white vinegar with 4% acetic acid or a liquid descaler to descale
the coffeemaker.
Note: If you are not aware of the water hardness in your area and are not
in a position to contact your local water board, we advise you to descale the
appliance every month.
Never use vinegar with an acetic acid content of 8% or more, natural
vinegar, powder descalers or tablet descalers to descale the appliance, as
this may cause damage.
Descaling takes approx. 30 to 60 minutes.
1 Fill the water tank with 0.8 litres of white vinegar (4% acetic acid).
Note:You can also use an appropriate liquid descaler. In this case, follow the
instructions on the package of the descaler.
2 Take a paper filter (type 1x4 or no. 4) and put it in the filter holder.
3 Press the on/off button to switch on the appliance and let it complete
the brewing cycle (see chapter ‘Using the appliance’).
4 Switch off the appliance.
5Empty the jug over a sink and throw away the paper filter.
Note: For extra thorough descaling and to make sure that there is no scale left
in the appliance, repeat steps 1 to 5.
6Let the appliance complete two more brewing cycles with fresh cold
water to remove any vinegar/descaler and scale residues.
Note: Let the appliance cool down for approx. 3 minutes before you start the
second run.
7Clean the jug and the water tank with filter holder.
Ordering accessories
To purchase accessories for this appliance, please visit our website
www.shop.philips.com/service. If you have any difficulties obtaining
accessories for your appliance, please contact the Philips Consumer Care
Centre in your country. You will find the contact details at www.philips.
com/support.
Environment
-- Do not throw away the appliance with the normal household waste
at the end of its life, but hand it in at an official collection point for
recycling. By doing this, you help to preserve the environment (Fig. 2).
Guarantee and service
If you need service or information or if you have a problem, please visit
the Philips website at www.philips.com/support or contact the Philips
Consumer Care Centre in your country. You find its phone number in the
worldwide guarantee leaflet. If there is no Consumer Care Centre in your
country, go to your local Philips dealer.
Troubleshooting
This chapter summarises the most common problems you could encounter
with the appliance. If you are unable to solve the problem with the
information below, visit www.philips.com/support for a list of frequently
asked questions or contact the Consumer Care Centre in your country.
Problem
Possible solution
The appliance does not
work.
Plug in and switch on the appliance.
Make sure that the voltage indicated on the
appliance corresponds to the local mains
voltage.
Fill the water tank with water.
In all other cases, contact the Philips Consumer
Care Centre.
The appliance takes
a long time to brew
coffee.
Descale the appliance (see chapter ‘Descaling’).
The appliance produces Descale the appliance (see chapter ‘Descaling’).
a lot of noise and
steam during the
brewing process.
The filter overflows
when I remove the
jug from the appliance
while it is brewing
coffee.
Coffee grounds end up
in the jug.
If you remove the jug for more than 20
seconds before all the water has passed
through the filter, the filter may overflow. Also
note that the coffee does not reach its full taste
before the end of the brewing cycle. Therefore
we advise you not to remove the jug and pour
out the coffee before the end of the brewing
cycle.
Use the right size of paper filter (1x4 or no. 4).
Make sure the paper filter is not torn.
Do not put too much ground coffee in the
filter.
Place the jug correctly under the water tank
with filter holder.
Clean the water tank with filter holder by
rinsing it with cold water. Pour out the water
after rinsing.
The coffee is too weak
Use the right proportion of coffee to water.
Make sure the paper filter does not collapse.
Use the right size of paper filter (1x4 or no. 4).
Make sure there is no water in the jug before
you start to brew coffee.
The coffee is not hot
enough.
Insulated jug: Rinse the jug with hot water
before brewing.
Glass jug: Place the glass jug properly on the
hotplate.
Descale the appliance (see chapter ‘Descaling’)
Français
Introduction
Félicitations pour votre achat et bienvenue dans l’univers Philips ! Pour
profiter pleinement de l’assistance Philips, enregistrez votre produit sur le
site à l’adresse suivante : www.philips.com/welcome.
Description générale (fig. 1)
1 Couvercle fixe de la cafetière
2 Porte-filtre amovible
3 Ouverture pour remplir le réservoir d’eau amovible
4 Indicateur de niveau d’eau
5 Réservoir d’eau amovible
6 Couvercle de la verseuse isotherme (HD7698 uniquement)
7 Verseuse isotherme (HD7698 uniquement)
8 Couvercle de la verseuse en verre (HD7689, HD7688 uniquement)
9 Verseuse en verre (HD7689, HD7688 uniquement)
10 Cadre de l’appareil
11 Plateau de la verseuse (HD7698 uniquement) ou plateau chauffant
(HD7689, HD7688 uniquement)
12 Bouton marche/arrêt
13 Cordon d’alimentation avec fiche secteur
Important
Lisez attentivement ce mode d’emploi avant d’utiliser
l’appareil et conservez-le pour un usage ultérieur.
Danger
-- Ne plongez jamais l’appareil dans l’eau, ni dans
d’autres liquides et ne le rincez pas sous le robinet.
Avertissement
-- Avant de brancher l’appareil, vérifiez que la tension
indiquée sur l’appareil correspond à la tension
supportée par le secteur local.
-- N’utilisez jamais l’appareil si la fiche, le cordon
d’alimentation ou l’appareil lui-même est endommagé.
-- Ne touchez pas les surfaces chaudes de l’appareil
pendant son fonctionnement.
-- Si le cordon d’alimentation est endommagé, il doit
être remplacé par Philips, par un Centre Service
Agréé Philips ou par un technicien qualifié afin
d’éviter tout accident.
-- Cet appareil n’est pas destiné à être utilisé par
des personnes (notamment des enfants) dont les
capacités physiques, sensorielles ou intellectuelles
sont réduites, ou par des personnes manquant
d’expérience ou de connaissances, à moins que cellesci ne soient sous surveillance ou qu’elles n’aient reçu
des instructions quant à l’utilisation de l’appareil par
une personne responsable de leur sécurité.
-- Veillez à ce que les enfants ne puissent pas jouer avec
l’appareil.
-- Maintenez le cordon d’alimentation hors de portée
des enfants. Ne le laissez pas dépasser de la table ou
du plan de travail sur lequel l’appareil est posé.
Attention
-- Ne posez jamais l’appareil sur une surface chaude et
veillez à ce que le cordon d’alimentation ne soit pas
en contact avec des surfaces chaudes.
-- Débranchez toujours l’appareil en cas de problème
lors de la préparation du café et avant de le nettoyer.
-- Attendez toujours que l’appareil ait refroidi avant de
le ranger et, en particulier si vous souhaitez replacer
le cordon d’alimentation à l’intérieur de l’appareil.
Le plateau de la verseuse et la verseuse isotherme
(HD7698 uniquement) ou le plateau chauffant et la
verseuse en verre (HD7688 uniquement) peuvent
être chauds.
-- Ne mettez jamais la verseuse au four à micro-ondes.
-- Ne déplacez jamais l’appareil en cours d’utilisation.
-- Ne retirez jamais le réservoir d’eau avec le portefiltre de leur logement pendant la préparation du café
car le porte-filtre contient de l’eau chaude.
-- Verseuse isotherme : ne plongez jamais la verseuse
dans l’eau ou dans tout autre liquide afin d’éviter des
infiltrations d’eau entre les parois de la verseuse.
-- Verseuse isotherme : ne démontez pas la verseuse.
-- Verseuse isotherme : lorsque la verseuse est remplie
de café, maintenez-la en position verticale pour éviter
toute fuite.
-- Verseuse en verre : la verseuse devient très chaude
pendant et après la préparation du café. Tenez-la
toujours par la poignée.
-- Cet appareil est destiné à un usage domestique ou
pour une utilisation similaire comme :
-- cuisine destinée aux employés dans les entreprises,
magasins et autres environnements de travail ;
-- fermes ;
-- utilisation par les clients dans les hôtels, motels et
autres environnements résidentiels ;
-- chambres d’hôte.
-- Ne nettoyez pas l’appareil avec des agents alcalins,
vous risqueriez de l’endommager. Utilisez plutôt un
chiffon doux et un peu de liquide vaisselle.
Conforme aux normes
Cet appareil est conforme à toutes les normes relatives aux champs
électromagnétiques (CEM). Il répond aux règles de sécurité établies sur la
base des connaissances scientifiques actuelles s’il est manipulé correctement
et conformément aux instructions de ce mode d’emploi.
La consommation énergétique de cet appareil à l’arrêt est inférieure
à 0,5 watt. Cela signifie que cet appareil est conforme à la directive
européenne 2009/125/CE, qui établit un cadre pour la fixation d’exigences
en matière d’écoconception applicables aux produits consommateurs
d’énergie.
Avant la première utilisation
Veillez à placer l’appareil sur une surface plane et stable, puis branchez le
cordon d’alimentation sur une prise secteur mise à la terre.
Pour des raisons d’hygiène, rincez l’appareil en remplissant le réservoir d’eau
froide et mettez la verseuse en place. Ne placez pas de filtre ni de café dans
le porte-filtre. Laissez l’appareil fonctionner jusqu’à ce que le réservoir soit
vide (voir les étapes 1 à 9 à l’intérieur du couvercle).
Fonction stop-goutte
La fonction stop-goutte vous permet de retirer la verseuse de la cafetière
avant que le cycle de préparation ne soit fini.
Remarque : Si vous retirez la verseuse plus de 30 secondes avant que toute
l’eau se soit écoulée par le filtre, celui-ci risque de déborder.
Nettoyage
Ne plongez jamais l’appareil ou la verseuse isotherme dans l’eau ou dans
tout autre liquide, ne les rincez pas non plus sous le robinet.
1 Nettoyez l’extérieur de l’appareil à l’aide d’un chiffon humide.
Remarque : Certaines pièces de l’appareil passent au lave-vaisselle. Reportezvous au tableau relatif au nettoyage pour savoir quelles pièces peuvent être
nettoyées au lave-vaisselle.
Détartrage
Un détartrage régulier permet de prolonger la durée de vie de votre
appareil et garantit des résultats optimaux et un temps de préparation
constant jour après jour.
Vous devriez détartrer votre appareil au moins :
-- tous les deux mois si vous utilisez de l’eau douce ou filtrée (inférieure à
18 °TH) ;
-- chaque mois si vous utilisez de l’eau dure (supérieure à 18 °TH).
Vous pouvez contacter le service de distribution des eaux de votre
commune pour en savoir plus sur la dureté de l’eau dans votre région.
L’accumulation de calcaire dans votre appareil peut se manifester par une
production plus intense de vapeur.
Pour détartrer votre cafetière, vous pouvez utiliser soit du vinaigre blanc
composé à 4 % d’acide acétique, soit un détartrant liquide.
Remarque : Si vous ne connaissez pas la dureté de l’eau dans votre région et
que vous n’êtes pas en mesure de contacter le service de distribution des eaux
de votre commune, nous vous recommandons de détartrer votre appareil une
fois par mois.
Afin d’éviter tout dommage, n’utilisez jamais de vinaigre blanc (à teneur
en acide acétique supérieure ou égale à 8 %), de vinaigre naturel, de
détartrant en poudre ou en tablette pour détartrer l’appareil.
Comptez environ 30 à 60 minutes pour détartrer l’appareil.
1 Versez environ 0,8 l de vinaigre blanc (4 % d’acide acétique) dans le
réservoir d’eau.
Remarque :Vous pouvez également utiliser un détartrant spécial. Dans ce cas,
suivez les instructions indiquées sur l’emballage.
2 Prenez un filtre en papier (type 1x4 ou n° 4) et placez-le dans le
porte-filtre.
3 Allumez l’appareil à l’aide du bouton marche/arrêt et laissez-
le effectuer un cycle complet (voir le chapitre « Utilisation de
l’appareil ».).
4 Éteignez l’appareil.
5Videz le contenu de la verseuse dans l’évier et jetez le filtre en papier.
Remarque : Pour réaliser un détartrage en profondeur et bien éliminer tous les
dépôts de calcaire accumulés dans l’appareil, répétez les étapes 1 à 5.
6Ensuite, faites fonctionner l’appareil deux fois avec de l’eau froide afin
d’éliminer le vinaigre/détartrant et tous les résidus de calcaire.
Remarque : Laissez l’appareil refroidir pendant 3 minutes environ avant de
procéder au deuxième détartrage.
7Nettoyez la verseuse et le réservoir d’eau avec le porte-filtre.
Commande d’accessoires
Pour acheter des accessoires pour cet appareil, rendez-vous sur notre site
Web www.shop.philips.com/service. Si vous rencontrez des problèmes
pour vous procurer des accessoires pour votre appareil, contactez le
Service Consommateurs Philips de votre pays. Vous trouverez leurs
coordonnées sur le site Web www.philips.com/support.
Environnement
-- Lorsqu’il ne fonctionnera plus, ne jetez pas l’appareil avec les ordures
ménagères, mais déposez-le à un endroit assigné à cet effet, où
il pourra être recyclé. Vous contribuerez ainsi à la protection de
l’environnement (fig. 2).
Garantie et service
Si vous souhaitez obtenir des informations supplémentaires, faire réparer
l’appareil ou si vous rencontrez un problème, rendez-vous sur le site
Web de Philips à l’adresse www.philips.com/support ou contactez le
Service Consommateurs Philips de votre pays. Vous trouverez le numéro
de téléphone correspondant sur le dépliant de garantie internationale. S’il
n’existe pas de Service Consommateurs Philips dans votre pays, renseignezvous auprès de votre revendeur Philips local.
Dépannage
Cette rubrique présente les problèmes les plus courants que vous pouvez
rencontrer avec votre appareil. Si vous ne parvenez pas à résoudre le
problème à l’aide des informations ci-dessous, rendez-vous sur www.
philips.com/support pour consulter les questions fréquemment posées,
ou contactez le Service Consommateurs de votre pays.
Problème
Solution possible
L’appareil ne
fonctionne pas.
Branchez l’appareil et mettez-le en marche.
Assurez-vous que la tension indiquée sur
l’appareil correspond bien à la tension secteur
locale.
Remplissez le réservoir d’eau.
Dans tous les autres cas, contactez le
Service Consommateurs Philips.
Le café passe très
lentement.
L’appareil fait du bruit Détartrez l’appareil (voir le chapitre
« Détartrage »).
et de la fumée s’en
dégage pendant la
préparation du café.
Le filtre déborde
lorsque je retire
la verseuse au
cours d’un cycle de
préparation.
Si vous retirez la verseuse pendant plus de
20 secondes avant que toute l’eau se soit
écoulée par le filtre, celui-ci risque de déborder.
Notez également que le café prend tout son
arôme uniquement à la fin d’un cycle complet.
Nous vous conseillons donc de ne pas retirer la
verseuse et de ne pas servir le café tant que le
cycle de préparation n’est pas terminé.
Du marc de café
s’est introduit dans la
verseuse.
Utilisez un filtre en papier de taille adéquate (1x4
ou n° 4).
Assurez-vous que le filtre en papier n’est pas
déchiré.
Ne mettez pas trop de café moulu dans le filtre.
Placez la verseuse correctement sous le réservoir
d’eau avec le porte-filtre.
Nettoyez le réservoir d’eau avec le porte-filtre en
le rinçant à l’eau froide. Videz l’eau restante après
le rinçage.
Le café est trop léger.
Utilisez un filtre en papier de taille adéquate (1x4
ou n° 4).
Remarque : Assurez-vous que la verseuse est correctement placée. Son bec
verseur doit être orienté vers l’intérieur de l’appareil. Si la verseuse n’est pas
correctement placée, la fonction stop-goutte est automatiquement activée.
,, Verseuse en verre : vous pouvez laisser la verseuse sur le plateau
chauffant pour maintenir votre café chaud et préserver tout son
arôme. L’appareil s’éteint automatiquement au bout de 120 minutes.
,, Verseuse isotherme : l’appareil s’éteint automatiquement lorsque le
café est prêt. La verseuse conserve le café chaud.
Utilisez la bonne proportion café/eau.
Assurez-vous que le filtre en papier ne s’est pas
replié.
Utilisation de l’appareil
Pour faire du café
Attention : Ne retirez jamais le réservoir d’eau avec le porte-filtre de leur
logement pendant la préparation du café car le porte-filtre contient de
l’eau chaude.
Détartrez l’appareil (voir le chapitre
« Détartrage »).
Assurez-vous qu’il n’y a pas d’eau dans la
verseuse avant de commencer la préparation du
café.
Le café n’est pas
assez chaud.
Verseuse isotherme : rincez la verseuse à l’eau
chaude avant de préparer du café.
Verseuse en verre : placez correctement la
verseuse en verre sur le plateau chauffant.
Détartrez l’appareil (voir le chapitre
« Détartrage »).
Remarque : Pour que le café reste chaud, rincez la verseuse à l’eau chaude
avant de préparer du café.
,, Avant de refaire du café, laissez l’appareil refroidir pendant au moins
3 minutes.
8/20/13 2:10 PM