1
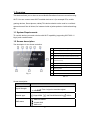
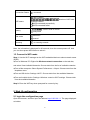
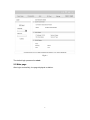
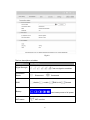
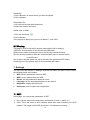
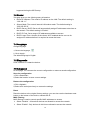
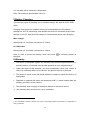
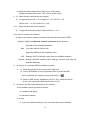
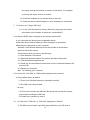
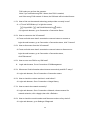
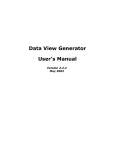
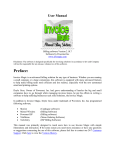
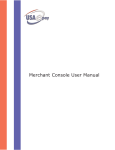
User Manual
1
Safety Precautions
Read the safety precautions carefully to ensure the correct and safe use of your
wireless device.
Do not switch on your device when the device use is prohibited or when
the device use may cause interference or danger.
Follow the rules or regulations in hospitals and health care facilities.
Switch off your device near medical apparatus.
Switch off your device in an aircraft. The device may cause interference
to control signals of the aircraft.
Switch off your device near high-precision electronic devices. The
device may affect the performance of these devices.
Do not attempt to disassemble your device or its accessories. Only
qualified personnel are allowed to service or repair the device.
Do not place your device or its accessories in containers with strong
electromagnetic field.
Do not place magnetic storage media near your device. Radiation from
the device may erase the information stored on them.
Do not put your device in a high-temperature place or use it in a place
with flammable gas such as a gas station.
Keep your device and its accessories away from children. Do not allow
children to use your device without guidance.
Use approved batteries and chargers only to avoid explosion.
Observe the laws or regulations on device use. Respect others’ privacy
and legal rights when using your device.
It is recommended that the equipment only be used in the environment where
temperature is between 0℃ and 50℃ and humidity is between 10% to 90%. Keep the
equipment in the environment where temperature is between -10℃ and 70℃ or
humidity is between 10% to 90%.
2
Content
Safety Precautions .................................................................................................... 2
1. Overview ................................................................................................................ 5
1.1 System Requirements....................................................................................... 5
1.2 Screen description ............................................................................................ 5
1.3 Connect in WiFi mode....................................................................................... 6
2. Web UI configuration ............................................................................................ 6
2.1 login the configuration page ............................................................................ 6
2.2 Main page ........................................................................................................... 7
3. Quick Setup ........................................................................................................... 9
4. Connection ............................................................................................................ 9
4.1 Connection status ............................................................................................. 9
4.2 Usage history................................................................................................... 10
4.3 Profile management ........................................................................................ 10
4.4 Network ............................................................................................................ 10
4.5 PIN management ............................................................................................. 11
4.6 Connected Device ........................................................................................... 11
5. SMS ...................................................................................................................... 11
6. SD card................................................................................................................. 12
6.1 File management ............................................................................................. 12
6.2 Sharing ............................................................................................................. 13
7. Settings ................................................................................................................ 13
3
7.1 WiFi ................................................................................................................... 13
7.2 WPS .................................................................................................................. 14
7.3 Router ............................................................................................................... 15
7.4 Language ......................................................................................................... 15
7.5 Diagnostic ........................................................................................................ 15
7.6 Advanced ......................................................................................................... 15
8 Battery Charging .................................................................................................. 16
9 Warranty................................................................................................................ 16
10 Q&A ..................................................................................................................... 17
11 Warning and Precautions .................................................................................. 21
4
1. Overview
This device allows you to share a secure Mobile Broadband internet connection using
Wi-Fi. You can connect most Wi-Fi enabled devices to it (for example PCs, mobile
gaming devices, Smart phones, tablet).This device should not be used in a confined
space where air flow is limited, for instance inside a jacket pocket or inside a hand bag
etc.
1.1 System Requirements
To use this device you need a device with Wi-Fi capability (supporting Wi-Fi 802.11
b/g/n) and a web browser.
1.2 Screen description
The description for the Screen as bellow:
1
Network Signal( Dynamic graphical symbol )
2
Network type (3G+/3G/2G)
3
SMS status (Full, unread, incoming)
4
Connection status(Connected and Disconnected )
WiFi (On/Off/ /number of users connected/
5
Fig 1.1
WPS connection)
6
Battery level(Dynamic graphical symbol/In charge)
7
Name of the network registered
8
Roaming status
9
Current volume used(MB/GB)
10
Dial mode(Manual/Automatic)
Tab 1.1
Screen description:
Category
Signal Strength
Network type
SMS status
Icon Display
From 1 signal to excellent signal
: Edge/GPRS
: UMTS/HSDPA/HSUPA
:SMS is available
:Unread SMS
:SMS is full
5
: HSPA+
Connection Status
connected
: WiFi is active
:Number of WiFi user
WiFi status
Battery
Dial mode
Roaming
:WPS is active
:WPS connected successfully
:WPS connected failed
: From 1 level to 4 level
:Low power
:automatic
:manual
:on roaming network
Note: the information is displayed for 20 seconds, then the screen powers off. And
you can short press WPS button to active it.
1.3 Connect in WiFi mode
Step 1: Use the Wi-Fi manager on the WiFi embedded device to select network name
(SSID).
◆From a Windows PC: Right-click Wireless network connection on the task bar,
and select View Available Networks. Choose SSID from the list of available networks.
◆From
a Mac computer: Select System Preferences -> Airport. Choose SSID from the
dropdown menu.
◆From an iOS device: Settings->Wi-Fi. Choose SSID from the available Networks.
◆From
an Android device: Settings->Wireless controls->Wi-Fi settings. Choose SSID
from the available Networks.
Step 2: Enter the WiFi key when prompted for a security key.
2. Web UI configuration
2.1 login the configuration page
Open the browser, and then input the address http://192.168.1.1. The page displayed
as bellow:
6
Fig 2.1
The default login password is admin.
2.2 Main page
After login successfully, the page displayed as bellow:
7
Fig 2.2
The icon description as bellow:
Category
Icon Display
Signal Strength
Connection
Status
SMS
From no signal to excellent
Disconnect
disable,
Connected
enable,
Battery
WiFi status
SMS is full,
Unread
From lowest power to full power
WiFi is active
8
Tab 2.1
3. Quick Setup
Connection Mode: Set the dial mode of this device, default is Manual.
SSID: Set the network name of this device.
Login Password: Set the password for login.
Security: Configure the security mode for WiFi connection.
4. Connection
You can move the mouse to "Connection" and click the items you want. In this section,
the following items are included:
Connection Status: current connection, WAN status, WLAN status;
Usage history: display the data and duration used;
Profile management: manage account settings, which includes your preferred
network connection as well as the Access Point Name (APN).
Network: choose and set up preferred network settings.
PIN management: manage PIN, enable/disable/change/verify;
Connected device: display the device connected;
4.1 Connection status
Current status
Active profile: Select the profile you want to use from the drop down box.
Rate: current download speed from 3G network;
Duration time: the duration for current connection;
Roaming: display whether you are in roaming network or not;
WAN status
IP address: this is the IP address arranged for this device.
Network name: the 3G network you used;
SIM card status: No SIM card, invalid SIM card, PIN lock, PUK lock; SIM card
ready;
Network type: GPRS/EDGE/UMTS/HSDPA/HSUPA/HSPA+;
WLAN status
SSID: the network name of this device.
Security: the cipher type of the WiFi used;
User: the users connected to this device and max capacity ;
9
4.2 Usage history
Click <Clear History> to make all the info displayed to 0;
Click <Refresh> to update the info displayed.
4.3 Profile management
Add a new profile:
1, Click <New>;
2, Input the correct parameters you get from the operator;
Note: Profile Name/Number/APN is the mandatory to be filled.
3, Click <Save>;
Edit a profile:
1, Select the profile from the connection profile list;
2, Change the parameters;
3, Click <Save>;
Delete a profile:
1, Select the profile from the connection profile list;
2, Click <Delete>;
3, On the pop up dialog ”are you sure to delete this profile?”,click <OK>;
Note: the default profile can not be deleted.
Set as default:
1, Select the profile from the connection profile list;
2, Click <Set default>;
3, On the pop up dialog ”are you sure to set this profile as default?”, click <OK>.
Note: Once set the profile as default,(D) will be added as a mark.
4.4 Network
Network Mode:Automatic/3G only/2G only, default is automatic
Network Selection: Automatic/Manual, default is automatic
Select a Network Manually
1,Choose Manual in the network selection;
2,Click <Apply>;
3,Click <Refresh> to list the available network;
4,Choose the network and Click <Select> to register;
Note: For the Services,3G+ (HSPA+),3G( HSUPA/HSDPA/UMTS),2G(Edge/GPRS);
For the Status, Active( the network registered), Available( the network can be used).
10
4.5 PIN management
Enable PIN
1, When PIN is disable, click <Enable>, PIN input page is displayed;
2, Enter the PIN you want to set, only number is accepted;
3,Click <Apply>;
Disable PIN
1, When PIN is enable, click <Disable>, PIN input page is displayed;
2,Enter the correct PIN;
3,Click <Apply>;
Change PIN
1, When PIN is enable, click <Change PIN>,PIN input page is displayed;
2,Enter the Old PIN/New PIN/Confirm PIN;
3,Click <Apply>;
Note: when you entered wrong PIN 3 times, PUK is needed, you can get this key from
the operator.
4.6 Connected Device
List the device connected.
You can click <refresh> to update the info.
5. SMS
You can move the mouse to "SMS" and click the items you want. In this section, the
following items are included:
Inbox: list the SMS received;
Write SMS: write the new SMS;
Sent: list the SMS sent successfully.
Draft: save the SMS not sent or sent failed.
SMS settings: set the SMS center number and the SMS saved location ;
Read SMS
Left click the content of the SMS to read;
Sent SMS
1,Move the mouse to “SMS”;
2,Left click “Write SMS”;
3,Input the number and the content;
11
4,Click <Sent>;
Forward SMS
1,Left click the content of the SMS you want to forward;
2,Click <Forward>;
3,Input the number;
4,Click <Sent>;
Reply SMS
1,Left click the content of the SMS you want to reply;
2,Click <Reply>;
3,Input the content;
4,Click <Sent>;
Delete SMS
1,Left click the Mark of the SMS you want to delete;
2,Click <Delete>;
Delete all SMS
1,Click <Mark All>;
2, Click <Delete>;
SMS settings
SMS Center Number: You can get it from your operator;
SMS Save Mode: the location SMS stored, default is SIM card;
6. SD card
You can move the mouse to "SD card" and click the items you want. In this section,
the following items is included:
File management: New/Read/delete the file in the SD card;
Sharing: set the share mode of SD card;
6.1 File management
Open a folder
Left click to open.
Create a new folder
1,Click “
”;
2,Input the name of the folder;
3,Click <OK>
12
Upload file
1,Click <Browse> to select the file you want to upload;
2,Click <Upload>;
Download a file
1,Left click the file and select download;
2,Select the location and save;
Delete a file or folder
1,Click the check box,
;
2,Click <Delete>;
3,On the pop up dialog “are you sure to delete?”, click <OK>;
6.2 Sharing
This page is used to set the file access mode and the file for sharing.
USB Only: Access the file in the SD card via USB cable;
Web access: enable to access the file in the SD card via Web browser;
SD card sharing: enable to allow the connected WiFi users to access the file
in the SD card
File to share: indicate which one will be shared to the connected WiFi Users;
Access type: set the operate right to the connected WiFi users;
7. Settings
You can move the mouse to "Settings" and click the items you want. In this section,
the following items are included:
WiFi: set the parameters related to WiFi;
WPS: set the method used for WPS;
Router: set the parameters related to router;
Language: set the language displayed on the web UI
Diagnostic: display the device info
Advanced: save & restore the configuration;
7.1 WiFi
In this page, you can set the parameters of WiFi.
802.11 Mode: selected the mode used, such as 802.11 b/802.11 g/802.11 n;
SSID: This is the name of Wi-Fi network, which was used to identify your Wi-Fi
network. The length of the SSID should be 1-32 characters including “_”.
13
WiFi Channel: Different domain has different channels (Channel 1~11 in FCC
(US)/IC (Canada); Channel 1~13 in ETSI (Europe); Channel 1~13 in MKK
(Japan)).
Max Number of Users: Set the maximum number of Wi-Fi users. The default and
maximum value is “10”.
Security: set the cipher for WiFi;
Select an encryption mode in the list and set your password.
If you select "None", any Wi-Fi enabled device can connect to the device without
the password.
WEP: Lower security. Works with older Wi-Fi devices.
Recommended only if your devices don't support WPA or WPA2.
WPA: A strong security standard, supported by most Wi-Fi devices.
8 to 63 ASCII characters needed.
WPA2: A stronger, newer security standard. Limited to newer Wi-Fi devices.
8 to 63 ASCII characters needed.
7.2 WPS
WPS (Wi-Fi Protected Setup) provide a more intuitive way of wireless configuration
between your device and the wireless client. Please make sure that the client support
WPS.
PBC(Push Button Configuration):
1, Long press WPS button of this device until WPS show in the screen;
2, On the client (eg PC), select the Wi-Fi access utility which includes WPS
support (provided by PC vendor) and select the PBC.
3, Login web page(192.168.1.1),settings->WPS;
4, Enable PBC and click "
";
Note: If the WPS function start correctly, the info will display in the page as bellow:
"PBC operation successfully!", Else displayed "PBC operation failed" to indicate
the problem happened during the WPS setup.
PIN:
1, Long press WPS/Wake Up button of this device until WPS show in the screen;
2, On the client (eg PC), select the Wi-Fi access utility which includes WPS
support (provided by PC vendor) and select the PIN method, then a 8 digits
PIN code will be generated;
3, Login web page(192.168.1.1),settings->WPS;
4, Enable PIN and entered the 8 digits PIN code;
5, Click <Apply>;
Note: If the WPS function start correctly, the info will display in the page as bellow:
"PIN submit successfully!", else displayed" PIN submit failed!" to indicate the problem
14
happened during the WPS setup.
7.3 Router
This page gives you the following status information:
Router IP Address: The router's IP address on the LAN. The default setting is
“192.168.1.1”.
Subnet Mask: The router's internal LAN subnet mask. The default setting is
“255.255.255.0”.
DHCP Server: DHCP Server will automatically assign IP addresses to devices on
the network. The default setting is “Enable”.
DHCP IP Pool: Set a range of IP addresses available to access.
DHCP Lease Time: Amount of time that a Wi-Fi enabled device can use its
assigned IP address before it is required to renew the lease.
7.4 Language
Change language:
1,Choose the language,
;
2, Click <Apply>.
The default language is English.
7.5 Diagnostic
Click <Reboot> to restart the device.
7.6 Advanced
On this page, You can save the current configuration or restore a saved configuration.
Save the configuration
1,Click <Download>;
2,Select the location to save current settings.
Restore the configuration
1,Click <Upload>;
2,Select a file saved previously to restore the settings.
Reset
Reset the device to the original factory settings. you can also use the hardware reset
button on the bottom of the device, marked with R.
MAC Filtering
MAC filtering is used to control specific MAC addresses to access.
Select “Disable" : All terminal devices are allowed to access the network.
Select “Enable": Only devices in this list are allowed to access the network.
15
You can add, edit or delete the configuration.
Note: The maximum allowed MAC list is 10.
8 Battery Charging
There are two types of charging, one is via Main charger, the other is via PC USB
cable.
Charging rates depend on whether the device is connected to the 3G network ,
whether the Wi-Fi is transmitting, and whether the device is connected to the mains
charger or to a PC. And the mains charger is recommended as the main charging.
Main charger:
When power off, it will take a maximum of 3 hours.
PC USB Cable:
When power off, it will take a maximum of 4 hours.
Note: In order to protect the battery, when low power
charging;
is indicated, please do
9 Warranty
•
The device is warranted against any deviation from technical specifications for a
period of twelve (12) months from the date specified on your original invoice1.
•
Under the terms of this warranty, you must immediately inform your vendor in
case of a conformity defect on this device, and present a proof of purchase.
•
The vendor or repair center will decide whether to replace or repair this device, as
appropriate.
•
Repaired or replaced this device are warranted ONE (1) month unless there are
statutory provisions to the contrary.
•
This warranty shall not apply to damage or defects to this device due to:
1)
Not following the instructions for use or installation,
1 The mandatory warranty period may vary if overriding statutory provisions are applicable in your jurisdiction. 16
2)
Not being compliant with technical and safety standards applicable in the
geographical area where this device is used,
3)
Improper maintenance of sources of energy, and of the overall electric
installation,
4)
Accidents or consequences of theft of the vehicle in which this device is
transported, acts of vandalism, lightning, fire, humidity, infiltration of liquids,
inclement weather,
5)
Connecting to or integrating into this device any equipment not supplied or not
recommended by the manufacturer,
6)
Any servicing, modification or repair performed by individuals not authorised by
the manufacturer, the vendor or the approved maintenance centre,
7)
Use of this device for a purpose other than that for which it was designed,
8)
Malfunctions caused by external causes (e.g., radio interference from other
equipment, power voltage fluctuations),
9)
Faulty connections resulting from unsatisfactory radio transmission or caused by
the absence of radio relay coverage.
•
Warranty is also excluded for this device on which markings or serial numbers
have been removed or altered.
•
This device is also warranted against hidden defects (defects inherent in the
design, manufacture, etc.).
•
There are no other express warranties than this printed limited warranty,
expressed or implied, of any nature whatsoever.
•
In no event shall the manufacturer be liable for incidental or consequential
damages of any nature whatsoever, including but not limited to trading loss,
commercial loss, to the full extent those damages can be disclaimed by law. Some
countries/states do not allow the exclusion or limitation of incidental or
consequential damages, or limitation of the duration of implied warranties, so the
preceding limitations or exclusions may not apply to you.
10 Q&A
1.
Q: How to turn on/off this device?
17
A: Switch the button down to the “ON” to turn on the device.
Switch the button down to the “OFF” to turn off the device.
2. Q: Which browser does the device support?
A:
It supports Firefox 4.0.1---9.0, Safari 2.0----5.1.2,IE 6.0----9.0,
Opera 9.64-----11.60; Chrome 5.0---14.0;
3. Q:
Which OS does the device support?
A:
It supports windows Xp/Vista/7; Mac OS X10.5----10.7;
4. Q: How to connect to the device?
A: Open your wireless network connection list and select the relative SSID.
Windows: Right-click Wireless network connection on the task bar,
and select View Available Networks.
Mac:
Pull down list from AirPort icon.
Select the SSID from the dropdown menu.
iOS:
Settings->Wi-Fi. Choose the SSID from the available Networks.
Android: Settings->Wireless controls->Wi-Fi settings. Choose SSID from the
available Networks.
5.
Q: How to do if I see the SSID but failed to connect?
A:
<1, Check the password you entered is the right one;
<2, Touch “WPS/Wake up” key to light the screen to check the WiFi
users connected, the maximum users permitted is 10
.
<3, Check if WPS security enabled on your PC? If so, check the device
to see if it is expecting a WPS action from your PC.
6.
Q: How to do if No service displayed on the screen?
A: the possible reason are listed as bellow:
<1. Unstable local signal.
<2. Hardware problem.
You may:
<1. If you are inside a building or near a structure that may be blocking
18
the signal, change the position or location of the device. For example,
try moving the device close to a window.
<2. Check the hardware or use another device and retry.
<3. Check the device Status Display for error messages or information.
7.
Q: How to do if I forgot WiFi Key?
A: You can reset the device to factory defaults by long press the master
reset button on the bottom of the device, marked with R.
8. Q: Why the SSID does not appear in the wireless network list?
A: you can check the device as the suggestion bellow:
●Check the device Status Display for error messages or information.
●Refresh your network list on your computer.
Windows: Click Refresh Network List on the left side of the Wireless
Network Connection screen.
If that does not work you can try the following:
<1. Open Network Connections.
<2. Right-click Wireless Network Connection and select Properties.
<3. Click the Wireless Networks tab.
<4. Delete any unused wireless connections from the Preferred Networks list
and click OK.
<5. Restart your computer.
Mac: Try rebooting your computer
9. Q: How to do if “No SIM” or “SIM invalid” displayed on the screen?
A: the possible reason as bellow:
<1,There is no SIM card inserted or inserted incorrectly.
<2,The SIM card is de-activated.
You may:
<1,Pull out and re-insert the SIM card. Be careful not to touch the contact
points when handling the SIM card.
<2,Contact your operator for advice
10.
Q: How to do if “PIN lock” or “PUK lock” displayed on Screen?
A: The SIM card is locked. Login Web page and Enter your PIN code or
19
PUK code you got from the operator.
Note: if you entered wrong PIN 3 times, then PUK is needed,
and if the wrong PUK entered 10 times, the SIM card will be locked forever.
11. Q: How to find out the network technology and provider currently in use?
A: <1,Touch “WPS/Wake up” to light the screen,
: Edge/GPRS
: UMTS/HSDPA/HSUPA
: HSPA+
<2,Login web browser, go to Connection->Connection Status
12. Q: How to connect to the 3G network?
A: Press and hold more than 2 seconds the connect button to connect or
login the web browser, go to Connection->Connection status, click "Connect"
13. Q: How to disconnect from the 3G network?
A: Press and hold more than 2 seconds the connect button to disconnect or
login the web browser, go to Connection->Connection status,
click "Disconnect"
14. Q: How to set a new PIN for my SIM card?
A:
Login web browser, Go to Connection->PIN Management
15. Q: Where can I find information about Internet connectivity and Wi-Fi setup?
A: Login web browser, Go to Connection->Connection status
16. Q: How to check the volume and time i used before?
A: Login web browser, Go to Connection->Usage History
17. Q: How to search the network manually?
A: Login web browser, Go to Connection->Network, choose manual for
network selection, click <Apply>,then click <Refresh>.
18. Q: How to check the model number and firmware versions of my device?
A: Login web browser, go to Settings->Diagnostic
20
19. Q: Can I backup and restore my configuration settings?
A: Login web browser, go to Settings->Advanced settings, click "Download"
to backup and "Upload" to restore.
20. Q: How to set the device dials to connect internet automatically
when turn on the device?
A: login web browser, and go to Quick setup->admin setup->
Connection mode->Auto
21. Q: How to change the SSID?
A: login web browser, and go to Quick setup->admin setup->SSID
22. Q: How to change the login password?
A: login web browser, and go to Quick setup->admin setup->login password
23. Q: How to change the WiFi Key?
A: login web UI, and go to Quick setup->admin setup, click “Next ” to
configure WiFi key; or Settings->WiFi->Security
24. Q: How to share the SD file?
A: login web UI, and go to SD card->Sharing, select Web shares mode in
the SD card sharing Mode;
25. Q: How to upload the file to SD card?
A: login web UI, and go to SD card->File management, click “browser”
to select the file and click “Upload”;
11 Warning and Precautions
Electronic Device
Turn off your device near high-precision electronic devices. The wireless device may
affect the performance of these devices. Such devices include hearing aids,
pacemakers, fire alarm system, automatic gates, and other automatic devices can be
21
affected. If you are using an electronic medical device, consult the device
manufacturer to confirm whether the radio wave affects the operation of this device.
Hospital
Pay attention to the following points in hospitals or health care facilities:
Do not take your wireless device into the operating room, intensive care unit, or
coronary care unit.
Do not use your wireless device at places for medical treatment where wireless
device use is prohibited.
Storage Environment
Do not place magnetic storage media such as magnetic cards and floppy disks
near the wireless device. Radiation from the wireless device may erase the
information stored on them.
Do not put your wireless device and other accessories in containers with strong
magnetic field, such as an induction cooker and a microwave oven. Otherwise,
circuit failure, fire, or explosion may occur.
Do not leave your wireless device in a very hot or cold place. Otherwise,
malfunction of the products, fire, or explosion may occur.
Do not subject your wireless device to serious collision or shock. Otherwise,
wireless device malfunction, overheat, fire, or explosion may occur.
Children Safety
Put your wireless device in places beyond the reach of children. Do not allow
children to use the wireless device without guidance.
Do not allow children to put the device in mouth.
Do not allow children to touch the small fittings. Otherwise, suffocation or gullet
jam can be caused if children swallow the small fittings.
Operating Environment
The wireless device is not water-resistant. Keep it dry. Protect the wireless device
from water or vapor. Do not touch the wireless device with a wet hand. Otherwise,
short-circuit and malfunction of the product or electric shock may occur.
Do not use the wireless device in dusty, damp and dirty places or places with
magnetic field. Otherwise, malfunction of the circuit may occur.
On a thunder stormy day, do not use your wireless device outdoors.
The wireless device may interfere with nearby TV sets, radio and PCs.
In accordance with international standards for radio frequency and radiation, use
wireless device accessories approved by the manufacturer only.
22
Traffic Safety
When driving, do not use the device.
When switched on, this device emits electromagnetic waves that
can interfere with the vehicle’s electronic systems such as ABS anti-lock brakes
or airbags. To ensure that there is no problem, do not place this device
on top of the dashboard or within an airbag deployment area.
Check with your car dealer or the car manufacturer to make sure that the
dashboard is adequately shielded from this device RF energy.
Conditions of Use
• Switch
this device off before boarding an aircraft.
• Switch
this device off when you are in health care facilities, except in
designated areas. As with many other types of equipment now in regular use,
this device can interfere with other electrical or electronic devices,
or equipment-using radio frequencies.
• Switch
this device off when you are near gas or flammable liquids. Strictly
obey all signs and instructions posted in a fuel depot, petrol station, chemical plant,
or in any potentially explosive atmosphere.
• When
this device is switched on, it should be kept at least 15 cm from any
medical device such as a pacemaker, a hearing aid or insulin pump, etc.
• Do
not let children use this device without supervision.
• When
replacing the cover, please note that this device may contain
substances that could create an allergic reaction.
• Always
• Do
handle this device with care and keep it in a clean and dust-free place.
not open, dismantle or attempt to repair this device yourself.
23
• Do
not drop, throw or bend this device.
• Do
not paint it.
Collection Point:
This symbol on this device means that these products must be taken to
collection points at the end of their life:
Municipal waste disposal centers with specific bins for these items of equipment.
Collection bins at points of sale.
They will then be recycled, so that their components can be reused, and to prevent
substances being disposed of in the environment.
In European Union countries:
These collection points are accessible free of charge.
All products with this symbol must be brought to these collection points.
In non-European Union jurisdictions:
Items of equipment with this symbol are not to be thrown into ordinary bins if your
jurisdiction or your region has suitable recycling and collection facilities; instead they
are to be taken to collection points for recycling. In the United States, please visit
www.recyclewirelessphones.org for more information on recycling wireless products.
Protection against theft
This device is identified by an IMEI (modem serial number) shown on
the packaging label. We recommend that you note the number the first time
you use your this device by login web browser and go to "Settings" ->
"Diagnostics" to get it.
24