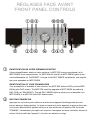
1
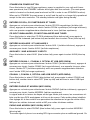
QuickStart
MPP-506
MPP-506DA
Stereo audiophile evolutionary preamplifier
Préamplificateur stéréo audiophile évolutif
RECYCLING IN EUROPEAN UNION COUNTRIES
Disposal of your old appliance
English
This symbol on the product or on its packaging means that
your electrical and electronic equipment should be disposed
at the end of life separately from your household wastes.
There are separate coilection systems for recycling in EU.
For more information, please contact the local authority or
the dealer where you purchased the product.
French
Ce symbole figurant sur le produit ou son emballage signifie
que votre équipement électrique et électronique doit être
mis au rebut séparément de vos déchets ménagers lorsqu’il
atteint Ia fin de sa durée de vie.II existe des systèmes de
coilecte séparée pour le recyclage dans l’UE.
Pour pius d’informations, veuiliez prendre contact avec lês
autorités locales ou lê revendeur auquel vous avez acheté
ce produit.
German
Das auf dem Produkt oder auf der Verpackung angebrachte
Symbol bedeutet, dass Ihre elektrischen und elektronischen
Geräte nicht mit dem Haushaltsmüll entsorgt werden sollen.
Es existieren separate Recycling-Sammelsysteme in der
EU. Für mehr Informationen wenden Sie sich bitte an Ihre
òrtiichen Behörden oder an den Fachhändier, bei
dem Sie das Produkt erworben haben.
Italian
Questo simbolo sul prodotto o sull’imballaggio
indica che 1’apparato elettrico o elettronico alia fine
dei suo periodo di vita dovrebbe essere smaltito
separatamente dai rifiuti domestici. Nell’UE esistono
altri sistemi di raccolta differenziata. Per ulteriori
infor-mazioni, contattare lê autorità locali o il rivenditore presso il quale è stato acquistato il prodotto.
Spanish
Este simbolo en el producto o en su embalaje significa que
deberfa deshacerse de su equipo eléctrico o electrônico, al
final de su vida util, de forma separada del resto de los
residuos domésticos. Para estos productos hay sistemas de
recogida selectiva para reciclarlos en la Union Europea.
Para mas informaciôn, rogamos contacte con la autoridad
local o el distribuidor donde adquirio el producto.
Portuguese
Este sîmbolo no produto ou na respectiva embalagem,
significa que o equipamento eléctrico ou electrônico deverà
ser descartado no fim da sua vida util separadamente do
lixo doméstico. Existem diverses sistemas de recolha separada para reciclagem na Uniào Europeia.Para mais informaçôes, queira contactar as autoridades locais ou o
revendedor onde adquiriu o produto.
Swedish
Märkningen av produkter och fôrpackningar med denna
symbol betyder att elektrisk och elektronisk utrustning
maste tasom hand séparât fràn hushàlissopor nàr utrustningen har förbrukats. EU har sàrskilda àtervinningsanlàggningar för denna typ av utrustning.Kontakta de lokala
myndigheterna eller àterförsäijaren dàr produkten har köpts
för mer information.
Danish
Dette symbol pà produktet eller pâ emballagen betyder, at
dit elektriske og elektroniske udstyr ved afslutningen af dets
levetid ikke skaï bortskaffes sammen med dit hushoidningsaffald. Derfindes separate opsamiingssystemer til genbrug
i EU. For mere information bedes du venligst kontakte de
lokale myndigheder eller forhandieren, hvor du har kebt
produktet.
Dutch
Dit symbool op het product of op zijn verpakking betekent
dat uw elektrische of elektronische apparatuur na het verstrijken van de levensduur gescheiden van het huisvuil moet
worden weggegooid. Er zijn afzonderlijke ophaalsystemen
voor recyclage in de E.U. Voor meer informatie
neemt u contact op met de plaatselijke overheid of
de dealer waar u het product hebt gekocht.
Norwegian
Dersom produktet eller emballasjen er merket med
dette symbolet, bor ditt elektriske eller elektroniske
utstyr kasseres atskilt fra ditt hushoidningsavfall nàr
det er utsiitt. 1 Norgefinnes det egne innsamiingssystemer for resirkulering. Venniigst ta kontakt med
lokale myndigheter eller forhandieren hvor du kjepte produktet for mer informasjon.
Finnish
Jos tuotteessa tai sen pakkauksessa on tämä symboli, se
tarkoittaa, että kyseiset sähköisetja elektroniset laitteet pitää
hävittää niiden käytön loputtua erillään kotitalousjätteistä.
EU:ssa on erillisiä keräysjärjestelmiä. Jos haluat lisätietoja,
ota yhteyttä paikallisiin viranomaisiin tai tuotteen myyjään.
Polish
Ten symbol na produkcie lub na jego opakowaniu oznacza,
ze. Pahstwa urzadzenie elektryczne lub elektroniczne po
zakohczeniu uzytkowania musi zostac poddane utylizacji
oddzieinie od odpadôw z gospodarstwa domowego. W Unii
Europejskiej istnieja^ oddzieine systemy zbierania odpadô
w poddawanych recykiingowi. Aby uzyskaô wiecej informacji, proszç skontaktowac sic z lokainymi wtadzami lub
sprzedawca, u ktôrego zakupiono produkt.
WARNING
ATTENTION
ATTENTION: afin de réduire tout risques de chocs électriques ou de feu, ne pas exposer votre appareil à l’humidité
ou à toutes sortes de liquides
WARNING: to reduce the risk of fire or electric shock, do not
expose this appliance to rain or moisture.
AVERTISSEMENT
Pour prévenir tout risques de chocs électriques, ne pas
ouvrir l’appareil. Si un problème apparait, faites réparer votre
appareil par un technicien qualifié.
CAUTION: To prevent the risk of electric shock, do not
remove cover (or back); no user serviceable parts inside.
Refer servicing to qualified service personnel.
LE POINT D’EXCLAMATION vous indiquera la présence
d’informations importantes, tant au niveau utilisation que
maintenance de votre appareil.
THE LIGHTNING FLASH with arrow-head symbo is intended to alert the user to the presence of uninsulated «dangerous voltage» within the product’s enclosure that may be
of sufficient magnitude to constitute a risk of electric shock
to persons.
Si vous souhaitez déplacer ou transporter votre appareil,
nous vous conseillons dans le cas d’un déménagement,
d’un retour pour réparation, etc...de réemballer dans son
emballage d’origine votre appareil.
An appliance and cart combination should be moved with
care. Before any transportation, your product must be packed correctly in order to avoid any damage.
IMPORTANT
* POUR PREVENIR LES CHOCS ELECTRIQUES NE
PAS UTILISER CETTE FICHE POLARISEE AVEC UN
PROLONGATEUR, UNE PRISE DE COURANT OU UNE
AUTRE SORTIE DE COURANT, SAUF SI LES LAMES
PEUVENT ETRE INSEREES A FOND SANS EN LAISSER
AUCUNE PARTIE A DECOUVERT.
* TO PREVENT ELECTRIC SHOCK, DO NOT USE THIS
PLUG WITH AN EXTENSION CORD, RECEPTACLE OR
OTHER OUTLET UNLESS THE BLADES CAN BE FULLY
INSERTED TO PREVENT BLADE EXPOSURE.
CONSIGNES DE SECURITE
LIRE LES INSTRUCTIONS
PROTECTION DU CORDON SECTEUR
Toutes les consignes de sécurité et instructions quand à l’utilisation de notre produit doivent faire l’objet d’une lecture attentive.
Votre cordon d’alimentation doit être correctement installée afin qu’il ne soit pas piétiner
ou arracher.
MEMORISER CES INSTRUCTIONS
NETTOYAGE
Les consignes de sécurité et instructions
doivent être retenues pour un usage futur de
votre produit
Votre appareil doit être néttoyée seulement
avec les produits préconisés par le fabricant.
Des produits trop agressifs contenant des
acides peuvent endommagés les différentes
surfaces de votre appareil.
TENEZ COMPTE DES ALERTES
Les mises en garde inscrites sur votre appareil
ou imprimées dans ce manuel doivent être
respectées.
SUIVRE LES INSTRUCTIONS
Toutes les instructions concernant l’utilisation
et le fonctionnement de votre appareils doivent
être suivies.
EAU ET MOISISSURE
Votre appareil ne doit pas être utilisé prés d’un
point d’eau ou dans un environnement trop
humide.
VENTILATION
Votre appareil doit être installé de telle façon
que sa ventilation ne soit en aucun cas entravée. Il ne faut pas l’utiliser sur un lit, un sofa
ou une surface similaire qui obstrurait ses
grilles de ventilation. Dans tous les cas, il
convient de vérifier que votre appareil puisse
être ventilé naturellement. Ne pas l’encastrer.
SOURCES DE CHALEUR
Il est conseillé d’éloigner votre appareil d’une
source de chaleur type radiateur ou autres
sources produisant une source de chaleur.
ALIMENTATION ELECTRIQUE
Le branchement de votre appareil doit se faire
en respectant les indications contenues dans
ce manuel. Votre installation électrique doit
être en conformité afin de permettre une utilisation en toute sécurité de votre appareil.
MASSE ET POLARITÉ
Des précautions doivent être prises afin de
respecter la polarité et la mise à la terre de
votre appareil.
AUTRES SOURCES D’ALIMENTATION
Dans le cas d’une utilisation d’une antenne
externe, vous devez l’éloigner d’une ligne
électrique.
PERIODE D’INUTILISATION
Si vous quittez votre domicile pour une longue
pèriode, nous vous conseillons de débrancher
votre appareil.
PÉNÉTRATION D’OBJETS OU DE LIQUIDE
Des précautions doivent être prises afin d’empécher la pénétration d’objets ou de liquide à
l’intérieur de votre appareil.
DOMMAGES NECESSITANT UNE
INTERVENTION
Votre appareil doit être dépanné par une personne qualifiée quand:
• La prise d’alimentation ou son cordon a subi
une détèrioration, ou
• Un objet ou un liquide a pénétré à l’intérieur
de votre appareil, ou
• Votre appareil a pris la pluie, ou
• Votre appareil ne semble pas fonctionner
correctement ou présente des modifications
quand à ses performances habituelles, ou
• Votre appareil est tombé ou son capot a été
endommagé.
SERVICE
Votre appareil doit être impérativement
dépanné par du personnel compétent et qualifié. Afin de connaitre la station technique la
plus proche, merci de contacter votre distributeur national.
SAFETY INSTRUCTIONS
READ INSTRUCTIONS
POWER-CORD PROTECTION
All the safety and operating instructions
should be read before the appliance is
operated.
Power-supply cords should be routed so
that they are not likely to be walked on
or pinched by paying particular attention
to cords at plugs, convenience
receptacles, and the point where they exit
from the appliance.
RETAIN INSTRUCTIONS
The safety anil operating instructions
should be retained for future use.
HEED WARNINGS
All warnings on the appliance and in the
operating instructions should be adhered
to.
FOLLOW INSTRUCTIONS
All operating and use instructions should
be followed.
WATER AND MOISTURE
The appliance should not be used near
water for example, near a bathtub,
washbowl, kitchen sink, laundry tub, in
a wet basement, or near a swimming
pool, etc.
VENTILATION
The appliance should be situated so that
its location or position does not interfere
with its proper ventilation. For example,
the appliance should not be situated on a
bed. sofa, rug, or similar surface that may
block the ventilation openings; or,
placed in a built-in installation, such as a
bookcase or cabinet that may impede the
flow of air through the ventilation
openings.
HEAT
The appliance should be situated away
from heat sources such as radiators, heat
registers, stoves, or other appliance
(including amplifiers) that produce heat.
POWER SOURCES
The appliance should be connected to a
power supply only of the type described
in the operating instructions or as marked
on the appliance.
GROUNDING OR
POLARIZATION
Precautions should be taken so that the
grounding or polarization means of an
appliance is not defeated.
CLEANING
The appliance should be cleaned only as
recommended by the manufacturer.
POWER LINES
An outdoor antenna should be located
away from power lines.
NON-USE PERIODS
The power cord of the appliance should
be unplugged from the outlet when left
unused for a long period of time.
OBJECT AND LIQUID ENTRY
Care should be taken so that objects do
not fall and liquids are not spilled into the
enclosure through openings.
DAMAGE REQUIRING SERVICE
The appliance should be serviced by
qualified service personnel when:
• The power-supply cord or the plug
has been damaged; or
• Objects have fallen, or liquids have
spilled into the appliance; or
• The appliance has been. exposed to
rain: or
• The appliance does not appear to operate normally or exhibits a marked
change in performance; or
• The appliance has been dropped, or
the enclosure damaged.
SERVICING
The user should not attempt to service
the appliance beyond that described in
the operating instructions. All other
servicing should be referred to qualified
service personnel.
RÉGLAGES FACE AVANT
FRONT PANEL CONTROLS
q io
k
q
asd
h
g
wer j tyu f
IDENTIFICATION DE VOTRE PRÉAMPLIFICATEUR
Votre préamplificateur existe en deux versions, le MPP-506 (sans convertisseur) et le
MPP-506DA (avec convertisseur). Le MPP-506 est évolutif en MPP-506DA grâce à une
carte additionnelle ref. DAC506KIT. Lorsque la led DAC INSIDE est allumée, cela signifie
que vous possédez un MPP-506DA.
IDENTIFICATION OF YOUR PREAMPLIFIER
Your preamplifier is available in two versions, the MPP-506 (without DAC) and the MPP506da (with DAC inside). The MPP-506 could be upgrade in MPP-506DA by addind a
DAC PCB (ref. DAC506KIT). The led DAC INSIDE lights up when your preamplifier is a
MPP-506DA or a MPP-506 with DAC board inside.
w
BOUTON STANDBY/ON
Appuyez sur ce bouton pour mettre en marche votre appareil (éclairage bleu de votre
bouton après sa temporisation). La mise en marche de votre appareil ne peut se faire que
si le bouton Marche/Arrêt général situé sur la face arrière est en position ON. En mode
STANDBY, l’alimentation principale est coupée à l’exception du micro-contrôleur servant à
activer l’état de veille de l’appareil. Le bouton est allumé en rouge.
STANDBY/ON POWER BUTTON
Press this button to turn ON your appliance, power is supplied to your unit and it becomes operational, the STANDBY indicator blue lights after few seconds. (The main power
switch is located on the back panel and must be ON in order to use STANDBY function).
When set to STANDBY the main power is cut-off and the unit is no longer fully operational
except for the micro controller. The standby indicator red lights during standby
e
i
ENTRÉES CD RCA, CD SYMÉTRIQUES ET TUNER
Appuyez sur ce bouton pour sélectionner l’entrée CD RCA asymétrique (led bleu inférieure), appuyez à nouveau pour choisir l’entrée CD Bal. symétrique (led rouge inférieure),
enfin une pression supplémentaire sélectionnera le tuner (led bleu supérieure).
CD INPUT UNBALANCED, CD INPUT BALANCED AND TUNER
Press this button to select the CD RCA unbalanced (blue bottom led), press again to
select CD Bal. balanced (red bottom led) and another time to select Tuner (blue top led).
r
o
ENTRÉES AUXILIAIRE 1 ET AUXILIAIRE 2
Appuyez sur ce bouton pour sélectionner l’entrée AUX.1 (led bleu inférieure), appuyez à
nouveau pour choisir l’entrée AUX.2 (led bleu supérieure).
AUXILIARY 1 AND AUXILIARY 2 INPUTS
Press this button to select AUX1 (blue bottom led), press again to select AUX2 (blue top
led).
t
a
ENTRÉES COAXIAL 1, COAXIAL 2, OPTICAL ET USB (MPP-506DA)
Appuyez sur ce bouton pour sélectionner l’entrée COAX1 (led bleu inférieure), appuyez à
nouveau pour choisir l’entrée COAX2 (led rouge inférieure), une nouvelle fois pour sélectionner l’entrée OPT (led bleu supérieure) enfin une pression supplémentaire sélectionnera l’entrée USB (led rouge supérieure).
COAXIAL 1, COAXIAL 2, OPTICAL AND USB INPUTS (MPP-506DA)
Press this button to select COAX1 (blue bottom led), press again to select COAX2 (red
bottom led), another time to select OPT (blue top led) and last time to select USB input
(red top led)
y
s
ENTRÉES PHONO ET AES/EBU (MPP-506DA)
Appuyez sur ce bouton pour sélectionner l’entrée PHONO (led bleu inférieure), appuyez à
nouveau pour choisir l’entrée AES/EBU (led bleu supérieure).
Le signal audio d’un lecteur de disque est de type stéréo plus masse, les connecteurs utilisés sont de type RCA analogiques et d’une vis de masse. Cette entrée phono bénéficie
d’un réglage sur la face arrière vous permettant de sélectionner le type de cellule utilisé,
MM pour les cellules à aimant mobile et MC pour celles à bobines mobiles.
PHONO AND AES/EBU (MPP-506DA) INPUTS
Press this button to select PHONO (blue bottom led), press again to select AES/EBU
(blue top led).
The audio signal of phono is an analog RCA type connector plus an additional ground. On
the back panel, you have the possibility to adjust the cartridge type used: MM for moving
magnet cartridges and MC for moving coil cartridges.
u
d
g
h
f
ENTRÉES PC RCA, PC JACK AND lp
Appuyez sur ce bouton pour sélectionner l’entrée PC RCA (led rouge inférieure),
appuyez à nouveau pour choisir l’entrée PC JACK (led bleu inférieure), enfin une pression supplémentaire sélectionnera l’entrée ip (led bleu supérieure).
Les connecteurs des entrées PC JACK et ip sont situés sur la face avant. Le niveau de
ces deux entrées a été optimisé. Ce sont des mini-jacks 3,5mm. gh
PC RCA, PC JACK AND lp INPUTS
Press this button to select the PC RCA (red bottom led), press again to select PC JACK
(blue bottom led) and another time to select ip (blue top led).
Please note that two inputs connectors for PC JACK and ip are on the front panel, their
input levels has been optimised (stereo minijack 3,5mm). gh
PRISE CASQUE 6,35MM
La sortie casque de votre préamplificateur permet d’alimenter un casque stéréophonique
conventionnel (non fourni) disposant d’une prise de type jack 6,35mm stéréophonique.
Le niveau de sortie de cette prise ne permet pas l’utilisation d’un casque électrostatique.
HEADPHONES
The headphone terminal provides a stereo audio signal sufficient for driving all conventional stereo headphones except electrostatic headphones which generally require signal
from a high level ouputs.
j
BOUTON DE VOLUME
Votre amplificateur utilise un bouton de volume unique à la fois pour le canal droit et le
canal gauche. Tourner ce bouton dans le sens des aiguilles d’une montre pour augmenter le niveau sonore et tourner dans le sens opposé pour réduire le niveau sonore.
VOLUME BUTTON
Your amplifier used a rotary type knob to control the 2 channel output sound level (left
and right). Turn this volume knob clockwise to increase the ouput sound level and turn
this volume knob counterclockwise to decrease the output sound level.
k
POINTES DE DÉCOUPLAGE
Votre amplificateur est équipé de pointes de découplage, il est livré avec des coupelles
antidérapantes. A installer comme indiqué sur la photo.
ISOLATING SPIKES
Your amplifier used spike-feet, you need to use them with non-skid cupels included.
MPP-506 upgrade to MPP-506DA
Mise à niveau de votre MPP-506 en MPP-506DA
MISE A NIVEAU DE VOTRE PRÉAMPLIFICATEUR MPP-506
Votre préamplificateur existe en deux versions, le MPP-506 (sans convertisseur) et le MPP-506DA (avec
convertisseur). Le MPP-506 est évolutif en MPP-506DA grâce à une carte additionnelle ref. DAC506KIT.
Lorsque la led DAC INSIDE est allumée, cela signifie que vous possédez un MPP-506DA.
Pour obtenir des informations complémentaires quand à l’acquisition de cette carte, veuillez contacter votre
revendeur conseil.
UPGRADE YOUR MPP-506 PREAMPLIFIER
Your preamplifier is available in two versions, the MPP-506 (without DAC) and the MPP-506da (with DAC
inside). The MPP-506 could be upgrade in MPP-506DA by addind a DAC PCB (ref. DAC506KIT). The led
DAC INSIDE lights up when your preamplifier is a MPP-506DA or a MPP-506 with DAC board inside.
To obtain additionnal informations about this upgrade card, please contact your appointed dealer.
WARNING ATTENTION
No good
Good
Your product is designed to be placed on a firm and level surface. Don’t place the unit sideways, a big power
exerts on the single side of the plate. With this power, the plate will be broken easily. Please see the picture.
Votre produit a été conçu pour être installé sur une surface plate et rigide. Ne poser pas votre appareil de travers car vous risqueriez de casser ses pieds. Chaque pied est constitué d’une pointe de découplage fixée sur
une coupelle métallique.
RÉGLAGES & CONNEXIONS FACE ARRIÈRE
REAR PANEL CONNECTIONS & CONTROLS
d* f*
g
we r t
y
s*
a
q
q
sdf
* Only MPP-506DA
* Uniquement sur MPP-506DA
ui
o
ENTRÉES DES SOURCES
Vous devez connecter vos sources sur les entrées stéréophoniques correspondantes.
Toutes ces entrées sont normalisées, elles conviennent à toutes sources standards
comme des tuners, des lecteurs CD, des lecteurs MP3, des lecteurs DVD, etc...
Remarque : Ces entrées conviennent uniquement à des signaux audio analogiques. Elles
ne doivent pas être raccordées à la sortie numérique d’un lecteur de CD ou d’un autre
appareil à sortie numérique.
INPUTS
You can connect your stereo sources on those inputs. These inputs are suitable for any
line level source equipment such as tuners, CD players, DVD, MP3 players, etc.
Note: These inputs are for analogue audio signals only. They should not be connected to
the digital output of a CD player or any other digital device.
w
e
ENTRÉE PHONO, SÉLECTEUR MM/MC ET CONNECTEUR DE MASSE
Vous devez connecter votre platine disque et sélectionner le type de cellule (MM ou MC).
Les platines disque incluent en général un petit fil de masse qu’il faut relier à la vis de
masse PHONO GROUND. Dévisser le connecteur de masse, insérer le fil de masse dans
la tige du connecteur puis revisser afin que le fil de masse soit maintenu.
PHONO INPUT, MM/MC SWITCH AND GROUND TERMINAL
You can connect your turntable and adjust the cartridge type (MM or MC cartridge).
Turntables normally includes a single wire earth lead. Use the phono ground connector
to connect this lead. Unscrew the terminal to expose the hole which will accept the lead.
After insertion, tighten the terminal to secure the lead.
r
t
PRE-OUT / SUBWOOFER OUT / HIGH PASS OUT / CROSSOVER FREQUENCY
PRE-OUT: Connectez les entrées L (gauche) et R (droite) de votre amplificateur de puissance aux sorties L et R de votre préamplificateur. Vous pouvez aussi utiliser ces sorties
avec un processeur ou égaliseur. L’intégralité de la bande passante est transmise à l’amplificateur de puissance.
SUBWOOFER OUT: Connectez ici un amplificateur additionnel destiné à un subwoofer
passif ou utiliser directemment ces sorties sur un subwoofer amplifié (actif).
CROSS OVER FREQUENCY: Appuyer sur ce bouton pour commuter la fréquence de
coupure de cette sortie en 75 ou 150Hz.
HIGH PASS OUT: Si vous utilisez un caisson de graves (subwoofer), vous pouvez alors
connecter votre amplificateur de puissance sur ces PRE-OUT. Seules les fréquences
supérieures à 75 ou 150Hz transiteront par cette sortie.
PRE-OUT / SUBWOOFER OUT / HIGH PASS OUT / CROSSOVER FREQUENCY
PRE-OUT: These connections allow you to connect L and R input from your power amplifier here. You also have the possibility to use on those connectors signal processors such
as equalizers.
SUBWOOFER OUT: Connect this outputs to the subwoofer power amplifier to drive your
subwoofer speaker, or connect to the subwoofer speaker with built in amplifier.
CROSSOVER FREQUENCY 150Hz/75Hz: Press this button to set the crossover frequency of the subwoofer at 150Hz or 75Hz.
HIGH PASS OUT: If you are using the SUB OUT with an active subwoofer, then, you can
connect your power amplifier on those HIGH PASS OUT. In this case, please note that
only frequencies upper to 75 or 150Hz will pass through.
y
SORTIES SYMETRIQUES (BAL. R et BAL. L)
Si votre amplificateur de puissance est équipé d’entrées symétriques, vous pouvez relier
ses prises symétriques (gauche et droite) aux sorties symétriques de votre préamplificateur.
BALANCED PRE-OUT (BAL. R et BAL. L)
If your power amplifier has balanced inputs, you have the possibility to connect it on the
balanced outputs of your preamplifier MPP-506.
u
SELECTEUR BOOST EQ
Les enceintes de petit volume rencontrent des difficultés à reproduire les fréquences graves, néanmoins, elle peuvent supporter dans leur grande majorité un important niveau de
grave sans distorsion ou dommage. Notre processeur BOOST EQ (en position ON) per-
met cette compensation. La led BOOST EQ s’illumine lorsque le commutateur est sur ON.
BOOST EQ SELECTOR
Although compact speakers do not generally produce a lot of low bass, many models can
handle a large amounts of bass power without distorsion or damage. BOOST EQ takes
advantage of this to provide a substantial compensation at low frequencies. (Led lights).
i
TRIGGER DE CONTRÔLE
Trigger pour contrôler la marche arrêt d’autres amplificateurs de puissance.
TRIGGER DE CONTRÔLE
Control trigger to ON/OFF others power amplifiers.
o
PRISE D’ALIMENTATION /INTERRUPTEUR GÉNÉRAL
SÉLECTEUR DE TENSION ET PORTE FUSIBLE
Pour alimenter votre appareil, commuter l’interrupteur général sur ON et vérifier la tension
d’alimentation. Si votre tension est de 115V vous devez changer les fusibles avec ceux
fournis.
POWER CORD /MASTER ON/OFF SWITCH
VOLTAGE SELECTOR AND FUSE HOLDER
Before plugging in the amplifier, its master power switch must be in the OFF position.
Also, you need to be sure about the voltage of your country. In case that you need to
use your appliance in 115V, you need to change the position of the voltage switch and to
replace the voltage fuses by those included in your product.
g
ENTRÉE SYMÉTRIQUE CD
Si vous disposez d’un lecteur CD possédant une sortie symétrique (ou autre source), vous
pouvez raccorder cette sortie stéréo à l’entrée symétrique stéréo BAL.R et BAL.L de votre
préamplificateur MPP-505
BALANCED CD INPUT
If your cd player has a stereo balanced output, you can connect it on the stereo balanced
cd input of your preamplifier MPP-505. Also, you can use this balanced input with others
sources like tuner, DVD, etc... having a similar output.
f
ENTRÉE AES/EBU (UNIQUEMENT MPP-506DA)
La norme AES/EBU définit la méthode de transfert pour l’audio numérique professionnelle. Cette norme a vu le jour dans les années 80 (AES3-1985, AES3-1992). Elle est
survenue suite à la collaboration entre l’Audio Engineering Society (AES) et de l’European
Boadcasting Union (EBU) permettant un échantillonnage de 32, 44,1 et 48 kHz en 16
bits de quantification qui a évolué par la suite jusque 96 et 192 kHz en 20 et 24bits. Les
signaux à la norme AES/EBU sont transmis par câbles XLR - dont
l’impédance fait 110 ohms - qui permettent le transport du signal symétrique sur des grandes longueurs. Cette norme est aussi appelé AES3. Si votre source est équipé de cette
sortie, alors connectez la sur cette entrée.
AES/EBU INPUT (ONLY MPP-506DA)
The digital audio standard frequently called AES/EBU, officially known as AES3, is
used for carrying digital audio signals between various devices. It was developed by the
Audio Engineering Society (AES) and the European Broadcasting Union (EBU) and first
published in 1989 (Watkinson, 1989), later revised in 1995, 1998, and 2003. AES3 uses
110 ohm shielded twisted pair (STP) cable with XLR connectors up to a distance of 100
meters. If your source has this type of plug, then you can use it with your MPP-506DA.
a
SORTIE REC
Il s’agit d’une sortie ligne fixe analogique (le signal ne varie pas avec le potentiomètre de
volume). Permet de raccorder un enregistreur de type cassette, MD, etc...
REC OUTPUT
This analog audio input and output are for connecting a recorder with an analog audio
input and output, such as a cassette deck, MD recorder, etc.
s
ENTRÉES DIGITALES COAXIALES (2), OPTIQUE (1) (UNIQUEMENT MPP-506DA)
Votre amplificateur est équipé de deux entrées coaxiales et une entrée optique. Vous
pouvez connecter sur ces entrées, la sortie numérique de votre lecteur Cd, MD, etc... et
profiter de l’excellente qualité du convertisseur intégré.
OPTICAL (1), COAXIAL (2) DIGITAL INPUTS (ONLY MPP-506DA)
Your amplifier integrate a DAC (Digital audio converter) with two coaxials inputs and one
optical input. You can connect the digital output of you CD, MD, etc... and use the high
quality DAC converter of your preamplifier MPP-506DA in order to obtain a better sound
result.
d
ENTRÉE USB (UNIQUEMENT SUR MPP-506DA)
Note: Ne pas allumer votre préamplificateur avant que la connexion USB ait été faite.
A partir de votre ordinateur fixe ou portable, vous pouvez lire ses fichiers audio sur
notre préamplificateur MPP-506DA par l’intermédiaire de la prise USB. Compatible avec
Window 2000 / Win XP / Vista / 7, Linux, et Mac OS X. La technologie utilisée ne nécessite pas de pilote.
USB INPUT (ONLY MPP-506DA)
Note: Do not turn on the unit until all connections have been made.
You can listen music files that are on your computer. Connect a USB ‘B–A’ cable from the
MPP-506DA USB input to one of the USB ports on the PC or Mac.
Compatible with Window 2000 / Window XP / Vista / 7, Linux, and Mac OS X. You don’t
need any additional driver to use this input.
TELECOMMANDE
REMOTE CONTROL
AUX.1
Selects the Auxiliary 1 source
Sélectionne l’entrée Auxiliaire 1
CD RCA
Selects the CD RCA source
Sélectionne l’entrée CD RCA
CD BAL.
Selects the CD balanced source
Sélectionne l’entrée CD symétrique
IP
Selects the IP source
Sélectionne l’entrée IP
OPT.
Selects the Optical source
Sélectionne l’entrée Optique
COAX.1
Selects the Coaxial 1 source
Sélectionne l’entrée Coaxial 1
COAX.2
Selects the Coaxial 2 source
Sélectionne l’entrée Coaxial 2
VOL Decrease the volume level
Diminue le niveau du volume
AUX.2
Selects the Auxiliary 2 source
Sélectionne l’entrée Auxiliaire 2
ON/STANDBY
Sets the preamp to On or Standby.
Commute le préampli en ON ou Stby
PHONO
Selects the phono source
Sélectionne l’entrée source
TUNER
Selects the tuner source
Sélectionne l’entrée Tuner
PC
Selects the PC source
Sélectionne l’entrée PC
AES/EBU
Selects the AES/EBU source
Sélectionne l’entrée AES/EBU
USB
Selects the USB source
Sélectionne l’entrée USB
VOL +
Increase the volume level
Augmente le niveau du volume
MUTING
Mutes or unmutes the preamplifier
Active ou désactive la mise en
sourdine.
SPECIFICATIONS
OUTPUT LEVEL UNBAL./BAL
1,5V/2V
FREQUENCY RESPONSE (-3dB)
10Hz-70kHz
DAC DIGITAL AUDIO CONVERTER
24bit-384kHz
USB FREQUENCY RESPONSE 48KHz
20Hz-20kHz
USB FREQUENCY RESPONSE 44,1KHz
20Hz-20kHz
DYNAMIC US RANGE
93,8dB
SNR SILENT
93,7dB
USB THD
-76,1dB
DISTORSION
< 0,05%
S/N RATIO
>96 dB
CHANNEL SEPARATION
> 60 dB
INPUT IMPEDANCE
20KΩ
INPUT IMPEDANCE PHONO
IN LEVEL (CD/AUX)
INPUT LEVEL PHONO MM/MC
AC INPUT
47KΩ/100Ω
500mV
2,5 / 0,2mV
115-230V
POWER CONSUMPTION STAND-BY
0,7W
POWER CONSUMPTION MAX
< 30W
TRANSFORMER(S)
2
DIMENSIONS
H.110x l.440x D.350
NET WEIGHT / GROSS WEIGHT
6,6 / 8,1 kg
Design and development in France by Advance Paris Sarl
13 rue du coq gaulois - 77390 Brie Comte Robert - FRANCE
Tel. +33 (0) 160 185 900 - Fax +33 (0) 160 185 895
email: [email protected]
www.advance-acoustic.com