1
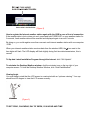
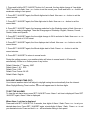
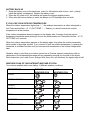
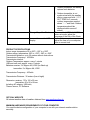
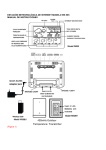
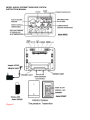
MODEL WS 585 INTERNET WEATHER STATION
INSTRUCTION MANUAL
(Figure 1)
QUICK SETUP
Step 1 Connect your computer on-line to the internet.
Step 2 Insert the wireless USB into your computer (lift up the antenna bar in vertical position for
best transmission distance).
Step 3 Insert the CD into your computer, the computer will automatically install the software (see
below “To Install the weather.exe program on your computer).
Step 4 Power up your internet weather station: plug the AC/DC adaptor to any household AC
outlet, then insert the DC jack at the lower back case of your internet weather station. Then insert
the stand to your internet weather station.
Step 5 Now the weather data of the chosen city will be transmitted to your Internet weather station
in 1-2 minutes.
Step 6 Keep your Internet Weather Station and wireless sensor next to each other. Slide open the
battery cover at the back of your wireless outdoor sensor, then insert 2 x AA alkaline batteries to
the back of it. Replace the battery cover. Your weather station will receive data signal from the
outdoor sensor in few seconds. Then place your outdoor sensor in a dry and shaded area outside.
Your weather station works with Microsoft OS XP, Vista or higher versions (Apple Mac OS not
applicable)
TO INSTALL THE WEATHER PROGRAM ON YOUR COMPUTER
Step 1 After inserted the CD into your computer, the weather.exe program is loaded. Please note
that the weather.exe program in your CD may not be most up-dated.
Step 2 Click “Next”.
Step 3 Click "Install”, the program will be installed.
Step 4 Click a Country and a City.
Step 5 Click "Finish" to complete the installation.
How to change a city
You could change a city anytime when your computer is online:
Step 1 Locate the small weather icon on the lower right menu bar of your computer.
Step 2 Right click your mouse at the weather icon, a menu will be displayed.
Step 3 Click and select a country and city.
Step 4 A pop-up window will appear next to the weather icon to indicate weather data of the newly
selected city is up-dated.
Be patient: New weather data of newly selected city will be displayed on your internet weather
station in around 1 minute.
Unten rechts in der Menüleiste (Figure 2)
How to register the Internet weather station again with the USB in case of lost of connection
If the weather data is lost or does not work, press and hold FORECAST on your weather station for
2 seconds, fresh weather data will be received and displayed again in around 1 minute.
By doing so, you could register more than one main unit internet weather station with one computer
/ USB.
When your internet weather station receives data from the wireless USB, the icon next to the
time digits will flash. The LED display will flash slightly during first time data transmission, this is
normal.
To Up-date Latest Installation Program through the internet: click “Soft Update”.
To minimize the Desktop Weather window: click the minimize icon on the top right of your
computer screen. To hide the Desktop Weather Window, click “Hide DeskWeather”.
Viewing Angle
You must keep in mind that the LCD screen is constructed with an “optimum viewing”. Your eye
should be at 60 degree to view the LCD screen correctly.
(Figure 3)
TO SET YEAR, CALENDAR, DAY OF WEEK, 12/24 HOUR AND TIME
1. Press and hold the SET / ALM SET button for 3 seconds, the time digits change to Year digits
"2007" and start to flash. Use + or – button to set the correct year. Press and hold + or – button will
accelerate setting in fast speed.
2. Press SET / ALM SET again, the Month digits start to flash. Now use + or – button to set the
correct month.
3. Press SET / ALM SET again, the Date digits start to flash. Now use + or – button to set the
correct date.
4. Press SET / ALM SET again, the language selection for the Weekday starts to flash. Now use +
or – button to select a language. There are 6 languages of Weekday: English, German, French,
Danish, Italian and Spanish.
5. Press SET / ALM SET again, the time digits change to 24 Hr and start to flash. Now use + or –to
select 12 Hr format or 24 Hr format.
6. Press SET / ALM SET again, the Hour displays start to flash. Now use + or – button to set the
correct hours.
7. Press SET / ALM SET again, the Minute digits start to flash. Press + or – button to set the
correct minutes.
8. Press SET / ALM SET to return to normal mode.
During the setting process, your weather station will return to normal mode in 20 seconds
automatically if there is no further press of any button.
Default Calendar: 1st January, 2007
Default Alarm 1 & 2: 0:00
Default Time: 0:00
Default Time Format: 24 HR
Default Week: English
DAYLIGHT-SAVING TIME (DST)
Your internet weather station will adjust to daylight saving time automatically from the internet.
When Daylight Saving Time is active,
icon will appear next to the time digits.
TO SET THE ALARMS
To view the set alarm times, press SET / ALM SET once. Alarm 1 set time is displayed. Press SET
/ ALM SET again, Alarm 2 time is displayed.
When Alarm 1 set time is displayed
Press and hold SET / ALM SET for 2 seconds, hour digits of Alarm 1 flash. Press + or - to set your
desired alarm hour. Press SET / ALM SET again, minute digits of Alarm 1 flash. Press + or - to set
your desired minute. Press and hold + or – will accelerate setting in fast speed.
When Alarm 2 set time is displayed
Press and hold SET / ALM SET for 2 seconds, hour digits of Alarm 2 flash. Press + or - to set your
desired alarm hour. Press SET / ALM SET again, minute digits of Alarm 2 flash. Press + or - to set
your desired minute. Press and hold + or – will accelerate setting in fast speed.
TO TURN ON / OFF ALARM 1 AND/OR ALARM 2
Press ALM ON/OFF once to turn on Alarm 1, icon appears. Press ALM ON/OFF again to turn on
Alarm 2,
icon appears. Press ALM ON/OFF once again to turn on both Alarm 1 and Alarm 2,
both
and
and
appear. Press ALM ON/OFF again to turn off both Alarm 1 and Alarm 2, both
disappear.
TO USE THE SNOOZE ALARM
When time reaches Alarm 1 or Alarm 2 set time, a beep alarm will sound. Press SNOOZE / LIGHT
button once to stop the alarm sound temporarily. The
in 5 minutes.
or
icon flashes. Alarm will sound again
TO STOP THE DAILY ALARM
When alarm is beeping, press any other key (not the SNOOZE button) to stop the alarm. Alarm will
sound again same time in the next day.
Alarm Duration: 2 minutes
Snooze Duration: 5 minutes
TO SELECT DEGREE C / F TEMPERATURE READOUT
Simply press – (C / F) OUT TEMP button once to view all temperatures in degree C or degree F
readout.
UV INDEX
The UV index indicates how strong the ultraviolet (UV) radiation from the sun is. It helps people to
effectively protect ourselves from UV light.
UV Index
0-2
3-5
6-7
8-10
11-12
Description
No danger to average person
Little risk of harm from unprotected
sun exposure
High risk of harm from unprotected
sun exposure
Very high risk of harm from
unprotected sun exposure
Extreme risk of harm from
unprotected sun exposure
BATTERY BACK-UP
1. Open the battery cover at the back case, insert 3 x AA batteries with correct + and – polarity
inside the battery compartment. Replace the battery cover.
2. When the AC power is off, the batteries will power the internet weather station.
3. When only the back-up battery is used, the always-on LCD backlight does not work.
IF YOU LOSE YOUR OUTDOOR TEMPERATURE
When the outdoor temperature digits show “- -“, the wireless transmission is either interrupted or
lost. Press and hold the – (C / F) OUT TEMP “- -.-“ flashes, you should receive the outdoor
temperature in a few minutes.
If the outdoor temperature does not appear on the display after 5 minutes, bring the remote
temperature transmitter inside placing it close to the thermometer unit. Press and hold the – (C / F)
OUT TEMP for 2 seconds.
When the outdoor temperature appears on the display again, then place the outdoor transmitter
back outside in the proper location. If you continue to lose the outdoor temperature, try placing the
transmitter in a different location until you have smooth transmission of the outdoor temperature
data.
Remarks: Keep in mind that your outdoor sensor has a 30-meter open air transmission with no
obstructions. Actual transmission range will vary depending on what is in the path of the signal.
Each obstruction (roof, walls, floors, ceilings, thick trees, etc.) will effectively cut signal range in half.
WEATHER ICONS OF YOUR INTERNET WEATHER STATION
Your internet weather station can display 14 different weather conditions:
DESCRIPTIONS
CLEAR
MOSTLY CLOUDY
CLOUDY
DRIZZLE
RAIN
SHOWERS
DRIZZLE & SNOW
TODAY”S
WEATHER ICON
4-DAY
WEATHER ICON
RAIN & SNOWY
SHOWER & SNOW
SNOW
THUNDERSTORM - SNOW
THUNDERSTORM - SMALL
THUNDERSTORM - MEDIUM
THUNDERSTORM - LARGE
TROUBLESHOOTING
In case of your weather station clock shows irrelevant information or digits, it may be affected by
electrostatic discharge or interferences form other devices. Press the RESET button on the top
right of your weather station. Your unit will be reset to default settings and it will start to receive
weather data and outdoor temperature again.
PROBLEM
Your internet weather
station is not working
SYMPTOM
LCD display is blank,
backlight is off
LCD Display
1) Only time, calendar and
indoor temperature and
RH% on the LCD, no
weather icons
2) Losing weather forecast
data
Weather forecast
Outdoor temperature and
relative humidity
REMEDY
Make sure the AC/DC adaptor is
plugged into AC outlet and
connected to your internet weather
station
1) Make sure your computer is
powered on and is connected
on-line
2) Make sure the USB is inserted
into your computer
3) Press and hold FORECAST for
2 seconds to start weather data
reception again
Weather forecast information Incorrect city is selected: right click
is not relevant to your outdoor small weather icon on your PC
screen, click “City Select”, then click
weather condition
country and then a city
Outdoor temperature and
1) Outdoor transmitter is out of
humidity readout shows “- -“
range: bring it closer to the
weather station
2) Outdoor transmitter low battery:
replace fresh batteries
Calendar
Strange Day of the Week
Time
Incorrect time on the LCD
display
3) Outdoor transmitter is not
synchronized with the weather
station: press and hold - / C/ F
OUT TEMP for 2 seconds,
outdoor temperature readout
shows “- -.-“ and flash. Outdoor
temperature should be
displayed within around 1
minute.
Press and hold SET / ALM SET to
enter set mode, adjust the
language of the Day of the Week
Incorrect time on your computer:
adjust the time on your computer
time to correct time
PRODUCT SPECIFICATIONS
Indoor range: temperature 0C to 50C / +32F to +122F
Outdoor range: temperature -50C to +70C / -58F to +158F
Transmission distance: up to 30 meters without obstructions
Transmission Frequency: 433 MHz
Transmission interval:
Outdoor Temperature: approx. every 1 minute
USB and main unit: approx. every 1 minute
Batteries receiver: 3 x Mignon AA, LR06 (for Back-up)
transmitter: 2 x Mignon AA, LR06
Transmission Frequency : 433mHz
Transmission Distance : 30 meters (line-of-sight)
Dimension: receiver: 170 x 120 x 55 mm
transmitter: 60 x 28 x 85 mm
Including AC-adaptor, USB stick,
Thermo sensor, PC Software
OFFICIAL WEB SITE
All internet weather data of weather obtained from www.weatheronline.de
MINIMUM HARDWARE REQUIREMENTS OF YOUR COMPUTER
You need the below configuration of your computer to run with your internet weather station
smoothly:
CPU 1G KHz
RAM 512MB
Hard Disk 1GB free
Remark: Changes or modifications not expressly approved by the party responsible for compliance
could void the user’s authority to operate the equipment.
Words in the figure:
Figure 1:
ENGLISH
ALARM 1 & 2
UV index
TODAY’S WEATHER FORECAST
TODAY’S HI AND LO
TEMPERATURES
NEXT 4-DAY FORECAST OF
WEATHER AND HI-LO
TEMPERATURE
CURRENT INDOOR OUTDOOR
TEMPERTURES
TIME, MONTH, DATE, DAY OF
WEEK
INTERNET WEATHER ICON
INSERT AC/DC ADAPTOR JACK
SNOOZE / LIGHT
INSERT 3 X AA BACK-UP
BATTERIES (NOT INCLUDED)
OUT TEMP, - / C / F
+
SET / ALARM SET
ALARM ON/OFF
FORECAST
RESET
WIRELESS USB
433 MHz OUTDOOR
TEMPERATURE TRANSMITTER
INSERT 2 X AA BATTERIES (NOT
INCLUDED)
Figure 2:
Pop-up window indicates weather
data update status
Lower right menu bar of your
computer
Other Language