1
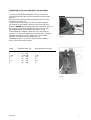
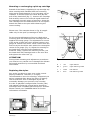
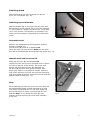
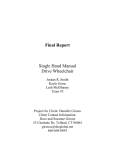
Contents
Page
Thorens Factory Warranty
2
Technical Specification
3
Unpacking and Assembly
4
Electrical Connections and Installation
4
Tonearm and Pickup Cartridge
5
Vertical alignment of cartridge
6
Operation of the TD 240
7
TD 240_E
2
Dear THORENS customer,
Thank you very much for your confidence in our product, the record player
TD 240. With the purchase of this device you have acquired a precision instrument for the purpose of playing back analogue records. This appliance however
requires your attention with respect to set-up, placement and handling in order
to achieve a flawless operation. The TD 240 has been designed and assembled
completely in Germany which will guarantee you the highest quality to be maintained for years to come. Understandably, you want to listen to your beloved
records right away but we strongly advise that you read these instructions attentively before proceeding with the setup, simply to ensure long-lasting listening pleasure. We have spared no efforts to pack all necessary information and
comprehensive guidance into this manual, yet in the event that you have any
further queries regarding your new record player please do not hesitate to ask
your THORENS dealer for further assistance.
Sincerely yours,
THORENS TEAM
WARRANTY
Legal warranty directives and regulations are to be applied here. In case a failure
or malfunction occurs in your record player during the warranty period please inform your THORENS dealer or general representative and describe the malfunction that has occurred. If the malfunction cannot be remedied on site by sending
you the respective user-serviceable spare part, you are kindly requested to send
the unit in its original shipping box to the THORENS representative in your country. If the original shipping box is no longer in your possession your THORENS
representative will be in the position to supply a new one for a small charge.
Shipping costs to THORENS or to an authorized service centre must be prepaid
because otherwise the parcel will be rejected upon arrival. After repair or service
the unit will be returned to you free of charge. Whenever you ship this turntable
kindly use the screws for the security during transportation.
Any damage or malfunction caused by failure to observe the instructions contained in this manual as well as damages occurred in transport or shipping are not
covered by this warranty. This warranty only covers the turntable and motor including power supply and mains transformer. The tone arm and pick-up cartridge
are covered by the warranty of the respective manufacturer thereof.
In the event that you have further queries or need assistance please do
not hesitate to contact your authorised THORENS service.
WARNING!
To prevent fire or shock hazard, do not expose this product rain or moisture
TD 240_E
3
Mains voltage
(Mains set)
100 – 240 V (AC)
Line frequency
50 / 60 Hz
Power requirement
1,5 W
Platter speeds
331/3, 45 , 78 U / min
Wow and flutter (DIN/WRMS)
± 0,07/0,04 %
Platter
Ø 304 mm
Signal-to-noise ratio (DIN 45 500)
Rumble unweighted signal- to- noise ratio
Rumble weightes signal- to noise ratio
46 dB
72 dB
Effective tonearm length
211 mm
Offset angle
26°
Overhang
19,5 mm
Tangential tracking error
0,15° / c m Rad.
Cartridge HiFi DIN 45 500
rot
R
right c hannel
grün
RG
right c hannel ground
blau
GL
left c hannel ground
weiß
L
left c hannel
AT 95 E
Diamant stylus
elliptic al
AT N 95 E
0,4 x 0,7 µm
Diamant stylus for 78 U / min
c onic al
AT N 9578
65 µm
Tracking force
1,5 g / mN
Frequency range
20 Hz – 20000 Hz
Output
3,5 mV / 5 c ms -1 / 1 kHz
Tracking capability (315 Hz)
80 µm
Cartridge weight
5,7 g
Total capacitance
T onearm leads and audio- c ables
c a. 160 pF
Dimensions (W x H x D) (mm)
440 x 119 x 360
TD 240_E
4
Unpacking and set - up
Take the record player and all accessories out
of the carton. Remove the two transportation
locks (Fig. 1) by applying lateral pressure. The
locks are located underneath the platter at the
front left and at the rear right.
Put the platter onto the sub-platter and press down
the two safety springs until they set into the groove
of the platter spindle (Fig. 2).
Insert each hinge into the respective recess (Fig. 3).
Hold the dust cover parallel to the hinges (opening
angle approximately 60°), insert and push as far as
it will go. Being in this position the dust cover may
be removed at any time.
Fig. 1
Fig. 2
Fig. 3
Electrical connections
By choosing the appropriate THORENS mains
transformer this record player can be operated from
nearly all existing public mains supplies. The
low-voltage plug on the cable that is coming from
the mains transformer unit is to be inserted into
jack 17 (Fig. 4) at the rear side of the record
player.
The stereo signal leads have two phono plugs which
are also known as "Cinch" or RCA-plugs. They are
marked with either the letter "L" for the left
channel or "R" for the right channel. lf these letters
are missing then most likely the right channel is
marked red, perhaps by featuring a red plug at both
ends, and the left channel is marked white or black
accordingly. The RCA-plugs are inserted into the
phono input jacks of an amplifier or receiver. The
separate single litz-wire is making a connection to
ground and is to be fastened underneath the ground
screw of the amplifier or receiver.
Fig. 4
IMPORTANT!
ALWAYS KEEP THE SHIPPING CARTON IN A DRY PLACE FOR THE EVENT THAT
THE RECORD PLAYER HAS TO BE PACKED AGAIN FOR TRANSPORTATION.
IN THIS CASE IT IS IMPORTANT TO DETACH THE PLATTER AND PUT IT ON THE
BOTTOM OF THE SHIPPINGBOX, JUST AS IT WAS ORIGINALLY DELIVERED TO YOU.
TD 240_E
5
Adjusting tone arm and pick-up cartridge
Turn the tracking force adjuster (1) to "0" and the
anti-skating knob (2) counter-clockwise until it stops
(Fig. 6).
Screw the tonearm counter weight (3) onto the rear
tonearm tube (Fig. 5).
Unlock the tone arm (4) and move it a bit towards
the centre of the platter. Bring the lift-lever (5) into
position DOWN while holding back the tone arm (Fig. 6).
By turning the counter weight (3) the tone arm can
be precisely balanced in order to make it hover
freely above the platter. Move the tone arm back to
its rest. You can now adjust the tracking force (1) and
the anti-skating force (2). Adjust to 1.5 mN (MilliNewton) for the factory-installed pick-up
cartridge AT 95 E. As for the required anti-skating
force refer to the table below:
Scale
Tracking force (1)
Anti-skating force (2)
1
1,25
1,5
2
2,5
3
=
=
=
=
=
=
1
1,25
1,5
2
2,5
3
10
12,5
15
20
25
30
mN
mN
mN
mN
mN
mN
Fig. 5
Fig. 6
TD 240_E
6
Mounting or exchanging a pick-up cartridge
Instead of the factory-supplied pick-up cartridge any
other cartridge with standard half-inch mounting
holes and a weight between 3 and 10 grams can be
installed. To do this loosen the collar-lock (9) and
pull off the head shell (Fig. 7). Unscrew the cartridge
and carefully remove the coloured signal leads from
the cartridge pins with a pair of tweezers. Screw the
new cartridge onto the head shell but do not tighten.
Attach the leads to the pins while observing the
correct coding.
Fig. 7
Please note: The example shown in Fig. 8 is applicable only for the pick-up cartridge AT 95 E!
For the precise adjustment of the so-called stylus
overhang push the head shell with cartridge into the
supplied mounting gauge. The adjustment is correct
if the stylus is flush with the V-shaped recess in the
gauge as viewed from above. When viewed from the
side the stylus should be seen within the rectangular
recess of the gauge (Fig. 9). Adjust the cartridge in
the head shell until the correct positions are
achieved. Lastly, tighten the mounting screws, put
the head shell with cartridge back on the tone arm
and tighten the collar-lock (9).
ATTENTION!
During these mounting and adjustment procedures
you must be very careful not to damage the delicate
stylus and cantilever by uncontrolled and brisk
movements.
Fig. 8
R
Replacing the stylus
=
red
right channel
RG =
green
right channel ground
L
=
white
left channel
LG
=
blue
left channel ground
Any stylus is subject to wear even under normal
playing conditions. Therefore, it is highly
recommended to have the cartridge, respectively its
stylus, inspected after about 500 hours of playing.
This is because a worn or damaged stylus will
eventually damage your precious vinyl records!
In order to playback vintage shellac records (78's)
with optimal results the original stylus should be
exchanged with a suitable special stylus for shellacs.
Please consult your THORENS dealer for further
information and details.
Fig. 9
TD 240_E
7
Selecting Speed
With the knob on the left the speed can be set
at 33, 45 und 78rpm (Fig. 10)
Selecting record diameter
With the button (6) on the right near the tone arm,
the diameter of the records can be pre-set, whereby
17 cm is used for "Single" and 30 cm for "Long Play
(LP)" vinyl records. This function is necessary only
when the record player is operated in its automatic
mode.
Fig. 10
Automatic start
Remove the transparent stylus guard by carefully
pulling it towards you.
The lift lever (5) must be in position UP.
Move the knob (7) into position Start and the tone
arm will be automatically lowered onto the record (Fig. 11)
Manual start and tone arm lift
Bring the lift-lever (5) into position UP.
Unlock the tone arm from its rest and move it above
the lead-in groove of the record. The motor and
platter will now start turning. By lowering the
lift-lever (5) the tone arm gently declines, thus
being very kind to your precious records. With the
help of the lift-lever the tone arm may be moved up
and down again anywhere across the record while the
platter keeps turning (Fig. 11)
Stop
After reaching the lead-out groove the tone arm will
be automatically lifted up and returned to its rest.
The motor is switched off. You can also switch off
the record player by either moving knob (7) into
position Stop, or by raising lift-lever (5) into
position UP and returning the tone arm manually
to its rest.
TD 240_E
Fig.11
8
Thorens Export Company Ltd.
Im Hübel 1, CH-4304 Giebenach – Basel / Switzerland
Tel. ++41 (0) 61 – 8 13 03 37 Fax Tel. ++41 (0) 61 – 8 13 03 39
Internet: http://www.thorens.ch, Email: [email protected]
TD 240_E
9