1
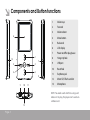
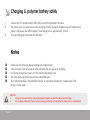
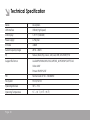
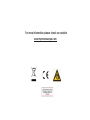
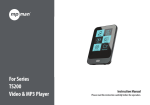
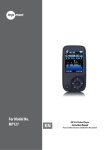
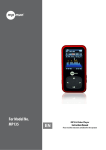
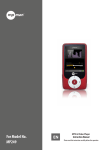
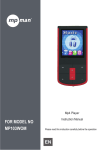
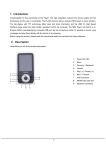
Model - No. :
MP101 WOM
MP 101
WOM
User’s Manual
For your safety – read this user guide carefully to ensure proper use of the
product and to avoid any danger of physical damage.
■
■
■
■
■
■
■
■
■
■
■
Please use your MP4 player properly in case of explosion, fire, electric shock, etc.
When using your player, pay attention to your health, especially the hearing power.
Do not leave the player in a place subject to moisture or temperature higher than 35℃ or 5℃.
Do not use the earphones while driving or riding a bicycle.
Do not repair the player by yourself, or it will cause damage.
It may cause traffic accident if you turn up the volume of the earphones while walking down the street.
Do avoid getting the player wet or drop it in water.
Do not turn up the volume too high, doctors warn against prolonged exposure to high volume.
Please backup important data onto your computer as repair or other causes may result in data loss.
Stop using the device or turn down the volume if you have ringing in your ears.
Always use the accessories provided by or approved by our company. Also do not spray water on the player
Note: Please recharge the digital player before using it!
Page 1
Function features
■
■
■
■
■
■
Page 2
The player supports MP3/WMA/WAV/OGG/APE/AIFF/MS_ADPCM/MPC/FLAC format music files.
Support USB 2.0 capability, much faster than USB 1.1, to enable faster communication with your PC.
The player can record outside voice and FM radio.
The player has repeat functions.
The player has Video Playback, Photo Viewer, E-book functions, etc.
The player can power off automatically after a preset time.
Components and Button functions
6
1
13
5
2
4
3
7
8
9
10
11
1.
Volume up
2.
Forward
3.
Volume down
4.
Menu button
5.
Backward
6.
LCD display
7.
Power on/off or play/pause
8.
Hang strip hole
9.
USB port
10.
Reset hole
11.
Earphone jack
12.
Micro SD/T-flash card slot
13.
Microphone
NOTE: You need a card which has songs and
videos in it to play, this player can’t save data
without card.
12
Page 3
Charging Li .polymer battery safely
1.
2.
Connect the PC USB port and the MP3 USB port with the provided USB cable.
The power sign is shown dynamic when charging, once full charged, the power sign will stop moving,
power is full, please shut off the power. The charging time is approximately 2 hours.
To stop recharging, disconnect the USB cable.
3.
Notes
Before your first time use, please recharge your digital player.
Your computer must be turned on while connected to your player for charging.
Do not overcharge your player, or it may shorten the battery’s life.
The times of charge/discharge are no less than 300 cycles.
The li-polymer battery is consumptive material, so recharge it periodically is needed even if the
player is not be used.
■
■
■
■
■
CAUTION
1.
Danger of explosion if battery is incorrectly replaced. Replace only with the same or equivalent type.
2.
Do not disassemble, crush, short-circuit or incinerate your battery as it may cause fire, injury, burns, or other hazards
Page 4
Basic operations
Turn power on and play music
1.
Connect earphone to earphone jack.
2.
Insert the card into Micro SD/T-Flash card slot in power off mode.
3.
Press and hold 【Play】 button to turn on and enter main menu.
4.
To return main menu: Press and hold 【M】 button.
To Pause/Play: Short press 【Play】 button.
To change tracks: Short press 【Forward/Backward】 button.
To turn unit off: Press and hold 【Play】 button.
NOTE: Please reset your player by pressing the RESET hole while failing to power on or hanging up in
power on mode.
Volume Adjustment
In Audio playing or tuning FM radio mode, short press 【+/-】 button to turn up/turn down the volume.
Page 5
Basic operations
Adding/Removing files/Folders
- you can use the player as a removable USB storage.
1.
2.
3.
4.
Page 6
Plug SD card into the card slot
Connect the PC USB port and the player USB port
with the provided USB cable.
Add files/folders to the USB storage‘s folder. Select
”USB Disk” or “MTP Device”,
Ⅰ. Open files/folders to transfer from your
computer.
Ⅱ. Open My Computer → Removable Disk from the
desktop.
Ⅲ. Select the files/folders to transfer from your
computer and draw and put them to a folder of your
choice in the Removable Disk (you also can transfer
files on your PC to the player using the "Copy" and
"Paste" functions).
Delete files from the removable USB storage (use the
"Delete" command).
Basic operations
Remove the player from PC
- please follow the steps in case of damaging the player or data loss.
1.
2.
3.
Click the left mouse button on the icon that is on the
taskbar at the bottom right corner of the desktop.
Click the "Safely remove USB Mass storage Device. Drive (X:)" column.
Disconnect the player from your computer.
CAUTION:
■
Do not remove the player while files within the USB Mass Storage are being played on your computer.
■
Do not disconnect the player from your computer or press 【M/Play】 button while transferring files,
or it will cause damage to the player or data loss.
Page 7
Basic operations
Menu Navigation
【M】 button: Enter main menu, submenu, confirm, long press return to main menu.
Skip button 【Forward/Backward】: Shift menus/long press fast backward/long press fast forward
Play/Pause button 【Play】: Play, Pause, or return.
1.
Press and hold 【M】 button to enter main menu.
2.
Press 【Forward/Backward】 buttons to select your desired option
(e.g. Music, Movie, Record, Play, Radio, Picture, Text, Browser, Setting, Tools).
3.
Press 【+/-】 buttons to increase/decrease volume.
Page 8
Music
Select “Music” in main menu and press 【M】 button to enter.
Press 【Forward/Backward】 buttons to select music files and press 【Play】 to playback it, press 【Play】 to pause.
Music Playback Submenu
In music playback mode, short press 【M】 button to enter submenu and short press 【Forward/Backward】
buttons to select your desired mode.
NOTE:
1.
2.
How to delete songs: When in playing status, press 【Play】 to pause, and then press 【M】,
Shows “Delete file” and Delete all” in the end of the submenu, you can delete songs.
All songs/Album/Artist/Genre all these items are created by Create Playlist, when choose these items,
it shows “playlist” on the top, user can update the playlist. After plug out the USB, player creates the
playlist automatically.
Now playing
1.
Press 【M】 to play
All songs
1.
Press 【M】 to show all songs in card
2.
Press 【Forward/Backward】 to choose the song you want to play
3.
Press 【M】to play
Page 9
Music
Album
1.
Press 【M】 to show all the albums
2.
Short press 【Forward/Backward】 buttons to select the album you want
Artists
1.
Press 【M】 to show all the artists
2.
Short press 【Forward/Backward】 buttons to select the artist
3.
Press 【M】 to confirm to show all the songs of this artist
4.
Short press 【Forward/Backward】 buttons to select the song you want
5.
Short press 【M】 to play
Genre
1.
Short press 【M】 to show all the genres
2.
Short press 【Forward/Backward】buttons to select the genre
3.
Short press 【M】 to choose genre you want
Card folder
1.
Short press 【M】 to show all the folders in card
2.
Short press 【Forward/Backward】 buttons to select the folder
3.
Short press 【M】 to show the files in the folder
Create playlist
1.
Short press 【M】 to create the playlist
Page 10
Setting
Short press 【M】 to show the items:
I.
Repeat
1.
Select Repeat and short press 【M】 button to enter.
2.
Short press 【Forward/Backward】 buttons to select your desired option
(e.g. Normal, Repeat one, Repeat All, Shuffle, Intro).
3.
Short press 【M】 button to confirm.
II.
1.
2.
3.
Equalizer
Select Equalizer and short press 【M】 to enter.
Short press 【Forward/Backward】 buttons to select your desired option
(e.g. Natural, Rock, Pop, Classic, Soft, Jazz, DBB, SRS WOW(.)HD).
Short press 【M】 button to confirm.
SRS WOW(*)HD:
a.
Select SRS WOW(*)HD and short press M button to enter.
b.
Short press 【Forward/Backward】 buttons to select your desired option
(e.g.SRS WOW(*)HD, SRS WOW, User setting, Disable SRS WOW(*)HD).
User setting:
Short press【Forward/Backward】 to select: SRS 3D, TruBass, FOCUS, CENTER, DEFINITION, Speakersize, Limiter,
Exit. Press 【M】 to enter and press 【Forward/Backward】 to setup it as your opinion.
Page 11
Setting
SRS 3D:
Adjust the effect of horizontal surround, press 【Forward/Backward】 button to adjust it.
Trubass:
Adjust Bass effect, press 【Forward/Backward】 button to adjust it.
FOCUS:
Adjust the effect of vertical surround, press 【Forward/Backward】 button to adjust it.
c.
Short press 【Play】 button to confirm.
WOW, SRS and are trademarks of SRS Labs, Inc.
WOW technology is incorporated under license from SRS Labs, Inc.
III.
Tempo rate
1.
Select Tempo rate and short press 【M】 button.
2.
Short press 【Forward/Backward】 buttons to select your desired option (-8-8).
3.
Short press M button to confirm.
NOTE: Only mp3 format file support “Tempo rate” mode.
IV.
1.
2.
3.
Replay
Select Replay mode and short press 【M】 button to enter.
short press 【Forward】 to select A point, short press 【Forward】 again to select B point and
replay the music playback period.
Short press 【M】 button to cancel.
Page 12
Movie
In order to play video files in this digital player, you must change the video files to AMV format.
RECORD
1.
In main menu, short press 【Forward/Backward】 button to select “Record“ mode and enter by
pressing 【M】 button.
2.
Short press 【M】 button to enter submenu: Card folder, Record format, Change volume,
Short press 【M】 button to enter.
3.
Press 【Play】 to start and pause recording.
4.
Short press 【M】 to save the recorded file.
Play
1.
2.
3.
4.
5.
In main menu, short press 【Forward/Backward】 button to select “Play “ mode and enter by
pressing 【M】 button.
Press 【Forward/Backward】 button to select the recorded file and short press 【Play】 button to play,
short press 【Play】 button to pause.
In playback mode, short press 【M】 button to enter submenu: Now playing, Card folder, Setting.
In pause mode, short press 【M】 button to enter submenu: Now playing, Card folder, Setting, Delete file, Delete all.
Long press 【M】 to return to main menu.
Page 13
Radio (Optional function)
1.
2.
3.
4.
In main menu, short press 【Forward/Backward 】buttons to select “Radio“ mode,
and short press 【M】 button to enter.
Short press 【Forward/Backward】 button to tune FM frequency from 87.5 to 108MHz(At intervals of 0.1MHz),
short press 【M】 button to enter the submenu: Save, Record, Delete, Delete all, Auto search, Exit.
- Save: Press 【M】 button to select save to save the station.
- Record: Press 【M】 button to select Record, press 【Play】 to start and stop,
long press 【M】 to save and return.
- Delete: Select the preset band, short press 【M】 button to select Delete and then
short press 【M】 to delete the preset band.
- Delete all: Select Delete all and press 【M】 button to delete all saved band.
- Auto search: Short press 【M】 button to enter submenu. Short press 【Forward/Backward】 and
【M】 button to start “Auto Search”. You may need to wait several minutes to let all detectable stations
be found and saved.
In normal mode, short press 【Play】 button to switch to preset mode.
Long press 【M】 to return to main menu.
Page 14
Picture
1.
In main menu, short press 【Forward/Backward】 buttons to select “Picture” mode and
enter by pressing 【M】 button.
2.
Short press 【M】 to enter submenu: Card folder, Playback set, Scan mode, Auto rotation, Delete file,
Delete all. Short press 【Forward/Backward】 to select and short press 【M】 to Enter.
- Card folder: Short press 【Forward/Backward】 button to select your desired photo file
and press 【Play】 to browse.
- Playback set: Short press 【Forward/Backward】 button to select: Manual play, Auto play.
Short press 【M】 to enter.
- Scan mode: Short press 【Forward/Backward】 button to select file list and picture browse
- Delete file: Short press 【Forward/Backward】 to select your desired photo file and
press 【M】 to select: No or Yes.
- Delete all: Short press 【M】 to select: No or Yes.
3.
Short press and hold 【M】 to return to main menu.
Page 15
TEXT
1.
2.
In main menu, short press 【Forward/Backward】 buttons to select TEXT mode and enter by pressing 【M】 button.
Press 【Forward/Backward】to select: Card folder, Playback set, Delete file, Delete all, Exit. short press 【M】 to enter.
3.
- Card folder: Short press 【Forward/Backward】 button to select your desired text file and press 【Play】 to browse.
In manual play mode, short press 【Forward/Backward】 to turn to previous or next page. short press
【M】 button to enter the submenu: Bookmark select, Bookmark delete, Bookmark add, Exit.
- Playback set: Short press 【Forward/Backward】 button to select: Manual play, Auto play.
Short press 【M】 to enter.
- Delete file: Short press 【Forward/Backward】 to select your desired text file and
press 【M】 to select: No or Yes.
- Delete all: Short press 【Forward/Backward】 to select: No or Yes.
In Short press 【M】 button to return to previous menu, press and hold 【M】 to return to main menu.
Note: the E-BOOK function only can browse .TXT files.
Page 15
Browser
1.
2.
3.
4.
5.
In main menu, short press 【Forward/Backward】 buttons to select browser and enter by
pressing 【M】 button.
Short press 【Forward/Backward】 buttons to select Local folder and then press 【M】 to enter.
Short press 【Forward/Backward】 to choose your desired file(including Video files, music files,
photo files, recorded files and TXT files, etc)
Short press 【M】 button to confirm and play the selected file.
Press and hold 【M】 button to return to main menu.
Page 16
Setting
1.
2.
In main menu, short press 【Forward/Backward】 buttons to select “Setting“ mode and enter by
pressing 【M】 button.
Short press 【Forward/Backward】 buttons to select the submenu: LCD set, Language, Power off,
Firmware version, Exit. Short press 【M】 button to enter the next submenu.
LCD set:
Short press 【Forward/Backward】 button to select: Dark mode, Exit. Select Dark mode and press 【M】 button to enter,
so press 【Forward/Backward】 to adjust it.
Language:
1.
Select language mode and short press 【M】 button to confirm.
2.
Short press 【Forward/Backward】 to select your desired option (e.g. English, French, Germany, Italian,
Dutch, Portuguese, Spanish)
3.
Short press 【M】 button to confirm.
Power off:
Short press 【Forward/Backward】 button, choose the number, short press 【M】 button to confirm.
Firmware version - You can scan the firmware version.
Notice
Do not use the player while raining.
Attention should be drawn to the environmental aspects of battery disposal.
Please use provided USB cable to connect the player with PC directly.
The user guide is only for reference. It is standard by the sample.
Page 17
Technical Specification
Name
Description
USB Interface
USB2.0 (High Speed)
LCD Display
1.8” TFT (128x160)
Power supply
Li-Polymer
S/N ratio
≥80dB
Audio Frequency Range
20Hz ~ 20kHz
EQ
Natural, Rock, Pop, Classic, Soft, Jazz, DBB, SRS WOW(*)HD
Support file format
Audio:MP3/WMA/WAV/OGG/APE/MS_ADPCM/MPC/AIFF/FLAC
Video: AMV
Picture: BMP/JPG/GIF
FM
Normal band: 87.50 ~ 108.00MHz
File System
FAT16, FAT32
Operating Moisture
10% ~ 75%
Operating Temperature
5℃ ~ 35 ℃ (41℉ ~ 95 ℉)
Page 18
MPMANAGER
For movie and music synchronisation and conversion,
please use MPMANAGER software supplied in the CD ROM.
This software can be used also for UPDATE of your player
MPMANAGER manual is included in your CDROM.
For more information please check our website
www.mpmaneurope.com