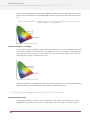
1
Reference Guide
Enfocus PitStop Server
Contents
1. Copyrights............................................................................................8
2. Introduction to Enfocus PitStop Server.................................................9
2.1 About this Reference guide...................................................................................9
2.2 System requirements............................................................................................9
2.3 Installing Enfocus PitStop Server.........................................................................9
To install PitStop Server from DVD.................................................................9
To install PitStop Server from the Enfocus Web site......................................9
2.4 Best practices after installing Enfocus PitStop Server .....................................10
Register Enfocus PitStop Server ...................................................................10
Lock PitStop Server .......................................................................................10
2.5 Licensing..............................................................................................................10
Creating an activation account......................................................................10
Starting a trial................................................................................................10
Activating licenses.........................................................................................13
Moving licenses between computers............................................................17
Deactivating licenses.....................................................................................17
Repairing licenses..........................................................................................20
Tips and troubleshooting for Licensing.........................................................22
2.6 Starting Enfocus PitStop Server .........................................................................23
To start Enfocus PitStop Server ....................................................................23
2.7 Getting Support....................................................................................................23
To consult the support information:..............................................................24
To consult the Enfocus Knowledge Base:.....................................................24
To report a problem:......................................................................................24
3. The concept of Enfocus PitStop Server...............................................25
3.1 What is Enfocus PitStop Server...........................................................................25
Hot folders defined.........................................................................................25
3.2 The components of Enfocus PitStop Server.......................................................25
PitStop Server ...............................................................................................25
PitStop Server WatchDog ..............................................................................25
Managing PitStop Server WatchDog from within PitStop Server.................26
Managing the WatchDog on Windows............................................................26
Managing PitStop Server on Mac OS.............................................................26
4. Looking at the Enfocus PitStop Server Work Area..............................27
4.1 Locking PitStop Server........................................................................................27
Locking PitStop Server...................................................................................27
Unlocking PitStop Server...............................................................................27
4.2 The PitStop Server Hot Folder tab......................................................................27
4.3 The PitStop Server Progress tab.........................................................................28
2
Contents
4.4 The PitStop Server History tab............................................................................29
4.5 The Hot Folder Editor..........................................................................................30
To display the Hot Folder Editor dialog box:..................................................31
To use the Hot Folder Editor:.........................................................................31
4.6 The PitStop Server Menu.....................................................................................32
File menu........................................................................................................32
Edit menu.......................................................................................................32
Hot Folder menu............................................................................................32
Progress menu...............................................................................................33
History menu..................................................................................................33
Window menu.................................................................................................33
Help menu......................................................................................................33
5. Working with Hot folders....................................................................35
5.1 What are hot folders?..........................................................................................35
Hot folders defined.........................................................................................35
Hot folder workflow illustrated......................................................................35
Main rules for valid hot folders......................................................................36
5.2 What is processing?............................................................................................36
Processing defined.........................................................................................36
Action Lists and Preflight Profiles: required “fuel” for processing..............36
Process results..............................................................................................37
5.3 Types of folders...................................................................................................38
Organizing your Enfocus PitStop Server work environment.........................38
Base folder.....................................................................................................38
Input Folder....................................................................................................38
Folders for original documents.....................................................................38
Folders for processed documents.................................................................39
Output folders for non-PDF files...................................................................39
Folders for reports.........................................................................................39
5.4 Managing hot folders...........................................................................................40
Creating a hot folder......................................................................................40
Editing a hot folder.........................................................................................40
Duplicate a hot folder.....................................................................................40
Deleting a hot folder.......................................................................................41
Importing a hot folder....................................................................................41
Exporting a hot folder.....................................................................................41
Hot folder status.............................................................................................42
Hot folder priority...........................................................................................42
6. Setting up Hot Folders........................................................................43
6.1 Valid hot folders...................................................................................................43
6.2 General settings of a hot folder...........................................................................43
Activating a hot folder....................................................................................43
6.3 Setting up a folder structure...............................................................................44
3
Enfocus PitStop Server
Basic folders vs advanced folders.................................................................44
Creating a folder structure using Create Basic Setup..................................44
Creating or editing a folder structure manually...........................................45
Absolute vs relative paths..............................................................................45
6.4 Processing : Subfolders and File renaming.......................................................46
Folders...........................................................................................................46
Report Generation..........................................................................................46
File renaming.................................................................................................47
6.5 Flattening.............................................................................................................47
Setting up Flattening......................................................................................47
6.6 Action Lists and Preflight Profile .......................................................................48
Adding Action Lists and/or a Preflight Profile...............................................48
Where Can I Find Action Lists and Preflight Profiles?..................................49
6.7 Smart Preflight....................................................................................................50
Overview.........................................................................................................50
Conceptual Overview of Smart preflight .......................................................50
Getting started with Smart Preflight ............................................................50
Types of Smart Preflight Variables ...............................................................51
Using Smart Preflight ...................................................................................51
Creating a Variable Set .................................................................................52
Creating a Smart Preflight Variable Set .......................................................52
Applying a Smart Preflight Variable .............................................................56
Test or verify variables in a Variable Set ......................................................57
Troubleshooting for Smart Preflight ............................................................58
6.8 Manage the Enfocus Certified PDF status of a PDF document..........................59
Changing the Certified PDF status of an incoming PDF document .............59
Certified options.............................................................................................59
6.9 Color Management..............................................................................................60
6.10 Fonts..................................................................................................................60
6.11 E-mail notification on processed documents...................................................60
Using e-mail notification................................................................................60
6.12 Summary............................................................................................................61
7. Preflighting and Checking PDF Documents........................................62
7.1 What is preflighting?...........................................................................................62
Preflighting defined........................................................................................62
Preflight Profiles............................................................................................62
Preflighting mechanism.................................................................................62
7.2 Properties of PDF documents.............................................................................63
Groups of properties......................................................................................63
7.3 Problem reporting...............................................................................................64
Problem severity levels defined.....................................................................64
Problem severity levels: example..................................................................64
7.4 Creating a Preflight Profile ................................................................................65
4
Contents
Predefined Preflight Profiles and Preflight Profile templates.....................65
Editing a Preflight Profile or creating a new Preflight Profile .....................65
To edit or create a Preflight Profile ..............................................................65
7.5 Adding Action Lists to Preflight Profiles.............................................................66
About adding Action Lists to Preflight Profiles.............................................66
To add Action Lists to a Preflight Profile ......................................................67
7.6 Locking a Preflight Profile .................................................................................67
About locking..................................................................................................67
To lock a Preflight Profile with a password...................................................67
8. Action Lists.........................................................................................69
8.1 Using the Action List Control Panel....................................................................69
To display the Action List Panel:....................................................................69
Removing an Action List.................................................................................70
Duplicating an Action List..............................................................................70
Importing and exporting Action Lists............................................................70
9. Working with Certified PDF Documents..............................................72
9.1 About Certified PDF ............................................................................................72
PDF workflow concept...................................................................................72
9.2 Guaranteed preflighting......................................................................................72
Preflighting issues.........................................................................................72
Preflighting in a Certified PDF workflow.......................................................72
9.3 Document consistency........................................................................................73
PDF editing issues..........................................................................................73
PDF editing in a Certified PDF workflow.......................................................73
9.4 Responsibility......................................................................................................74
Responsibility issues......................................................................................74
Responsibility in a Certified PDF workflow...................................................74
9.5 The Certified PDF workflow explained................................................................74
A conventional PDF workflow........................................................................74
The Certified PDF workflow: incremental save.............................................74
Roll-back mechanism....................................................................................75
9.6 What is an Enfocus Certified PDF document?....................................................76
Acrobat metadata...........................................................................................76
Enfocus metadata..........................................................................................76
9.7 Setting the Enfocus Certified PDF user identification........................................76
To set the Certified PDF user identification:.................................................76
9.8 Adding a Session Comment................................................................................77
To add a session comment:...........................................................................77
10. Managing fonts.................................................................................78
10.1 Types of fonts and their usage..........................................................................78
Standard 14 fonts...........................................................................................78
PostScript Type 1 fonts..................................................................................79
PostScript Type 3 fonts..................................................................................79
5
Enfocus PitStop Server
TrueType font.................................................................................................79
Multiple Master font.......................................................................................80
Double-byte font.............................................................................................81
10.2 PDF font substitution.........................................................................................81
Finding exact font names...............................................................................82
10.3 Embedding versus subsetting fonts..................................................................82
Embedding fonts............................................................................................82
Subsetting fonts.............................................................................................83
11. Managing Color.................................................................................84
11.1 About Color Management..................................................................................84
11.2 Color models.....................................................................................................84
The RGB color model.....................................................................................84
The CMYK color model...................................................................................84
The Grayscale model......................................................................................85
11.3 Color gamuts and color spaces.........................................................................85
Device-dependent color.................................................................................86
Device-independent color..............................................................................86
11.4 Rendering Intents..............................................................................................86
Perceptual remapping...................................................................................86
Saturation remapping....................................................................................87
Relative colorimetric remapping...................................................................87
Absolute colorimetric remapping..................................................................88
11.5 Using Color Management in Enfocus PitStop Server ......................................88
Working with ICC profiles..............................................................................88
Using ICC profiles in Enfocus PitStop Server ...............................................89
Disabling color management.........................................................................90
11.6 Spot colors.........................................................................................................91
Spot colors defined........................................................................................91
Unambiguously defined spot colors..............................................................91
Converting spot colors to the equivalent CMYK process colors...................91
12. Running jobs through PitStop Server................................................93
12.1 Dropping files or folders in the input folder.....................................................93
How often is an input folder checked ?..........................................................93
Creating subfolders in the input folder.........................................................93
13. Monitoring active jobs.......................................................................94
13.1 To sort the active jobs........................................................................................94
13.2 To pause all active jobs.....................................................................................94
13.3 To resume all active jobs...................................................................................94
13.4 To cancel active jobs..........................................................................................94
14. Viewing finished jobs in the History tab............................................96
14.1 History Logging..................................................................................................96
14.2 Managing the History List.................................................................................96
14.3 Exporting History...............................................................................................96
6
Contents
14.4 Statistics............................................................................................................96
14.5 Special Events Log.............................................................................................97
15. Enfocus PitStop Server Preferences.................................................98
15.1 To set the Measurement Units..........................................................................98
15.2 To set the Language..........................................................................................99
Enfocus Pack Manager..................................................................................99
15.3 To set the Folders............................................................................................101
15.4 To set the Processing preferences.................................................................101
15.5 To set the File Cleanup preferences...............................................................101
15.6 To set your Font preferences..........................................................................102
15.7 To set your Color Management preferences..................................................102
15.8 To set your E-Mail preferences.......................................................................103
15.9 To set your Personal Info.................................................................................103
15.10 To set the Update Preferences......................................................................103
7
Enfocus PitStop Server
1. Copyrights
© 2012 Enfocus BVBA all rights reserved. Enfocus is an Esko company.
Certified PDF is a registered trademark of Enfocus BVBA; patent pending.
Enfocus PitStop Pro, Enfocus PitStop Workgroup Manager, Enfocus PitStop Server, Enfocus PitStop
Connect, Enfocus Instant PDF, Enfocus StatusCheck, Enfocus CertifiedPDF.net, Enfocus Instant
Barcode, Enfocus PitStop Extreme, Enfocus PDF Workflow Suite, Enfocus LightSwitch, Enfocus
FullSwitch, Enfocus PowerSwitch, Enfocus SwitchClient, Enfocus SwitchScripter and Enfocus
Browser are product names of Enfocus BVBA.
Acrobat, Distiller, InDesign, Illustrator, Photoshop, FrameMaker, PDFWriter, PageMaker, the
Adobe logo, the Acrobat logo and PostScript are trademarks of Adobe Systems Incorporated.
Apple, Mac, Mac OS, Macintosh, iPad and ColorSync are trademarks of Apple Computer, Inc.,
registered in the U.S. and other countries.
Windows, Windows 2000, Windows XP and Windows Vista are registered trademarks of Microsoft
Corporation.
PANTONE® Colors displayed herein may not match PANTONE-identified standards. Consult current
PANTONE Color Publications for accurate color.
PANTONE®, PantoneLIVE and other Pantone trademarks are the property of Pantone LLC. All
other trademarks or registered trademarks are the property of their respective owners. Pantone
is a wholly owned subsidiary of X-Rite, Incorporated. © Pantone LLC, 2012. All rights reserved.
OPI is a trademark of Aldus Corporation.
Quark, QuarkXPress, QuarkXTensions, XTensions and the XTensions logo among others, are
trademarks of Quark, Inc. and all applicable affiliated companies, Reg. U.S. Pat. & Tm. Off. and in
many other countries.
This product and use of this product is under license from Markzware under U.S.Patent No.
5,963,641.
Other brand and product names may be trademarks or registered trademarks of their respective
holders. All specifications, terms and descriptions of products and services are subject to change
without notice or recourse.
8
Enfocus PitStop Server
2. Introduction to Enfocus PitStop Server
2.1 About this Reference guide
Enfocus PitStop Server allows you to successfully operate and manage workflow procedures on
PDF documents.PitStop Server runs independently from other Enfocus products, yet certain of its
features and options rely on Enfocus PitStop Pro.
2.2 System requirements
The system requirements are displayed during the second step of the installation process, and
are also listed on the product pages on the Enfocus Web site (www.enfocus.com).
2.3 Installing Enfocus PitStop Server
To install PitStop Server from DVD
1. Insert the Enfocus DVD into your DVD drive.
2. In Microsoft Windows, the flash movie will start automatically if the AutoPlay function is enabled
for that DVD drive. On Mac OS, you need to open the DVD, and double-click the “Start” flash
movie.
3. A flash movie will guide you to the installer.
4. Follow the installation instructions on your screen.
To install PitStop Server from the Enfocus Web site
1. Go to the Enfocus Web site (www.enfocus.com).
2. Download the Enfocus PitStop Server installer from the site.
3. Start the appropriate installer
4. Follow the installation instructions on your screen
9
Enfocus PitStop Server
2.4 Best practices after installing Enfocus PitStop Server
After installing Enfocus PitStop Server, it can be advisable to take the following actions:
Register Enfocus PitStop Server
See Buying and registering Enfocus PitStop Server
Lock PitStop Server
See Locking PitStop Server on page 27.
2.5 Licensing
Creating an activation account
Activation is hardware linked, so PitStop Server can only be activated on one computer at the same
time. If you want to move PitStop Server to another computer it needs to be deactivated on the old
computer and activated again on the new computer. if you try to activate PitStop Server on another
computer than the one it was activated on you will get an error message. You are not able to activate
it on this new computer as long as the License is still active on the old computer.
1. Go to http://www.enfocus.com/CreateAccount.
2. Enter the appropriate information in the fields.
3. If you would like to receive news from Enfocus or be contacted by an Enfocus Certified Partner,
leave the two bottom checkboxes selected; otherwise, clear them.
4. Click Create my Account.
5. After a few minutes, check your e-mail program for a new message from Enfocus regarding
activating your new account.
Note:
If you do not receive this e-mail message, you might have to check any spam folders in your
e-mail program as well.
6. Once it arrives, open the message and click the link to confirm your e-mail address.
You should receive a message that your account was confirmed successfully in your default
web browser.
Starting a trial
Once you have created and confirmed your activation account (see Creating an activation account
on page 10), you can start a 30-day trial for your copy of PitStop Server.
10
Enfocus PitStop Server
• If the computer running your copy of PitStop Server is connected to the Internet, you can start
a 30-day trial from that machine.
See Starting a trial on-line on page 11.
• Otherwise, you must create a trial request file and use a computer that is connected to the
Internet to upload it to an activation server.
See Starting a trial off-line on page 11
Starting a trial on-line
You can start a 30-day trial on-line if the computer where your copy of PitStop Server is installed
is connected to the internet.
To start a 30-day trial on-line, do the following:
1. In PitStop Server, navigate to Help > About Enfocus PitStop Server to open the About Enfocus
PitStop Server window.
2. Click the Start Trial button.
This opens the Enfocus Software Activation dialog.
3. Enter the name and password of your activation account. Select the Remember Password
checkbox if you want PitStop Server to remember your password.
Note:
You should have created this activation account in Creating an activation account on page 10.
If you haven't created an activation account yet, click the Create a new Enfocus Account link
in the Wizard and see Creating an activation account on page 10 for more instructions.
4. The Activate 30 day trial version radio button will be selected by default.
5. Click the Activate button.
A message appears saying that the trial was successfully activated and displaying the product
version and number of trial days remaining.
6. Click Close button to close the Enfocus Software Activation dialog.
Starting a trial off-line
If the computer where you will use your software is NOT connected to the internet, you need to
start your trial off-line.
To start a trial off-line, do the following:
1. Create the trial request file using the Off-Line Initialization dialog and copy it to a machine
with full Internet access.
See Creating a trial request for offline activation on page 12.
2. Upload the trial request file, download the trial response file and copy this file to the machine
with PitStop Server installed.
See Uploading the trial request and downloading the response file on page 12.
3. On this machine, use the Off-Line Initialization dialog to start your trial.
11
Enfocus PitStop Server
See Loading the trial response file on page 13.
Creating a trial request for offline activation
To create a trial request file, do the following:
1. In PitStop Server, navigate to Help > About Enfocus PitStop Server to open the About Enfocus
PitStop Server window.
2. Click the Start Trial button.
This opens the Enfocus Software Activation dialog.
3. Enter the name and password of your activation account. Select the Remember Password
checkbox if you want PitStop Server to remember your password.
Note:
You should have created this activation account in Creating an activation account on page 10.
If you haven't created an activation account yet, go to http://www.enfocus.com/CreateAccount
on a computer connected to the internet, and see Creating an activation account on page 10
for instructions.
4. The Activate 30 day trial version radio button will be selected by default.
5. Click Activate button.
The Connection Problem To Activation Server dialog will appear.
6. Select the Off-line activation radio button and click the Next button.
The Off-Line Initialization dialog will appear.
7. The left pane of this dialog will display the trial request file. Click the Save button and save it
in a desired location.
8. Copy the trial request file to a computer with Internet access.
Uploading the trial request and downloading the response file
Once you have copied the trial request file to a machine with full Internet access, do the following:
1. Start a web browser on that machine and go to http://www.enfocus.com/Activation.
2. On the web page, select Offline Product Activation and click Continue.
3. Click the Choose File button, browse for the trial request file you copied to this machine and
click Continue button.
4. Enter your activation account password in the Password: field (your Account Name should be
filled in automatically) and click Continue button.
5. Verify that the product information contained in the trial request file is correct and click Continue
button.
6. The website generates a response file (response.xml).
Depending on the level of security of your Web browser, the response file will download
automatically, or it may be blocked.
If it is blocked, click the direct link to download it.
12
Enfocus PitStop Server
Important: Do NOT click on the warning message at the top of your browser window then
go back to the previous page and try to download the file again. If you do this the file you
download will be corrupt.
7. Copy the response file back to the machine running PitStop Server and go to that machine.
Loading the trial response file
Once you are back at the machine running PitStop Server, do the following to load the trial response
file:
1. In PitStop Server, navigate to Help > About Enfocus PitStop Server to open the About Enfocus
PitStop Server window.
2. Click the Start Trial button.
This opens the Enfocus Software Activation dialog.
3. Enter the name and password of your activation account. Select the Remember Password
checkbox if you want PitStop Server to remember your password.
Note:
You should have created this activation account in Creating an activation account on page 10.
If you haven't created an activation account yet, go to http://www.enfocus.com/CreateAccount
on a computer connected to the internet, and see Creating an activation account on page 10
for instructions.
4. The Activate 30 day trial version radio button will be selected by default.
5. Click Activate button.
The Connection Problem To Activation Server dialog will appear.
6. Select the Off-line activation radio button and click the Next button.
The Off-Line Initialization dialog will appear.
7. Click the Load button in the right pane of the Off-Line Initialization dialog.
8. Browse to the response file you copied from the machine with full Internet access and click
Next button.
Attention: Select the response file you downloaded from the website (response.xml) and
NOT the trial request file you uploaded.
A message will appear saying that your trial licenses have been successfully activated.
9. Click Close button in the Enfocus Software Activation dialog.
10. You will see the number of trial days remaining in the Trial tab of the About Enfocus PitStop
Server window.
Activating licenses
Once you have created and confirmed your activation account (see Creating an activation account
on page 10), you can start activating the licenses using your software’s product keys.
13
Enfocus PitStop Server
Product keys come from online stores, from product key files you receive from Enfocus, or you
can find them inside product boxes.
Note: Product key files are HTML files. You can double-click them to see what product keys they
contain.
• If the computer running your copy of PitStop Server is connected to the Internet, you can get
licenses for the product keys and activate them from that machine.
See On-line activation on page 14.
• Otherwise, you must create an activation request file and use a computer that is connected to
the Internet to upload it to an activation server.
See Off-line activation on page 14
On-line activation
You can activate your product key(s) on-line if the computer where you will use your software is
connected to the internet.
To activate a product key on-line, do the following:
1. Open the Enfocus Software Activation dialog by either:
• navigating to Help > About Enfocus PitStop Server and clicking the Activate button in the
About Enfocus PitStop Server window. Or
• going to Help > License > Activate .
2. Enter the name and password of your activation account. Select the Remember Password
checkbox if you want PitStop Server to remember your password.
Note:
You should have created this activation account in Creating an activation account on page 10.
If you haven't created an activation account yet, click the Create a new Enfocus Account link
in the Wizard/Assistant and see Creating an activation account on page 10 for instructions.
3. The Activate a product key radio button will be selected by default.
4. Click the Browse button and select the product key from the location where you had saved it.
5. Click Activate button to activate your license key for the PitStop Server.
A message will appear saying that your licenses have been successfully activated.
6. Click Close button in the Enfocus Software Activation dialog.
7. The product and its license will appear in the License tab of the About Enfocus PitStop Server
window.
Off-line activation
If the computer where you will use your software is NOT connected to the internet, you need to
activate your product key(s) off-line.
To activate a product key off-line, do the following:
14
Enfocus PitStop Server
1. Create the initialization request file using the Off-Line Initialization dialog and copy it to a
machine with full Internet access.
See Creating an initialization request on page 15.
2. Upload the initialization request file, download the initialization response file and copy this file
to the machine with PitStop Server installed.
See Uploading the activation request and downloading the response file on page 15.
3. On this machine, use the Off-Line Initialization dialog to activate your software.
See Loading the activation response file on page 16.
Creating an initialization request
To create an initialization request file for off-line license activation, do the following:
1. Open the Enfocus Software Activation dialog by either:
• going to the Help > About Enfocus PitStop Server and clicking the Activate button,
• going to Help > License > Activate .
The Enfocus Software Activation window appears.
2. Enter the name and password of your activation account. Select the Remember Password
checkbox if you want PitStop Server to remember your password.
Note:
You should have created this activation account in Creating an activation account on page 10.
If you haven't created an activation account yet, go to http://www.enfocus.com/CreateAccount
on a computer connected to the internet, and see Creating an activation account on page 10
for instructions.
3. The Activate a product key radio button will be selected by default.
4. Click the Browse button and select the product key from the location where you had saved it.
5. Click Activate button to activate your license key for the PitStop Server.
The Connection Problem To Activation Server dialog will appear.
6. Select the Off-line activation radio button and click the Next button.
The Off-Line Initialization dialog will appear.
7. The left pane of this dialog will display the initialization request file which is named by default
as requestinitilize.xml. Click the Save button and save it in a desired location.
8. Copy the initialization request file, requestinitilize.xml, to a computer with Internet
access using whatever method you have available - USB thumb drive, diskette, network...
Uploading the activation request and downloading the response file
Once you have copied the initialization request file, requestinitilize.xml to a machine with
full Internet access, do the following:
1. Start a web browser on that machine and go to http://www.enfocus.com/Activation.
15
Enfocus PitStop Server
2. On the web page, select the Offline Product Activation radio button and click the Continue
button.
3. Browse for the initialization request file you copied to this machine and click Continue button.
4. Enter your activation account password in the Password: field (your Account Name should be
filled in automatically) and click Continue button.
5. Verify that the product information contained in the initialization request file is correct and click
the Continue button.
6. The website generates an initialization response file (response.xml).
Depending on the level of security of your Web browser, the response file will download
automatically, or it may be blocked.
If it is blocked, click the direct link to download it.
Important: Do NOT click on the warning message at the top of your browser window then
go back to the previous page and try to download the file again. If you do this the file you
download will be corrupt.
7. Copy the initialization response file, response.xml, back to the machine running PitStop
Server and go to that machine.
Loading the activation response file
Once you are back at the machine running PitStop Server, do the following to load the initialization
response file:
1. Open the Enfocus Software Activation dialog by either:
• going to the Help > About Enfocus PitStop Server and clicking the Activate button,
• going to Help > License > Activate .
The Enfocus Software Activation window appears.
2. Enter the name and password of your activation account. Select the Remember Password
checkbox if you want PitStop Server to remember your password.
Note:
You should have created this activation account in Creating an activation account on page 10.
If you haven't created an activation account yet, go to http://www.enfocus.com/CreateAccount
on a computer connected to the internet, and see Creating an activation account on page 10
for instructions.
3. The Activate a product key radio button will be selected by default.
4. Click the Browse button and select the product key from the location where you had saved it.
5. Click Activate button to activate your license key for the PitStop Server.
The Connection Problem To Activation Server dialog will appear.
6. Select the Off-line activation radio button and click the Next button.
The Off-Line Initialization dialog will appear.
16
Enfocus PitStop Server
7. Click the Load button in the right pane of the Off-Line Initialization dialog.
8. Browse to the initialization response file, response.xml, you copied from the machine with
full Internet access and click the Initilize button.
Attention: Select the initialization response file you downloaded from the website
(response.xml) and NOT the initialization request file you uploaded.
A message will appear saying that your licenses have been successfully activated.
9. Click Close button in the Enfocus Software Activation dialog.
10. The product and its license will appear in the License tab of the About Enfocus PitStop Server
window.
Moving licenses between computers
To move licenses between computers, do the following:
1. Deactivate the licenses on the computer that will not use them anymore.
See Deactivating licenses on page 17.
2. Copy the product keys file to the computer that will use the licenses.
3. On the computer acquiring the licenses, activate the licenses using the product keys file.
See Activating licenses on page 13.
Deactivating licenses
Just as with activating licenses, deactivating licenses can be done both on-line and off-line. You
must deactivate a license before moving it to another computer.
On-line deactivation
To deactivate a license on-line, do the following:
1. Open the Enfocus Software Deactivation dialog by either:
• navigating to Help > About Enfocus PitStop Server and clicking the Deactivate button in
the About Enfocus PitStop Server window.
or
• going to Help > License > Deactivate .
2. Select the Export license information during deactivation checkbox, if you want to save the
product key as a HTML file. You will need this file to activate the license for this product key on
another computer.
a) Click Deactivate button.
The Save License Information File dialog appears. The File name drop-down menu in this
dialog will display the LicensesBackup.html file.
b) Click Save button to save the file in your desired location.
3. A message appears saying the deactivation was completed successfully. Click Close button.
17
Enfocus PitStop Server
The license will no longer appear in the About Enfocus PitStop Server window.
Off-line deactivation
If the computer where you use your software is NOT connected to the internet, you need to deactivate
your product key(s) off-line.
To deactivate a product key off-line, do the following:
1. Create an off-line deactivation request and copy it to a machine with internet access.
See Creating a deactivation request on page 18.
2. Upload that request to the activation server, download the response file and copy this file to
the machine with PitStop Server installed.
See Uploading the deactivation request file and downloading the response file on page 18.
3. On this machine, use the Off-Line Initialization to deactivate your software.
See Loading the deactivation response on page 19.
Creating a deactivation request
To create an deactivation request file for off-line license deactivation, do the following:
1. Open the Enfocus Software Deactivation dialog by either:
• going to the Help > About Enfocus PitStop Server and clicking the Deactivate button,
• going to Help > License > Deactivate .
The Enfocus Software Deactivation window appears.
2. Select the Export license information during deactivation checkbox, to save the product key
as a HTML file.
a) Click Deactivate button.
The Save License Information File dialog appears. The File name drop-down menu in this
dialog will display the LicensesBackup.html file.
b) Click Save button to save the file in your desired location.
The Connection Problem To Activation Server dialog will appear.
3. Select the Off-line activation radio button and click the Next button.
The Off-Line Initialization dialog will appear.
4. The left pane of this dialog will display the initialization request file which is named by default
as requestinitilize.xml. Click the Save button and save it in a desired location.
5. Copy the initialization request file, requestinitilize.xml, to a computer with Internet
access using whatever method you have available - USB thumb drive, diskette, network...
Uploading the deactivation request file and downloading the response file
Once you have copied the deactivation request file to a machine with full Internet access, do the
following:
1. Start a web browser on that machine and go to http://www.enfocus.com/Activation.
2. On the web page, select Offline Product Deactivation and click Continue button.
18
Enfocus PitStop Server
3. Browse for the deactivation request file you copied to this machine and click Continue button.
4. Verify that the product information contained in the deactivation request file is correct and click
Continue button.
5. The website generates a response file (response.xml).
Depending on the level of security of your Web browser, the response file will download
automatically, or it may be blocked.
If it is blocked, click the direct link to download it.
Important: Do NOT click on the warning message at the top of your browser window then
go back to the previous page and try to download the file again. If you do this the file you
download will be corrupt.
6. Copy the response file back to the machine running PitStop Server and go to that machine.
Loading the deactivation response
Once you are back at the machine running PitStop Server, do the following to load the deactivation
response file:
1. pen the Enfocus Software Deactivation dialog by either:
• going to the Help > About Enfocus PitStop Server and clicking the Deactivate button,
• going to Help > License > Deactivate .
The Enfocus Software Deactivation window appears.
2. Select the Export license information during deactivation checkbox, to save the product key
as a HTML file.
a) Click Deactivate button.
The Save License Information File dialog appears. The File name drop-down menu in this
dialog will display the LicensesBackup.html file.
b) Click Save button to save the file in your desired location.
The Connection Problem To Activation Server dialog will appear.
3. Select the Off-line activation radio button and click the Next button.
The Off-Line Initialization dialog will appear.
4. Click the Load button in the right pane of the Off-Line Initialization dialog.
5. Browse to the response file you copied from the machine with full Internet access and click
the Initilize button.
Attention: Select the response file you downloaded from the website (response.xml) and
not the deactivation request file you uploaded.
A message will appear that the deactivation was completed successfully.
6. Click Close button in the Enfocus Software Deactivation dialog.
19
Enfocus PitStop Server
The license will no longer appear in the About Enfocus PitStop Server window.
Repairing licenses
Licenses are tied to identifying characteristics of the hardware inside your computer. Licenses
may break if you change the hardware significantly (for example if you add memory AND the hard
drive crashes AND your network card breaks...).
If more than three hardware elements of the computer change simultaneously, the licenses are
invalidated and declared broken.
As with activating and deactivating licenses, the repair procedure may be done on-line or off-line.
On-line repairing
To repair your broken license(s) online, do the following:
1. Open the About Enfocus PitStop Server window.
When your license needs repair, the window shows "Needs repair" in red, and a Repair
button.
2. Click the Repair button to open the Repair License wizard.
3. Click Next button in the first screen of the Repair License dialog box.
4. Leave On-line Repair selected and click Next button.
A status bar will appear while the system communicates with the activation server. After that,
a message will appear that the repair completed successfully and that you can now use the
product(s) on your computer.
5. Click Close button.
Off-line repairing
To repair broken licenses on a machine without Internet access, follow the same general procedure
as when performing an off-line activation or deactivation.
Creating a repair request
To create the repair request, do the following:
1. Open the About Enfocus PitStop Server window.
When your license needs repair, the window shows “Needs repair” in red, and a Repair
button.
2. Click the Repair button to open the Repair License dialog.
3. Click Next button in the first screen of the Repair License dialog box.
4. Select Off-line repair and click Next button.
5. Leave Step 1: Create a repair request selected and click Next button.
6. Save the repair request file.
a) Click Save As (PC) / Select... (Mac).
b) In the pop-up that opens, browse to the desired location and click Save button.
20
Enfocus PitStop Server
Note: By default, the activation request file is called requestrepair.xml.
7. A message will appear saying that Step 1 of the off-line repair has been completed successfully.
8. Copy that file to a computer with Internet access using whatever method you have available USB thumb drive, diskette, network...
Uploading the repair request file and downloading the response file
Once you have copied the repair request file to a machine with full Internet access, do the following:
1. Start a web browser on that machine and go to http://www.enfocus.com/Activation.
2. On the web page, select Offline Repair and click Continue button.
3. Browse for the repair request file you copied to this machine and click Continue button.
4. Verify that the product information contained in the repair request file is correct and click
Continue button.
5. Depending on the level of security of your Web browser, the response file (response.xml)
will download automatically, or it may be blocked. If it is blocked, click the direct link to download
the response file.
Important: Do NOT click on the warning message at the top of your browser window then
go back to the previous page and try to download the file again. If you do this the file you
download will be corrupt.
6. Copy the response file back to the machine running PitStop Server and go to that machine.
Loading the repair response
Once you are back at the machine running PitStop Server, do the following to load the deactivation
response file:
1. Open the About Enfocus PitStop Server window.
2. Click the Repair button to open the Repair License dialog.
3. Click Next button in the first screen of the Repair License dialog box.
4. Select Off-line repair and click Next button.
5. Select Step 2: Load a repair response and click Next button.
6. Browse to the folder containing the response file you copied from the machine with full Internet
access, double-click it, and click Next button.
Attention: Select the response file you downloaded from the website (response.xml) and
not the repair request file you uploaded.
A status bar will appear while the system processes the response file. After that, a message
will appear that the repair completed successfully.
21
Enfocus PitStop Server
7. Click Close button.
Tips and troubleshooting for Licensing
In this section are tips and troubleshooting information designed to help you use the software if
there are unexpected results.
Error messages - is the problem local or on the Web server?
On the rare occasion that you get an error message when you are manipulating licenses, if there
is an incident ID, the error is on the Web server. If there is no incident ID, the problem is local.
For example, "An error occurred while processing an
activation/deactivation/repair response. Incident ID: 1443" indicates that
there is a problem on the Web server.
Error during activation / deactivation / repair
If you get the error message: “An error occurred during
activation/deactivation/repair”, check the version of your FNP Licensing Service.
The Licensing Wizard/Assistant works with the FNP Licensing Service on both Mac and PC. The
versions of your FNP Licensing Service and of the Licensing Wizard/Assistant must match.
If deactivation fails
If deactivation of your licenses fails, resulting in disabled licenses, you should be able to clean
them up by deactivating them again.
Error when processing the response file
When your off-line activation, deactivation or repair fails after loading the response file you
downloaded from the activation website, it may be because you downloaded the file twice.
This happens when your browser blocks automatic downloads, and you click the security message
at the top of your browser window then go back to the previous page to try downloading the file
again.
This generates a second, corrupt response file, that will cause the activation / deactivation / repair
to fail.
If this happened to you, contact your Customer Service representative.
To avoid this next time you download a response file, you need to either change your browser’s
security settings, or click the direct link on the download page.
See also:
• Uploading the activation request and downloading the response file on page 15
• Uploading the deactivation request file and downloading the response file on page 18
• Uploading the repair request file and downloading the response file on page 21
On-line activation issues
When performing an on-line activation, if the Activate License Wizard/Assistant cannot access the
Internet, it will prompt for proxy server information.
• If you have a proxy server, enter the required information and try again.
• If you do not have a proxy server, something else is wrong with your connection.
22
Enfocus PitStop Server
If the program hangs
If your software hangs when you launch it, it could be because another application using licenses
may have crashed and locked the connection to the licensing server.
In this case, quitting the process of the crashed application in Window’s Task Manager, or rebooting
the machine (Mac or Windows) should solve the problem.
Careful use of filesystem monitoring utilities
The licensing server software stores its critical configuration information in a special area of the
filesystem called trusted storage. This area of the computer can appear empty when in reality it
is not.
If you are using a filesystem monitoring utility such as Radmind on the Macintosh, it can delete
the configuration in the trusted storage area thinking it is empty. Make sure in the monitoring
utility to exclude those directories from monitoring/cleanup/replacing.
Operating System
Trusted Storage location
OS X on a Macintosh
/Library/Preferences/FLEXnet Publisher/FLEXnet
Windows XP on a PC
\Documents and Settings\All Users\Application
Data\FLEXnet
Windows Vista, Windows \ProgramData\FLEXnet
7, Windows Server 2008 on
a PC
2.6 Starting Enfocus PitStop Server
To start Enfocus PitStop Server
Enfocus PitStop Server is accessible by running the PitStop Server application.
The Enfocus PitStop Server splash screen appears and remains displayed for a couple of seconds.
Once you have registered Enfocus PitStop Server, or clicked the Start Trial button, you can start
using Enfocus PitStop Server.
If the PitStop Server WatchDog is not running, or is set to another user (on Mac OS), you can start
the PitStop Server WatchDog and change it to the current user.
2.7 Getting Support
When contacting the Enfocus Support Department, it is important that you can provide our product
specialists with the necessary information about the configuration of your computer system and
the Enfocus product(s) you are using. To this end, we have included this support information in the
About PitStop Server dialog box.
23
Enfocus PitStop Server
Furthermore, you can also consult the Enfocus Knowledge Base or use the Support section on the
Enfocus Web site to report a problem.
To consult the support information:
1. On Windows, choose Help > About Enfocus PitStop Server , or on Mac, choose PitStop Server
> About Enfocus PitStop Server
The About Enfocus PitStop Server dialog box appears.
2. Click the Support info tab.
You can see all the relevant information about your version of Enfocus PitStop Server and about
the configuration of your computer system.
3. Click Copy to Clipboard.
4. Paste the support information in a text file or e-mail message and send it to
[email protected].
To consult the Enfocus Knowledge Base:
Choose Help > Knowledge Base .
To report a problem:
1. Choose Help > Get Support > Report a problem .
2. Fill out the online form.
3. Click Submit button.
24
Enfocus PitStop Server
3. The concept of Enfocus PitStop Server
3.1 What is Enfocus PitStop Server
Enfocus PitStop Server is a stand-alone and hot folder based application. It allows you to easily
set up and manage PDF based workflows.
Hot folders defined
An Enfocus PitStop Server hot folder is actually a collection of dedicated folders for batch PDF
processing. You create such folders on the hard disk of your computer or on a network drive.
Enfocus PitStop Server automatically processes PDF documents that arrive in a given input folder
of this hot folder and places the processed files based on the result accordingly in the specified
output folder. The original PDF document and the preflight results can be saved in the same or a
different folder, depending on whether processing was successful or not.
The hot folder’s input folder is an active folder: Enfocus PitStop Server will monitor the input folder
of a hot folder at regular intervals and will, upon arrival of a PDF document in this input folder,
start the appropriate automatic action.
Hot folders are interlinked folders. You use the Hot Folder Editor to create the links between the
folders of a hot folder: you specify the path the PDF documents have to follow as they are processed.
3.2 The components of Enfocus PitStop Server
Enfocus PitStop Server consists of a number of components, amongst which the PitStop Server
application, and the PitStop Server WatchDog.Enfocus PitStop Server can process in the background,
even after closing the PitStop Server application.
PitStop Server
The PitStop Server application is the actual user interface. It allows to define and edit hot folders,
monitor active jobs, and view the job history. Unlike in earlier versions of Enfocus PitStop Server,
closing the application does not quit Enfocus PitStop Server. This implies that files can be processed
even while PitStop Server is not running.
PitStop Server WatchDog
The PitStop Server WatchDog is an application that ensures that all necessary software components
to process files are running. If a component hasn’t started, or has quit for any reason, the PitStop
Server WatchDog will launch or relaunch this software component.
25
Enfocus PitStop Server
Note: OS permissions can impose restrictions on editing hot folders. While this may be helpful in
some cases you must ensure that the PitStop Server WatchDog user and the user who edits hot
folders have full permissions.
Managing PitStop Server WatchDog from within PitStop Server
Starting PitStop Server
If PitStop Server is launched, and the PitStop Server WatchDog is not running, you will be asked
if you want to start it at that moment.
Closing PitStop Server
If you close PitStop Server, you will be asked if you want PitStop Server to keep processing files.
• If you click Yes, the PitStop Server application will quit, but the PitStop Server WatchDog and
all software components to process files, will keep running in the background.
• If you click No, the PitStop Server WatchDog and all other software components will be quit as
well.
Managing the WatchDog on Windows
On Windows, PitStop Server WatchDog is installed as a Service. Users who want to automatically
run launch WatchDog must change the service manually, as described in the Knowledge Base.
For more information on managing PitStop Server WatchDog as a Service, we refer to the Enfocus
Knowledge Base on http://www.enfocus.com.
Managing PitStop Server on Mac OS
On Mac OS, the PitStop Server WatchDog is by default installed as a regular application, and can
be started from within PitStop Server.
On Mac OS, the Watchdog will be linked with a user account, so the choice of this PitStop Server
WatchDog user is important.
Note: It is advisable to create a user, e.g. “PitStopServer” with sufficient privileges, use this User
to install the software, and keep this user always logged on. If needed, you could set the PitStop
Server WatchDog as a Login Item for this user.
The WatchDog is also installed as a Daemon, but will not be automatically launched. For more
information on starting WatchDog as a Daemon, see http://www.enfocus.com/kb.php?id=6089
26
Enfocus PitStop Server
4. Looking at the Enfocus PitStop Server Work Area
4.1 Locking PitStop Server
It is possible to lock PitStop Server using a password. Only day-to-day tasks are possible while
PitStop Server is locked: monitor and cancel jobs, manage the history, view hot folders, etc.
Configuring PitStop Server is prevented.
Locking PitStop Server
1. Click the Lock settings button
in the upper right corner of PitStop Server.
The Lock Settings dialog box appears.
2. Enable Locked.
3. Enter a password, and confirm the password by entering it again.
4. Click OK button.
Unlocking PitStop Server
1. Click the Unlock settings button
in the upper right corner of PitStop Server.
The Lock Settings dialog box appears.
2. Enter the password and click the Unlock button.
3. Enable Unlocked.
4. Click OK button.
4.2 The PitStop Server Hot Folder tab
The PitStop Server Hot Folder tab will by default appear as soon as you launch PitStop Server. You
can use the Hot Folder tab for the following purposes:
• To manage your hot folders
• To keep track of the status of a particular hot folder
The contextual menu on a Hot Folder allows to perform a number of basic tasks, such as
activating/deactivating, changing the priority, manage the hot folders, sort the list or explore the
input folder or one of the output folders.
27
Enfocus PitStop Server
A. Menu bar
B. Buttons to manage your hot folders
C. Hot folder Status, Priority and Name
D. Special Events Log (see “Special Events Log )
E. Lock settings Button (see Locking PitStop Server on page 27)
F. Current User for PitStop Server and PitStop Server WatchDog
Note: For a detailed description on managing hot folders, see Working with Hot folders on page
35. For a detailed description on setting up hot folders, see Setting up Hot Folders on page 43.
4.3 The PitStop Server Progress tab
The PitStop Server Progress tab provides information on the active jobs in PitStop Server. You can
use the Progress tab for the following purposes:
• To monitor jobs being processed by PitStop Server
• To keep track of the status of a particular job
28
Enfocus PitStop Server
A. Menu bar
B. Buttons to pause/resume job processing, and to delete the selected jobs
C. Job name, the hot folder, step, progress, and info
D. Special Events Log (see “Special Events Log )
E. Locking Button (see Locking PitStop Server on page 27)
F. Status of PitStop Server WatchDog
Note: For a detailed description on Jobs in progress, see Active Jobs in Enfocus PitStop Server .
4.4 The PitStop Server History tab
The PitStop Server History tab provides information on the finished jobs in PitStop Server. You can
use the History tab for the following purposes:
• To manage your finished jobs; filtered by name, date, ...
• To check the preflight status of finished jobs
• To check the statistics
29
Enfocus PitStop Server
A. Menu bar
B. Buttons to manage your History
C. Output name, hot folder, date, preflight status and special events for every job
D. Special Events Log (see “Special Events Log )
E. Locking Button (see Locking PitStop Server on page 27)
F. Filter applied on the History
Note: For a detailed description on the History, see The Enfocus PitStop Server History .
4.5 The Hot Folder Editor
A hot folder is a collection of folders and is made up of a set of properties.
You can use the Hot Folder Editor to set or change these properties.
30
Enfocus PitStop Server
A. The categories of properties to define a hot folder.
B. The hot folder status and, if any, indication of the configuration error.
C. A Help line on the active category and setting.
D. Type a descriptive name for your hot folder.
E. The hot folder description is optional.
F. Activate your hot folder and specify a priority level.
To display the Hot Folder Editor dialog box:
In the Hot Folder tab, do one of the following:
• To set the properties of a new hot folder, click the Create a new hot folder button
. See
also Setting up Hot Folders on page 43.
• To change the properties of an existing hot folder, select the hot folder in the list and click Edit
the selected hot folder button
or double-click the hot folder in the list.
To use the Hot Folder Editor:
1. Display a group of properties in the Hot Folder Editor by clicking the respective category.
31
Enfocus PitStop Server
2. Make the changes to the properties that you want
Note: For a detailed description of the changes you can make, see Setting up Hot Folders on
page 43.
3. If necessary, select any other group of properties that you want to change by clicking the
respective category.
4. Click OK button to save your settings and return to the Hot Folder tab.
4.6 The PitStop Server Menu
The PitStop Server menu allows to quickly access basic functions. Some menu items are only
available if the correct item is selected, for example, the Hot Folder menu is only available if a hot
folder is selected in the Hot Folder tab.
File menu
Menu Item
Windows Mac OS
More information
PitStop Server WatchDog on page 25
Quit WatchDog
Exit PitStop Server
alt-F4
cmd-Q
Select all
ctrl-A
cmd-A
Deselect All
ctrl-shift-A cmd-shift-A
On Mac OS, this can be found in the application
menu.
Edit menu
Hot Folder menu
New
ctrl-N
cmd-N
Creating a hot folder on page 40
Edit
ctrl-E
cmd-E
Editing a hot folder on page 40
Import
ctrl-O
cmd-O
Importing a hot folder on page 41
Export
ctrl-S
cmd-S
Exporting a hot folder on page 41
Delete
Del
Backspace Deleting a hot folder on page 41
Duplicate
ctrl-D
cmd-D
Enable
32
Duplicate a hot folder on page 40
Hot folder status on page 42
Enfocus PitStop Server
Disable
Hot folder status on page 42
Priority
Hot folder priority on page 42
Explore
Shows the selected input or output folder in the
finder / explorer
Show Hot Folders
ctrl-1
cmd-1
Progress menu
Pause All Jobs
To pause all active jobs
Resume All Jobs
To resume all active jobs
Cancel Job
escape
cmd-.
Active Jobs in Enfocus PitStop Server
Show Progress
ctrl-2
cmd-2
Active Jobs in Enfocus PitStop Server
History menu
To export the information in the list
Export History
Show Statistics
ctrl-I
Remove From History Del
cmd-I
Backspace To delete jobs from the list
Special Events Log
View Special Events
Log
Show History
To view the statistics
ctrl-3
cmd-3
Filtering the History
Window menu
Preflight...
ctrl-alt-P cmd-opt-P Action Lists and Preflight Profile on page 48
Action Lists...
ctrl-alt-A cmd-opt-A Action Lists and Preflight Profile on page 48
Variable Sets...
ctrl-alt-V
Preferences...
ctrl-alt-K cmd-opt-K On Mac OS, Preferences can be found in the
or cmd-,
Application menu.
Enfocus PitStop Server Preferences on page 98
Help menu
About Enfocus PitStop
Server
On Mac OS, this can be found in the Application
menu
33
Enfocus PitStop Server
License
Enfocus Home Page
Buy now!
Check for Updates
Manage Languages...
Enfocus Pack Manager on page 99
PitStop Server (HTML)
Read Me (PDF)
License Agreement
(PDF)
Online Resources
34
Knowledge Base
Getting Support on page 23
Get Support
Getting Support on page 23
Enfocus PitStop Server
5. Working with Hot folders
5.1 What are hot folders?
Hot folders defined
An Enfocus PitStop Server hot folder is actually a collection of dedicated folders for automated
PDF processing. You create these folders on the hard disk of your computer or on a network drive.
Enfocus PitStop Server automatically processes PDF documents that arrive in a given input folder
of this hot folder and places them in the output folder which you have specified. The original PDF
document and a process report can be placed in the same or a different folder, depending on
whether processing was successful or not.
The hot folder’s input folder is an active folder: Enfocus PitStop Server will monitor the input folder
of a hot folder at regular intervals and will, upon arrival of a PDF document in this input folder,
start the appropriate automatic action.
Hot folders are interlinked folders. You use the Hot Folder Editor to create the links between the
folders of a hot folder: You specify the path the PDF documents have to follow as they are processed.
Hot folder workflow illustrated
The illustration below shows a typical set-up of a hot folder and its workflow.
1. Enfocus PitStop Server detects incoming PDF documents in the input file folder and processes
them automatically.
2. Enfocus PitStop Server places the original PDF documents in a separate folder, depending on
the result after processing: folder 2 if processing was successful or folder 2’ if processing of
the PDF document returned errors.
35
Enfocus PitStop Server
3. Enfocus PitStop Server places successfully processed PDF documents in a dedicated folder
(3) but also saves the PDF documents with errors (3’).
4. Enfocus PitStop Server generates a preflight report and saves it in the respective folder.
Main rules for valid hot folders
Hot folders cannot work without any Action Lists or a Preflight Profile. A hot folder must have
either a Preflight Profile or at least one Action List before you can successfully activate it. In other
words, a hot folder can be valid when it has:
• Just a Preflight Profile and no Action Lists
• One or more Action Lists and no Preflight Profile
• A Preflight Profile and one or more Action Lists
A hot folder can have several Action Lists, but only one Preflight Profile.
To be valid, other requirements need to be met, e.g. a hot folder also needs valid paths to the
respective input and output folders. When the hot folder is not valid, the errors to be corrected
will be shown at the bottom of the dialog, and in the Summary. See Summary on page 61.
5.2 What is processing?
Processing defined
Hot folders in an Enfocus PitStop Server environment "process" incoming documents automatically
and place these documents in a given folder, depending on the process result. What do we
understand by processing?
Processing can mean the following:
• A PDF document can be checked against a Preflight Profile and corrected correspondingly. A
Preflight Profile is a set of user-defined criteria which define whether a PDF document is
output-worthy or not.
• An Action List can be applied to a PDF document. An Action List is a series of tasks to edit or
correct PDF documents automatically. You can also use Action Lists to check elements.
• You can combine a PDF Profile and Action List(s) in one processing method called 'preflight
and auto correct'
• Documents other than PDF documents can arrive in the input folder of a hot folder. Enfocus
PitStop Server will detect that their digital format is not PDF and move these documents to a
given folder.
Note: You can design Preflight Profiles or Action Lists with products like Enfocus PitStop Pro, a
plug-in for Adobe Acrobat.
Action Lists and Preflight Profiles: required “fuel” for processing
Action Lists and Preflight Profiles are the "fuel" for hot folders. The processing of hot folders can
be triggered by one or more Action Lists, a Preflight Profile or a combination of both. A hot folder
with neither an Action List nor a Preflight Profile simply won’t run. For each hot folder you can
specify:
36
Enfocus PitStop Server
• One or more Action Lists, to be executed consecutively
and/or
• One Preflight Profile
PDF documents received in a hot folder are first fed to the folder’s current Action List(s). The
changes defined in the Action List(s) are applied to the file before it proceeds to the next part of
the engine. A Preflight Profile is run against the PDF document before it leaves the input folder.
First the Action Lists and fixes included in the PDF Profile will be applied if necessary. After that,
the PDF document will be preflighted with the PDF Profile.
Process results
A processed document can have either one of the following results:
Result
Meaning
Success
The processed PDF document meets all the criteria specified in the Preflight Profile
without any intervention from Enfocus PitStop Server.
and/or
The Action Lists were applied successfully and none of the checked or detected
properties were logged as “Warning” or “Error”.
Warning
The processed PDF document does not meet one or more of the criteria labeled
“Warning” specified in the Preflight Profile
or
One or more of the properties checked or detected by an Action List were logged as
“Warning”.
Fixed
The processed PDF document meets all the criteria specified in the Preflight Profile
after being fixed by the Action List, by the PDF Profile or by an Action List in the
PDF Profile
Non-critical A Failure occurred while processing the PDF document, meaning that Enfocus PitStop
Failure
Server was not able to perform a requested fix (e.g. because a font that should be
embedded is not available on the system). The Failure is set in the Action List as a
“non-critical failure”, or it occurred on a fix from the PDF Profile.
Error
The processed PDF document does not meet one or more of the criteria labeled
“Error” specified in the Preflight Profile.
or
One or more Action Lists could not be applied successfully or one or more of the
checked or detected properties were logged as “Error”.
Critical
Failure
A Failure occurred while processing the PDF document, meaning that Enfocus PitStop
Server was not able to perform a task (e.g. because a font that should be embedded
is not available on the system). The Failure is set in the Action List as a “critical
failure”.
Non-PDF
The document which arrived in the input folder is not in PDF format.
37
Enfocus PitStop Server
Note: See also Using the Action List Control Panel on page 69.
5.3 Types of folders
Organizing your Enfocus PitStop Server work environment
When setting up a hot folder, you can specify all folders and organize them in such a way that they
fit your working environment best. For example, you may choose to save processed documents in
separate folders, depending on their process result (OK, Warning, Error...) or you can save all
processed documents in the same folder. The same applies to original documents, non-PDF files
and process reports.
Below, you find a brief overview and description of the folders you can specify using the Hot Folder
Editor.
Base folder
The base folder is the root folder from which you can make other folders branch automatically.
You do not necessarily have to define a base folder, and even if you do, the various folders don’t
need to be directly under the base folder. It may however be recommended to do so.
Input and output folders can be defined using absolute paths, or using relative paths. For these
relative paths, the base folder will be used as “starting location”
For example, you can define a base folder for each hot folder, as shown in the example below.
Figure 1: Base folder (A) with its subfolders.
Input Folder
The "Input Folder" is the starting point of the workflow. This is the folder which Enfocus PitStop
Server will monitor for new documents to arrive. As soon as Enfocus PitStop Server detects a
document in this folder, processing will start. As soon as the document is in process, the original
input file will be removed from the input folder and moved to the “Original Documents” folder. The
input file will be read, processed and saved to one of the output folders for processed documents.
Folders for original documents
When a document arrives in the input folder, Enfocus PitStop Server will not only process this
document, but it can also keep the original. Originals can be placed in either one of the following
folders, depending on the process result:
• A folder for originals that are processed with success
• A folder for originals that are processed with warning(s)
• A folder for originals that are processed with fixes
38
Enfocus PitStop Server
•
•
•
•
A folder for originals that are processed with error(s)
A folder for originals that are processed with Critical Failure
A folder for originals that are processed with Non-critical Failure(s)
A folder for originals which are non-PDF file
Folders for processed documents
Like the original documents, processed documents are routed to dedicated folders, based on their
process result.
Output folders for non-PDF files
Non-PDF files cannot be processed and, evidently, do not have an output folder for “processed”
files. They will simply be moved from the input folder to the output folder for non-PDF files. These
folders can contain any file, for example:
• Original PostScript files
• Log files which are created by Acrobat Distiller
Enfocus PitStop Server will also generate a report (“error log”) about this event. This report will
be placed in a “Non-PDF Error Log” folder.
You could e.g. drop all files from your customer in the input folder, and then investigate what
appears in the non-PDF folder for manual processing (images, PostScript files, Word documents,
...).
Folders for reports
When a PDF document arrives in an input folder, Enfocus PitStop Serverwill run one or more Action
Lists and/or a Preflight Profile. In this process, the following events may occur in the PDF document:
• The PDF document can be analyzed and information can be gathered about specific properties
• Some of the properties of the PDF document can be changed
Detailed information about these events will be logged and summarized in preflight reports.
Preflight reports are special types of PDF documents: they have hyperlinks to any potential
problems, i.e. Warnings or Errors in the processed PDF documents. Thus, they help you determine
why a document was labeled "Certified Not OK" or indicate specific properties in successfully
processed PDF documents which need special attention.
By default, preflight reports get the name of the original PDF document, with the suffix “_log.pdf”,
but this can be changed using File renaming (see File renaming on page 47). You can specify
dedicated folders for these reports, based on the process result of the PDF document.
39
Enfocus PitStop Server
5.4 Managing hot folders
You can manage your hot folders from the Hot Folders tab in the PitStop Server. All the options
underneath can also be accessed from the contextual menu, by pressing ctrl and clicking or
right-clicking in the Hot Folder tab.
Creating a hot folder
You can create a hot folder by clicking the
button. This will open the Hot Folder Editor. For
more information on the individual settings to be made, see Setting up Hot Folders on page 43.
Editing a hot folder
You can edit an existing hot folder by selecting it in the list of hot folders and clicking the
button, or by double clicking an existing hot folder in the list. This will open the Hot Folder Editor.
For more information on the individual settings to be made, see Setting up Hot Folders on page
43.
It is recommended to disable hot folders during editing, because files that are in the input folder
will continue to be processed with the old settings while the user is still editing the hot folder.
If you want to rename/delete subfolders of the input folder, disabling the hot folder is even
mandatory.
Duplicate a hot folder
Duplicating a hot folder means that you create a copy of an existing hot folder. You may want to
do this to create a new hot folder based on an already created hot folder in the list, but with a
couple of different settings.
To duplicate a hot folder:
1. Select a hot folder in the list and click this
button. The copy of the selected hot folder
appears in the list. You can also right click a hot folder and choose Manage > Duplicate in the
contextual menu.
2. Select the copy of the hot folder and click the
contextual menu.
button or choose Manage > Edit in the
3. Change the properties of your choice and click OK button. For more information on the individual
settings to be made, see Setting up Hot Folders on page 43.
Note: Make sure you check the input and output folders of the new hot folder. These folders
will be the same as those of the folder on which the copy was based.
40
Enfocus PitStop Server
Note: A duplicated hot folder will have exactly the same settings as the original, but will always
be set to inactive.
Deleting a hot folder
Deleting a hot folder means that you remove the hot folder from the list. It will no longer be
monitored by Enfocus PitStop Server. The actual folders will not be removed from your hard disk.
To delete a hot folder:
1. Select a hot folder in the list and click the
menu.
button or click Delete option in the Hot Folder
2. Click OK to confirm.
Importing a hot folder
Importing a hot folder means that you create a new hot folder based on the settings exported from
a hot folder using the Export function (see below). Importing and exporting hot folders is a very
good way to exchange, backup and restore your hot folder settings.
To Import a hot folder:
1. Click the
button.
A dialog will open to select the hot folder settings file.
2. Click Open button.
3. Define to save all resources (Action Lists, PDF Profiles, ...) or only those that don't exist on the
system yet, and in what folder, and click Next button.
4. Check the list of all resources, and click Next button.
5. If necessary, define the new base folder to be used, and click Import option.
The new hot folder is imported and added to the list. Using the option you can immediately open
the new hot folder in the Hot Folder Editor.
6. Change the properties of your choice and click OK button. For more information on the individual
settings to be made, see Setting up Hot Folders on page 43..
Note: Make sure you check and change the input and output folders of the new hot folder.
These folders will be the same as those of the original folder on which the settings were based.
Exporting a hot folder
Exporting a hot folder means that you create a file on your hard disk, containing all settings for
the selected hot folder. These settings can later be imported using the Import a hot folder function
(see above).
41
Enfocus PitStop Server
To export a hot folder:
1. Click the
button.
2. A dialog will open to define the name and location for the hot folder settings file.
3. Click OK button.
The settings are collected into one single file with the file extension .ehf.
Hot folder status
In the hot folder list, the first icon shows the status of the hot folder. This can be one of the following:
Status
Meaning
The hot folder has been correctly configured, and has been activated.
The hot folder has been activated, but is not configured correctly. Select the hot folder
and click the
button to open the Hot Folder Editor and check and correct the
missing or incorrect settings
The hot folder has not been activated, and is not configured correctly. Select the hot
folder and click the
button to open the Hot Folder Editor and check and correct
the missing or incorrect settings
The hot folder has not been activated. Select the hot folder and click the
to open the Hot Folder Editor activate it in the General category.
button
Hot folder priority
In the hot folder list, you can see the priority of the different hot folders. The priority defines the
order in which jobs will be processed.
Enfocus PitStop Server will first process all jobs in hot folders with priority “High”. If all those are
processed, the jobs in hot folders with priority “normal” will be processed next. Finally, if no jobs
with priority “high” or “normal” are waiting to be processed, the jobs with priority “low” will be
processed.
For jobs with the same priority, the order will be determined by the time of submission: the job
that was submitted first, will also be processed first (FIFO principle: First In, First Out).
42
Enfocus PitStop Server
6. Setting up Hot Folders
6.1 Valid hot folders
In order to process files through a hot folder, the hot folder should be valid and enabled. You can
see the status of your hot folder in the Hot Folders tab.
To set up a valid hot folder:
1. Set the hot folder's name and description in the General category in the Hot Folder Editor.
2. Set all properties in the different categories.
3. Use the Summary to get an overview of all settings and errors.
4. Go back to the corresponding categories or to the Preferences pane to fix any errors.
Repeat step 3 and 4 until all errors are fixed.
5. Enable the hot folder in the General category with the Enable hot folder option, and set the
Priority.
6. Specify the History logging setting of your choice. If not set up in the hot folder editor the default
option as defined in the global preferences will be used.
7. Click OK button.
6.2 General settings of a hot folder
In the General category in the Hot Folder Editor, you can define the name of the hot folder and a
hot folder description.
In this category, you can also enable the hot folder.
Activating a hot folder
When you have set up a hot folder, it will not start processing PDF documents immediately. You
will first have to make it active. When activating a hot folder, you can also give it a specific priority
level: low, medium or high. You may want to “turn off” a hot folder if you do not wish to use it
temporarily, by making it inactive. It is also advisable to make a hot folder inactive while changing
its settings. See Editing a hot folder on page 40.
To activate a hot folder:
1. In the Enfocus PitStop Server Control Panel, select the hot folder which you want to activate
and click Edit the selected hot folder.
2. Display the General properties, select Enable hot folder and select a priority level. Setting a
priority level is optional. The default is medium priority
43
Enfocus PitStop Server
3. Click OK button.
6.3 Setting up a folder structure
Basic folders vs advanced folders
In the Folders category, you can switch between basic folders and advanced folders by clicking
the More Options... or Less Options... button. When using Create Basic Setup, you can choose
Create all subfolders radio button to define advanced folders, or Create minimal set of subfolders
radio button to define only basic folders.
Advanced folders contain all basic folders and a number of additional folders.
If no advanced folders are defined, the output will be rerouted :
• Warning, Fixed and Non-critical Failure will use the “Success” output.
• Critical Failure will use the “Error” output.
When switching from basic folders to advanced folders, the paths will be copied, giving the same
result as this rerouting:
• The “Success” paths are copied for Warning, Fixed and Non-critical Failure
• The “Error” path is copied to the Critical Failure output
basic or advanced folders
rerouting in basic folders
Success
Basic
Success
Warning
Advanced
Fixed
Advanced
Non-critical Failure
Advanced
Error
Basic
Critical Failure
Advanced
Non-PDF
Basic
Error
Non-PDF
Creating a folder structure using Create Basic Setup
The Create Basic Setup... option is a simple way to create a basic folder structure inside a base
folder. A base folder is the root folder from which you can make the input folder and the related
output folders branch. Consequently, you need to create a base folder only if all related folders —
or most of them — have to be subfolders of this base folder.
The Create Basic Setup... option can be used on an existing folder on your computer hard disk or
network drive. Using the “Make New Folder” button, a new physical folder can be created as well.
44
Enfocus PitStop Server
To create a Basic Setup:
1. In the Hot Folder Editor, go to the Folders category
2. Click the Create Basic Setup... button.
3. Select Create all subfolders radio button to define advanced folders, or Create minimal set of
subfolders radio button to define only basic folders.
4. Do one of the following:
• navigate to the existing folder you want to use as a base folder
• navigate to the location you want to create a new folder, and click Make New Folder button.
The new folder appears with a temporary name, which can be changed to a more descriptive
name for the folder, e.g. “hot_folder_01”
5. Select the new or existing folder, and click OK button.
Creating or editing a folder structure manually
A folder structure can be created, edited or expanded manually. For the input folder and every
output folder, a folder can be assigned.
To assign a folder
1. Click the
button next to the input or output folder you want to assign to.
2. Navigate to the folder you want to assign as input or output folder or create it using the Make
New Folder button
The path of the selected folder will be shown.
You can also type or paste the path of the folder, e.g. to assign the same path for different
outputs.
To remove a path, you can click the
button.
Absolute vs relative paths
The paths defining the different folders can be entered and shown either absolute or relative. An
absolute path shows the location of the folder completely, starting from the drive letter. A relative
path shows the location of the folder relative to the base folder. For example, “./input” indicates
a folder “input” inside the base folder.
Switching between relative and absolute paths is done using the button next to the browse button.
To change all paths to absolute or relative
1. Click the
button next to the base folder
2. select Make all subfolders absolute to change all paths to absolute paths, or select Make all
subfolders relative to the base folder to change all paths to relative paths.
The representation of all folders will change to absolute resp. relative paths.
To change a single path to absolute or relative
3. Click the
button next to the specific folder
45
Enfocus PitStop Server
4. select Make subfolder absolute or Make subfolder relative to the base folder to change the
path.
The path for the folder will change to an absolute or a relative path.
6.4 Processing : Subfolders and File renaming
In the Processing category in the Hot Folder Editor, you can define the folder processing method,
the report generation and the file renaming for the output files.
Folders
The input folder can receive single files, but also folders can be dropped in the input folder. The
folder processing method defines how these subfolders should be treated.
option
result
Don't process subfolders in
input folder
Only files in “root” of input
folder will be processed. Files
in subfolders are ignored
Process subfolders, keeping
folder structure
Files from subfolders will be
processed. The output files will
be placed in a same subfolder
structure in the output folder(s).
Process subfolders, flatten
folder structure
Files from subfolders will be
processed. All output files will
be placed in the “root” of the
output folder(s).
Delete empty subfolders in
input folder
Subfolders that are empty after
processing, will be deleted.
Input and Output
Report Generation
The reports from the preflighting can be created as PDF files, using a report layout style, or as an
XML file.
For XML Reports, you can choose between version 1 (v1) and version 2 (v2). The version of the XML
defines the schema used for the XML report. While v1 reports are compatible with previous versions,
v2 reports are optimized to have a smaller file size but contain the same information as v1. It is
also possible to truncate the number of items per category and the number of objects per item,
resulting in a possibly incomplete report but imposing a limit on its size.
An Annotated Report, created by selecting an “Annotated Report” Layout style, makes the
combination of the report and the original document. It offers the possibility to navigate through
the Preflight Report in Acrobat Reader or in a browser, without using any Enfocus software.
46
Enfocus PitStop Server
An Annotated Report is a combination of the original document and the Report Information. The
Report Information is integrated in the original document as a number of notes and bookmarks,
allowing to easily navigate to the errors and warnings.
You can also define the language in which the report will be created.
File renaming
By default, the file renaming is set to “%CurrentDocumentName%”, meaning that the output files
will have the same name as the original input file. Using the file renaming, the output file names
can be built using the “Variables”. When selecting a variable, the “current value” is shown at the
bottom. It is also possible to type fixed text, e.g. to add “_log” to the name for the report files.
Variable
Meaning
Example
%User Company%
the company name as defined
in the Personal Info
Enfocus N.V.
%Current Document Name%
the file name of the input file
examplefile.pdf
%User Name%
the company name as defined
in the Personal Info
User
%Time%
the current time in hours,
minutes and seconds
08_43_28
%UniqueID
a unique sequential number
45
%Date%
the current date
2007-06-18
%Document Status%
the current preflight status of
the document
NOK (Not OK)
%Subfolder Name%
the name of the subfolder
%Hot Folder Name%
the name of the Hot Folder
6.5 Flattening
Flattening allows you to remove some features from your document (blend modes, overprints,
DeviceN color spaces...), maintaining the same visual appearance: the blend will be calculated to
whatever is underneath at that moment and will be adapted in a lineart object (if possible) or an
image.
As flattening has an effect on the objects in a PDF, it will be executed prior to executing any Action
Lists or the Preflight Profile defined in that hot folder to guarantee the best result.
Setting up Flattening
1. In the PitStop Server Hot Folder Editor, select the Flattening category.
47
Enfocus PitStop Server
2. Select Resolve transparency checkbox to enable flattening. All objects using a blend mode or
transparency will be flattened.
3. Enable Resolve overprint if you want to flatten overprint objects as well, without changing the
visual appearance.
4. Set the Print resolution. If the flattening result cannot be generated as lineart objects, an image
will be generated at the selected resolution.
Note:
If flattening is needed on an RGB object, it will be put in CMYK (+ spot colors) by the flattening
mechanism. Objects created by the flattener will always be in CMYK + spots color space.
When the Resolve transparency checkbox is not selected, overprint problems will not be flattened,
unless the Resolve overprint checkbox is selected. This means that other transparencies (at least
those not interfering with overprint objects) remain in the PDF.
6.6 Action Lists and Preflight Profile
Action Lists and Preflight Profiles are the “fuel” for the preflighting process. For a more detailed
overview of Preflighting, see Preflighting and Checking PDF Documents on page 62.
Adding Action Lists and/or a Preflight Profile
To add one or more Action Lists to a hot folder:
1. In the Hot Folder Editor, go to the Action Lists and Preflight Profile category
2. Click the + button below the Selected Action Lists area to open the Select Action List dialog.
3. Select one or more Action Lists you want to add, either From database on page 49 or From file
on page 49. You can select multiple Action Lists in one go by holding the shift key or the ctrl
(Windows) or apple (Mac OS) key.
4. Click OK button. The Action Lists of your choice are added to the bottom of the list of Selected
Action Lists.
5. If necessary, change the order of the Action Lists: select an Action List and click the Move Up
(
) or Move Down (
) button.
Note: The Action Lists will be run on the PDF documents in the order in which they appear in
this list: the Action List on top of the list will start first. As a different order can give a different
result, it is important to make sure this order is correct.
To add a Preflight Profile to a hot folder:
1. In the Hot Folder Editor, go to the Action Lists and Preflight Profile category.
2. Click the + button below the Selected Preflight Profile area to open the Select Preflight Profile
dialog.
48
Enfocus PitStop Server
3. Select a Preflight Profile you want to add, either From database on page 49 or From file on
page 49
4. Click OK. The name of the Preflight Profile and its description will be shown.
Where Can I Find Action Lists and Preflight Profiles?
If you want to add Action Lists or a Preflight Profile to your hot folder, this is where you can find
them:
From database
The Database contains predefined Action Lists or Preflight Profiles and Action Lists or Preflight
Profiles which are already available in the Enfocus Action List Database or the Enfocus Preflight
Profile Database. Both are installed on your computer's hard disk along with Enfocus PitStop
Server. These databases can also be used and updated by other Enfocus products, such as Enfocus
Instant PDF (4.0 or higher) and Enfocus PitStop Pro (7.0 or higher). This means that, if you create
an Action List or a Preflight Profile with Enfocus Instant PDF, it will also appear in the From
database list in the Selected Action Lists dialog or the Selected Preflight Profile dialog.
The Default database contains Action Lists and Preflight Profiles, installed with the application
and available to all users on the computer. The Default database and its contents can not be
modified. The Local database level is only available to the current user. Additional folders can be
added in the Preferences (see Enfocus PitStop Server Preferences on page 98).
From file
You can use Action Lists or a Preflight Profile that is stored on your computer's hard disk or on a
network drive, for example, if someone has sent you an Action List or Preflight Profile by e-mail.
The default extension of an Action List *.eal. The default extension of a Preflight Profile is *.ppp
The Browse button allows to select the Action List or Preflight Profile you want to use.
Enfocus Action List Library
You can find Action Lists on the Enfocus Action List Library page on the Enfocus Web site:
www.enfocus.com > Support > Download > Action Lists. You can also access this page from within
Enfocus PitStop Server: choose Help > Online Resources > Action List Library, or by clicking the
More Action Lists available in the Action List library hyperlink in the Select Action List window.
Select an Action List or the complete Enfocus Action List Library and download the archive file.
Extract or expand the Action Lists in the archive file to a folder, then click the + button again to
add the Action Lists to your hot folder.
Enfocus Preflight Profiles Library
You can find Preflight Profiles on the Enfocus Preflight Profiles Library page on the EnfocusWeb
site: www.enfocus.com > Support > Download > PDF Profiles. You can also access this page
from within Enfocus PitStop Server: choose Help > Online Resources > Preflight Profiles Library
, or by clicking the More Preflight Profiles available in the Preflight Profiles Library hyperlink
in the Select Preflight Profiles window.
Select a Preflight Profile or the complete Enfocus Preflight Profile Library and download the archive
file. Extract or expand the Preflight Profiles in the archive file to a folder, then click the + button
again to add the Preflight Profile to your hot folder.
49
Enfocus PitStop Server
6.7 Smart Preflight
Overview
Smart Preflight is a new functionality that enables PitStop Server customers to improve the quality
of their PDF preflight and correction, reduce the amount of Preflight Profiles they require and
increase the efficiency of their PitStop Server installation by improved automation.
Smart Preflight does this by allowing preflight settings to be driven from an XML/JDF job ticket.
This means job specific settings and corrections such as page trim size, inks, output intent or
others can be automatically set on a job-by-job basis. In addition, conditional variables can be
defined allowing more complex decision making to be applied to settings making PitStop Server
a truly smart preflight solution.
Following are a couple examples of how Smart Preflight can be used within PitStop Server:
1. Trim Page Size: Trim page size (height and width) checks can be automatically adjusted to
match the current job specifications from the XML/JDF job ticket.
2. Conditional changes based on job type: Output intent, such as "offset", or "digital" printing can
be used to determine the number of colors allowed for a job, and/or adjust total ink coverage
as needed.
Conceptual Overview of Smart preflight
PitStop Server provides "hands off" automation for preflight checks and corrections. With Smart
Preflight within PitStop Server the goal is to be able to adjust the preflight and correction settings
on a job-by-job basis by using job tickets to drive Preflight and Action list values and settings.
To process Smart Preflight jobs, a PDF file requires a matching XML/JDF job ticket, both these
files need to be present in a PitStop Server Hot Folder for a PDF file to be processed. PitStop
Server then uses the values within the job ticket within the preflight and action list settings.
Note: Because a job ticket based Preflight Profile requires both a matching job ticket and PDF
file, these Hot Folders are dedicated to job ticket based jobs. If a single PDF file is put into one of
these Hot Folders, it will wait for the user specified time for a matching job ticket and once the
timeout has been reached the PDF will error into the designated error folder.
What you need to be successful with Smart Preflight in PitStop Server
1. A lead system that can generate a properly formatted XML/JDF file.
2. A properly formatted XML/JDF Job ticket for each PDF job.
3. A properly named XML/JDF Job ticket that associates to the PDF job file.
4. An understanding of PitStop Server and setting up workflows.
Getting started with Smart Preflight
To begin Smart Preflight you need to start by defining your variables. These are saved within a
Variable Set which is selected with the Hot Folder preferences of your Preflight configuration.
Variables within the Variable Set can then be used in your Preflight Profiles or Action Lists and
50
Enfocus PitStop Server
applied to different checks or corrections when Enable Variable Names is turned on for that
preflight check or correction. You will probably need only one Variable Set for your installation,
but you can create more if necessary. However, you can only activate one variable set per Hot
Folder configuration.
Note: PitStop Pro and PitStop Server can share the same Smart Preflight Variable Sets much like
Preflight Profiles or Action Lists. However, "Constant" variables are specific for use in PitStop Pro
and, "Job Ticket" variables are specific to PitStop Server. Non-supported variables are ignored or
the default value is used when processing.
PitStop server uses XML/JDF job ticket data to drive the Smart Preflight processing. Before building
a variable set, you need to decide which Job Ticket values will be used from the XML/JDF and what
functions they will affect.
Types of Smart Preflight Variables
There are two primary types of variables for PitStop Pro, "Constants" and "Rule Based". Following
is a definition of both:
Constant
(PitStop Pro
Only):
A constant variable field when applied to a preflight check will display a default
value to the operator allowing them to override it before running that preflight
check. Constants can be a text string, a number, a measurement or a Boolean
(yes/no or on/off) value.
Note: Although Constant variables are available in PitStop Server to stay
compatible with PitStop Pro, only the default value is used when processing.
No choice is given at the time of processing a Constant variable since PitStop
Server is intended to process files 100% "hands-off".
Rule Based:
A "Rule Based" variable allows you to use an existing variable to determine the
value change in another preflight check or set of checks. Using Rule Based
variables enables you to take values from another variable and use them to
create new values based on different conditions, as an example the paper type
and printing method could both be used to define the value for the necessary
Total Ink Coverage.
Job Ticket:
Job Ticket variable values are extracted from an XML/JDF file submitted to
PitStop in conjunction with the PDF job file. These variables can either change
a single setting or be linked to Rule Based variables for more complex
processing.
Manual
Job Tickets
Databases
PitStop Pro
PitStop Server
PitStop Server with
Enfocus Switch
Using Smart Preflight
Following is the overview of the step to using Smart Preflight variables within PitStop Server:
51
Enfocus PitStop Server
1. Create a Variable Set.
2. Define the variables to be used based on your XML/JDF Job Ticket.
3. Edit a preflight profile and locate a check to use a variable.
4. Enable Variable Names under the “Action” for that preflight check.
5. Select the correct variable name to be used for that check from the required variable set.
6. Save your changes.
7. Add the Preflight Profile and required Variable Set to a hot folder set-up.
8. Run files (PDF+XML/JDF) through the hot folder set-up.
The following sections will go into more detail about each step.
Creating a Variable Set
A variable set contains all your Smart Preflight variables that can be used within your preflight
profiles. You can create more than one Variable Set and each set can have multiple variables
defined. However, you can only run one "active" variable set at a time per PitStop Server workflow.
It is recommended that you keep all your variables within one Variable Set however this is not a
restriction, just a recommendation.
To create a Variable Set click on the Windows menu from the main PitStop Server Window and
select Variable Sets... or use the shortcut keys ctrl + Alt + V on Windows OS and Option + Command
+ V on Mas OS. This will bring up the Variable Set Panel. This panel will display all the installed
Variable Sets as well as any local Variable Sets that have been defined.
With the Variable Set Panel open, select the Action drop-down menu, and New" from the sub-menu.
This will open the Enfocus Variable Set Editor dialog using which you can create and open a new
Variable Set that will be saved to your "Local" PitStop Server folder.
Creating a Smart Preflight Variable Set
Once in the Enfocus Variable Set Editor, you can name your variable set.
To add a new variable to a new list or existing list click the + button in the lower left of the Enfocus
Variable Set Editor dialog box. Click the - button to remove a variable from the list and click the
++ button to duplicate a selected variable.
Click this
button to test or verify current variables.
Creating a Smart Preflight Variable
After you create a new variable by clicking the + button, you can name it by typing a name in the
Name textbox.
Note: Be sure to name the variable something easily recognizable, for example, the check it is
intended for or if you plan on using it with PitStop Server and an XML/JDF data, the name may
reflect that field. The User Readable Name is there in case the variable name is a data field for
use in PitStop Server and you also need a user readable name.
As described earlier in this chapter, there are two different types of variables that can be created
- "Constant" and "Rule Based". Each type of variable needs to have a variable "Type" defined. It
is important that the variable type matches the preflight check setting it's intended for. When
52
Enfocus PitStop Server
applying variables to a preflight check setting, only the variables which match that type of entry
will be displayed.
For example, if a variable for a trim page size is to be created, then it must have a "Length" variable
type. If a variable is needed to select or deselect a check box (such as to turn on a correction), then
a Boolean variable type needs to be defined.
You can provide a brief description about the Smart Preflight Variable Set you are creating in the
Description list box.
Variable Type:
Type
Number
Description
A whole number
Length
A number
String
Boolean
Any text
On or off
Example Use
Page count, Number of
separations, etc
Page trim size, bleed amount,
etc
Entry for a metadata field
Selection for any checkboxes
Creating Job Ticket variables
Job Ticket variables are defined from an XML/JDF job ticket file. These files may vary based on
the source of the job ticket. A sample XML/JDF job ticket file is needed to easily locate the
appropriate data needed for the variable.
Note: The XML/JDF job tickets are required to be submitted to the PitStop Server Hotfolder as
the corresponding PDF file, if a match between a PDF file and it’s corresponding job ticket cannot
be made within the user specified timeout value, the individual PDF or XML will error and be
rejected to defined error folder.
To define a Job Ticket variable, add a new variable and define it’s “Type” as Job Ticket and the
correct corresponding value type for the value.
Next, for “XPath” select “Browse” to open the “Select XPath from sample file” window and select
“Browse” again and locate your sample job ticket file. It can be located anywhere on your local
system as only the internal XPath is required.
Once your sample job ticket is selected, all the internal data fields will be visible. Navigate through
the data fields and select the correct data field needed for the check you’re creating.
Once selected, the XPath will populate at the top of the dialog and you can exit that window.
If necessary it is also possible to manually edit an XPath if you require a more advanced method
to return a value from your job ticket.
Note: XPath definitions, and values obtained from an XML/JDF job ticket can be checked within
the Variable Set Inspector. See “Inspect/verify variables in a Variable Set” later in this section for
more information.
Job Ticket Text Manipulations
It's possible the values returned from the job ticket may need to be manipulated in order to get
the result desired for the preflight profile or action list. PitStop Server provides several standard
manipulations to help you to quickly extract the information needed. Following is an explanation
of the Manipulations available.
53
Enfocus PitStop Server
Manipulation
Description
Example
Trim leading white space
Removes any extra spaces at Changes “ sample” to “sample”
the beginning of a result string
Trim trailing white space
Removes any extra spaces at
the end of a result string
Changes “sample ” to “sample”
Merge adjacent white space
Removes any spaces between
result phrases
Changes “Sample Text 2” to
“SampleText2”
Case: Unchanged
Leaves the result unchanged
No changes to result
Case: Convert to lowercase
Converts all text to lowercase
Changes “Sample Text” to
“sample text”
Case: Convert to uppercase
Converts all text to uppercase Changes “Sample Text” to
“SAMPLE TEXT”
After
Captures all data after a
character or phrase
The complete result is “Sample
Text 1234”. You need “1234” for
your value. Entering “Text” in
“After” will return “1234” as the
result
Before
Captures all data before a
character or phrase
The complete result is “Sample
Text 1234”. You need “Sample”
for your value. Entering “Text”
in “Before” will return “Sample”
as the result
Segment
Allows you to capture a specific
segment of text from a result.
This manipulation is expressed
numerically based on the
character count for the start
and the end of the segment
The complete result is “Sample
Text 1234”. You need “Text” for
your value. The “T” in “Text” is
8 characters in and the ending
“t” is 11 characters in. Entering
“8- 11” for segment will return
“Text” for the result
Search
Allows you to use “Regular
Expressions” (RegExp) to
manipulate your results. See
the section on “Regular
Expressions” for more
information on creating and
using regular expressions
The complete result is “Sample
Text 4321” You need only the
first two numbers of the result.
For this, the regular expression
would be: (1-9)[1,2]. This
expression asks for only
numbers (1-9) and only the first
two positions (1,2). The result
from this example would be
“43”
Checking modifications to Job Ticket values
To check modifications defined, use the Variable Set Tester described later in this section to load
sample job ticket files and see results.
Rule Based Variable Definition
The concept of a rule-based variable is to build a variable that will change based on the state of
another setting. For example:
54
Enfocus PitStop Server
IF job type is Digital, THEN change "Image Resolution" check to 150ppi
ELSE
IF job type is Offset THEN change "Image Resolution" check to 300ppi
OR IF Paper Stock is Uncoated
AND Printing Method is Sheetfed THEN Total Ink Coverage value is 320%
ELSE IF Paper Stock is Coated AND Printing Method is Sheetfed THEN Total Ink Coverage
value is 300%
Rule based variables have two parts, one of the variable(s) used to trigger the Rule, and the other
is the variable with the conditions defined.
As defined in the example above, the two triggers are “Digital” or “Offset” and the conditional
variables are “150” and “300”.
To make the Rule Based Variable work you will need to create two variables. One will be a “Job
Ticket” variable and the other will be the actual “Rule Based” variable.
Following is a step-by-step explanation of how a rule-based variable is defined and applied to a
preflight profile.
This example is based on the following rule:
IF job type is Digital THEN change "Image Resolution" check to 150ppi. AND IF job type is
Offset then change "Image Resolution" to 300ppi.
To create the above rule based variable, perform the following steps
Please note that this is not a working tutorial but just an example of how to define a Rule Based
variable.
1. Define Job Ticket Variable
a) From within the Enfocus Variable Set Editor for your Variable set, create a new Job Ticket
variable and name it “Job Type”. Assign a value from the XML/JDF job ticket as described
in Creating Job Ticket variables on page 53. This value entry from the XML/JDF file will be
used as the “trigger” for the rule-based variable.
2. Define the Rule Based variable
a) From within the Enfocus Variable Set Editor for your Variable Set, create a new Rule Based
and name it. The variable type will be “Rule based” and “Number”. In this example, the rule
has two trigger variables, “Offset” and “Digital”. Each come from the Job Ticket value
previously defined as “Job Type”. In the Variable Value, the Job Ticket variable is selected
to define where the variable trigger will come from. Then the rule based statement is built
according to the logic needed to use the correct setting based on the value.
55
Enfocus PitStop Server
AND/OR/ELSE Statements
When working with Rule based variables, you can expand the variable argument by adding
conditions to a single statement, and/or have multiple statements to reflect different results.
Note that each new condition can use the same variable trigger or a different variable trigger.
AND/OR statements will add a condition to the selected statement. Making the statement
dependent on two or more conditions.
ELSE adds an alternative statement to the overall variable, and there is always an exception
ELSE statement at the end of the argument so that any exceptions are handled with a preflight
error or with a default value.
3. Assign the rule-based variable to a preflight check. To use the Rule Based variable assign it to
a preflight check. In this example, it is assigned to the Images, Resolution check in two places.
One for the Resolution check and again as a value for a Fix to resample the image to the correct
resolution if required.
Applying a Smart Preflight Variable
With your variables defined, applying them to your preflight profiles is simple. This section will
describe how you can apply variables most checks within a Preflight profile.
Applying a variable to a preflight check
Edit your Preflight profile and select a check that will use a Smart Preflight variable. From the
Actions menu for that check, click on it and select Enable Variable Names.
Text boxes and check boxes that can have a variable applied will now show the variable button
next to it.
To apply the variable check, click the variable button next to the preflight check. The Select a
Variable dialog box will be displayed.
First, ensure you are working with the correct Variable Set, if necessary you should select and
load the one you want to use.
56
Enfocus PitStop Server
This dialog will display all variables available for that type (i.e. Number, Length, String, or Boolean)
of check. If the variable you need does not display, it's either entered in a different Variable Set,
or it's not defined as the same "type" as the check you're applying it to.
To apply the variable, select it from the list and click the OK button. The name of the variable will
display in the entry box or next to the checkbox it's applied.
Running Variable Checks
Once you have your variable sets defined and applied to your preflight profiles (or Action Lists) you
can easily apply it to a PitStop Server workflow.
To start, you'll define a new Hot Folder set-up or edit an existing one. Once all the settings for the
base set-up is complete, you'll click on the Smart Preflight option in the PitStop Server Hot Folder
Editor.
Under Smart Preflight, you'll start by selecting the Variable Set to be used with the Preflight Profile
and Action list in this Hot Folder set up. It's very important that the correct one is selected as the
workflow will not activate if the Variable Set does not match what's been used in the profiles.
Job ticket file matching
Next, you need to turn on Use Job Ticket and define the file name pattern for the associated job
ticket. For the file name pattern there are two variables that can be inserted - one to duplicate the
source PDF file name and one for the file extension.
The Time out function will tell PitStop Server how long to wait before rejecting any orphaned
documents or job tickets. You then have choices for where orphaned files are moved. The default
location is the root directory of your PitStop Server Hot Folder set up for that workflow.
Transfer Job Tickets will allow you to define where processed job tickets are sent after processing.
Test or verify variables in a Variable Set
In the Enfocus Variable Set Editor, you can review and verify settings within a Variable Set to
ensure the variables defined work as expected.
57
Enfocus PitStop Server
The intent of this feature is to allow you to verify values from XML/JDF job ticket file are defined
correctly and to ensure logic defined within Rule Based variables work as expected. This dialog
does not change any settings within a variable.
To check a Variable Set select the Tester icon in the Enfocus Variable Set Editor. All the variables
within the current Variable Set will be displayed with the values currently defined along with the
last XML/JDF job ticket loaded (if any).
Within the Enfocus Variable Set Tester, you can Browse to load a sample XML/JDF job ticket file.
By default, the last file loaded is displayed. Below the Sample Job Ticket, the current variables
are listed on the left with the values returned from the loaded job ticket for each variable displayed
on the right.
If a new job ticket is loaded the values that will be returned from that job ticket are displayed, this
functionality enables you to easily test your variables against different sample files to check the
expected results will be returned to the preflight profile.
Job Ticket variables and their values will be displayed based on the file loaded along with the XPath
defined and any modifications to that field based on the variable settings. If there is an error in the
XPath or if the variable does not exist in the sample XML/JDF file, the variable will display in Red.
Errors in job ticket values may be the result of errors in any manipulations defined or errors in
the XML/JDF sample file. Errors in the XPath or manipulations can be corrected by editing the
offending variable.
Rule Based variables that use Job Ticket values to trigger values will change based on the sample
job ticket file loaded. These values are not editable within the Tester.
Constant variables and Rule Based Variables that use Constant variables defined in PitStop Pro
will be displayed and the Constant variables can be modified for testing. However, PitStop Server
will only use the default value from the Constant variable when processing jobs.
Troubleshooting for Smart Preflight
Following table lists how to fix some issues you may run across while working with Smart Preflight.
Issue
Probable Cause
Fix
Variable not available to apply Variable "type" does not match
to a preflight check
the type of preflight check or is
entered in differing Variable Set
than currently selected
Review the variable and ensure
it's defined as the right "type"
(Number, Length, String or
Boolean) to match the preflight
check or check to make sure
the correct Variable Set is
selected
Hot Folder workflow won't
activate with Smart Preflight
enabled
Smart Preflight settings under
Hot Folder set-up for that
workflow and ensure you have
the correct Variable set
selected
Variables we're used in the
preflight profile that are not in
your active Variable Set for that
workflow
Regular Expressions
Regular expressions, or "regexps", provide a way to find patterns within text. This is useful in many
contexts, for example a regexp can be used to check whether a piece of text meets some criteria.
For more information, refer this http://www.roblocher.com/technotes/regexp.aspx website.
58
Enfocus PitStop Server
6.8 Manage the Enfocus Certified PDF status of a PDF document
In the Certified PDF category in the Hot Folder Editor you can define how Enfocus PitStop Serverwill
handle incoming Certified PDF documents. For a more elaborate explanation on Enfocus Certified
PDF Workflow, see Working with Certified PDF Documents on page 72.
Changing the Certified PDF status of an incoming PDF document
When a PDF document arrives in an input folder of a hot folder, it can be a Certified PDF or not.
You can use Enfocus PitStop Server to change the Enfocus Certified status. To this end, you set
your hot folder to perform one of the following actions on the PDF document as soon as the
document arrives in the input folder:
• Keep the document status unchanged
• Make the document Certified using hot folder Preflight Profile
• Make the document uncertified
If you set your hot folder to change the Enfocus Certified status of incomingPDF documents, it will
do so before it actually processes the PDF document, i.e.:
• Before it starts to run Action Lists
• Before it checks the document against a Preflight Profile
Incoming non-Certified PDF documents:
If the option Keep document status unchanged or Make document uncertified is chosen, the
non-Certified documents will remain uncertified.
If the option Make document Certified using hot folder Preflight Profile is chosen, the PDF
document will be Certified using the Preflight Profile defined in the hot folder.
Incoming Certified PDF documents:
If the option Make document uncertified is chosen, the PDF document will no longer be certified.
If the option Keep document status unchanged is chosen, the PDF document will remain Certified.
By default, the Certified PDF document will keep its embedded Preflight Profile.
If the option Change Certified Preflight Profile to hot folder Preflight Profile is on, the Preflight
Profile defined in the hot folder will be used instead of the embedded Preflight Profile.
If the option Make document Certified using hot folder Preflight Profile is chosen, the PDF
document will be Certified using the Preflight Profile defined in the hot folder. However, if the
option Keep original Certified Preflight Profile if incoming document is already a Certified PDF
is on, the Certified PDF will keep its embedded Preflight Profile.
Certified options
On Certified PDF documents, you have the option to use the Roll-back system and you can add a
session comment. This is only applicable when using the option Make document Certified using
hot folder Preflight Profile and on incoming Certified PDF documents when using Keep document
status unchanged”.
59
Enfocus PitStop Server
Allow rollback to previous version
The Certified PDF workflow can offer you a robust roll-back mechanism. This allows you to revert
to any previous stage in the Certified PDF workflow and to compare different versions of your PDF
document, even though you maintain one physical PDF file. By enabling Perform Certified full
save (no rollback to previous sessions), you will not be able to take advantage of the roll-back
functionality; you will however reduce the file size.
This option is only applicable for Certified documents, thus will be disabled when using Make
document uncertified.
6.9 Color Management
Color Management can be set for Enfocus PitStop Server in the Preferences. However, using the
Color Management category in the Hot Folder Editor, it is possible to override these general color
settings.
Managing Color on page 84
Enfocus PitStop Server Preferences on page 98
6.10 Fonts
The Preferences allow to define all general Font settings for Enfocus PitStop Server. However,
using the Fonts category in the Hot Folder Editor, it is possible to add specific font folders for the
selected hot folder. Fonts will be searched on the System first, then in the general font folders,
and then in the font folders specific for the hot folder.
The Modify button offers a shortcut to the font settings in the Preferences.
Managing fonts on page 78
Enfocus PitStop Server Preferences on page 98
6.11 E-mail notification on processed documents
Enfocus PitStop Server processes PDF documents in the background. You might not even notice
that Enfocus PitStop Server is at work for you. However, you can, if you wish, get feedback on how
the processing went. You can get this feedback by means of an e-mail message.
Using e-mail notification
You can configure Enfocus PitStop Server in such a way that it sends you — or anyone who is
interested in the outcome of the processing — an e-mail message. You can request an e-mail
message every time a PDF document is processed or depending on the outcome of the processing.
60
Enfocus PitStop Server
To use e-mail notification:
1. Open the Hot Folder Editor.
2. Display the E-mail Notification properties.
3. Select one or more cases in which an e-mail message has to be sent:
•
•
•
•
•
•
•
•
If the PDF document is successfully processed
If the PDF documenthas properties labeled “Warning”
If the PDF document has properties labeled “Fix”
If the PDF document was processed with non-critical failure(s)
If the PDF documenthas properties labeled “Error”
If the PDF document was processed with critical failure(s)
If the processed document is not a PDF file
If the document or job ticket has timed out
For every job, only one e-mail will be sent.
4. Configure the message that will be sent. It is for example possible to add the preflight report
to the e-mail.
5. Fill in the e-mail addresses of the persons who has to be notified. Multiple addresses must be
entered semicolon separated.
Note: You may want to fill in your own e-mail address first and click Send Test Notification to
see if the e-mail is working properly. If not, see Enfocus PitStop Server Preferences on page
98.
6. Click OK button.
6.12 Summary
The summary of the Hot Folder Editor gives an overview of all warnings and errors in the
configuration of the hot folder. The most severe message is also shown in the hot folder status
line in the bottom left corner of the Hot Folder Editor.
61
Enfocus PitStop Server
7. Preflighting and Checking PDF Documents
Enfocus PitStop Server lets you conveniently check and fine tune your PDF documents before you
output them, either on screen or in printed form. You can ensure the properties of your PDF
documents to match the properties as specified in the selected Preflight Profile. The result of
these preflight actions is presented in a preflight report, stored in a log folder.
7.1 What is preflighting?
Preflighting defined
Preflighting is a term derived from the airline industry. The pilot has the responsibility to determine
the airworthiness of the aircraft before take-off. This means that he or she has to perform a number
of checks prior to each flight.
Preflighting PDF documents basically means the same thing: the “pilot in command”, i.e. the
person who creates or processes a PDF document, has to make sure that the document is
“airworthy”, or rather, “outputworthy”, before sending it for output.
“Outputworthy” means that the PDF document is “fit for use”, for example:
• That a PDF document to be printed on a four-color printing press contains only CMYK images
and that all the necessary fonts are included
• That a PDF document intended for online viewing contains only RGB images
Moreover, any property of a PDF document which does not meet the requirements of the preflight
check can be reported as a “problem” and fixed in the same process.
Preflight Profiles
To preflight PDF documents, you use Preflight Profiles. A Preflight Profile is a collection of criteria
which a PDF document should meet to be outputworthy. For each criterion, you can specify:
• If it should be checked or not
• How it should be listed in the preflight report, i.e. “Warning” or “Error”
• How the problem, if any, should be fixed
An example of a criterion is RGB colors. If you do not want RGB colors in your PDF documents,
you can check this and have all RGB colors converted to CMYK.
Preflighting mechanism
How exactly does preflighting work in Enfocus PitStop Server? The typical stages in a preflight
check are the following:
1. Create, edit or import a Preflight Profile via the Action List And Preflight Profile Panel. You
can import Preflight Profiles in your Hot Folder "From database" or "From File".
2. Place PDF documents in the input folder to have them checked and fixed automatically.
62
Enfocus PitStop Server
3. Enfocus PitStop Server checks the PDF documents and depending on your preflight profile
fixes problems, if any. It generates a preflight report and saves the report in a log folder.
4. If necessary, re-check the PDF document until it is output-ready and can be taken to the final
output stage, e.g., for print, press or online viewing.
Figure 2: Typical preflight workflow with Enfocus PitStop Server
7.2 Properties of PDF documents
Groups of properties
The Enfocus Preflight Profile Editor gives you access to, and control over, a large number of
properties in PDF documents. These properties have been subdivided into a number of categories
and are represented as such in the Enfocus Preflight Profile Editor.
A preflight check verifies and fixes these properties of a PDF document. These relate to the following
categories:
•
•
•
•
•
The document's digital format
Security
Pages
Fonts
Color
63
Enfocus PitStop Server
•
•
•
•
•
•
•
•
•
Images
OPI
Text
Line art
Layers
Transparency
Annotations
Metadata
PDF/X
7.3 Problem reporting
Problem severity levels defined
If any of the properties in a PDF document does not comply with the settings as specified in the
Preflight Profile, it will be logged in the preflight report and, if you have Enfocus PitStop Pro
installed, also in the Enfocus Navigator. You can select how these deviations should be reported:
• As “Warning”
• As “Sign-Off”
• As “Error”
These labels indicate severity levels of the detected “problem”. If a property does not comply, you
can define how severe the detected problem is:
• You can label deviating properties as “Warning” if it is not a real problem in the strict sense of
the word, but just something you would like to be informed about.
• You can label deviating properties as “Sign-off” if it could be a real problem (handled as an
Error), unless the user signs off the problem, stating that it is no real issue for this particular
document. In that case it will be handled as a Warning.
• You can label deviating properties as “Error” if you really want them to be as specified in the
Preflight Profile before you send them to output.
Problem severity levels: example
Suppose that some of the PDF documents you work with contain RGB colors. First, you want to
print them on a black and white output device, such as a laser printer, for proofing purposes. In
that case, RGB colors are not really a problem. However, you would like to know which PDF
documents contain objects in RGB color, because at a later stage, you might want to print these
documents on a color printing press. You could then use two different Preflight Profiles to preflight
these PDF documents:
• A Preflight Profile for the laser printer, which reports RGB colors as “Warning”
• A Preflight Profile for the color press, which reports RGB colors as “Error”
64
Enfocus PitStop Server
7.4 Creating a Preflight Profile
Predefined Preflight Profiles and Preflight Profile templates
Enfocus PitStop Server comes with a number of predefined Preflight Profiles and Preflight Profile
templates, including a template for an empty Preflight Profile. A Preflight Profile template is
essentially the same as a Preflight Profile. The only difference is that you see a list of Preflight
Profile templates, not Preflight Profiles, when you click Action > New in the Action List and Preflight
Profile Control Panel to create a new Preflight Profile.
This gives you the following options to create a Preflight Profile:
• You can use the empty Preflight Profile template to create a Preflight Profile from scratch,
“empty” meaning that no check or fix has been specified yet.
• You can create a new Preflight Profile based on one of the predefined Preflight Profile templates
and change the settings of your choice.
• You can edit a predefined Preflight Profile.
• You can create a copy of an existing Preflight Profile and edit it.
Editing a Preflight Profile or creating a new Preflight Profile on page 65
Editing a Preflight Profile or creating a new Preflight Profile
Creating a new Preflight Profileor editing one are basically the same tasks. Even if you wish to
create a new Preflight Profile “from scratch”, you will always have a number of predefined Preflight
Profile templates available which came with the installation of Enfocus PitStop Server. These
Preflight Profile templates cover the most common output media. You can create a generic Preflight
Profile based on a Preflight Profile template first and fine-tune your settings of this profile later
on.
When you edit a Preflight Profile, you change some of the properties of that Preflight Profile.
To edit or create a Preflight Profile
1. Navigate to Window > Preflight... in the Enfocus PitStop Server to open the Enfocus Preflight
Profile Panel.
2. Click the Action button.
3. Do one of the following:
• To create a new profile, click New. Select aPreflight Profile template from the list and click
OK.
• To edit an existing Preflight Profile, select the Preflight Profilefrom the list and click Edit.
The Enfocus Preflight Profile Editor appears.
4. In the SETUP > General category, check and, if necessary, change the Preflight Profile
Properties: Name, Author, Company and Description of the Preflight Profile.
a) In the Permissions section, you can choose to partially lock the preflight profile and set a
password for it. You can also choose to allow fixes, sign-off and/or change log fixes, preflight
report and color management settings. See Locking a Preflight Profile on page 67 for more
information.
65
Enfocus PitStop Server
b) In the Problem Handling section, you can decide what you want to do when an error occurs.
You can allow fixes, allow sign-off and/or allow changing the log fixes.
c) In the Preflight Report section, along with the preflight details you can choose to include
information on font, color/ color spaces, page box, images, OPI and output intent.
5. In the SETUP > Color Management category, you can define your color management settings.
See for more information.
Furthermore, you can enable or disable all fixes in the Preflight Profile. Indeed, an Enfocus
Preflight Profile can do more than just a preflight check of PDF documents: it can also fix
detected problems. You can, however, also create a Preflight Profile in which you specify a
number of fixes and disable these fixes. You may want to do this if you just want to check PDF
documents but not change them now, maybe later.
6. Click the .
7. In the CHECK ON category, click a profile check in the list. Select the checkbox next to it to
enable this profile check.
8. In the Available Checks section, double click one or more checks or potential problems to
check to add it to the profile check.
9. Specify how to fix the problem, if necessary.
10. Select how the detected problem should be listed in the preflight report: Warning, Sign-off or
Error.
11. In the Actions drop-down menu, you can select Enable Variable Names to use a variable instead
of a fixed value. This icon appears and when you click it, the Select a variable dialog box
appears.
12. In the Select a variable dialog box, you can either choose to not use a variable set or you can
select a variable set which contains the variable that you want to use.
A variable is a special, well-recognizable text string that gets replaced by a dynamic value.
Variable data can be used to provide a value for a property. for more information.
13. Repeat steps 6 through 10 for each profile check you wish to check and fix.
14. Click OK button.
7.5 Adding Action Lists to Preflight Profiles
About adding Action Lists to Preflight Profiles
Before you perform a preflight check in your PDF document, you may want to edit your PDF
document first. And you may want to use Action Lists to perform a number of Global Changes. For
example, you may have a number of Action Lists to correct or change colors in your PDF document.
Instead of running these Action Lists separately and then performing the preflight check, it may
be a better idea to include these Action Lists in your Preflight Profile. You will then kill two birds
with one stone:
• The Action Lists in the Preflight Profile will be run first.
66
Enfocus PitStop Server
• The Preflight Profile will check the selected properties of your PDF document and fix problems,
if any.
To add Action Lists to a Preflight Profile
1. Navigate to Window > Preflight... in the Enfocus PitStop Server to open the Enfocus Preflight
Profile Panel.
2. Select a Preflight Profile in the list and click Action > Edit .
The Enfocus Preflight Profile Editor appears.
3. Click the Action Lists category.
4. Select Enable Action Lists.
5. Click the
button and select an Action Listto check properties or fix problems. You can only
add Action Lists with checks or Action Lists with fixes.
6. If you add several Action Lists, use the
Lists should be run.
,
buttons to specify the order in which the Action
Note: Running two or more Action Lists in a different order may produce a different result.
You may want to test this first.
7. Click OK.
Action Lists on page 69
7.6 Locking a Preflight Profile
About locking
You can secure your Preflight Profile, or part of it, with a password to prevent others from changing
its settings. This may be convenient when the Preflight Profile is shared among multiple users.
You can lock a Preflight Profile with a password when you create the Preflight Profile or you can
add a password afterwards.
The password can include:
• Uppercase and lowercase letters
• Any character on the keyboard
• Spaces
To lock a Preflight Profile with a password
1. Choose Window > Preflight... in the Enfocus PitStop Server to open the Enfocus Preflight
Profile Panel.
2. In the Action List and Preflight Profile Control Panel, select a Preflight Profile and click Action
> Edit.
3. Click the Locking category in the Enfocus Preflight Profile Editor.
67
Enfocus PitStop Server
4. Select a restriction level:
Restriction level
Meaning
Not locked
None of the settings of the Preflight Profile will be locked. Anyone can
change any setting.
Partially locked
Some or all of the settings cannot be changed. The PDF Profile can
still be opened, and the settings can be viewed.
Locked
Nothing can be changed. You can only select the Preflight Profile and
run it in your PDF document.
5. If necessary, select the options:
• Allow changing “Allow fixes”.
• Allow changing “Allow sign-off”
• Allow changing 'Log fixes', 'Preflight Report' and 'Color Management' settings.
6. Fill in a password and confirm it.
7. Click OK button.
Creating a Preflight Profile on page 65
Adding Action Lists to Preflight Profiles on page 66
68
Enfocus PitStop Server
8. Action Lists
One of the main reasons for using Enfocus PitStop Server is the automated editing of PDF
documents. To do this, you can add one or more Action Lists to a hot folder. An Action List is a
series of sequential tasks saved in one file. For example, this can be tasks such as changing color
or objects. Enfocus PitStop Server will automatically carry out the respective tasks in the defined
sequence.
For example, suppose you have a line-art object in several PDF documents. You want to change
the following properties of this object in all of your PDF documents:
• Fill colors of a number of areas in the object
• Lines in the object which are thinner than a given line weight.
Figure 3: Changing multiple properties of an object in multiple PDF documents.
This job may consist of a number of sequential tasks, as outlined in the illustration. Using Enfocus
PitStop Server, you can apply these tasks to all PDF documents that arrive in a specified hot folder.
8.1 Using the Action List Control Panel
You use the Action List Panel to manage Action Lists. This panel is made up of the following parts:
• A pane displaying Action Lists by name
• An Action menu
The Action menu enables you to:
•
•
•
•
•
•
Create a new Action List
Remove an Action List
Rename an Action List
Duplicate an Action List
Import or Export an Action List
Sort the Action Lists, alphabetically or in categories
To display the Action List Panel:
Navigate to Window > Action Lists... in the Enfocus PitStop Server to open the Action List Panel.
69
Enfocus PitStop Server
Note: To create and/or edit Action Lists, you can also use Enfocus PitStop Pro. For more information
about this Adobe Acrobat Professional plug-in, we refer to our Web site at www.enfocus.com.
Removing an Action List
When you remove an Action List, it will no longer appear in the Action List Panel and it is deleted
from your hard disk.
To remove an Action List:
1. Navigate to Window > Action Lists... in the Enfocus PitStop Server to open the Action List
Panel.
2. In the Action List Panel, select the Action List you wish to remove.
3. Choose Remove... from the Action menu.
Duplicating an Action List
Duplicating an Action List means that you save a copy of this Action List.
To duplicate an Action List:
1. Navigate to Window > Preflight... in the Enfocus PitStop Server to open the Action List Panel.
2. In the Enfocus PitStop Server Action List Panel, select the Action List you wish to duplicate.
3. Click Duplicate in the Action menu.
Enfocus PitStop Server creates a copy of the selected Action List with the same name as the
original, followed by “copy”. This copy will also appear in the Action List Panel.
Importing and exporting Action Lists
You can import and export Action Lists and then handle them as “regular” files:
• Exporting an Action List means that you save it as a separate file.
• Importing an Action List means that you load it into the Action List Panel.
You may want to do this for a number of different reasons, for example:
•
•
•
•
To re-use this Action List later on
To share the Action List with other users
To send an Action List to a service provider or any other recipient or supplier of PDF documents
To create a backup copy
To import an Action List:
1. Navigate to Window > Action Lists... in the Enfocus PitStop Server to open the Action List
Panel.
2. Select the category in which you want to import the Action List.
3. Click Import in the Action menu.
4. Select the Action List to import.
5. Click Open button.
70
Enfocus PitStop Server
The imported Action List appears at the bottom of the selected category in the Enfocus PitStop
Server Action List Panel.
To export an Action List:
1. Navigate to Window > Action Lists... in the Enfocus PitStop Server to open the Action List
Panel.
2. In the Action List Panel, select the Action List you wish to export.
3. Click Export in the Action menu or the contextual menu for the Action List.
Note: If the Action List is not secured with a password, the following message will appear:
4. Specify the Action List’s file name and location.
5. Click Save button.
71
Enfocus PitStop Server
9. Working with Certified PDF Documents
9.1 About Certified PDF
PDF workflow concept
Enfocus Certified PDF is a PDF workflow concept developed by Enfocus Software, based on customer
requests and feedback from industry experts. The Certified PDF concept has been designed to
address three fundamental issues faced by the majority of users implementing a PDF workflow:
• How to Guaranteed preflighting on page 72that a PDF document was successfully preflighted
with a specific Preflight Profile.
• How to maintain Document consistency on page 73between the source document(s) and the
PDF document when (minor) changes can be applied to the PDF document throughout the
workflow.
• How to minimize risk and Responsibility on page 74when changing a customer's PDF document
before final output.
9.2 Guaranteed preflighting
Preflighting issues
“Preflighting” is the process of checking a PDF document against various criteria to ensure that
the PDF document meets all the requirements for output or publication. Typically, the criteria vary
depending on the output or publishing process. A set of criteria matching the requirements of a
particular process is called a “Preflight Profile”.
Enfocus PitStop Server, for example, allows you to create a Preflight Profile that checks your PDF
document against various criteria, such as color and font usage. Moreover, you can use Enfocus
PitStop Server to actually fix detected problems in your PDF documents.
Ideally, a PDF document should be preflighted at an early stage in a workflow, i.e. as soon as it
has been created. This is particularly true if the PDF document will move from the PDF document
provider, who created the PDF document, to the PDF document recipient, for example a publishing
or printing department. Detecting problems in the PDF document before the file leaves the PDF
document provider saves time (and money). Even more so, when the PDF file is sent to a different
physical location.
Note: You can also create Certified PDF documents with Enfocus Instant PDF. For more information
about Enfocus Instant PDF, visit our Web site at www.enfocus.com.
Preflighting in a Certified PDF workflow
A Certified PDF workflow supports the preflight process by:
72
Enfocus PitStop Server
• Offering the PDF document provider a simple and streamlined way to preflight a PDF document
with a Preflight Profilesupplied by the PDF document recipient.
• Including the Preflight Profileand the corresponding preflight report in the PDF document. This
way there can be no doubt about the preflight status of the PDF document.
• Offering a straightforward user interface that enables the recipient of the PDF document to
verify that the document has been preflighted successfully with a profile he or she provided.
The above-mentioned features help to:
• Motivate the PDF document provider to actually preflight his or her PDF documents.
• Dramatically reduce the number of problems in files received from PDF document providers.
9.3 Document consistency
PDF editing issues
PDF editing tools, such as Enfocus PitStop Pro, are very convenient for making intermediate or
last-minute corrections in PDF documents. This saves you both time and money because you do
not have to go back to the original application program to re-create the PDF document. Sometimes,
it may even be more efficient to make the changes directly in your PDF document. Enfocus PitStop
Pro, for example, allows you to make global color changes throughout your PDF document.
However, PDF editing also involves a risk: as soon as you edit and save a PDF document, you create
a version of a document that is different from the original document you made using a word
processor or a desktop publishing software. These inconsistencies are hard to manage, and may
introduce problems in archiving or when the document is republished at a later date.
Action Lists on page 69.
PDF editing in a Certified PDF workflow
To help reduce document consistency problems, the Certified PDF workflow features a mechanism
that:
• Logs all the changes that are made to a Certified PDF document
• Can store these changes inside the Certified PDF document
Based on this information, an edit log —a human readable PDF report— can be generated.
If consistency between the PDF document and the source file(s) is very important, you can use the
edit log to change the source file(s) accordingly. To assist in this process, a Certified PDF document
can also keep a reference to the source file(s) from which the PDF document was created. You
can use this reference to make sure that the source file has not been edited since the PDF document
was created.
73
Enfocus PitStop Server
9.4 Responsibility
Responsibility issues
In addition to causing inconsistencies, changing a PDF document that was created by someone
else can create ambiguity about who is ultimately responsible for the final result.
Many printers, service providers, etc. are extremely reluctant to make any changes to their
customer's documents for fear of having to assume responsibility if anything goes wrong. This
includes issues that can be totally unrelated to the small correction applied.
Responsibility in a Certified PDF workflow
The Certified PDF workflow settles responsibility issues by:
• Providing a detailed log file of all the changes made to a PDF document
• Keeping track of the PDF editing process, i.e. who applied which change, when and using what
tool (PitStop Pro, PitStop Server, ...)
• Implementing a robust roll-back mechanism, which, if you wish, allows you to easily return to
a previously saved state —a “snapshot”— of your PDF document
• Offering the possibility to compare any two of these snapshots visually to detect and examine
the differences
9.5 The Certified PDF workflow explained
A conventional PDF workflow
In a conventional PDF workflow, the PDF document goes through the hands of different parties
who can each edit it, if necessary. The original PDF document is replaced by the edited one.
The Certified PDF workflow: incremental save
74
Enfocus PitStop Server
In the Certified PDFworkflow, all the modifications done in a PDF document are logged per session
and saved in an edit log file. Also, the edited PDF documents can be saved incrementally. This
means that the changes done in version 3, for example, can be saved “on top of” the changes done
in version 2 but you keep one physical PDF file.
The incremental save principle does not necessarily increase the file size of your PDF document
drastically because Adobe Acrobat only saves the changes made during the different sessions.
The difference in file size may become apparent if you delete a large number of objects, because
these objects are maintained in one or more versions. You can, however, at any stage in the
workflow, “optimize” your Certified PDF document, i.e. reduce its file size, simply by using the
Save Asfunction of Adobe Acrobatand clicking the Certified Full Save button. You will still have a
Certified PDF document with history information about previous editing sessions, but you will no
longer be able to save snapshots of these sessions or use the roll-back mechanism to revert to a
previous state of your Certified PDF document.
To set the Processing preferences on page 101
Roll-back mechanism
The Certified PDF workflow can also offer you a robust roll-back mechanism. Each time you save
your Certified PDF document, a “snapshot” will be included in the file. You may think of a snapshot
as an “image” of the state of the PDF document at the time it was saved. This allows you to revert
to any previous stage in the Certified PDF workflow and to compare different versions of your PDF
document, even though you maintain one physical PDF file.
Note: You cannot save snapshots or use the roll-back mechanism in “optimized” Certified PDF
documents. See also To set the Processing preferences on page 101.
75
Enfocus PitStop Server
9.6 What is an Enfocus Certified PDF document?
Acrobat metadata
Any regular PDF document contains metadata, i.e. information about the document itself. The
Document Properties dialog box of Adobe Acrobat, for example, includes the following metadata:
•
•
•
•
•
•
•
Creation and modification date of the PDF document.
The application with which the PDF document was created.
The PDF version.
File size.
The name and path of the PDF file.
Number of pages.
Page size.
Enfocus metadata
An Enfocus Certified PDF document can be enriched with the following metadata:
•
•
•
•
•
A reference to one or more source documents on which the PDF document was based.
A Preflight Profile.
A preflight report.
User and system identification.
An edit log, listing all the changes done in the PDF document per editing session (the time in
which the PDF document was opened, edited and saved).
• Session comments.
9.7 Setting the Enfocus Certified PDF user identification
An Enfocus Certified PDF document can contain two types of user identification: personal information
and system information. Each of these serves its own purpose:
• The personal information is your name and company contact details, together with a message,
if any. You can fill this in so that people know how to reach you if they should have any questions
about edit or preflight actions done in the PDF document. This information is required for an
efficient use of the Certified PDF workflow and is used as Sender data in the e-mail notifications.
• The system information consists of the details of the person who registered Enfocus PitStop
Server and information taken from your operating system, network and computer. This
information cannot be changed and is therefore a reliable source to pinpoint responsibility, for
example. If people claim or disclaim responsibility for a given change made in the PDF document,
the system information will provide incontestable proof. This information will be used in the
edit log to show who made which changes in a given session.
To set the Certified PDF user identification:
1. In the PitStop Server, navigate to Window > Preferences... > Personal Info
76
Enfocus PitStop Server
2. Enter your personal information, such as your name, e-mail address and other contact details.
This information is required for an efficient use of the Certified PDF workflow and is used as
Sender data in the e-mail notifications.
Fill in as much information as possible. A message is optional.
3. Click Apply or OK button.
9.8 Adding a Session Comment
Certified PDF enables you to enhance the quality of your PDF workflow by adding comments to
the edit log. Before sending your PDF document to the publisher for example, you may want to
explain why given changes have been made.
You can add a comment per editing session. A session is the time in which you edit and save a PDF
document.
To add a session comment:
1. Select a hot folder and click Edit the selected hot folder button.
The PitStop Server Hot Folder Editor appears.
2. In the Hot Folder Editor, go to the Certified PDF category.
3. Add a new session comment or change the comment of the current session.
4. Click OK button.
77
Enfocus PitStop Server
10. Managing fonts
What are the implications of using Times-Roman instead of Times New Roman in a document?
Can I use these fonts interchangeably and, if not, when do I use which font? How do the various
types of fonts affect the output of my PDF document, onscreen and in print? This chapter provides
the answers to these questions, together with some more theoretical background information
about fonts.
10.1 Types of fonts and their usage
Standard 14 fonts
When working in PostScript and PDF environments, you may come across the notion “standard
14 fonts” or “base 14 fonts”. What exactly are these “standard 14 fonts”?
Actually, the term is derived from the standard set of 13 PostScript fonts, which are resident in all
PostScript output devices. These fonts are listed in the table below.
Font family
Font
Times
Times-Roman
Times-Italic
Times-Bold
Times-BoldItalic
Helvetica
Helvetica
Helvetica-Oblique
Helvetica-Bold
Helvetica-BoldOblique
Courier
Courier
Courier-Oblique
Courier-Bold
Courier-BoldOblique
Symbol
78
Symbol
Enfocus PitStop Server
For PDF environments, ZapfDingbats is added to this standard font set.
PostScript Type 1 fonts
PostScript Type 1 fonts were originally developed by Adobe Systems for use in PostScript printers.
PostScript Type 1 fonts are outline fonts. They use lines and cubic Bézier curves to define letter
shapes or “glyphs”. A “glyph” is the shape in a font that is used to represent a character code on
screen or paper. Examples of glyphs are the letters of the alphabet or the symbols in a font like
ITC ZapfDingbats (i.e. ), J or 4).
Type 1 fonts have the following characteristics:
• They are smaller in file size than TrueType fonts, which means that they occupy less space on
your system’s hard disk.
• Being outline fonts, Type 1 fonts are scalable to almost any size. They remain sharp and smooth
on any platform and in print, and their legibility remains good, even when printed at small point
sizes on low-resolution laser printers.
• PostScript Type 1 fonts are commonly used in professional publishing environments and are
supported by most high-end output devices, because most of these devices use PostScript as
their page description language.
• A PostScript Type 1 font is stored in two separate files: one which contains the character outlines
and one which contains the font metric data. In Microsoft Windows, you can recognize these by
their extensions: *.pfb for the character outline and *.pfm for the one containing the metric
data. The former (.pfb) is commonly called the printer font, the latter (.pfm) is also known as
the screen font. The combined file size of both files, however, is smaller than the file size of its
TrueType counterpart. The file size of the PostScript font may sometimes even be as little as
half of the size of the corresponding TrueType font.
PostScript Type 3 fonts
PostScript Type 3 fonts are primarily decorative ornaments fonts with a lot of tonal variations and
filled-and-stroked objects in the same character. Indeed, Type 3 fonts can have grayscale fills and
strokes and other “special effects”, whereas Type 1 or TrueType fonts are entirely black.
Consequently, Type 3 fonts have the following characteristics:
• Their file size is bigger than the corresponding of Type 1 or TrueType fonts.
• They may take longer to print or output.
• They look worse than Type 1 or TrueType fonts in very small point sizes and when printed at
low resolutions.
• They are not always displayed well on screen.
Note: PostScript Type_3 fonts can’t be converted to outlines by PitStop Server.
TrueType font
The TrueType font format was developed by Apple Computer as an alternative to the Adobe Type 1
standard. It is used both on Macintosh and Windows computers.
Like PostScript Type 1 fonts, TrueType fonts also use outlines to describe the letter shapes.
TrueType fonts have the following characteristics:
• Their use is widespread and they are integrated in almost every desktop office software program
for Microsoft Windows or Macintosh systems.
79
Enfocus PitStop Server
• TrueType fonts can print well on both non-PostScript and PostScript output devices. However,
to print well on a PostScript device, the TrueType font must be converted to PostScript outlines,
which may affect the visual quality of the resulting font. This is why many prepress service
providers are reluctant to support TrueType fonts.
• On Windows-based systems, a TrueType font is physically stored in a single file, the name of
which has the .ttf extension. On Macintosh, it is stored as a single Suitcase.
• A TrueType font is represented by the icon in Windows environments and the icon on a
Macintosh operating system.
• A TrueType font, or a combined use of TrueType and PostScript fonts in one document, may be
troublesome in high-end PostScript devices, especially imagesetters.
Times as PostScript Type 1 Single Master font on screen
Times New Roman as TrueType font on screen
Times as PostScript Type 1 Single Master font printed
Times New Roman as TrueType font printed
Multiple Master font
The Multiple Master font format is an extension of the PostScript Type 1 format. “Multiple Masters”
are fonts offering design variations at the extremes of the “design axis”. This design axis represents
a given variable property for that font, such as:
• Weight (light vs. bold)
• Width (condensed vs. expanded)
• Optical size
The mechanism of Multiple Master fonts is that the two masters at the extremes of the design axis
have a fixed design, but you can create any variation between these masters. Typically, Multiple
Master fonts have two design axes, which require four masters. These masters can be considered
the cornerstones of the matrix.
80
Enfocus PitStop Server
A. Master
B. Font property
C. Design axis
D. User-defined variant “in-between”
To create the in-between variants, you require Adobe Type Manager.
Double-byte font
Double-byte character sets are needed if you are working with Asian languages such as Japanese,
Chinese and Korean. These languages have many characters and require hard- and software that
support the double-byte format.
Double-byte characters use 16-bit or two byte characters instead of 8-bit or one byte characters.
10.2 PDF font substitution
If you transfer PDF documents across computers or computer platforms, the fonts in the document
may be in any of three conditions. They may be:
• Available as system fonts, i.e. the fonts in the PDF document are also installed on the computer
where the PDF document is viewed
• Available as embedded fonts, which means that the fonts are included completely or partially
(subset) in the PDF document
• Not available, either in the document or on the system.
81
Enfocus PitStop Server
If the font is not available, it will have to be replaced by a font which is available on the recipient's
computer. This process is called “PDF font substitution”. PDF font substitution may affect the
appearance and output of your documents.
Finding exact font names
A given font can have different names. And the name of the font which you see in your source
application is not necessarily the same as its “real” internal font name.
For example, the Adobe Type 1 font “Times” as you see it in your word processing or desktop
publishing program also has a PostScript name: “Times-Roman”. The same applies to its TrueType
counterpart “Times New Roman”: its name appears in Adobe Acrobat as “TimesNewRoman”
(without spaces).
Consequently, if you need to enter a font name manually in one of the dialog boxes of Enfocus
PitStop Server, it is important that you type the font name exactly as it is spelled in Adobe Acrobat.
You can use a PDF file containing the desired font to find the exact spelling of the name.
To find the exact font name:
1. Use any application to create a one-page document with the font(s) of which you want to know
the exact name.
2. Create a PDF file of the document.
3. Open the PDF file in Adobe Acrobat and do one of the following:
• In Adobe Acrobat 4, choose File > Document Info > Fonts .
• In Adobe Acrobat 5, 6, 7 or 8, choose File > Document Properties > Fonts .
4. Write down the name of the font(s), using the exact spelling, capitalization, and hyphenation of
the name as it appears in the Font Info dialog box.
5. Click OK button.
10.3 Embedding versus subsetting fonts
Embedding fonts
Using the Enfocus Preflight Profile Editor, you can specify in a Preflight Profile whether a PDF
document should:
• Embed all fonts
• Embed all fonts except the standard 14 fonts
• Embed all fonts except those that can be emulated for viewing
Embedding a font implies that the entire font, i.e. every single character of the font, is copied into
your PDF document. This is particularly useful if your document needs to be displayed and printed
on a different computer, which may not have the same fonts installed.
Furthermore, if the entire font is embedded, you might be able to edit the text in the PDF document
on a computer that does not have the font installed. Note that embedding an entire font – a standard
82
Enfocus PitStop Server
roman font typically contains 256 characters – will increase the file size of the PDF document by
30k to 40k for PostScript Type 1 fonts, or more for TrueType fonts.
Subsetting fonts
Using the Enfocus Preflight Profile Editor, you can specify in a Preflight Profile whether a PDF
document should:
• Subset all fonts
• Subset all except the standard 14 fonts
• Subset all fonts except those that can be emulated for viewing
Instead of embedding an entire font, you may want to embed only a subset of the font – i.e. the
characters of the font that are actually used in the text. Subsetting a font allows you to keep a file
as small as possible, which is recommended especially if you do not plan to add more text (and
hence more font characters) to the file. Note that when you combine two or more PDF documents
that have the same font subset, duplicate character information is not deleted from the merged
sets. This will result in a considerably larger file.
However, if it is not important that readers see the file in its original fonts, do not embed fonts at
all, and let Acrobat use substitute fonts when necessary. This will produce the smallest file possible.
Naturally, reducing file size will improve the file transferability.
83
Enfocus PitStop Server
11. Managing Color
This chapter offers a brief introduction to color management and color basics. It explains how you
can use Enfocus PitStop Server to obtain an accurate, high-quality reproduction of the colors in
your PDF documents.
11.1 About Color Management
Color monitors and color printers reproduce color in completely different ways.
A color management system (CMS) is a collection of tools designed to reconcile the different color
capabilities of scanners, monitors, and printers to ensure consistent color throughout the creation,
display and print process. Ideally, this means that the colors displayed on your monitor accurately
represent the colors of the final output. It also means that different applications, monitors and
operating systems will display colors consistently.
11.2 Color models
The RGB color model
A monitor uses red, green, and blue (RGB) light to create colors. Combining the full intensities of
all three colors makes white. RGB colors are used for lighting, video, and monitors. Your computer
monitor creates color by emitting light through red, green, and blue phosphors.
Figure 4: RGB color model
The CMYK color model
A printing press uses a CMYK color model, in which three colors of transparent ink (cyan — C,
magenta — M, and yellow — Y) are combined along with black (noted as K, derived from “key
color”) in varying amounts to create different colors. CMYK inks filter the white light that reflects
back from the paper and subtract some of the red, green, and blue light from the spectrum. The
color we see is what’s left.
84
Enfocus PitStop Server
In theory, pure cyan, magenta, and yellow pigments should combine to absorb all color and produce
black. But because all printing inks contain impurities, these three inks actually produce a muddy
brown and must be combined with black ink to produce a true black. Combining these inks to
reproduce color is called four-color process printing.
Figure 5: In theory, mixing cyan, magenta and yellow yields perfect black; in practise the key color black has
to be added.
The Grayscale model
The Grayscale model uses shades of gray to represent objects. In this case, every pixel of a grayscale
image has a brightness value ranging from 0% (black) to 100% (white). The maximum number of
grays that most output devices can produce is 256.
11.3 Color gamuts and color spaces
The visible spectrum contains millions of colors, but color devices, such as scanners, monitors
and color printers can only (re)produce a subset of this spectrum. This “subset” is called a color
gamut. The gamut of a device defines the color space it can (re)produce. For example, a monitor
can display a wider range of colors than an offset press can print using CMYK colors, while some
of the CMYK colors cannot be accurately displayed on the monitor. Each device has a different
color gamut.
A - RGB color gamut
B - CMYK color gamut
85
Enfocus PitStop Server
For more information on color gamuts and color spaces, see the online Adobe Acrobat Guide.
Device-dependent color
Device-dependent colors relate to the settings of the device on which the image was created or
output. Device-dependent colors require all devices in the workflow to be “calibrated” to obtain
consistent color reproduction. In other words, the input devices (e.g. scanners or digital cameras),
monitors and output devices (e.g. digital color printers) have to be tuned to each other to make
the colors match.
Differences may even occur between devices of the same type or model, because they may have
different settings. Monitors may have different brightness or contrast, for example. For more
information on device-dependent color, see the online Adobe Acrobat Guide.
Device-independent color
To eliminate or at least minimize, color differences between devices, you can use a color
management system. Color management systems use a standard, device-independent color model,
such as CIELab. Images are associated with a profile, which contain information about the input
and/or output devices. Thus, if images are to be output on a specific device, it will be associated,
or “tagged”, with a profile for that device. Of course, the same goes for text or line-art. For more
information on device-independent color, see the online Adobe Acrobat Guide.
11.4 Rendering Intents
A color management system allows you to remap colors so that they best match the intended use.
‘Remapping’ means that colors from one output device’s color space are mapped to the color
space of another device. This remapping is done according to a specific remapping method, also
known as rendering intent. There are four remapping methods or rendering intents:
•
•
•
•
Perceptual remapping
Saturation remapping
Relative colorimetric remapping
Absolute colorimetric remapping
Perceptual remapping
The human eye is sensitive to the relationships between colors. Perceptual mapping alters all the
colors in the original color space to bring them into the gamut of the destination color space, but
86
Enfocus PitStop Server
preserves the relationships between the colors. As the relationships are preserved, the change in
colors will hardly be perceivable.
Figure 6: Perceptual remapping rescales the original gamut (A) within the gamut of the destination color space
(B), but preserves the relationships between colors.
Saturation remapping
Reproduces the original image color saturation (vividness) when converting into the target device's
color space. In this approach, the relative saturation of colors is maintained from gamut to gamut.
This render intent is primarily designed for business graphics, where the exact relationship between
colors (such as in a photographic image) is not as important as are bright saturated colors.
Figure 7: Saturation remapping scales all colors to the brightest saturation possible (B). The saturation (also
called chroma) will remain the same, but some colors will appear lighter or darker.
Relative colorimetric remapping
Colors that fall within the gamuts of both input and output device are left unchanged. Colors that
fall outside the gamut of the output device are usually altered to colors with the same lightness,
but different saturation.
This method may reduce the total number of colors in the image considerably, if many different
input colors map to the same output color.
87
Enfocus PitStop Server
But this matching method is useful when combining 2 output profiles for proofing. Since the color
gamut of the proofing device (2) should be bigger than the color gamut of the destination profile
(1).
Figure 8: Relative colorimetric remapping replaces colors outside of the gamut by colors with the same
lightness, but different saturation (B).
Absolute colorimetric remapping
Colors that fall within the gamuts of both input and output device are left unchanged. Colors that
fall outside the gamut of the output device are clipped to a color on the edge of the output gamut.
This may lead to a loss of detail in some regions. Over most of the tonal range, a close match is
obtained. This method is suited for spot colors.
Absolute colorimetric remapping clips colors outside of the gamut to a color on the gamut boundary
(B). Colors which cannot be displayed in the target color gamut will be lost.
11.5 Using Color Management in Enfocus PitStop Server
Working with ICC profiles
In working environments where color management is used, objects in PDF documents can be
tagged with ICC profiles. An ICC profile is a description of the color space related to a specific
88
Enfocus PitStop Server
device. ICC profiles help you reproduce colors accurately across different platforms, devices and
ICC-compliant software programs.
Suppose you use a digital camera to take pictures. If you want to make sure that the colors in these
pictures are displayed consistently on a specific monitor, you can tag the images with an ICC profile
of your digital camera. The images then get a detailed mathematical description of how your digital
camera “saw” the colors at the moment when you took the pictures. A color management system
can use this description to convert the colors to the color space of another output device, such as
a monitor. In that case, the colors seen through the lens of your digital camera and the colors
displayed by your monitor will look (almost) identical.
Using ICC profiles in Enfocus PitStop Server
Enfocus PitStop Server can be set to use the same profiles for all objects, or to use specific profiles
for images. In the first case, there will only be one tab, to define color management for all objects.
In the latter case, there will be a tab to define color management for images, and one for other
objects.
Enfocus PitStop Server enables you to specify source and target ICC profiles for the following color
models:
•
•
•
•
Gray
RGB
CMYK
Lab
The ICC profiles will be used when color conversions have to be done from one color model to
another, for example, when RGB colors are converted to CMYK colors.
When necessary, the target profiles can be set different than the source profiles, by selecting the
“use other ICC profile than source” option, and defining the target profiles.
You can define ICC profiles at different levels:
• Default ICC profiles apply to all hot folders. You specify these profiles in the Enfocus PitStop
Server preferences.
• Specific ICC profiles apply to a particular hot folder. You may want to use these profiles to
process PDF documents in which color conversions have to be performed from a given color
model to a device-specific color.
• Specific ICC profiles defined in a Preflight Profile or in an Action List
To use default ICC profiles for all hot folders:
1. Choose Window > Preferences .
2. Click the Color Management category.
3. Click the Enable color management check box.
4. Define if you want the same profiles for all objects, or if you want to define profiles for images
and for other objects
5. Select source and target ICC profiles for the color models of your choice.
6. Click OK button.
89
Enfocus PitStop Server
To use ICC profiles for a specific hot folder:
1. Select a hot folder and click Edit.
2. Display the Color Management properties.
3. Click Override General Color Settings.
4. Define if you want the same profiles for all objects, or if you want to define profiles for images
and for other objects
5. Select source and target ICC profiles for the color models of your choice.
6. Click OK.
Disabling color management
Sometimes you want to use color management in the Enfocus PitStop Server environment,
sometimes you don't. Reasons for using color management and ICC profiles are outlined in Working
with ICC profiles on page 88. Reasons for not using color management in Enfocus PitStop Server
can be the following:
• You do not process PDF documents coming from or going to color-managed environments. For
example, you know that PDF documents which arrive in a given hot folder never contain images
which are tagged with ICC profiles and you do not wish to tag them either.
• You wish to leave the ICC tagging of the images in the PDF documents as is.
In these cases, you can disable color management. If you do so and you process PDF documents
with profile-tagged images, the color profiles will be left untouched: they will not be removed or
changed.
You can enable color management for all hot folders and disable it for one or more specific hot
folders and vice versa. Disabling color management for all hot folders only applies to hot folders
which you create from that moment onwards. Existing hot folders which already use specific ICC
profiles maintain their settings.
To disable color management for all hot folders:
1. Choose Window > Preferences .
2. Click the Color Management category.
3. Click to clear the Enable color management check box.
4. Click OK button.
Note: Existing hot folders which already use specific ICC profiles maintain their settings.
To disable color management for a specific folder:
1. Select a Hot Folder and click Edit.
2. Display the Color Management properties.
3. Select Override General Color Settings checkbox.
4. Click uncheck the Enable color management checkbox.
5. Click OK button.
90
Enfocus PitStop Server
11.6 Spot colors
Spot colors defined
Spot colors are colors which are printed with their own premixed inks. You can choose from several
spot color systems and from hundreds of different spot-color inks. In spot-color offset printing,
each spot color is reproduced using a single printing plate. In contrast, process color printing uses
four inks only (CMYK: cyan, magenta, yellow and black) to reproduce all colors.
If you print a spot color at 100%, a solid opaque color appears on your page (not a dot pattern). A
tint of a spot color, i.e. a lightened spot color, is created by printing smaller halftone dots of the
base color.
Spot colors can provide excellent results when used for offset printing. For digital output or monitor
display, however, spot colors are less well-suited and should be used with caution.
Unambiguously defined spot colors
Unambiguously defined spot colors are colors which have distinct names and associated CMYK
equivalents. If two spot colors with different CMYK values have the same name, they will be
considered ambiguously defined.
An example would be a document which contains objects from various applications:
• Green lines which were drawn in a word processing application.
• The company logo which was created using illustration software.
If the spot colors of these objects have the same name, say “company green”, but different CMYK
values, they are ambiguously defined.
A - Company logo: “company green” C 100%, M 0%, Y 100%, K 50%
B - Separator lines: “company green” C 90%, M 0%, Y 90%, K 50%
Converting spot colors to the equivalent CMYK process colors
Sometimes, it may be convenient to use spot colors in your source document and have Enfocus
PitStop Server convert these spot colors to the corresponding RGB or CMYK colors in the PDF
91
Enfocus PitStop Server
document. Rather than creating dedicated — RGB, CMYK and spot-color — source files for different
output purposes, you may want to maintain one single source document.
For example, you may have a newsletter or brochure containing spot-color objects, such as your
company logo. You would then have the following option:
• You could leave the spot color definitions unchanged and use the PDF document to produce
individual offset printing plates for each color.
• You could have Enfocus PitStop Server convert the spot colors to the equivalent CMYK process
colors for output on, for example a digital four-color press.
92
Enfocus PitStop Server
12. Running jobs through PitStop Server
12.1 Dropping files or folders in the input folder
By dropping a file in the input folder, this file is submitted to be processed by the hot folder.
How often is an input folder checked ?
An input folder is checked for incoming files, based on the Time Interval set in the Processing
category of the Preferences. By default, the input folder is checked every 10 seconds.
Creating subfolders in the input folder
If you create subfolders in the input folder, either by dropping folders in the input folder or by
creating subfolders manually, the way these subfolders are processed depends on the “Processing”
category in the Hot Folder Editor.
Option
Result
Don't process
subfolders in input
folder
Only files in “root” of input folder
will be processed. Files in
subfolders are ignored
Input and Output
Process subfolders,
Files from subfolders will be
keeping folder structure processed. The output files will
be placed in a same subfolder
structure in the output folder(s).
Process subfolders,
flattening folder
structure
Files from subfolders will be
processed. All output files will be
placed in the “root” of the output
folder(s).
Delete empty subfolders Subfolders that are empty after
in input folder
processing, will be deleted.
93
Enfocus PitStop Server
13. Monitoring active jobs
In the Hot Folders tab, you can see the number of jobs queued to a specific hot folder. However,
to monitor individual jobs, you can use the Progress tab.
In the Progress tab in PitStop Server, all active jobs can be monitored. For every job, you can see
•
•
•
•
•
The name of the job. This will be the name of the input file.
The hot folder processing the job
The current step
The progress on this step
Additional info
13.1 To sort the active jobs
You can sort the active jobs in the list.
1. Go to the Progress tab in PitStop Server
2. Click in the header of the column you want to use as base to sort the active jobs
3. To change between sorting ascending and descending, click the same header again.
13.2 To pause all active jobs
1. Go to the Progress tab in PitStop Server
2. Click the
button to pause all jobs.
13.3 To resume all active jobs
1. Go to the Progress tab in PitStop Server
2. Click the
button to resume processing on all jobs.
13.4 To cancel active jobs
1. Go to the Progress tab in PitStop Server
2. Select one or more active jobs
94
Enfocus PitStop Server
3. Click the
button to cancel the selected jobs.
95
Enfocus PitStop Server
14. Viewing finished jobs in the History tab
After finishing a job, and logging is enabled for the hot folder, the job will be shown in the History
tab. The History tab in PitStop Server gives an overview of all finished jobs, showing the output job
name, the hot folder name, the date, the Preflight status and any special events that occurred.
14.1 History Logging
History Logging enables or disables keeping a log of the processed file, which will then be shown
in the History tab.
History Logging can be set on or off in the General category in the PitStop Server Hot Folder
Editor. If History Logging is set to Use global preferences, the hot folder will use the setting of
the Log history checkbox in the Processing category of the Enfocus PitStop Server Preferences
panel.
14.2 Managing the History List
Using the Filters on top of the list, you can define what jobs you want to see, based on different
criteria (date, file name, preflight status, ...). This allows to get an overview of all jobs for a specific
customer or hot folder, get an overview of all jobs with errors, etc.
By clicking the column headers, you can also sort the list based on the selected column.
14.3 Exporting History
The information in the history can be exported to a file for archiving, statistics, etc. using the Export
button
. This file can either be tab separated text (TXT), with or without detail, or an XML.
14.4 Statistics
The statistics allow to check the number of files processed per hot folder, processing times, average
pages per jobs, etc.
Statistics are opened by clicking the
96
button
Enfocus PitStop Server
14.5 Special Events Log
The Special Events Log, opened by clicking the
button, shows all jobs that, for some reason,
failed to be processed. This could be e.g. because the incoming PDF file is corrupted. The Special
Events Log will also show errors that are not job-related, e.g. if there are missing components of
Server itself, if Enfocus PitStop Server has no access to a folder due to changed permissions, etc.
97
Enfocus PitStop Server
15. Enfocus PitStop Server Preferences
Enfocus PitStop Server allows you to specify the following categories of preferences:
Category
Related to...
General
The units (points, picas, inches, centimeters or milimeters) to be used
in PitStop Server and processing and logging.
Language
The language used for logging and processing, and the language used
in PitStop Server.
Folders
The location of the folders for temporary files, quarantined files and log
files of PitStop Server.
Processing
The time interval for hot folder checking, optimized save setting, etc.
File Cleanup
Automatic Deletion of files after processing
Fonts
Font locations. Folders on your hard disk or network drive where Enfocus
PitStop Serverwill look for fonts, e.g. when a font has to be
(re-)embedded.
Color Management
Enabling color management and the color models which you wish to
use.
E-Mail
SMTP server for e-mail notification, and e-mail settings for PitStop
Server special events.
Personal Info
Name, company, address, e-mail addresses and phone numbers, etc.,
e.g. used when sending an e-mail.
Updates
Checking for application updates, and sending notification e-mails to
PitStop Server Administrator
15.1 To set the Measurement Units
1. In the PitStop Server, choose Window > Preferences... .
2. Select the General category.
3. Select the default measurement units you want to use for processing and logging in the Default
measurement units drop-down menu. This default measurement units are used on the
processing side of PitStop Server. Practically speaking, this means the measurement units in
the PDF or XML report.
4. Select the default measurement units you want to view in the PitStop Server in the Measurement
units for viewing drop-down menu. These measurement are used on the viewing side of PitStop
98
Enfocus PitStop Server
Server. For example, the measurement units in the editor panels, like the Preflight Profile
editor etc.
5. Select the Disable all warning messages checkbox to disable all warning messages which
appear in PitStop Server. The Reset All Messages button enables all warnings again.
15.2 To set the Language
1. In PitStop Server, choose Window > Preferences... .
2. Select the Languages category.
3. Define the Language for PitStop Server processing and logging in the Default language
drop-down menu.
4. Define if PitStop Server uses the same language or define the language to be used instead.
Note: If the language for PitStop Server is changed, you will have to restart Enfocus PitStop
Server.
Note: The language to be used in the Reports can be set in the Hot Folder setup. By default,
the language defined in the preferences is used. See also Report Generation on page 46.
5. Click the Manage Languages... button to launch the Enfocus Pack Manager dialog box. This
dialog box provides access to new languages and an install/ remove mechanism for installing/
removing languages. Refer the next topic, Enfocus Pack Manager for more information.
6. Click the OK button in the Enfocus PitStop Server Preferences dialog box.
7. Restart Adobe Acrobat.
Enfocus Pack Manager
The PitStop Pro help system can be displayed in a language other than English by installing the
appropriate language pack and selecting the desired language in the Enfocus PitStop Pro
Preferences. Installing languages is done via the Enfocus Pack Manager dialog box.
99
Enfocus PitStop Server
Installed tab
This tab lists all the language packs which are already installed. You can,
1. Search for a pack using the search field.
2. Use the Actions button to install, uninstall, download and refresh the available language packs.
Apply various filter options using the Show menu.
3. Uninstall a pack using the Uninstall button.
4. View a list of configurators installed on the computer if Enfocus Switch is also installed on it.
Web tab
This tab lists all the language packs available for download from the Enfocus website. You can,
1. Search for a language pack using the search field.
2. Use the Actions button to install, uninstall, download and refresh the available language packs.
Apply various filter options using the Show menu.
3. Install a pack using the Install button.
4. Uninstall a pack using the Uninstall button.
5. View a list of configurators (both installed and not installed) if Enfocus Switch is also installed
on it.
Local tab
This tab provides a list of locally stored packs (for example: packs that were downloaded but not
yet installed, installed packs appear in the Installed tab). You can,
1. Search for a pack using the search field.
2. Use the Actions button to install, uninstall, download and refresh the available language packs.
Apply various filter options using the Show menu.
3. Browse to the local folder where the language packs are stored using the Browse for folder
button.
100
Enfocus PitStop Server
4. Install a pack using the Install button.
5. Uninstall a pack using the Uninstall button.
Note: The Enfocus Pack Manager is common across all Enfocus products. It helps you in selecting
and installing the language packs and the configurators (in case you have Enfocus Switch installed)
of your choice.
15.3 To set the Folders
1. In PitStop Server, choose Window > Preferences...
2. Select the Folders category
3. Define in what folder PitStop Server can store temporary files. Click the Use Default button to
store them in the default location or click the Browse button to choose any other folder.
Note: If the Temporary Files folder is changed, you will have to restart PitStop Server WatchDog.
4. Define in what folder quarantined files will be stored. Quarantined files are files that need to
be taken out of the processing workflow, e.g. if the file is corrupt. Make sure you have sufficient
permissions to access this folder and there is sufficient disk space available on this drive.
5. Define in what folder PitStop Server will store its special events log files. These are files which
contain information about the special events that may occur in PitStop Server. Make sure you
have sufficient permissions to access this folder.
15.4 To set the Processing preferences
1. In the PitStop Server, choose Window > Preferences... .
2. Select the Processing category.
3. Define how often input folders must be checked for new files.
4. Set the number of days to keep Logs and Special Event Logs.
5. Define if PitStop Server should continue processing files in the background when closing the
application. The default setting is Ask the user, which means you get the choice when closing
Enfocus PitStop Server.
15.5 To set the File Cleanup preferences
1. In PitStop Server, choose Window > Preferences... .
2. Select the File Cleanup category
101
Enfocus PitStop Server
3. Define if files have to be deleted after a number of days, if they exceed a number of megabytes,
or if the number of files gets too high.
4. Define if empty subfolders need to be removed
5. Define what file types you want to be deleted automatically.
Note: Note that Enfocus PitStop Server will only remove files and folders that have been
processed.
15.6 To set your Font preferences
1. In PitStop Server, choose Window > Preferences .
2. Select the Fonts category.
3. Click the Add... button.
4. Select the necessary font folders on your hard disk or network drive and click OK.
The selected font folders appear in the Font Folders pane of the Enfocus PitStop Server
Preferences Panel.
Note: You can add font folders for a specific hot folder in the Hot Folder setup. See also Fonts
on page 60.
5. Click the Remove button to remove a font folder.
15.7 To set your Color Management preferences
1. In PitStop Server, choose Window > Preferences
2. Select the Color Management category
3. Configure the general color management settings in the General tab.
4. In the Images tab, you can select the Apply General color settings checkbox to apply the general
settings for the images too or you can select the Enable color management checkbox to override
the general color settings and configure separate settings for images.
5. Select a default source and target ICC profile for each color space. By selecting Sync with
Acrobat, the corresponding ICC profile defined in the Acrobat preference will be used.
6. Select the CMM Engine to be used, and (if applicable) select Use black point compensation
checkbox.
Note: You can set color management for a specific hot folder in the Hot Folder setup. See also
Using Color Management in Enfocus PitStop Server on page 88.
102
Enfocus PitStop Server
15.8 To set your E-Mail preferences
1. In PitStop Server, choose Window > Preferences... .
2. Select the E-Mail category.
3. Fill in the name and port for your outgoing mail. You can find this information in your e-mail
program or contact your system administrator for assistance.
4. Fill in the user name and password, if any.
5. Define to who PitStop Server sends an e-mail notification if a special event occurs. Multiple
e-mail addresses can be entered.
15.9 To set your Personal Info
1. In PitStop Server, choose Window > Preferences...
2. Select the Personal Info category
3. Enter your name, company, address and all other personal information.
15.10 To set the Update Preferences
1. In PitStop Server, choose Window > Preferences... .
2. Select the Updates category.
3. Define how often PitStop Server should check for application updates.
4. Define how often the PitStop Server administrator (as defined in the E-Mail preferences) should
get a notification on available updates.
103
Enfocus PitStop Server
Index
A
absolute colorimetric remapping 88
Action List Control Panel
displaying 69
overview of the main parts 69
using 69
Action Lists
duplicating 70
explained 69
exporting 70, 71
importing 70
managing 69
removing 70
where to find them 49
activating a hot folder 43
Active jobs 94
activity status
setting 49
adding
Action Lists to a PDF Profile 67
Applying smart preflight variable 56
automatic deletion of files
specifying when 101
automating tasks
using Action Lists 69
B
buying and registering Enfocus Pitstop Server 23
C
categories of problems 63
Certified PDF document
definition 76
Certified PDF workflow
explained 72, 74
incremental save 74
PDF editing 73
preflighting in a ~ 72
responsibility in a ~ 74
check time for hot folders
specifying 101
CMYK
color model
defined 84
color
converting spot colors to CMYK 91
device-independent 86, 88
spot 91
using unambiguously defined spot colors 91
color management
defined 84
color management (continued)
disable for a specific folder 90
preferences 102
color models
CMYK 84
grayscale 85
RGB 84
color space
See also gamut 85
colorimetric remapping
absolute 88
relative 87
consult
support information 24
conventional PDF workflow
illustration and description 74
creating
PDF Profiles 65
creating a PDF Profile 65
Creating Variable Set 53
D
deleting
PDF documents (automatically) 101
device-independent color 86
disabling color management for a specific folder 90
displaying
hot folder properties 31
document consistency 73
double-byte font
defined 81
duplicating
Action Lists 70
duplicating a hot folder 40
E
e-mail
setting preferences 103
e-mail notification
using 60
editing
PDF Profiles 65
editing a session comment 77
embedding fonts 82
versus subsetting fonts 82
Enable
hot folder 43
Enfocus metadata 76
error reporting 64
error severity levels
defined 64
example 64
Index
exporting
Action Lists 70
F
feedback
getting ~ on processed PDF documents 60
finding PostScript font names 82
Folders
checking input folders 93
handling subfolders 93
font locations
specifying in preferences 102
fonts
finding PostScript font names 82
Multiple Master 80
PostScript Type 1 79
PostScript Type 3 79
standard 14 fonts 78
TrueType 79
G
gamut 85
general preferences
setting 101
getting support 23
grayscale color model 85
guaranteed preflighting 72
H
History
History tab 96
logging 96
host name
specifying in preferences 103
hot folder
activating 49
activity status 49
duplicating 40
how and why? 35
specifying when to check 101
using ICC profiles for specific ~ 90
valid 36
Hot folder
activation 43
handling subfolders 93
input folder checking 93
priority 43
valid hot folders 43
hot folder properties
displaying 31
using 31
hot folders
using default ICC profiles for all ~ 89
I
ICC profiles
preferences 102
using for a specific hot folder 90
using for all hot folders 89
importing
Action Lists 70
index term 50, 52, 53, 54, 55
intent
rendering 86
J
Jobs
active jobs 94
L
language
specifying 101
locking
PDF Profiles 67
M
managing
Action Lists 69
PDF Profiles 65
the Enfocus Certified status of a PDF document
how 59
metadata 76
Multiple Master fonts 80
P
Pack Manager 99
password
to lock a PDF Profile 67
PDF editing
in a Certified PDF workflow 73
issues 73
PDF Profile
creating 65
definition 62
error level options 64
managing 65
PDF Profiles
locking with a password 67
predefined 65
PDF properties
groups 63
PDF workflow
concept 72
conventional 74
perceptual remapping 86
port
specifying in preferences 103
Enfocus PitStop Server
PostScript font name
finding 82
PostScript fonts
finding font names 82
Type 1 79
Type 3 79
predefined PDF Profiles and PDF Profile templates 65
preferences
color management 102
ICC profiles 102
selecting a language 101
setting general ~ 101
specifying font locations 102
specifying for e-mail 103
specifying the folder for temporary files 101
specifying when to delete files automatically 101
preflight profile
See PDF Profile 62
preflighting
defined 62
definition 62
guaranteed 72
illustrated 62
in a Certified PDF workflow 72
issues 72
mechanism explained 62
properties verified 62
Priority 43
problem categories 63
processed PDF documents
e-mail notification 60
Progress 94
R
registering and buying Enfocus Pitstop Server 23
relative colorimetric remapping 87
remapping
absolute colorimetric 88
perceptual 86
relative colorimetric 87
saturation 87
removing
Action Lists 70
rendering intent 86
responsibility
PDF editing issues in a Certified PDF workflow 74
RGB
color model 84
roll-back mechanism of a Certified PDF document 75
Rule based variable definition 54
S
saturation
remapping 87
security
locking a PDF Profile with a password 67
session comment
adding 77
editing 77
setting general preferences 101
Smart Preflight 50
SMTP server
specifying in preferences 103
specifying in preferences
e-mail 103
spot color
converting to CMYK 91
defined 91
unambiguously defined 91
standard 14 fonts 78
Statistics 96
status
hot folder activity 49
subsetting fonts 82, 83
versus embedding fonts 82
support information
to consult 24
T
tasks
automating using Action Lists 69
temporary files
specifying a folder for ~ 101
trial version 23
Troubleshooting for Smart Preflight 58
TrueType fonts 79
Types of Smart Preflight Variables 51
U
using hot folder properties 31
Using Smart Preflight 51
V
valid hot folder 36
Verify variables 57