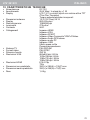
1
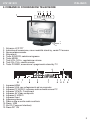
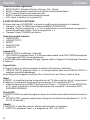
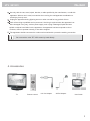
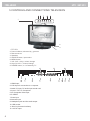
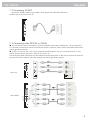
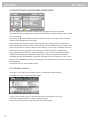
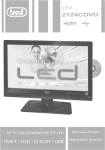
LTV
2513CI
13” TV COLOR/MONITOR TFT LCD
DVB-T - CI SLOT - USB
Manuale D’uso
ITALIANO
1 PREFAZIONE
LTV 2513CI
Grazie per aver acquistato questo TV!
Prima di utilizzare il prodotto si prega di leggere attentamente il seguente manuale d’uso.
Accertarsi che il TV non sia danneggiato, in tal caso rivolgersi al venditore.
Controllare che siano presenti tutti gli accessori.
Non aprire il TV: all’interno non vi sono nè comandi manipolabili dall’utente nè parti di
ricambio. Per tutte le operazioni rivolgersi ad un Centro Assistenza Autorizzato Trevi.
2 PRECAUZIONI DI SICUREZZA
VOLTAGGIO PERICOLOSO
ATTENZIONE
Questo simbolo riportato sul retro dell'apparecchio ed in
questo manuale segnala la presenza all'interno di questo
apparecchio di componenti operanti ad alta tensione, non
apritelo per evitare il rischio di scosse elettriche.
Questo simbolo riportato sul retro dell'apparecchio ed in
questo manuale indicano la presenza sugli stessi di importanti
istruzioni per la sicurezza d'uso. Leggetele attentamente
prima di utilizzare l'apparecchio.
Posizionare il TV su una superficie piana.
Posizionare il TV in modo che ai suoi lati ci sia sempre abbastanza spazio per la libera
circolazione dell’aria (almeno 10 cm).
Non collocare nessun oggetto sopra il TV.
Non coprire le fessure di ventilazione poste sopra e dietro il TV.
I cavi devono essere nascosti e protetti onde evitare l’inciampo da parte di qualcuno e la
conseguente caduta del TV.
Tenere il TV lontano dai seguenti luoghi:
vicino a fonti di calore (caloriferi, stufe, raggi diretti del sole, ecc...);
vicino a zone umide (stanze da bagno, piscine, ecc...);
zone polverose;
zone soggette a forti vibrazioni.
Scollegare il cavo di alimentazione durante i temporali o per lunghi periodi di inutilizzo.
3 CURA E MANUTENZIONE
Scollegare il TV prima di pulirlo.
Non usare solventi o liquidi per pulire il TV, usare solo un panno morbido e asciutto.
4 ALL’INTERNO DELL’IMBALLO
Televisore
2
Telecomando
Adattatore
Auto 12V
Alimentatore
esterno
Manuale d’uso
LTV 2513CI
5 COMANDI E CONNESSIONI TELEVISORE
ITALIANO
2
3
4
1.
2.
3.
4.
5.
6.
7.
8.
9.
Schermo LCD TFT
Indicatore d’accensione, rosso modalità stand-by, verde TV acceso
Sensore telecomando
Altoparlanti
Tasto SOURCE, selezione ingresso
Tasto MENU
Tasti VOL-/VOL+, regolazione volume
Tasti CH-/CH+, cambio canale
Tasto POWER, accensione / spegnimento stand-by TV
1. Ingresso HDMI
2. Ingresso VGA, per collegamento ad un computer
3. Ingresso PC AUDIO, ingresso audio scheda sonora PC
4. Ingresso Y/Pb/Pr Component
5. Ingresso AV Video composito
6. Ingresso S-VIDEO
7. Ingresso Scart
8. Ingresso antenna
9. Presa cuffie e uscita audio ausiliaria
10.Presa USB
11.Slot CI (Common Interface)
12.Presa DC 12V
3
ITALIANO
6 TELECOMANDO
LTV 2513CI
6.1 INSTALLAZIONE
Attenzione: batterie non incluse
Aprire il vano batterie posto sul retro del telecomando.
Inserire le batterie (formato AAA) assicurandosi di rispettare la polarità e i segni guida
all’interno del vano batterie.
Richiudere il vano batterie.
Per prevenire la perdita di liquido da parte delle batterie con il conseguente danneggiamento
del telecomando, assicurarsi di installare correttamente le batterie e di non installare tipologie
di batterie diverse (vecchie e nuove, alcaline e zinco-carbone, ecc...).
Rimuovere le batterie dal telecomado se non si usa per lunghi periodi.
4
LTV 2513CI
ITALIANO
6.2 DESCRIZIONE COMANDI
1. Tasto POWER, consente di accendere e spegnere il TV dalla modalità stand-by.
2. Tasto S.MODE, consente di selezionare le cinque equalizzazioni del suono preimpostate dalla fabbrica. Le
equalizzazioni sono: Standard, Musica, Dialogo, Film, Utente.
3. Tasto P.MODE, consente di selezionare le quattro equalizzazioni dell’immagine preimpostate dalla fabbrica.
Le equalizzazioni sono: Standard, Vivace, Morbida, Ottimale, Utente.
4. Tasto MUTE, consente di escludere momentaneamente l’audio. Premerlo di nuovo o utilizzare i tasti volume
per ripristinarlo.
5. Tasto AUTO per auto configurazione diretta in modalita’ PC.
6. Tasto SLEEP, consente di spegnere automaticamente il TV dopo un periodo di tempo preimpostato.
7. Tasto -/--, consente di selezionare un canale a cifra doppia o tripla (da 10 in su). Dopo aver premuto il tasto
digitare i numeri che compongono il canale. Per riselezionare un canale a cifra unica ripremere il tasto.
8. Tasto DISPLAY, consente di visualizzare le informazioni riguardanti sorgente e canale.
9. NICAM / AUDIO , consente l’accesso al menu MULTI-AUDIO. Se disponibile, abilita la modalita’ NICAM.
10. Tasti Numerici (0-9) tasti selezione canali - tasti numerici.
11. Tasto
consente il ritorno all’ultimo canale visualizzato.
12. Tasto SOURCE, consente di entrare nel menu’ di selezione ingresso. Le sorgenti disponibili sono: TV, DTV,
AV, S-VIDEO, SCART, YPBPR, HDMI, PC, MEDIA.
13. Tasti CH+/CH-, consentono di selezionare il canale successivo o precedente a quello che si sta guardando.
14. Tasti
, consentono di muoversi all’interno dei menu’.
15. Tasto ENTER, consente di confermare le impostazioni scelte nei menu’.
16. Tasto VOL+/VOL-, consentono di aumentare o diminuire il volume del TV.
17. Tasto EXIT, consente di uscire dai menu’ di impostazione.
18. Tasto TV MENU,consente di entrare o uscire nei menu’ di impostazione .
19. Tasto MEDIA, consente di accedere ai contenuti del dispositivo USB.
20. Tasto EPG, consente di visualizzare il menu’ Guida Canali in modalita’ DTV.
21. Tasto HOLD /
, blocca o rilascia le pagine che si stanno visualizzando sul teletext, in modalita’ MEDIA
consente la funzione Avanzamento Veloce in lettura file audio/video.
22. Tasto TEXT /
,consente di entrare o uscire in modalita’ teletext, in modalita’ MEDIA consente la funzione
Indietro Veloce in lettura file audio/video.
23. Tasto INDEX /
, consente di aprire la pagina indice in modalita’ teletext, in modalita’ MEDIA consente di
selezionare il file precedente.
24. Tasto SIZE /
, consente di cambiare la dimensione della pagina in modalita’ teletext, in modalita’ MEDIA
consente di selezionare il file successivo.
25. Tasto verde, consente di selezionare opzioni nei vari menu’.
26. Tasto rosso / TV/RADIO, consente di selezionare opzioni nei vari menu’, consente di selezionare tra TV
e RADIO in modalità DTV.
27. Tasto giallo, consente di selezionare opzioni nei vari menu’.
28. Tasto blu, consente di selezionare opzioni nei vari menu’.
29. Tasto SUBPAGE /
, consente di visualizzare una sottopagina del teletext digitando i quattro numeri
identificativi corrispondenti, in modalita’ MEDIA consente di arrestare la lettura di un file .
30. Tasto
, consente di mettere in pausa/riproduzione la lettura di un file in modalita’ MEDIA.
31. Tasto REVEAL/ZOOM, in modalita’ teletext mostra il contenuto nascosto di una pagina (ad esempio la
soluzioni di giochi), in modalita’ MEDIA consente di ingrandire l’immagine di un file (foto o video) che si sta
visualizzando.
32. Tasto SUBTITLE, consente di attivare e selezionare i sottotitoli di un programma se disponibili in modalita’
DTV.
33. Tasto FAV, consente di visualizzare la lista dei canali preferiti.
34. Tasto
, consente di attivare la registrazione.
35. Tasto FAV-, consente di selezionare il canale precedente dalla lista dei programmi preferiti in modalità DTV.
36. Tasto FAV+, consente di selezionare il canale successivo dalla lista dei programmi preferiti in modalità DTV.
5
ITALIANO
7 INSTALLAZIONE E COLLEGAMENTI
LTV 2513CI
7.1 ACCENSIONE
UTILIZZO CON ALIMENTAZIONE DI RETE AC 230V / 50Hz
Collegare l’alimentatore AC 230V / DC 12V in dotazione ad una presa elettrica.
Collegare lo spinotto alla presa DC 12V posta a lato del TV.
Premere il tasto POWER sul televisore o del telecomando per accendere il TV.
Per riattivare la modalità stand-by premere una seconda volta POWER sul televisore o del
telecomando.
Nota:
Se il TV è privo di segnale, verrà attivata la modalità STAND-BY, per avviare
nuovamente il TV premere il tasto POWER.
UTILIZZO CON ALIMENTAZIONE DC12V DA IMPIANTO AUTO/CAMPER TRAMITE
ADATTATORE AUTO
Questo collegamento permette di utilizzare il LTV2513CI all’interno dell’automobile/camper.
Collegare l’adattatore per auto ad una presa accendisigari DC 12V per auto e lo spinotto
nell’ingresso adattatore DC 12V.
Premere il tasto POWER sul televisore o del telecomando per accendere il TV.
Per riattivare la modalità stand-by premere una seconda volta POWER sul televisore o del
telecomando.
Nota:
Non collegare il LTV2513CI alla presa accendisigari di camper e mezzi pesanti che
forniscono 24V.
E’ sconsigliato l’utilizzo per lunghi periodi ad automobile spenta del LTV 2513CI
per evitare di scaricare la batteria.
6
LTV 2513CI
ITALIANO
7.2 COLLEGAMENTO ALL’ANTENNA
Collegare il cavo d’antenna 75 ohm all’ingresso antenna posto sul retro del TV.
Nota:
Per l’utilizzo in auto e/o camper e’ possibile collegare al LTV 2513CI un’antenna
esterna Trevi modello AA 6051 o AA 6052 opzionale.
Antenna TV esterna opzionale
Modello AA 6052
Antenna TV esterna opzionale
Modello AA 6051
7
ITALIANO
LTV 2513CI
7.3 COLLEGAMENTO TRAMITE CAVO SCART
Collegare l’uscita SCART del dispositivo audio/video (Lettore Mpeg4-DVD/Videoregistratore/Telecamera,...) tramite un cavo SCART all’ingresso SCART posto sul retro del TV.
Collegamento
RCA A/V
Collegamento
RCA Y/Pb/Pr
8
S-VIDEO
7.4 COLLEGAMENTO TRAMITE CAVO RCA A/V o Y/Pb/Pr
A/V: Collegare l’uscita A/V del dispositivo (Lettore Mpeg4-DVD/Videoregistratore/Telecamera,...) tramite cavi RCA agli ingressi Video Composito / AUDIO IN (L/R) posti sul retro
del TV. Assicurarsi di rispettare i colori relativi alle varie sorgenti: giallo per il video, bianco
per il canale audio sinistro e rosso per il canale audio destro.
Y/Pb/Pr: Collegare l’uscita Y/Pb/Pr del dispositivo (Lettore Mpeg4-DVD/Videoregistratore/Telecamera,...) tramite cavi RCA agli ingressi Y/Pb/Pr posti sul retro del TV. Assicurarsi di rispettare i colori relativi alle varie sorgenti: verde per Y, blu per Pb, rosso per
Pr.Collegare l’uscita audio del dispositivo agli ingressi AUDIO IN posti sul retro del TV.
Assicurarsi di rispettare i colori relativi alle varie sorgenti: bianco per il canale audio sinistro
e rosso per il canale audio destro.
S-Video
LTV 2513CI
ITALIANO
7.5 COLLEGAMENTO TRAMITE CAVO VGA / JACK
Collegare l’uscita VGA-RGB del computer tramite un cavo VGA all’ingresso VGA posto
sul retro del TV, e l’uscita audio del computer tramite un cavo jack/jack all’ingresso PC
AUDIO posto sul retro del TV.
7.6 COLLEGAMENTO TRAMITE CAVO HDMI
Collegare l’uscita HDMI del dispositivo audio/video (Lettore Mpeg4-DVD/Videoregistratore/Telecamera,...) tramite un cavo HDMI all’ingresso HDMI posto sul retro del TV.
Nota:
C’è la possibilità che l’uscita HDMI del vostro dispositivo vada attivata; controllare
il manuale d’uso del vostro dispositivo.
7.7 COLLEGAMENTO DISPOSITIVO USB
Collegare il dispositivo USB all’ingresso USB posto sul retro del TV.
9
ITALIANO
8 TELEVISIONE ANALOGICA
LTV 2513CI
8.1 OPERAZIONI PRELIMINARI
8.1.1 CAMBIO LINGUA MENU
Premere il tasto SOURCE e selezionare con i tasti
la voce “TV”, quindi premere
ENTER.
Premere il tasto TV MENU per entrare nel MAIN MENU.
Premere i tasti di navigazione
fino a selezionare la voce FUNCTION con il tasto .
Selezionare OSD LANGUAGE e premere i tasti di navigazione
fino a selezionare il
linguaggio dell’OSD (menù) in ITALIANO.
Premere il tasto EXIT per uscire.
8.1.2 RICERCA AUTOMATICA DEI CANALI
Premere il tasto TV MENU per entrare nel MENU PRINCIPALE.
Premere i tasti di navigazione
fino a selezionare la voce TV e premere .
Premere i tasti di navigazione e selezionare la funzione RICER.AUTOMA. confermare
con .
La ricerca inizia automaticamente e vengono memorizzati in maniera progressiva tutti i
programmi TV disponibili; l’operazione richiede alcuni minuti.
8.1.3 POSTAMENTO CANALI E ALTRE OPERAZIONI
Consente di spostare la posizione (numero) di un canale precedentemente memorizzato.
Premere il tasto TV MENU per entrare nel MENU PRINCIPALE.
Premere i tasti di navigazione
fino a selezionare la voce TV, premere , selezionare
EDITA CANALE e premere nuovamente .
Selezionare il canale che si desidera spostare e premere il tasto ROSSO ( swap ). Accanto
al canale selezionato comparira’ un piccolo asterisco giallo. Spostarsi nella posizione che
si vuole assegnare al canale e premere ENTER.
Al termine delle operazioni premere il tasto EXIT.
Sono possibili altre operazioni sui canali:
ELIMINA: premendo il tasto BLU e’ possibile cancellare un programma dalla lista.
Selezionare il canale che si desidera cancellare (verra’ mostrato un piccolo asterisco giallo
accanto al canale ). Per confermare la cancellazione e’ necessario premere ENTER. Il
canale verra’ cancellato dalla lista canali.
COPIA: premendo il tasto GIALLO e’ possibile copiare un canale in una nuova posizione,
mantenendo pero’ anche la vecchia posizione nella lista canali. Selezionare il canale che
si desidera copiare ( verra’ mostrato un piccolo asterisco giallo accanto al canale ),
selezionare la posizione su cui si vuole copiare il canale e premere ENTER.
INSERI.: funzione equivalente alla funzione swap.
RINOMINA: selezionando un canale e premendo il tasto ENTER e’ possibile rinominare
il canale stesso aiutandosi con i tasti navigazione e i tasti colorati ( seguire le indicazioni
mostrate sullo schermo ).
8.1.4 RICERCA MANUALE DEI CANALI
Consente di sintonizzare manualmente i programmi sul canale desiderato.
Premere il tasto TV MENU per entrare nel MENU PRINCIPALE.
Premere i tasti di navigazione
fino a selezionare la voce TV e premere .
Selezionare alla voce CANALE il numero di canale sul quale si vuole effettuare la sintonia
manuale.
Premere i tasti di navigazione
fino a selezionare la voce RICER.MANUALE e
premere o .
10
LTV 2513CI
ITALIANO
Continuare la ricerca premendo o fino al raggiungimento del programma desiderato
che verrà memorizzato automaticamente.
Ulteriori informazioni sul menu TV:
SISTEMA COLO.: consente di cambiare il sistema di riproduzione colore. In Italia si usa
il PAL
SISTEMA AUDIO: consente di cambiare il sistema di riproduzione audio. In Italia si usa
il sistema BG.
RICER.AUTOMA.:permette di effettuare una sintonia automatica dei canali.
SINTO. FINE: permette di regolare manualmente la frequenza del canale registrato.
SALTA: permette di togliere i canali selezionati dalla lista canali senza pero’ eliminarli.
Dopo aver selezionato il canale su cui operare, selezionare SALTA e con il tasto attivare
la voce (comparira’ “ON”). Per ripristinare il canale disattivare la voce SALTA
(comparira’”OFF”).
Nota:
Se il TV segnala “NESSUN SEGNALE” significa che non c’è segnale, occorre quindi
verificare il cavo o l’impianto d’antenna.
8.2 VISUALIZZAZIONE CANALI MEMORIZZATI
Premere il tasto CH+ per posizionarsi sul canale memorizzato successivo.
Premere il tasto CH- per posizionarsi sul canale memorizzato precedente.
E’ possibile utilizzare anche il tastierino numerico; per cercare canali a doppia cifra premere
il tasto -/--.
8.3 REGOLAZIONE VOLUME
Premere i tasti VOL+ e VOL- del telecomando per aumentare/diminuire il volume del TV.
Premere il tasto MUTE per escludere momentaneamente l’audio, ripremerlo per
ripristinarlo.
8.4 IMPOSTAZIONI VIDEO
Premere una volta il tasto TV MENU per entrare nel MENU PRINCIPALE e selezionare
IMMAGINE, infine confermare con .
Premere i tasti di navigazione
fino a selezionare la voce desiderata e regolarla tramite
i tasti di navigazione
.
Premere il tasto TV/MENU per uscire.
Descrizione delle regolazioni:
MOD.IMMAGINE: Standard, Vivace,Morbida,Ottimale, Utente.
LUMINOSITA’: luminosità dell’immagine.
CONTRASTO:differenza tra toni chiari e toni scuri dell’immagine.
DEFINIZIONE: qualità dell’immagine.
COLORE: ricchezza del colore.
TEMP.COL.: tonalita’ del colore (Normale,Caldo,Freddo).
8.5 IMPOSTAZIONI AUDIO
Premere una volta il tasto TV MENU per entrare nel MENU PRINCIPALE e selezionare
AUDIO, infine confermare con .
Premere i tasti di navigazione
fino a selezionare la voce desiderata e regolarla tramite
i tasti di navigazione
.
Premere il tasto TV/MENU per uscire.
11
ITALIANO
LTV 2513CI
Descrizione delle regolazioni:
MODO AUDIO: Standard, Musica, Dialogo, Film, Utente.
BILAN.: bilanciamento tra altoparlante sinistro e altoparlante destro.
ALTI: intensità tonale sulle frequenze alte.
BASSI: intensità tonale sulle frequenze basse.
AVL: attiva o disattiva la funzione AVL
8.6 IMPOSTAZIONI DI SISTEMA
All’interno del menu FUNZIONE si possono modificare le impostazioni di sistema.
Premere il tasto TV MENU per entrare nel MENU PRINCIPALE.
Premere i tasti di navigazione
fino a selezionare la voce desiderata e regolarla o
attivarla/disattivarla tramite i tasti di navigazione
.
Premere il tasto TV/MENU per uscire.
Descrizione delle funzioni:
LINGUA OSD
LINGUA TESTO
RESET
DURATA OSD
ASPETTO
Lingua OSD
In LINGUA OSD si modificano i linguaggi.
OSD LINGUA: premere il tasto in corrispondenza della voce OSD LINGUA e scegliere
il linguaggio dell’OSD (menù) desiderato.
L’OSD e’ disponibile nelle seguenti lingue: Inglese, Italiano, Spagnolo, Portoghese, Francese
e Tedesco.
Lingua Testo
In Lingua Testo e’ possibile scegliere la codifica utilizzata per il televideo.
LINGUA TESTO: premere il tasto
in corrispondenza della voce LINGUA TESTO e
scegliere la codifica desiderata.
Sono disponibili le seguenti codifiche: Euro Ovest, Euro est, Russo, Arabo e Farsi.
Reset
In RESET, e’ possibile riportare le impostazioni del TV alle condizioni iniziali ( impostazioni
di fabbrica ) e cancellare le liste canali sia analogica (TV) che digitale (DTV).
Selezionare la funziona RESETt e attivarla con il tasto . Comparira’ la voce RIPRISTIN.
e il Tv verra’ inizializzato. Al termine dell’operazione comparira’ una finestra INFO
ASSENZA SEGNALE.
Durata OSD
In DURATA OSD e’ possibile scegliere il tempo di visualizzazione delle finestre informative
del TV.
DURATA OSD: premere e selezionare il tempo di visualizzazione desiderato ( 5, 10, 15,
20, 25, 30 secondi ).
Aspetto
In ASPETTO e’ possibile variare l’aspetto dell’immagine visualizzata.
ASPETTO: premere il tasto e scegliere tra 16:9, 4:3, AUTO.
12
LTV 2513CI
ITALIANO
8.7 TELETEXT
Il teletext è un sistema di informazioni trasmesso da alcune emittenti che si consulta come
un giornale, sfogliandolo pagina per pagina.
Premere il tasto TEXT per attivare il teletext.
Sullo schermo apparirà il sommario con le varie rubriche formate da pagine di tre cifre.
Premere il tasto EXIT per uscire dal teletext.
Nota:
Se il canale selezionato non trasmette il teletext, apparirà lo schermo nero con
l’indicazione P100; in questo caso uscire dal teletext e scegliere un altro canale.
Funzioni teletext
Ricerca di una pagina
Comporre il numero di pagina voluta con il tastierino numerico. Digitare le tre cifre che
compongono il numero della pagina (per esempio “201”) premendo in sequenza il numero “2”
- “0” - “1”, il numero viene visualizzato in alto a sinistra, il conta pagine inizia la ricerca, la pagina
viene visualizzata.
Per consultare un’altra pagina ripetere l’operazione.
Pagina principale
Per tornare in qualsiasi momento alla pagina principale premere il tasto INDEX.
Accesso diretto alle rubriche (Top Teletext)
In fondo allo schermo vengono visualizzate delle zone colorate. I quattro tasti colorati servono
ad accedere direttamente alle rubriche o alle pagine corrispondenti senza bisogno di digitare
il numero di pagina.
Blocco pagina
Questa funzione consente di bloccare lo scorrimento automatico di alcune pagine formate da
sotto-pagine; premere il tasto HOLD per bloccare la sotto-pagina desiderata, sullo schermo
in alto a sinistra compare la scritta HOLD (blocco della pagina). Per ripristinare la situazione
precedente premere di nuovo il tasto HOLD, il simbolo di blocco scompare dallo schermo.
Zoom della pagina
Questa funzione consente di ingrandire le dimensioni della pagina che si sta guardando;
premere in sequenza il tasto SIZE per visualizzare la parte superiore, la parte inferiore e
ritornare alle dimensioni normali.
Informazioni nascoste
Questa funzione consente di visualizzare informazioni nascoste contenute in alcune pagine;
premere il tasto REVEAL per far apparire o scomparire le informazioni (soluzioni di giochi).
9 TELEVISIONE DIGITALE TERRESTRE (DTV)
Per navigare all’interno dei menù occorre utilizzare i tasti di navigazione
e , premere
ENTER per confermare la selezione oppure premere il tasto EXIT per uscire.
9.1 OPERAZIONI PRELIMINARI
9.1.1 CAMBIO LINGUA MENU
Premere il tasto SOURCE e selezionare con i tasti
la voce DTV, quindi premere
ENTER.
Premere il tasto TV MENU per entrare nel menu’ di impostazioni generali.
Premere i tasti di navigazione
fino a selezionare la voce FUNCTION con il tasto .
Selezionare LANGUAGE e premere i tasti di navigazione
fino a selezionare il
linguaggio dell’OSD (menù) in ITALIANO.
Premere il tasto EXIT per uscire.
13
ITALIANO
LTV 2513CI
9.1.2 RICERCA AUTOMATICA DEI CANALI
Premere il tasto TV MENU per entrare nel menu’ principale.
Premere i tasti di navigazione
fino a selezionare la voce DTV e premere .
Con i tasti di navigazione
portarsi sulla voce AREA e con i tasti navigazione
selezionare ITALIA.
Con i tasti di navigazione
portarsi sulla voce RICER. AUTOMA. e premere .
La ricerca inizia automaticamente e vengono memorizzati in maniera progressiva tutti i
programmi TV disponibili; l’operazione richiede alcuni minuti.
Nota:
Se il TV visualizza il messaggio “Nessun segnale” significa che non c’è segnale,
occorre quindi verificare il cavo o l’impianto d’antenna.
9.1.3 OPERAZIONI SUI CANALI MEMORIZZATI
E’ possibile spostare la posizione (numero) di un canale precedentemente memorizzato.
Premere il tasto TV MENU per entrare nel menu’ principale.
Premere i tasti di navigazione
fino a selezionare la voce DTV, premere , selezionare
CH MANAGE e successivamente selezionare CH.ORGN. , premere OK.
Selezionare il canale che si desidera spostare e premere il tasto GIALLO. Accanto al
canale selezionato comparira’ una freccia, spostarsi sulla nuova pozione che si desidera
assegnare e premere il tasto ENTER.
Al termine delle operazioni premere il tasto EXIT.
Sono possibili altre operazioni sui canali:
BLOCCO: premendo il tasto BLU e’ possibile bloccare la visione di un canale ( verra’
visualizzato un lucchetto blu ) dopo aver inserito il codice di protezione del blocco minori
( default 0000 ). Al termine della selezione confermare con ENTER per aggiornare la lista
dei canali bloccati. Attivando questa funzione il canale potra’ essere visionato solo dopo
aver inserito il codice di sicurezza.
FAV: premendo il tasto ROSSO e’ possibile aggiungere uno o piu’ canali alla lista dei
favoriti (verra’ visualizzato un cuoricino rosso). Al termine della selezione confermare con
ENTER per aggiornare la lista dei canali preferiti.
ELIM.: premendo il tasto VERDE e’ possibile cancellare uno o piu’ canali ( verra’
visualizzata una croce ). Confermando con il tasto ENTER verra’ richiesta una ulteriore
conferma della cancellazione (Volete cancellare l’articolo selezionato?), selezionando SI
e confermando con ENTER verranno eliminati i canali indesiderati.
Assegnare o modificare un nome al canale: selezionando un canale e premendo il
tasto e’ possibile rinominare il canale stesso aiutandosi con i tasti numerici e i tasti
colorati.Al termine confermare con ENTER.
Dal menu’ DTV/CH MANAGE sono possibili ulteriori operazioni sui canali memorizzati:
Ordina Canali: per ordinare i canali secondo vari criteri (fare riferimento alle istruzione che
compaiono sul video).
Gruppo CH.: per raggruppare i canali a seconda del gruppo di interesse.
Canc.Ch.TV: per cancellare tutti i canali TV memorizzati (verra’ richiesta una conferma,
selezionare SI e premere ENTER).
Canc.Ch.Radio: per cancellare tutti i canali RADIO memorizzati (verra’ richiesta una
conferma, selezionare SI e premere ENTER).
14
LTV 2513CI
ITALIANO
Funzione LCN
Questo TV e’ dotato di funzione LCN ( Logical Channel Number ) che e’ uno standard a livello
nazionale che assegna la numerazione dei canali uguali per tutto il paese in cui si effettua
la scansione. Se si desidera disattivare questa funzione e visualizzare la lista dei canali in
modo progressivo (1,2,3,...), premere TV MENU, selezionare DTV, premere , selezionare
IMPOSTA.ADV.,selezionare LCN. Disattivare la funzione LCN con i tasti
( ON/OFF ).
La funzione LCN di default e’ attiva (ON).
9.1.4 RICERCA MANUALE DEI CANALI
Consente di sintonizzare manualmente i programmi sul canale desiderato.
Premere il tasto TV MENU per entrare nel menu’ principale.
Premere i tasti di navigazione
fino a selezionare la voce DTV, premere , selezionare
RICERCA MANUALE e premere .
Selezionare il canale nella finestra NOME CANALE sul quale si desidera effettuare la
sintonia manuale e confermare con ENTER.
Attendere che il TV termini la sintonia, automaticamente verranno salvati tutti i canali
trovati e il televisore uscira’ dal menu’.
Nota:
Se il TV segnala “NESSUN SEGNALE” significa che non c’è segnale, occorre quindi
verificare il cavo o l’impianto d’antenna.
9.1.5 IMPOSTAZIONI AVANZATE DTV
Premere il tasto TV MENU per entrare nel menu’ principale.
Premere i tasti di navigazione
fino a selezionare la voce DTV, premere , selezionare
IMPOSTA ADV. Comparira’ un menu’ dove sono presenti le voci:
Audio: e’ possibile selezionare la lingua di default dei canali multilingua.
Sottotitolo: e’ possibile selezionare la lingua di default dei sottotitoli se presenti.
CI (Common Interface): mostra informazioni sulla CAM e sulla Scheda che si stanno
utilizzando (queste informazioni cambiano a seconda della CAM/Scheda utilizzate).
CA: attiva la funzione CA ( on=attivo, off=non attivo ).
Blocco parent: modifica la password per accedere ai contenuti protetti (default 0000).
Classificazio: e’ possibile inserire il grado di controllo parentale.
LCN: Questo TV e’ dotato di funzione LCN ( Logical Channel Number ) che e’ uno
standard a livello nazionale che assegna la numerazione dei canali uguali per tutto il
paese in cui si effettua la scansione. Se si desidera disattivare questa funzione e
visualizzare la lista dei canali in modo progressivo (1,2,3,...), premere TV MENU,
selezionare DTV, premere 4, selezionare IMPOSTA.ADV.,selezionare LCN. Disattivare
la funzione LCN con i tasti 34 ( ON/OFF ). La funzione LCN di default e’ attiva (ON).
9.1.6 IMPOSTAZIONE ORARIO
In ORA si imposta l’orario di sistema del TV ( default: AUTO ).
Premere il tasto TV MENU per entrare nel menu’ principale.
Premere i tasti di navigazione
fino a selezionare la voce DTV, premere , selezionare
TIMER e confermare con .
Modo Timer: permette la regolazione di ora e data di sistema ( default:AUTO, selezionando
MANUALE si imposta in maniera manuale la data e l’ora attraverso le voci corrisondenti).
GMT Offset: permette la correzione dell’orologio rispetto al proprio fuso orario (default:AUTO).
15
ITALIANO
LTV 2513CI
9.1.7 GIOCHI
In NATIVE GAME sono presenti tre giochi da utilizzare come divertente passatempo.
Premere il tasto TV MENU per entrare nel menu’ principale.
Premere i tasti di navigazione
fino a selezionare la voce DTV, premere , selezionare
NATIVE GAME e confermare con .
Comparira’ un menu’ dove e’ possibile selezionare i giochi BOX MAN, TETRIS o HITRAT.
Per giocare utilizzare il telecomando e seguire le indicazioni che compariranno sul video.
In GIOCHI le finestre informative sono disponibili solo nella lingua Inglese.
9.2 VISUALIZZAZIONE CANALI MEMORIZZATI
Premere il tasto CH+ per posizionarsi sul canale memorizzato successivo.
Premere il tasto CH- per posizionarsi sul canale memorizzato precedente.
E’ possibile utilizzare anche il tastierino numerico; per cercare canali a doppia/tripla cifra
digitare i numeri che compongono il canale e attendere il cambio del canale. Nel caso il cambio
canale non avvenga significa che il canale digitato non esiste.
9.3 REGOLAZIONE VOLUME
Premere i tasti VOL+ e VOL- del telecomando per aumentare/diminuire il volume del TV.
Premere il tasto MUTE per escludere momentaneamente l’audio, ripremerlo per
ripristinarlo.
9.4 IMPOSTAZIONI VIDEO
Vedere il capitolo 8.4 IMPOSTAZIONI VIDEO.
9.5 IMPOSTAZIONI AUDIO
Vedere il capitolo 8.5 IMPOSTAZIONI AUDIO.
9.6 IMPOSTAZIONI DI SISTEMA
All’interno del menu FUNZIONE si possono modificare le impostazioni di sistema.
Premere il tasto MENU per entrare nel menu’ generale e selezionare FUNZIONE, infine
confermare con .
Premere i tasti di navigazione
fino a selezionare la voce desiderata e regolarla o
attivarla/disattivarla tramite i tasti di navigazione
.
Premere il tasto EXIT per uscire.
Descrizione delle funzioni:
LINGUA OSD
RESET
DURATA OSD
ASPETTO
Lingua
Vedere capitolo 8.6 Lingua Osd.
Reset
Vedere capitolo 8.6 Reset.
Durata OSD
Vedere capitolo 8.6 Durata OSD.
Aspetto
Vedere capitolo 8.6 Aspetto.
16
LTV 2513CI
ITALIANO
9.7 GUIDA ELETTRONICA DEI PROGRAMMI (EPG)
All’interno di EPG si possono visualizzare tutte le informazioni inerenti alle trasmissioni di ogni
canale.
Premere il tasto EPG per visualizzare la finestra informativa sulla programmazione del
canale che si sta guardando.
Con i tasti
selezionare tra la finestra Nome Canale ( a sinistra ) o la finestra informativa
dei programmi ( a destra ).
Con i tasti
selezionare il canale o il programma su cui si desiderano informazioni.
Con il tasto ROSSO selezionare EPG modalita’ giornaliera, con il tasto VERDE modalita’
settimanale.
Con il tasto GIALLO e’ possibile, una volta selezionato un programma, aprire una finestra
con ulteriori informazioni sul programma stesso ( per uscire da questa finestra premere il
tasto TV MENU ).
Con il tasto BLU e’ possibile, una volta selezionato un programma, impostare una
registrazione programmata ( TIMER ). Apparira’ un messaggio di corretta impostazione
della registrazione programmata ( Aggiornato con successo ), o un generico messaggio
di errata impostazione.Un errore nell’impostazione della registrazione programmata si ha
solitamente quando il programma che si desidera registrare e’ gia’ iniziato.
Utilizzare il tasto EXIT per uscire dalla funzione EPG.
9.8 OPERAZIONI CON DISPOSITIVO USB ( MEDIA )
Attenzione: prima di effettuare operazioni inserire un dispositivo USB nell’ingresso USB
posto a lato del TV.
Premere il tasto SOURCE per entrare nel menu’ di selezione degli ingressi, e con i tasti
selezionare l’ingresso MEDIA, confermare con OK. E’ possibile l’accesso diretto al
dispositivo USB anche premendo il tasto MEDIA sul telecomando.
Dopo una breve pausa in cui il TV controllera’ il contenuto del dispositivo USB, verra’ mostrata
una lista delle partizioni incluse nel dispositivo USB.
Selezionare il dispositivo ( normalmente USB1) e confermare con OK.
Comparira’ una finestra con tutte le cartelle (directory) disponibili nel dispositivo USB.
Attraverso i tasti colorati del telecomando e’ possibile selezionare il tipo di file su cui si vuole
operare (ROSSO per visualizzare file video, VERDE per ascoltare file audio, GIALLO per
visionare file immagini, BLU per eseguire giochi che si possono scaricare gratuitamente da
internet). Dopo aver selezionato il tipo di file, con i tasti selezione
scegliere una
cartella e premendo OK verra’ mostrato il contenuto della cartella stessa. Selezionare il file
che si desidera visionare/ascoltare, confermare con OK. Una volta terminata la visione o
l’ascolto di un file, e’ possibile il ritorno ai menu’ precedenti tramite il tasto EXIT fino al menu’
principale MEDIA.
9.8.1 Riproduzione di file video
Durante la riproduzione di un file video, premendo il tasto DISPLAY, e’ possibile visualizzare
una finestra con le informazioni di riproduzione.Per i comandi sulle operazioni disponibili, fare
riferimento al capitolo 6.2 Descrizione Comadi in modalità Media.
9.8.2 Riproduzione di file audio
Durante la riproduzione di un file audio, sara’ presente una finestra con tutte le informazioni
disponibili sul file stesso. Per i comandi sulle operazioni disponibili, fare riferimento al capitolo
6.2 Descrizione Comadi in modalità Media.
17
ITALIANO
LTV 2513CI
9.8.3 Riproduzione di file immagine
Durante la riproduzione di un file immagine,premendo il tasto DISPLAY, e’ possibile
visualizzare una finestra informativa sul file che si sta visionando.Tramite i tasti selezione
e’ possibile ruotare, specchiare o capovolgere l’immagine.
9.8.4 Registrare con il TV
Mentre si sta visionando un programma da ingresso DTV ( TV digitale ) e’ possibile effettuarne
la registrazione.
Premendo il tasto
si aprira’ la finestra MENU REG. con le seguenti voci:
INIZIA REGIS: premere ENTER per iniziare la registrazione immediata del programma che
si sta visionando.Comparira’ una piccola finestra sul TV con scritto REGISTRAZIO.
FILE MANAGER: qui e’ possibile gestire i file presenti sul dispositivo USB selezionato;
verra’ visualizzata una lista con il contenuto del dispositivo USB, tramite i tasti
selezione scegliere un file sul quale sono possibili le seguenti operazioni: tasto ROSSO
riproduce il file selezionato nel riquadro a destra, tasto VERDE cancella il file, tasto
GIALLO cancella tutti i file presenti nel dispositivo, tasto BLU riproduce a pieno
schermo il file scelto. Nel caso si desideri cancellare uno o piu’ file verra’ richiesta una
conferma dell’operazione, selezionare SI e premere ENTER.
LISTA DISPOS: mostra una lista dei dispositivi presenti.
SOTTOSCRIVI: permette la registrazione programmata (TIMER) di un programma.
Selezionare il numero che si desidera associare ad una programmazione (TIMER N.),
selezionare il tipo di programmazione (CHIUSA=nessuna programmazione, UNA
VOLTA=programmazione di un evento, GIORNALIERO=programmazione giornaliera di
un evento, SETTIMANALE=programmazione settimanale di un evento), selezionare il
canale (CANALE SVEGLIA),selezionare la data (DATA SVEGLIA), selezionare l’ora di
inizio (ORA ACC), selezionare la durata in ore e minuti (DURATA).
, verra’ richiesta una conferma
Per arrestare la registrazione premere di nuovo il tasto
dell’operazione (selezionare SI e premere ENTER ).
Mentre si sta effettuando una registrazione non e’ possibile cambiare canale.
Se nel dispositivo USB non c’e’ abbastanza spazio, il tv fornira’ una indicazione di errore; in
questo caso utilizzando le funzioni di FILE MANAGER , cancellare file per recuperare spazio
su disco. Attenzione: i file cancellati non sono recuperabili.
Il TV potrebbe segnalare che il dispositivo USB e’ lento nel trasferimento dati ( Device speed
not enough, RECORD anyway? ). Confermando (selezionare SI e premere ENTER ) e’
possibile registrare ma potrebbero esserci errori nel trasferimento dati da TV a dispositivo
USB. Munirsi di dispositivo USB ad alta velocita’.
Non e’ possibile effettuare la registrazione da canali criptati a pagamento.
18
LTV 2513CI
10 COLLEGAMENTO AD APPARECCHI ESTERNI
ITALIANO
Questo TV può essere collegato come monitor ad altri dipositivi esterni come lettori DVD,
videoregistratori, videocamere, pc.
Seguire le istruzioni presenti sul manuale del dipositivo esterno per il corretto collegamento
al televisore.
Quando si desidera vedere il segnale proveniente da dipositivo esterno, premere il tasto
SOURCE sul televisore o del telecomando, selezionate l’ingresso desiderato con i tasti
e confermate con ENTER.
Gli ingressi disponibili sono: TV, DTV, AV, S-VIDEO, SCART, YPBPR, HDMI, PC, MEDIA.
Per il collegamento ai vari ingressi fare riferimento al capitolo 7 (Installazione e
Collegamenti).
11 MONITOR PC
11.1 IMPOSTAZIONI VIDEO MONITOR PC
Il PC riconosce il monitor come plug and play, quindi non necessita di alcun driver, basta
collegarlo ed accendere il computer.
Premere il tasto TV MENU per entrare nel MENU PRINCIPALE.
Premere i tasti di navigazione
fino a selezionare la voce PC confermare con .
Effettuare le regolazioni richieste e premere il tasto EXIT per uscire.
Descrizione delle regolazioni:
REGOLAZ.AUTO: imposta automaticamente tutti i valori di configurazione per una
perfetta visualizzazione dell’immagine.
POSIZ.O: posizione orizzontale dell’immagine.
POSIZ.V: posizione verticale dell’immagine.
FASE: fase dell’immagine.
ORA: dimensione orizzontale dell’immagine.
19
ITALIANO
12 PROBLEMI E SOLUZIONI
LTV 2513CI
Se il vostro televisore non funziona correttamente controllare questa breve lista prima di
portare il TV presso un centro assistenza autorizzato TREVI.
In ogni caso non tentare di riparare l’apparecchio da soli, questo farebbe decadere la garanzia.
Solo i centri assistenza tecnica TREVI sono autorizzati ad eseguire interventi su questo TV.
Assenza di immagine
Controllare il collegamento d’antenna.
Controllare il corretto inserimento dei cavi.
Immagine scadente
Controllare il cavo d’antenna.
Regolare manualmente la sintonia.
Tenere il TV lontano da fonti elettromagnetiche (lampade al neon, telefoni cellulari, ecc...).
Assenza di suono
Controllare che non sia inserita la funzione MUTE.
Regolare il volume.
Verificare che il sistema audio sia BG (il sistema usato per l’Italia). Per maggiori
informazioni vedere paragrafo 8.1.4 alla voce SISTEMA AUDIO.
Il televisore si spegne automaticamente
Qualora il TV non riceva segnale per 5 minuti, il TV si pone automaticamente in modalità
stand-by.
Il telecomando non funziona
Sostituire le batterie
I comandi non rispondono
Scollegare la presa d’alimentazione dell’apparecchio per 30 secondi per effettuare un
reset.
Nota
La presenza di punti sullo schermo (fino ad un massimo di 3 punti accesi e 3 punti
spenti) è possibile a causa delle caratteristiche costruttive del display a cristalli
liquidi; ciò non influisce sulla qualità o durata del prodotto.
20
LTV 2513CI
13 CARATTERISTICHE TECNICHE
Alimentazione
Assorbimento
Display
Dimensioni schermo
Display
Risoluzione max
Luminosità
Contrasto
Collegamenti
Sistema TV
Formati video
Potenza d’uscita
Risoluzioni VGA
Risoluzioni HDMI
Dimensioni con piedistallo
Dimensioni senza piedistallo
Peso
ITALIANO
DC 12V
25 W Max / In stand-by <1 W
LCD 13,3” a cristalli liquidi con matrice attiva TFT
(Thin-Film-Transistor)
Tuner e scheda televideo incorporati
13.3” (33,78 cm)16:10
262.000 colori
1280X800 dpi
275 cd\m²
500:1
Ingresso HDMI
Ingresso VGA
Ingresso SCART
Ingresso Video Composito/YPbPr/SVideo
Ingresso Audio RCA stereo
Ingresso audio PC
Ingresso USB
Uscita presa cuffie
Presa antenna esterna
PAL/SECAM
PAL/NTSC
2X3 W
800x600 dpi / 60 Hz
1024x768 dpi / 60Hz
1280x720 dpi / 60 Hz
1280x768 dpi / 60 Hz
576i, 576p
720p
330(L) x 280(A) x 130(P) mm
330(L) x 255(A) x 70(P) mm
1,4 Kg
21
ITALIANO
14INDICE
LTV 2513CI
1 PREFAZIONE
pag. 2
2 PRECAUZIONI DI SICUREZZA
pag. 2
3 CURA E MANUTENZIONE
pag. 2
4 ALL’INTERNO DELL’IMBALLO
pag. 2
5 COMANDI E CONNESSIONI TELEVISORE
pag. 3
6 TELECOMANDO
6.1INSTALLAZIONE
6.2DESCRIZIONI COMANDI
pag. 4
pag. 5
7 INSTALLAZIONE E COLLEGAMENTI
7.1ACCENSIONE
7.2COLLEGAMENTO ALL’ANTENNA
7.3 COLLEGAMENTO TRAMITE CAVO SCART
7.4 COLLEGAMENTO TRAMITE CAVO RCA A7V O YPBPR
7.5 COLLEGAMENTO TRAMITE CAVO VGA / JACK
7.6 COLLEGAMENTO TRAMITE CAVO HDMI
7.7 COLLEGAMENTO DISPOSITIVO USB
pag. 6
pag. 7
pag. 8
pag. 8
pag. 9
pag. 9
pag. 9
8 TELEVISIONE ANALOGICA
8.1 OPERAZIONI PRELIMINARI
8.1.1 CAMBIO LINGUA MENU
8.1.2 RICERCA AUTOMATICA DEI CANALI
8.1.3 SPOSTAMENTO CANALI E ALTRE OPERAZIONI
8.1.4 RICERCA MANUALE DEI CANALI
8.2 VISUALIZZAZIONE CANALI MEMORIZZATI
8.3 REGOLAZIONE VOLUME
8.4IMPOSTAZIONI VIDEO
8.5IMPOSTAZIONI AUDIO
8.6IMPOSTAZIONI SISTEMA
8.7TELETEXT
9 TELEVISIONE DIGITALE TERRESTRE (DVB-T)
9.1 OPERAZIONI PRELIMINARI
9.1.1 CAMBIO LINGUA MENU
9.1.2 RICERCA AUTOMATICA DEI CANALI
9.1.3 OPERAZIONI SUI CANALI MEMORIZZATI
9.1.4 RICERCA MANUALE DEI CANALI
9.1.5 IMPOSTAZIONI AVANZATE DTV
9.1.6 IMPOSTAZIONE ORARIO
9.1.7 GIOCHI
9.2VISUALIZZAZIONE CANALI MEMORIZZATI
9.3REGOLAZIONE VOLUME
9.4IMPOSTAZIONI VIDEO
9.5IMPOSTAZIONI AUDIO
9.6IMPOSTAZIONI DI SISTEMA
9.7GUIDA ELETTRONICA DEI PROGRAMMI (EPG)
9.8 OPERAZIONI CON DISPOSITIVO USB(MEDIA)
9.8.1 RIPRODUZIONE DI FILE VIDEO
9.8.2 RIPRODUZIONE DI FILE AUDIO
22
pag. 10
pag. 10
pag. 10
pag. 10
pag. 10
pag. 11
pag .11
pag. 11
pag. 11
pag. 12
pag. 13
pag. 13
pag. 13
pag. 14
pag. 14
pag. 15
pag. 15
pag. 15
pag. 16
pag. 16
pag. 16
pag. 16
pag. 16
pag. 16
pag. 17
pag. 17
pag. 17
pag. 17
LTV 2513CI
9.8.3 RIPRODUZIONE DI FILE IMMAGINE
9.8.4 REGISTRARE CON IL TV
ITALIANO
pag. 18
pag. 18
10 COLLEGAMENTO AD APPARECCHI ESTERNI
pag. 19
11 MONITOR PC
11.1IMPOSTAZIONI VIDEO MONITOR PC
pag. 19
12 PROBLEMI E SOLUZIONI
pag. 20
13 CARATTERISTICHE TECNICHE
pag. 21
14 INDICE
pag. 22
23
User Guide
ITALIANO
LTV 2513CI
1. Safety instructions
Thank you for choosing our product. Please read this manual carefully and observe all
safety and operating instructions. Store the manual in a safe place for later reference.
CAUTION
RISK OF ELECTRIC SHOCK
DO NOT OPEN!
The flash symbol displayed in a triangle warns the user of dangerous electrical voltages
inside the device that could lead to electrical shocks with harmful effects to health if the
device is used incorrectly.
2. WARNING
The apparatus shall not be exposed to dripping or splashing and that no objects filled with liquids,
such as vases, shall be placed on the apparatus.
3. NOTES
Read these instructions.
Keep these instructions.
Heed all warnings.
Follow all instructions.
Do not use this apparatus near water.
Clean only with dry cloth.
Do not block any ventilation openings. Maintain well ventilated conditions around the product. Do
not put product on bed, sofa or anything that blocks ventilation. Install according to the
manufacturers instructions.
Do not install near any heat sources such as radiators, heat registers, stoves, or other apparatus
(including amplifiers) that produce heat.
Read, heed and follow all instructions to ensure correct and safe installation and interconnection
of the apparatus.
The apparatus shall not be exposed to dripping or splashing and that no objects filled with liquids,
such as vases, shall be placed on the apparatus.
The mains socket-outlet shall be installed near the apparatus and the mains plug shall remain
readily operable.
Protect the power cord from being walked on or pinched particularly at plugs, convenience
receptacles, and the point where they exit from the apparatus.
Only use attachments/accessories specified by the manufacturer.
2
LTV 2513CI
ITALIANO
Use only with the cart, stand, tripod, bracket, or table specified by the manufacturer, or sold with
apparatus. When a cart is used, use caution when moving the cart/apparatus combination to
avoid injury from tip-over.
Unplug the apparatus during lightning storms or when unused for long periods of time.
Refer all servicing to qualified service personnel. Servicing is required when the apparatus has
been damaged in any way, such as power-supply cord or plug is damaged, liquid has been
spilled or objects have fallen into the apparatus, the apparatus has been exposed to rain or
moisture, does not operate normally, or has been dropped.
The apparatus shall be connected to a mains socket outlet with a protective earthing connection.
Do not touch the color TFT LCD screen by hand directly.
4. Accessories
TV
Remote control
12V Car Adapter
AC/DC Adapter
User Guide
3
ITALIANO
LTV 2513CI
5 CONTROLS AND CONNECTIONS TELEVISION
2
3
1. TFT LED
2. Power indicator, red:stand-by , green:on
3. Remote sensor
4. Speakers
5. SOURCE button, input select
6. MENU button
7. VOL-/VOL + Keys, volume change
8. Keys CH-/CH +, channel change
9. POWER button, on / off stand-by TV
1. HDMI input
2. VGA input for connection to a computer
3. Audio PC input, PC audio input sound card
4. Input Y / Pb / Pr Component
5. AV Composite Video Input
6. S-VIDEO
7. Scart input
8. Antenna input
9. Headphone jack and line audio output
10. USB socket
11. Slot CI (Common Interface)
12. 12V DC input
4
4
LTV 2513CI
ITALIANO
6 REMOTE CONTROL
6.1 INSTALLATION
note: batteries not included
Open the battery compartment on the back of the remote control.
Insert the batteries (AAA) making sure to observe proper polarity and guide signs inside the battery
compartment.
Close the battery compartment.
To prevent loss of liquid from the battery with the consequent damage to the remote control, make sure to
install the batteries correctly and not to install different types of batteries (old and new, carbon-zinc and
alkaline, etc. ...). Remove the batteries from the remote controls is not used for long periods.
5
ITALIANO
LTV 2513CI
6.2 DESCRIPTION OF CONTROLS
1. POWER button:Press to enter or exit the standby mode.
2.S.MODE button:Press this button to change the audio mode.
3.P.MODE button:Press to select the picture mode.
4.MUTE button:Press to turn on or off the audio output.
5.AUTO:Press to do auto configuration directly(PC-RGB MODE).
6.SLEEP button:This feature allows you to set up sleeptime.
7.-/-- Button:Press this button to enter a program number for multiple program channel such as 2-1,etc.
8.DISPLAY button:Press this button to display information about the current mode on the screen.
9.NICAM:Press to select the NICAM modes./AUDIO: Audio Select Button.
10.Number buttons (0-9):Press to select numbers.
11.
Button:In the ATV/DTV mode, press to return to the channel last viewed.
12.SOURCE button:Press to select enter the source selecting menu.
13.CH+/- button:In ATV or DTV mode, press to select channel.
14.Direction buttons:Press the direction buttons to select menu options or settings.
15.ENTER/OK button:Press to confirm selection in the setup Menu.
16.VOL+/-button:Press to increase or decrease the volume.
17.EXIT button:Press to exit all the OSD on the screen.
18.TV MENU button:Press to enter or exit the setup menu.
19.MEDIA button :Press to enter the MEDIA playback.
20.EPG button:Press to display the Channel Guide menu in DTV mode.
21.HOLD:Hold on or off for current page display./
:Playing forward fast.
22.TEXT:Switch on or off the teletext mode (TV mode)/
23.INDEX: Request the index page (Teletext mode)/
:playing backward fast
: skip backward button.
:Skip forward button.
24.SIZE:Change display size in teletext mode./
25-26. color button/ TV/RADIO:Select the TV/RADIO mode.
29. SUBPAGE:Sub coded page access/■:Press to stop playing.
30.
Button:Press to pause the playback.Press Again to resume normal playback.
31. ZOOM:ZOOM can change display size./REVEALReveal or hidden the hidden words.
32. SUBTITLE button:In DTV mode, press to select alternate subtitle languages during.
view/playback of a DTV program.In teletext mode, press to display P.100.
Note: Subtitle and teletext is only availableif the service is provided by broadcaster.
33.FAV button:Displays the selected favorite programmers.
34.
:Record Botton.
35.FAV-:Displays the selected favorite down programmers.
36.FAV+:Displays the selected favorite up programmers.
6
LTV 2513CI
ITALIANO
7 INSTALLATION AND CONNECTIONS
7.1 POWER
USE WITH AC 230V/50 Hz POWER SUPPLY
Plug the supplied AC 230V / DC 12V power adapter into a mains socket.
Plug the jack into the DC 12V socket on the side of the TV.
Press the POWER key on the TV or on the remote control to turn on the TV.
Press the POWER key again on the TV or on the remote control to re-activate the standby mode.
Note: If the TV receives no signal, the STANDBY mode will be activated.
To turn on the TV again, press the POWER key.
USE WITH DC12V POWER SUPPLY FROM CAR/CAMPER SYSTEM BY MEANS OF CAR ADAPTER
This connection allows the use of LTV 2513CI inside the car/camper.
Plug the car adapter into a DC 12V car cigarette lighter socket and the jack at the inlet of the DC 12V adapter.
Press the POWER key on the TV or on the remote control to turn on the TV.
Press the POWER key again on the TV or on the remote control to re-activate the standby mode.
Note: Do not plug the LTV2513CI in the cigarette lighter socket of campers and trucks that supply 24V.
It is not recommended the use of the LTV2513CI for long periods of time with the car turned off,
to prevent battery discharge.
7
ITALIANO
LTV 2513CI
7.2 Connecting to TV-Signal Input
Connect the TV signal cable (the antenna cable, for example) to the Antenna Input Jack on the back
of the unit so that you can receive television programmes.
Note:
Connected the LTV 2513CI Antenna Input Jack to Trevi model AA 6051 or AA 6052 (optional).
TV Antenna(Optional)
Model: AA 6052
TV Antenna(Optional)
Model: AA 6051
8
LTV 2513CI
ITALIANO
7.3 Connecting SCART
Connect the SCART output of your audio / video player with a SCART cable to the
SCART input on the back of the TV.
7.4 Connecting cable RCA AV or Y/Pb/Pr
RCA A/V
S-VIDEO
■ AV: Connect the output of AV device by RCA composite video inputs / AUDIO IN (L / R) on the back of
TV . Be sure to observe the colors for the various sources: yellow for video, white for left audio channel and
red for right audio channel.
■ Y / Pb / Pr: Connect the Y / Pb / Pr of the device by RCA inputs Y / Pb / Pr on the back of the TV. The
various sources colors: green for Y, blue for Pb, red for Pr.
Connecting the audio output device to the AUDIO IN on the back of the TV. Be sure to observe the colors for
the various sources: white for left audio channel and red for right audio channel.
S-Video
RCA Y/Pb/Pr
9
ITALIANO
LTV 2513CI
7.5 Connecting to PC
Connect one end of the VGA cable and audio cable to the input jack on the rear panel of the unit and connect
the other end to the PC.
Set the PC video resolution to match that of the television .
7.6 Connecting to HDMI
After connection, turn on the power of the unit and the external AV signal source and use the SOURCE
and the direction buttons to select HDMI mode, and then press the ENTER button to confirm.
Note:
HDMI provides both audio and video signals and typically provides superior image quality
to component or composite.
7.7 USB Device Connection
Connect the USB device to USB port on the back of the TV.
10
LTV 2513CI
ITALIANO
8.TV OPERATION
8.1ANALOGUE TV
PROGRAM
COLOR SYSTEM
SOUND SYSTEM
AUTO SEARCH
MANUAL SEARCH
FINE TUNE
SKIP
Program: select the channel.
Color System:select the local color system.
Sound System:select the local sound system.
Auto Search:search the channels automatically.
Manual Search:search the channelmanually.
Fine Tune:fine tune the program.
Skip :select skipping the current channel or not.
8.1.1 ANALOGUE TV CHANGE MENU LANGUAGE
Press the SOURCE key and select using the keys ▼ the item TV, then press ENTER.
Press the TV MENU key to access the MAIN MENU.
Press the navigation keys ▼ until selecting the item FUNCTION with the key ► .
Select OSD LANGUAGE and press the navigation keys ► to select the OSD language (menu).
Press the EXIT key to exit.
8.1.2 AUTOMATIC CHANNELSEARCH
Press the TV MENU key to access the MAIN MENU.
Press the navigation keys ▼ until selecting the item TV and press ►.
■Press the navigation keys and select the RICER.AUTOMA. function. Confirm with ► .
The searching process starts automatically and all the available TV channels are stored in
a progressive order. The process may take some minutes.
8.1.3 CHANNEL SHIFTING
Allows changing the position (number) of a previously stored channel.
Press the TV MENU key to access the MAIN MENU.
Press the navigation keys ▼ until selecting the item TV, press ►, select EDITA CANALE
and press again ►.
Select the channel you wish to change its position and press the RED (swap) key. A small
yellow asterisk will appear next to the selected channel. Navigate to the position you want
to assign to the channel and press ENTER.When finished, press EXIT.
11
ITALIANO
LTV 2513CI
8.1.4 MANUAL CHANNEL SEARCH
Allows manually tuning the programs on the desired channel.
Press the TV MENU key to access the MAIN MENU.
Press the navigation keys▼ until selecting the item TV and press ►.
At the entry CANALE, select the channel number on which you manually want to tune.
Press the navigation keys ▼ until selecting the item RICER.MANUALE and press 4 or ►.
Continue the search by pressing 4 or 4until you find the desired program that will be
automatically stored.
Note: If the "NESSUN SEGNALE" message is displayed, it means that the TV is getting no
signal. Check the cable or the antenna system.
8.2 DIGITAL TERRESTRIAL TV (DTV)
To navigate the menus you must use the navigation keys and ▼, press ENTER to confirm the
selection or press the EXIT key to exit.
CH.MANAGE
AREA
AUTO SEARCH
MANUAL SEARCH
ADV SETTING
TIME
NATIVE GAME
8.2.1 AUTOMATIC CHANNEL SEARCH
Press the TV MENU key to access the main menu.
Press the navigation keys ▼ until selecting the item DTV and press ►.
Using the navigation keys▼ go to the item AREA and with the navigation keys < ► select the
country.
Using the navigation keys▼ go to the item RICER. AUTOMA. and press ► .
The searching process starts automatically and all available TV channels are stored in a progressive
order. The process may take some minutes.
Note: If the "NESSUN SEGNALE"message is displayed, it means that the TV is getting no signal.
Check the cable or the antenna system.
8.2.2 CHANNEL SHIFTING
Allows changing the position (number) of a previously stored channel.
Press the TV MENU key to access the main menu.
Press the navigation keys ▼ until selectingthe item DTV, press ► , select CH MANAGE and then
select CH.ORGN., press OK.
Select the channel you wish to change and press the YELLOW key. An arrow will appear next to the
selected channel. Move to the new position you wish to assign and press the ENTER key.
When finished, press EXIT.
12
LTV 2513CI
ITALIANO
8.2.3 LCN Function
This TV is supplied with LCN (Logical Channel Number) function, which is a national standard for
assigning the numeration of channels in the same manner all over the country where the scanning
takes place. If you wish to disable this function and view the list of channels in a progressive way
(1,2,3,...), press TV MENU, select DTV, press ► , select IMPOSTA.ADV. and select LCN. Disable the
LCN function using the◄/► (ON/OFF) keys.
The LCN function is enabled (ON) by default.
8.2.4 MANUAL CHANNEL SEARCH
Allows manually tuning the programs on the desired channel.
Press the TV MENU key to access the main menu.
Press the navigation keys ▼ until selecting the item DTV, press ►, select RICERCA MAN UALE and
press ► .
In the NOME CANALE window, select the channel on which you wish to perform the manual tuning
and confirm with ENTER.
Wait until the TV finishesthe tuning, all TV channels found will be automatically stored and the TV will
exit the menu.
Note: If the "NESSUN SEGNALE"message is displayed, it means that the TV is getting no signal.
Check the cable or the antenna system.
8.3 CHANNEL SHIFTINGSTORED CHANNEL DISPLAY
Press the CH+ key to select the next stored channel.
Press the CH- key to select the previous stored channel.
8.4 VOLUME ADJUSTMENT
Press the VOL+ and VOL- keys on the remote control to increase/decrease the TV volume.
Press the MUTE key to mute the audio temporarily. Press it again to restore the audio.
8.5 PICTURE SETTINGS
1. Press the "MENU" button on the remote control to enter the OSD menu, then press “▲
/ ▼ " button to select the "Picture" menu.
2. Press the "►" button to enter the "Picture" menu setting, use “▲ / ▼" to move the
menu bar, and then press “◄ / ►" button to Adjust the value of selected items.
3. Press "MENU" button to return to upper menu.
13
ITALIANO
LTV 2513CI
Description of settings:
Picture Mode: select the picture mode.
Brightness: adjust the brightness.
Contrast: adjust contrast ratio.
Sharpness:adjust the sharpness of the image.
Colour: adjust colour of the image.
HUE: adjust hue of the image.
Colour Tone: enter to the colour tone mode.
8.6 SOUND SETTINGS
1. Press the "MENU" button on the remote control to enter the OSD menu,
then press “▲ / ▼ " button to select the "Sound" menu.
2. Press the “►" button to enterthe "Sound" menu setting, use “▲ / ▼ " to move the menu bar,
and then press “◄ / ►"button to adjust the value of selected item.
3. Press "MENU" button to return to upper menu.
Description of settings:
Sound mode :select sound mode.
Balance:adjust balance of the sound.
Treble:adjust treble.
Bass:adjust the bass.
AVL:select the AVL function on/off.
8.7 FUNCTION SETTINGS
1. Press the "MENU" button on the remote control to enter the OSD menu, then press “▲ / ▼ "
button to select the “Function” menu.
2. Press the “►" button to enter the “Function” menu setting, use “▲ / ▼ " to move the menu bar,
and then press “◄ / ►"button to adjust the value of selected item.
3. Press "MENU" button to return to upper menu.
14
LTV 2513CI
ITALIANO
Description of settings:
OSD language :select the OSD language desired.
TXT language:select the TXT language desired.
Reset:recover factory setting..
OSD time:select the OSD time.
Aspect:select the display mode.
8.8 PC SETTINGS
Press the Source button and select PC, then use "►" to enter into PC mode.
1. Press the “PC" button on the remote control to enter the OSD menu, then press “▲ / ▼ "
button to select the “PC” menu.
2. Press the “►" button to enter the “PC” menu setting, use “▲ / ▼ " to move the menu bar,
and then press “◄ / ►"button to adjust the value of selected item.
3. Press "MENU" button to return to upper menu.
Auto adjust:Adjust VGA mode automatically.
H-Position:change the horizontal position ofthe image.
V-Position:change the vertical position ofthe image.
Phase:Adjust the display quality of the image.
Clock:conduct image stretching.
15
ITALIANO
LTV 2513CI
8.9 ELECTRONIC PROGRAMME GUIDE (EPG)
EPG can display all the information pertaining the programming of each channel.
Press the EPG key to display the information window about the programming of the channel
you are watching.
Using the keys ► select between the Nome Canale window (to the left) orthe information
window of the programmes (to the right).
Using the keys ▼ selectthe channel orthe programme for which you search information.
Using the RED key select the daily EPG mode and using the GREEN key the weekly mode.
Once a programme is selected, using the YELLOW key, you can open a window with more
information about the programme (to exit from this window, press the TV MENU key).
Once a programme is selected, using the BLUE key, you can set a scheduled recording
(TIMER). A message will be displayed confirming the correct setting of the scheduled
recording (Successfully updated) or a generic message of incorrect setting. An error in the
setting of the scheduled recording occurs only when the programme you wish to record has
already started.
Use the EXIT key to exit the EPG function.
8.10 Teletext function
Press the ( TXT) button on the remote control to enable the Teletext function.
To disable the function, press the button again.
1.Press ( TXT ) button to turn on the Teletext function press again to turn it off.
2.Press the (Number) buttons to jump to different pages.
3.Press the (CH+/-) buttons to go to the previous or next page.
16
LTV 2513CI
ITALIANO
8.11 OPERATIONS WITH USB DEVICE ( MEDIA )
Warning: Before performing any operation, insert a USB device into the USB port on the side of the TV.
Pressthe SOURCE keytoenterthe selection menu of the inputs. Usingthe ▼ keys, select the MEDIA input and
confirm with OK. You can directly access the USB device by pressing the MEDIA key on the remote control.
After a short pause in which the TV will check the contents of the USB device, a list of the partitions included in
the USB device will be displayed. Select the device (normally USB1) and confirm with OK.
A window will be displayed showing all the folders (directories) available on the USB device. Using the
coloured keys on the remote control you can select the type of file you wish to operate with (RED to display
the video file, GREEN to listen to audio files, YELLOW to see image files, BLUE to play games that can be
downloaded for free from the Internet). After having selected the type of file, with the selection keys 4 ► ▼
choose a folder and press OK to see the contents of the folder. Select the file you want to view/listen and
confirm with OK. After having viewed or listened to afile, you can return to the previous menus by pressing the
EXIT key until arriving to the MEDIA main menu.
1.PLAYBACK OF VIDEO FILES
While playing a video file, pressing the DISPLAY key will display a window with information for playback.
2.PLAYBACK OF AUDIO FILES
While playing an audio file, a window will bedisplayed containing all the information available on the file.
3.PLAYING IMAGE FILES
While playing an image file, pressing the DISPLAY key will display awindowwith information on the file being
viewed. Using the selection keys 4 ► ▼ you can rotate, mirror or reverse the image.
4.Native32 Games Player
The user can play Games via this player. In left interface you can press to▲ ▼ select your desired game and
press Enter to play.
While the Music is playing, you can operate as below:
Press to ◄ ►▲ ▼ play games.
Press ■ to return the upper menu.
17
ITALIANO
LTV 2513CI
8.12 TV RECORDING
You can record a proaram while watching it from DTV input (digital TV).
RECORD START
Pressing the key ●, the MENU REG. window will open with the following items:
INIZIA REGIS: press ENTER to start the immediate recording of the programme viewed. A small window
will be displayed on the TV with the text message REGISTRAZIO.
FILE MANAGER: here you can manage the files present on the selected USB device; a list with the
contents of the USB device will be displayed, using the selection keys
choose a file on which the following operations can be performed: RED key plays the selected file in the
box on the right; the GREEN key deletes the file; the YELLOW key deletes all files present on the device;
the BLUE key plays in full screen t h e selected file. If you want to delete one or more files, a confirmation
of the operation will be requested. Select YES and press ENTER.
LISTA DISPOS: displays a list of the present devices.
SOTTOSCRIVI: allows the scheduled recording (TIMER) of a programme. Select a number you wish to
associate to a programming (TIMER N.); select the type of programming (CHIUSA=no programming, UNA
VOLTA=programming of an event,
GIORNALIERO=daily programming of an event, SETTIMANALE=weekly programming of an event); select
the channel (CANALE SVEGLIA); select the date (DATA SVEGLIA); select the start time (ORA ACC);
select the duration in hours and minutes (DURATA).
To stop recording, press the key ●again. You will be asked to confirm the operation (select YES and press
ENTER).
While making a recording you cannot change the channel.
If there is not enough space on the USB device, the TV will display an error message. In this case, using
the functions of the FILE MANAGER , delete files to recover disk space. Warning: Deleted files cannot be
restored.
The TV may signal there is slow data transfer on the USB device (Device speed not enough, RECORD
anyway?). You can record by confirming (select YES and press ENTER), but there might be errors while
transferring data from the TV to the USB device. Get a high-speed USB device.
You cannot record from encrypted pay channels.
18
LTV 2513CI
ITALIANO
8.13 HOTEL MODE
To enter Menu Hotel press the SOURCE button and enter code 4588.
It will activate a window with the following entries:
HOTEL GENERAL LOCK: You can activate or deactivate the Hotel (On / Off).
ASPECT RATIO LOCK: blocks the appearance of the image on TV
POWER ON SOURCE SET: Allows you to lock the TV on only one input.
DEFAULT VOLUME SET: You can set the volume at which you turn on your TV.
MAXIMAL VOLUME SET: Sets the maximum volume level.
CHANNEL SCAN LOCK: To prohibit access to the channel search function.
PICTURE USER LOCK: inhibits the image adjustment controls.
POWER ON STANDBY.
KEYPAD LOCK: functional lock on the keyboard TV
9. TROUBLESHOOTING
Carry out the problem-solving measures described in the following section before contacting Customer
Support. Turn off the device immediately as soon as you suspect a malfunction and unplug the power
plug. Do not attempt to repair the device yourself.
SYMPTOM
LED screen stays dark.
There is no sound.
There is no picture or
picture move up and
down unsteady.
The remote control does
not work.
CHECK ITEM
Make sure the unit is turned on and the connections are correct.
Make sure the power adapter is correctly connected.
Make sure the system connection is correct.
Make sure the power of speakers is turned on.
Check if the connections with the external AV signal source are correct.
Correctly set the items in the picture menu.
Check if the video type input signal is not corresponding to the unit.
Make sure the unit is turned on and in correct video type.
Make sure there are no obstructions between the remote control and the unit.
Make sure the remote control is pointing at the unit. Make sure the batteries
are inserted or the polarity is correct. Make sure the batteries are not weak.
Replace the weak battery.
19
ITALIANO
10 SPECIFICATIONS
Power
Consumption
Display
Display Screen Size
Max Resolution
Brightness
Contrast
Connecting
TV System
Video Formats
VGA Output Resolution
HDMI Resolution
Dimensions with stand
Dimensions without stand Dimensions
Weight
20
LTV 2513CI
DC 12V
Max 25 W / Stand-by <1 W
13.3 "LCD
13.3 "(33.78 cm) 16:10
1280X800 dpi
275 cd/m2
500:1
HDMI / VGA / SCART
Composite Video / YPbPr / S-Video
Stereo Audio / PC Audio / USB input
Headphone Jack output
External antenna jack
PAL / SECAM
PAL / NTSC
2X3 W
800x600 dpi / 60 Hz
1024x768 dpi / 60Hz
1280x720 dpi / 60 Hz
1280x768 dpi / 60 Hz
576i, 576p 720p
330 (L) x 280 (H) x 130 (D) mm
330 (L) x 255 (H) x 70 (D) mm
1.4 Kg
Rimini, 29/10/2010
MADEINCHINA
TREVI S.p.A.
Strada Consolare Rimini-San Marino, 62
47924 Rimini (RN) Italy
TREVI S.p.A. - Strada Consolare Rimini-San Marino, 62 47924 Rimini (RN) Italy - Tel. 0541-756420 - Fax 0541-756430 - www.trevi.it - E-mail: [email protected]
DICHIARAZIONE DI CONFORMITÀ
SI DICHIARA CHE:
L'apparecchio Televisore marca TREVI mod. LTV 2513CI
risponde alle prescrizioni dell'art. 2 comma 1 del
D.M. 28 agosto 1995 , n. 548