1
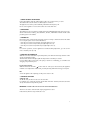
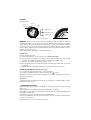
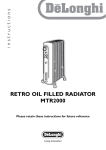
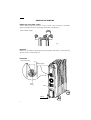
GB
OPERATING THE RADIATOR
MODELS WITH “EASY WHEEL” SYSTEM
Turn the radiator upside down and rest it on a piece of cloth or other soft surface to avoid damaging the paint. Open the wheels completely by rotating them outwards (fig. 1).
Turn the radiator upright.
fig. 1
IMPORTANT
When in use, the radiator should always be kept vertical (wheels at the bottom, controls at the top).
Any other position could be dangerous!
DESCRIPTION
Thermostat pointer
Indicator light
Power
selector
Timer
Wheels
2
1. WHERE TO LOCATE THE APPLIANCE
Position the radiator under the coldest window in the room or wherever else you want.
The radiator will reduce the effects of cold draughts to a minimum.
The appliance must not be positioned directly underneath a fixed power point.
Do not use the appliance in rooms with a surface area of less than 4 m².
2. CONNECTION
The radiator must be connected to a perfectly functioning 230-240 V AC socket with correct poles.
Avoid contact between clothing, household linen, furniture, inflammable material and the socket
providing power to the radiator.
3. TURNING ON
Plug into the mains, turn the thermostat pointer as far as it will go to maximum and turn the radiator on using the power selector as described below:
• Turn the power selector to 1 (minimum power) (the light comes on).
• Turn the power selector to 2 (medium power) (the light comes on).
• Turn the power selector to 3 (maximum power) (the light comes on).
NB:
For economic operation, once the appliance has reached working temperature, you can use minimum or medium power (1 or 2).
4. ADJUSTING THE THERMOSTAT
When the room has reached the required temperature, turn the thermostat slowly clockwise until a
"click" is heard and no further.
The thermostat will automatically regulate the temperature set and keep it constant.
If your model has three power levels, in the spring or autumn or on mild days, you can further save
energy by using minimum power.
Frost protection function
With the thermostat dial in the
position and one of the power levels selected, the appliance
maintains room temperature at about 5°C, preventing freezing with minimal energy consumption.
NB:
To turn the appliance off completely, turn the power selector to "0".
5. APPLIANCE WITH TIMER
Setting the clock
As with all clocks, the timer must be set to the exact time.
For example, if it is 9.30 in the morning, turn the dial of the timer clockwise (in the direction of the
arrow) until 9.30 is lined up with the pointer.
IMPORTANT: DO NOT TURN THE DIAL OF THE TIMER ANTICLOCKWISE.
The timer is an electric clock and works only if plugged into a socket.
If disconnected, the timer stops and must be reset.
3
THE TIMER
See figure below:
Tooth
Period of
operation
Pointer
Manual mode
Programme mode
0
Appliance off
Selector (some models only)
IMPORTANT: the timer consists of 96 teeth, each representing a 15-minute period. The appliance
can be programmed to come on and go off at set times. With the timer, the appliance is programmed to within 15 minute intervals and you can programme up to 48 cycles (each cycle consists of
a coming on and a going off time) during a 24 hour period). The teeth can be pushed or pulled
with your fingers. When a tooth is pushed towards the centre of the dial, the radiator remains in
operation for those 15 minutes.
If the tooth is pulled out, the radiator is off during that period.
Using the timer
A) Plug into the mains socket.
B) Turn the dial clockwise to set the current time (see SETTING THE CLOCK).
C) Push the teeth corresponding to the period you do not want the radiator to operate towards
the outside. For example, the radiator in the figure will be on from 2.00 to 5.00.
D) Turn the power selector to the required position (1, 2 or 3).
E) Once the teeth have been set for the desired periods of heating, the radiator will come on and
go off as set.
F)
While the radiator remains plugged into the socket, the timer retains the correct time.
CUTTING OUT THE TIMER (models with selector only)
To cut out the timer, place the selector in the I position (see figure).
To go back to programmed operation, place the selector in the
position.
NB: when the selector is in the 0 position, the appliance is off. In the I and 0 positions, the timer is
still set to the current time.
Safety device
A safety device shuts the radiator down in the case of overheating. To start the radiator up again,
call the nearest service centre.
6. MAINTENANCE AND SERVICE
Before performing any operations on the appliance, always unplug from the mains socket and
leave to cool.
Dust the radiator with a soft damp cloth without using detergents or abrasives.
If the radiator is not used for a long period of time, wrap the cable around the cable tidy and store
the appliance in a dry place.
This appliance has been made to last many years without problems.
In the event of malfunction or doubt, do not try and repair on your own. There would be the danger of fire or electric shock.
Call the nearest service centre (see list of service centres).
4
7. IMPORTANT SAFEGUARDS
IMPORTANT: To avoid overheating, never under any circumstances cover the appliance
during operation as this would lead to a dangerous rise in temperature.
If this recommendation is not respected, a safety device will turn the radiator off. To reset, contact the technical assistance service.
CAUTION: In order to avoid a hazard due to inadvertent resetting of the thermal cutout, this
appliance must not be supplied through an external switching device, such as a timer, or connected to a circuit that is regularly switched on and off by the utility.
-
-
-
Do not use the radiator near bath tubs, showers, sinks or swimming pools. The appliance is
not intended for use by persons (including children) with reduced physical, sensory or mental
capabilities, or lack of experience and knowledge, unless they have been given supervision or
instruction concerning use of the appliance by a person responsible for their safety. Children
should be supervised to ensure that they do not play with the appliance.
Do not use the radiator to dry washing, do not rest the power cable on hot elements.
Always use the radiator in the vertical position.
If the power cable is damaged, it must be replaced by the manufacturer, an authorised service
centre or a qualified electrician in order to eliminate all risk.
When you turn the appliance on for the first time, operate it at maximum for at least two
hours. During this time, you should ventilate the room to eliminate the “new” smell given off.
It is normal for the appliance to make "squeaking" noises when first turned on.
The appliance must not be placed immediately under a fixed power socket.
This appliance is filled with a precise quantity of oil and repairs requiring it to be opened must
be carried out by the manufacturer or an authorised technical assistance centre only. In the
event of oil leaks, contact the manufacturer or an authorised technical assistance centre.
When disposing of this appliance, respect legislation on disposal of oil.
Do not use this appliance in rooms measuring less than 4m².
Important information for correct disposal of the product in accordance with EC
Directive 2002/96/EC.
At the end of its working life, the product must not be disposed of as urban
waste. It must be taken to a special local authority differentiated waste collection centre or to a dealer providing this service. Disposing of a household
appliance separately avoids possible negative consequences for the environment and health deriving from inappropriate disposal and enables the constituent materials to be recovered to obtain significant savings in energy and
resources.As a reminder of the need to dispose of household appliances
separately, the product is marked with a crossed-out wheeled dustbin.
5