1
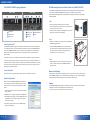
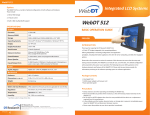
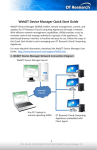
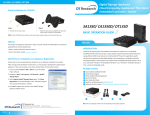
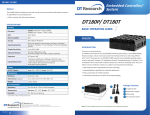
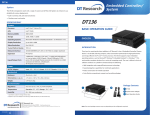
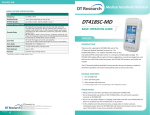
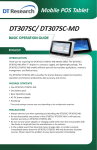
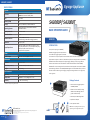
SA3000P/ SA3000T
Signage Appliance
SPECIFICATIONS
System
Processor
SA3000P: Intel® Core™ 2 Duo, 2.26GHz
SA3000T: Intel® Celeron® T3100, 1.9GHz
GPU
Intel® GM45
Memory (RAM)
2GB
Storage
8GB Flash, 250GB HDD, or 32GB to 64GB SSD
Operating Systems
Microsoft® Windows® XP Embedded or Windows®
Embedded Standard 7
Display Resolution
Up to 1920 x 1080
Video Resolution
Full-HD
Network Interface
10/ 100/ 1000Mb BaseT LAN;
Wi-Fi 802.11a/b/g or Wi-Fi 802.11a/b/g/n (optional)
Expansion
PCI Express; USB
Input/Output Ports
1 VGA port; 1 HDMI port; 1 COM port; 18.5V DC-in jack; 2
Audio jacks (Microphone-in, Line-in, Headphone-Out jacks); 2
USB 2.0 ports; RJ45 connector for Ethernet;
Wi-Fi dipole antenna (optional)
Power
AC/DC Adapter
Input: 100 – 240V AC; Output: 18.5V DC
Mechanical
Enclosure
Aluminum + steel
Dimensions (H x W x D)
2.16 x 5.82 x 6.5 in/ 55 x 148 x 165.1 mm
Weight
2.9 lbs/ 1316 g
Environmental
Regulatory
FCC Class B, CE, UL, C-Tick, RoHS compliant
Temperature
Operation: 0°C - 40°C; Storage: -20°C - 60°C
Humidity
0% - 90% non-condensing
* Specifications subject to change without notice.
SA3000P/ SA3000T
BASIC OPERATION GUIDE
ENGLISH
INTRODUCTION
Thank you for acquiring the SA3000P/
SA3000T, a Signage Appliance by DT Research.
The DT Research Signage Appliance facilitates
the creation of a unique and powerful communication medium that offers unparalleled
opportunities to capture an audience’s attention at key decision-making locations. The SA3000P/
SA3000T enables efficient deployment for digital signage, featuring reliable, energy-efficient
hardware and intuitive server-based software. The Microsoft® Windows® based SA3000P/
SA3000T offers remote management of the hardware and the displayed content with the WebDT
Content Manager software. The SA3000P/ SA3000T together with the WebDT software, offers an
efficient solution for delivering and managing messages that target audiences in the right place,
at the right time.
Package Contents
1
1. One DT Research Signage Appliance
SA3000P/ SA3000T
2. Software and User Guide (including
WebDT Content Manager, and user
guides on Software Disk)
3. VESA-compliant Mounting Bracket
4. AC/DC Power Adapter
2
DT Research, Inc.
2000 Concourse Drive, San Jose, CA 95131 http://www.dtresearch.com http://www.signage.dtri.com
signage dtri com
ENGLISH
4
Copyright © 2012, DT Research, Inc.
All Rights Reserved. DT Research is a registered trademark of DT Research, Inc.
BOG041112SA3000ENG
Content Manager
3
4
5. Basic Operation Guide
NOTE: The actual package contents may vary
depending on the configuration acquired.
SA3000P/ SA3000T
THE SA3000P/ SA3000T Signage Appliance
VESA Mounting Bracket Installation Guide for SA3000P/ SA3000T
Front View
A
Rear View
B
C
D
E
G
F
H
The DT Research Signage Appliance package includes a VESA-compliant mounting bracket (1)
which mounts the SA3000P/ SA3000T (2) onto a VESA-compatible monitor or display.
NOTE: The VESA Mounting Bracket is compatible with most displays and monitors that support
the VESA standard.
Step1:
Audio jacks
Power button
C USB 2.0 (2)
A
D
G
B
E
H
Ethernet port
HDMI port
F VGA port
RS232 COM port
DC-in
<1>
• Locate the existing mounting holes on the monitor.
• Line the bracket holes up with the holes on the back of the
monitor, as shown to the right.
• Place the screws to hold the mounting bracket in place and
tighten the screws (do not over-tighten).
Step2:
Powering ON and OFF
The SA3000P/ SA3000T is programmed to Power On automatically when power is first applied
or re-established. There is also a Power Button, located on the front of the SA3000P/ SA3000T.
To turn the SA3000P/ SA3000T on, push and release the Power Button on the front bezel. The
adjacent power LED will be lit (blue), and the corresponding interface will be shown on the
display monitor.
To turn off the device, use the software shutdown interface provided, or unplug the appliance.
In the event of system lockup, unplug or re-plug the power cable. Also, the Power Button may
be used to perform a reset of the device. To do that, push and hold the Power Button for at least
4 seconds. The system will shut down and all unsaved work may be lost. Pushing on the Power
Button again will restart the device.
Server Installation
Please refer to the corresponding User Guides for software installation instructions.
Appliance Registration
After turning on the SA3000P/ SA3000T for the first time, a
screen prompt is displayed for registering the player. If the
screen prompt is not shown, please follow the instructions
below:
1. Press and hold “Control + Shift + Space” to exit the WCM
Player software.
• Remove the two M3 screws (3) originally on the SA3000P/
SA3000T signage appliance.
• Place the SA3000P/ SA3000T (2) on the bracket rail with
the interface ports side facing downwards so that the two
mounting holes on the appliance are aligned with the
existing holes on the rail (see picture).
<2>
Step 3:
• Apply and tighten the screws into their original locations and
make sure that the bracket and the SA3000P/ SA3000T are
properly secured.
<3>
Memory and Storage
Depending on the base software configuration, the user may need only the internal flash memory
of the SA3000P/ SA3000T for user’s installed software and storage. The user may also supplement
storage space with USB-based peripherals such as flash disks, disk drives, etc.
Options
The SA3000P/ SA3000T Signage Appliance is designed to work with a range of custom and off-theshelf options to enhance its applicability for various deployments.
* Internal PCI Express wireless LAN (WLAN) adapters with dipole antenna
2. Navigate to Start | Programs | DT Research | WCM Player
3. Select Register Player Again. The Player Registration screen
should appear. Fill in all fields to register. The required
information is marked.
4. Click OK to register and connect to the WebDT Signage
Appliance Publish Server.
ENGLISH
2
3
ENGLISH