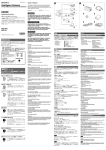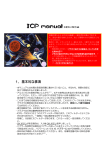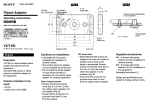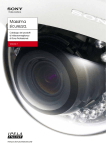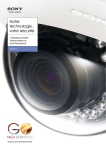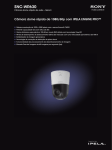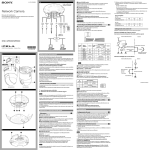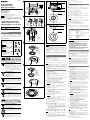
1
4-154-385-01 (1) In-Ceiling Bracket Dome Cover Clear Dome Cover Smoked 直径φ233∼237の穴 / φ233 to 237 (9 /4 to 9 /8) hole 1 3 2 3 226 (9) 天井 / 112.1 (4 1/2) Ceiling 10 to 35 (13/32 to 1 7/16) 取付説明書 152.1 (6) YT-ICB124(天井埋め込みキット) 1 2 115.5 (4 5/8) 3 固定板 / 固定板 / お買い上げいただきありがとうございます。 電気製品は安全のための注意事項を守らないと、火災や人身 事故になることがあります。 この取付説明書には、事故を防ぐための重要な注意事項と製品の取り扱い かたを示しています。この取付説明書をよくお読みのうえ、製品を安全に お使いください。お読みになったあとは、いつでも見られるところに必ず 保管してください。 ドームカバーについている保護シートをはがす。 はずしかた 23.8 (15/16) Installation Instructions Manuel d’installation Manual de instalación カバーをネジで固定する。 4 5 ø270 (10 /4) Fixing plate Fixing plate 3 単位: ミリ / Unit: mm (inches) 6 7 カバーを天井に押さえつけながらネジをはずす。 反時計回りに回して取りはずす。カバーは垂直方向にはずしてくださ い。 カバーが回らない場合は、 カバーの両脇を押しながら ( a) 回してくだ さい。 カメラを天井ユニットから取りはずす。 詳しくは、 カメラの設置説明書をご覧ください。 ネジをゆるめて金具から天井ユニットをはずす。 天井ユニットに接続されているケーブルとワイヤーロープをはずす。 詳しくは、 カメラの設置説明書をご覧ください。 金具の左右の固定板が縦になるまで、左右のネジを反時計回りにゆるめ る。 アンカーボルトをゆるめて天井から金具をはずす。 ご注意 ネジをゆるめるときのトルクは、1.0 N・m (10 kgf・cm)以下にしてくだ さい。 ネジをゆるめるときは金具や天井ユニットを押さえてください。金具や 天井ユニットが落ちる危険があります。 固定板 / Fixing plate YT-ICB124(In-Ceiling Bracket) YT-LD124C(Dome Cover Clear) YT-LD124S(Dome Cover Smoked) Installation 1 2 取りはずし / Removal © 2009 Sony Corporation Printed in China YT-LD124C/LD124S(YT-ICB124専用のドームカバー ) 単位:ミリ / Unit: mm (inches) 取り付け / 20.8 (27/32) 120.5 (4 3/4) ドームカバーを天井に押さえつけながらネジをはずす。 反時計回りに回して取りはずす。カバーは垂直方向にはずしてくださ い。 カバーが回らない場合は、 ドームカバーの両脇を押しながら ( a) 回し てください。 仕様 ø270 (10 3/4) 安全のために ソニー製品は安全に充分配慮して設計されています。しかし、電気製品は、 まちがった使いかたをすると、火災や感電などにより死亡や大けがなど人身 事故につながることがあり、危険です。事故を防ぐために次のことを必ずお 守りください。 マークを合 わせる / 安全のための注意事項を守る。 警告表示の意味 この取付説明書および製品では、次のよ く理解してから本文をお読みください。 WARNING M4 × 10付属ネジ / M4 supplied screws 単位:ミリ / Unit: mm (inches) 日本語 人身事故につながることがあります。 この表示の注意事項を守らないと、感電 やその他の事故により けが をしたり周 天井などの高所に設置する際は、専門の工事業者に依頼してください。 高所への設置は、設置部および使用する取り付け部材(付属品を除く)が本 機とカメラを含む重量に充分耐えられる強度があることをお確かめのう え、確実に取り付けてください。充分な強度がないと落下して大けがの原 因となります。 落下事故防止のため、 カメラ本体に付属のワイヤーロープは必ず取り付け てください。 高所へ設置した場合は、1年に一度は取り付けがゆるんでいないことを点 検してください。また、使用状況に応じて、点検の間隔を短くしてくださ い。 行為を禁止する記号 マークを合 わせる / Align the marks 突起(丸型) / 行為を指示する記号 Protrusion (round type) 辺の物品に 損害 を与えたりすることが あります。 概要 a a YT-LD124C/LD124Sは、YT-ICB124(天井埋め込みキット)専用のドームカ バーです。 使用する場合は、天井埋め込みキット(YT-ICB124)が必要です。 設置は専門の工事業者に依頼する 設置については、必ずお買い上げ店またはソニーの業務用製 品ご相談窓口にご依頼ください。 壁面や天井など高所への設置は、本機とカメラを含む重量に YT-ICB124は、ネットワークカメラSNC-RH124、RS46N/RS46P、RS44N/ RS44P専用のキットです。 カメラ本体を天井に埋め込んで使用する場合や、石膏ボードなど天井の材質 がもろくネジがききにくい場合に使用します。 厚さ約10 ∼ 35 mmの天井に設置できます。 下記の注意を守らないと、火災や感電により死亡や大けが につながることがあります。 ご注意 YT-ICB124(天井埋め込みキット)は屋内専用です。屋外への設置にはお使 YT-LD124C/LD124S(YT-ICB124専用のドームカバー )を使用した場合、画 いになれません。 像のゆがみ、輝点などにより、カメラの光学性能が劣化する場合がありま す。また、グレースモ−クのドームカバーでは、画面の明るさが約1 絞り暗 くなります。 YT-LD124C/LD124S(YT-ICB124専用のドームカバー )を取り付けて使用 する場合、温度が40℃を超える場所での使用を避けてください。 充分耐えられる強度があることをお確かめください。充分 な強度がないと、落下して、大けがの原因となります。 また、1年に一度は、取り付けがゆるんでないことを点検し てください。また、使用状況に応じて、点検の間隔を短くし てください。 取り付けかた マークを合 わせる / 不安定な場所に設置しない YT-ICB124(天井埋め込みキット) 1 Align the marks 次のような場所に設置すると、倒れたり落ちたりして、故障 突起(丸型) / やけがの原因となることがあります。 Protrusion (round type) 不安定な場所 振動や衝撃のかかるところ また、設置・取り付け場所の強度を充分にお確かめください。 指定されたカメラを取り付ける 2 a 指定以外のカメラを取り付けると、しっかりと固定されない 3 ため部品やカメラが落下し、足などにけがをする原因となる ことがあります。 a 接続コード類を傷つけない ります。 本機と天井などの間にコードを挟み込まない。 コード類を接続したまま移動しない。 4 インナーカバー / Inner cover 分解や改造をしない 分解や改造をすると、金具の強度が低下し、設置している製 5 品が落下してけがの原因となることがあります。 機器や部品の取り付けは正しく行う 6 別売りの機器や部品の取り付け方法を誤ると、機器が落下し てけがをすることがあります。機器や部品を取り付けると きは、取付説明書をよく読んだうえ、確実に取り付けてくだ ネジ / Screw ネジ / Screw 取り付け時にネジを確実に締める 7 8 ネジの締めつけが不充分な場合、本機が落下し、けがをする 原因となることがあります。 指の挟み込みに注意する 金具を取り付ける際、金具と金具の間、または金具と天井の 間に指を挟み込まないように注意してください。 アンカーボルトで天井埋め込み金具を天井に固定する(アンカーボルト は別売)。 金具の左右にある固定板が縦になっていること(工場出荷状態)を確認 してから、金具を天井の穴に組み込んでください。 () 金具に開いている◇穴がカメラの正面になる位置です。 必要に応じて、向きを調整して取り付けてください。 金具の左右のネジを締め、金具で天井を挟む。 ネジを締めると、縦になっていた固定板が外側へ回転して開きます。さ らにネジを締めると固定板が下がって天井を挟みます。() 固定板が天井をしっかり挟んでいることを確認してください。 ネジを締めるときは、1.0 N・m (10 kgf・cm)以下のトルクで締めて ください。あまり強く締めると埋め込み金具が壊れることがあります。 カメラの天井ユニットにケーブルと天井ユニット用のワイヤーロープ を接続する。 この製品には、鋭利なエッジが露出しており、手を触れると けがをする恐れがあります。 開梱および設置の際には、けがを防ぐため保護手袋を着用し てください。 YT-ICB124 is the special package for SNC-RH124/RS46N/RS46P/RS44N/RS44P. It is used when the body of the camera is embedded in the ceiling, or with gypsum boards and such where the material used in the ceiling is too fragile to hold ordinary screws. Install the camera on the ceiling with the thickness from 10 mm to 35 mm (13/32 ~ 1 7/16 inches) inclusive. YT-LD124C/LD124S is the dedicated dome cover for YT-ICB124 (In-ceiling kit). When using this dome cover, the in-ceiling kit (YT-ICB124) is required. Notes YT-ICB124 (In-ceiling kit) is for indoor use. It cannot be used for installation outdoors. Using YT-LD124C/LD124S (dedicated dome cover for YT-ICB124) may cause deterioration of the camera’s optical performance due to image distortion and luminous spots, etc. If you use a grey-smoke dome cover, the brightness of the screen becomes darker by about 1 aperture. Do not use YT-LD124C/LD124S (dedicated dome cover for YT-ICB124) attached in a place where the temperature becomes more than 40°C (104°F). Installing YT-ICB124 (In-ceiling kit) 1 2 3 天井ユニットを金具に奥まで差し込み、アームで仮固定する。 金具に開いている正面を示す◇の穴と天井ユニットに付いている正 面マークを合わせる。 金具の突起に天井ユニットの穴を合わせる。 突起が乗り上げていないかを確認してください。 天井ユニットの穴と金具のネジ穴を合わせる。 4 5 6 付属のM4×10ネジを使って、天井埋め込み金具にカメラの天井ユ ニットを取り付ける。() 天井ユニットに本体カメラをカチッと音がするまで差し込む。 LOCK(ロック)ボタンを押して、しっかりロックされていることを確 認してください。 8 詳しくは、 カメラの設置説明書をご覧ください。 インナーカバーでマスクされているエリアを撮影したい場合は、インナーカ バーをはずしてお使いください。 () インナーカバーでマスクされていた部分は倍率や角度によって画像にボケ や歪みが生じる場合があります。 1 ドームカバーを埋め込み金具にかぶせ、時計回りに回して固定する。 かぶせるときは、カバー上の右側の突起(角型)を金具のV字型の切り欠 きに合わせます。その後、左側の突起(丸型)がV字型の切り欠きの位置 に来るまで時計回りに回します。 Tighten the left and right screws of the bracket. The bracket should grip the ceiling. As you tighten the screws, the fixing plates swing outward and open. When you tighten the screws further, the fixing plates swing lower and grip the ceiling. () Ensure that the fixing plates are gripping the ceiling firmly. Torque the screws to 1.0 N•m (10 kgf•cm) or less to tighten them. Tightening the screws too much may cause damage to the in-ceiling bracket. Connect the cable and the ceiling unit wire rope to the ceiling unit of the camera. ¿ For details, see the Installation Manual of the camera. When you insert the ceiling unit into the bracket completely, the arm temporarily supports the ceiling unit. Position the ¯ hole in the bracket (indicating the front) and the front side mark on the ceiling unit. Match the protrusions of the bracket with the holes in the ceiling unit. Make sure that the protrusions fit the holes. Align the holes in the ceiling unit with the screw holes in the bracket. Using the supplied M4Ï10 screws, attach the ceiling unit of the camera to the in-ceiling bracket. () Always fix with the supplied screws. Using screws other than those supplied may cause the camera to fall, which may cause serious injury. Using the device with temporary fixture may result in the camera falling, which may cause serious injury. 7 「YT-LD124C/LD124S(YT-ICB124専用のドームカバー )」 Fix the in-ceiling bracket to the ceiling with an anchor bolt (anchor bolt is not supplied). Make sure that the fixing plates on both sides of the bracket are in the lengthwise position (factory default), and install the bracket in the hole in the ceiling. () The ¯ hole in the bracket shows the front side of the camera. Adjust the direction when attaching the in-ceiling kit as necessary. Warning 必ず付属のネジで固定してください。付属以外のネジを使用した場 合、落下して大けがの原因になる恐れがあります。 仮固定のままでご使用されると、 カメラが落下して大けがの原因にな る恐れがあります。 付属のカバーを取り付ける。() 別売のドームカバー(YT-LD124C/LD-124S)を取り付ける場合は、 「YTLD124C/LD-124S(YT-ICB124専用ドームカバー )」をご覧ください。 付属のカバーを埋め込み金具にかぶせ、時計回りに回して固定する。 かぶせるときは、カバー上の右側の突起(角型)を金具のV字型の切り 欠きに合わせます。その後、左側の突起(丸型)がV字型の切り欠きの 位置に来るまで時計回りに回します。 カバーをネジで固定する。 Make a ø235 ± 2 mm (9 3/8 ± 3/32 inches) hole in the ceiling. Use the supplied template. Use the four slotted holes on the template to decide the center position of the camera. Note 詳しくはカメラの設置説明書をご覧ください。 ご注意 シャープエッジには素手で触れない Overview さい。 下記の注意を守らないと、けが をしたり周辺の物品に 損害 を 与えることがあります。 This installation should be made by a qualified service person and should conform to all local codes. Ensure that the installation location and its material are strong enough to withstand the gross weight of the camera and the InCeiling Bracket, and then install the camera securely. If they are not strong enough, the camera may fall and cause serious injury. To prevent the camera from falling, be sure to attach the wire rope supplied with the camera. If you install the camera at a height, check periodically, at least once a year, to ensure that the connection has not loosened. If conditions warrant, perform this periodic check more frequently. 天井にφ235 ± 2 mmの穴を開ける。 付属のテンプレートをご利用ください。 テンプレートの4か所の長穴は、カメラの中心位置を決めるときにご利 用ください。 ご注意 接続コードを傷つけると、火災や感電の原因となることがあ 図 をご覧ください。 テンプレート (1)、M4×10ネジ (3)、取付説明 書 (1) 別売アクセサリー ドームカバー (クリア) YT-LD124C ドームカバー (スモーク) YT-LD124S YT-LD124C/LD124S(YT-ICB124専用のドームカバー ) 質量 約400 g 外形寸法 図 をご覧ください。 付属品 取付説明書 (1) English うな表示をしています。表示の内容をよ や 感電 などにより 死亡 や 大けが など 外形寸法 付属品 Align the marks 注意を促す記号 この表示の注意事項を守らないと、火災 YT-ICB124(天井埋め込みキット) 質量 約930 g(付属のカバー含む) Insert the camera into the ceiling unit until you hear a click. Push the Lock button to confirm the camera is locked. ¿ For details, see the Installation Manual of the camera. Attach the cover (supplied). () See the “YT-LD124C/LD124S (dedicated dome cover for YT-ICB124)” to install the purchased dome cover. Place the cover over the in-ceiling bracket and turn the cover clockwise to fix it. When installing the cover, match the right protrusion (square type) on the cover with the notch in the bracket. Then turn the cover clockwise until the left protrusion (round type) meets the notch. Secure the cover with screws. YT-LD124C/LD124S (dedicated dome cover for YT-ICB124) Remove the inner cover for a wider area view. Note The lens zoom and angle may result in a blurred or inclined image of the area covered by inner cover. 1 2 3 Place the dome cover over the in-ceiling bracket and turn the cover clockwise to fix it. When installing the cover, position the right protrusion (square type) of the dome over the notch in the bracket. Then turn the cover clockwise until the left protrusion (round type) meets the notch. Secure the dome cover with screws. Remove the protective sheet on the dome cover. Trou de φ233 à 237 (9 1/4 à 9 3/8)/ φOrificio de 233 a 237 (9 1/4 a 9 3/8) 2 226 (9) 152,1 (6) 112,1 (4 1/2) Plafond / Techo 10 à 35 (13/32 à 1 7/16) / De 10 a 35 (13/32 a 1 7/16) 3 23,8 (15/16) Plaque de fixation / Placa de fijación Plaque de fixation / Placa de fijación 115,5 (4 5/8) ø270 (10 3/4) 4 5 Plaque de fixation / Placa de fijación Unité : mm (pouces) / Unidad: mm (pulgadas) Retrait / Extracción 6 120,5 (4 3/4) 7 ø270 (10 3/4) 8 Alignez les repères / Alinear las marcas Vis M4 fournies / Tornillos M4 suministrados Unité : mm (pouces) / Unidad: mm (pulgadas) Lorsque vous insérez complètement l’unité au plafond dans le support, le bras supporte momentanément le poids de l’unité au plafond. Alignez le trou ¯ situé sur le support (qui indique l’avant) au repère avant de l’unité au plafond. Alignez les parties saillantes du support aux trous situés sur l’unité au plafond. Assurez-vous que les parties saillantes pénètrent dans les trous. Alignez les trous de l’unité au plafond aux trous de vis sur le support. Instalación YT-ICB124 (kit para techo) 1 2 3 À l’aide des vis M4Ï10 fournies, fixez l’unité au plafond de la caméra au support de fixation au plafond. () Pour la fixation, utilisez toujours les vis fournies. Si vous vous servez de vis différentes de celles qui vous sont fournies, la caméra risque de tomber, ce qui peut provoquer de graves blessures. L’utilisation d’éléments de fixation de fortune peut entraîner la chute de la caméra, ce qui risque de provoquer de graves blessures. Insérez la caméra dans l’unité au plafond jusqu’à ce que vous entendiez un déclic. Appuyez sur le bouton de verrouillage pour vous assurer que la caméra est correctement fixée. ¿ Pour plus de détails, consultez le Manuel d’installation de la caméra. Fixez le couvercle (fourni). () Pour installer le dôme acheté, voir « YT-LD124C/LD124S (dôme conçu pour le support YT-ICB124) » Placez le couvercle sur le support de fixation au plafond, puis faitesle pivoter dans le sens des aiguilles d’une montre pour le fixer. Lors de l’installation du couvercle, alignez la partie saillante droite (de forme carrée) du couvercle à l’encoche du support. Faites pivoter le couvercle dans le sens des aiguilles d’une montre jusqu’à ce que la partie saillante gauche (de forme arrondie) s’insère dans l’encoche. Fixez le couvercle à l’aide des vis. YT-LD124C/LD124S (dôme conçu pour le support YT-ICB124) Retirez le couvercle intérieur pour avoir une vue d’ensemble. Remarque YT-ICB124 (In-ceiling kit) 1 2 Alignez les repères / Alinear las marcas 3 Partie saillante (de forme arrondie) / Protrusión (tipo redondo) 4 5 6 a 7 Hold the cover and then, remove the screws on the cover. 1 Remove the cover by turning it counter-clockwise and the cover down vertically. If it can not be turned, turn the cover while pushing both side ( a). Remove the camera from the ceiling unit. For details, see the Installation Manual of the camera. Loosen the screws and remove the ceiling unit from the bracket. Remove the cable connecting to the ceiling unit and the wire rope. For details, see the Installation Manual of the camera. Loosen the left and right screws of the bracket by turning them counter-clockwise until the fixing plates are in the lengthwise position. Loosen the anchor bolt and remove the bracket from the ceiling. 2 3 a Torque the screws to 1.0 N•m (10 kgf•cm) or less to loosen them. Hold the bracket and ceiling unit while loosening screws. Otherwise the bracket and ceiling unit may fall. YT-LD124C/LD124S (dedicated dome cover for YT-ICB124) 1 2 Hold the dome cover on the ceiling and remove the screws. Remove the cover by turning it counter-clockwise and the cover down vertically. If it can not be turned, turn the dome cover while pushing both side ( a). Dimensions Supplied accessories Alignez les repères / Alinear las marcas Optional accessories Partie saillante (de forme arrondie) / Protrusión (tipo redondo) 1 2 3 4 5 6 Approx. 930 g (2.1 lb 34 oz) (including accessorial cover) See . Template (1), M4Ï10 screws (3), Installation Instructions (1) Dome cover (clear) YT-LD124C Dome cover (smoked) YT-LD124S AVERTISSEMENT L’installation doit être confiée à un technicien qualifié et doit être conforme à toutes les réglementations locales. Assurez-vous tout d’abord que l’emplacement et le support d’installation sont suffisamment solides pour supporter le poids de la caméra et celui du support de fixation au plafond, puis installez correctement la caméra. S’ils ne sont pas suffisamment solides, la caméra risque de tomber et de provoquer des blessures graves. Pour éviter toute chute de la caméra, veillez à fixer le câble métallique fourni. Si vous installez la caméra en hauteur, vérifiez-la régulièrement (au moins une fois par an) afin de vous assurer que l’ensemble n’est pas desserré. Nous vous conseillons, dans la mesure du possible, de procéder à cette vérification plus souvent. Couvercle intérieur / Tapa interior Le support de fixation au plafond YT-ICB124 permet d’installer les produits SNC-RH124/RS46N/RS46P/RS44N/RS44P. Ce support est nécessaire lorsque le corps de la caméra est encastré dans le plafond ou lorsque des plaques de plâtre sont utilisées et que la qualité du matériel entrant dans la composition du plafond rend difficile la tenue de vis conventionnelles. Installez la caméra sur un plafond dont l’épaisseur est comprise entre 10 mm et 35 mm (13/32 ~ 1 7/16 pouces). Le dôme YT-LD124C/LD124S est spécialement conçu pour le kit de fixation au plafond YT-ICB124. Si vous souhaitez installer le dôme, vous devez vous procurer le kit de fixation au plafond (YT-ICB124). Remarques Le kit de fixation au plafond YT-ICB124 est réservé à un usage intérieur. Il ne peut en aucun cas être installé à l’extérieur. L’utilisation du dôme YT-LD124C/LD124S (conçu pour le kit YT-ICB124) peut diminuer les performances optiques de la caméra, notamment à cause de la distorsion de l’image et des points lumineux. Si vous utilisez un dôme teinté, la luminosité de l’écran diminue d’environ 1 ouverture. N’utilisez pas le dôme YT-LD124C/LD124S (conçu pour le support YT-ICB124) dans un endroit où la température est supérieure à 40 °C (104 °F). Installation YT-ICB124 (kit de fixation au plafond) 1 Retirez le couvercle en le faisant pivoter dans le sens inverse des aiguilles d’une montre, puis tirez-le vers le bas en position verticale. Si vous ne parvenez pas à le retirer, faites-le pivoter tout en appuyant sur les deux côtés ( a). Desserrez les vis et retirez l’unité au plafond du support. Retirez le câble qui relie l’unité au plafond, ainsi que le câble métallique. Pour plus de détails, consultez le Manuel d’installation de la caméra. Desserrez les vis gauche et droite du support en les faisant pivoter dans le sens inverse des aiguilles d’une montre jusqu’à ce que les plaques de fixation se trouvent dans le sens de la longueur. Desserrez le boulon d’ancrage et retirez le support du plafond. YT-LD124C/LD124S (dôme conçu pour le support YT-ICB124) 1 2 Percez un trou de ø235 ± 2 mm (9 3/8 ± 3/32 pouces) dans le plafond. Utilisez le modèle fourni. Utilisez les quatre trous du modèle pour centrer la caméra. Maintenez le dôme au plafond et retirez les vis. Retirez le dôme en le faisant pivoter dans le sens inverse des aiguilles d’une montre, puis tirez-le vers le bas en position verticale. Si vous ne parvenez pas à le retirer, faites-le pivoter tout en appuyant sur les deux côtés ( a). Spécifications YT-ICB124 (kit de fixation au plafond) Poids Environ 930 g (2,1 lb 34 oz) (couvercle compris) Dimensions Voir . Accessoires fournis Modèle (1), Vis M4Ï10 (3), Manuel d’installation (1) Accessoires en option Dôme (transparent) YT-LD124C Dôme (teinté) YT-LD124S YT-LD124C/LD124S (dôme conçu pour le support YT-ICB124) Poids Environ 400 g (0,9 lb 14 oz) Dimensions Voir . Accessoires fournis Manuel d’installation (1) Español ADVERTENCIA Esta instalación la debe realizar una persona de servicio cualificada y deberá cumplir todas las normas locales. Asegúrese de que la ubicación de la instalación y el material correspondiente sean lo suficientemente resistentes como para soportar el peso bruto de la cámara y el soporte para techo. A continuación, instale la cámara firmemente. Si la resistencia no es suficiente, es posible que la cámara se caiga y cause lesiones graves. Para impedir que se caiga la cámara, asegúrese de fijar la cuerda de cable suministrada con ella. Si instala la cámara a una altura, compruébela periódicamente (al menos una vez al año) para asegurarse de que la conexión no se haya aflojado. Realice esta comprobación con mayor frecuencia según requieran las condiciones. Visión general YT-ICB124 es el paquete especial para los modelos SNC-RH124/RS46N/ RS46P/RS44N/RS44P. Se utiliza cuando el cuerpo de la cámara se incrusta en el techo o con placas de yeso y elementos similares en los que el material que se usa en el techo es demasiado frágil como para soportar tornillos estándar. Instale la cámara en el techo con un grosor de 10 mm a 35 mm (de 13/32 a 1 7/16 pulgadas) inclusive. YT-LD124C/LD124S es la tapa convexa específica para el modelo YT-ICB124 (kit de techo). Cuando se utilice esta tapa convexa, se requiere el kit para techo (YT-ICB124). Fije el montaje para techo a este con un perno de anclaje (no suministrado). Asegúrese de que la fijación de ambos lados del soporte se realiza en longitudinal (modo predeterminado) e instale el soporte en el orificio del techo. () El orificio ¯ del soporte muestra la parte frontal de la cámara. Ajuste la dirección al colocar el kit para techo según sea necesario. Apriete los tornillos izquierdos y derechos del soporte. El soporte debería fijarse firmemente en el techo. A medida que apriete los tornillos, las placas de fijación oscilan hacia afuera y se abren. Al apretar aún más los tornillos, las placas de fijación oscilan más bajo y se fijan firmemente al techo. () Asegúrese de que las placas de fijación están fijadas firmemente al techo. Aplique una torsión máxima a los tornillos de 1,0 N•m (10 kgf•cm) o menor para apretarlos. Si los aprieta demasiado, es posible que se dañe el soporte para techo. Conecte el cable y la cuerda de cable a la unidad de techo de la cámara. ¿ Para obtener más información, consulte el Manual de instalación de la cámara. Al insertar por completo la unidad de techo en el soporte, el brazo soporta temporalmente la unidad de techo. Alinee el orificio ¯ con la posición en el soporte (que indica la parte frontal) y la marca del lateral frontal de la unidad de techo. Alinee las protrusiones del soporte con los orificios de la unidad de techo. Asegúrese de que los salientes encajan con los orificios. Alinee los orificios de la unidad de techo con los de los tornillos del soporte. Utilice los tornillos M4Ï10 suministrados para conectar la unidad de techo de la cámara al soporte para techo. () Advertencia Realice siempre la instalación con los tornillos suministrados. Si utiliza tornillos que no sean los suministrados, la cámara podría desprenderse y provocar daños. Si se utiliza el dispositivo con un accesorio temporal podría provocar la caída de la cámara, que podría causar lesiones graves. 7 8 Inserte la cámara en la unidad de techo hasta oír un clic. Presione el botón de bloqueo para confirmar que la cámara está bloqueada. Para obtener información detallada, consulte el manual de instalación de la cámara. Coloque la tapa (suministrado). () Consulte las instrucciones de “YT-LD124C/LD124S (tapa convexa específica de YT-ICB124)” para instalar la tapa convexa adquirida. Coloque la tapa en el soporte para techo y gírela hacia la derecha para fijarla. Al instalar la tapa, alinee la protrusión derecha (tipo cuadrado) de la tapa con la pestaña del soporte. A continuación, gire la tapa hacia la derecha hasta que la protrusión izquierda (tipo redondo) se alinee con la pestaña. Fije la tapa con tornillos. YT-LD124C/LD124S (tapa convexa dedicada para YT-ICB124) Retire la tapa interior para disponer de una mejor visibilidad. Nota El posible que el zoom del objetivo y el ángulo resulten en una imagen borrosa o inclinada del área cubierta por la tapa interior. 1 Retirez la caméra de l’unité au plafond. Pour plus de détails, consultez le Manuel d'installation de la caméra. Lorsque vous desserrez les vis, appliquez un couple inférieur ou égal à 1,0 N•m (10 kgf•cm). Tenez fermement le support et l’unité au plafond lorsque vous desserrez les vis. Dans le cas contraire, le support et l’unité au plafond risquent de tomber. Description générale Vis / Tornillo Tenez le couvercle, puis retirez les vis. Français a 6 Retirez les feuilles protectrices du dôme. Remarques YT-LD124C/LD124S (dedicated dome cover for YT-ICB124) Mass Approx. 400 g (0.9 lb 14 oz) Dimensions See . Supplied accessories Installation Instructions (1) a 5 Fixez le dôme à l’aide des vis. YT-ICB124 (kit de fixation au plafond) 7 Specifications YT-ICB124 (In-ceiling kit) Mass 4 Retrait Notes Placez le dôme sur le support de fixation au plafond, puis faites-le pivoter dans le sens des aiguilles d’une montre pour le fixer. Lors de l’installation du dôme, alignez la partie saillante droite (de forme carrée) du couvercle à l’encoche du support. Faites pivoter le dôme dans le sens des aiguilles d’une montre jusqu’à ce que la partie saillante gauche (de forme arrondie) s’insère dans l’encoche. Realice un orificio de ø235 ± 2 mm (9 3/8 ± 3/32 pulgadas) en el techo. Utilice la plantilla suministrada. Utilice los cuatro orificios con ranura de la plantilla para establecer la posición central de la cámara. Nota Selon le zoom et l’angle de l’objectif, les images de la zone obstruée par le couvercle intérieur risquent d’être floues ou inclinées. Removing Vis / Tornillo Raccordez le câble et le câble métallique de l’unité au plafond à l’unité au plafond de la caméra. ¿ Pour plus de détails, consultez le Manuel d’installation de la caméra. YT-ICB124 (kit de techo) es para uso en interiores. No se puede utilizar para instalación en el exterior. El uso del modelo YT-LD124C/LD124S (tapa convexa específica para YT-ICB124) podría provocar el deterioro del rendimiento óptico de la cámara debido a la distorsión de imágenes y los puntos luminosos, etc. Si se utiliza una tapa convexa de color gris claro, el posible que la apertura de la pantalla se oscurezca por un punto de apertura. No utilice el modelo YT-LD124C/LD124S (tapa convexa dedicada para YT-ICB124) colocado en un lugar en el que la temperatura pueda superar los 40 °C (104 °F). Le couple de serrage des vis doit être inférieur ou égal à 1,0 N•m (10 kgf•cm). Un couple de serrage supérieur risque d’endommager le support de fixation au plafond. Notas Avertissement 20,8 (27/32) Serrez les vis gauche et droite du support. Le support doit adhérer complètement au plafond. Commencez à serrer les vis. Les plaques de fixation s’écartent peu à peu. Lorsque vous serrez les vis à fond, les plaques de fixation basculent vers l’extérieur et vers le bas pour adhérer au plafond. () Assurez-vous que les plaques de fixation adhèrent solidement au plafond. Remarque Unité : mm (pouces) / Unidad: mm (pulgadas) Installation / Instalación Fixez le support de fixation au plafond à l’aide d’un boulon d’ancrage (non fourni). Assurez-vous que les plaques de fixation droite et gauche du support se trouvent dans le sens de la longueur (position par défaut), puis insérez le support dans le trou du plafond. () Le trou ¯ situé sur le support indique la face avant de la caméra. Positionnez le support correctement lors de l’installation du kit de fixation au plafond. 2 3 Coloque la tapa convexa sobre el soporte para techo y gírela hacia la derecha para fijarla. Al instalar la tapa, alinee la protrusión derecha (tipo cuadrado) de la parte convexa con la pestaña del soporte. A continuación, gire la tapa hacia la derecha hasta que la protrusión izquierda (tipo redondo) se alinee con la pestaña. Utilice los tornillos para fijar la tapa convexa. Extraiga la hoja de protección de la tapa convexa. Extracción YT-ICB124 (kit para techo) 1 2 3 4 5 6 7 Sostenga la tapa y retire los tornillos correspondientes. Para extraer la tapa, gírela hacia la izquierda y bájela verticalmente. Si no se puede girar, gírela a la vez que empuja los laterales ( a). Extraiga la cámara de la unidad de techo. Para obtener información detallada, consulte el manual de instalación de la cámara. Afloje los tornillos y extraiga la unidad de techo del soporte. Retire el cable de conexión con la unidad del techo y la cuerda. Para obtener información detallada, consulte el manual de instalación de la cámara. Afloje los tornillos izquierdo y derecho del soporte girándolos en sentido contrario a las agujas del reloj hasta que las placas de fijación se encuentren en posición longitudinal. Afloje el perno de anclaje y extraiga el soporte del techo. Notas Aplique una torsión máxima a los tornillos de 1,0 N•m (10 kgf•cm) para aflojarlos. Sostenga el soporte y la unidad de techo mientras afloja los tornillos. De lo contrario, es posible que se caigan el soporte y la unidad de techo. YT-LD124C/LD124S (tapa convexa específica para YT-ICB124) 1 2 Sostenga la tapa convexa en el techo y extraiga los tornillos. Para extraer la tapa, gírela hacia la izquierda y bájela verticalmente. Si no se puede girar, gírela a la vez que empuja los costados ( a). Especificaciones YT-ICB124 (kit para techo) Peso 930 g (2,1 lb 34 oz) aproximadamente (incluida la tapa para accesorios) Dimensiones Consulte . Accesorios suministrados Plantilla (1), Tornillos M4Ï10 (3), Instrucciones de instalación (1) Accesorios opcionales Tapa convexa (transparente) YT-LD124C Tapa convexa (ahumada) YT-LD124S YT-LD124C/LD124S (tapa convexa específica para YT-ICB124) Peso 400 g (0,9 lb 14 oz) aproximadamente Dimensiones Consulte . Accesorios suministrados Instrucciones de instalación (1)