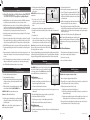
1
B. Vaporizer operates too fast, fuse blows:
If no replacement part can be provided, we will replace your Vaporizer.
Overboiling, flickering lights, blown fuse or heavy steam flow generally indicates one of the following causes:
1. Too much salt was added to the water. To correct the condition:
I. Disconnect the vaporizer from the electrical outlet and allow to cool.
II. Pour out the water and rinse the tank. Rinse steam unit as described in weekly maintenance under
“Cleaning and Storage”. Refill with fresh water but do not add salt. If vaporizer now does not
operate or steams too slowly, follow the instructions in “Initial Setup and Operation”.
2. You live in a “hard water” area and minerals in the tap water are causing the vaporizer to steam too
rapidly. To correct the condition:
I. Disconnect the vaporizer from the electrical outlet and allow to cool.
II. Remove steam unit allowing hot water to first dribble out, then pour out water and rinse the tank.
Rinse steam unit as described in the weekly maintenance section. Refill with fresh water but do not
add salt.
III. If unit still steams too rapidly, use 1/2 distilled water and 1/2 tap water.
C. Vaporizer is making crackling / buzzing / humming sounds or water container is
unusually hot:
1. You may have added too much salt. See section B above.
2. You may live in a “hard water” area. See section B above.
3. This condition can happen when the water level in the tank is low. Disconnect the vaporizer from the
electrical outlet, allow to cool, remove steam unit allowing hot water to first dribble out. Fill the tank with
tap water to MAX water level marking.
4. This may be an indication your vaporizer needs cleaning. Refer to weekly maintenance under“Cleaning
and Storage”.
5
Humidifier Assistance
Support and Accessories
Vaporizer
Humidifier
This warranty is voided if your Vaporizer is not purchased and used in the USA or Canada.
This warranty excludes and does not cover defects, malfunctions, or failures of the Vaporizer which were caused
by repairs by persons not authorized by us, use of parts, or accessories not authorized by us, mishandling,
modifications, or damage to the Vaporizer while in your possession, or unreasonable use, including
failure to provide reasonable and necessary maintenance. This warranty does not cover Vaporizers used in
commercial applications. There are no express or implied warranties as to commercial purchasers or users.
Owner’s Guide
To obtain service, contact the nearest Hunter authorized service center or the Hunter Fan Company Service
Department, 7130 Goodlett Farms Pkwy., Suite 400, Memphis, TN 38016, 1-888-830-1326. You will be
responsible for insurance and freight or other transportation to our factory service center. We will return the
Vaporizer freight prepaid to you. The Vaporizer should be properly packaged to avoid damage in transit
since we will not be responsible for any such damage. Proof of purchase is required when requesting warranty
service. The purchaser must present the sales receipt or other document that establishes proof of purchase.
English
IV. In “hard water” areas it is advisable to clean the unit every few days in accordance with the weekly
maintenance instructions.
IF THE ORIGINAL RESIDENTIAL USER OR CONSUMER PURCHASER CEASES TO OWN THE VAPORIZER,
THIS WARRANTY AND ANY IMPLIED WARRANTY WHICH THEN REMAINS IN EFFECT, INCLUDING BUT
NOT LIMITED TO ANY IMPLIED WARRANTY OF MERCHANTABILITY OR FITNESS FOR A PARTICULAR
PURPOSE, ARE VOIDED. THIS WARRANTY IS IN LIEU OF ALL OTHER EXPRESS WARRANTIES. THE
DURATION OF ANY IMPLIED WARRANTY, INCLUDING BUT NOT LIMITED TO ANY IMPLIED WARRANTY OF
MERCHANTABILITY OR FITNESS FOR A PARTICULAR PURPOSE IS EXPRESSLY LIMITED TO THE PERIOD OF
THE EXPRESS WARRANTY SET FORTH ABOVE.
IN NO EVENT SHALL HUNTER FAN COMPANY BE LIABLE FOR DIRECT, INDIRECT, SPECIAL, CONSEQUENTIAL
OR INCIDENTAL DAMAGES IN EXCESS OF THE PURCHASE PRICE OF THE VAPORIZER. YOUR SOLE REMEDY
WILL BE REPAIR OR REPLACEMENT AS PROVIDED ABOVE. SOME AMERICAN STATES AND CANADIAN
PROVINCES DO NOT ALLOW:
• LIMITATIONS ON HOW LONG AN IMPLIED WARRANTY LASTS;
• THE EXCLUSION OR LIMITATION OF DIRECT, INDIRECT, SPECIAL, INCIDENTAL OR CONSEQUENTIAL
DAMAGES;
• THE EXCLUSION OR INVALIDITY OF EXPRESS OR IMPLIED WARRANTIES IF THE USER CEASES TO OWN
THE VAPORIZER;
• THE LIMITATION OF THE REMEDIES AND RECOURSES AVAILABLE TO THE PURCHASER; OR THE INVALIDITY
OF AN EXPRESS WARRANTY WHEN A PRODUCT IDENTIFIED BY BRAND NAME IS NOT USED (UNLESS
SPECIFIC CONDITIONS ARE FULFILLED);
SO THE ABOVE LIMITATIONS OR EXCLUSIONS MAY NOT APPLY TO YOU.
THIS WARRANTY GIVES YOU SPECIFIC LEGAL RIGHTS AND YOU MAY ALSO HAVE OTHER RIGHTS WHICH
VARY FROM STATE TO STATE OR PROVINCE TO PROVINCE.
If you need any assistance with setup, operation, or parts for your new Hunter Humidifier, please call us, our
technical support staff is ready to help!
USA: 1-888-830-1326
Canada: 1-866-268-1936
Model
Hours of operation are from 7:00 am to 7:00 pm Monday - Friday and 8:00 am to 5:00 pm on Saturday,
Central Time. You may also contact us over the Internet at www.hunterfan.com or register your product
at www.hunterfan.com/register and select your product under product registration.
6
35156
Warranty
3 Year Guarantee
The Hunter Fan Company, Inc. makes the following warranty to the original residential user or consumer
purchaser of the vaporizer humidifier:
If any part of the vaporizer humidifier fails during the first 3 (three) years from the date of purchase due to a
defect in material or workmanship, we will provide a replacement part free of charge.
Form# 44051-01
20100426
©2010 Hunter Fan Co.
1
6. When using vaporizer medications, fill the medicine
cup on the steam unit as directed by the medicine
package. Figure 4.
At A Glance
Warnings
For the most effective and safe use of Hunter’s Vaporizer, please Read and
Save these instructions! Especially those regarding adding salt.
• ALWAYS place this vaporizer on a firm, level, and water resistant surface. ALWAYS place the vaporizer at
least six (6) inches away from walls and heat sources such as stoves, radiators, or heaters.
• ALWAYS place the vaporizer in an area that is out of the reach of children especially infants or toddlers.
Supervision is necessary when the vaporizer is used near children, patients, or pets. Hunter realizes that
many customers use vaporizers in their homes with small children. Please take the time to instruct children
that the vaporizer is not a toy. Vaporizers produce steam that could cause serious burns.
Over Filled
MAX
NOTE: DO NOT add medication of any type into the
water in the tank.
Fill to here
MIN
Minimum Level
7. Plug the power cord into 110-120 Volts AC
outlet protected up to 15 Amps. The vaporizer
will produce a gentle flow of steam within a few
minutes.
8. If steaming does not start within ten minutes, unplug the steam unit and allow to cool.
• This product has a polarized plug (one blade is wider than the other) as a safety feature. This plug will
fit into a polarized outlet only one way. If the plug does not fit fully into the outlet, reverse the plug. If it
still does not fit, contact a qualified electrician. DO NOT attempt to defeat or override this safety feature.
11. If steaming still does not start after another 10 minutes, add another
pinch or two of salt and mix thoroughly. Do not exceed 1/8 teaspon of
salt, about 4-5 pinches, as excessive boiling or a blown fuse could occur.
• ALWAYS UNPLUG the vaporizer when it is not in operation or while it is being emptied, filled or cleaned.
Note: Remember the amount of salt you added to start the unit steaming. You
will need to add the same amount each time the unit is refilled. Salt has no
effect on the purity of the steam or medication.
• DO NOT add medication of any type into the water in the container. Do not cover the steam outlet or place
anything over it while the vaporizer is operating. Never drop or insert any object into any opening.
• Never fill the humidifier tank with hot water. Always use clean, cool tap water.
2
Initial Setup and Operation
1. Remove the plastic bag covering from the vaporizer.
Power
Cord
2. Unravel and straighten the cord before use.
3. Remove the steam unit from the tank. Twist the steam unit counter-clockwise
until the power cord lines up beside the unlock symbol and lift it out of the
tank. Figure 1 and 2.
CAUTION: DO NOT use the vaporizer with extension cords.
MIN
Figure 1.
Note: The tank has built-in antimicrobial properties to inhibit the growth of
bacteria, mold, and fungi that may affect the water in the tank. Daily and
weekly maintenance are still necessary to prevent the growth of bacteria, mold,
and fungi.
End of Season Maintenance:
1. Follow the instructions for weekly maintenance before storing the unit.
2. Ensure all parts are completely dry before storing the unit.
MAX
Figure 7.
MIN
3. Store the unit in a cool dry place.
Humidifier Assistance
4
Troubleshooting
A. Vaporizer does not operate or steams too slowly:
Daily Maintenance:
1. Unplug the steam unit and allow it to cool.
1. Make sure the vaporizer is plugged in and the power light is on.
2. Remove the steam unit by turning counter-clockwise until the power cord is
beside the unlock graphic and lift it out of the tank.
2. If the power light is not on, you may have a blown fuse, tripped a circuit breaker, or a defective electrical
outlet. Try a different outlet or check your breaker or fuse in the house.
Figure 5.
4. Turn the tank upside down and drain any water into a sink or tub. Shake the unit gently to remove any
remaining water.
6. Wipe the steam unit shaft with a dry cloth. Figure 6.
7. If the medicine cup was used, wipe it out with a slightly damp clean cloth. Figure 7.
8. Refill the tank as directed under “initial setup and operation” and resume use.
MAX
MIN
8. Dry with a clean cloth. Clean the medicine cup with a slightly damp clean cloth.
Cleaning and Storage
5. Rinse the tank thoroughly with water, empty, and wipe with a dry, clean cloth. Figure 5.
5. Replace the steam unit in the tank with the power cord lining up beside the
unlock symbol. Twist the steam unit clockwise until the power cord lines up
beside the lock symbol.
Figure 6.
7. Empty the solution from the tank and rinse the tank. Fill the tank with tap
water to the MAX line as indicated on the water level window on the front of the tank. Place the steam unit
back into the tank for 30 seconds. Remove the steam unit and empty the water. Repeat the rinsing steps
until the vinegar smell is gone.
4. Never store the unit with water in the tank.
Maintenance
3. Let all water drain back into the tank from the steam unit.
Caution: Never fill the humidifier with hot water.
NOTE: Protect your floor and furniture by placing the vaporizer on a nonmetallic, waterproof, heat-resistant surface.
MAX
Note: ALWAYS unplug the steam unit from the electrical outlet and allow the
unit to cool before cleaning. Never remove the Steam Unit while it is plugged
in, electrocution or burning could occur. DO NOT attempt to disassemble the
steam unit. Never allow water to sit in the tank when not in use.
Using Your Humidifier
4. Fill the tank with clean, cool tap water until the water level is up to the MAX
mark in the Water Level Window. DO NOT OVERFILL. Figure 3.
Figure 4.
The vaporizer will automatically stop producing steam when the water has reached the minimum level indicated
by the water level in the window on the front of the unit. Figure 3. The power light will remain on indicating that
the vaporizer is still plugged in. ALWAYS unplug the steam unit and allow to cool before removing the tank.
3
5. Create a 50/50 solution of vinegar and water which should be 1/2 gallon
vinegar and 1/2 gallon water. Pour this solution into the tank. Be sure to
only fill the tank to the MAX line as indicated on the water level window
on the front of the tank.
MAX
• Before using the vaporizer, extend the cord and inspect for any signs of damage. DO NOT use the product
if the cord has been damaged.
• Always ensure the vaporizer is sitting flat on the surface it is placed and not resting on the cord or other
obstructions. Ensure the vaporizer cord is tucked away as to prevent the vaporizer form being upset or
turned over.
4. Turn the tank upside down and empty any water into a sink or tub.
6. With the steam unit unplugged, place it back into the tank and soak for 30
minutes. After soaking for 30 minutes, remove the steam unit.
Figure 3.
9. Remove the Steam unit from the tank and add 2 to 3 pinches of ordinary table salt to the water and mix
thoroughly.
Medicine
10. Reassemble the unit.
• The vaporizer should always be placed at least four feet from a bedside and out of reach of the patient or
children.
3. Let all water drain back into the tank.
Weekly Maintenance:
3. The fault may be low mineral content in the water. To rectify:
I. Unplug the vaporizer from the electrical outlet and allow to cool.
II. Remove the steam unit allowing hot water to first dribble out, then add one or two pinches of salt to
the water and mix thoroughly.
III. Replace the steam unit and plug in the vaporizer. It should steam within 5 minutes. If it does not, add
salt only by the pinch, since too much salt can cause excessive boiling or blowing of fuse.
4. If the vaporizer has been operating normally and is now failing to steam, it may need to be cleaned. See
the weekly maintenance section under ”Cleaning and Storage” on page 5.
1. Unplug the steam unit and allow it to cool.
MIN
Figure 2.
2. Remove the steam unit by turning counter-clockwise until the power cord is beside the unlock graphic and
lift it out of the tank.
44051-01 • 06/10/2010
©2010 Hunter Fan Company