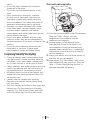
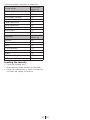
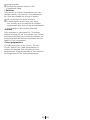
1
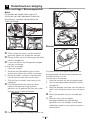
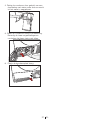
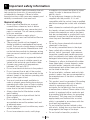
Droogautomaat
Dryer
DCU 7430 X
Lees deze handleiding grondig door voor u het product in gebruik neemt!
Geachte Klant
We hopen dat uw product, dat in een moderne fabriek werd geproduceerd en dat de strengste
kwaliteitscontroles heeft ondergaan, u zeer goede resultaten geeft.
We adviseren u deze handleiding grondig door te lezen voor u het product voor het eerst gebruikt
en deze bij te houden voor later gebruik.
Deze gebruikershandleiding zal
u helpen uw machine snel en veilig te gebruiken.
• Lees de gebruikershandleiding voor u het product installeert en in gebruik neemt.
• Volg in het bijzonder de instructies met betrekking tot veiligheid.
• Bewaar deze gebruikershandleiding binnen handbereik voor toekomstig gebruik.
• Lees alle bijkomende documenten die bij dit product werden geleverd.
Vergeet niet dat deze gebruikershandleiding van toepassing kan zijn op verschillende andere
modellen.
Verklaring van de symbolen
In deze gebruikershandleiding worden de volgende symbolen gebruikt:
Belangrijke veiligheidsinformatie Waarschuwing voor gevaarlijke situaties met betrekking tot leven en eigendom.
B
Opgepast; Waarschuwing voor netspanning.
Opgepast; Waarschuwing voor brandgevaar.
Opgepast; Waarschuwing voor hete oppervlaktes.
C
Lees de instructies.
Nuttige informatie. Belangrijke informatie of nuttige tips over het gebruik.
Dit apparaat draagt het symbool voor gescheiden inzameling van afgedankte elektrische en
elektronische apparatuur. Het valt hierdoor onder de bepalingen van richtlijn 2002/96/EG
die voorschrijft dat het gerecycled dan wel ontmanteld moet worden teneinde het milieu te
sparen U kunt u voor nadere inlichtingen wenden tot uw gemeente.
Elektronische producten die niet gescheiden worden ingezameld vormen een potentieel
gevaar voor het milieu en de volksgezondheid wegens de gevaarlijke stoffen die deze
apparatuur bevat.
2 FL
2960310599_FL/230113.1039
A
1 Belangrijke veiligheidsinformatie
Deze sectie bevat veiligheidsinformatie die
zal helpen om de risico’s op persoonlijke
verwondingen of materiële beschadigingen
te beperken. Indien u deze instructies niet
opvolgt, vervalt elke garantie en vervalt de
productaansprakelijkheid van de fabrikant.
Algemene veiligheidsvoorzorgen
• Plaats de machine nooit op een vloer die
met tapijt is bedekt. Anders kan het gebrek
aan luchtstroom onder de machine ervoor
zorgen dat de elektrische onderdelen
oververhit raken. Dit veroorzaakt
problemen met uw machine.
• Indien de stroomkabel of de stekker
beschadigd is moet u een erkende service
bellen voor herstelling.
• De stekker van het product mag tijdens
de installatie, onderhoud en reparatiewerk
niet in het stopcontact zitten. Dergelijke
werkzaamheden moet altijd worden
uitgevoerd door de technische dienst. De
fabrikant kan niet aansprakelijk worden
gesteld voor schade die voortkomt uit
handelingen die zijn uitgevoerd door
onbevoegde personen.
• Sluit het product aan op een geaard
stopcontact, beveiligd door een zekering
met voldoende capaciteit, zoals vermeld in
de technische specificaties.
• Bedien uw product bij temperaturen tussen
+5 °C en +35 °C.
• Gebruik geen elektrische toestellen in het
product.
• Sluit de luchtaflaat van het product niet aan
op de rookkanalen die worden gebruikt
voor de uitlaatgassen van apparaten die
met gas of andere brandstoffen werken.
• Zorg voor voldoende ventilatie om te
voorkomen dat de gassen die afkomstig
zijn van apparaten die met andere
brandstoffen werken, waaronder de open
vlam, zich in de kamer ophopen vanwege
naontstekingeffect.
• Reinig de pluisfilter na elke lading.
• Bedien de droogautomaat nooit als de
pluisfilter niet is geïnstalleerd.
• Laat vezels, stof en vuil niet ophopen
rondom de afvoer en omliggende
gebieden.
• Het netsnoer moet goed bereikbaar zijn na
de installatie.
• Gebruik geen verlengsnoeren,
meerwegstekkers of adapters om de
droogautomaat aan te sluiten, om de kans
op elektrische schokken te verkleinen.
• Maak geen aanpassingen aan de stekker
die bij het product is geleverd. Als deze
niet compatibel is met het stopcontact,
laat dan een bevoegde elektricien het
stopcontact vervangen door een die
geschikt is.
• Items die zijn gereinigd of gewassen met
stookolie, chemische oplosmiddelen of
ontvlambare of explosieve stoffen en
items die zijn bevlekt of verontreinigd met
dergelijke materialen mogen niet in het
product worden gereinigd, aangezien
ze ontvlambare of explosieve dampen
afgeven.
• Droog geen items die zijn gereinigd
met industriële chemicaliën in de
droogautomaat.
• Droog geen vuile voorwerpen in de
droogautomaat.
• Items die zijn vervuild door kookolie,
aceton, alcohol, stookolie, ontvlekker,
terpentijn, paraffine en paraffineverwijderaar
moeten in heet water worden gewassen
met een extra hoeveelheid wasmiddel
voordat ze in de droogautomaat worden
gedroogd.
• Kleding of kussens gevuld met
schuimrubber (latexschuim),
douchekapjes, waterbestendig textiel,
materiaal met rubberen versterking en
rubberen schuimkussentjes mogen niet in
de droogautomaat worden gedroogd.
• Gebruik geen wasverzachters of producten
om statische elektriciteit te verwijderen
tenzij ze zijn aanbevolen door de fabrikant
van de wasverzachter of het product.
• Dit product moet worden geaard.
De aardleiding verkleint de kans op
elektrische schokken door een pad met
lage weerstand voor de elektriciteitstroom
te openen in het geval van een storing
3 FL
•
•
•
•
•
•
•
•
•
•
•
•
of defect. Het netsnoer van dit product
is uitgerust met een geleider en een
aardstekker waarmee het product kan
worden geaard. Deze stekker moet
goed worden geïnstalleerd en in een
stopcontact worden gestoken dat geaard
is in overeenstemming met de plaatselijke
wetgeving en voorschriften.
Installeer het product niet achter een deur
met een slot, een schuifdeur of een deur
met een scharnier tegen het scharnier van
de droogautomaat.
Installeer of laat het product niet op
plaatsen waar het wordt blootgesteld aan
weersomstandigheden van buiten.
Ontregel de bedieningsknoppen niet.
Voer geen herstelling- of
vervangingsprocedures uit op het
product, ook al bent u in staat om deze
uit te voeren, tenzij dit duidelijk in de
bedieningsinstructies of de handleiding
staat aangegeven.
De binnenzijde en de uitlaatbuis van
het product moeten regelmatig door
gekwalificeerd onderhoudspersoneel
worden gereinigd.
De verkeerde aansluiting van de
aardingsgeleider kan elektrische schokken
veroorzaken. Als u twijfels hebt over de
aardaansluiting, laat deze dan nakijken
door een gekwalificeerde elektricien,
servicemedewerker of servicepersoneel.
Niet in de machine reiken wanneer de
trommel draait.
Verwijder de stekker uit het stopcontact
wanneer de machine niet in gebruik is.
Was het toestel nooit met water! U kunt
een elektrische schok krijgen! Verwijder de
stekker altijd uit het stopcontact voor u de
machine reinigt.
Raak de stekker nooit aan met natte
handen. Trek nooit aan de kabel, trek aan
de stekker om deze uit het stopcontact
te verwijderen. Gebruik de machine
niet indien de netsnoer of de stekker is
beschadigd!
Probeer de machine nooit zelf te herstellen,
anders brengt u uw eigen leven en het
leven van anderen in gevaar.
Voor storingen die niet kunnen worden
opgelost door de informatie in de
veiligheidsinstructies op te volgen:
Schakel de machine uit, trek de stekker
uit het stopcontact, draai de waterkraan
dicht en neem contact op met een erkend
onderhoudsbedrijf.
• Stop de droogautomaat nooit voor de
droogcyclus is beëindigd, tenzij u alle
wasgoed snel uit de droogautomaat
verwijdert om het uit te spreiden en de hitte
te verspreiden.
• Verwijder de deur van het
droogcompartiment voor u het product uit
bedrijf neemt of wegwerpt.
• De laatste stap van de droogcyclus
(afkoelcyclus) vindt plaats zonder hitte toe
te dienen om ervoor te zorgen dat de items
op een temperatuur blijven waarbij ze niet
beschadigd raken.
• Wasverzachters of gelijksoortige producten
moeten volgens de instructies van de
wasverzachter worden gebruikt.
• Ondergoed dat metalen verstevigers
bevat mogen niet in een droogautomaat
worden geplaatst. Er kan schade aan de
droogautomaat optreden indien de metalen
verstevigingen loskomen tijdens het
drogen.
• Controleer alle kleding op vergeten
aanstekers, munten, metalen voorwerpen,
naalden enz. voor u de droogautomaat
vollaadt.
C Houd de deur van uw machine gesloten
als de machine niet in gebruik is of nadat
u het wasgoed na het droogproces heeft
uitgenomen.
BUw machine is altijd geactiveerd zolang
deze op het stopcontact is aangesloten.
Bedoeld gebruik
• Dit product is ontworpen voor huishoudelijk
gebruik. Het mag niet voor andere
doeleinden worden gebruikt.
• Gebruik het product alleen om wasgoed te
drogen dat hiervoor is bestemd.
• Droog alleen de artikelen in uw product die
in deze handleiding zijn vermeld.
• Dit product is niet bedoeld om te worden
gebruikt door personen met lichamelijke,
geestelijke of zintuiglijke handicaps of door
4 FL
onervaren personen (inclusief kinderen),
tenzij ze onder toezicht staan van een
persoon die verantwoordelijk is voor hun
veiligheid of die hun instructies geeft over
het gebruik van het product.
Veiligheid van kinderen
• Elektrische toestellen zijn gevaarlijk voor
kinderen. Houd de kinderen van de
machine weg tijdens zijn werking. Laat hen
niet met de machine spelen.
• Verpakkingsmateriaal is gevaarlijk voor
kinderen. Houd het verpakkingsmateriaal
buiten het bereik van kinderen of gooi het
weg volgens de afvalrichtlijnen.
• Laat kinderen niet in het product zitten/
klimmen.
• Kinderen moeten onder toezicht staan om
ervoor te zorgen dat ze niet spelen met het
product.
• Sluit de vuldeur wanneer u de ruimte
verlaat waar het product zich bevindt.
5 FL
2 Installatie
Neem contact op met uw dichtstbijzijnde
erkend servicepunt voor installatie van uw
product.
CVoorbereiding van de locatie en elektrische
installatie voor het product is de
verantwoordelijkheid van de klant.
BInstallatie en elektrische aansluitingen
moeten worden uitgevoerd door
gekwalificeerd personeel.
AControleer voor de installatie visueel of
het product defecten heeft. Laat het in
dat geval niet installeren. Beschadigde
producten kunnen uw veiligheid in gevaar
brengen.
verwijderen.
1. Open de vuldeur.
2. Binnenin de trommel bevindt zich een
nylon zak met een stuk piepschuim. Neem
deze vast aan het deel gemarkeerd met
XX.
3. Trek de nylon naar u toe en verwijder de
transportbeveiliging.
Geschikte installatieplaats
• Installeer het product in een ruimte waar
het niet kan vriezen op een stabiel en
waterpas oppervlak.
• Laat product werken in een goed
geventileerde, stofvrije omgeving.
• Blokkeer de luchtafvoer vooraan en
onderaan het apparaat niet met materialen
zoals tapijten met lange haren en houten
strips.
• Plaats uw product niet op een tapijt
met lange haren of op gelijkaardige
oppervlakken.
• Installeer het product niet achter een
deur met een slot, een schuifdeur of een
scharnierende deur die tegen het product
kan slaan.
• Als het product eenmaal is geïnstalleerd,
moet het op dezelfde plaats blijven als waar
de aansluitingen zijn gemaakt. Zorg er bij
de installatie van het product voor dat de
achterwand ervan niets aanraakt (kraan,
stopcontact, enz.) en let erop dat u het
product op een plaats installeert waar het
permanent zal blijven.
BPlaats het product niet bovenop de
stroomkabel.
• Houd minstens 1,5 cm afstand van de
wanden van ander meubilair.
Verwijderen van de
transportbeveiliging
AVoordat u het product voor de eerste keer
gebruikt moet u de transportbeveiliging
AVoordat u het product voor de eerste
keer gebruikt moet u controleren of u de
transportbeveiliging hebt verwijderd (nylon
+ piepschuim). Laat geen voorwerpen
achter in de droogtrommel.
Installatie onder het werkblad
• Een speciaal onderdeel (Onderdeel nr.:297
360 0100) dat de bovenste strip vervangt,
moet worden geleverd en geïnstalleerd
door een erkende onderhoudsdienst om
de machine onder een werkblad of in een
kast te installeren. De machine mag nooit
in werking worden gesteld zonder de
bovenste strip.
• Laat minstens 3 cm ruimte tussen de zijen achterwanden van het product en de
wanden van het werkblad/kast wanneer u
uw product onder een werkblad of in een
kast plaatst.
Montage bovenop een
wasmachine
• Er moet een bevestigingsstuk worden
gebruikt tussen de twee machines
wanneer de droogautomaat boven een
wasmachine wordt geïnstalleerd. De
beugel (Onderdeel nr. 297 720 0200
wit/297 720 0500 grijs) moet door een
6 FL
erkend servicebedrijf worden geïnstalleerd.
• Plaats het product op een stevige
ondergrond. Indien het bovenop een
wasmachine moet worden geplaatst, mag
het gewicht van beide machines samen
180 kg zijn wanneer ze vol zijn. De vloer
moet het gewicht kunnen dragen!
Aansluiting op waterafvoer;
In producten die zijn uitgerust met een
condensator, wordt het water dat tijdens
de droogcyclus geaccumuleerd wordt,
verzameld in een waterreservoir. U moet het
geaccumuleerde water na elke droogbeurt
verwijderen.
Belangrijk:
• De slang moet worden bevestigd op een
hoogte van maximum 80 cm.
• U moet voorzichtig zijn dat de slang niet
gebogen of geklemd is.
• Het einde van de slang mag niet gebogen
zijn, er mag niet op gestapt worden en de
slang mag niet gevouwen liggen tussen de
afvoer en de machine.
Voetjes verstellen
Ten einde ervoor te zorgen dat uw machine stiller
en zonder trillingen werkt, moet deze waterpas en
in evenwicht op zijn poten staan. Zet de machine
in evenwicht door de poten aan te passen.
Draai de voeten om ze aan te passen tot de
machine waterpas en stevig staat.
C Draai de verstelbare poten nooit uit hun
behuizing.
Elektrische verbinding
U kunt het geaccumuleerde water direct
afvoeren via de waterafvoerslang die bij de
machine geleverd wordt in plaats van het
geaccumuleerde water in het waterreservoir
periodiek te verwijderen.
Aansluiten van de waterafvoerslang
1. Verwijder de slang op de machine door
aan het uiteinde ervan te trekken. Gebruik
geen gereedschappen om de slang te
verwijderen.
2. Sluit de speciale afvoerslang die hij
de machine geleverd is aan op de
slangbevestiging.
3. Het andere einde van de afvoerslang kan
rechtstreeks worden verbonden op de
afvalwaterafvoer of op de wasbak. De
plaatsing moet altijd vastgemaakt worden
in alle types aansluiting. Uw huis kan
overstroomd worden indien de slang uit
zijn behuizing geraakt tijdens het afvoeren
van water.
Sluit de machine aan op een geaard stopcontact,
beveiligd door een zekering met voldoende
capaciteit, zoals vermeld in de technische
specificaties. Ons bedrijf is niet aansprakelijk voor
schade die optreedt bij gebruik van de machine
zonder aardgeleiding.
• De aansluiting moet voldoen aan de nationale
reglementering.
• Als de stroomsterkte van de zekering of
stroomonderbreker in het huis lager is dan
16 Amp, laat een erkende elektricien dan een
zekering van 16Amp installeren.
• Het netsnoer moet goed bereikbaar zijn na
de installatie.
• De spanning en de toegestane zekeringsof stroomonderbrekerbescherming zijn
gespecificeerd in het deel “Technische
specificaties”.
• De aangegeven spanning moet gelijk zijn aan
uw netspanning.
• Maak geen aansluitingen met verlengsnoeren
of meerwegstekkers.
7 FL
• De hoofdzekering en schakelaars moeten
een contactafstand hebben van minimum
3 mm.
BEen beschadigd netsnoer mag alleen
worden vervangen door een erkende
elektricien.
BAls het product defect is, mag het niet
worden gebruikt tenzij na herstelling! U
kunt een elektrische schok krijgen!
Vervoer van de machine
1. Trek de stekker van de machine uit het
stopcontact.
2. Verwijder de waterafvoerslang (indien van
toepassing) en de pijpaansluitingen.
3. Laat water dat in de machine is
achtergebleven volledig weglopen voor het
vervoer.
De oude machine weggooien
Eerste gebruik
• Controleer of het product op de juiste
plaats staat en dat de voedingsinstallaties
geschikt zijn voordat u het erkende
servicebedrijf belt, zodat het product klaar
voor gebruik is. Indien dit niet het geval
is, bel dan een erkende elektricien om de
nodige werkzaamheden te laten uitvoeren.
• Controleer of de voedingsaansluitingen
van het product in overeenstemming zijn
met de instructies die werden gegeven
in de betreffende hoofdstukken van deze
handleiding.
Verwijder uw oude machine op een
milieuvriendelijke wijze.
Neem contact op met uw dealer of
recyclagecentrum voor meer informatie over het
verwijderen van de machine.
Trek de stekker uit het stopcontact en maak de
vergrendeling van de laaddeur onbruikbaar voor
u uw oude machine wegwerpt, om gevaarlijke
toestanden voor kinderen te vermijden.
Verpakkingsmateriaal wegwerpen
Verpakkingsmateriaal is gevaarlijk voor kinderen.
Bewaar alle verpakkingsmateriaal op een
veilige plaats buiten het bereik van kinderen.
Het verpakkingsmateriaal van uw product is
vervaardigd uit recycleerbaar materiaal. Sorteer
ze en werp ze weg in overeenstemming met
de instructies voor gerecycleerd afval. Gooi het
verpakkingsmateriaal niet weg met normaal
huishoudafval.
Technische specificaties
FL
2
Hoogte (aanpasbaar)
84,6 cm
Breedte
59,5 cm
Diepte
53 cm
Capaciteit (max.)
7 kg
Gewicht (netto)
36 kg
Voltage
Aangeduid gebruikt vermogen
Zie typeplaatje
Modelcode
Typeplaatje bevindt zich achter de vuldeur.
8 FL
3 Initiële voorbereidingen voor het drogen
Dingen die u kunt doen om
energie te besparen:
het juiste programma selecteert.
• Zorg ervoor dat u het product volledig
gevuld gebruikt, maar let op dat u het niet
te zwaar belaadt.
• Centrifugeer uw wasgoed op de hoogst
mogelijke snelheid bij het wassen. Zo
wordt de centrifugetijd verkort en neemt
het energieverbruik af.
• Let op dat u dezelfde soorten wasgoed
samen droogt.
• Volg de instructies in de
gebruikershandleiding voor
programmaselectie.
• Zorg ervoor dat er aan de voor- en
achterkant van de droogautomaat
voldoende vrije ruimte is voor
luchtcirculatie. Blokkeer het rooster aan de
voorkant van het product niet.
• Open de deur van de machine tijdens het
drogen niet tenzij het noodzakelijk is. Als
u de deur zeker moet openen, houd deze
dan niet langdurig geopend.
• Voeg tijdens het drogen geen nieuw (nat)
wasgoed toe.
• De pluizen en vezels die vrijkomen van het
wasgoed in de lucht tijdens de droogbeurt,
worden verzameld in de “pluisfilter”. Zorg
ervoor dat u de filters voor en na iedere
droogbeurt reinigt.
• Zorg er in modellen met een condensor
voor dat u deze regelmatig en minstens
een keer per maand of na iedere 30
droogcycli reinigt.
• Volg in modellen met ventilatie de
regels voor de afvoeraansluiting in de
gebruikershandleiding en let op de
afvoerreiniging.
• Ventileer de ruimte waar de droogautomaat
staat goed tijdens het drogen.
Wasgoed dat in de machine kan
worden gedroogd
C Volg altijd de adviezen op de wasetiketten
op. Droog in deze droogautomaat enkel
wasgoed met een label waarop staat dat
het geschikt is om te worden gedroogd in
een droogautomaat en zorg ervoor dat u
A B C D
Drogen bij
normale
temperatuur
Drogen bij
lage
temperatuur
Niet
Trommeldrog
en toegestaan trommeldrogen
l n m
Plat drogen
Nat ophangen Ophangen om
te drogen
o p q
Heet strijken
Warm
strijken
Niet strijken
Wasgoed dat niet in de machine
kan worden gedroogd
• Wasgoed met metalen stukken zoals beha’s,
gespen en metalen knopen kunnen de
droogautomaat beschadigen.
• Droog geen items zoals wollen en
zijden kleding en nylonkousen, delicate
geborduurde stukken, wasgoed met metalen
accessoires en items zoals slaapzakken in
de droogautomaat.
• Wasgoed vervaardigd uit delicate
en waardevolle stoffen evenals voile
glasgordijnen kunnen kreuken. Droog deze
daarom niet in de droogautomaat!
• Droog geen items vervaardigd uit luchtdichte
vezels zoals kussens en dekbedden in de
droogautomaat.
• Wasgoed uit schuim of rubber raken
vervormd.
• Droog geen wasgoed dat rubber bevat in de
droger.
• Droog geen wasgoed dat blootgesteld is aan
petroleum, brandbare of explosieve stoffen
in de droogautomaat, zelfs indien deze op
voorhand gewassen werden.
• Te nat wasgoed of wasgoed met druipend
water moet ook niet in de droogautomaat
worden geplaatst.
• Items die zijn gereinigd of gewassen met
stookolie, chemische oplosmiddelen of
ontvlambare of explosieve stoffen en
9 FL
•
•
•
•
•
•
items die zijn bevlekt of verontreinigd met
dergelijke materialen mogen niet in het
product worden gereinigd, aangezien ze
ontvlambare of explosieve dampen afgeven.
Droog geen items die zijn gereinigd met
industriële chemicaliën in de droogautomaat.
Droog uw ongewassen wasgoed niet in de
droger.
Items die zijn vervuild door kookolie, aceton,
alcohol, stookolie, ontvlekker, terpentijn,
paraffine en paraffineverwijderaar moeten in
heet water worden gewassen met een extra
hoeveelheid wasmiddel voordat ze in de
droogautomaat worden gedroogd.
Kleding of kussens gevuld met schuimrubber
(latexschuim), douchekapjes, waterproof
textiel, materiaal met rubberen versterking en
rubberen schuimkussentjes mogen niet in de
droogautomaat worden gedroogd.
Gebruik geen wasverzachters of producten
om statische elektriciteit te verwijderen tenzij
ze zijn aanbevolen door de fabrikant van de
wasverzachter of het product.
Droog ondergoed verstevigd met metalen
onderdelen niet in de droogautomaat. Als
deze metalen verstevigingen tijdens het
drogen losraken en breken, beschadigen ze
uw droogautomaat.
Correcte laadcapaciteit
AVolg de informatie in de
"Programmaselectietabel". Start het
programma altijd overeenkomstig de
maximum laadcapaciteit
C Meer wasgoed in de machine doen dan
het niveau aangegeven in de afbeelding
is niet aan te raden. De droogresultaten
zullen verminderen wanneer de machine te
zwaar geladen is. Bovendien kunnen uw
droogautomaat en wasgoed beschadigd
geraken.
C Plaats uw wasgoed losjes in de trommel
zodat het niet in de knoop zal geraken.
Wasgoed op het drogen
voorbereiden
• Controleer al het wasgoed voor u het in
het product plaatst om er zeker van te zijn
dat er geen aanstekers, munten, metalen
voorwerpen, naalden enz. in de zakken of
een ander onderdeel zitten.
• Wasverzachters en gelijksoortige producten
moeten volgens de instructies van de
fabrikant van dergelijke producten worden
gebruikt.
• Alle wasgoed moet gecentrifugeerd zijn aan
de hoogste centrifugeersnelheid die uw
wasmachine toestaat voor het wasgoedtype.
• Het wasgoed kan in de knoop zitten na het
wassen. Scheid het wasgoed voor u het in
de droogautomaat plaatst.
• Sorteer uw wasgoed volgens het type en
de dikte. Droog hetzelfde type wasgoed
samen. Bijv.: dunne keukenhanddoeken en
tafelkleedjes drogen sneller dan de dikke
badhanddoeken.
10 FL
De volgende gewichten worden als voorbeeld gegeven.
Woningartikels
Katoenen dekbedovertrekken
(dubbel)
Katoenen dekbedovertrekken
(enkel)
Lakens (dubbel)
Lakens (enkel)
Groot tafelkleed
Klein tafelkleed
Servetten
Badhanddoeken
Handdoeken
Kleding
Bloezen
Katoenen hemden
Hemden
Katoenen kleed
Kleedjes
Jeans
Zakdoeken (10 stuks)
T-Shirts
Benaderende
gewichten (g)
1500
1000
500
350
700
250
100
700
350
Benaderende
gewichten (g)
150
300
200
500
350
700
100
125
Laden
• Open de vuldeur.
• Plaats het wasgoed losjes in de
droogautomaat.
• Duw de vuldeur om te sluiten. Zorg dat er
niets tussen de deur is geraakt.
11 FL
4 Een programma selecteren en uw machine bedienen
Bedieningspaneel
1
2
3
4
5
1. Aan/Uit-knop
2. Programmakeuzeknop
3. Display
4. Instelknop eindtijd
5. Starten/Pauze/Annuleren-knop
Symbool Starten en pauze
Waarschuwingssymbool Waterreservoir vol
Waarschuwingssymbool Filter reinigen
Symbool voor het specificeren van de eindtijd
(Startuitstel)
12 FL
Voorbereiden van de machine
1. Steek de stekker van de machine in het
stopcontact.
2. Plaats het wasgoed in de machine.
3. Druk gedurende 1 seconde op de Aan/Uitknop.
CDrukken op de knop “Aan/Uit” betekent niet
noodzakelijkerwijze dat het programma gestart
is. Druk op de knop Starten/Pauze/Annuleren
om de machine het programma te laten starten.
Programmakeuze
Zoek het geschikte programma in de
onderstaande tabel die de droogniveaus
aangeeft. Selecteer het gewenste programma
met de programmakeuzeknop.
Drogen bij hoge temperatuur,
enkel voor katoenen
wasgoed. Dik en meerlagig
wasgoed (Bijv.: handdoeken,
linnengoed, jeans) wordt
Extra droog
gedroogd op een manier
zodat het niet moeten worden
gestreken voor het in de kast
wordt gelegd.
Kastdroog
Confectie
Plus
Strijkdroog
Normaal wasgoed (Bijv.:
tafelkleed, ondergoed) wordt
gedroogd op een manier
dat het wasgoed niet moet
worden gestreken voor het in
de kleerkast wordt geplaatst.
Normaal wasgoed (Bijv.:
tafelkleed, ondergoed) wordt
gedroogd op een manier
dat het wasgoed niet moet
worden gestreken voor het in
de kleerkast wordt geplaatst.
Ze zijn echter droger
vergeleken met de optie
Kledingkast droog.
Normaal wasgoed (Bijv.:
hemden, kleedjes) wordt
gedroogd klaar om te worden
gestreken.
CVoor meer programmadetails, zie
Programmakeuzetabel
•Hoofdprogramma's
Afhankelijk van het type wasgoed, zijn de
volgende hoofdprogramma's beschikbaar:
• Katoen
U kunt uw duurzaam wasgoed met dit
programma drogen. Drogen bij hoge
temperatuur. Het is aanbevolen voor gebruik
voor uw katoenen stukken (zoals lakens,
dekbedovertrekken, ondergoed, enz.).
• Synthetisch
U kunt uw minder duurzaam wasgoed met
dit programma drogen. Het droogt bij een
lagere temperatuur vergeleken met het
katoenprogramma. Het is aanbevolen voor uw
synthetisch wasgoed (zoals hemden, bloezen,
gemengd synthetisch/katoenen wasgoed, enz.).
CDroog geen gordijnen en voile
glasgordijnen in de machine.
•Antikreuk
Een antikreukprogramma van 2 uur om te
voorkomen dat het wasgoed kreukt, zal worden
geactiveerd indien u het wasgoed niet uit de
droogautomaat haalt nadat het programma is
beëindigd. Dit programma roteert het wasgoed
met onderbrekingen van 10 minuten om
kreuken te voorkomen.
•Speciale programma’s
Voor speciale gevallen zijn er ook extra
programma's beschikbaar:
C De extra programma's kunnen verschillen
afhankelijk van uw machinemodel.
•Express 15’
Gebruik deze functie om 2 overhemden in 15
minuten strijkklaar te krijgen.
COm betere resultaten te krijgen met
uw droogmachine moet het wasgoed
gewassen zijn met het geschikte
programma en gecentrifugeerd zijn met de
aanbevolen snelheid in uw wasmachine.
• Hemden
Dit programma droogt de hemden gevoeliger
en kreukt ze minder, waardoor ze gemakkelijker
gestreken kunnen worden.
C Uw hemden kunnen aan het einde van
het programma enigszins vochtig zijn.
Het is raadzaam de hemden niet in de
droogautomaat achter te laten.
• Jeans
U kunt dit programma gebruiken om jeans te
13 FL
drogen dat tegen hoge snelheid gecentrifugeerd
is in de wasmachine.
C Bekijk het relevante deel van de
programmatabel.
• Delicaat
U kunt uw zeer fijn wasgoed (zijden bloes, fijn
ondergoed, enz.) dat kan worden gedroogd
of wasgoed dat met de hand moeten worden
gewassen, drogen bij een lagere temperatuur.
COm betere resultaten te krijgen met uw
droogmachine, moet het wasgoed
gewassen zijn met het geschikte
programma en gecentrifugeerd zijn met de
aanbevolen snelheid in uw wasmachine.
• Verluchten
Er wordt enkel gedurende 10 minuten
geventileerd zonder warme lucht te blazen. U
kunt uw kleding die gedurende lange tijd in een
gesloten omgeving werd geplaatst, verluchten
dankzij dit programma om onaangename
geuren te ontgeuren.
• Tijdschakelaarprogramma´s
U kunt timerprogramma’s van 10, 20, 40 of 60
minuten kiezen om het gewenste droogniveau
te verkrijgen bij lage temperaturen. Het
programma droogt op de geselecteerde tijd
ongeacht de droogtemperatuur.
14 FL
Programmaselectie en verbruikstabel
FL
Programma’s
Hoeveelheid
resterende
Capaciteit Centrifugeersnelheid
vochtigheid
(kg)
in wasmachine (tpm)
bij
benadering
Droogtijd (minuten)
Katoen/Gekleurde was
A
Kastdroog
7
1000
% 60
116
A
Confectie Plus
7
1000
% 60
120
A
Strijkklaar
7
1000
% 60
90
Express 15’
0.5
1200
% 50
15
Hemden
1.5
1200
% 50
40
Jeans
Delicaat
4
1200
% 50
80
1.75
600
% 40
40
3.5
800
% 40
45
Synthetisch
B
Kastdroog
Waarden energieverbruik
Programma’s
Katoen linnen klaar om te
dragen*
Katoen strijkklaar
Synthetisch kastdroog
Capaciteit Centrifugeersnelheid
(kg)
in wasmachine (tpm)
Hoeveelheid
resterende
Waarde
vochtigheid
energieverbruik kWh
bij
benadering
7
1000
% 60
4.17
7
1000
% 60
3.25
3.5
800
% 40
1.42
* : Energy Label standaard programma (EN 61121:2012)
Alle waarden in de tabel werden vastgelegd volgens de EN 61121:2012 Standaard. Deze
waarden kunnen afwijken van de tabel afhankelijk van het wasgoedtype, centrifugeersnelheid,
milieuomstandigheden en voltageschommelingen.
15 FL
Hulpfunctie
Audiowaarschuwing annuleren
de tank volledig gevuld is met water. De
machine stopt met functioneren wanneer
tijdens de werking van een programma dit
waarschuwingssymbool begint te branden.
Om de machine te herstarten, verwijder het
water uit het waterreservoir. Druk op de knop
Starten/Pauze/ om het programma te starten
nadat u het waterreservoir leeggemaakt hebt.
Het waarschuwingssymbool verdwijnt en het
programma hervat.
Uw droogautomaat geeft een
geluidswaarschuwing als het programma tot
een einde komt of iedere keer dat u een knop
indrukt. Indien u de geluidswaarschuwing uit
wilt zetten, drukt u gelijktijdig 3 seconden op
de knoppen Programma "-" en Eindtijd "+".
"off-bzr-off" verschijnt op de display. Als een
knop wordt ingedrukt geeft de machine geen
geluidswaarschuwing aan het eind van het
programma. U kunt de geluidswaarschuwing
inschakelen door dezelfde knoppen nogmaals
gedurende 3 seconden gelijktijdig in te drukken.
Als u dit doet, verschijnt "on-bzr-on" op de
display en wordt de geluidswaarschuwing
ingeschakeld.
C U kunt deze functie selecteren voor of
nadat het programma start.
Specificeren van de eindtijd
(startuitstel)
Waarschuwingslampjes
C Waarschuwingslampjes kunnen verschillen
afhankelijk van uw machinemodel.
Pluisfilterreiniging
Met de functie Startuitstel kunt u de eindtijd van
het programma tot 24 uur uitstellen.
1. Open de vuldeur en voeg wasgoed toe.
2. Als het programma eenmaal
geselecteerd is stelt u de eindtijd in
met de eindtijdknoppen ‘‘+’’ en ‘‘-’’. Het
eindtijdsymbool knippert.
Druk op de knop Starten/Pauze om de
startuitstelfunctie in werking te stellen. Uitsteltijd
verschijnt op de display en de symbolen Eindtijd
en Starten/Pauze lichten op. De tijd op het
display is het totaal van de normale droogtijd en
de startuitstel.
De uitsteltijd wijzigen
Een waarschuwingslampje zal branden om u
eraan te herinneren de filter te reinigen nadat het
programma is beëindigd.
C Indien de waarschuwing voor filterreiniging
continu brandt, zie “Suggesties voor
probleemoplossing”.
Waterreservoir
Indien u tijdens het aftellen de tijd wilt wijzigen:
1. Druk op de knop Starten/Pauze. Het
symbool Eindtijd licht op en het symbool
Starten/Pauze knippert.
2. Druk op de eindtijdknoppen ‘‘+’’ en ‘‘-’’
om de nieuwe eindtijd in te stellen. De
symbolen Eindtijd en Starten/Pauze
knipperen als u de nieuwe instellingen
doorvoert.
3. Druk op de knop Starten/Pauze om
de instelling van de nieuwe eindtijd te
voltooien. De symbolen Eindtijd en Starten/
Pauze knipperen.
C Bij het nogmaals instellen van de eindtijd,
gaat het symbool Eindtijd uit en knippert
Een waarschuwingssymbool zal verschijnen
aan het einde van het programma of wanneer
16 FL
het symbool Starten/Pauze zodra de
actuele programmaduur op de display
verschijnt. Als u de knop Starten/Pauze
indrukt, begint het programma onmiddelijk
zonder uitstel.
Het startuitstel annuleren
Indien u het aftellen van de startuitstel wilt
annuleren en het programma onmiddellijk wilt
starten:
1. Druk de knop Starten/Pauze gedurende
3 seconden in om het programma te
annuleren.
2. Druk op de knop Starten/Pauze om het
gewenste programma te kiezen.
in de droogautomaat met natte kleding,
waardoor het wasgoed nog nat zal zijn na
beëindiging van het droogproces.
CTijdens het droogproces kan altijd wasgoed
worden toegevoegd of verwijderd, maar
gezien dit proces het drogen voortdurend
zal onderbreken, wordt de programmaduur
verlengd en stijgt het energieverbruik. Het
is daarom aanbevolen wasgoed toe te
voegen voor het droogprogramma wordt
gestart.
Kinderslot
Verander het programma nadat het
werd gestart
U kunt deze functie gebruiken nadat u machine
begonnen is met het drogen van uw kleding op
hogere of lagere temperaturen.
Bijvoorbeeld:
1. Houd de knop Starten/Pauze/Annuleren
gedurende 3 seconden ingedrukt om het
programma te annuleren ten einde het
programma Extra droog te selecteren in
plaats van het programma Strijkdroog.
2. Selecteer het programma met de
programmakeuzeknop.
3. Druk op de knop Starten/Pauze/Annuleren
om het programma te starten.
C Om deze handeling te kunnen uitvoeren
mag het kinderslot van de machine niet
actief zijn. Deactiveer het kinderslot als het
actief is voor u deze handelingen uitvoert.
Wasgoed toevoegen/verwijderen in de
stand-by-modus
Om wasgoed toe te voegen of te verwijderen
nadat het programma werd gestart:
1. Druk op de knop Starten/Pauze/Annuleren
om de droogautomaat om te zetten naar
de pauzestand. Het droogproces zal
stoppen.
2. Open de deur in de pauzepositie en sluit
deze opnieuw nadat u wasgoed hebt
toegevoegd of verwijderd.
3. Druk op de knop Starten/Pauze/Annuleren
om het programma te starten.
C Alle wasgoed dat werd toegevoegd na het
starten van het droogproces, zorgt voor
het mengen van de reeds droge kleding
Er is een kinderslot om een
programmaonderbreking te voorkomen
dat knoppen worden ingedrukt terwijl het
programma in werking is. Wanneer het
kinderslot actief is, zijn de vuldeur en alle
knoppen behalve de aan/uit-toets op het paneel
gedeactiveerd.
Druk de knoppen Eindtijd "-" en Programma
"+" gedurende 3 seconden gelijktijdig in om het
kinderslot te activeren. "CL3-CL2-CL1" en "onCL-on" verschijnt op de display en de functie
wordt geactiveerd.
Om een nieuw programma te starten nadat het
programma beëindigd is of om het programma
te onderbreken, moet het kinderslot worden
gedeactiveerd. Druk gedurende 3 seconden
op dezelfde knoppen om het kinderslot te
deactiveren. "CL3-CL2-CL1" en "oFF-CL-oFF"
verschijnt op de display en de functie wordt
gedeactiveerd.
C Het kinderslot is gedeactiveerd wanneer de
machine herstart wordt door op de aan/uitknop te drukken.
C Druk gedurende 3 seconden op de
17 FL
relevante knoppen om het kinderslot te
activeren. Er klinkt een lange pieptoon en
het kinderslot wordt geactiveerd. Als u
een willekeurige knop indrukt terwijl het
kinderslot actief is, klinkt er een dubbele
pieptoon. Druk gedurende 3 seconden
op de knoppen om het kinderslot te
deactiveren. Er klinkt één enkele pieptoon
en het kinderslot wordt gedeactiveerd.
Het programma beëindigen via
annulering
Om het geselecteerde programma te annuleren,
druk gedurende ongeveer 3 seconden op de
knop “Start/Pauze/Annuleren”.
AGezien de binnenkant van de machine zeer
heet zal zijn wanneer u een programma
annuleert tijdens de werking van de
machine, moet u het ventilatieprogramma
activeren ter afkoeling.
Programma-einde
Einde verschijnt op de display en de
waarschuwingen Filter reinigen en
Waterreservoir lichten op als het programma
voorbij is. De deur kan worden geopend en de
machine is klaar voor een tweede cyclus.
Druk op de knop “Aan/Uit” om de
droogautomaat uit te schakelen.
CDe laatste stap van het droogproces
(afkoelproces) wordt uitgevoerd zonder
warmtetoevoeging om de items op een niet
schadelijke temperatuur te behouden.
CEen antikreukprogramma van 2 uur om te
voorkomen dat het wasgoed kreukt, zal
worden geactiveerd indien u het wasgoed
niet uit de machine haalt nadat het
programma beëindigd is.
C Als u het wasgoed niet meteen uitneemt,
stop de droogautomaat dan niet voordat
het droogproces is voltooid.
C Reinig de filter na elke droogbeurt (zie
Reinigen van pluisfilter).
CMaak het waterreservoir leeg na elke
droogbeurt (zie Waterreservoir).
18 FL
5 Onderhoud en reiniging
pakking van de deur.
Filter-cartridge / Binnenoppervlak
deur
De pluizen en vezels die in de lucht
vrijkomen van het wasgoed tijdens de
droogbeurt, worden verzameld in de
“filter-cartridge”.
Sensor
C Zulke pluizen en vezels worden meestal
gevormd tijdens het dragen en wassen.
C Reinig de filter en het binnenoppervlak altijd
na elke droogbeurt.
C U kunt de filter en het filtergebied reinigen
met een stofzuiger.
Om de filter te reinigen:
1. Open de vuldeur.
2. Verwijder de filterbedekking door deze
omhoog te trekken en de filter te openen.
3. Reinig de vezels, pluizen en katoenrafels
met de hand of met een zachte doek.
4. Sluit de filter en plaats deze terug in zijn
behuizing.
C Het filteroppervlak kan verstopt raken
nadat u de machine enige tijd hebt
gebruikt; als dit gebeurt de filter met water
wassen en voor gebruik drogen.
Er bevinden zich vochtigheidssensors in uw
droogautomaat die detecteren wanneer het
wasgoed droog is of niet.
Om de sensor te reinigen:
1. Open de vuldeur van de droogautomaat.
2. Laat de droogautomaat afkoelen na elke
droogbeurt.
3. Veeg de metalen sensoren met een zachte
doek, bevochtigd met azijn, af en droog ze
af.
C Reinig de metalen sensors viermaal per
jaar.
AGebruik nooit oplosmiddelen,
reinigingsmiddelen en gelijkaardige
middelen voor het reinigen, omdat deze
materialen brand en een explosie kunnen
veroorzaken!
C Reinig het volledige binnenoppervlak en de
19 FL
Waterreservoir;
Het vocht in het natte wasgoed wordt uit het
wasgoed gehaald en gecondenseerd. Maak het
waterreservoir na elke droogbeurt of tijdens het
drogen leeg wanneer het waarschuwingslampje
“Waterreservoir” begint te branden.
AGecondenseerd water is niet drinkbaar!
AVerwijder nooit het waterreservoir zolang
het programma loopt!
Indien u vergeet om het waterreservoir leeg
te maken, zal de droogautomaat tijdens de
volgende droogbeurten stoppen zodra het
reservoir vol is en het waarschuwingslampje
“Waterreservoir” begint te branden. Als dit het
geval is, druk dan op de knop “Starten/Pauze/
Annuleren” om het drogen te hervatten nadat u
het reservoir hebt leeggemaakt.
Voor de condensor;
De hete en vochtige lucht in de condensor
wordt afgekoeld door de koude kamerlucht.
De vochtige lucht die circuleert in de
droogautomaat, wordt gecondenseerd en
vervolgens in het reservoir gepompt.
C Reinig de condensor na elke 30
droogbeurten of eenmaal per maand.
Om de condensor te reinigen:
1. Indien het droogproces uitgevoerd werd,
open de deur van de machine en wacht tot
deze afkoelt.
Afwateren van het waterreservoir:
1. Trek de lade open en verwijder het
waterreservoir voorzichtig
2. Ontgrendel de 2 condensorvergrendelingen
nadat u de beschermplaat hebt geopend.
2. Maak het waterreservoir leeg.
3. Trek de condensor eruit.
3. Indien er pluizen zitten in de trechter van
het waterreservoir, spoel dit dan weg onder
stromens water.
4. Plaats het waterreservoir terug in zijn
behuizing.
20 FL
4. Reinig de condensor door gebruik van een
douchekop met water onder druk en wacht
tot het water is weggelopen.
5. Plaats de condensor terug in de behuizing.
Bevestig de twee vergrendelingen en
controleer dat deze stevig vast zitten.
6. Plaats de beschermplaat terug.
21 FL
6 Voorgestelde probleemoplossing
Het droogproces duurt te lang
• De netstructuur van de pluisfilter kan verstopt raken. Was het pluisfilter met warm water.
Het wasgoed is nat aan het einde van de droogbeurt.
• De netstructuur van de pluisfilter kan verstopt raken. Was het pluisfilter met warm water.
• Mogelijk werd er teveel was in de machine geladen. De droogautomaat niet overladen.
De wasdroger gaat niet aan of het programma start niet. De wasdroger start niet na het instellen.
• Misschien werd de stekker niet in het stopcontact gestoken. Kijk of de stekker in het
stopcontact zit.
• De deur staat mogelijk op een kiertje. Zorg ervoor dat de vuldeur juist gesloten is.
• Het programma is mogelijk niet ingesteld of de knop Starten/Pauze/Annuleren is mogelijk
niet ingedrukt. Zorg ervoor dat het programma is ingesteld en niet in de “pauze”-modus
staat.
• Het kinderslot is mogelijk geactiveerd. Inactiveer het kinderslot.
Het programma werd zonder enige oorzaak onderbroken.
• De deur staat mogelijk op een kiertje. Zorg ervoor dat de vuldeur juist gesloten is.
• De elektriciteit is mogelijk afgesloten. Druk op de knop Starten/Pauze/Annuleren om het
programma te starten.
Het wasgoed is gekrompen, vervilt of beschadigd.
• Mogelijk werd geen programma voor het wasgoedtype gebruikt. Droog enkel wasgoed
dat mag worden gedroogd in de droogautomaat nadat u de labels op uw kleding hebt
gecontroleerd.
• Selecteer een programma met een geschikte lage temperatuur voor het type wasgoed om
uw kleding te drogen.
Het trommellampje brandt niet. (alleen bij modellen met verlichting)
• Zorg ervoor dat de wasdroger ingeschakeld is.
• De lamp is mogelijk gesprongen. Bel naar een erkend servicebedrijf om de lamp te
vervangen.
Het symbool “Reinigen van filter” brandt.
• Mogelijk is het pluisfilter nog niet gereinigd. Maak de filtercassette schoon.
"Er komt water uit de deur"
• Reinig het volledige binnenoppervlak van de deur en de pakking van de deur.
“Deur opent vanzelf.”
• Druk het deksel vast totdat u hoort dat het sluit.
Alleen voor producten met een condenser:
Het waarschuwingssymbool “Waterreservoir” brandt.
• Het waterreservoir kan vol zijn. Maak het waterreservoir leeg.
AContacteer een erkende servicedienst als het probleem aanhoudt.
22 FL
Read this manual prior to initial operation of the product!
Dear Customer,
We hope that your product, which has been manufactured in modern facilities and passed
through a strict quality control procedure, will give you very good results.
We advise you to read through this manual carefully before using your product and keep it for
future reference.
This User Manual will
• Help you use your machine in a fast and safe way.
• Read the User Manual before installing and starting your product.
• In particular, follow the instructions related to safety.
• Keep this User Manual within easy reach for future reference.
• Please read all additional documents supplied with your product.
Remember that this User Manual is also applicable for several other models.
Explanation of symbols
Throughout this User Manual the following symbols are used:
B
Important safety information. Warning for hazardous situations with regard to life and property.
Caution; Warning for supply voltage.
Caution; Warning for fire hazard.
Caution; Warning for hot surfaces.
Read the instructions.
C
Useful information. Important information or useful hints about usage.
This appliance’s packaging material is recyclable. Help recycle it and protect the
environment by dropping it off in the municipal receptacles provided for this purpose.
Your appliance also contains a great amount of recyclable material. It is marked with
this label to indicate the used appliances that should not be mixed with other waste.
This way, the appliance recycling organised by your manufacturer will be done under
the best possible conditions, in compliance with European Directive 2002/96/EC on
Waste Electrical and Electronic Equipment. Contact your town hall or your retailer for the used
appliance collection points closest to your home. We thank you doing your part to protect the
environment.
24 EN
2960310599_EN/230113.1039
A
1 Important safety information
This section includes safety information that will
help protection from risks of personal injuries
or materialistic damages. Failure to follow
these instructions shall cause any warranty and
reliability commitment to become void.
•
General safety
• Never place the machine on a carpetcovered floor, otherwise, lack of airflow
beneath the machine may cause electrical
parts to overheat. This will cause problems
with your machine.
• If the power cable or mains plug is
damaged, you must call Authorised Service
Agent for repair.
• The product should not be plugged in
during installation, maintenance and repair
works. Such works should always be made
by the technical service. Manufacturer shall
not be held responsible for damages arising
from processes carried out by unauthorised
persons.
• Connect the product to a grounded outlet
protected by a fuse of suitable capacity as
stated in the technical specifications table.
• Operate your product at temperatures
between +5°C and +35°C.
• Do not use electrical devices in the product.
• Do not connect the air exit of the product
to the chimney holes which are used for the
exhaust fumes of the devices operating with
gas or other types of fuel.
• You must provide enough ventilation in
order to prevent gases exiting from devices
operating with other types of fuels including
the naked flame from accumulating in the
room due to the back fire effect.
• Always clean the lint filter before or after
each loading.
• Never operate your dryer without the lint
filter installed.
• Do not allow fibre, dust and dirt
accumulation around the exhaust exit and
at adjacent areas.
• Power cable plug must be within easy reach
after installation.
• Do not use extension cords, multi-plugs
•
•
•
•
•
•
•
•
•
25 EN
or adaptors to connect the dryer to power
supply in order to decrease the risk of
electric shock.
Do not make any changes on the plug
supplied with the product. If it is not
compatible with the socket, have a qualified
electrician change the socket with a suitable
one.
Items cleaned or washed with gasoil/fuel oil,
dry-laundry solvents and other combustible
or explosive materials as well as the items
that are contaminated or spotted with such
materials should not be dried in the product
since they emit flammable or explosive
vapor.
Do not dry items cleaned with industrial
chemicals in the dryer.
Do not dry unwashed items in the dryer.
Items soiled with cooking oils, acetone,
alcohol, fuel oil, kerosene, stain remover,
turpentine, paraffin and paraffin removers
must be washed in hot water with plenty of
detergent before being dried in the dryer.
Garments or pillows bolstered with rubber
foam (latex foam), shower bonnets, water
resistant textiles, materials with rubber
reinforcement and rubber foam pads should
not be dried in the dryer.
Do not use fabric softeners and anti-static
products unless they are recommended by
the manufacturers of the fabric softener or
the product.
This product must be grounded. Grounding
installation decreases the risk of electric
shock by opening a path with low
resistance for the electricity flow in case of
a malfunction or failure. Power cable of this
product is equipped with a conductor and
a grounding plug that allows for grounding
the product. This plug must be installed
appropriately and inserted into a socket
which is grounded in accordance with the
local laws and regulations.
Do not install the product behind a door
with a lock, sliding door or a door that has a
hinge against the hinge of the dryer.
Do not install or leave this product in
•
•
•
•
•
•
•
•
•
•
•
•
•
•
places where it will be exposed to outdoor
conditions.
Do not tamper with the controls.
Do not perform any repair or part replacing
procedures on the product even if you
know or have the ability to perform unless
it is clearly suggested in the operating
instructions or the published service
manual.
Inside and exhaust duct of the product
must be cleaned by the qualified service
personnel periodically.
Wrong connection of grounding conductor
of the product can cause electric shock. If
you have any suspect about the grounding
connection, have it checked by a qualified
electrician, service representative or service
personnel.
Do not reach into the machine when the
drum is spinning.
Unplug the machine when it is not in use.
Never wash down the appliance with water!
There is the risk of electric shock! Always
disconnect by unplugging from the mains
before cleaning.
Never touch the plug with wet hands. Never
unplug by pulling on the cable, always
pull out by grabbing the plug only. Do not
operate the machine if the power cable or
plug is damaged!
Never attempt to repair the machine
yourself, otherwise, you will be putting your
life and others’ lives in danger.
For malfunctions that cannot be solved by
following the information given in the safety
instructions:
Turn off the machine, turn off and contact
an authorised service agent.
Do not stop the dryer before the drying
cycle comes to an end unless you will
remove all laundry from the dryer fast in
order to lay them and dissipate the heat.
Remove the door of the drying
compartment before decommissioning or
disposing of the product.
The final step of the drying cycle (cooldown cycle) occurs without applying
heat to ensure that the items are left at a
temperature that will not damage them.
Fabric softeners or similar products should
be used as specified by the fabric softener
instructions.
• Underwear that contains metal
reinforcements should not be placed in
a dryer. Damage to the dryer can result if
metal reinforcements come loose during
drying.
• Check all garments for forgotten lighters,
coins, metal pieces, needles, etc. before
loading.
C At times when your machine is not in use
or after the laundry is taken out following the
completion of drying process, keep the door
of your machine closed.
BYour machine is always energized as long
as it is plugged in.
.
Intended use
• This product has been designed for
domestic use. It should not be used for
other purposes.
• Use the product only for drying laundry that
are marked accordingly.
• Dry only those articles in your product that
are stated in this manual.
• This product is not intended to be used by
persons with physical, sensory or mental
disorders or unlearned or inexperienced
people (including children) unless they
are attended by a person who will be
responsible for their safety or who will
instruct them accordingly for use of the
product.
Children’s safety
• Electrical appliances are dangerous for
the children. Keep children away from the
machine when it is operating. Do not let
them tamper with the machine.
• Packaging materials are dangerous to
children. Keep the packaging materials out
of reach of children or dispose them by
classifying according to waste directives.
• Do not allow children sit/climb on or enter in
the product.
• Children should be supervised to ensure
that they do not play with the product.
• Close the loading door when you leave the
area where the product is located.
26 EN
2 Installation
Refer to the nearest Authorised Service Agent
for installation of your product.
CPreparation of location and electrical
installation for the product is under
customer’s responsibility.
BInstallation and electrical connections must
be carried out by a qualified personnel.
APrior to installation, visually check if the
product has any defects on it. If so, do not
have it installed. Damaged products will
cause risks for your safety.
Appropriate installation location
• Install the product in an environment which
has no risk of freezing and is in a stable and
level position.
• Operate your product in a well ventilated,
dust-free environment.
• Do not block the air ducts in front of and
under the product with materials such as
long pile rugs and wooden bands.
• Do not place your product on a long pile rug
or on similar surfaces.
• Do not install the product behind a door
with a lock, sliding door or a hinged door
which can strike the product.
• Once the product is installed, it should stay
at the same place where its connections
have been made. When installing the
product, make sure that the rear wall of it
does not touch anywhere (tap, socket, etc.)
and also pay attention to install the product
at a place where it will stay permanently.
BDo not place the product on top of the
power cable.
• Keep at least 1.5 cm distance to walls of
other furniture.
Removing the transportation
safety assembly
ARemove the transportation safety assembly
before using the product for the first time.
1. Open the loading door.
2. There is a nylon bag inside the drum that
contains a piece of styrofoam. Hold it from
its section marked with XX.
3. Pull the nylon towards yourself and remove
the transportation safety assembly.
AMake sure that you have removed
the transportation safety assembly
(nylon+styrofoam pieces) before using the
product for the first time. Do not leave any
items inside the drum.
Under counter installation
• A special part (Part no. 297 360 0100)
replacing the top trim must be provided and
installed by the Authorised Service Agent in
order to use the machine under a counter or
in a cupboard. It should never be operated
without the top trim.
• Leave at least 3 cm of space between
the side and rear walls of the product and
the walls of the counter/cupboard when
installing your product under a counter or in a
cupboard.
Mounting over a washing machine
• A fitting device should be used between
the two machines when installing above a
washing machine. The bracket (Part no. 297
720 0200 white/297 720 0500 grey) must be
installed by the Authorised Service Agent.
• Place the product on a firm floor. If it will be
placed on top of a washing machine, the
approximate weight of both machines may
reach 180 kg when they are full. Therefore,
the floor must be capable of carrying the load
on it!
Connection to water drain;
In products equipped with a condenser unit the
water accumulated during the drying cycle is
collected in the water tank. You should drain the
accumulated water after each drying cycle.
You can directly send the accumulated water
out through the water drain hose supplied with
the machine instead of periodically draining the
27 EN
water collected in the water tank.
Connecting the water drain hose;
CNever unscrew the adjustable feet from their
housings.
Electrical connection
1. Remove the hose on the machine by pulling
it out from its end. Do not use any tools to
take out the hose.
2. Connect the special drain hose supplied with
the machine to the pipe fitting.
3. The other end of the drain hose can be
directly connected to the wastewater drain
or to the washbasin. The fitting must always
be secured in all types of connections. Your
house may be flooded if the hose gets out of
its housing during water discharge.
Important:
• The hose should be attached to a height of
maximum 80 cm.
• You must be careful not the pinch or bend
the hose.
• The end of the hose should not be bent, it
should not be stepped on and it must not be
folded between the drain and the machine.
Adjusting the feet
In order to ensure that your machine operates
more silently and vibration-free, it must stand
level and balanced on its feet. Balance the
machine by adjusting the feet.
Rotate the feet to adjust until the machine
stands level and firmly.
Connect the machine to a grounded outlet
protected by a fuse of suitable capacity as
stated in the technical specifications table. Our
company shall not be liable for any damages
that will arise when the machine is used on a
circuit without grounding.
• Connection must comply with national
regulations.
• If the current value of the fuse or breaker
in the house is less than 16 Amps, have a
qualified electrician install a 16 Amp fuse.
• Power cable plug must be within easy
reach after installation.
• The voltage and allowed fuse or breaker
protection are specified in the “Technical
Specifications” section.
• The specified voltage must be equal to your
mains voltage.
• Do not make connections via extension
cables or multi-plugs.
• The main fuse and switches must have a
contact distance of minimum 3 mm.
BDamaged power cable must only be
replaced by a qualified electrician.
BIf the product is faulty, it must not be
operated unless it is repaired! There is the
risk of electric shock!
First use
• To have the product ready for operation
before calling the authorised service agent,
make sure that its location and power
supply installations are appropriate. If they
are not, call a qualified electrician to have
any necessary arrangements carried out.
• Make sure that the power connections of
the product are in accordance with the
instructions given in relevant chapters of
this manual.
28 EN
Disposing of packaging material
Packaging materials are dangerous to children.
Keep packaging materials in a safe place out
of reach of children. Packaging materials of
your product are manufactured from recyclable
materials. Sort and dispose of them in
accordance with recycled waste instructions.
Do not dispose of them with normal domestic
waste.
Transportation of the machine
1. Unplug the machine from the mains.
2. Remove the water drain (if any) and
chimney connections.
3. Drain water remained in the machine
completely before transportation.
Disposing of the old machine
Dispose of your old machine in an
environmentally friendly manner.
Refer to your local dealer or solid waste
collection centre in your area to learn how to
dispose of your machine.
Before disposing of your old machine, cut off
the power cable plug and make the loading
door lock unusable to avoid dangerous
conditions to children.
Technical specification
EN
2
Height (adjustable)
84,6 cm
Width
59,5 cm
Depth
53 cm
Capacity (max.)
7 kg
Weight (net)
36 kg
Voltage
Rated power input
See type label
Model code
Type label is located behind the loading door.
29 EN
3 Initial preparations for drying
Things to be done for energy
saving:
• Make sure that you operate the product
at its full capacity but pay attention to not
exceeding it.
• Spin your laundry at the highest speed
possible when washing them. Thus,
the drying time is shortened and energy
consumption is decreased.
• Pay attention to dry same types of laundry
together.
• Follow the instructions in the user manual
for programme selection.
• Make sure that sufficient clearance is
provided at the front and rear side of the
dryer for air circulation. Do not block the grill
at the front side of the product.
• Do not open the door of the machine
during drying unless necessary. If you must
certainly open the door, pay attention not to
keep it open for a long time.
• Do not add new (wet) laundry during drying.
• Lint and fibres released from the laundry to
the air during the drying cycle are collected
in the “Lint Filter”. Make sure that you clean
the filters before or after each drying.
• In models with condenser, make sure that
you clean the condenser regularly at least
once every month or after every 30 drying
cycles.
• In vented models, follow the chimney
connection rules in the user manual and
pay attention to the chimney cleaning.
• Ventilate the room, where the dryer is
located, well during drying.
Laundry suitable for drying in the
machine
C Always follow the suggestions on the
A B C D
Low
l n m
o p q
Laundry unsuitable for drying in
the machine
• Laundry items with metal attachments such
•
•
•
•
•
•
laundry labels. Dry only the laundry having a
label stating that they are suitable for drying
in a dryer and make sure that you select the
appropriate programme.
•
•
30 EN
as belt buckles and metal buttons can
damage your dryer.
Do not dry items such as woollens, silk
garments and nylon stockings, delicate
embroidered fabrics, laundry with metal
accessories and items such as sleeping
bags in the dryer.
Laundry made of delicate and valuable
fabrics as well as lace curtains can be
creased. Do not dry them in the dryer!
Do not dry items made of hermetic fibres
such as pillows and quilts in the dryer.
Laundry made of foam or rubber will be
deformed.
Do not dry laundry containing rubber in the
dryer.
Do not dry laundry exposed to petroleum,
oil, combustible or explosive agents in the
dryer even if they are washed beforehand.
Overly wet laundry or laundry with dripping
water must not be put into the dryer.
Items cleaned or washed with gasoil/fuel oil,
dry-laundry solvents and other combustible
or explosive materials as well as the items
that are contaminated or spotted with such
materials should not be dried in the product
since they emit flammable or explosive
vapor.
Correct load capacity
• Do not dry items cleaned with industrial
chemicals in the dryer.
• Do not dry your unwashed laundry in the
dryer.
• Items soiled with cooking oils, acetone,
alcohol, fuel oil, kerosene, stain remover,
turpentine, paraffin and paraffin removers
must be washed in hot water with plenty of
detergent before being dried in the dryer.
• Garments or pillows bolstered with rubber
foam (latex foam), shower bonnets, water
resistant textiles, materials with rubber
reinforcement and rubber foam pads should
AConsider the information in the "Programme
not be dried in the dryer.
Selection Table". Always start the
• Do not use fabric softeners and anti-static
programme in accordance with the
products unless they are recommended by
maximum load capacity.
the manufacturers of the fabric softener or the C Adding laundry to the machine more
product.
than the level shown in the figure is not
• Do not dry the underwear reinforced with
recommended. Drying performance will
metal parts in the dryer. If these metal
degrade when the machine is overloaded.
reinforcements loosen and break during
Furthermore, your dryer and your laundry
drying, they will damage your dryer.
can be damaged.
Preparing laundry for drying
C Place your laundry into the drum loosely so
• Check all laundry items before loading them
that they will not get tangled.
into the product to make sure that there are
CLarge pieces (E.g.: bed sheets, quilt covers,
no lighters, coins, metal items, needles and
large tablecloths) may bunch-up. Stop the
etc. in their pockets or on any part of them.
dryer 1-2 times during drying process to
• Fabric softeners and similar products must be
separate bunched-up laundry.
used in accordance with the instructions of
the manufacturer of the relevant products.
• All laundry must be spun at the highest spin
speed that your washing machine allows for
the laundry type.
• Laundry may be tangled after washing.
Separate your laundry before placing them
into your dryer.
• Sort your laundry according to their types and
thicknesses. Dry the same type of laundry
together. E.g.: fine kitchen towels and table
cloths dry faster than the thick bath towels.
31 EN
Following weights are given as examples.
Home articles
Cotton quit covers (double)
Cotton quit covers (single)
Bed sheets (double)
Bed sheets (single)
Large tablecloths
Small tablecloths
Tea napkins
Bath towels
Hand towels
Garments
Blouses
Cotton shirts
Shirts
Cotton dresses
Dresses
Jeans
Handkerchiefs (10 pieces)
T-Shirts
Approximate
weights (g)
1500
1000
500
350
700
250
100
700
350
Approximate
weights (g)
150
300
200
500
350
700
100
125
Loading the laundry
• Open the loading door.
• Place laundry items loosely into the dryer.
• Push the loading door to close. Ensure that
no items are caught in the door.
32 EN
4 Selecting a Programme and Operating Your Machine
Control panel
1
2
3
4
5
1. On/Off button
2. Programme selection button
3. Display
4. End time setting button
5. Start/Pause/Cancel button
Start and pause symbol
Water tank full warning symbol
Filter cleaning warning symbol
Symbol for specifying the end time
(Time Delay)
33 EN
Preparing the machine
1. Plug in your machine.
2. Place the laundry in the machine.
3. Press the On/Off button for 1 second.
CPressing the “On/Off” button does not
necessarily mean the programme has
started. Press “Start/Pause/Cancel” button
to allow the machine start the programme.
Programme selection
Decide the appropriate programme from the
table below which includes drying levels.
Select the desired programme with the
Programme Selection button.
Drying at high
temperature only for
cotton laundry. Thick
and multi layered laundry
(E.g.: towels, linens,
Extra dry
jeans) are dried in a way
that they do not require
ironing before placing in
the wardrobe.
Cupboard dry
Cupboard
dry Plus
Iron dry
Normal laundry (E.g.:
tablecloths, underwear)
are dried in a way that
they do not require
ironing before placing in
the wardrobe.
Normal laundry (E.g.:
tablecloths, underwear)
are dried in a way that
they do not require
ironing before placing in
the wardrobe. However,
they are dried more
when compared to the
Wardrobe Dry option.
Normal laundry (E.g.,
Shirts, dresses) are dried
ready to be ironed.
CFor further programme details, see,
“Programme Selection Table”
•Main programmes
Depending on the type of laundry, the following
main programmes are available:
• Cottons
You can dry your durable laundry with this
programme. Dries at high temperature. It is
recommended to use for your cotton items
(such as bed sheets, quilt cover, underclothing,
etc.).
• Synthetics
You can dry your less durable laundry with this
programme. It dries at a lower temperature
compared to the cottons programme. It is
recommended for your synthetic laundry (such
as shirts, blouses, synthetic/cotton blended
laundry, etc.).
CDo not dry curtains and lace in your
machine.
•Anti-creasing
A 2-hour anti creasing programme to prevent
laundry from creasing will be activated if
you do not take the laundry out after the
programme is over. This programme rotates
the laundry in 10-minute intervals to prevent
creasing.
•Special programmes
For special cases, there are also extra
programmes available:
C Additional programmes may differ
according to the model of your machine.
•Express 15’
Use this function to make 2 shirts ready for
iron in 15 minutes.
CTo obtain better results from your
dryer, your laundry must be washed at
suitable programmes and spun at the
recommended spin speeds in the washing
machine.
• Shirts
This programme dries the shirts more
sensitively and creases them less and thus,
helps to iron them more easily.
C There may be a little humidity on your
shirts at the end of the programme. We
recommend you not to leave the shirts in
the dryer.
• Jeans
You can use this programme to dry your jeans
that you have spun at high speeds in your
34 EN
washing machine.
C Review the relevant section in the
programme table.
• Delicates
You can dry at a lower temperature your very
delicate laundry (silk blouses, fine underwear,
etc.) that are suitable for drying or laundry
which is advised to be hand-washed.
CTo obtain better results from your dryer,
your laundry must be washed at suitable
programmes and spun at the recommended
spin speeds in the washing machine.
•Refresh
Only ventilation is performed for 10 minutes
without blowing hot air. You can air your clothes
that have been kept at closed environments for
a long time and deodourise unpleasant odours
thanks to this programme.
•Timer programmes
You can select one of the 10 min., 20 min.,
40 min. and 60 min. timer programmes to
achieve the desired final drying level at low
temperatures. Programme dries at the selected
time regardless of the drying temperature.
35 EN
Programme selection and consumption table
EN
2
Spin speed in washing
Capacity (kg)
machine (rpm)
Programs
Approximate
amount of
remaining
humidity
Drying time
(minutes)
Cottons / Coloreds
A
Cupboard dry
7
1000
% 60
116
A
Cupboard dry plus
7
1000
% 60
120
A
Iron dry
7
1000
% 60
90
Xpress 15'
0.5
1200
% 50
15
Shirt
1.5
1200
% 50
40
4
1200
% 50
80
1.75
600
% 40
40
3.5
800
% 40
45
Approximate
amount of
remaining
humidity
Energy
consumption
value kWh
Jeans
Delicates
Synthetics
B
Cupboard dry
Energy consumption values
Programs
Spin speed in washing
Capacity (kg)
machine (rpm)
Cottons cupboard dry*
7
1000
% 60
4.17
Cottons iron dry
7
1000
% 60
3.25
3.5
800
% 40
1.42
Synthetics cupboard dry
* : Energy Label standard programme (EN 61121:2012)
All values given in the table have been fixed according to EN 61121:2012 Standard. These values
may deviate from the table according to the laundry type, laundry spin speed, environmental
conditions and voltage fluctuations.
36 EN
Auxiliary function
Cancel audio warning
is running. To restart the machine, please
drain the water in the water tank. Press "Start/
Pause" button to start the program after you
have emptied the water tank. The warning
symbol turns off and the programme resumes
operating.
Specifying the end time ( Ending
In)
Your dryer will give an audio warning when
the programme comes to an end or each time
you press the buttons. If you want to disable
the audio warning, press the Programme "-"
and End Time "+" buttons simultaneously for 3
seconds. "off-bzr-off" appears on the display.
Machine does not give an audio warning at
the end of the programme or when a button
is pressed. You can enable the audio warning
by pressing the same buttons simultaneously
again for 3 seconds. If you do so, "on-bzr-on"
appears on the display and audio warning is
enabled.
C You can select this function either before or
after the programme starts.
Warning indicators
With the “Time delay” function you can delay
the ending time of the programme up to 24
hours.
1. Open the loading door and put the laundry
in.
2. Once the programme is selected, set the
end time with end time ‘‘+’’ , ‘‘-’’ buttons.
End time symbol flashes.
Press "Start/Pause" button to start the time
delay function. Delay time appears on the
display and End Time symbol and Start/Pause
symbol illuminates. The time on the display is
the total of normal drying time and delay time.
Changing the delay time
C Warning indicators may differ according to
If you want to change the time during the
countdown:
1. Press Start/Pause button. End Time symbol
illuminates and Start/Pause symbol flashes.
2. Press End Time ‘‘+’’ , ‘‘-’’ buttons to set the
new end time. End Time symbol and Start/
Pause symbol flash while making the new
settings.
3. Press Start/Pause button to complete
setting the new end time. End Time symbol
and Start/Pause symbol flash.
C When setting the end time again, End Time
symbol turns off and Start/Pause symbol
flashes once the actual programme duration
appears on the display. Programme starts
immediately without any delay if you press
Start/Pause button.
the model of your machine.
Lint filter cleaning
A warning light will turn on to remind filter
cleaning after the programme finishes.
C If the filter cleaning warning lights up
continuously, please refer to, “Suggested
solutions for problems”.
Water tank
A warning symbol will turn on at the end of
the programme or when the tank is full with
water. The machine stops operating when this
warning symbol lights up while a programme
Canceling the time delay
If you want to cancel the time delay countdown
and start the programme immediately:
1. Press “Start/Pause” button for 3 seconds to
cancel the programme.
37 EN
2.Then, press "Start/Pause" button to select
the desired programme.
Changing the programme after it
has started
You can use this feature to dry your clothes
under higher or lower temperatures after your
dryer has started.
For example;
1. Press and hold the “Start/Pause/Cancel”
button for about 3 seconds to “Cancel”
the programme in order to select “Extra
Dry” programme instead of “Iron Dry”
programme.
2. Select the programme with the Programme
Selection button.
3. Press "Start/Pause/Cancel" button to start
the programme.
C Child-proof lock of the machine should not
be active in order to perform this operation.
If the child-proof lock is active, deactivate it
before performing these operations.
loading door and all buttons except the "On/
Off" button on the control panel are deactivated
when the child-proof lock is active.
In order to activate the childproof lock, press
End Time "-" and Programme "+" buttons
simultaneously for 3 seconds. "CL3-CL2-CL1"
and "on-CL-on" appears on the display and the
function is activated.
To start a new programme after the programme
is over or to interrupt the programme, the childproof lock should be deactivated. Press the
same buttons for 3 sec. again to deactivate the
child-proof lock. "CL3-CL2-CL1" and "oFF-CLoFF" appears on the display and the function is
deactivated.
C Child-proof lock is deactivated when the
machine is restarted by pressing the On/Off
button.
Adding/removing laundry in
standby mode
In order to add or remove laundry after the
programme starts:
1. Press the “Start/Pause/Cancel” button to
switch the dryer to “Pause” mode. Drying
process will stop.
2. Open the door at “Pause” position and
close it again after adding or taking out
laundry.
3. Press "Start/Pause/Cancel" button to start
the programme.
C Any laundry added after the drying process
has started may cause the dried clothes in
the machine intermingle with wet clothes
and the result will be wet laundry after the
drying process is over.
CLaundry may be added or taken out as
much as desired during a drying process,
but as this process will interrupt drying
continuously, it will extend the programme
duration and increase energy consumption.
Therefore, it is recommended to add laundry
before the drying programme has started.
Child-proof lock
There is a child-proof lock to prevent any
programme interruption due to the pressing of
button while the programme is running. The
C Press the relevant buttons for 3 seconds to
activate the child-proof lock. A long beep
will be heard and the child-proof lock will be
activated. A double beep will be heard if you
press any button when the child-proof lock
is active. Press the buttons for 3 seconds to
deactivate the child-proof lock. Single beep
will be heard and child-proof lock will be
deactivated.
Ending the programme through
canceling
In order to cancel the selected program;
press "Start/Pause/Cancel" button for about 3
seconds.
AAs the inside of the machine will be
excessively hot when you cancel the
programme while the machine is running,
activate the ventilation programme to cool
it down.
End of programme
"End" appears on the display and “Filter
cleaning” and "Water tank" warning lights turn
on when the programme is over. The door can
be opened and the machine becomes ready for
38 EN
a second cycle.
Press “On/Off” button to turn off the dryer.
CFinal step of the drying cycle (cooling step)
is performed without heat application in
order to keep the items at a temperature
that would not harm them.
CA 2-hour anti creasing programme to
prevent laundry from creasing will be
activated if you do not take the laundry out
after the programme has come to an end.
C If you will not take the laundry out
immediately, do not stop the dryer before
the drying process is complete.
C Clean the filter after each drying (please see,
Lint filter cleaning)
CDrain the water tank after each drying
(please see, Water tank)
39 EN
5 Maintenance and cleaning
Filter Cartridge / Door Inner
Surface
Lint and fibres released from the laundry to the
air during the drying cycle are collected in the
“Filter Cartridge”.
Sensor
CSuch fibre and lint are generally formed
during wearing and washing.
CAlways clean the filter and the inner surfaces
of the cover after each drying process.
CYou can clean the filter and filter area by
vacuum cleaner.
To clean the filter:
1. Open the loading door.
2. Remove the cover filter by pulling it up and
open the filter.
3. Clean lint, fibre, and cotton raveling by hand
or with a soft piece of cloth.
4. Close the filter and place it back into its
seat.
C Clogging may arise on the filter surface
after using your machine for some time; if
this occurs, wash the filter with water and
dry it before using again.
C
There are humidity sensors in your dryer that
detect whether the laundry is dry or not.
To clean the sensor:
1. Open the loading door of the dryer.
2. Allow the machine to cool down if drying
has been carried out.
3. Wipe the metal sensors with a soft cloth,
dampened with vinegar and dry them.
CClean metal sensors 4 times a year.
ANever use solvents, cleaning agents
or similar substances when cleaning
since these materials can cause fire and
explosion!
Clean the entire inner surface of the cover
and door gasket.
40 EN
Water tank;
The moisture in the damp laundry is taken from
the laundry and condens ed. Drain the water
tank after each drying cycle or during drying
when “Water tank” warning light turns on.
ACondensed water is not drinkable!
ANever take out the water tank when the
programme is running!
If you forget to drain the water tank, your dryer
will stop during the following drying cycles
when the water tank is full and the “Water
tank” warning light will turn on. If this is the
case, press the “Start/Pause/Cancel” button to
resume the drying cycle after draining the water
tank.
*To drain the water tank:
1-Pull the drawer and remove the water tank
carefully.
For the condenser;
Hot and humid air in the condenser is cooled
with the cold air from the room. Thus, the
humid air circulating in your dryer is condensed
and then pumped into the tank.
CClean the condenser after every 30 drying
cycles or once a month.
To clean the condenser:
1. If a drying process has been carried out,
open the door of the machine and wait until
it cools down.
2. Unlock the 2 condenser locks after opening
the kick plate.
2-Drain the water in the tank
3. Pull out the condenser.
3-If there is lint accumulation in the funnel of
the water tank, clean it under running water.
4-Place the water tank into its seat.
41 EN
4. Clean the condenser by applying pressurized
water with a shower armature and wait until
the water drains.
5. Place the condenser in its housing. Fasten
the 2 locks and make sure that they are
seated securely.
6. Close the kick plate cover.
42 EN
6 Suggested solutions for problems
Drying process takes too much time
• Meshes of the lint filter may be clogged. Wash the lint filter with warm water.
Laundry comes out wet at the end of drying.
• Meshes of the lint filter may be clogged. Wash the lint filter with warm water.
• Excessive laundry might have been loaded in. Do not load the dryer in excess.
Dryer does not switch on or the programme does not start. Dryer does not start when it is set.
• It might have not been plugged in. Make sure that the machine is plugged in.
• The loading door may be ajar. Make sure that the loading door is properly closed.
• Programme might have not been set or the "Start/Pause/Cancel" button might have not
been pressed. Make sure that the programme has been set and it is not in “Pause” mode.
• "Childproof lock" might have been activated. Deactivate the Childproof Lock.
Programme is interrupted without any cause.
• The loading door may be ajar. Make sure that the loading door is properly closed.
• Electricity may be cut off. Press "Start/Pause/Cancel" button to start the programme.
Laundry has shrunk, become felted or deteriorated.
• A programme suitable for the laundry type might have not been used. Dry only the laundry
which is suitable for drying in dryer after checking the labels on your clothes.
• Select a programme with suitable low temperature for the laundry type to dry your clothes.
Drum lightning does not come on. (For models with lamp)
• Make sure that the dryer is switched on.
• Bulb may have blown. Call the authorised service agent to replace the bulb.
“Filter cleaning” symbol is on.
• Lint filter might have not been cleaned. Clean the filter cassette.
"Water leaks from the door"
• Clean the entire inner surface of the door and door gasket.
"Door opens spontaneously."
• Push it until you hear that it is closed.
For products with a condenser:
“Water tank” warning symbol is on.
• Water tank may be full. Drain the water in the tank.
ACall an authorised service agent if the problem persists.
43 EN