1
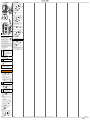
1
– Press the menu button
2.4.2
23
22
21
19
20
18
17
Babyviewer 4100
When the display in on (If not, press the monitor key 20 shortly to turn on
the display)
– Press and hold the menu button
26 for 2 seconds.
19 or down button
– Select with the up
25 the contrast
icon.
– Press the monitor key 20 .
19 or down button
– Press the up
25 to select the desired
contrast (5 steps).
– Press the menu button
26 to confirm.
24
27
26
25
0
29
30
31
28
On the parent unit:
When the display in on: (If not, press the monitor key 20 shortly to turn on
the display)
– Press and hold the menu button
26 for 2 seconds.
19 or down button
– Select with the up
25 the night light
-icon.
– Press the monitor key 20 .
19 or down button
– Press the up
25 to select on (green
color) or off (red color).
– Press the menu button
26 to confirm.
-
9
8
7
6
5
4
3
-
1 x AAA
10
12
11
13
14
15
16
A
+
-
+
-
VOX
2
1
B
1 x AAA
A
1 x AA
+
ENGLISH
Getting started
Thank you for purchasing this TOPCOM product. This
product has been designed and assembled with utmost
care for you and the environment. Because we at
TOPCOM like to think of the future of our planet and our
children, we aim to do our best to help saving the
environment. This is why we decided to reduce the
number of pages of our user guides and product manuals.
If you keep in mind that it takes up to 24 trees to produce
1 ton of paper, publishing product manuals in many
languages costs our planet a lot of trees. In this short manual provided with
your TOPCOM device you can find a brief explanation of how to install and
use your TOPCOM device.If you would still like to discover all the features
of your new TOPCOM device, please visit our website (www.topcom.net)
where you can download the complete user manual in your language. By
doing this TOPCOM hopes to do its share to make our planet a better place,
but we can only succeed with your help!
1.1
Installing batteries in the baby unit
See Figure
on the picture.
A
•
•
•
Turn the night light stars on or off
The night light stars can be turned on/off on the baby and parent unit:
On the baby unit:
– Press the 14
night light button shortly to switch ON/OFF the
night lights.
+
1
2.4.3
1
26 to confirm.
Display contrast
You can operate the baby unit with 3 AAA cells (LR03;
we recommend alkaline cells) or the included AC
mains adapter.
The baby unit cannot recharge batteries.
It is recommended to always leave the batteries in the
unit, even if you use the AC mains adapter. The unit
will automatically switch to battery power in case of a
mains power interruption.
2.4.4
Turn the lullaby music on or off
Your baby can be soothed to sleep by gentle lullaby from the baby unit.
There are 5 pre-programmed lullabies that you can play on the baby unit.
These are played one by one within 15 minutes.
The lullaby can be turned on/off on the baby and parent unit:
On the baby unit:
– Press and hold the 14
lullaby button to switch ON/OFF the
19 or down button
lullaby. Press the up
25 to select the
volume.
On the parent unit:
When the display in on: (If not, press the monitor key 20 shortly to turn on
the display)
– Press and hold the menu button
26 for 2 seconds.
19 or down button
– Select with the up
25 the lullaby
icon.
– Press the monitor key 20 .
19 or down button
– Press the up
25 to select on (green
color) or off (red color).
– Press the menu button
26 to confirm.
2.5
Talking with your baby
You can use the parent unit to talk with your baby.
•
Allow your baby to get used to the talk function before
you use it in practice.
– Press the Talk button PTT 30 on the parent unit and hold it
pressed.
– Hold the parent unit vertical with the microphone 21
approximately 10 cm from your mouth, and speak into the
microphone.
– Release button PTT 30 when you have finished talking.
2.6
Voice activated transmission (VOX)
The Babyviewer 4100/4200 will only transmit if a certain level of sound if
captured by the baby unit microphone.
You can set the sound detection sensitivity (VOX) of the babyphone. If the
sensitivity is set to high, the baby unit will pick up weaker sounds.
– Turn the VOX sensitivity wheel 2 left to decrease the sensitivity.
– Turn the VOX sensitivity wheel 2 right to increase the sensitivity.
– Remove the battery compartment cover 12 .
– Fit 3 AAA alkaline cells (LR03) in the battery compartment. Ensure
that the polarity is correct.
– Close the battery compartment 12 .
•
1.2
Never mix used cells with fresh cells.
Connecting the baby unit to the AC mains
Insert the small plug of the AC mains adapter in the mains power connector
of the baby unit 9 and plug the AC mains adapter into a mains connector
(100~240 V - 50/60 Hz).
CAUTION
•
•
1.3
The mains connector must be within easy reach so you can
quickly unplug the power cable in an emergency.
Use only the supplied AC mains adapter (6 V DC / 800 mA).
Installing the rechargeable battery pack in the parent unit
See Figure
on the picture.
B
CAUTION
•
Use only the supplied Li-ion battery pack in the parent unit.
– Remove the belt clip 31 .
– Remove the battery compartment cover 28 .
– Place the Li-ion battery pack in the battery compartment.
Ensure that the battery contacts do make contact with the charge
contacts as illustrated.
– Carefully close the battery compartment and place the belt clip
back.
1.4
Connecting the parent unit to the AC mains
– Insert the small plug of the AC mains adapter in the mains power
connector 24 of the charger and plug the AC mains adapter into
a mains connector (100~240 V - 50/60 Hz), the LED 23 will lit.
– Put the Parent unit on the charger.
•
2
2.1
It takes around 10 hours to fully charge the batteries.
Operation and use
Switching the baby unit and parent unit On and Off
– Slide the on/off switch 29 to ‘l’ to switch on the parent unit. The
display 17 and on/off led 27 is activated.
– Press the on/off button
5 up to switch on the baby unit. The
on/off LED 4 is activated.
•
The parent unit will try to establish a
connection with the baby unit. If captured
image from the camera is displayed, a
connection has been established.
– Slide the on/off switch 29 to ‘o’ to switch off the parent unit.
– Press the on/off switch
5 to switch off the baby unit (press
and hold until the LED 4 goes off).
2.2
Checking the connection between the parent unit and the
baby unit
You should always check the wireless connection when you use the
babyphone for the first time.
– Put the parent unit in the same room as the baby unit, separated
by at least two metres.
– Switch on both devices. The parent unit will try to establish a
connection with the baby unit.
– The display of the parent unit will show the captured image from
the baby unit after the connection has been established (monitor
mode).
– The sounds picked up by the microphone 7 are reproduced by
the parent unit.
– If no connection is established, the out of range icon is
displayed and the 27 LED will be red.
2.3
Setting the reproduction volume of the parent unit
There are 8 volume levels.
19 to increase the volume.
– Press button
– Press button
25 to decrease the volume.
2.4 Setting on the parent unit
2.4.1
Display brightness
When the display in on (If not, press the monitor key 20 shortly to turn on
the display):
– Press and hold the menu button
26 for 2 seconds.
19 or down button
– Select with the up
25 the brightness
-icon.
– Press the monitor key 20 .
19 or down button
– Press the up
25 to select the desired
brightness (5 steps).
Babyviewer 4100
www.topcom.net
This product is in compliance with the essential requirements and other relevant provisions of the R&TTE directive 1999/5/EC. The Declaration of conformity can be found on: http://www.topcom.net/cedeclarations.asp
MD10600405 ECO V1.0
2
Babyviewer 4100
www.topcom.net
This product is in compliance with the essential requirements and other relevant provisions of the R&TTE directive 1999/5/EC. The Declaration of conformity can be found on: http://www.topcom.net/cedeclarations.asp
MD10600405 ECO V1.0