1
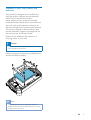
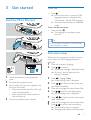
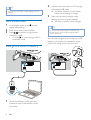
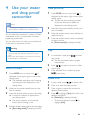
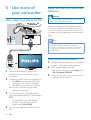
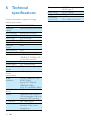
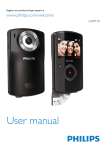
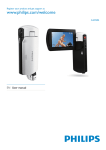
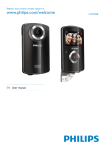
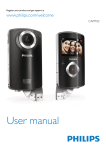
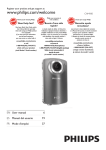
Register your product and get support at www.philips.com/welcome CAM150 User manual Contents 1 Important 2 Safety Notice 2 2 2 Your camcorder Introduction What's in the box Functional overview 3 Get started Load the Micro SD card Turn on First-time setup Charge the built-in battery 4 Use your water and drop proof camcorder Record video Take pictures Play Options during video play Adjust settings 5 Use more of your camcorder View video or pictures on TV Install and use the camcorder software 4 4 4 5 7 7 7 7 8 9 9 9 9 10 11 12 12 12 14 7 Frequently asked questions (FAQ) 15 EN 1 1 Important Safety a Read these instructions. m After use in sea water, immediately rinse the camcorder with fresh water to prevent corrosion, then clean the camcorder with a soft dry cloth and let it dry in a well-ventilated place away from direct sunlight. n Do not use this camcorder in water deeper than 3 meters (10 feet) or for longer than 30 minutes. b Keep these instructions. c Heed all warnings. d Follow all instructions. e Clean only with dry cloth. f Do not block any ventilation openings. Install in accordance with the manufacturer's instructions. g Do not install near any heat sources such as radiators, heat registers, stoves, or produce heat. h Only use attachments/accessories i personnel. Servicing is required when the apparatus has been damaged in any way, such as power-supply cord or plug is damaged, objects have fallen into the apparatus or does not operate normally. j Do not place any sources of danger on the apparatus (e.g. lighted candles). k Before use underwater, always securely close the protective cover at the bottom of the camcorder. l Never open the protective cover underwater or when the camcorder is still wet after use underwater. 2 EN device that are not expressly approved by Philips Consumer Lifestyle may void the user’s authority to operate the equipment. Notice This digital apparatus does not exceed the Class B limits for radio noise emissions from digital apparatus as set out in the Radio Interference Regulations of the Canadian Department of Communications. This Class B digital apparatus complies with Canadian ICES-003. The set complies with the FCC-Rules, Part 15 and with 21 CFR 1040.10. Operation is subject to the following two conditions: 1. This device may not cause harmful interference, and 2. This device must accept any interference received, including interference that may cause undesired operation. This product is designed to be waterproof in compliance with IEC 60529 IP68. Disposal of your old product and batteries Your product is designed and manufactured with high quality materials and components, which can be recycled and reused. Never dispose of your product with other household waste. Please inform yourself about the local rules on the separate collection of electrical and electronic products and batteries. The correct disposal of these products helps prevent potentially negative consequences on the environment and human health. Please visit for additonal information on a recycling center in your area. Caution Removal of the built-in battery invalidates the warranty and may destroy the product. Always bring your product to a professional to remove the built-in battery. Note The safety logo and power rating information are located at the inner side of the protective cover at the bottom of the camcorder. EN 3 2 Your camcorder Introduction With this portable camcorder, you can: take full HD (1080P), sports HD (720P with 60 FPS) or VGA movies take pictures take the camcorder underwater (up to 3 meters, 10 feet) take with you anywhere thanks to the rugged and drop-proof design (1.5-meter drop-proof) play recorded movies or pictures either directly or on the large screen of a connected TV upload the recorded movies or pictures to the Internet directly via your PC/Mac What's in the box Make sure that the following items are packed in the box: Camcorder USB cable (with a mini USB connector) Quick start guide Pouch 4 EN Functional overview r q a b p c d e f n h i j kl m g a Built-in speaker b Display panel c mode. In play mode, play a selected video clip. d o / Navigate left/right in a menu. Select a menu option. In play mode, turn to the previous/next picture/video clip. ( the scene selection window. ( the settings menu. e +/ Navigate up/down in a menu. Change a value in the settings menu. During video play, change the volume. ! " " on the display panel. f Shutter button # start/stop video recording. mode. g Fastener Secure the protective cover. h Protective cover i Mini USB socket Connect to a PC/Mac through the supplied USB cable. j Reset button Restore default settings. k Micro SD socket Connect a Micro SD card. l Mini HDMI socket Connect to a TV through an HDMI cable with a mini HDMI connector (type C). EN 5 m Tripod socket n Turn on/off the camcorder. o MODE Switch between picture and video recording modes. p Built-in microphones q Lens r Flashlight 6 EN 3 Get started Turn on Load the Micro SD card Press . » $% "&*+ language selection is displayed (See ''Get started - Set the OSD language). » ; mode. To turn off the camcorder: Press and hold . » The backlight on the display panel turns off. Tip To save energy, the camcorder turns off automatically after being idle for 3 minutes. First-time setup < " time, a menu for OSD language selection is displayed. 1 2 Press +/- to select a language. Press » = > » An inquiry box for date and time setting is displayed. 1 Unlock the fastener on the protective cover. 3 2 3 Press to highlight [Yes]. » A date setting menu is displayed. Flip open the protective cover. 4 Press / to select the day, month and 5 6 Press +/- " 7 Press / to select the hour and minute 8 9 Press +/- " 4 Insert a Micro SD card (not supplied) into the micro SD socket. Make sure that the the Micro SD card is not write-protected. Make sure that the metal contact of the card faces up. Close the protective cover securely. Press » A time setting menu is displayed. Press » ; % » ; EN 7 Tip 2 Connect the camcorder to a PC through the supplied USB cable. » The status indicator on the shutter => 3 Wait until the status indicator stops > » The built-in battery is fully charged. See 'Use your camcorder - Adjust settings' for more settings. Select a special effect 1 2 3 special effect setting. to enter Press +/- to select a special effect. Press =# Or press to cancel and go back to Tip ; " "% It takes about 3 hours to fully charge the built-in battery via the PC. You can also charge the camcorder via a USB adaptor (not supplied) connected to mains power. The charge time is about 2 hours. Charge the built-in battery UK EUR 1 ?# " > protective cover at the bottom of the camcorder. 8 EN 4 Use your water and drop proof camcorder Take pictures 1 Press MODE once or twice until is displayed at the upper right corner of the display panel. » ; = of pictures that can be taken are displayed on the display panel. 2 Hold the camcorder steadily and aim the lens as needed. 3 Press the shutter button down halfway to adjust the focus. 4 Press the shutter button down completely to take a picture. » [Picture saved!] = > Note This camcorder is designed to be drop-proof (1.5 meters, 5 feet) and water-proof (3 meters, 10 feet). You can take this camcorder 3 meters (10 feet) # "@ happening underwater. You can also take it out with you on the beach, in the pool or anywhere you like. Warning After use underwater, make sure to rinse the camcorder with tap water, then wipe with a soft dry cloth. Never open the protective cover when the camcorder is still wet after use underwater. Record video 1 Press MODE once or twice until is displayed at the upper right corner of the display panel. » The selected resolution and remaining recording time are displayed on the display panel. 2 Hold the camcorder steadily and aim the lens as needed. 3 Press the shutter button to start recording. » A red time indicator is displayed on the display panel. » The status indicator on the shutter => 4 Play 1 to enter play mode. » The last recorded media is played automatically. 2 Press / to select a picture or video clip for play. 3 " to start play. 1 2 3 In play mode, press 4 Press to highlight [Yes] deletion operation. » [Deleted!] = > / Press + to enter the edit window. Press + again to enter the window for To exit the operation, press highlight [No]. to Press the shutter button again to end recording. » [Recording saved!] = > EN 9 Zoom in a picture 1 2 3 4 In play mode, press picture. / to select a Press + to enter the edit window. Press 1 2 3 In play mode, press 4 K XZ Press +/-/ / to pan through the enlarged picture. To return to normal view, press . Press + to enter the edit window. Press - ; - again. Preview Trim a video clip / Note In play mode, press -. » ; ="[ on each page. ; +/-/ / . & J+ J be edited (trimmed) on the camcorder. & 1 In play mode, press recorded video clip. 2 3 Press + to enter the edit window. / to select a Press to enter the trim window. » A bar for video trimming is displayed at the top of the window. 4 5 6 7 Press 8 Press +/- to select an option, then press to set the starting point you want. Press Press to set the ending point you want. Press » A video trim menu is displayed. Menu option [Go back] [Preview edit] "# $% [Cancel and exit] Description Go back to the trim window. Preview the trimmed video clip. Save the trimmed video Cancel the trim operation and exit. 1 During preview, hold . » A tag operation menu is displayed. 2 Press +/- to select an option, then press / to highlight [Yes]" Menu option [Play all] [Play tagged] [Quick impression] [Clear all tags] EN ? Options during video play Fast forward/reverse During video play, press and hold / . To return to the normal speed, release / . Adjust volume level 10 Description ! ! ! \ " During video play, press +/-. Adjust settings 1 . » A settings menu is displayed. 2 3 4 Press +/- to highlight an option. Press / [Format SD card] [TV system] Clear contents from the micro SD card. Change this setting if the output video does not appear correctly on your TV. to select a setting. Press Settings menu option [Flash] [Resolution] [Photo Size] [Scene] [Smile Detection] [Dual recording] [Autoplay] [Pre-record] [Capture sound] [Date] [Time] [Language] Description * > ][On], [Off] or [Auto]. Select a video resolution: [Full HD] (for best video quality), [Sports HD]^""" moving objects), or [Standard] ^" * " be saved (the higher the photo Select an automatic exposure mode that matches your shot for easy shooting. Enable/disable smile detection. Record full HD and compressed QVGA videos at the same time. Start automatic play when the camcorder is connected to a PC. Enable/disable 3-second prerecord mode. Turn on/off the capture sound. Set the date. Set the time. Select your desired menu language. EN 11 5 Use more of your camcorder Install and use the camcorder software Warning View video or pictures on TV If you remove the supplied software, you will not be able to get one from ArcSoft for free. With the software (ArcSoft MediaImpression HD Edition) available in the internal memory of the camcorder, you can import, edit, archive or upload your pictures/videos to the Internet easily. Mini HDMI / HDMI Note The software supplied only works on PCs that operate Microsoft® Windows® XP, Vista and Windows 7. When you connect the camcorder to a Mac, use the iMovie software to import and edit your pictures/ videos directly. Install the camcorder software 1 ?# " > protective cover at the bottom of the camcorder. 2 Connect an HDMI cable (not supplied) to: the HDMI socket on the camcorder (requiring a mini HDMI connector) the HDMI input socket on an HDTV » An inquiry box for output mode selection is displayed. 3 To output the exact camcorder display with menu options to the TV screen, select [TV]. To output the camcorder display without menu options to the TV screen, select [Live CAM]. 4 & play. 12 EN 1 Connect the camcorder to a PC (see 'Get started' > 'Charge the built-in battery'). 2 If the software does not install # Setup icon at My Computer\CAM150. 3 $ % installation of the software. Install and use the camcorder software 1 On your PC, click Start\(All) Programs\ ArcSoft MediaImpression HD Edition. » The main screen of the software is displayed. 2 Click an option to select the corresponding operation. 3 Follow the on-screen instructions to complete the operation. Transfer video/pictures to a PC/Mac 1 Connect the camcorder to a PC/Mac (see 'Get started' > 'Charge the built-in battery'). » It may take some time for the PC/Mac 2 Find your video/pictures at My Computer\CAM150\DCIM\100MEDIA or My Computer\CAM150 SD\ DCIM\100MEDIA. 3 Copy any video/pictures you want to your designated folder in the PC/Mac. Tip z camcorder software (for PC) or iMovie (for Mac). EN 13 6 Technical specifications Product information is subject to change without prior notice. Image sensor Operation modes Lens (focusing) Focus mode Focus range Aperture + Exposure control White balance Auto power off Memory Shutter type Shutter speed ! format Video container format (compression) Video resolution format Battery PC interface System support 14 EN 1/3.2" 8MP CMOS sensor Movie record, picture record Auto focus f=4.76mm Auto focus }X F2.8 5X Auto Auto 3 minutes 64MB (512Mbit) DDR2 + 128MB SLC (96MB for AP) + Micro-SD card Slot Electronic 1/2~1/4000 second JPEG *.MP4 (H.264 ) Full HD (1080p 30) 1920 X1080 (30fps) Sports HD (720p 60) 1280X720 (60fps) VGA (4:3) 640X480 (30fps) AAC 1100mAh Li-ion (built-in); 120-minute battery life time based on 720P recording Mini USB 2.0 port Windows XP/Vista/ Windows 7, Mac (mass storage only ) TV out Power rating Weight Dimensions (W x H x D) NTSC/PAL selectable, Mini HDMI (type C) DC 5V, 500mA 145 g 57.6 x 109.2 x 21.5 mm 7 Frequently asked questions (FAQ) Why is there no response when I use the camcorder? * The camcorder is in power-off mode. Turn on the camcorder (see 'Get started' > 'Turn on'). * The built-in battery may be drained. Charge the battery (see 'Get started' > 'Charge the built-in battery'). Why is [Memory full!] displayed when I try to record? * Ensure that the Micro SD card has been inserted correctly (see 'Get started' > 'Load the Micro SD card'). * The memory is used up. Save your video/ pictures to a computer (see 'Use more of your camcorder' > 'Transfer video/pictures !J; " camcorder or clear the memory. How much memory is needed for 1 hour of Full HD recording? * The camcorder uses 4GB on average for 1 hour of Full HD video. For a more complex video recording (e.g. with lots of motions in the video, or a lot of panning), the camcorder will use more memory. This is done to maintain the video quality, but will increase the usage of memory. Why do I have no access to folders on the camcorder from my computer? * Ensure that the USB connection is correct. * The camcorder turns off automatically 15 minutes after it is connected to a computer. You can press to turn it on again. Why do my video/pictures look blurry? * Hold the camcorder steady in your hands during shooting. * * During video capture, do not move the camcorder too fast. Use a tripod (not supplied) if necessary. Why do my video/pictures look distorted on a TV screen? * Select the correct TV system. How do I charge the camcorder? * You can charge the camcorder via the supported USB cable. When you connect it to your PC/laptop it will automatically charge. You can also connect the camcorder to a USB charger via the supplied USB cable. How long do I have to charge the camcorder? * ; " " usage. The camcorder charge time when connected to your PC/laptop is 3 hours. When you charge it via USB adaptor, the charge time is 2 hours. ; < =>@JX^ charge the battery? CAM150 can be charged via regular USB adaptors, which are readily available in electronic stores. CAM150 is also compatible with iPhone adaptors. How do I fast-forward or rewind on the camcorder? * You can fast-forward during play of a movie by pressing the right-button for 2 seconds. You can rewind during play of a movie by pressing the left-button for 2 seconds. Camcorder stopped responding? * In the unlikely event that your camcorder stops responding, you can manually reset it. The reset button is located under the protective cover. There you see a small opening beside the USB socket. Please use a small prying object (like a pen) to insert and press gently for resetting. After you have reset the camcorder, please turn on the camcorder again, and set-up will start again. EN 15 Why does the camcorder sometimes not record the right color? * To record both indoors and outdoors, and not having to change any settings, the camcorder has an automatic whitebalance correction. This enables you to record both indoors and outdoors where the amount of light in the environment changes. If you move fast from outdoors to indoors, the camcorder might need some time to correct that, and in extreme cases the colors might seem a bit unnatural. However, after a few seconds this will be corrected automatically by the camcorder. Can I connect the camcorder directly to TV, DVD/Blu-ray player or Home Cinema set via their USB-port? * The USB connection is designed to share your videos/pictures to your PC or Laptop. You can connect the CAM150 directly to your TV, DVD/Blu-ray player or Home cinema set (called the host from this point on), and it will play the pictures that are stored on the CAM150. To play the videos from the CAM150, it depends if your host " [" CAM150. Most Blu-ray enabled players are able to play this format. How do I connect it to a Windows PC/laptop? * Connect the camcorder to your PC/laptop via USB. For easy sharing and editing, install the software program (Media Impression HD) that comes with the camcorder. How do I connect it to a Mac? * The camcorder works with the Mac via USB. The camcorder works great with the iMovie software, which is part of the iLife package that comes with your Mac. To transfer videos using iMovie, simply connect the camcorder to your Mac via USB, launch iMovie and start importing by clicking the camcorder icon. Select ‘Use original quality’ to ensure the best quality, 16 EN How do I play my videos on TV? * To play back on TV, please use an HDMI connector (mini HDMI to standard HDMI) if your TV accepts HDMI input. Why is there no lens cover? * The camcorder comes without a lens cover, keeping it simple to use and fussfree. It is made of robust material that doesn't scratch under normal usage. A travel pouch and a lens cloth are provided, allowing you to keep the camcorder clean. What format does the camcorder record in? * The camcorder uses the same video format as Blu-ray players and discs – H.264. This highly sophisticated format delivers superb HD picture quality. What does pre-record mean that is in the setting? * The pre-record button is designed to let you never miss a moment. When you enable the pre-record function, the camcorder will record video 3 seconds before you have pressed the record button. So when you play-back the Z = " pressed the record button. This can be " \ The pre-record function will not drain battery life, it will operate as normal. # ; that? * = ; camcorder, set [Dual recording] to [Off] before you record video (see 'Use your camcorder' > 'Adjust settings'). Tips on video making * You can easily look back on fun moments and relive them with the camcorder. To enjoy these memories to the fullest, here are some simple video tips: When capturing videos, hold your camcorder steady in your hand Don't move too fast when panning (i.e. will be hard to follow what is captured when you review the video Try shooting from different angles – for example, from the side, from the front, or even from below. You can easily join the different video segments together with the PC software included EN 17 Register online at www.philips.com/welcome today to get the very most from your purchase. Registering your model with PHILIPS makes you eligible for all of the valuable benefits listed below,so don't miss out. Register online at www.philips.com/welcome to ensure: *Product Safety Notification *Additional Benefits By registering your product, you'll receive notification - directly from the manufacturer. Registering your product guarantees that you'll receive all of the privileges to which you’re entitled, including special moneysaving offers. Congratulations on your purchase, and welcome to the “family!” Dear PHILIPS product owner: Thank you for your confidence in PHILIPS.You’ve selected one of the best-built, best-backed products available today.We’ll do everything in our power to keep you happy with your purchase for many years to come. As a member of the PHILIPS “family,” you’re entitled to protection by one of the most comprehensive warranties in the industry. What’s more, your purchase guarantees you’ll receive all the information and special offers for which you qualify, plus easy access to accessories from our convenient home shopping network. Most importantly, you can count on our uncompromising commitment to your total satisfaction. All of this is our way of saying welcome - and thanks for investing in a PHILIPS product. P.S. To get the most from your PHILIPS purchase, be sure to register online at: www.philips.com/welcome 18 This “bolt of lightning” indicates uninsulated material within your unit may cause an electrical shock. For the safety of everyone in your household, please do not remove product covering. The “exclamation point” calls attention to features for which you should read the enclosed literature closely to prevent operating and maintenance problems. WARNING: To reduce the risk of fire or electric shock, this apparatus should not be exposed to rain or moisture and objects filled with liquids, such as vases, should not be placed on this apparatus. CAUTION: To prevent electric shock, match wide blade of plug to wide slot, fully insert. ATTENTION: Pour éviter les choc électriques, introduire la lame la plus large de la fiche dans la borne correspondante de la prise et pousser jusqu’au fond. For Customer Use Enter below the Serial No. which is located on the rear of the cabinet. Retain this information for future reference. Model No.__________________________ Serial No. ________________________ PHILIPS LIMITED WARRANTY ONE (1) YEAR WARRANTY COVERAGE: PHILIPS warranty obligation is limited to the terms set forth below. WHO IS COVERED: Philips warrants the product to the original purchaser or the person receiving the product as a gift against defects in materials and workmanship as based on the date of original purchase (“Warranty Period”) from an Authorized Dealer. The original sales receipt showing the product name and the purchase date from an authorized retailer is considered such proof. WHAT IS COVERED: The Philips warranty covers new products if a defect in material or workmanship occurs and a valid claim is received by Philips within the Warranty Period. At its option, Philips will either (1) repair the product at no charge, using new or refurbished replacement parts, or (2) exchange the product with a product that is new or which has been manufactured from new, or serviceable used parts and is at least functionally equivalent or most comparable to the original product in Philips current inventory, or (3) refund the original purchase price of the product. Philips warrants replacement products or parts provided under this warranty against defects in materials and workmanship from the date of the replacement or repair for ninety (90) days or for the remaining portion of the original product’s warranty, whichever provides longer coverage for you. When a product or part is exchanged, any replacement item becomes your property and the replaced item becomes Philips’ property. When a refund is given, your product becomes Philips’ property. Note: Any product sold and identified as refurbished or renewed carries a ninety (90) day limited warranty. Replacement product can only be sent if all warranty requirements are met. Failure to follow all requirements can result in delay. WHAT IS NOT COVERED - EXCLUSIONS AND LIMITATIONS: This Limited Warranty applies only to the new products manufactured by or for Philips that can be identified by the trademark, trade name, or logo affixed to it. This Limited Warranty does not apply to any non-Philips hardware product or any software, even if packaged or sold with the product. Non-Philips manufacturers, suppliers, or publishers may provide a separate warranty for their own products packaged with the bundled product. Philips is not liable for any damage to or loss of any programs, data, or other information stored on any media contained within the product, or any non-Philips product or part not covered by this warranty. Recovery or reinstallation of programs, data or other information is not covered under this Limited Warranty. This warranty does not apply (a) to damage caused by accident, abuse, misuse, neglect, misapplication, or non-Philips product, (b) to damage caused by service performed by anyone other than Philips or Philips Authorized Service Location, (c) to a product or a part that has been modified without the written permission of Philips, or (d) if any Philips serial number has been removed or defaced, or (e) product, accessories or consumables sold “AS IS” without warranty of any kind by including refurbished Philips product sold “AS IS” by some retailers. This Limited Warranty does not cover: F Shipping charges to return defective product to Philips. F abor charges for installation or setup of the product, adjustment of customer controls on the product, and installation or repair of antenna/signal source systems outside of the product. F !roduct repair and/or part replacement because of improper installation or maintenance, connections to improper voltage supply, power line surge, lightning damage, retained images or screen markings resulting from viewing fixed stationary content for extended periods, product cosmetic appearance items due to normal wear and tear, unauthorized repair or other cause not within the control of Philips. F amage or claims for products not being available for use, or for lost data or lost software. F amage from mishandled shipments or transit accidents when returning product to Philips. F product that requires modification or adaptation to enable it to operate in any country other than the country for which it was designed, manufactured, approved and/or authorized, or repair of products damaged by these modifications. F product used for commercial or institutional purposes (including but not limited to rental purposes). F !roduct lost in shipment and no signature verification receipt can be provided. F ailure to operate per Owner’s Manual. TO OBTAIN ASSISTANCE IN THE U.S.A., PUERTO RICO, OR U.S. VIRGIN ISLANDS… Contact Philips Customer Care Center at: 1-888-PHILIPS (1-888-744-5477) TO OBTAIN ASSISTANCE IN CANADA… 1-800-661-6162 </8-2Speaking) 1-888-PHILIPS (1-888-744-5477) - (English or Spanish Speaking) REPAIR OR REPLACEMENT AS PROVIDED UNDER THIS WARRANTY IS THE EXCLUSIVE REMEDY #THE CONSUMER. PHILIPS SHALL NOT BE LIABLE #ANY INCIDENTAL OR CONSEQUENTIAL DAMAGES #BREACH ANY EXPRESS OR IMPLIED WARRANTY ON THIS PRODUCT. EXCEPT TO THE EXTENT PROHIBITED BY APPLICABLE LAW, ANY IMPLIED WARRANTY MERCHANTABILITY OR %$$ #A PARTICULAR PURPOSE ON THIS PRODUCT IS LIMITED IN DURATION TO THE DURATION THIS WARRANTY. Some states do not allow the exclusions or limitation of incidental or consequential damages, or allow limitations on how long an implied warranty lasts, so the above limitations or exclusions may not apply to you. This warranty gives you specific legal rights. You may have other rights which vary from state/province to state/province. Philips, P.O. Box 10313 Stamford, CT 06904 3140 035 50201 19 Specifications are subject to change without notice © 2011 Koninklijke Philips Electronics N.V. All rights reserved. CAM105_37_UM_V1.0