1
Synology DiskStation User's Guide
Based on DSM 4.0
Document ID
Syno_UsersGuide_DS_20120326
Table of Contents
Chapter 1: Introduction
Chapter 2: Get Started with Synology DiskStation Manager
Install Synology DiskStation .................................................................................................................................................. 7
Log in to Synology DiskStation Manager ............................................................................................................................. 7
DiskStation Manager Appearance ...................................................................................................................................... 10
Manage DSM with the Main Menu ..................................................................................................................................... 12
Manage Personal Options ................................................................................................................................................... 14
Chapter 3: Modify System Settings
Change DSM Settings .......................................................................................................................................................... 16
Change Network Settings .................................................................................................................................................... 19
Modify Regional Options ...................................................................................................................................................... 22
Use Energy Saving Features .............................................................................................................................................. 24
Chapter 4: Manage Storage Space
What is Volume and Disk Group?....................................................................................................................................... 27
Manage Volumes or Disk Groups with Storage Manager ............................................................................................... 28
Manage iSCSI Target with Storage Manager ................................................................................................................... 33
Manage iSCSI LUNs with Storage Manager ..................................................................................................................... 35
Manage Hard Disks with Storage Manager....................................................................................................................... 37
Manage External Disks ........................................................................................................................................................ 38
Chapter 5: Access your DiskStation from the Internet
Use the EZ-Internet Wizard ................................................................................................................................................. 40
Set Up Port Forwarding Rules for Router .......................................................................................................................... 40
Publish your DiskStation to the Internet via ezCloud ....................................................................................................... 42
Set up VPN Connection ....................................................................................................................................................... 44
Chapter 6: Enhance Internet Security
Prevent Unauthorized Connection with Firewall ............................................................................................................... 45
Automatically Block Suspicious Login Attempts ............................................................................................................... 46
Chapter 7: Set Up File Sharing
Enable File Sharing Protocols for All Platforms ................................................................................................................ 48
Join DiskStation to Directory Service ................................................................................................................................. 50
Host LDAP Service with Directory Server ......................................................................................................................... 52
Manage Users and Groups.................................................................................................................................................. 52
Set Up Shared Folders ......................................................................................................................................................... 57
Define Windows ACL Privileges for Shared Folder.......................................................................................................... 61
Index Shared Folder Contents ............................................................................................................................................ 62
2
Chapter 8: Access Files from Anywhere
Access Files within the Intranet........................................................................................................................................... 63
Access Files via FTP ............................................................................................................................................................ 66
Access Files via WebDAV ................................................................................................................................................... 67
Sync Files via Cloud Station ................................................................................................................................................ 68
Access Files via File Station ................................................................................................................................................ 69
Chapter 9: Back Up Data
Back Up Computer Data ...................................................................................................................................................... 76
Back up Data or iSCSI LUN on Synology DiskStation..................................................................................................... 77
Sync Shared Folder Contents between DiskStations ...................................................................................................... 80
Backup DiskStation Data with Time Backup ..................................................................................................................... 82
Back up Data on USB Device or SD Card......................................................................................................................... 83
Chapter 10: Host Websites, Email Server, and Print Server
Use Web Station to Host Websites .................................................................................................................................... 84
Host Mail Server .................................................................................................................................................................... 87
Set Synology DiskStation as Print Server ......................................................................................................................... 89
Chapter 11: Discover Various Applications with Package Center
What Package Center Offers .............................................................................................................................................. 92
Chapter 12: Share Photos, Videos, and Blogs with Photo Station
Install Photo Station .............................................................................................................................................................. 95
Enable Personal Photo Station ........................................................................................................................................... 96
Set Thumbnail and Video Settings ..................................................................................................................................... 97
Manage Photo Station User Accounts ............................................................................................................................... 98
Create Albums ....................................................................................................................................................................... 99
Manage Albums .................................................................................................................................................................. 100
View and Edit Photos and Videos..................................................................................................................................... 102
Customize Album Layout ................................................................................................................................................... 103
Use the Blog ........................................................................................................................................................................ 103
Chapter 13: Play Music with Audio Station
Install Audio Station ............................................................................................................................................................ 105
Choose Audio Source......................................................................................................................................................... 106
Organize Your Music .......................................................................................................................................................... 108
Play Music ............................................................................................................................................................................ 111
Download Music .................................................................................................................................................................. 114
Chapter 14: Download Files with Download Station
Install Download Station..................................................................................................................................................... 115
Set up BT/HTTP/FTP/NZB ................................................................................................................................................ 116
Create BT/HTTP/FTP/NZB Download Tasks .................................................................................................................. 119
Manage BT/HTTP/FTP/NZB Download Tasks ............................................................................................................... 122
Set up eMule ........................................................................................................................................................................ 123
Connect to ED2K Server/Kad............................................................................................................................................ 126
Create eMule Download Tasks ......................................................................................................................................... 127
Manage eMule Download Tasks....................................................................................................................................... 128
3
Table of Contents
Chapter 15: Safeguard Your Environment with Surveillance Station
Install Surveillance Station................................................................................................................................................. 130
Manage IP Cameras ........................................................................................................................................................... 131
Watch Live View .................................................................................................................................................................. 132
Play and Manage Events ................................................................................................................................................... 134
Manage Notification Settings ............................................................................................................................................. 135
Use E-Map ........................................................................................................................................................................... 138
Manage Advanced Settings ............................................................................................................................................... 139
Assign Privilege ................................................................................................................................................................... 140
View Log ............................................................................................................................................................................... 141
About Camera License ....................................................................................................................................................... 142
Chapter 16: Manage Media Server and iTunes Service
Install DLNA Media Server ................................................................................................................................................ 143
Manage DLNA Media Server ............................................................................................................................................ 143
Install iTunes Server ........................................................................................................................................................... 146
Manage iTunes Server ....................................................................................................................................................... 146
Chapter 17: Perform Advanced Management Tasks
Check System Information................................................................................................................................................. 148
Monitor System Resources................................................................................................................................................ 151
Update DSM ........................................................................................................................................................................ 152
Receive Event Notifications ............................................................................................................................................... 153
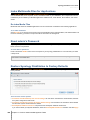
Access Applications with Independent Login .................................................................................................................. 156
Index Multimedia Files for Applications............................................................................................................................ 158
Reset admin's Password.................................................................................................................................................... 158
Restore Synology DiskStation to Factory Defaults......................................................................................................... 158
Reinstall Synology DiskStation ......................................................................................................................................... 159
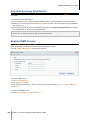
Enable SNMP Service ........................................................................................................................................................ 159
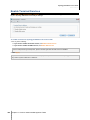
Enable Terminal Services .................................................................................................................................................. 160
Chapter 18: Communicate with Mobile Devices
Manage DSM Settings with DSM mobile ......................................................................................................................... 161
Use iOS and Android Apps ................................................................................................................................................ 161
Use Other Mobile Devices ................................................................................................................................................. 162
4
Table of Contents
Chapter
Chapter 1:
Introduction
Congratulations on your purchase of Synology DiskStation. Synology DiskStation is a multi-functional NetworkAttached Storage server, serving as a file-sharing center within your Intranet. Moreover, it is specially designed
for a variety of purpose, allowing you to perform the following tasks with the web-based Synology DiskStation
Manager (DSM):
Store and Share Files over the Internet
Windows users, Mac users, and Linux users can easily share files within the Intranet or through the Internet.
Unicode language support makes sharing files in different languages from Synology DiskStation simple.
Manage Files with Web-Based File Station
One of Synology DiskStation Manager’s applications, File Station, can make it possible for users to manage their
files on Synology DiskStation easily through a web interface. You can also access the files stored on
Synology DiskStation with a mobile device.
Transfer Files via FTP
Synology DiskStation provides FTP service with bandwidth restriction and anonymous login. To transfer data
safely, FTP over SSL/TLS and uninvited IP auto-block are also available.
Sync Files with Cloud Station
Cloud Station is a file sharing service that allows your DiskStation to become a file sync center to sync files
between multiple client computers. With the Cloud Station application installed on your computers, you can
simply drop your office file to a folder on your office computer, and then open the same file automatically synced
to your laptop.
Share Storage Capacity as iSCSI LUNs
You can designate portion of your Synology DiskStation volume space to be an iSCSI LUN, which will allow the
iSCSI initiator to access the space like a local disk.
Back Up Files on Computer and Server
Synology DiskStation provides various backup solutions to back up computer data to Synology DiskStation, back
up Synology DiskStation data or iSCSI LUN to an external hard drive, another Synology DiskStation, an rsynccompatible server, Amazon S3 server, HiDrive backup server, etc.
Enjoy Entertainment Content on the Server
Download Station allows you to download files from the Internet through BT, FTP, HTTP, eMule and NZB to
Synology DiskStation. The Media Server and iTunes support allows computers or DMA devices within LAN to
1
playback multimedia files on Synology DiskStation .
With the USBCopy or SDCopy function, you can press the Copy button on your DiskStation to instantly copy files
2
from a camera or SD card to Synology DiskStation.
Share Photos, Videos, and Blogs with Photo Station
Photo Station gives you the freedom to share photos and videos over the Internet without complicated upload
steps. Album control ensures the content is shared with the right persons. Visitors can leave comments for your
--------1
2
5
For recommended peripheral models, including hard drive, USB printer, DMA, and UPS, please visit www.synology.com.
USBCopy or SDCopy is supported on specific models only. Visit www.synology.com for more information.
1
Synology DiskStation User's Guide
Based on DSM 4.0
photos. Furthermore, a brand new blogging system is integrated for you to easily share your life and thoughts
over the Internet.
Enjoy Music Anytime and Anywhere
Audio Station allows you to listen to music stored on the Synology DiskStation, from a connected iPod, or even
stream Internet Radio stations. In addition, you can stream music from the Synology DiskStation with a web
browser over the Internet.
Host Websites
The Virtual Host feature allows you to host up to 30 websites using Web Station, with PHP and MySQL
supported.
Record Videos with IP Cameras
Surveillance Station allows you to manage, view, and record videos from multiple IP cameras over the network.
By accessing the web-based management interface of Surveillance Station, you can watch the real-time image
the camera is monitoring, and record videos continuously, in motion-detection mode, or in alarm-recording mode.
Discover More Apps with Package Center
Package Center brings intuitiveness and convenience for users to easily install and update a variety of
applications (which are packed into packages). Just browse all available applications and select the ones that
best suit your needs. All can be done with just a few clicks.
USB Print Server
USB printers connected to your DiskStation can be shared by client computers over the local area network.
AirPrint support allows you to print to the printer from an iOS device, while Google Cloud Print support allows you
1
to print to the printer when you are using Google products and services.
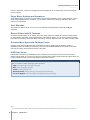
Online Resources
Click on the links to obtain Synology's online resources.
FAQ: www.synology.com/support/faq.php
Wiki: forum.synology.com/wiki
Forum: forum.synology.com
Download Center: www.synology.com/support/download.php
Technical Support: www.synology.com/support/support_form.php
--------1
6
For recommended peripheral models, including hard drive, USB printer, DMA, and UPS, please visit www.synology.com.
Chapter 1: Introduction
Chapter
Chapter 2:
Get Started with Synology DiskStation
Manager
This chapter explains how to log in to Synology DiskStation's web-based management UI, Synology
DiskStation Manager (DSM), customize your own desktop, manage its taskbar and widgets, and use the Main
Menu to access DSM settings and applications.
Install Synology DiskStation
For more information about setting up Synology DiskStation and installing DSM, see the Quick Installation
Guide that came with your installation disc.
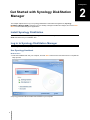
Log in to Synology DiskStation Manager
You can log in to DSM with Synology Assistant or with a web browser.
Use Synology Assistant
Windows User:
1 Insert the installation disc into your computer, and click Start. Follow the onscreen instructions to complete the
setup process.
2 Synology Assistant will be installed and launched on your computer.
7
2
Synology DiskStation User's Guide
Based on DSM 4.0
3 Choose the server you want to manage. Click Connect or double-click the selected server to go to DSM's
login screen.
4 Enter your user name and password, and click Login. The default password for admin is empty. If you want to
save your login information and log in automatically next time, tick Remember me before logging in.
Mac OS X User:
1 Insert the installation disc into your computer, and then double-click the SynologyInstall icon on the desktop.
2 In the window that appears, double-click the MacOSX folder, and then double-click Synology Assistant[number].dmg.
3 Double-click the Synology Assistant.app in the window that appears.
4 Follow step 3 to 4 of the “Windows User” section to log in to DSM.
8
Chapter 2: Get Started with Synology DiskStation Manager
Synology DiskStation User's Guide
Based on DSM 4.0
Linux (Ubuntu) User:
1 Insert the installation disc into your computer, and then double-click the SynologyInstall icon on the desktop.
2 In the File Browser window that appears, double-click the Linux folder, and then double-click Synology
Assistant-[number].tar.gz.
4.0-2197
4.0-2197
3 Click Extract, and then extract the SynologyAssistant directory to the path /usr/local or any other path.
4.0- 219 7
4 Go to the path /usr/local/SynologyAssistant (or [the path you just specified]/SynologyAssistant), doubleclick SynologyAssistant, and then select Run in Terminal in the dialog box that appears.
5 Follow step 3 to 4 of the “Windows User” section to log in to DSM.
9
Chapter 2: Get Started with Synology DiskStation Manager
Synology DiskStation User's Guide
Based on DSM 4.0
Use a Web Browser
1 Open a web browser window, enter any of the following in the address field, and then press Enter on your
keyboard:
http://Synology_Server_IP:5000
http://Synology_Server_Name:5000/ (or http://Synology_Server_Name.local:5000/ on a Mac)
Synology_Server_Name should be replaced with the name you set up for Synology DiskStation during the
setup process. If you choose One-step Setup during the setup process, the Synology_Server_Name will be
DiskStation, CubeStation, USBStation, or RackStation.
2 Enter your user name and password, and click Login. The default password for admin is empty. If you want to
save your login information and log in automatically next time, tick Remember me before logging in.
Note: To ensure your connection to DSM runs smoothly, please use the following browsers.
Chrome
Firefox: 3.6 or later
Safari: 5.0 or later
Internet Explorer: 8.0 or later
DiskStation Manager Appearance
When you log in to Synology DiskStation Manager (DSM), you can see the desktop, taskbar and widgets.
Desktop and Shortcuts
The desktop is where your application windows are displayed. You can also create desktop shortcuts to
frequently used applications.
10
Chapter 2: Get Started with Synology DiskStation Manager
Synology DiskStation User's Guide
Based on DSM 4.0
To create a desktop shortcut to an application:
Drag its thumbnail from the Main Menu to the desktop.
To remove a desktop shortcut to an application:
Right-click the shortcut and choose Remove shortcut.
To open Synology-designed or third-party applications (available at Package Center) in a new browser
window:
Right-click the applications' Main Menu thumbnail or desktop shortcut and choose Open in New Window.
Note: You can also customize your desktop background color or wallpaper with the Desktop function. See "Desktop"
on Page 14 for more information.
Taskbar
The taskbar at the top of the desktop contains the following functions:
1 The Show Desktop button: Click to clear your application windows and reveal the desktop. Click again to
bring the windows back to the desktop. For more information about application windows, see "Open
Application Windows" on Page 13.
2 The Main Menu button: Click to reveal the Main Menu. See "Manage DSM with the Main Menu" on Page 12
for more information.
3 The icons of open applications:
Click the icon of an application to show or hide its window on the desktop.
Right-click the icon and choose from the shortcut menu to manage the application window (Maximize,
Minimize, Restore, Close) or its taskbar icon (Pin to Taskbar, Unpin from Taskbar).
4 The Notifications button (with an exclamation mark): Click to check the logs of important events.
Clear All: Click to remove all events and hide the Notification button.
Show All: Click to see all notifications in another window.
(Number) unread: If there are more than 30 unread notifications, (Number) unread will appear instead of
Show All to notify you of how many notifications have not been read. Click to see all notifications in another
window.
Note: For more information about system log, see "Log" on Page 149.
5 The Options menu: Click to manage your user account settings or leave DSM.
Options: Click to manage personal options for your DSM users. See “Manage Personal Options” on Page
14 for more information.
Logout: Click to exit your current account and return to login screen.
6 The Search icon: Click to enter keywords in the search field to quickly find a list of relevant applications and
DSM Help articles.
7 The Pilot View button: Click to have an instant preview of all open applications and hover your mouse over
the application windows for quick navigation.
Note: Pilot View is not supported by Internet Explorer.
Widgets
The widgets at the bottom-right corner of the desktop contain the system information of your Synology
DiskStation.
11
Chapter 2: Get Started with Synology DiskStation Manager
Synology DiskStation User's Guide
Based on DSM 4.0
If there is only one volume on your DiskStation, you will be asked if you want to run the package after
installation. Click Yes to continue.
If there are multiple volumes on your DiskStation, you will be asked to choose from the drop-down menu to
specify a destination volume to install the package.
a Select your destination volume and click Next.
b Tick Run after installation if you want to run the package once the installation is complete, and click
Apply to install the package.
When the installation is complete, the package will be moved to the Installed tab and the Main Menu will
automatically expand with the package’s thumbnail on it. Moreover, the music shared folder will be created
automatically to contain your Audio Station data.
To launch Audio Station:
Go to Main Menu and click Audio Station.
To connect via Mobile Device:
You can download DS audio from Apple's App Store or Android Market to play the music in Audio Station with
your iOS and Android device. For more information about DS audio, see "Chapter 18: Communicate with Mobile
Devices" on Page 161.
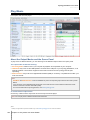
Choose Audio Source
On the left section of Audio Station are several audio sources you can choose from for playback on Audio Station.
Library
The library contains music in the music shared folders or any other indexed folders of your Synology DiskStation,
which will be organized into the following categories.
To browse your music library, do any of the following:
Click All Music to browse all music in the music shared folder.
Click By Folder to browse music by directory.
Click By Album to browse music by the album information of the song.
Click By Artist to browse music by the artist information of the song.
106
Chapter 13: Play Music with Audio Station
Synology DiskStation User's Guide
Based on DSM 4.0
Click By Genre to browse music by the genre information of the song.
Click Random100 to browse 100 songs chosen randomly by the system.
Click Recently added to browse the albums that have been recently added.
Note: To add a folder as an indexed folder, log in to DSM as admin (or a user belonging to
the administrators group), and then go to Main Menu > Control Panel > Media Indexing Service > Indexed
Folder. For more information, click the Help button at the top-right corner of the window.
Personal and Shared Playlist
You can click the disclosure triangle next to Personal Playlist or Shared Playlist to see your personal playlists
(viewable by yourself only) or shared playlists (viewable by all DiskStation users with access to Audio Station).
To edit your playlist, do any of the following:
Select Refresh to update all playlists.
Select New Playlist to create a new playlist.
Note: Only users with the Manage Playlist privilege (in Settings > Privileges in the top-left corner) can edit or add
playlists.
Smart Playlist
You can click the disclosure triangle next to Smart Playlist to see your smart playlists.
To refresh your smart playlist:
Select Refresh to update all smart playlists.
To add or edit a smart playlist, do any of the following:
Add or edit in DSM:
a Go to Main Menu > iTunes Server in Synology DiskStation Manager.
b Click Smart Playlist to add or edit your playlist.
Add or edit in Audio Station: See "Work with Playlist" on Page 110 for more information.
iPod
If there is an iPod classic connected to the USB port of your DiskStation, you can click the disclosure triangle
next to iPod to see the iPod connected to the USB port on Synology DiskStation.
To refresh iPod contents:
Select Refresh to update the iPod contents.
Note:
Audio Station only supports iPods formatted by iTunes for Windows.
Only users with the USB/UPnP Renderer privilege (in Settings > Privileges in the top left corner) have access to
iPod contents.
Internet Radio
Audio Station comes with lists of Internet radio stations provided by SHOUTCast(TM) and RadioIO. You can also
add your radio stations manually.
To add a radio station:
1 Select Add Radio Station to open the settings window.
2 Fill in the corresponding information (Name, Description, and URL) to add a radio station to the User defined
list.
To see the list of radio stations:
1 Select an existing Internet radio provider or User defined list.
107
Chapter 13: Play Music with Audio Station
Synology DiskStation User's Guide
Based on DSM 4.0
2 See the details of its radio stations in the main section.
3 Drag your favorite radio stations to My favorite for quick access.
Media Server
Audio Station can browse and play media contents on DLNA-certified Digital Media Servers or other
Synology DiskStations on the local area network.
To search for media servers on the local area network:
Select Scan Media Server to search for available servers.
Note: Only users with the UPnP Browsing privilege (in Settings > Privileges in the top left corner) can play media
server contents.
Organize Your Music
After selecting one of the audio sources on the left side, you can browse its contents in the main section of the
Audio Station, and organize your favorite music into playlists.
Browse Music
You can change views, see your current location, and use the search field to find your music quickly.
Note: If you see unreadable song titles, album names, or artist names while browsing through your music, go to
Synology DiskStation Manager to set the correct codepage that matches the language of your computer, and then reindex your music. See "Language" on Page 22 and "Search Music" on Page 109 for more information.
Change Views
By clicking the three buttons above the main section, you can browse your songs in different views.
There are three views to browse your songs:
List (the first button): Organize your items in a list.
Icon (the second button): The icons or artwork (if any) of your songs or folders appear in the main section.
108
Chapter 13: Play Music with Audio Station
Synology DiskStation User's Guide
Based on DSM 4.0
Cover Flow (the third button): All icons/artwork and song/directory names appear using Cover Flow, a fancy
way to flip through your library.
Note:
Cover flow is available only when browsing the library using By Album or By Artist.
Only when music files are in the following formats can their cover art be displayed in Audio Station: MP3, M4A.
See Your Current Location
You can use the Up icon (with an upward arrow) or any of the path names above the main area to go back to
previous directories.
To go back to a previous directory, do any of the following:
Click the Up button to go back to the last directory.
Click any of the path names to the right of the Up icon to go back to a previous directory.
Search Music
You can use the search field above the music player section of Audio Station to search your music.
To search music:
1 Choose a category from the All Categories drop-down menu.
2 Enter a word or phrase in the search field.
3 Press Enter (PC) or Return (Mac) on your keyboard.
The search result will appear in the main section.
To filter the artist, album, or genre to show in the main section:
When you are at the root directory of By Album, By Artist, or By Genre, you can see the Filter field above the
main area of Audio Station. Enter a keyword in the field and press "Enter" on your keyboard to quickly find the
album, artist, or genre you want, depending on your current location.
To re-index audio files:
1 Go to Main Menu > Control Panel > Media Indexing Service.
2 Under the Media Indexing Service tab, click Re-index to reconstruct the index structure of the audio files If
you found missing music in Audio Station. The process will be executed in the background.
Edit Music Information
With Audio Station, you can view or edit the information of music files.
To view or edit music information:
1 Select one or more music files, and right-click to choose Edit music tag.
2 Here you can view or modify the music file's information, or choose a language from the Codepage drop-down
menu to convert non-Unicode text to Unicode and display the text in the correct language. (System default is
the codepage you specified at Main Menu > Control Panel > Regional Options.)
3 Click Save to finish the setup.
Note:
You can only edit music files in the following formats: mp3, wma, wav, ogg.
Only users with the Edit Music Tag privilege (in Settings > Privileges in the top left corner) can edit music
information.
Display Additional Attributes
You can display additional attributes of your music to show them in new columns of the main section.
To display additional attributes:
1 Hover the pointer over any column header of the main section, and click the downward arrow that appears to
the right of the header.
109
Chapter 13: Play Music with Audio Station
Synology DiskStation User's Guide
Based on DSM 4.0
2 From the pop-up menu, choose the Columns submenu.
3 Tick the checkboxes next to the extra attributes to show them in new columns.
Work with Playlist
You can organize your songs into playlists to categorize and access your favorite music more easily.
There are two types of playlists: Personal playlist (viewable by the DiskStation user who creates the playlist)
and shared playlist (viewable by all DiskStation users with access to Audio Station).
To create a playlist, do any of the following:
Method 1:
a Click New Playlist under Personal Playlist or Shared Playlist to create an empty playlist.
b While browsing through the library, select any songs/radio stations in the main section.
c Drag the selected songs/radio stations to the playlist you just created.
Method 2:
a While browsing through your library, select any songs/radio stations you want in the main section.
b Drag the selected songs/radio stations to New Playlist below Personal Playlist or Shared Playlist.
Method 3:
a Go to Playlist > New Playlist at the top-left corner to create an empty personal playlist. (if you want to
create a shared playlist, tick Add as shared playlist.)
b While browsing through the library, select any songs in the main area, and then drag them to the playlist you
just created.
To create a smart playlist:
1 Go to Playlist > New Smart Playlist at the top-left corner to create a personal smart playlist.
2 Name the playlist and click OK.
3 In the window that appears, click Add Rule to set the rules, and click OK.
4 You will see the new smart playlist under Personal Playlist on the left panel.
Note:
You cannot add folders to playlists.
You can also add songs from the queue to a new playlist. See "About the Output Modes and the Queue Panel" on
Page 111 for more information.
DSM administrators (DSM admin or a user belonging to the administrators group) can create shared smart
playlists by going to DSM's Main Menu > iTunes Server and clicking the Smart Playlist button.
To rename or remove a playlist:
Right-click the playlist and choose Rename or Delete.
To adjust the order of songs in a playlist, do any of the following:
Select songs in the main section and click Up or Down on the top to move them up or down in the playlist.
Select and drag the songs up or down in the main section.
To remove songs from a playlist:
Press and hold Shift or Ctrl while making multiple selections, and right-click to choose Delete.
To copy a shared playlist to a personal playlist and vice versa:
Right-click the playlist and choose Copy to personal playlist or Copy to shared playlist.
To edit the rules of a smart playlist:
Right-click the playlist and choose Edit smart playlist to modify the rules.
110
Chapter 13: Play Music with Audio Station
Synology DiskStation User's Guide
Based on DSM 4.0
Play Music
The right side of Audio Station consists of the queue panel and the music player. You can play the music added
to the queue with the music player.
About the Output Modes and the Queue Panel
To play music via different devices, you can add songs to the different output modes in the queue panel.
The output modes include the following:
Streaming Mode: Stream music to your computer for playback via the speakers of your computer.
USB Mode: Play music via the USB speakers connected to the USB port of your Synology DiskStation, or via
external speakers or home stereo equipment connected to the audio dock of Synology Remote (sold
separately).
1
Media Renderer: Play music via a Digital Media Renderer (DMR) or an AirPlay compatible device within your
local area network.
Note:
USB Mode and Media Renderer mode are available only when corresponding output devices are found by Audio
Station.
If you play music via the Optical S/PDIF Output port on the audio dock of Synology Remote, adjust the remote
volume to maximum to achieve best audio quality.
For more information about Synology Remote, visit www.synology.com.
To switch between output modes:
Choose any of them from the drop-down menu at the top of the music player.
Note: You can play music in different modes at the same time.
--------1
111
AirPlay is supported on specific models only. Visit www.synology.com for more information.
Chapter 13: Play Music with Audio Station
Synology DiskStation User's Guide
Based on DSM 4.0
Add Music to Queue
You can add your songs from the library to the queue panel on the right side for playback.
To add your songs from the library to the queue panel, do any of the following:
Double-click an item in the main section to add it to the queue and start playing it right away.
Select one or more items in the main section, and then drag them to the queue.
Select one or more items in the main section, right-click and choose Add selections to queue to add selected
songs to the queue.
Right-click an item and choose Add all to queue to add all items in the same directory to the queue.
Add a Playlist to Queue
You can add or append playlists to the queue panel on the right side for playback.
To add a playlist to the queue and replace the existing songs in the queue:
Right-click the playlist and choose Play. Audio Station will play the songs in the playlist immediately.
To append a playlist to the queue without replacing the existing songs in the queue:
Right-click the playlist and choose Add to queue.
Manage Songs in the Queue Panel
To play a song in the queue:
Right-click the song and choose Play to play it right away.
To adjust the order of songs in the queue, do any of the following:
Select and drag the songs up and down in the queue.
Select the song, right-click one of them, and choose Up or Down.
To add all songs in the current queue panel to a new playlist:
Right-click any of the songs and choose Save playing queue.
To remove a song from the queue:
Select the song, right-click and choose Remove.
To remove all songs from the queue:
Right-click any of the songs and choose Remove all.
Note: Only users with the USB/UPnP Renderer privilege (in Settings > Privileges in the top left corner) can play
music through USB devices or UPnP renderers.
Play Music with Music Player
You can play the music added to the queue with the music player.
The upper part of the music player displays the information of the currently playing music, including the song's
title, album, artist, and duration. The lower part contains the controls you can use to control music playback.
To play a song:
Click Play/Pause, Next, or Previous.
To skip to any point in the currently playing song:
Drag the playhead along the timeline (below the song's duration) to any point you want.
To adjust the volume:
Drag the volume slider below the timeline.
112
Chapter 13: Play Music with Audio Station
Synology DiskStation User's Guide
Based on DSM 4.0
To repeat all songs or currently playing song in the queue, or turn off repeat:
Click the No repeat, repeat all, or repeat one button (the first button from the left in the lower-right corner of the
music player).
To play the songs in the queue in random order:
Click Shuffle on/off (the second button from the left in the lower right corner of the music player).
To customize sound frequencies with equalizer (USB mode only):
Click the EQ button to open the equalizer, tick the checkbox, and choose a preset from the drop-down menu. You
can also drag the sliders and save your own User Defined preset.
Play Music with Mini Player
Click the Switch to mini player button at the top-right corner of the music player.
To play a song:
Click Play/Pause, Next, or Previous.
To skip to any point in the currently playing song:
Drag the playhead along the timeline (below the song's duration) to any point you want.
To adjust the volume:
Drag the volume slider below the timeline.
To switch back to the full mode:
Click the Switch to full mode button at the bottom-right corner of the mini player.
Manage Transcoder
Managing transcoder will allow Audio Station to support more audio formats under streaming mode. The
following audio formats will be transcoded if your browser does not support them: FLAC, APE, AAC, OGG, AIFF,
WMA.
To manage transcoder:
1 Go to Settings > Transcoder.
2 Choose any of the following options (available on specific models only):
Transcode to WAV format: WAV format is supported on specific browsers only. (Firefox 3.6 and above,
Safari 5, Opera 10.60)
Transcode to MP3 format: By transcoding to MP3, you enjoy better browser support. However, this also
occupies more system resources. In addition to the formats listed above, WAV format will also be
transcoded to MP3 when this option is selected.
3 Click OK.
Note: The Transcoder options are available on specific models only.
113
Chapter 13: Play Music with Audio Station
Synology DiskStation User's Guide
Based on DSM 4.0
Download Music
You can enable music download and then download songs from Audio Station to your local computer.
To enable music download:
1 Click Settings and then click the Options tab.
2 Tick Enable music download.
3 Click OK.
To download music, do any of the following:
Select multiple songs by holding Ctrl key and right-click to choose Download selected song(s).
Right-click any of the songs in the queue panel, and choose Download playing queue.
Right-click any playlist and choose Download playlist.
114
Chapter 13: Play Music with Audio Station
Chapter
Chapter 14:
Download Files with Download Station
14
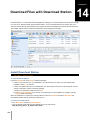
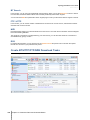
Download Station is a web-based download application, allowing you to download files from the Internet through
BT, FTP, HTTP, NZB and eMule. With Download Station, you can download files from file hosting sites, and
search for torrent files via system default search engines as well as self-added ones with the BT search function.
This chapter explains how to enable Download Station and manage download tasks.
Install Download Station
Go to Main Menu > Package Center to install Download Station.
To install Download Station:
Under the Available tab, click Install to install the package.
If there is only one volume on your DiskStation, you will be asked if you want to run the package after
installation. Click Yes to continue.
If there are multiple volumes on your DiskStation, you will be asked to choose from the drop-down menu to
specify a destination volume to install the package.
a Select your destination volume and click Next.
b Tick Run after installation if you want to run the package once the installation is complete, and click
Apply to install the package.
When the installation is complete, the package will be moved to the Installed tab and the Main Menu will
automatically expand with the package’s thumbnail on it.
To launch Download Station:
Go to Main Menu and click Download Station.
Type the following web address in the address bar of your web browser:
http://Synology_Server_IP_Address/download/
115
Synology DiskStation User's Guide
Based on DSM 4.0
To enable eMule downloads:
1 Click the gear icon at the bottom-left corner of Download Station, and then tick Enable eMule downloads.
2 If there are multiple volumes on your DiskStation, you can choose from the drop-down menu to specify the
temporary location for storing the files that are being downloaded.
3 Click OK.
To go to the BT/HTTP/FTP/NZB or eMule section of Download Station:
After launching Download Station, click the BT/HTTP/FTP/NZB or eMule tab at the bottom of Download Station.
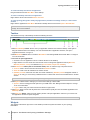
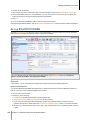
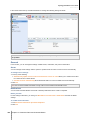
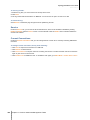
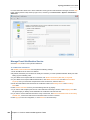
Set up BT/HTTP/FTP/NZB
Click the BT/HTTP/FTP/NZB tab at the bottom of Download Station, and click the gear icon next to the search
field at the top to manage the following settings of BT/HTTP/FTP/NZB.
Note: For detailed information about BT/HTTP/FTP/NZB settings, open DSM Help and then go to Download
Station > BT/HTTP/FTP/NZB > Set up BT/HTTP/FTP/NZB.
General
In this section, you can set download schedule, prioritize process order, and enable notification.
Download Schedule
You can limit BT/HTTP/FTP/NZB's download tasks to certain time period of a week and alternative speeds, so
that you can free up more network bandwidth when needed.
To set the download schedule:
1 Choose any of the following:
Immediately: Allow download tasks to continue without stop.
Advanced schedule: Click Schedule Plan and do the following:
a If you want to limit download tasks to alternative speeds during certain periods of a week, enter the
maximum download or upload rates in the BT Alternative Speed Settings section. ("0" means unlimited.)
b Choose any of the following and click on the grid to limit download tasks' time or speeds to certain period of
a week:
116
Chapter 14: Download Files with Download Station
Synology DiskStation User's Guide
Based on DSM 4.0
a No Download: Do not download or upload files.
b Default Speed: Download or upload files at the default maximum speeds.
c Alternative Speed: Download or upload files at the maximum speeds you specified in the BT Alternative
Speed Settings section.
2 Click OK.
Note: Downloading or uploading files at alternative speeds is available for BT tasks only.
Process Order
Do the following to sort the order of download tasks:
1 Choose any of the following:
By date created: Sort the order of download tasks by the date they are added.
By user (one task at a time): Sort the order of download tasks by the users who added the download tasks.
2 Click OK.
Note: Choosing By user can improve the fairness among users, so it is recommended when more than one user are
downloading files.
Notification
You can have Download Station send email or desktop notifications when a task is completed.
Before you start:
For the setting to take effect, you must go to Main Menu > Control Panel > Notification and enter the SMTP
settings.
To enable email notification:
1 Tick Send email notification upon task completion.
2 Click OK.
To enable desktop notification:
1 Tick Display desktop notification upon task completion.
2 Click OK.
Location
In this section, you can specify download destination folder and torrent/NZB watched folder.
Default Destination Folder
Specify a folder that will be used to store files downloaded via BT/HTTP/FTP/NZB.
To specify the default destination folder:
1 Click Select and choose a folder.
2 Click Select.
3 Click OK.
Torrent/NZB Watched Folder
Specify a watched folder which will be monitored by Download Station to create download tasks automatically for
any torrent/NZB files within that folder.
To specify a watched folder:
1 Tick Load torrent/NZB file(s) from watched folder automatically.
2 If you want to delete torrent/NZB files after download tasks have been created for those files, tick Delete
loaded torrent/NZB files.
3 Click Select and choose a folder.
4 Click Select.
117
Chapter 14: Download Files with Download Station
Synology DiskStation User's Guide
Based on DSM 4.0
5 Click OK.
File Hosting
There are many online file hosting and media sharing websites, where users can upload and share the files or
multimedia contents with other people. With Download Station, you can download files from those websites. For
more information about downloading files from those websites with your premium or free membership information,
click the Help button (with a question mark) at the top-right corner, go to Download Station > Set up
BT/HTTP/FTP/NZB, and refer to the File Hosting section.
BT
In this section, you can edit the following settings for downloading BT files.
To specify the TCP port number:
Enter “6881” at the TCP Port field. By default, the port is 6881. It can also be set from 1 to 65535 manually by the
administrator.
Note: You cannot use the following port number for BT access, because they are reserved for system use:
Port Number: 20, 21, 22, 23, 25, 80, 110, 137, 138, 139, 143, 199, 443, 445, 515, 543, 548, 587, 873, 993, 995,
3306, 3689, 5000, 5001, 5005, 5006, 5335, 5432, 9997, 9998, 9999
FTP default port range: The actual range may vary depending on different models.
To set up BT upload and download rates:
Enter the maximum upload and download rate for BT downloads and uploads in the Max. upload rate or Max.
download rate fields. ("0" means unlimited.)
BT Network Setting
See below for more advanced BT settings.
To encrypt BT traffic:
1 Choose any of the following from the BT protocol encryption drop-down menu:
Disable: Disable outgoing encrypted connections, but will accept incoming encrypted connections.
Auto: Attempt to accept incoming encrypted connections, but will fall back to an unencrypted mode if
connection fails.
Always: Always accept incoming encrypted connections and use outgoing encrypted connections.
2 Click OK.
To set maximum number of peers for each BT task:
1 Enter a number in the Max. peers allowed per torrent file field. ("Peers" are BT clients currently sharing the
same files over the network.)
2 Click OK.
To enable DHT for BT network:
1 Tick Enable DHT network, and then change the default DHT UDP port setting if necessary.
2 Click OK.
Auto Stop Task
The BT download task will continue seeding even when the task is finished. This setting allows you modify the
share ratio and seeding interval for the download task.
Note: Download Station will stop tasks when both criteria are met.
118
Chapter 14: Download Files with Download Station
Synology DiskStation User's Guide
Based on DSM 4.0
BT Search
In this section, you can see a list of default BT search engines. When you use the BT Search function to search
for torrent files, Download Station will list search results provided by these search engines.
You can also click Add and upload a BT search engine plug-in to add your favorite BT search engines to the list.
FTP / HTTP
In this section, you can set the number of simultaneous connections to one FTP server, and limit the maximum
download rate of each FTP task.
NZB
Download Station allows you to download files via a news server. The news server information must be assigned
before downloading NZB files.
The maximum connections is usually limited by your news server, you can also limit maximum connections to
each NZB task by giving it a value.
RSS
For RSS download tasks, you can choose from the Update interval drop-down menu to shorten the update
interval from 24 hours to your preferred time period.
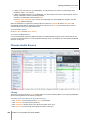
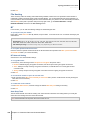
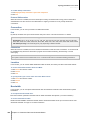
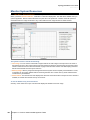
Create BT/HTTP/FTP/NZB Download Tasks
This section explains how to create BT/HTTP/FTP/NZB tasks.
119
Chapter 14: Download Files with Download Station
Synology DiskStation User's Guide
Based on DSM 4.0
Create by Uploading Files
You can create download tasks by uploading the following files from your local computer to Download Station:
Torrent files (.torrent) contain information for downloading files being shared over the BT network.
NZB files (.nzb) contain information for retrieving posts from news servers.
URL files (.txt) contain a list of HTTP/FTP URLs for downloading the linked files.
To create download tasks by uploading files:
1 Do any of the following:
Click the Create button, click the button next to Open a file, and browse to the files for upload. (If you have
installed Flash Player 9 or later, you can make multiple selections.)
Select the files on your computer's desktop or file explorer (for example, Windows Explorer or Mac Finder),
and then drag and drop them into Download Station.
2 Change your download destination, or tick the checkbox to show BT information (for ".torrent" files only)
according to your preferences.
3 Click Create.
Note:
You can upload up to 20 files at a time.
Drag-n-drop files from computer's desktop or file explorer is supported on specific browsers only: Chrome, Firefox
4 or onwards
Create by Entering URLs
You can create download tasks by entering URLs.
To create download tasks by entering URLs:
1 Click Add.
2 In the window that appears, enter the URLs of the file you want to download. You can enter up to 50 URLs in
the box.
Note:
If you want to download a FTP folder, simply enter the FTP link with the forward slash (/) at the end of the link.
All of the files and sub-directories in the folder will be downloaded.
SFTP/FTPS folder downloading is not supported.
3 If authentication is required, tick Authentication required and enter your username and password.
4 If you want to change your download destination, click Select to select another folder.
5 Click Create.
Create via BT Search
You can search for torrent files with BT search engines to help you find your favorite downloads more easily.
Note: Before you use the Search function, make sure you have enabled at least one search engine at Settings > BT
Search. See "BT Search" on Page 119 for more information.
To create download tasks via BT search:
1 Enter a keyword in the search field at the top-left corner of BT/HTTP/FTP/NZB, and press "Enter" on your
keyboard to start searching.
2 Click Search on the left panel. The search result of available files will be listed in the main area.
3 Make your selections, and then click any of the following buttons to create download tasks:
Download immediately: Download the selected files to the default destination folder you specified at
Settings > Location. See "Location" on Page 117 for more information.
Download to: Change destination folder and modifies the torrent file's URL or authentication (if required).
Click Create to create the download task.
120
Chapter 14: Download Files with Download Station
Synology DiskStation User's Guide
Based on DSM 4.0
Create Download Tasks for RSS Feeds
You can use Download Station to download RSS feeds.
More Information
What is RSS?
RSS (Really Simple Syndication, also known as RSS feed) is an alternative way of web browsing. Web
publishers often use RSS feeds to publish frequently-updated works, such as blog entries, news headlines,
podcasts, photo albums, or audio/video clips.
Can Download Station download all kinds of RSS feeds?
RSS files on the website of BT search engines and iTunes podcasts are generally supported by Download
Station.
Some download links in the RSS file are links to a web page rather than the actual file. This kind of RSS files will
not be supported. To view and update their RSS feeds, you can use a RSS reader (such as Google Reader)
instead.
To view and update the list of RSS feeds:
1 Right-click the RSS icon on a webpage to copy the URL of the RSS file.
2 Launch Download Station and click RSS Feeds on the left panel. You can see the file list in the main area.
3 Click the Add button above the file list.
4 In the window that appears, paste the URL into the text field and click OK. (If you tick Automatically
download all items, Download Station will automatically add all RSS feeds listed in the RSS file to download
tasks.) The RSS file is now added to the file list. You can rename or remove the RSS file by clicking the
Rename or Remove button above the file list.
5 Select the RSS file and view the list of its RSS feeds under the RSS Feeds tab.
6 Click Update above the file list to update the list of RSS feeds for the selected RSS file, or click Update All to
update the lists of RSS feeds for all RSS files in the file list.
Note: By default, Download Station automatically updates the lists of RSS feeds on a daily basis. You can go
to Settings > RSS to shorten the update interval.
To create download tasks by selecting RSS feeds:
1 Click RSS Feeds on the left panel, and then select the RSS file containing feeds you want to download.
2 From the list of RSS feeds under the RSS Feeds tab, select the feeds you want to download.
3 Click the Download button below the RSS Feeds tab to create download tasks for the selected RSS feeds.
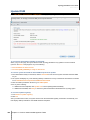
To create download tasks by setting download filter:
1 Click RSS Feeds on the left panel, and then select the RSS file containing feeds you want to download.
2 Under the Download Filter tab, click Add.
3 In the window that appears, enter the following information and click OK to create a filter:
Name: The name of the filter
Matches: The keyword for searching RSS feeds with matching names
Does not match: The keyword for excluding RSS feeds with matching names
Destination: The destination folder for the downloaded RSS feeds
4 You will see the new filter under the Download Filter tab. Click Edit or Delete if you want to edit or delete the
filter.
5 When the list of RSS feeds is updated, Download Station will automatically create download tasks for newlyadded RSS feeds matching the criteria set in Download Filter.
121
Chapter 14: Download Files with Download Station
Synology DiskStation User's Guide
Based on DSM 4.0
Note:
If you leave Matches and Does not match blank, Download Station will create download tasks for all newly-added
RSS feeds.
Download Filter only works for newly-added feeds. Original RSS feeds on the list can only be downloaded using
the Download button below the RSS Feeds tab.
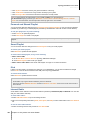
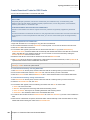
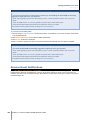
Manage BT/HTTP/FTP/NZB Download Tasks
You can check and manage the download tasks you just created.
View BT/HTTP/FTP/NZB Tasks
Click any of the following on the left panel to view BT/HTTP/FTP/NZB tasks:
All Downloads lists all download tasks.
Downloading lists download tasks that are currently downloading.
Completed lists download tasks that are completely downloaded.
Active Downloads lists download tasks that are currently downloading or seeding.
Inactive Downloads lists download tasks that are erroneous, waiting, or paused by you.
Stopped lists download tasks that are paused by you.
Manage BT/HTTP/FTP/NZB Tasks
While checking BT/HTTP/FTP/NZB tasks, you can use the buttons along the top of download queue and the tabs
below the queue to manage your tasks.
To pause/resume/remove download tasks:
1 Select the download task(s) you want to pause, resume, or remove.
2 Click Pause or Resume or Remove.
To end an incomplete or erroneous download task:
1 Select the download task you want to end.
2 Click End incomplete or erroneous download tasks.
122
Chapter 14: Download Files with Download Station
Synology DiskStation User's Guide
Based on DSM 4.0
3 Click OK to end the task and the files will be moved to your destination shared folder.
Warning: You cannot resume/restart the task after completing this action.
To edit download tasks:
1 Click Edit to customize the general settings (auto stop task, maximum upload/download rate, maximum peers
allowed per torrent file) and tracker lists for the current task.
2 Click OK.
Note:
To edit the default setting for all download tasks, refer to "Set up BT/HTTP/FTP/NZB" on Page 116.
The maximum upload/download rates and the maximum peers allowed per torrent file cannot exceed the default
setting.
To clear finished download tasks:
Click Clear completed items. Downloaded files will remain in the destination shared folder.
To change the list order of download tasks:
Click on the column headings. Default ordering is by the creation date of the download tasks.
To view detailed information about a download task:
1 Select the download task you want to view.
2 Click any of the following tabs below the download queue to view detailed information of the task. (If you
cannot see the tabs, click the upward triangle at the bottom right corner of Download Station.)
General displays general information of the download task.
Tracker (BT tasks only) lists servers that track other BT clients sharing the same files over the network. You
can add or remove trackers by clicking Add or Remove.
Peers (BT tasks only) lists other BT clients sharing the same files over the network.
File (BT/NZB tasks only) lists files to download for the current task. For BT tasks, you can set download
priority for each file or skip downloading certain files.
Log (NZB tasks only) records the download progress of files.
Troubleshooting
When error(s) occur, all action buttons will be disabled. You can enable the action buttons by checking for the
possible errors:
Download Station is disabled.
The network is down.
Download destination not set.
Your account is disabled or removed.
Unknown Error.
If the problem still exists after checking the above list of possible errors, consult the Administrator.
Set up eMule
eMule downloading is not enabled by default. You will need to enable eMule before configuring its settings.
To enable eMule:
1 Click the gear icon at the bottom-left corner of Download Station, and then tick Enable eMule downloads.
2 If there are multiple volumes on your DiskStation, you can choose from the drop-down menu to specify the
temporary location for storing the files that are being downloaded.
3 Click OK.
Now you can click the eMule tab at the bottom-left corner of Download Station, and then click the gear icon next
123
Chapter 14: Download Files with Download Station
Synology DiskStation User's Guide
Based on DSM 4.0
to the search field at the top of Download Station to manage the following settings of eMule.
Note: For detailed information about eMule settings, open DSM Help and then go to Download Station > eMule >
Set up eMule.
General
In this section, you can manage the settings of ED2K server, notification, and protocol obfuscation.
Server
You can manage server settings with the options to update server list or/and connect to server automatically.
To manage server settings:
1 Tick any of the following:
Automatically update server list when connected to a server or client allows you to retrieve server lists
from other servers or eMule clients.
Connect to server automatically allows Download Station to connect to ED2K server automatically.
2 Click OK.
Note: See "Connect to ED2K Server/Kad" on Page 126 for more information about ED2K servers.
Notifications
You can have Download Station send email or desktop notifications when a task is completed.
Before you start:
For the setting to take effect, you must go to Main Menu > Control Panel > Notification and enter the SMTP
settings.
To enable email notification:
1 Tick Send email notification upon task completion.
2 Click OK.
124
Chapter 14: Download Files with Download Station
Synology DiskStation User's Guide
Based on DSM 4.0
To enable desktop notification:
1 Tick Display desktop notification upon task completion.
2 Click OK.
Protocol Obfuscation
When this function is enabled, the server will accept incoming connections that is using protocol obfuscation.
Administrators can also choose to use obfuscation for outgoing connections or only accept obfuscated
connections.
Connection
In this section, you can set up connection for eMule downloads.
Port
By default, the eMule TCP port is 4662 and the UDP port is 4672. It can also be set from 1 to 65535.
Note: The TCP port should exclude the following ports:
Port Number: 20, 21, 22, 23, 25, 80, 110, 137, 138, 139, 143, 199, 443, 445, 515, 543, 548, 587, 873, 993, 995,
3306, 3689, 5000, 5001, 5005, 5006, 5335, 5432, 6881, 8080, 7000, 7001, 8081, 9997, 9998, 9999, 50001, 50002
FTP default port range: The actual range may vary depending on different models.
Connection
When this function is enabled, the server will limit the maximum TCP/IP and UDP connections. A connection will
be established only when there are tasks in progress such as: data transferring, file searching or source
exchanging.
Note: The max. connections should be between 100 and 500. A large number of max. connections will consume
more system resources and a small number of min. connections will lower the overall downloading performance.
Location
In this section, you can set the default destination folder for eMule, and share your files on the ED2K network.
To set the download destination folder for eMule:
1 Click Select and choose a folder.
2 Click Select.
3 Click OK.
To specify folders you want to share with other eMule clients:
1 Click Select and choose a folder.
2 Click Select.
3 Click OK.
Bandwidth
In this section, you can set upload and download rates and download schedule to limit download and upload
bandwidths.
To set upload and download rates:
Enter the maximum upload and download rate for eMule downloads and uploads. ("0" means unlimited.)
To set the download schedule:
Like BT/HTTP/FTP/NZB’s download schedule, eMule’s download schedule is set up in the same manner. See
"Download Schedule" on Page 116 for more information.
125
Chapter 14: Download Files with Download Station
Synology DiskStation User's Guide
Based on DSM 4.0
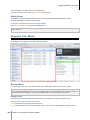
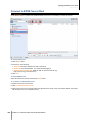
Connect to ED2K Server/Kad
Click Server/Kad on the left panel to set up Server/Kad. An ED2K server contains information about resources
on the ED2K network. To search and download ED2K resources, it is necessary to connect to a server.
To add an ED2K server:
1 Click the Add button.
2 Choose any of the following:
Server IP: Enter the IP address and port of the server.
ED2K Link: Enter the ED2K link. (e.g. ed2k://|server|IP|port|/)
Update server.met from URL: Enter the URL of the server.met file (e.g.
http://www.synology.com/server.met).
3 Click Add.
To delete ED2K servers:
Select the servers from the list and click the Delete button.
To connect to a random ED2K server:
1 Select a server from the server list.
2 Click Connect/Disconnect server.
3 Wait for the server to be connected. When the selected server is full or has an invalid IP address, the system
will randomly connect to an available server.
126
Chapter 14: Download Files with Download Station
Synology DiskStation User's Guide
Based on DSM 4.0
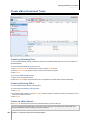
Create eMule Download Tasks
This section explains how to create eMule download tasks.
Create by Uploading Files
You can create download tasks by uploading a text file (.txt) containing ED2K links from your local computer to
Download Station:
To create download tasks by uploading a file:
1 Click Download Queue on the left panel, and then click the Create button.
2 Choose Open a file and click the button to browse to the text file for upload.
3 Click Create.
To resume an eMule download task:
1 Select one or more tasks in the list.
2 Click the Resume button. Only tasks which are not completed or paused will be resume downloading.
Create by Entering URLs
You can create download tasks by entering URLs.
To create download tasks by entering URLs:
1 Click Create.
2 In the window that appears, choose Enter URL, and enter the URLs of the file you want to download. You can
enter up to 50 URLs in the box.
3 Click Create.
Create via eMule Search
Click Search on the left panel to search and download the files your are looking for.
Note: If you want to perform eMule search, make sure you are connected to an ED2K server at Server/Kad. See
"Connect to ED2K Server/Kad" on Page 126 for more information.
127
Chapter 14: Download Files with Download Station
Synology DiskStation User's Guide
Based on DSM 4.0
To create download tasks via general search:
1 Enter a keyword in the search field at the top-left corner of eMule, select a file type and search method. Press
"Enter" on your keyboard to start searching. Click Start/Stop search to stop searching.
2 The search result of available files will be listed in the main area, and might be shown in the following colors:
Blue: There are sufficient sources available on the network for those files.
Red: The file is already in the download queue or in the download destination.
Note: Files already exist in the download queue will not be added to the queue again.
3 Make your selections, and click Download selected file(s) to create download tasks.
To create download tasks via advanced search:
1 Click on the down arrow to the right of the Start/Stop search button.
2 In the window that appears, do the following:
Enter a keyword.
Select the file type.
Select the search method.
Enter the minimum and maximum file size for the desired files. (optional)
Enter the number of minimum sources. (optional)
Enter the file extension. (optional)
3 Click Start/Stop search to start searching. Click the button again to stop searching.
4 Make your selections, and click Download selected file(s) to create download tasks.
To clear search results:
Click Clear search results to clear the search result.
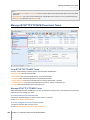
Manage eMule Download Tasks
You can check the download tasks you just created, and manage the tasks with eMule.
Manage Download Queue
Click Download Queue on the left panel to manage the download tasks.
128
Chapter 14: Download Files with Download Station
Synology DiskStation User's Guide
Based on DSM 4.0
To pause/resume/remove download tasks:
1 Select the download task(s) you want to pause, resume, or remove.
2 Click Pause or Resume or Remove.
To view detailed information about a download task:
1 Select the download task you want to view.
2 Click the tabs below the download queue to view detailed information of the task.
To edit download tasks:
1 Click Edit to edit the priority and change destination folder for the task.
Note: To change the default destination folders for all download tasks, see "Location" on Page 117.
2 Click OK.
To clear finished download tasks:
Click Clear. Downloaded files will remain in the destination shared folder.
Check Upload Queue
Click Uploading on the left panel to check your shared files currently uploaded to other eMule clients.
Note: To specify folders you want to share with other eMule clients, see "Location" on Page 125.
129
Chapter 14: Download Files with Download Station
Chapter
Chapter 15:
Safeguard Your Environment with
Surveillance Station
15
Surveillance Station is a web-based application that can manage IP cameras to safeguard your home or office
environment. With Surveillance Station, you can watch and record live view videos, set up scheduled recording,
playback recorded events via web browser, VisualStation, or mobile device for remote monitoring. Notifications
can also be sent to you whenever important events occur.
This chapter explains how to manage IP cameras, watch and record live view videos, set up scheduled recording,
playback recorded events, and use all the other comprehensive features provided by Surveillance Station.
Install Surveillance Station
Go to Main Menu > Package Center to install Surveillance Station.
To install Surveillance Station:
Under the Available tab, click Install to install the package.
If there is only one volume on your DiskStation, you will be asked if you want to run the package after
installation. Click Yes to continue.
If there are multiple volumes on your DiskStation, you will be asked to choose from the drop-down menu to
specify a destination volume to install the package.
a Select your destination volume and click Next.
b Tick Run after installation if you want to run the package once the installation is complete, and click
Apply to install the package.
When the installation is complete, the package will be moved to the Installed tab and the Main Menu will
automatically expand with the package’s thumbnail on it. Moreover, the surveillance shared folder will be
created automatically to contain your Surveillance Station data. The shared folder is read-only and can be
accessed only by admin or a user belonging to the administrators group.
To launch Surveillance Station, do either of the following:
Go to Main Menu and click Surveillance Station.
Type Synology DiskStation's IP address or server name or domain name plus a colon and the customized port
number (e.g. http://ericawang.dyndns.org:9900) in the address bar of your web browser. Press “Enter”
(Windows) or “Return” (Mac) on your keyboard.
Surveillance Station will be launched in a new browser window.
Enhance Mac Compatibility
Before watching events or live views with Mac Safari, do the following to make sure your browser settings are
appropriate:
1 Make sure your Safari is updated to version 5.1 or onward.
2 Go to Apple menu > Software Update and check for any possible Java updates to make sure your Java
applet is up-to-date.
3 Go to Applications > Utilities, and then open Java Preferences to do the following:
On the list of Java applications, make sure the version of Java SE is 1.6.0_26 or onward.
Move the 32-bit version of Java SE to the top of the application list (above 64-bit).
If you are using Mac OS X 10.7 or onward, tick Enable applet plug-in and Web Start applications.
130
Synology DiskStation User's Guide
Based on DSM 4.0
Manage IP Cameras
Go to Camera > Camera List under Management to add and edit cameras, set up recording schedule, and set
up the advanced settings: Motion Detection, Liveview Analytics, Guard Settings, Fisheye Dewarping. To
organize multiple cameras into camera groups for easier deployment, go to System > Camera Group. For
detailed instructions, click the Help button (with a question mark) at the top-right corner.
131
Chapter 15: Safeguard Your Environment with Surveillance Station
Synology DiskStation User's Guide
Based on DSM 4.0
The system's general information includes the following:
Basic Information: You can see the detailed information about your Synology DiskStation here, including
serial number, model name, memory size, DSM version, system time, operating time, and thermal status.
Time: You can see the time setting of your Synology DiskStation here, including time server and time zone. To
set up your time server, see "Set Up Time" on Page 23.
External Devices: You can see the model name of your external eSATA or USB devices here.
Network
Under the Network tab, you can view the status of network configuration and network interfaces.
The network status includes the following:
Basic information: See the basic information of your DiskStation’s network configuration.
[Interface Name]: See the detailed information of the network interface(s) currently configured on your
DiskStation.
Storage
Under the Storage tab, you can check the free or used space of your DiskStation volumes and check the status
of the hard disks.
To check volume usage:
From the pie charts, you can see the free or used space of DiskStation volumes.
Following are the possible status types of an internal hard disk:
Normal: System partition and volume are available for use on the hard drive.
Initialized: System partition is established, but no volume has been created.
Not Initialized: System partition and volume are not established on the hard drive.
No Disk Installed: No disk is installed in the corresponding hard drive slot.
System Partition Failed: System partition on the hard drive is unavailable. We recommend that you replace
the hard drive.
Crashed: Failed to access volume on the hard drive. We recommend that you replace the hard drive.
Note: For the system to function normally, there should be at least one disk in Normal or Initialized status.
Log
Under the Log tab, you can view the log records of DiskStation services. Furthermore, after viewing the log
records, you can delete or save them.
To see the log records of specific service:
Use the drop-down menu to view the System log, the Connection log, FTP file transfer log, File Station log, the
WebDAV log, the Windows file service transfer log, the Backup log, the USB Copy/SD Copy log, and the Network
Backup log.
Note:
When the log size reaches its limit, the oldest record will be removed for space-saving consideration.
SDCopy/USBCopy is available on specific models only.
To delete log records:
1 Select the log item you want to delete from the drop-down menu.
2 Click Clear to delete the log records.
149
Chapter 17: Perform Advanced Management Tasks
Synology DiskStation User's Guide
Based on DSM 4.0
To save log records:
1 Select the log item you want to save from the drop-down menu.
2 Click Save.
3 The log records will be extracted to an .html file. You can choose to open it or save it to a disk.
To refresh the log:
Click Refresh to reload the page and get the most updated log records.
Service
Under the Service tab, you can see the list of DSM services, which can be enabled or disabled by clicking
Enable or Disable under the Action column. The checkmarks under the Status column indicate whether the
services are enabled.
Current Connections
Under the Current Connections tab, you can manage the list of users who is currently accessing DiskStation
resources.
To manage current connections, do any of the following:
Click Save to export the current list to an HTML file.
Click Refresh to refresh the list.
Click Kill connection to stop the user from accessing the resource. The disconnected user has to authorize
again to gain access to the resource.
Click Disable user to disable the user. To enable the user again, go to Main Menu > Control Panel > User.
150
Chapter 17: Perform Advanced Management Tasks
Synology DiskStation User's Guide
Based on DSM 4.0
Monitor System Resources
Go to Main Menu > Resource Monitor to monitor system resources.
When you launch Resource Monitor, it will start to collect and display data. The data will be deleted when you
quit the application. Resource data collected in the past will not be preserved. A window would be opened to
show detail resource usage information if any of the small resource usage windows is double-clicked.
The system resources include the following:
CPU Usage: You can see the overall CPU usage as well as the CPU usage of each process in the order of
decreasing CPU load. CPU load could be high when Resource Monitor is first launched, because the system
needs to collect its resource data and load the UI page at the same time. Please note that keeping Resource
Monitor launched will consume system resource.
Memory Usage: Memory usage remains high because the system stores frequently accessed data in cache,
so the data can be quickly obtained without accessing the hard drive. Cache memory will be released when
overall memory is insufficient.
Network Flow: The network flow chart displays the data sent and received rate in KB per second. If PPPoE is
enabled, its transfer rate will also show up on the chart.
To see the details of any of the resources:
Click any of the resources to open a window that displays the details of resource usage.
151
Chapter 17: Perform Advanced Management Tasks
Synology DiskStation User's Guide
Based on DSM 4.0
Update DSM
Go to Main Menu > Control Panel > DSM Update to keep your Synology DiskStation up to date.
Important: The data saved on the Synology DiskStation will not be erased during the updating process. However, for
security reason, we strongly recommend that you back up the data first.
To check if the latest DSM is available for download:
When you go to this page, the system will check with Synology Website for any updates. The check results
(shown in the Status field) might be any of the following:
Current DSM is the latest version.
The latest [DSM_VERSION] is ready for download.
To have the system download the latest DSM and perform the update:
1 If the latest DSM is ready for download, click the Download link to have the system download the latest DSM
for you.
2 The system will display any of the following desktop notifications to tell you whether the download is successful
or not: DSM Download Completed or DSM Download Failed.
3 Click the desktop notification window to go to DSM Update.
4 Do any of the following:
If DSM download completed, click Update now to start updating DSM immediately.
If DSM download failed, click Retry to have the system download the latest DSM from Synology again.
To check for updates regularly:
1 Tick Check for update regularly.
2 Click OK.
After you enable the function, the system will check for the latest DSM regularly, download it automatically, and
then display desktop notification when DSM download completes.
152
Chapter 17: Perform Advanced Management Tasks
Synology DiskStation User's Guide
Based on DSM 4.0
Troubleshooting
If you see error messages (in red text) during checking or downloading the latest DSM, the following
suggestions might help solve your problem:
Check if the upgrading process was interrupted by users, or other unexpected events, such as a power
failure.
Check the DSM version. You can only update the system with a newer DSM version.
Download the DSM update again because the update file might be corrupted.
If the problem remains, please contact Synology's Technical Support.
To perform manual DSM update:
1 Visit Synology's Download Center to download the latest .pat update file to your local computer. Unzip the file
to get a .pat update file.
2 Click Manual DSM Update to enter Manual DSM Update Page.
3 Click Browse to select the update file.
4 Click OK to start to update your DSM. The system will reboot automatically when the update completes.
Troubleshooting
If you cannot update DSM, the following suggestions might help solve your problem:
Check if the upgrading process was interrupted by users, or other unexpected events, such as a power
failure.
Check the DSM version. You can only update the system with a newer DSM version.
Download the DSM update again because the update file might be corrupted.
If the problem remains, please contact Synology's Technical Support.
Receive Event Notifications
Go to Main Menu > Control Panel > Notification and set up Synology DiskStation to notify you via e-mail, SMS,
mobile devices, Windows Live Messenger, or Skype, when status changes or errors occur to the system, for
example: connection loss, fan behavior change, power failure, storage volume running out of space, or back and
restoration failure, etc.
153
Chapter 17: Perform Advanced Management Tasks
Synology DiskStation User's Guide
Based on DSM 4.0
For more information about how to select notification event types and edit notification messages, click the Help
button (with a question mark) at the top-right corner, and then go to Control Panel > System > Notification >
Advanced.
Manage E-mail Notification Service
Click the E-mail section to set up email notifications.
To enable E-mail notification:
Tick Enable e-mail notifications and complete the following settings:
1 Enter the SMTP server name or IP address.
2 By default, the SMTP port number is 25. Modify the number if you have specified a different SMTP port while
setting up port forwarding rules.
3 If your SMTP server requires SSL/TLS connection, tick Secure connection (SSL/TLS) is required.
4 If your SMTP server requires SMTP authentication, click SMTP authentication and tick Authentication
required, enter your username and password for the email server, and then click Save.
5 Enter the email address that will receive the notification mails in the Primary email or the Secondary
email field.
6 Click Send a test email to see if your email settings are set up properly.
7 If you want to add a subject prefix in front of the notification mail subject, enter it in the Subject prefix field.
The prefix helps you identify which DiskStation the notification mail was sent from.
8 If you want to send a notification mail to the newly created user, tick Send a notification mail to the newly
created user, and the user will receive a mail when his/her account is created.
9 Click Apply to save the configuration, or click Cancel to cancel the setup.
154
Chapter 17: Perform Advanced Management Tasks
Synology DiskStation User's Guide
Based on DSM 4.0
More Information
About SMTP server's domain name:
The SMTP server can be an IP address or a domain name. If it is a domain name, please make sure a valid
DNS server IP has been entered at Main Menu > Control Panel > Network, and make sure the server is on the
Internet.
Manage SMS Notification Service
Click the SMS section to set up SMS notifications.
To enable SMS notification:
Tick Enable SMS notifications and complete the following settings:
1 Select a SMS provider from the SMS service provider drop down list. The default service provider is
"clickatell".
2 Click Add to create a new SMS provider configuration or click Delete to delete the selected SMS provider
configuration.
3 In the Username field, enter the username of your SMS service account.
4 In the Password and Confirm password field, enter and confirm the password of your SMS service account.
5 Enter your Primary phone number or Secondary phone number. If both numbers are entered, SMS
notification messages will be sent to both numbers.
6 If you do not wish to receive too many messages, tick Enable SMS interval limit and limit the number of
notification messages to one message per the time interval you specified.
7 Click Send a test SMS message to send a test SMS message to the phone number you specified. If no
message is received, it means the configuration is incorrect.
8 Click Apply to save the configuration, or click Cancel to cancel the setup.
Note:
Username: case sensitive and must be between 1 and 32 Unicode characters.
Password: case sensitive and must be between 0 and 24 displayable characters, including letters, numbers,
signs, and space.
The SMS interval limit must be between 1 and 10000 minutes.
Fees might apply to send SMS messages. Contact your local SMS service provider for more information.
To create a SMS provider configuration:
1 Click Add.
2 In the Provider name field, enter the name of your SMS service provider.
3 In SMS URL field, enter a SMS URL with the message content set to "Hello world." You can obtain the SMS
URL from your SMS service provider.
4 Click Next.
5 The system will break down the SMS URL into several parameters. Define each parameter by selecting the
corresponding category. Each parameter category can be used only once except Other.
Note: Provider name is case sensitive and must be between 1 and 32 Unicode characters.
155
Chapter 17: Perform Advanced Management Tasks
Synology DiskStation User's Guide
Based on DSM 4.0
More Information
SMS URL: case sensitive and must be between 1 and 500 Unicode characters. The number of parameters must
be between 4 and 10. This SMS URL is only for setup purposes. No SMS message will be sent after setup is
completed. The format of this URL is provided by the SMS service provider, and the URL must include the
following parameters: username, password, destination phone, and message content.
Using Clickatell as an example, a sample URL would be the following (reference only):
https://api.clickatell.com/http/sendmsg?user=TestUser&password=TestPassword&api_id=3148203&to=8861234
56789&text=Hello+world
Please note that in "message content" parameter, the space between "Hello" and "world" will be replaced by the
particular character defined by the service provider.
Manage Mobile Devices and Instant Messaging Notifications
Click the Push Service section to set up mobile device and instant messaging notifications.
To enable mobile device notifications:
1 Tick Enable mobile device notifications, and then click Apply.
2 Install and launch DS finder on your mobile device, and then add your DiskStation to the Favorite list to pair
your mobile with the DiskStation. For more information, refer to its Help file.
Note: Push service is currently supported by DS finder for iPhone/iPad only.
3 Click Send a test message and then click OK to send a test notification. Now you can launch DS finder on
your mobile device to check whether the test message is received.
To manage paired mobile devices:
1 Click Manage paired devices to see the list of all paired mobile devices.
2 If you want to unpair any of the devices, select them and click Unpair. (Press and hold Shift or Ctrl while
making multiple selections.) No notification will be sent to them unless you pair them up again.
To enable instant messaging notifications:
1 Tick Enable Windows Live Messenger notifications and/or Enable Skype notifications, and then
click Apply.
2 Enter one or more instant messaging accounts in the Windows Live Messenger account and/or the Skype
account field.
Note: For each instant messaging program, the maximum number of accounts is 2. You must separate them with
';'.
3 Log in to your instant messaging program to accept friend invitation from Synology's push service.
4 Click Send a test message and then click OK to send a test notification. Now you can launch your instant
messaging program to check whether the test message is received.
Access Applications with Independent Login
Go to Main Menu > Control Panel > Application Portal to configure connection settings of applications, which
allows you to run the applications in an independent browser window without logging in to DSM. These
connection settings include customizing portal aliases, HTTP and HTTPS ports.
Note: Applications whose connection settings can be configured via Application Portal are: Audio Station, Download
Station, Surveillance Station, File Station.
156
Chapter 17: Perform Advanced Management Tasks
Synology DiskStation User's Guide
Based on DSM 4.0
Customized Alias
Applications can be opened in an independent browser window at [http(s)://DSM server address:DSM server
port number [HTTP(S)]/alias name/]once the portal alias is set up.
To enable a customized alias:
1 Select an application, and click Edit or double-click the selected application.
2 In the window that appears, tick Enable customized alias, specify a customized alias, and click OK.
3 Click Save on the main page. The application can be accessed via the customized portal alias.
To redirect from [http(s)://DSM server address/alias name/]:
1 Tick Redirect from and click OK.
2 Click Save on the main page.
It spares you the trouble of memorizing the port number for each application, and allows you to type in your easyto-remember customized alias (when enabled) at the address bar.
To disable a customized alias:
1 Select an application, and click Edit or double-click the selected application.
2 In the window that appears, uncheck Enable customized alias, and click OK.
3 Click Save on the main page. The customized alias of the application is disabled.
Note:
Following are the respective default aliases of the four applications, Audio Station, Download Station,
Surveillance Station, File Station: audio, download, cam, file.
Alias names cannot be the same as those reserved for system, browsers, or used by other applications, and
their number of characters must be limited within 2 to 20.
Alias names can consist of mixed case letters, numeric characters, and two special characters (-), (_), but
these two characters can only be used for the other characters except the first and last ones.
Customized HTTP(S) Ports
Applications can be opened in an independent browser window at [http(s)://DSM server address:customized
port number]once the HTTP(S) port is set up.
To enable a customized port [HTTP(S)]:
1 Select an application, and click Edit or double-click the selected application.
2 In the window that appears, tick Enable customized port [HTTP(S)], specify a customized port number, and
click OK.
3 Click Save on the main page. The application can be accessed via the customized HTTP(S) port.
To disable a customized port [HTTP(S)]:
1 Select an application, and click Edit or double-click the selected application.
2 In the window that appears, uncheck Enable customized port [HTTP(S)], and click OK.
3 Click Save on the main page. The customized HTTP(S) port of the application is disabled.
Note: The range of port number can be from 1 to 65535, but the following ports should be excluded because they
are reserved for system use: 20, 21, 22, 23, 25, 80, 110, 137, 138, 139, 143, 199, 443, 445, 515, 543, 548, 587,
873, 993, 995, 3306, 3689, 5000, 5001, 5005, 5006, 5335, 5432, 6881, 8080, 7000, 7001, 8081, 9997, 9998,
9999, 50001, 50002, eMule default ports: 4662 (TCP), 4672(UDP), and FTP default port range: the actual range
may vary depending on different models.
157
Chapter 17: Perform Advanced Management Tasks
Synology DiskStation User's Guide
Based on DSM 4.0
Index Multimedia Files for Applications
Go to Main Menu > Control Panel > Media Indexing Service to have Media Indexing Service automatically
scan multimedia files, such as photos, music, and videos stored on your DiskStation, and compile them into the
media library to be indexed by multimedia applications: Media Server, Audio Station, Photo Station, and iTunes
Server.
Re-index Media Files
Multimedia data within the installed applications can be scanned and re-indexed for the following applications.
To re-index media files:
Click Re-index to re-construct the index structure of all media files in the indexed folders, both default folders and
the ones created by yourselves. The process will be executed in the background.
Reset admin's Password
If you forgot the password for admin and are therefore unable to log in to DSM, you can reset the password to
blank and set a new password.
To reset admin's password:
Press and hold the RESET button on the back panel of your Synology DiskStation for 4 seconds until you heard
a beep sound.
Note: Other than resetting administrator's password, using the RESET button will also restore Synology DiskStation's
IP and DNS to the default value.
Restore Synology DiskStation to Factory Defaults
Go to Main Menu > Control Panel > Restore Defaults if you want to restore your Synology DiskStation to
factory defaults.
There are three restore options:
Format the hard disk but keep the current settings: All user data in the hard drive will be deleted; whereas
the system configurations will remain.
Format the hard disk and restore to factory default settings: All user data in the hard drive will be deleted
and the entire system will be restored to default.
Reset MySQL Database Password: The password of the MySQL database will be reset.
If you wish to delete your MySQL databases, check the Delete MySQL Databases checkbox and click Apply.
158
Chapter 17: Perform Advanced Management Tasks
Synology DiskStation User's Guide
Based on DSM 4.0
Reinstall Synology DiskStation
If you want to reinstall your Synology DiskStation without losing its data, you can use the RESET button on the
back panel.
To reinstall Synology DiskStation:
1 Press and hold the RESET button for about 4 seconds until the Synology DiskStation emits a beep sound.
2 Within the next 10 seconds, press and hold RESET button for about 4 seconds until the Synology DiskStation
emits a beep sound.
3 Run Synology Assistant and follow the installation instructions in the Quick Installation Guide that came with
your installation disc to set up the Synology DiskStation.
Important: The data saved on the Synology DiskStation will not be erased during the reinstallation. However, for
security reason, we strongly recommend that you back up the data first.
Enable SNMP Service
Go to Main Menu > Control Panel > SNMP to enable SNMP service, which allows users to monitor
Synology DiskStation network flow with the network management software.
Currently, SNMPv1 and SNMPv2c protocols are supported.
To enable SNMP service:
1 Tick Enable SNMP service
2 Enter a Community name.
3 Enter the optional information to help you identify your Synology DiskStation: Name, Location, and Email.
4 Click Apply.
To disable the SNMP service:
Uncheck Enable SNMP service, and click Apply.
159
Chapter 17: Perform Advanced Management Tasks
Synology DiskStation User's Guide
Based on DSM 4.0
Enable Terminal Services
Go to Main Menu > Control Panel > Terminal to enable Terminal service, allowing you to use Telnet or SSH to
log in to Synology DiskStation and modify its settings.
To enable connection to Synology DiskStation via Telnet or SSH:
1 Do any of the following:
If you want to enable the Telnet service, tick Enable Telnet service.
If you want to enable the SSH service, tick Enable SSH service.
Note: When you disable the SSH service, all SSH tasks will be terminated immediately. If you disable the SSH
service while performing a backup task, perform the task again after the SSH service is disabled.
2 Click Apply.
Important: Use the Terminal service with caution. Improper manipulation or modification to Synology DiskStation
may result in system malfunction or data loss.
160
Chapter 17: Perform Advanced Management Tasks
Chapter
Chapter 18:
Communicate with Mobile Devices
18
As Internet access grows popular on mobile devices, Synology provides you with several creative alternatives to
communicate with your Synology DiskStation using iOS/Android or other mobile devices.
Manage DSM Settings with DSM mobile
DSM mobile allows DSM admin (or a user belonging to the administrators group) to manage DSM settings and
check DSM information with the web browser of an iOS (iPhone, iPad or iPod touch) or Android device.
To log in to DSM mobile:
1 Use the web browser of your iOS or Android device to connect to http://Synology_Server_IP:5000.
2 Enter your DSM user credentials and tap Login.
Note: For more information about DSM mobile, tap Help on the home page.
Use iOS and Android Apps
The Synology mobile apps are now available on Apple's App Store or Android Market, allowing you to
communicate with Synology DiskStation wherever Wi-Fi access is available. You can manage your DiskStation
files, music, photo and video albums, and even the surveillance videos on the go.
DS audio
DS audio allows you to access Audio Station with an iOS or Android device and listen to your favorite music on
the go. Besides, the remote controller feature allows you to control Audio Station's music playback when there is
an audio output device connected to the USB port of your DiskStation, such as a USB speaker, or an external
speakers or home stereo equipment connected to the audio dock of Synology Remote (sold separately).
DS cam
DS cam allows users who own an iOS or Android device to live view their IP cameras, take snapshots, and view
recorded events from your Surveillance Station whenever a network connection is available.
DS photo+
DS photo+ allows you to access Photo Station with an iOS or Android device and share your precious moments
on the go. Download and save photos from Photo Station to your mobile device so you can enjoy the flashbacks
anytime anywhere. You can also use DS photo+ to upload snapshots or videos from your camera phone straight
to Photo Station. Besides, you and your friends can interact by leaving comments on any photos, adding more
fun to your photo sharing experiences.
DS file
DS file allows you to access and manage DiskStation files with iOS or Android devices.
161
Synology DiskStation User's Guide
Based on DSM 4.0
DS finder
DS finder allows you to monitor or email the status of your DiskStation, and request it to perform wake on LAN
(WOL), restart, shut down, or play beep sounds (to help you quickly find the its location) with an iOS or Android
device.
Note: For more information about those mobile Apps, refer to the Help files that come with the Apps.
Use Other Mobile Devices
If you have a mobile device running on Windows Mobile 6.0 (with Internet Explorer Mobile or Opera 9.0 or later),
Symbian OS 9.1 (with S60 3rd Edition or later), or iPhone OS 2.3.1 or later, you can use the device to log in to
Synology DiskStation to view photos with Mobile Photo Station and read supported file formats with Mobile File
Station around the world where Internet access is available.
162
Chapter 18: Communicate with Mobile Devices
Troubleshooting
For any questions about managing your DSM, go to Main Menu > DSM Help or click the Help button (with a
question mark) at the top-right corner of every window. For any questions other than that, please visit Synology
Inc. website www.synology.com for further assistance.
163
SYNOLOGY, INC.
END USER LICENSE AGREEMENT
IMPORTANT–READ CAREFULLY: THIS END USER LICENSE AGREEMENT ("EULA") IS A LEGAL AGREEMENT
BETWEEN YOU (EITHER AN INDIVIDUAL OR A SINGLE ENTITY) AND SYNOLOGY, INC. AND ITS AFFILIATES,
INCLUDING SYNOLOGY AMERICAN CORP AND SYNOLOGY UK LTD., (COLLECTIVELY, "SYNOLOGY") FOR ANY
SYNOLOGY SOFTWARE, TOGETHER WITH ANY OTHER ASSOCIATED FIRMWARE, MEDIA, PRINTED MATERIALS AND
"ONLINE" OR ELECTRONIC DOCUMENTATION (COLLECTIVELY, THE "SOFTWARE") AVAILABLE FOR DOWNLOAD AT
WWW.SYNOLOGY.COM OR PROVIDED WITH OR INSTALLED ON A SYNOLOGY PRODUCT (THE "PRODUCT").
YOU AGREE TO BE BOUND BY THE TERMS OF THIS EULA BY OPENING THE PACKAGE CONTAINING THE
SOFTWARE, INSTALLING THE SOFTWARE NOT OTHERWISE PRE-INSTALLED BY SYNOLOGY ON A PRODUCT OR
OTHERWISE USING A PRODUCT THAT INCLUDES PRE-INSTALLED SOFTWARE. IF YOU DO NOT AGREE TO THE
TERMS OF THIS EULA, DO NOT OPEN THE BOX CONTAINING THE PRODUCT, INSTALL THE SOFTWARE OR USE THE
PRODUCT CONTAINING THE SOFTWARE. INSTEAD, YOU MAY RETURN THE PRODUCT TO THE RESELLER WHERE
YOU PURCHASED IT FOR A REFUND IN ACCORDANCE WITH THE RESELLER'S APPLICABLE RETURN POLICY.
Section 1. Limited Software License. Subject to the
terms and conditions of this EULA, Synology grants you a
limited, non-exclusive, non-transferable, personal license to
install, run and use one copy of the Software on the Product
solely in connection with your authorized use of the Product.
Section 2. Documentation. You may make and use a
reasonable number of copies of any documentation provided
with the Software; provided, that such copies will only be
used for internal business purposes and are not to be
republished or redistributed (either in hard copy or electronic
form) to any third party.
Section 3. Backup. You may make a reasonable number
of copies of the Software for backup and archival purposes.
Section 4. Updates. Any software provided to you by
Synology or made available on the Synology web site at
www.synology.com ("Web Site") that updates or
supplements the original Software is governed by this EULA
unless separate license terms are provided with such
updates or supplements, in which case, such separate terms
will govern.
Section 5. License Limitations. The license set forth in
Section 1 applies only to the extent you have ordered and
paid for the Product and it states the entirety of your rights
with respect to the Software. Synology reserves all rights
not expressly granted to you in this EULA. Without limiting
the foregoing, you will not, and you will not authorize or
permit any third party to: (a) use the Software for any
purpose other than in connection with the Product;
(b) license, distribute, lease, rent, lend, transfer, assign or
otherwise dispose of the Software or use the Software in any
commercial hosted or service bureau environment;
(c) reverse engineer, decompile, disassemble or attempt to
discover the source code for or any trade secrets related to
the Software, except and only to the extent that such activity
is expressly permitted by applicable law notwithstanding this
limitation; (d) adapt, modify, alter, translate or create any
derivative works of the Software; (e) remove, alter or
obscure any copyright notice or other proprietary rights
notice on the Product; or (f) circumvent or attempt to
circumvent any methods employed by Synology to control
access to the components, features or functions of the
Product or Software.
Section 6. Open Source. The Software may contain
components licensed to Synology under the GNU General
Public License ("GPL Components"), currently available at
http://www.gnu.org/licenses/gpl.html. The terms of the GPL
will control solely with respect to the GPL Components to the
extent that this EULA conflicts with the requirements of the
GPL with respect to your use of the GPL Components, and,
in such event, you agree to be bound by the GPL with
respect to your use of such components.
Section 7. Audit. Synology will have the right to audit your
compliance with the terms of this EULA. You agree to grant
access to Synology to facilities, equipment, books, records
and documents and to otherwise reasonably cooperate with
Synology in order to facilitate any such audit.
Section 8. Ownership. The Software is valuable property
of Synology and its licensors and is protected by copyright
and other intellectual property laws and treaties. Synology
or its licensors own all right, title and interest in and to the
Software and all copyright and other intellectual property
rights in the Software.
Section 9. Limited Warranty. Synology warrants that for a
period of ninety (90) days after either your (a) installation of
the Software on Products that do not include pre-installed
Software or (b) use of a Product that includes pre-installed
Software, as applicable, (the "Warranty Period"), the
Software will substantially conform to Synology's published
specifications for the Software, if any, or otherwise set forth
on the Web Site. Synology will use commercially reasonable
efforts to, in Synology's sole discretion, either correct any
such nonconformity in the Software or replace any Software
that fails to comply with the foregoing warranty, provided that
you give Synology written notice of such noncompliance
within the Warranty Period. The foregoing warranty does not
apply to any noncompliance resulting from any: (w) use,
reproduction, distribution or disclosure not in accordance
with this EULA; (x) any customization, modification or other
alteration of the Software by anyone other than Synology;
(y) combination of the Software with any product, services or
other items provided by anyone other than Synology; or
(z) your failure to comply with this EULA.
Section 10.
Support.
During the Warranty Period,
Synology will make available to you the support services.
Following the expiration of the applicable Warranty Period,
support for Software may be available from Synology upon
written request.
Section 11. Disclaimer of Warranties. EXCEPT AS
EXPRESSLY SET FORTH ABOVE, SYNOLOGY AND ITS
SUPPLIERS PROVIDE THE SOFTWARE "AS IS" AND
WITH ALL FAULTS. SYNOLOGY AND ITS SUPPLIERS
HEREBY DISCLAIM ALL OTHER WARRANTIES,
EXPRESS, IMPLIED OR STATUTORY, ARISING BY LAW
OR OTHERWISE, INCLUDING BUT NOT LIMITED TO ANY
IMPLIED
WARRANTIES
OF
MERCHANTABILITY,
FITNESS FOR A PARTICULAR PURPOSE OR USE, TITLE
AND NONINFRINGEMENT, WITH REGARD TO THE
SOFTWARE. WITHOUT LIMITING THE FOREGOING,
SYNOLOGY DOES NOT WARRANT THAT THE
SOFTWARE WILL BE FREE OF BUGS, ERRORS,
VIRUSES OR OTHER DEFECTS.
Section 12. Disclaimer of Certain Damages. IN NO
EVENT WILL SYNOLOGY OR ITS LICENSORS BE LIABLE
FOR THE COST OF COVER OR FOR ANY INCIDENTAL,
INDIRECT, SPECIAL, PUNITIVE, CONSEQUENTIAL OR
SIMILAR DAMAGES OR LIABILITIES WHATSOEVER
(INCLUDING, BUT NOT LIMITED TO LOSS OF DATA,
INFORMATION, REVENUE, PROFIT OR BUSINESS)
ARISING OUT OF OR RELATING TO THE USE OR
INABILITY TO USE THE SOFTWARE OR OTHERWISE
UNDER OR IN CONNECTION WITH THIS EULA OR THE
SOFTWARE, WHETHER BASED ON CONTRACT, TORT
(INCLUDING NEGLIGENCE), STRICT LIABILITY OR
OTHER THEORY EVEN IF SYNOLOGY HAS BEEN
ADVISED OF THE POSSIBILITY OF SUCH DAMAGES.
Section 13. Limitation of Liability. SYNOLOGY'S AND
ITS SUPPLIERS' LIABILITY ARISING OUT OF OR
RELATING TO THE USE OR INABILITY TO USE THE
SOFTWARE
OR
OTHERWISE
UNDER
OR
IN
CONNECTION WITH THIS EULA OR THE SOFTWARE IS
LIMITED TO THE AMOUNT ACTUALLY PAID BY YOU
FOR THE PRODUCT REGARDLESS OF THE AMOUNT OF
DAMAGES YOU MAY INCUR AND WHETHER BASED ON
CONTRACT, TORT (INCLUDING NEGLIGENCE), STRICT
LIABILITY OR OTHER THEORY. The foregoing disclaimer
of warranties, disclaimer of certain damages and limitation of
liability will apply to the maximum extent permitted by
applicable law. The laws of some states/jurisdictions do not
allow the exclusion of implied warranties or the exclusion or
limitation of certain damages. To the extent that those laws
apply to this EULA, the exclusions and limitations set forth
above may not apply to you.
Section 14. Export Restrictions. You acknowledge that
the Software is subject to U.S. export restrictions. You
agree to comply with all applicable laws and regulations that
apply to the Software, including without limitation the U.S.
Export Administration Regulations.
Section 15.
U.S. Government License Rights.
All
Software provided to the U.S. Government is provided with
the commercial license rights and restrictions described in
this EULA. By installing, copying or using the Software, the
U.S. Government agrees that the Software is "commercial
computer software" or "commercial computer software
documentation" within the meaning of FAR Part 12.
Section 16. Termination. Without prejudice to any other
rights, Synology may terminate this EULA if you do not abide
by the terms and conditions contained herein. In such event,
you must cease use of the Software and destroy all copies of
the Software and all of its component parts.
Section 17. Assignment. You may not transfer or assign
your rights under this EULA to any third party. Any such
transfer or assignment in violation of the foregoing restriction
will be void.
Section 18. Applicable Law. Unless expressly prohibited
by local law, this EULA is governed by the laws of the State
of Washington, U.S.A. without regard to any conflict of law
principles to the contrary. The 1980 U.N. Convention on
Contracts for the International Sale of Goods or any
successor thereto does not apply.
Section 19. Dispute Resolution. Any dispute, controversy
or claim arising out of or relating to this Warranty, the
Software or services provided by Synology with respect to
the Software or the relationship between you and Synology
will be resolved exclusively and finally by arbitration under
the current commercial rules of the American Arbitration
Association if you reside in the United States, except as
otherwise provided below. In such cases, the arbitration will
be conducted before a single arbitrator, and will be limited
solely to the dispute between you and Synology. The
arbitration, or any portion of it, will not be consolidated with
any other arbitration and will not be conducted on a classwide or class action basis. The arbitration shall be held in
King County, Washington, U.S.A. by submission of
documents, by telephone, online or in person as determined
by the arbitrator at the request of the parties. The prevailing
party in any arbitration or legal action occurring within the
United States or otherwise shall receive all costs and
reasonable attorneys’ fees, including any arbitration fee paid
by the prevailing party. Any decision rendered in such
arbitration proceedings will be final and binding on the
parties, and judgment may be entered thereon in any court
of competent jurisdiction. You understand that, in the
absence of this provision, you would have had a right to
litigate any such dispute, controversy or claim in a court,
including the right to litigate claims on a class-wide or classaction basis, and you expressly and knowingly waives those
rights and agrees to resolve any disputes through binding
arbitration in accordance with the provisions of this
Section 19. If you do not reside within the United States,
any dispute, controversy or claim described in this Section
shall be finally resolved by arbitration conducted by three
neutral arbitrators in accordance with the procedures of the
R.O.C. Arbitration Law and related enforcement rules. The
arbitration shall take place in Taipei, Taiwan, R.O.C., and the
arbitration proceedings shall be conducted in English or, if
both parties so agree, in Mandarin Chinese. The arbitration
award shall be final and binding on the parties and may be
enforced in any court having jurisdiction. Nothing in this
Section shall be deemed to prohibit or restrict Synology from
seeking injunctive relief or seeking such other rights and
remedies as it may have at law or equity for any actual or
threatened breach of any provision of this EULA relating to
Synology's intellectual property rights.
Section 20. Attorneys' Fees. In any arbitration, mediation,
or other legal action or proceeding to enforce rights or
remedies under this EULA, the prevailing party will be
entitled to recover, in addition to any other relief to which it
may be entitled, costs and reasonable attorneys' fees.
Section 21. Severability. If any provision of this EULA is
held by a court of competent jurisdiction to be invalid, illegal,
or unenforceable, the remainder of this EULA will remain in
full force and effect.
Section 22. Entire Agreement. This EULA sets forth the
entire agreement of Synology and you with respect to the
Software and the subject matter hereof and supersedes all
prior and contemporaneous understandings and agreements
whether written or oral. No amendment, modification or
waiver of any of the provisions of this EULA will be valid
unless set forth in a written instrument signed by the party to
be bound thereby.
SYNOLOGY, INC.
LIMITED PRODUCT WARRANTY
THIS LIMITED WARRANTY ("WARRANTY") APPLIES TO THE PRODUCTS (AS DEFINED BELOW) OF SYNOLOGY, INC.
AND ITS AFFILIATES, INCLUDING SYNOLOGY AMERICA CORP AND SYNOLOGY UK LTD., (COLLECTIVELY,
"SYNOLOGY"). YOU ACCEPT AND AGREE TO BE BOUND BY THE TERMS OF THIS WARRANTY BY OPENING THE
PACKAGE CONTAINING AND/OR USING THE PRODUCT. IF YOU DO NOT AGREE TO THE TERMS OF THIS
WARRANTY, DO NOT USE THE PRODUCT. INSTEAD, YOU MAY RETURN THE PRODUCT TO THE RESELLER WHERE
YOU PURCHASED IT FOR A REFUND IN ACCORDANCE WITH THE RESELLER'S APPLICABLE RETURN POLICY.
Section 1. Definitions. (a) "Category I Product" means
Synology product models RS810+, RS810RP+ and RX410.
(b) "Category II Product" means Synology product models
RS3412xs, RS3412RPxs, RS2212+, RS2212RP+, RS812+,
RS812RP+, DS3612xs, DS1812+, DS1512+, DS712+,
DS3611xs, DS2411+, DS1511+, DS1010+, DS710+,
DS509+, DS508, RS812, RS212, RS3411xs, RS3411RPxs,
RS2211+, RS2211RP+, RS411, RS409RP+, RS409+,
RS409, RS408-RP, RS408, RS407, RX1211, RX1211RP,
DX1211, DX510, DX5, RX4, and RAM Module (1GB/2GB).
(c) "Category III Product" means all other Synology product
models purchased by Customer after March 1, 2008.
(d) "Category IV Product" means all other Synology product
models purchased by Customer before February 29, 2008.
(e) "Customer" means the original person or entity
purchasing the Product from Synology or an authorized
Synology distributor or reseller. (f) "Product" means a
Category I Product, Category II Product, Category III Product,
or Category IV Product and any hardware incorporated into
the product by Synology and any accompanying
documentation. (g) "Software" means the Synology
proprietary software that accompanies the Product when
purchased by Customer, is downloaded by Customer at the
Web Site, or is pre-installed on the Product by Synology, and
includes any firmware, associated media, images,
animations, video, audio, text and applets incorporated into
the software or Product and any updates or upgrades to
such software. (h) "Warranty Period" means: (i) the period
commencing on the date the Product is purchased by
Customer and ending (1) five years after such date for
Category I Products; (2) three years after such date for
Category II Products; or (3) two years after such date for
Category III Products; or (4) one year after such date for
Category IV Products. (i) "Web Site" means the Synology
web site located at www.synology.com.
Section 2. Limited Warranty and Remedies
2.1
Limited Warranty. Subject to Section 2.7, Synology
warrants to Customer that each Product (a) will be free of
material defects in workmanship and (b) under normal use
will perform substantially in accordance with Synology's
published specifications for the Product during the Warranty
Period. Synology warrants the Software as set forth in the
accompanying end user license agreement provided with the
Product, if any.
2.2
Product Registration.
Customers may register
Products with Synology and may obtain the manufacturing
date for Category I Products, Category II Products and
Category III Products at the Web Site. The failure to register
a Product at the Web Site will not diminish the warranty
rights set forth in Section 2.1. Synology is not responsible
for Customer's failure to identify the manufacturing date of
any Product.
2.3
Exclusive Remedy. If Customer gives notice of
noncompliance with any of the warranties set forth in
Section 2.1 within the applicable Warranty Period in the
manner set forth below, then, upon verification of the
noncompliance by Synology, Synology will, at Synology's
option: (a) use commercially reasonable efforts to repair the
Product, or (b) replace the noncomplying Product or part
thereof upon return of the complete Product in accordance
with Section 2.4 The foregoing sets forth Synology's entire
liability and Customer's sole and exclusive remedy for any
breach of warranty under Section 2.1 or any other defect or
deficiency in the Product. Customer will reasonably assist
Synology to diagnose and validate any nonconformity with
the Product. The warranty set forth in Section 2.1 does not
include: (1) any warranty relating to the Software;
(2) physical installation or removal of the Product from
Customer's site; (3) visits to Customer's site; (4) labor
necessary to effect repairs or replace defective parts other
than during Synology's or its contracted service providers'
normal local business hours, exclusive of weekends and
service providers’ holidays; (5) any work with any third party
equipment or software; (6) any warranty of the hard disk if
installed by Customer or any other third party; or (7) any
warranty of compatibility with the hard disk.
2.4
Return. Any Product returned by Customer under
Section 2.3 must be assigned a Return Merchandise
Authorization ("RMA") number by Synology before shipment
and must be returned in accordance with Synology's then
current RMA procedures.
Customer may contact any
authorized Synology distributor or reseller or Synology
Support to obtain assistance in obtaining an RMA, and must
provide proof of purchase and product serial number when
asking for such assistance. For warranty claims, Customer
must return the complete Product to Synology in accordance
with this Section 2.4 to be eligible for coverage under this
Warranty. Any Product returned without an RMA number, or
any Product that has been disassembled (except under the
direction of Synology) will be refused and returned to
Customer at Customer's expense. Any Product that has
been assigned a RMA number must be returned in the same
condition as it was received from Synology to the address
designated by Synology, freight pre-paid, in packaging
sufficient to protect the contents thereof and with the RMA
number prominently displayed on the outside of the box.
Customer is responsible for insurance and risk of loss with
respect to returned items until they are properly received by
Synology. A Product issued a RMA number must be
returned within fifteen (15) days after issuance of the
applicable RMA number.
2.5
Replacement by Synology. If Synology elects to
replace any Product under this Warranty set forth in
Section 2.1, then Synology will ship a replacement Product
at Synology's expense via the shipping method selected by
Synology after receipt of the nonconforming Product
returned in accordance with Section 2.4 and validation by
Synology that the Product does not conform to the warranty.
Replacement Product will be new or serviceably used,
comparable in function and performance to the original
Product and warranted for the remainder of the original
Warranty Period or thirty (30) days after it is shipped to
Customer, whichever period is longer Any Product found by
Synology to be non-defective will be returned to Customer.
2.6
Support. During the Warranty Period, Synology will
make available to Customer the support services. Following
the expiration of the applicable Warranty Period, support for
Products may be available from Synology upon written
request.
2.7
Exclusions. The foregoing warranties and warranty
obligations do not apply to any Product that (a) has been
installed or used in a manner not specified or described in
the Product specifications; (b) has been repaired, modified
or altered by anyone other than Synology or its agent or
designee; (c) has been in any way misused, abused, or
damaged; (d) has been used with items not provided by
Synology other than the hardware or software for which the
Product is designed; or (e) otherwise fails to conform to the
Product specifications and such failure is attributable to
causes not within or under Synology's control. Further, the
foregoing warranties will be void if (1) Customer
disassembles the Product except as authorized by Synology;
(2) Customer fails to implement any correction, modification,
enhancement, improvement or other update made available
to Customer by Synology; or (3) Customer implements,
installs or uses any correction, modification, enhancement,
improvement or other update made available by any third
party. The warranty set forth in Section 2.1 will terminate
upon Customer's sale or transfer of the Product to a third
party.
ACCOMPANYING DOCUMENTATION OR SOFTWARE
AND ANY OTHER GOODS OR SERVICES PROVIDED
UNDER THIS WARRANTY IS LIMITED TO THE AMOUNT
ACTUALLY PAID BY CUSTOMER FOR THE PRODUCT
REGARDLESS OF THE AMOUNT OF DAMAGES
CUSTOMER MAY INCUR AND WHETHER BASED ON
CONTRACT, TORT (INCLUDING NEGLIGENCE), STRICT
LIABILITY OR OTHER THEORY. The foregoing disclaimer
of certain damages and limitation of liability will apply to the
maximum extent permitted by applicable law. The laws of
some states/jurisdictions do not allow exclusion or limitation
of certain damages. To the extent that those laws apply to
the Product, the exclusions and limitations set forth above
may not apply to Customer.
2.8
Disclaimer of Warranties. THE WARRANTIES,
OBLIGATIONS, AND LIABILITIES OF SYNOLOGY AND
THE REMEDIES OF CUSTOMER SET FORTH IN THIS
WARRANTY ARE EXCLUSIVE AND IN SUBSTITUTION
FOR, AND CUSTOMER HEREBY WAIVES, RELEASES
AND
DISCLAIMS,
ALL
OTHER
WARRANTIES,
OBLIGATIONS AND LIABILITIES OF SYNOLOGY AND ALL
OTHER RIGHTS, CLAIMS AND REMEDIES OF
CUSTOMER AGAINST SYNOLOGY, EXPRESS OR
IMPLIED, ARISING BY LAW OR OTHERWISE, WITH
RESPECT TO THE PRODUCT, ACCOMPANYING
DOCUMENTATION OR SOFTWARE AND ANY OTHER
GOODS OR SERVICES DELIVERED UNDER THIS
WARRANTY, INCLUDING, BUT NOT LIMITED TO ANY:
(A) IMPLIED WARRANTY OF MERCHANTABILITY OR
FITNESS FOR A PARTICULAR PURPOSE OR USE;
(B) IMPLIED WARRANTY ARISING FROM COURSE OF
PERFORMANCE, COURSE OF DEALING, OR USAGE OF
TRADE;
(C) CLAIM
OF
INFRINGEMENT
OR
MISAPPROPRIATION;
OR
(D) CLAIM
IN
TORT
(WHETHER BASED ON NEGLIGENCE, STRICT LIABILITY,
PRODUCT LIABILITY OR OTHER THEORY). SYNOLOGY
MAKES
NO
GUARANTEE
AND
SPECIFICALLY
DISCLAIMS ANY WARRANTY THAT THE DATA OR
INFORMATION STORED ON ANY SYNOLOGY PRODUCT
WILL BE SECURE AND WITHOUT RISK OF DATA LOSS.
SYNOLOGY RECOMMENDS THAT CUSTOMER TAKES
APPROPRIATE MEASURES TO BACK UP THE DATA
STORED ON THE PRODUCT. SOME STATES DO NOT
ALLOW LIMITATIONS ON IMPLIED WARRANTIES, SO
THE ABOVE LIMITATION MAY NOT APPLY TO
CUSTOMER.
Section 4. Miscellaneous
Section 3. Limitations of Liability
3.1
Force Majeure. Synology will not be liable for, or be
considered to be in breach of or default under this Warranty
on account of, any delay or failure to perform as required by
this Warranty as a result of any cause or condition beyond
its reasonable control (including, without limitation, any act or
failure to act by Customer).
3.2
Disclaimer of Certain Damages. IN NO EVENT
WILL SYNOLOGY OR ITS SUPPLIERS BE LIABLE FOR
THE COST OF COVER OR FOR ANY INCIDENTAL,
INDIRECT, SPECIAL, PUNITIVE, CONSEQUENTIAL OR
SIMILAR DAMAGES OR LIABILITIES WHATSOEVER
(INCLUDING, BUT NOT LIMITED TO LOSS OF DATA,
INFORMATION, REVENUE, PROFIT OR BUSINESS)
ARISING OUT OF OR RELATING TO THE USE OR
INABILITY
TO
USE
THE
PRODUCT,
ANY
ACCOMPANYING DOCUMENTATION OR SOFTWARE
AND ANY OTHER GOODS OR SERVICES PROVIDED
UNDER THIS WARRANTY, WHETHER BASED ON
CONTRACT, TORT (INCLUDING NEGLIGENCE), STRICT
LIABILITY OR OTHER THEORY EVEN IF SYNOLOGY HAS
BEEN ADVISED OF THE POSSIBILITY OF SUCH
DAMAGES.
3.3
Limitation of Liability. SYNOLOGY'S AND ITS
SUPPLIERS' LIABILITY ARISING OUT OF OR RELATING
TO THE USE OR INABILITY TO USE THE PRODUCT, ANY
4.1
Proprietary Rights.
The Product and any
accompanying Software and documentation provided with
the Product include proprietary and intellectual property
rights of Synology and its third party suppliers and licensors.
Synology retains and reserves all right, title, and interest in
the intellectual property rights of the Product, and no title to
or ownership of any intellectual property rights in or to the
Product, any accompanying Software or documentation and
any other goods provided under this Warranty is transferred
to Customer under this Warranty. Customer will (a) comply
with the terms and conditions of the Synology end user
license agreement accompanying any Software furnished by
Synology or an authorized Synology distributor or reseller;
and (b) not attempt to reverse engineer any Product or
component thereof or accompanying Software or otherwise
misappropriate, circumvent or violate any of Synology's
intellectual property rights.
4.2
Assignment. Customer will not assign any of its
rights under this Warranty directly, by operation of law or
otherwise, without the prior written consent of Synology.
4.3
No Additional Terms.
Except as expressly
permitted by this Warranty, neither party will be bound by,
and each party specifically objects to, any term, condition or
other provision that conflicts with the provisions of this
Warranty that is made by the other party in any purchase
order, receipt, acceptance, confirmation, correspondence or
otherwise, unless each party specifically agrees to such
provision in writing. Further, if this Warranty conflicts with
any terms or conditions of any other agreement entered into
by the parties with respect to the Product, this Warranty will
prevail unless the other agreement specifically references
the sections of this Warranty that it supersedes.
4.4
Applicable Law. Unless expressly prohibited by
local law, this Warranty is governed by the laws of the State
of Washington, U.S.A. without regard to any conflict of law
principles to the contrary. The 1980 U.N. Convention on
Contracts for the International Sale of Goods or any
successor thereto does not apply.
4.5
Dispute Resolution. Any dispute, controversy or
claim arising out of or relating to this Warranty, the Product
or services provided by Synology with respect to the Product
or the relationship between Customers residing within the
United States and Synology will be resolved exclusively and
finally by arbitration under the current commercial rules of
the American Arbitration Association, except as otherwise
provided below. The arbitration will be conducted before a
single arbitrator, and will be limited solely to the dispute
between Customer and Synology. The arbitration, or any
portion of it, will not be consolidated with any other
arbitration and will not be conducted on a class-wide or class
action basis. The arbitration shall be held in King County,
Washington, U.S.A. by submission of documents, by
telephone, online or in person as determined by the
arbitrator at the request of the parties. The prevailing party in
any arbitration or legal action occurring within the United
States or otherwise shall receive all costs and reasonable
attorneys’ fees, including any arbitration fee paid by the
prevailing party. Any decision rendered in such arbitration
proceedings will be final and binding on the parties, and
judgment may be entered thereon in any court of competent
jurisdiction. Customer understands that, in the absence of
this provision, Customer would have had a right to litigate
any such dispute, controversy or claim in a court, including
the right to litigate claims on a class-wide or class-action
basis, and Customer expressly and knowingly waives those
rights and agrees to resolve any disputes through binding
arbitration in accordance with the provisions of this
Section 4.5. For Customers not residing within the United
States, any dispute, controversy or claim described in this
section shall be finally resolved by arbitration conducted by
three neutral arbitrators in accordance with the procedures
of the R.O.C. Arbitration Law and related enforcement rules.
The arbitration shall take place in Taipei, Taiwan, R.O.C.,
and the arbitration proceedings shall be conducted in
English or, if both parties so agree, in Mandarin Chinese.
The arbitration award shall be final and binding on the
parties and may be enforced in any court having jurisdiction.
Nothing in this Section shall be deemed to prohibit or restrict
Synology from seeking injunctive relief or seeking such other
rights and remedies as it may have at law or equity for any
actual or threatened breach of any provision of this Warranty
relating to Synology's intellectual property rights.
4.6
Attorneys' Fees. In any arbitration, mediation, or
other legal action or proceeding to enforce rights or
remedies under this Warranty, the prevailing party will be
entitled to recover, in addition to any other relief to which it
may be entitled, costs and reasonable attorneys' fees.
4.7
Export Restrictions. You acknowledge that the
Product may be subject to U.S. export restrictions. You will
comply with all applicable laws and regulations that apply to
the Product, including without limitation the U.S. Export
Administration Regulations.
4.8
Severability. If any provision of this Warranty is held
by a court of competent jurisdiction to be invalid, illegal, or
unenforceable, the remainder of this Warranty will remain in
full force and effect.
4.9
Entire Agreement. This Warranty constitutes the entire
agreement, and supersedes any and all prior agreements,
between Synology and Customer related to the subject matter
hereof. No amendment, modification or waiver of any of the
provisions of this Warranty will be valid unless set forth in a
written instrument signed by the party to be bound thereby.