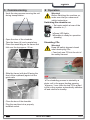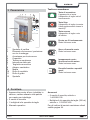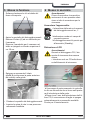
1
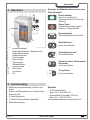
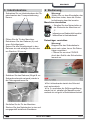
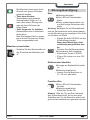
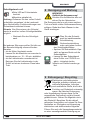
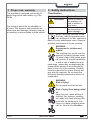
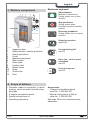
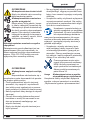
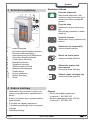
411.2 OMDD
BETRIEBSANLEITUNG
MASCHINE ZUR VERNICHTUNG
OPTISCHER DATENTRÄGER
OPERATING INSTRUCTIONS
OPTICAL MEDIA DESTRUCTION
DEVICE
MANUALE OPERATIVO
APPARECCHIO PER LA DISTRUZIONE DI SUPPORTI DATI OTTICI
INSTRUKCJA OBSŁUGI
NISZCZARKA OPTYCZNYCH
NOŚNIKÓW DANYCH
Classic 411.2 OMDD
1.570.999.100 B
10/2011
!
27WA
411.2 OMDD
deutsch:
Maschine zur Vernichtung optischer Datenträger HSM Classic 411.2 OMDD . . . . . . 3
english:
Optical media destruction device HSM Classic 411.2 OMDD . . . . . . . . . . . . . . . . . . 11
italiano:
Apparecchio per la distruzione di supporti dati ottici HSM Classic 411.2 OMDD . . . 19
polski:
Niszczarka optycznych nośników danych HSM Classic 411.2 OMDD . . . . . . . . . . . 27
2
Classic 411.2 OMDD
10/2011
deutsch
1 Bestimmungsgemäße Verwendung, Gewährleistung
Die Maschine ist ausschließlich zum Vernichten optischer Datenträger (z.B. CDs und
DVDs) bestimmt.
Die Gewährleistungszeit für das Gerät beträgt 2 Jahre. Verschleiß, Schäden durch
unsachgemäßen Gebrauch sowie Eingriffe
von dritter Seite fallen weder unter die Gewährleistung noch unter die Garantie.
2 Sicherheitshinweise
Klassifizierung
Sicherheitshinweis Erläuterung
WARNUNG Die Missachtung
der Warnung kann
Schäden für Leib
und Leben zur Folge
haben.
Achtung
Die Missachtung
des Hinweises kann
Sachschäden verursachen.
Lesen Sie vor Inbetriebnahme der
Maschine die Betriebsanleitung,
bewahren Sie sie für späteren
Gebrauch auf und geben Sie die Anleitung
an spätere Nutzer weiter. Beachten Sie alle
auf dem Aktenvernichter angebrachten
Sicherheitshinweise.
WARNUNG
Gefahren für Kinder und andere
Personen!
Die Maschine darf nicht durch
Personen (einschließlich Kindern
unter 14 Jahren) mit eingeschränkten physischen, sensorischen oder
geistigen Fähigkeiten oder mangels Erfahrung und/oder mangels Wissen
benutzt werden, es sei denn, sie werden
durch eine für ihre Sicherheit zuständige
Person beaufsichtigt oder erhielten von ihr
Anweisungen, wie das Gerät zu benutzen
ist. Kinder sollen beaufsichtigt werden, um
sicherzustellen, dass sie nicht mit dem Gerät spielen. Lassen Sie den Aktenvernichter
nicht unbeaufsichtigt eingeschaltet.
10/2011
Classic 411.2 OMDD
3
deutsch
WARNUNG
Verletzungsgefahr!
Fassen Sie niemals in den Einwurfschlitz.
Verletzungsgefahr durch
Einziehen!
Bringen Sie lange Haare, lose
Kleidung, Krawatten, Schals,
Hals– und Armkettchen usw. nicht
in den Bereich der Zuführöffnung.
Vernichten Sie kein Material, das
zu Schlingenbildung neigt, z.B.
Bänder, Verschnürungen, Weichplastikfolien.
Verletzungsgefahr durch Splitter!
Splitterschutz ist nur gewährleistet, wenn
das Sicherheitselement die Zuführungsöffnung abdeckt. Führen Sie CDs und DVDs
nur durch den Einwurfschlitz zu.
–
–
–
–
–
–
4
WARNUNG
Gefährliche Netzspannung!
Fehlerhafter Umgang mit der Maschine kann zu elektrischem
Stromschlag führen.
Überprüfen Sie vor dem Einstecken des
Netzsteckers, dass Spannung und Frequenz Ihres Stromnetzes mit den Angaben auf dem Typenschild übereinstimmen.
Achten Sie darauf, dass der Netzstecker
leicht erreichbar ist.
Vermeiden Sie, dass Wasser in die Maschine gelangt. Tauchen Sie weder Netzkabel noch Netzstecker in Wasser.
Fassen Sie den Netzstecker niemals mit
feuchten Händen an.
Ziehen Sie den Netzstecker nie an der
Zuleitung aus der Steckdose, sondern
fassen Sie immer den Netzstecker an.
Verwenden Sie das Gerät nur in trockenen Innenräumen. Betreiben Sie es nie in
Feuchträumen oder im Regen.
Prüfen Sie Gerät und Kabel regelmäßig auf Schäden. Schalten
Sie die Maschine bei Beschädigung oder nicht ordnungsgemäßer Funktion sowie vor Platzwechsel oder Reinigung aus und
ziehen Sie den Netzstecker.
– Halten Sie das Gerät, den Netzstecker
und das Netzkabel von offenem Feuer
und heißen Flächen fern. Die Lüftungsschlitze müssen frei sein und ein Abstand
zur Wand oder zu Möbeln von min. 5 cm
eingehalten werden.
Servicearbeiten dürfen nur vom
HSM–Kundendienst und Service–
Technikern unserer Vertragspartner durchgeführt werden.
Kundendienstadressen siehe
Seite 36.
Achtung Gefahr durch Fehlgebrauch
Benutzen Sie die Maschine ausschließlich
gemäß den Vorgaben des Kapitels „Bestimmungsgemäße Verwendung“.
Classic 411.2 OMDD
10/2011
deutsch
Anzeige- und Bedienelemente an der
Folientastatur
3 Übersicht
1 2
3
4
5
Einschalttaste
Maschine schaltet ein.
Schneidwerk läuft in Einzugsrichtung.
Stopp-Taste
Schneidwerk bleibt stehen.
Maschine in Bereitschaft
6
I
0
7
12
8
9
11
Reversiertaste
Schneidwerk läuft rückwärts.
10
Betriebsbereit
grüne Leuchtdiode
1
2
3
4
5
6
7
8
9
10
11
12
Revisionsklappe
Sicherheitselement / Splitterschutz
Sicherheitshinweis
Gehäuseoberteil
Folientastatur
Netzschalter
Typenschild
Warnaufkleber
Unterschrank
Bockrollen
Lenkrollen
Tür
Schnittgutsack voll
rote Leuchtdiode
Papierstau bzw. Elektromotor
überlastet
rote Leuchtdiode
Tür geöffnet
rote Leuchtdiode
4 Lieferumfang
• Maschine anschlussfertig in Karton verpackt
• Karton auf Europalette mit Verpackungsband umreift
• 5 Schnittgutsäcke
• 1 Flasche Schneidblock-Spezialöl
• Betriebsanleitung
10/2011
Zubehör
• 5 Schnittgutsäcke
Best.-Nr. 1.442.995.100
• Schneidblock-Spezialöl (250 ml)
Best.-Nr. 1.235.997.403
Kundendienstadressen siehe Seite 28.
Classic 411.2 OMDD
5
deutsch
5 Inbetriebnahme
6 Bedienung
• Schrauben Sie vor Inbetriebnahme die Flügelschrauben der Transportsicherung
heraus.
Warnung!
Stellen Sie vor dem Einschalten der
Maschine sicher, dass alle Sicherheitshinweise beachtet wurden.
Maschine einschalten
• Schalten Sie den Netzschalter an
der Rückseite der Maschine auf
„I“.
I
0
Anzeige am Bedienfeld leuchtet.
Maschine ist betriebsbereit.
• Öffnen Sie die Tür der Maschine.
• Entnehmen Sie den Rahmen (A) und
einen Schnittgutsack.
• Setzen Sie den Schnittgutsack in den
Rahmen ein und schlagen Sie den oberen Rand ca. 20 cm um.
Datenträger vernichten
Warnung!
Klappen Sie das Sicherheitselement nach unten, bevor Sie Datenträger vernichten.
• Führen Sie nur eine CD/DVD
durch den Schlitz des Sicherheitselements zu.
A
• Schieben Sie den Rahmen (Bügel B zur
Schrankvorderseite zeigend) wieder in
die Führungsschienen ein.
Die Lichtschranke startet das Schneidwerk automatisch.
Ca. 3 s nachdem die Zuführungsöffnung
wieder frei ist, schaltet die Maschine automatisch ab und geht in Betriebsbereitschaft.
B
• Schließen Sie die Tür der Maschine.
• Stecken Sie den Netzstecker in eine ordnungsgemäß installierte Steckdose.
6
Classic 411.2 OMDD
10/2011
deutsch
Die Maschine kann auch durch
Drücken der grünen Pfeiltaste
gestartet werden:
• Taste kurz drücken:
Schneidwerk wird gestartet.
Automatischer Stopp ca. 3 s
nach dem letzten Einzug oder
manuell durch Drücken der
Stopp-Taste.
• Taste länger als 2 s drücken:
Dauerbetrieb ohne Lichtschrankenfunktion.
Das Schneidwerk läuft so lange,
bis es durch Drücken der StoppTaste ausgeschaltet wird.
Maschine ausschalten
• Schalten Sie den Netzschalter an
der Rückseite der Maschine auf
„0“.
7 Störungsbeseitigung
Stau
Maschine blockiert.
Rote LED auf Folientastatur
blinkt.
Motor schaltet automatisch um
und läuft einige Sekunden rückwärts.
Achtung Betätigen Sie die Einschalttaste
und die Reversiertaste nicht wechselweise,
um die Blockierung zu beseitigen. Dies führt
zu Schäden am Gerät.
• Ziehen Sie ddie CD/DVD aus der
Zuführöffnung heraus.
Wenn der Datenträger nicht
vollständig ausgestoßen wurde::
• Drücken Sie die Reversiertaste.
Schneidwerk läuft rückwärts.
• Entnehmen Sie die CD/DVD.
• Führen Sie immer nur eine CD/
DVD zu.
I
0
Elektromotor überhitzt
Anzeige am Bedienfeld leuchtet
rot.
Maschine schaltet ab.
• Lassen Sie die Maschine ca.
15 - 20 min. abkühlen.
Fronttür offen
Rote LED auf Folientastatur
leuchtet.
Maschine schaltet ab.
• Schließen Sie die Tür.
Hinweis Wird die Tür geöffnet, während
das Schneidwerk läuft, muss nach dem
Schließen der Tür die Maschine mittels der
grünen Einschalttaste neu gestartet werden.
10/2011
Classic 411.2 OMDD
7
deutsch
Schnittgutsack voll
8 Reinigung und Wartung
Rote LED auf Folientastatur
leuchtet.
Maschine schaltet ab.
Achtung Entleeren Sie den vollen Schnittgutbehälter umgehend, da bei mehrmaligem Nachdrücken Funktionsstörungen am
Schneidwerk auftreten können.
Hinweis Das Reversieren des Schneidwerks ist auch bei vollem Schnittgutbehälter
möglich.
• Wechseln Sie den Schnittgutsack.
WARNUNG
Gefährliche Netzspannung!
Schalten Sie die Maschine aus und
ziehen Sie den Netzstecker.
Die Reinigung darf nur mit einem weichen
Tuch und einer milden Seifenwasserlösung
erfolgen. Dabei darf kein Wasser in das
Gerät eindringen.
Ölen Sie das Schneidwerk bei nachlassender
Schnittleistung,
Geräuschentwicklung
oder nach jedem Leeren
des Schnittgutbehälters:
• Spritzen Sie Schneidblock–Spezialöl auf ganzer Breite auf die
Schneidwellen.
• Lassen Sie das Schneidwerk
ohne Zufuhr von CD/DVD vorwärts - rückwärts laufen.
Staub und Partikel werden gelöst.
Bei anderen Störungen prüfen Sie bitte vor
der Benachrichtigung unseres Kundendienstes
– ob der Motor überlastet wurde.
Lassen Sie die Maschine vor erneuter Inbetriebnahme ca. 15 – 20 min. abkühlen.
– ob die Lichtschranke verschmutzt ist.
Reinigen Sie die Lichtschranke in der
Zufuhr mit einem trockenen Pinsel oder
Tuch.
9 Entsorgung / Recycling
Elektrische und elektronische
Altgeräte enthalten vielfach noch
wertvolle Materialien, teils aber
auch schädliche Stoffe, die für die
Funktion und Sicherheit notwendig
waren. Bei falscher Entsorgung
oder Handhabung können diese für die
menschliche Gesundheit und die Umwelt
gefährlich sein. Geben Sie Altgeräte nie in
den Restmüll. Beachten Sie die aktuell
geltenden Vorschriften und nutzen Sie Sammelstellen zur Rückgabe und Verwertung
elektrischer und elektronischer Altgeräte.
Führen Sie auch alle Verpackungsmaterialien einer umweltgerechten Entsorgung zu.
8
Classic 411.2 OMDD
10/2011
deutsch
10 Technische Daten
Schnittart
Partikelschnitt
Schnittgröße (mm)
2,2 x 4,0
Schnittleistung pro Arbeitsgang
1 optischer Datenträger (CD oder DVD)
Gewicht
80 kg
Geräuschemission (Leerlauf / Last)
60 dB(A) / 75 dB(A)
Schnittgeschwindigkeit
120 mm/s
Arbeitsbreite
(Zuführschlitz im Sicherheitselement)
130 mm
Anschluss
230 V, 50 Hz
Leistung
2100 W
Maße B x T x H (mm)
595 x 470 x 990
Volumen des Schnittgutbehälters
146 l
EG-Konformitätserklärung
Der Hersteller HSM GmbH + Co. KG, Austrasse 1 - 9, D-88699 Frickingen erklärt hiermit, dass die nachstehend bezeichnete Maschine
HSM Classic 411.2 OMDD
aufgrund ihrer Konzeption und Bauart in der von uns in Verkehr gebrachten Ausführung den grundlegenden Sicherheits- und Gesundheitsanforderungen der nachfolgend aufgeführten EG-Richtlinien entspricht:
Niederspannungsrichtlinie 2006 / 95 / EG
EMV-Richtlinie 2004 / 108 / EG
Angewandte Normen und technische Spezifikationen:
• EN 55014-1:2006
• EN 61000-4-2:1995 + A1:1998 + A2:2001
• EN 55014-2:1997 + A1:2001 + A2:2008
• EN 61000-4-4:2004
• EN 61000-3-2:2006
• EN 61000-4-5:2006
• EN 61000-3-3:1995 + A1:2001 + A2:2005
• EN 61000-4-6:2007
• EN 13849-1:2008
• EN 61000-4-11:2004
• EN 62233:2008
• EN 50366:2003 + A1:2006
• EN 60950-1:2006 + A11:2009 + A1:2010
Frickingen, 01.03.2011
Rolf Gasteier - Technischer Leiter
10/2011
Classic 411.2 OMDD
9
deutsch
10
Classic 411.2 OMDD
10/2011
english
1 Proper use, warranty
2 Safety instructions
The shredder is designed exclusively for
destroying optical data media, e.g. CDs,
DVDs.
Classification
The warranty period for the shredder is
2 years. This warranty and guarantee exclude wear and damage caused by improper handling or actions taken by third parties.
Safety notice
WARNING
Notice
Explanation
Failure to observe
this warning can
lead to serious or
fatal injury.
Failure to observe
this instruction can
cause damage.
Before using the machine for the
first time, read the operating manual, and keep it for later use and to
pass on to any subsequent users. Observe
all safety instructions on to the machine.
WARNING
Dangerous for children and
others!
The machine may not be used by
persons (including children under
14 years of age) with limited physical, sensory or mental capabilities
or with a lack of experience and
knowledge, unless they are supervised by
a responsible person or are instructed by
them on the use of the machine. Children
must be supervised to ensure they do not
play with the machine. Do not leave the
document shredder switched on when it is
unattended.
WARNING
Risk of injury!
Do not reach into the feed slot.
Risk of injury from being pulled
in!
Keep long hair, loose articles of
clothing, ties, scarves, jewellery,
etc. away from feed opening. Material with the tendency to form
loops, e.g. tapes, strapping material, etc. must not be shredded.
10/2011
Classic 411.2 OMDD
11
english
Risk of injury from slivers!
Wear protective goggles when destroying
CDs. Keep the safety element closed when
destroying CDs.
–
–
–
–
–
–
WARNING
Dangerous mains voltage!
Improper handling of the machine
can lead to an electric shock.
Before you insert the power plug, make
sure that the voltage and frequency of
your power supply comply with the information on the name plate.
Make sure that the power plug is easily
accessible.
Make sure that no water gets into the
shredder. Do not immerse the power cable or the power plug in water.
Never touch the power plug with wet
hands.
Never pull the plug out of the socket using the power cable. Always pull out the
plug directly.
Only use the machine in a dry room indoors. Never operate the machine in
damp rooms or in the rain.
Service work may only be carried
out by HSM Customer Service or
by the service technicians of our
contractual partners.
See page 36 for our customer
service addresses.
Notice
Danger from improper use
Only operate this machine in accordance
with the instructions outlined in “Proper
use”.
Check the machine and cable
regularly for damage. Switch the
shredder off if it is damaged or
not working correctly or before
relocating or cleaning it and disconnect it from the mains.
– Keep the machine, the plug and cable
away from open fire and hot surfaces.
The ventilation slots must not be blocked
or covered and there must be at least
5 cm space between the shredder and
any wall or furniture.
12
Classic 411.2 OMDD
10/2011
english
Membrane keyboard
3 Machine components
1 2
3
4
ON pushbutton
Shredder is switched on.
Cutting system runs in feed
direction.
5
6
I
0
Stop pushbutton
Cutting system stops.
Shredder remains in standby
function.
7
12
8
Reversing pushbutton
Cutting system runs in reverse
direction.
9
11
10
1
2
3
4
5
6
7
8
9
10
11
12
Ready for operation
green LED
Inspection door
Safety element / splinter protection
Safety instructions
Cover
Membrane keyboard
Mains switch
Name plate
Caution label
Bottom frame
Roller
Guide roller
Door
Cut material bag full
red LED
Paper jam – electric motor
overloaded
red LED
Front door opened
red LED
4 Scope of delivery
• Shredder, ready for connection, in carton
packing, carton on pallet, tied with strapping tape
• 5 bags for shredded material
• Special cutting block oil
• Operating instructions
10/2011
Accessories
• 5 Bags for shredded material,
order No.: 1.442.995.100
• Special cutting block oil 250 ml,
order No.: 1.235.997.403
See page 28 for our customer service
addresses.
Classic 411.2 OMDD
13
english
5 Commissioning
6 Operation
• Undo the wing screws securing the unit
during transportation.
Warning!
Before switching the machine on,
make sure that you observe all
safety instructions.
Switching the shredder on
• Set mains switch at rear of the
shredder to „I“.
I
0
• Open the door of the shredder.
• Take the frame (A) and a waste bag.
• Place the waste bag on the frame and
fold over the top approx. 20 cm.
Green LED lights.
Shredder is ready for operation
(standby)
Shredding CDs
Warning!
Keep the safety element closed
when destroying CDs.
• Feed only one CD into the slot of
the safety element.
A
• Slide the frame (with bar B facing the
front of the cupboard) again into the
guide rails.
B
The shredding process is started by a
photo–cell in the paper feeding opening.
Approx. 3 sec. after the last CD is pulled
in the cutting system automatically switches
off and returns to standby.
• Close the door of the shredder.
• Plug the machine into a properly
installed socket.
14
Classic 411.2 OMDD
10/2011
english
The shredder can also be started
by pressing the green arrow button:
• Press briefly:
Cutting device starts.
Automatic stop approx. 3 seconds
after the last CD was drawn in, or
manual stop when the stop button
is pressed.
• Hold down for longer than
2 seconds:
constant operation without light
barrier function.
The cutting device runs until it is
switched off with the stop button.
Switching shredder off
• Set mains switch at rear of the
shredder to „0“.
7 Troubleshooting
Jam
Shredder jammed.
Red LED in the key pad flashes.
Shredder reverses automatically.
Notice!
Do not press dashed arrow button and
green arrow button alternately forwards and
backwards. Cutting unit can be damaged.
• Pull CD out of the feeding opening.
If CD is not completely pushed out,
then
• Press dashed arrow button.
CD is pushed out.
• Feed only one CD/DVD.
Electric motor overheated
Red LED on membrane keyboard lights.
Shredder switches off automatically.
• Allow shredder to cool down for
approx. 15 to 20 min.
I
0
Front door is open
Red LED on membrane keyboard lights.
Shredder stops automatically.
• Close front door.
Note
If the door is opened when
the cutting device is running, the shredder
must be started again using the green button after the door of the shredder has been
closed.
10/2011
Classic 411.2 OMDD
15
english
Bag for shredded material full
8 Cleaning and maintenance
Red LED on membrane keyboard lights.
Shredder stops automatically.
Notice
Empty the cut material container,
immediately because if it is too full, malfunctions can occur in the cutting system.
Note
Reversing the cutting device
(“Reverse” button) is also possible even
when the shredded material container is full.
• Insert new bag.
Switch off the shredder and pull out the
mains plug. When cleaning only use a soft
cloth and a mild soap-water solution. However, no water must enter the equipment.
Oil the cutting unit when
cutting performance decreases or the device
becomes noisy, or every
time you empty the waste
container:
• Spray special cutting block oil
across the whole width of the cutting system blades.
• Run cutting system forwards and
backwards several times without
feeding CD/DVD.
Dust and particles are shaken off.
For all other malfunctions, before calling
customer service please check
– if the motor was overloaded
Let the shredder cool down for approx.
15 – 20 mins. before using it again.
– if the light barrier is soiled.
Clean the light barrier in the feed using a
dry brush or cloth.
9 Disposal / Recycling
Electrical and electronic old devices contain a variety of valuable
materials, but also hazardous
substances which were required
for function and safety. Incorrect
disposal or handling can be dangerous to your health and the environment.
Never dispose of old devices in the household waste. Observe the current applicable
regulations and use the collection points for
returning and recycling electric and electronic devices. Dispose of all the packaging
materials also in an environmentally-responsible way.
16
Classic 411.2 OMDD
10/2011
english
10 Technical data
Cutting type
Cross cut
Shred size (mm)
2.2 x 4.0
Cutting capacity per cycle
1 optical data medium, e.g. CD, DVD
Weight
80 kg
Noise level (Idle running/ load)
60 dB(A) / 75 dB(A)
Cutting speed
120 mm/s
Loading width (slot of the safety element)
130 mm
Voltage
120 V, 60 Hz
Power
2100 W
Dimensions W x D x H (mm)
595 x 470 x 960
Volume of shredded material bag
146 l
EC Declaration of Conformity
The manufacturer HSM GmbH + Co. KG, Austrasse 1 - 9, D-88699 Frickingen hereby declares that the machine,
referred to here as
HSM Classic 411.2 OMDD
corresponds to the health and safety requirements of the following EC directives listed below due to its conception and
design of the version in which it was put into circulation by us:
Low voltage directive 2006 / 95 / EEC
EMC directive 2004 / 108 / EC
Applied standards and technical specifications:
• EN 55014-1:2006
• EN 61000-4-2:1995 + A1:1998 + A2:2001
• EN 55014-2:1997 + A1:2001 + A2:2008
• EN 61000-4-4:2004
• EN 61000-3-2:2006
• EN 61000-4-5:2006
• EN 61000-3-3:1995 + A1:2001 + A2:2005
• EN 61000-4-6:2007
• EN 13849-1:2008
• EN 61000-4-11:2004
• EN 62233:2008
• EN 50366:2003 + A1:2006
• EN 60950-1:2006 + A11:2009 + A1:2010
Frickingen, 01.03.2011
Rolf Gasteier - Technical Director
10/2011
Classic 411.2 OMDD
17
english
18
Classic 411.2 OMDD
10/2011
italiano
1 Norme d’uso, garanzia
2 Avvertenze per la sicurezza
La macchina è stata ideata unicamente per
la distruzione di supporti dati ottici come CD
o DVD.
Classificazione
I distruggidocumenti sono coperti da garanzia per 2 anni. Usura, danni derivanti da
un uso non corretto o interventi da parte di
terzi non sono né coperti da garanzia, né in
garanzia.
Avvertenza per
la sicurezza
AVVERTENZA
Attenzione
Osservazioni
L’inosservanza di
questa avvertenza
può comportare
danni per l’incolumità e la vita delle
persone.
L’inosservanza di
questo avviso può
comportare danni
materiali.
Prima della messa in funzione
della macchina, leggere le istruzioni per l’uso, conservarle per poterle consultare in seguito e consegnarle agli
altri utenti. Osservare tutte le avvertenze
per la sicurezza applicate sul distruggidocumenti!
AVVERTENZA
Pericoli per bambini e altre persone!
La macchina non deve essere
utilizzata da persone (compresi
bambini sotto i 14 anni) con ridotte
capacità fisiche, sensoriali o mentali
oppure prive della necessaria esperienza e/o competenza, a meno che esse
non siano sotto la supervisione di una persona responsabile per la loro sicurezza o abbiano ricevuto da questa disposizioni sull’uso
dell’apparecchio. Controllare sempre che i
bambini non giochino con l’apparecchio. Non
lasciare mai il distruggidocumenti incustodito
mentre è ancora acceso.
10/2011
Classic 411.2 OMDD
19
italiano
AVVERTENZA
Pericolo di lesioni.
Non intervenire mai nella feritoia
dell’alimentazione della carta.
Pericolo di lesioni da trascinamento!
In prossimità dell’apertura dell’alimentazione della carta è indispensabile prendere le dovute precauzioni affinché capelli sciolti, lembi
di vestiario, cravatte, sciarpe,
collane, braccialetti ecc. non vengano agganciati. Non distruggere
materiali che tendono ad avvolgersi, quali nastri, corde, film in plastica ecc.
Pericolo di ferimento a causa della fuoriuscita di schegge!
Indossare occhiali di protezione quando si
distruggono CD. L’elemento di sicurezza deve
essere chiuso.
–
–
–
–
–
20
AVVERTENZA
Tensione di rete pericolosa!
L’uso improprio della macchina
può causare scosse elettriche.
Prima di inserire la spina di rete, assicurarsi che i dati della tensione e della
frequenza della vostra rete elettrica coincidano con quelli indicati sulla targhetta.
Assicurarsi che la spina di rete sia facilmente accessibile.
Evitare penetrazioni d’acqua nel distruggidocumenti. Non immergere mai il cavo
e la spina di rete in acqua.
Non toccare mai la spina di rete con le
mani umide.
Staccare sempre la spina di rete dalla
presa afferrando la stessa e mai tirando il
cavo di alimentazione.
– Utilizzare l’apparecchio esclusivamente
in ambienti interni asciutti. Non azionarlo
mai in ambienti umidi o sotto la pioggia.
Controllare regolarmente che
apparecchio e cavo non siano
danneggiati. Spegnere il distruggidocumenti se danneggiato o se
non funziona correttamente, nonché in caso di cambio di posto o
durante la pulizia, ed estrarre la
spina di rete.
– Tenere l’apparecchio, la spina di rete e
il cavo di rete lontani da fiamme libere
e superfici incandescenti. Le feritoie di
ventilazione non devono essere coperte e
deve essere mantenuta una distanza min
di 5 cm dalla parete o da mobili.
I lavori di assistenza devono essere eseguiti unicamente dal servizio di assistenza clienti HSM e
dai tecnici del servizio di assistenza dei nostri partner autorizzati.
Per gli indirizzi di servizio assistenza clienti, vedere pagina 36.
Attenzione
Pericolo derivante da uso improprio
Utilizzare la macchina solo in modo conforme ai dati forniti al capitolo “Norme d’uso”.
Classic 411.2 OMDD
10/2011
italiano
Tastiera a membrana
3 Panoramica
1 2
3
4
Tasto di accensione
L’apparecchio si avvia.
Il dispositivo di taglio inizia il
trascinamento.
5
6
I
0
Tasto Stop
Il dispositivo di taglio si arresta.
Il distruggidocumenti rimane in
stand-by.
7
12
8
Tasto reverse
Il dispositivo di taglio ruota
all’indietro.
9
11
10
1
2
3
4
5
6
7
8
9
10
11
12
Pronto per il funzionamento
Diodo luminoso verde
Sportello di verifica
Elemento di sicurezza / protezione
con tro le schegge
Avvertenze per la sicurezza
Coperchio
Tastiera a membrana
Interruttore della rete
Targhetta conoscitiva
Adesivo cautelativo
Mobile
Rullo di cavalletto
Rullo di guida
Sportello
Sacco di raccolta vuoto
Diodo luminoso rosso.
Inceppamento carta Sovraccarico del motore
Diodo luminoso rosso.
Pannello frontale o sportelli
aperti
Diodo luminoso rosso.
4 Fornitura
• Apparecchio pronto all‘uso, imballato in
cartone, cartone attacato sulla paletta
con nastro per imballagio
• 5 sacchi di raccolta
• 1 bottiglia di olio speciale da taglio
• Manuale operativo
10/2011
Accessori
• 5 sacchi di raccolta, articolo n.
1.442.995.100
• Bottiglia di olio speciale da taglio (250 ml)
articolo n. 1.235.997.403
Per gli indirizzi di servizio assistenza clienti
vedere pagina 28.
Classic 411.2 OMDD
21
italiano
5 Messa in funzione
6 Messa in esercizio
• Svitare ed estrarre le viti ad alette del
fermo di trasporto.
Avvertimento!
Prima di accendere la macchina,
assicurarsi di aver prestato attenzione a tutte le avvertenze per la
sicurezza.
Accendere l’apparecchio
• Interruttore della rete sul rovescio
del distruggidocumenti su „I“.
I
0
• Aprire lo sportello del distruggidocumenti.
• Estrarre il telaio (A) ed un sacchetto per
il cascame.
• Disporre il sacchetto per il cascame nel
telaio e ripiegarlo sul bordo superiore di
ca. 20 cm.
Indicazione verde sul campo di
comando accesa.
Il distruggidocumenti è pronto per
all’esercizio (Standby).
Distruzione di CD
A
Avvertimento!
Quando si distruggono CD, l’elemento di sicurezza deve essere
chiuso.
• Introdurre solo un CD nella fessura dell’elemento di sicurezza.
• Spingere nuovamente il telaio
(staffa B rivolta verso la parte anteriore
del mobile) nelle guide.
B
Il processo di sminuzzamento è controllato da una fotocellula che si trova nell’apertura di introduzione della carta.
Dopo circa 3 sec. dall‘introduzione dell‘ultimo CD, il meccanismo di taglio si spegne
automaticamente e passa alla modalità
• Chiudere lo sportello del distruggidocumenti. Pronto per il funzionamento.
• Inserire la spina di rete in una presa correttamente installata.
22
Classic 411.2 OMDD
10/2011
italiano
Il distruggidocumenti può essere
avviato anche premendo il tasto
freccia verde:
• Premere il tasto per un attimo:
Il meccanismo di taglio viene avviato.
Stop automatico circa 3 s dopo
l’ultimo caricamento di carta o
manualmente premendo il tasto
“Stop”.
• Premere il tasto per più di 2 s:
Funzionamento continuo senza
funzione fotocellula.
Il meccanismo di taglio procede
finché non viene disattivato premendo il tasto “Stop”.
Spegnimento del distruggidocumenti
• Interruttore della rete sul rovescio
del distruggidocumenti su „0“.
7 Eliminazione dei disturbi
Carta inceppata
Distruggidocumenti bloccato.
Il LED rosso sulla tastiera a
membrana lampeggia.
Il distruggidocumenti marcia indietro automaticamente.
Attenzione!
Non azionare il tasto
freccia tratteggiato e il tasto freccia verde
alternativamente in avanti ed indietro. Il
meccanismo di taglio può essere danneggiato.
• Estrarre il CD dalla fessura di
alimentazione.
Se non è stato espulso tutto il CD:
• Premere il tasto freccia tratteggiato.
Il meccanismo di taglio gira all‘indietro.
• Inserire solo un CD/DVD.
Elettromotore surriscaldato
I
0
10/2011
Indicazione rossa sul campo di
comando accesa.
Il distruggidocumenti si spegne
automaticamente.
• Lasciar raffreddare il distruggidocumenti circa 15-20 min.
Classic 411.2 OMDD
23
italiano
Contatto sportello interrotto
8 Pulizia e cura
Indicazione rossa sul campo di
comando accesa.
Il distruggidocumenti si spegne
automaticamente.
• Chiudere lo sportello.
Nota
Se la porta viene aperta mentre il meccanismo di taglio è in funzione, dopo la chiusura della stessa il distruggidocumenti deve
essere riavviato premendo il tasto verde.
Sacco raccoglitore pieno
Indicazione rossa sul campo di
comando accesa.
Il distruggidocumenti si spegne
automaticamente.
ATTENZIONE!
Svuotare assolutamente il contenitore pieno
di materiale tagliato perché una compressione ripetuta può causare delle anomalie di
funzionamento del meccanismo di taglio.
Nota
L’inversione del meccanismo di taglio (tasto
“Indietro”) è possibile anche quando il contenitore per materiali di taglio è pieno.
• Scambiare il sacco raccoglitore.
Nel caso di altri disturbi, prima di informare
il nostro Servizio di Assistenza Clienti, controllare che
– il motore non sia stato sovraccaricato.
Prima di una nuova messa in funzione
fare raffreddare il distruggidocumenti per
ca. 15 – 20 min.
– che la cella fotoelettrica non sia sporca
per la presenza di polvere di carta.
Pulire la cella fotoelettrica nell’alimentazione della carta con un pennello o con
un panno asciutto.
24
Spegnere il distruggidocumenti ed estrarre
la spina di rete.
La pulizia deve essere effettuata soltanto con un panno morbido e una soluzione
delicata di acqua saponata. Durante questa operazione non deve penetrare acqua
nell’apparecchio.
Applicare uno strato d’olio
al meccanismo di taglio in
caso di riduzione delle
prestazioni di taglio oppure dopo ogni svuotamento
del contenitore per materiali di taglio:
• Alzare sportello di verifica della
parte superiore dell‘apparecchio
e spruzzare sui cilindri a coltello
del meccanismo di taglio l‘olio
speciale per il blocco di taglio
(solo apparecchi con taglio a
frammenti).
• Fare girare i cilindri a coltello in
avanti ed indietro a vuoto per diverse volte.
La polvere e le particelle si staccano.
9 Smaltimento / Riciclaggio
Gli apparecchi elettrici ed elettronici usati contengono ancora una
molteplicità di materiali preziosi,
ma in parte anche sostanze nocive
che erano necessarie al funzionamento e alla sicurezza dell’apparecchio. Se queste sostanze vengono smaltite o impiegate in modo non conforme
potrebbero rappresentare un pericolo per la
salute dell’uomo e l’ambiente. Non gettare
mai gli apparecchi usati nei rifiuti generici.
Osservare le disposizioni attualmente vigenti e utilizzare centri di raccolta per la restituzione e il riciclaggio degli apparecchi elettrici ed elettronici usati. Smaltire anche tutti i
materiali da imballaggio conformemente alle
norme di protezione dell’ambiente.
Classic 411.2 OMDD
10/2011
italiano
10 Scheda tecnica
Tipo di taglio
particelle
Grandezza di taglio (mm)
2,2 x 4,0
Prestazioni di taglio per fase di lavoro
1 CD o DVD
Peso
80 kg
Livello di rumorosità (Corsa a vuoto/Carico)
60 dB(A) / 75 dB(A)
Velocità di taglio
120 mm/s
Formato
130 mm
Allacciamento
230 V, 50 Hz
Potenza motore Con n. di fogli max.
2100 W
Dimensioni largh x prof x alt (mm)
595 x 470 x 960
Capacità del sacco di raccolta
146 l
Dichiarazione di Conformità CEE
Il produttore HSM GmbH + Co. KG, Austrasse 1 - 9, D-88699 Frickingen con la presente dichiara che la macchina
menzionata in alto
HSM Classic 411.2 OMDD
sulla base della sua concezione e struttura nella versione messa sul mercato dalla nostra ditta soddisfa i requisiti di
sicurezza e sulla salute delle direttive CE elencate qui di seguito:
Direttiva sulla bassa tensione 2006 / 95 / CE
direttiva sulla compatibilità elettromagnetica 2004 / 108 / CE
Norme e specifiche tecniche applicate:
• EN 55014-1:2006
• EN 61000-4-2:1995 + A1:1998 + A2:2001
• EN 55014-2:1997 + A1:2001 + A2:2008
• EN 61000-4-4:2004
• EN 61000-3-2:2006
• EN 61000-4-5:2006
• EN 61000-3-3:1995 + A1:2001 + A2:2005
• EN 61000-4-6:2007
• EN 13849-1:2008
• EN 61000-4-11:2004
• EN 62233:2008
• EN 50366:2003 + A1:2006
• EN 60950-1:2006 + A11:2009 + A1:2010
Frickingen, 01.03.2011
Rolf Gasteier - Direttore tecnico
10/2011
Classic 411.2 OMDD
25
italiano
26
Classic 411.2 OMDD
10/2011
polski
1 Użytkowanie zgodne z przeznaczeniem, gwarancja
Urządzenie jest przeznaczone wyłącznie
do niszczenia optycznych nośników danych
(np. płyt CD i DVD).
Okres rękojmi na urządzenie wynosi 2 lata.
Zużycie, szkody wywołane przez nieprawidłową obsługę oraz niedozwolone ingerencje osób trzecich nie podlegają gwarancji
ani rękojmi.
2 Wskazówki bezpieczeństwa
Klasyfikacja
Wskazówka bezObjaśnienie
pieczeństwa
OSTRZEŻE- Zlekceważenie
ostrzeżenia może
NIE
doprowadzić do
obrażeń zagrażających życiu i zdrowiu.
Uwaga
Zlekceważenie
wskazówki może
doprowadzić do
powstania szkód
materialnych.
Przed uruchomieniem maszyny
przeczytać instrukcję obsługi,
przechowywać instrukcję do późniejszego użycia i przekazać ją kolejnemu
użytkownikowi. Przestrzegać wszystkich
informacji bezpieczeństwa umieszczonych
na niszczarce dokumentów!
OSTRZEŻENIE
Zagrożenie dla dzieci i innych
osób!
Urządzenia nie mogą obsługiwać
osoby (w tym dzieci poniżej 14 lat)
o ograniczonych zdolnościach
fizycznych, organoleptycznych
i umysłowych, niedostatecznym
doświadczeniu i/lub niedostatecznej wiedzy,
chyba że są one nadzorowane przez właściwą osobę odpowiedzialną za ich bezpieczeństwo lub otrzymały od niej instrukcje o
tym, w jaki sposób urządzenie należy obsługiwać. Dzieci należy nadzorować w celu
upewnienia się, że urządzenie nie jest wykorzystywane do zabawy. Nie pozostawiać bez
nadzoru włączonej niszczarki dokumentów.
10/2011
Classic 411.2 OMDD
27
polski
OSTRZEŻENIE
Niebezpieczeństwo obrażeń ciała!
Nigdy nie wkładać rąk w szczelinę
doprowadzania papieru.
Niebezpieczeństwo zranienia w
wyniku wciągnięcia!
Długie włosy, luźną odzież, krawaty, szale, naszyjniki, bransolety itp.
zabezpieczyć przed dostaniem się
do strefy szczeliny doprowadzania
papieru. Nie niszczyć materiałów
mających tendencję do tworzenia
zapętleń, np. taśmy, sznurki, folia z
tworzywa sztucznego itd.
Niebezpieczeństwo zranienia w wyniku
odprysków!
Zabezpieczenie przed odłamkami jest zagwarantowane tylko pod warunkiem, że
osłona zakrywa szczelinę doprowadzania
papieru. Płyty CD i DVD należy wrzucać
wyłącznie przez szczelinę wlotową.
OSTRZEŻENIE
Niebezpieczne napięcie zasilające!
Nieprawidłowe obchodzenie się z
urządzeniem może doprowadzić do porażenia prądem elektrycznym.
– Przed podłączeniem wtyczki sieciowej
sprawdzić, czy napięcie i częstotliwość
sieci elektrycznej zgadzają się z parametrami podanymi na tabliczce znamionowej.
– Należy zapewnić łatwy dostęp do wtyczki
sieciowej.
– Chronić niszczarkę dokumentów przed
kontaktem z wodą. Nie zanurzać w wodzie ani przewodu zasilającego, ani
wtyczki sieciowej.
– Nigdy nie dotykać wtyczki sieciowej mokrymi rękoma.
28
– Nie wyciągnąć wtyczki sieciowej z gniazda wtykowego, ciągnąc za przewód zasilający, lecz zawsze trzymając za wtyczkę
sieciową.
– Urządzenie należy użytkować wyłączenie
w pomieszczeniach suchych. Nie należy
go użytkować w pomieszczeniach wilgotnych ani w czasie deszczu.
Urządzenie i przewód należy regularnie sprawdzać po względem
uszkodzeń. W razie uszkodzenia
lub nieprawidłowego działania
oraz przed przemieszczeniem lub czyszczeniem niszczarkę dokumentów należy
wyłączyć i wyciągnąć wtyczkę sieciową z
gniazda wtykowego.
– Urządzenie, wtyczkę sieciową i przewód zasilający należy trzymać z dala
od otwartego płomienia i gorących powierzchni. Otwory wentylacyjne muszą
być odkryte i należy zapewnić minimalny
odstęp 5 cm od ściany lub mebli.
Prace serwisowe może wykonywać tylko personel serwisowy
HSM i technicy serwisowi naszych partnerów kontraktowych.
Adresy punktów serwisowych,
patrz strona 36.
Niebezpieczeństwo w wyniku
nieprawidłowego użytkowania
Urządzenie należy użytkować wyłącznie
zgodnie z danymi zawartymi w rozdziale
„Użytkowanie zgodne z przeznaczeniem“.
Uwaga
Classic 411.2 OMDD
10/2011
polski
Klawiatura foliowa
3 Schemat poglądowy
1 2
3
4
Przycisk włączenia
Niszczarka włącza się. Mechanizm tnący przesuwa się w
w kierunku otworu podajnika
papieru.
5
6
I
0
7
Przycisk stop
Mechanizm tnący zatrzymuje
się.
Niszczarka pozostaje w stanie
stand by.
12
8
9
11
Przycisk reverse
Mechanizm tnący przesuwa się
wstecz.
10
1
2
3
4
5
6
7
8
9
10
11
12
Gotowość do eksploatacji
zielona dioda świetlna
Klapa rewizyjna
Szczelina doprowadzania papieru,
Element zabezpieczający /
zabezpieczenie przed odłamkami
Informacje bezpieczeństwa
Część górna obudowy
Klawiatura foliowa
Wyłącznik sieciowy
Tabliczka znamionowa
Nalepka ostrzegawcza
Szafka dolna
Krążek stojakowy
Krążek kierujący
Drzwi
Worek na ścinki pełen
czerwona dioda świetlna
Stłoczenie papieru lub
przeciążenie
czerwona dioda świetlna
Otwarte drzwi lub klapa leja
czerwona dioda świetlna
4 Zakres dostawy
• Niszczarka dokumentów, w stanie gotowym do podłączenia, zapakowana w
karton
• Karton na palecie euro opasany taśmą
opakunkową
• 5 worków na odpady papierowe
• 1 butelka specjalnego oleju do zespołu
tnącego
• Instrukcja obsługi
10/2011
Osprzęt
• Worek na odpady papierowe
nr zamów. 1.442.995.100
• Butelka specjalnego oleju (250 ml)
nr zamów. 1.235.997.403
Classic 411.2 OMDD
29
polski
5 Uruchamianie
6 Obsługa
• Przed uruchomieniem wykręcić śruby skrzydełkowe zabezpieczenia
transportowego.
OSTRZEŻENIE
Przed włączeniem maszyny należy
się upewnić, czy uwzględniono
wszystkie wskazówki bezpieczeństwa
Włączanie urządzenia
• Ustawić wyłącznik sieciowy z tyłu
urządzenia na „I“.
I
0
• Otworzyć drzwiczki niszczarki.
• Wyjąć ramę (A) i worek na ścinki.
• Włożyć worek na ścinki w ramę i zawinąć
ok. 20 cm jego górnej krawędzi.
Wskaźnik lampki kontrolnej pali
się w kolorze zielonym.
Urządzenie jest gotowe do pracy.
Niszczenie nośników danych
OSTRZEŻENIE
Opuścić osłonę na dół przed zniszczeniem nośnika danych.
• Płyty CD i DVD wkładać tylko
przez szczelinę w osłonie.
A
• Ponownie wsunąć ramę (pałąk B zwrócony w kierunku przodu szafki) w szyny
prowadzące.
Proces szatkowania jest uruchamiany
przez fotokomórkę.
Gdy po ok. 3 s otwór podajnika jest ponownie wolny, niszczarka wyłącza się automatycznie i przechodzi w stan gotowości.
B
• Zamknąć drzwiczki niszczarki.
• Włożyć wtyczkę sieciową do prawidłowo
zainstalowanego gniazda wtykowego.
30
Classic 411.2 OMDD
10/2011
polski
Niszczarkę można także uruchomić poprzez naciśnięcie zielonego przycisku ze strzałką:
• Krótkie naciśnięcie przycisku:
uruchamiany jest mechanizm
tnący.
Automatyczne zatrzymanie ok.
3 s po ostatnim wciągnięciu lub
ręczne zatrzymanie po naciśnięciu przycisku Stop.
• Naciśnięcie przycisku przez
dłużej niż 2 s:
praca ciągła bez funkcji fotokomórki. Mechanizm tnący pracuje
do chwili wyłączenia przez naciśnięcie przycisku Stop.
Wyłączenie urządzenia
• Wyłącznik zasilania z tyłu urządzenia przełączyć na „0“.
7 Usuwanie zakłóceń
Zacięcie
Urządzenie zablokowane.
Czerwona dioda LED na klawiaturze foliowej świeci się.
Silnik przełącza się automatycznie i biegnie kilka sekund wstecz.
UWAGA!
Nie naciskać na przemian klawiszy „Do
przodu“ - „Wstecz“, aby usunąć blokadę.
Prowadzi to do uszkodzenia niszczarki
dokumentów.
• Wyciągnąć płytę CD/DVD ze
szczeliny wlotowej.
Jeśli nośnik danych nie został
całkowicie usunięty:
• Nacisnąć kreskowany przycisk
ze strzałką.
Mechanizm tnący przesuwa się
wstecz.
• Wyciągnąć płytę CD/DVD.
• Wprowadzać zawsze tylko jedną
płytę CD/DVD.
I
0
Silnik elektryczny jest przegrzany
Świeci się czerwona dioda LED
na klawiaturze foliowej.
Urządzenie wyłącza się.
• Poczekać ok.15 – 20 min., aż
urządzenie przestygnie.
Drzwi otwarte
Świeci się czerwona dioda LED
na klawiaturze foliowej.
Urządzenie wyłącza si.
• Zamknąć drzwi.
Wskazówka
Jeżeli podczas pracy mechanizmu tnącego
zostaną otwarte drzwi, po zamknięciu drzwi
należy ponownie uruchomić niszczarkę
dokumentów za pomocą zielonego przycisku włączającego.
10/2011
Classic 411.2 OMDD
31
polski
Worek na odpady papierowe jest pełny
W razie spadku wydajności cięcia, wzrostu poziomu szumów lub po każdej
wymianie worka na ścinki
należy naoliwić mechanizm tnący:
• Spryskać otwór wejścia papieru
na całej szerokości specjalnym
olejem do smarowania zespołu
tnącego.
• Mechanizm tnący wielokrotnie wprawić w ruch do przodu i
wstecz bez doprowadzania papieru.
Zator papieru i ścinki są usuwane.
Świeci się czerwona dioda LED
na klawiaturze foliowej.
Urządzenie wyłącza się.
UWAGA!
Napełniony worek na odpady papierowe
należy koniecznie opróżnić, gdyż wielokrotne dociskanie może spowodować zakłócenia funkcji mechanizmu tnącego.
Wskazówka
Ruch nawrotny mechanizmu tnącego (przycisk „Wstecz“) jest możliwy również przy
pełnym pojemniku na ścinki.
• Wymienić worek na odpady papierowe.
W razie wystąpienia innych zakłóceń prosimy sprawdzić przed powiadomieniem naszego działu serwisowego:
– czy silnik nie został przeciążony.
Przed ponownym uruchomieniem niszczarki dokumentów poczekać ok.
15 – 20 min., aż urządzenie przestygnie.
– czy zapora świetlna jest zanieczyszczona
pyłem papierowym.
Wyczyścić zaporę świetlną w podajniku
papieru przy użyciu suchego pędzelka
lub szmatki.
8 Czyszczenie i konserwacja
OSTRZEŻENIE
Niebezpieczne napięcie zasilające!
Przed czyszczeniem niszczarkę
dokumentów należy wyłączyć i
wyciągnąć wtyczkę sieciową z
gniazda wtykowego.
Czyścić urządzenie tylko przy użyciu miękkiej ściereczki z dodatkiem łagodnego roztworu wody z mydłem. Uważać przy tym,
aby do wnętrza urządzenia nie wniknęła
woda.
32
9 Usuwanie odpadów / recykling
Stare urządzenia elektryczne i
elektroniczne zawierają często
jeszcze wartościowe materiały,
jednakże również substancje szkodliwe, które były niezbędne do
prawidłowego funkcjonowania i
zachowania bezpieczeństwa. W przypadku
niewłaściwego usuwania odpadów lub ich
użytkowania mogą być one szkodliwe dla
zdrowia ludzi oraz dla środowiska. Nie należy nigdy wrzucać starych urządzeń do pozostałych odpadów. Należy przestrzegać
aktualnie obowiązujących przepisów i korzystać z punktów zbiorczych służących do
zwrotu i utylizacji starych urządzeń elektrycznych i elektronicznych. Wszystkie opakowania powinny zostać poddane przyjaznemu dla środowiska unieszkodliwieniu.
Classic 411.2 OMDD
10/2011
polski
10 Dane techniczne
Rodzaj cięcia
Cięcie w ścinki
Rozmiar cięcia (mm)
2,2 x 4,0
Przepustowość na cykl roboczy
1 optyczny nośnik danych (CD lub DVD)
Ciężar
80 kg
Emisja szumów (bieg jałowy/pełne obciążenie)
60 dB(A) / 75 dB(A)
Prędkość szatkowania
120 mm/s
Szerokość wejścia
(Szczelina wlotu w osłonie)
130 mm
Przyłącze elektryczne
230 V, 50 Hz
Moc
2100 W
Wymiary szer. x głęb. x wys. (mm)
595 x 470 x 990
Pojemność worka na odpady
146 l
Deklaracja o zgodności z normami WE
Producent HSM GmbH + Co. KG, Austraße 1 - 9, D-88699 Frickingen oświadcza niniejszym, że opisana poniżej
niszczarka dokumentów HSM Classic 411.2 OMDD
ze względu na jej koncepcję i budowę w wersji wprowadzonej przez producenta w obieg odpowiada zasadniczym
wymogom bezpieczeństwa i zdrowotnym wymienionych poniżej dyrektyw WE:
Dyrektywa niskiego napięcia 2006 / 95 / WE
Dyrektywa kompatybilności elektromagnetycznej (EMC) 2004/108/WE
Zastosowane normy i specyfikacje techniczne:
• EN 55014-1:2006
• EN 55014-2:1997 + A1:2001 + A2:2008
• EN 61000-3-2:2006
• EN 61000-3-3:1995 + A1:2001 + A2:2005
• EN 13849-1:2008
• EN 62233:2008
• EN 60950-1:2006 + A11:2009 + A1:2010
•
•
•
•
•
•
EN 61000-4-2:1995 + A1:1998 + A2:2001
EN 61000-4-4:2004
EN 61000-4-5:2006
EN 61000-4-6:2007
EN 61000-4-11:2004
EN 50366:2003 + A1:2006
Frickingen, 01.03.2011
Rolf Gasteier - Kierownik ds. technicznych
10/2011
Classic 411.2 OMDD
33
polski
34
Classic 411.2 OMDD
10/2011
411.2 OMDD
10/2011
Classic 411.2 OMDD
35
411.2 OMDD
HSM GmbH + Co. KG
Austraße 1-9
88699 Frickingen / Germany
Tel. +49 7554 2100-0
Fax. +49 7554 2100 160
[email protected]
www.hsm.eu
HSM (UK) Ltd.
14 Attwood Road / Zone 1
Burntwood Business Park
Burntwood
Staffordshire
WS7 3GJ
HSM France SAS
Parc de Genève
240, Rue Ferdinand Perrier
69800 SAINT-PRIEST
FRANCE
Tél: +33 (0) 810.122.633
Fax: +33 (0) 4.72.51.74.81
[email protected]
Tel. +44(0) 1543.272.480
Fax +44(0) 1543.272.080
[email protected]
www.hsmuk.co.uk
HSM of America LLC
419 Boot Road
Downingtown, PA 19335
Tel. (484) 237-2308
(800) 613-2110
Fax (484) 237--2309
[email protected]
[email protected]
www.hsmofamerica.com
HSM Polska SP. z.o.o.
ul. Emaliowa 28
02-295 Warszawa
HSM GmbH + Co. KG
Oficina Barcelona
C/Tona
Nave n° 15 "El Lago"
Pol. Ind. Monguit
08480 L'Ametlla del Vallès
BARCELONA
Hotline Gratuito
Tel. 00800 44 77 77 66
Fax 00800 44 77 77 67
[email protected]
Tel. +48 / 22 862 23 69 / 70
Fax +48 / 22 862 23 68
[email protected]
www.hsmpolska.com
36
Classic 411.2 OMDD
10/2011