1
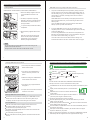
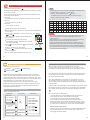
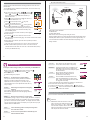
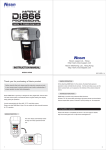
DIGITAL TTL POWER ZOOM FLASH
Nissin Japan Ltd., Tokyo
http://www.nissin-japan.com
INSTRUCTION MANUAL
Nissin Marketing Ltd., Hong Kong
http://www.nissindigital.com
Type C
Design and Specifications are subject to change without prior notice.
Thank you for purchasing a Nissin product
Before using this flash unit, please read this instruction manual and refer
your camera owner’s manual carefully to get a better understanding of
proper operation to enjoy flash photography.
C0111 REV. 1.2
SIMPLE OPERATION
When attaching Di866 Mark II to the camera, the basic flash exposure
operation is fully controlled by the camera. It is the same idea as when you use
the built-in camera flash, but it is placed on the hotshoe of the camera instead
of using the built-in flash.
ADVANCED FUNCTIONS
Nissin Di866 Mark II type Canon is designed for Canon digital SLR, with the
latest TTL flash control system, and features Nissin’s original rotating color
display, easily guiding its operations.
Di866 Mark II provides many advanced flash functions.
Wireless TTL off camera flash technology, high speed shutter synchronization,
frequent repeat-flash system, External Av priority setting, etc. are supported.
It works automatically with Canon ETTL/ ETTL II auto-flash systems.
Please note that Di866 Mark II type C is not usable with other branded cameras
for TTL operation.
Compatible cameras
Please refer Nissin’s compatibility chart shown in its home page for details.
UNIQUE FUNCTION
http://www.nissin-japan.com or http://www.nissindigital.com
The color display automatically rotates
to allow for easy operation in both the
horizontal and vertical positions.
1
2
SAFETY INSTRUCTIONS
Nomenclature
These safety instructions refer to important information on how to use this
product safely and properly. Please read the following instructions before using
the product.
Light diffusing panel
Fill-in reflector
X-terminal
USB service port
Flash head/
WARNING
Wireless transmitter
This sign refers the danger or serious damage.
External service
Sub-Flash
The flash unit contains high voltage electric parts. Do not try to open or repair the flash unit. Return it back
to the repair service station or the store you bought it from.
Do not touch the inside parts from the opening when the unit was dropped or broken.
box
Remote/ Slave sensor
Power Pack socket
AF-assist light
Do not shoot the flash directly to the eye at short distance. It may damage the eye.
External auto exposure sensor
When taking a flash picture, especially toward a baby, it is recommended to keep the flash unit at least 1
Lock ring
meter (3.3feet) away from the subject. Or use diffuser or bounce the light to the ceiling or to the wall to
Hotshoe contacts
Mounting foot
soften its intensity.
Foot lock pin
Do not place the flash unit near any flammable gas, chemical or such liquids. It may cause fire or electric
shock.
Do not touch the flash unit with wet hands or use in the water. The flash unit carries high voltage inside and
it may cause an electric shock.
Rotating
Do not shoot the flash unit directly at the driver of automobiles or such vehicles.
display screen
Battery magazine
Do not set the flash window close to the human body and shoot, which may get burned.
Place the batteries correctly in position. Placing the batteries in wrong polarity may cause leakage,
Multifunction button
exothermic heat or explosion.
Set button
CAUTIONS
Select button
Select button
This sign refers the damage or defect.
Do not leave or store the flash unit in the temperature over 40ºC, such as in the automobile.
Pilot lamp (Test flash button)
On/Off switch (System lock button)
The flash unit is not water resistance. Keep the unit away from rain, snow and humidity.
Do not use benzene, thinner or other alcoholic agents to clean the unit.
Do not use this flash unit with the cameras which are not recommended in compatibility list at official
website, otherwise it may damage the camera’s circuitry.
Remove the batteries when not in use for a longer period of time.
Flash stand
Do not have a heavy impact to the flash unit, nor throw it onto a hard surface floor.
Extra
Soft Case
When using the external power pack, read the safety instructions carefully and follow the operation manual.
battery magazine
(optional)
3
4
MENU SCREEN FOR MAIN MODES
ADVANCED FUNCTIONS
Di866 Mark II Flash Mode and Functions - to be set on the flash unit.
Advanced functions are provided in some operation modes –
to be set on the flash unit
… Full Automatic Mode
Advanced
Operation Modes
Functions
… TTL Program Mode
… Manual Setting Mode
… Multi- flash Mode
… Wireless Remote Flash Mode
Sub-Flash
TTL Program Mode
Manual Setting Mode
Manual Zoom
TTL Program Mode
Manual Setting Mode
Slave Function
Manual Setting Mode
F.Stop Setting*1
Manual Setting Mode
ISO setting*2
Manual Setting Mode
*1 Effective on at Universal Slave function in Manual Power operation and when using Di866 Mark II with
… Custom Setting Mode
film type camera or with non dedicted camera.
*2 Effective on Universal Slave function, and when using Di866 Mark II with film type camera or with non
dedicated camera.
Full Automatic Mode
page 10
Flash light is fully controlled by the camera for the most proper exposure.
Functions by Camera setting – The flash is automatically
controlled by the camera
TTL Program Mode
page 12
Flash light is automatically controlled by the camera but the flash exposure
value can be compensated.
Manual Setting Mode
FE. Lock
FE.
Lock Flash exposure can be locked at the main subject while moving the framing.
page 34
page 17
Manual Mode -Selecting the desired manual power on the flash unit,
Av poriority Mode- Selecting the desired f-stop on the flash unit.
Multi-flash Mode
page 23
Multiple lighting exposes the playback photos in one frame of picture.
Wireless Remote Flash Mode
page 25
Placing multiple numbers of flashes (slave flash) off camera and controlling the
creative TTL lighting.
Custom Setting Mode
page 33
Variety of custom settings is available for own default value.
5
6
BASIC OPERATION
Di866 Mark II has energy saving double power off function.
Inserting batteries
Usable batteries - Alkaline batteries, Lithium batteries, NiMH batteries.
1.
The power is automatically turned off (to stand-by mode), in about 30
seconds of idle use on the camera or after the last setting is made. To
1. Remove the battery magazine and insert
save the battery energy, you can select the display-off setting from the
4 x size AA batteries as shown in the
custom setting. In this case, the display screen turns off in about 8
picture.
seconds of idle use.
While Di866 Mark II is in the stand-by mode, display screen turns off
2. The battery compartment is specially
x4
designed so that every cell is placed in the
and the pilot lamp blinks every 2 seconds showing the flash unit is in
same direction to avoid the confusion in
stand-by mode.
poor light condition.
To turn on Di866 Mark II again, press the camera’s shutter button
3. +/- symbol is clearly marked at the battery
compartment.
halfway or press any button of the flash unit.
2.
In case the Di866 Mark II is not in use over 30 minutes, the unit is
completely turned off. To turn on Di866 Mark II again, take the first step
4. Place the battery magazine back into the
of turning the flash unit on.
body.
In case of using Di866 Mark II in off-camera-use mode (Wireless TTL
flash-slave, Universal Slave function), it is recommended to change the
When the recycle time becomes longer
turn off timer at the Custom setting....ref. page 33 .
than 20 seconds, replace the batteries
The mode and the value set on the flash unit before turning off is
with the fresh ones or recharge the
memorized and returns in the same condition when switch it on again.
batteries (rechargeable batteries).
! NOTE
It is recommended to use all 4 batteries in same brand and type, and
replace them all at the same time.
Wrong insertion of each cell would not make electric contact.
7
8
Mounting Di866 Mark II on the Camera
SETTING THE MODE AND THE FUNCTION
1. Turn off the power switch of both Di866
Full Automatic Flash Control
Mark II and the camera
The modes to be set on the camera:
2. Turn the lock ring of Di866 Mark II to
loosen it all the way as shown in the
picture.
(Full Auto),
(Aperture priority),
Av
Portrait,
3. Slide the mounting foot of Di866 Mark II
into the hotshoe of the camera.
(Program), Tv (Shutter priority),
(Manual),
Landscape,
A-DEP
Automatic depth-of-field,
Close-up,
Sports,
Night Portrait.
In all the camera modes listed above, Di866 Mark II will automatically
4. Turn the lock ring to opposite direction
and tighten it.
5. Lock pin comes out to hook the foot at the
hotshoe for sure contact.
and fully work in ETTL / ETTL II automatic flash control system.
Set Di866 Mark II to the camera’s hotshoe and press the on/off switch to power
on.
Display screen automatically shows A, the Full Automatic
Mode.
Di866 Mark II is now set for the camera’s automatic flash
control system.
Removing Di866 Mark II from the Camera
Loosen the lock ring and slide the mounting foot of Di866 Mark II off the
hotshoe of the camera. Make sure to turn the lock ring all the way to
completely clear the lock pin off the hooking slot on the hotshoe.
Turn on the flash unit
Press the on/off switch. Screen A appears, and the mode A is set.
The pilot lamp blinks red showing the unit is charging.
In a few seconds, the pilot lamp turns green.
The display screen automatically turns off in about 30 seconds after the
setting job is terminated.
For a test-flash, press the pilot lamp.
To turn off the flash unit manually, press the on/off switch and hold it for 2
Press the on/off switch once again to lock this condition on
your flash. (Press it again to release the lock)
All the jobs required for this mode are completed.
When the pilot lamp turns green, press the shutter button of your camera
halfway to focus the subject.
Shutter speed, aperture and flash mark (
) are shown in camera’s view finder
and the display panel of the camera.
Press the shutter, and Di866 Mark II is fired. The result is immediately shown on
the camera’s LCD monitor.
Flash power is automatically controlled by the camera and the most proper
exposure is obtained on your picture.
When you change the focal length of your camera lens, Di866 Mark II responds
without delay and sets its light source for the proper illumination angle.
seconds.
9
10
The lens focal length you set is shown in the display screen of the flash unit.
The flash illumination coverage of Di866 Mark II responds to the lens focal
length of 24mm to 105mm (full size format / film camera standard).
Set the camera’s mode, select the focal length and take pictures with
Di866 Mark II on your camera.
Di866 Mark II is a supplement to help you taking a creative and live
TTL Flash Exposure Value Compensation
With the latest TTL flash control system, the flash power level is always
automatically controlled by the camera for the most appropriate exposure. You
can soften or weaken the flash light, or give more light to the subject without
changing the environmental or background exposure effect. The Di866 Mark II
can possibly make it quicker control the flash output for each individual picture.
The modes to be set on camera:
picture. While you are taking pictures in Full Automatic mode, almost all
jobs are automatically done by the camera and you just control the camera
only.
(Full Auto),
Av
Mode
Shutter Speed
Aperture Setting
(Aperture priority),
Portrait,
Control on the camera
(Program), Tv (Shutter priority),
(Manual),
Landscape,
A-DEP
Automatic depth-of-field,
Close-up,
Sports,
Night Portrait.
Automatic
Automatic
Automatic
Automatic
Automatic
Any available
Tv
Manual
Automatic
Av
Automatic
Manual
Manual
Automatic
Manual
shutter speed can be set.
Any available
f-stop can be set.
Any shutter speed /
f-stop combination can be set.
In all those camera’s modes listed above, Di866 Mark II will automatically
and fully work in ETTL / ETTL II automatic flash control system.
Set Di866 Mark II to the camera’s hotshoe and press the on/off switch to
power on.
Display screen shows A. Press set
Set
and the display
turns to the screen of 6 icons.
Select TTL by select button
and set
Set
. Or the
display returns back to the A mode screen in about 8
seconds.
The TTL flash exposure compensation value 0.0Ev is
shown as a default setting.
TTL flash exposure compensation is provided in 19 steps
by 0.3Ev increment from -3.0・・・0・・・to +3.0Ev.
11
12
Select
and set
the compensation value you desire
Set
.
To keep this value on your flash, press on / off switch to
lock. (Press it again to release the lock)
Take a picture and the aimed subject is shown with required
lighting effect by keeping the exposure level of background
as originally expected.
On some cameras, the TTL flash exposure compensation can be set on the
camera.
When the flash exposure compensation is set on the flash unit, this value is
to be counted in addition to the compensation value you set on the camera.
ADVANCED CUSTOM SETTING
An ADVANCED CUSTOM SETTING enables you to enjoy creative flash
photography.
For advanced flash photography, the following five functions can be set on your
flash.
Sub Flash Function
Di866 Mark II provides an extra small flash below the main flash. This small
flash gives a fill-in light while bouncing the main flash. Bouncing the light may
shadow the underside of face, and this fill-in flash brightens up the shadow.
The display screen of the flash unit however shows the exposure
On the TTL function screen, press the set button
compensation value set on the flash unit.
TTL Advance page appears.
Select
Set the camera’s mode, select the flash exposure compensation value and
take pictures.
Almost all jobs are automatically done by the camera with such
compensation of the flash exposure value and you just manually control
the camera only.
Subflash and continuously select
and set
Set
Set
for 2 seconds.
the power
or wait for 8 seconds to returns to the TTL
function screen.
The following 8 powers are prepared in accordance with the
photographic situation.
Subflash power
Guide No. at ISO100
1/1 (Full power)
12
1/2
8.5
1/4
6
1/8
4
1/16
3
1/32
2
1/64
1.5
1/128
1
This subflash function is available only
at bounce photography, and the mark
SUB appears when tilting the flash head.
When the flash head is set at the normal
position, this mark disappears.
13
14
Hi-Speed Sync
Manual Zoom Setting
The reflector position of Di866 Mark II can be set manually.
The flash of Di866 Mark II can be set for camera with higher shutter speeds up
To get an illumination area different from the picture frame either wider or
to 1/8000 second.
narrower field, manual zoom setting makes sense. When using Di866 Mark II
On the TTL function screen, press the
with non-dedicated camera or traditional film type camera, the reflector position
for 2 seconds.
of Di866 Mark II does not respond to the camera lens movement. In this case,
TTL Advance page appears.
use this Manual Zoom Setting.
Select ‘Hi-Speed’ by
Set
button.
Select ‘On’ for High-Speed Sync by
On the TTL function screen, press the set button
Set
for 2
Press the
seconds.
set
A symbol H appears at the upper right hand corner for High-Speed Sync
M.Zoom and continuously select
Set
button.
button or wait for 8 seconds to return to the TTL function
screen.
TTL Advance page appears.
Select
Set
button
on and
or wait for 8 seconds to returns to the TTL function
Flash Exposure Bracketing (FEB)
screen.
Be aware that now your Di866 Mark II will not adjust the zoom
Di866 Mark II supports exposure bracketing function at every 0.3Ev increment
setting automatically when you change the focal length of your
within the range of
lens until you will have returned to “M.Zoom Off”on the TTL
exposure effects on each frame. Set the camera shutter for drive mode and
Advanced page.
number of picture frame is to be set on the camera. Refer the camera owner’s
manual for details.
2nd (rear) curtain synchronization
On the TTL function screen, press the
Flash usually synchronizes to the camera shutter when it opens (1st curtain
Select ‘Bracketing’ by
just before the shutter closes (2nd curtain sync.). By using this function, a moving
Bracketing by
Press the
button for 2 seconds.
Set
K
1
button.
Select your favorite EV step from
manual for details.
Set
button for 2 seconds.
button.
Select ‘On’ for Bracketing by
subject is imaged with such moving marks behind. Refer the camera owner’s
On the TTL function screen, press the
Set
TTL Advance page appears.
sync.). For the slow shutter photography, Di866 Mark II can be set the flash timing
0.3 to
3 for
button.
button or wait for 8 seconds to return to the TTL function
screen.
TTL Advance page appears.
Select ‘Curtain’ by
3Ev. You will get 3 continuous flash pictures in different
A ‘BKT1’ symbol appears at the upper right hand corner for Bracketing.
button.
Select ‘2nd’ for 2nd Curtain Sync by
Remark:
button.
Press the Set button or wait for 8 seconds to return to the TTL function screen.
A symbol ‘>>>’ appears at the upper right hand corner for 2nd Curtain Sync,
while no symbol appears for normal flash sync. (1st curtain)
IMAGE ZONE (
Sports,
Full Auto,
Portrait,
Landscape,
Close-up,
Night Portrait) When setting the camera mode to any of
those image zone, Di866 Mark II is automatically set at TTL-AUTO
function mode. In this mode, TTL exposure level compensation can not
be adjusted. All other advance functions are available.
15
Manual Power Opertion
16
As for the non-dedicated or traditional type film
cameras, the film speed (ISO) information is not
The mode to be set on the camera:
or
transferred from the camera.
v
Flash Power can be adjusted manually. The photographer can set the desired
exposure manually by the most appropriate power in combination with the
aperture value set on the camera. 22 different power, from full power to 1/128
power, by every 1/3 stops are available.
Set the camera mode, to
or
In this case, the film speed (ISO) is to be set on the
flash unit to indicate the camera-subject distance.
Move cursor
to ISO line at Advanced function page
and continuously select
Press the set
Set
the ISO value to which you set camera.
button. Or wait for 8 seconds to return to M function
screen.
v on your camera.
Set the mode of Di866 Mark II. From the 6 icons screen,
select
M / Av and set
Set
.
Select
M and set
Select
your desired power and set
Set
.
Set .
The camera-subject distance for the most proper exposure
is determined by the film speed (ISO) and the F stop set
on the camera.
This distance is shown in the Manual function screen.
The film speed information (ISO) is automatically
transferred from the camera.
The F. stop you set on the camera is to be set maunally on
the flash unit, too.
To get the camera-subject distance on the display screen,
9.0
F. Stop setting is required.
Press set
Set
for 2 seconds, the screen goes to the
Advanced Function page.
Move cursor
to F.Stop line and continuously select
the same F.Stop number you set on your camera.
Press on/off switch to lock the value. (Press it again to
release the lock)
The distance is automatically followed by changing the
focal length and ISO sensitivity level on the camera, or
selecting another power level.
17
18
Setting of Master and Slave flash:
ADVANCED CUSTOM SETTING
Setting Master flash:
The master flash to be set is one unit only.
Advanced custom setting is prepared in this mode.
Sub Flash Function
page 14
Manual Zoom Setting
page 15
Universal Slave Function
page 19
Place the master flash on the
camera and switch it on, and set to
Manual function mode or set to the
camera’s built-in flash on. Make
sure which mode you chose, digital
Di866 Mark II has a universal wireless remote flash system as a slave unit.
pre-flash flash system or analogue flash system.
You can enjoy creative flash photography with multiple lightings from the
Setting Slave flash Di866 Mark II:
various directions. 2 slave modes are provided in accordance with the flash
Multiple numbers of flashes can be set. Switch
system of the master flash.
Di866 Mark II on and select the appropriate slave
Slave Digital (SD) for digital pre-flash system and Slave Film (SF) for an
system, either SD or SF.
analogue flash system are available.
When flash is set to the slave function, the red
LED starts blinking every 2 seconds showing the
SD: In this mode Di866 Mark II synchronizes to pre-flash system. The master
slave function is in order. Make sure the mode
flash is to be set at TTL / ETTL II mode.
you set, SD or SF which should couple with the master
SF: In this mode Di866 Mark II synchronizes to the traditional single flash
flash system.
system. The master flash is to be set at manual mode. Studio strobe lighting
Set slave flash at any place and direct the flash head as you
system synchronizes to this mode. This mode also responds to open flash and
desire. Slave sensor in the slave flash is facing to the camera or
to traditional type flash units in the market.
to the master flash.
Use the included flash stand. Place Di866 Mark II on to the flash
How to find SD or SF?
stand which can be placed either on a flat place or on the tripod
Select SD on your slave flash and release your camera’s shutter to flash your
by the screw.
master flash. The slave flash flashes if the Master flash is SD, and does not
flash if the Master flash is SF. If your slave flash is set at SF, it flashes against
! NOTE
both of SF and SD flash system.
Metal type accessory shoe is not recommended since it may give electric damage on
the electrical contact of the flash hotshoe.
To set Di866 Mark II to the salve function mode, move
cursor
to Slave line at Advanced function page and
continuously select
When setting Di866 Mark II to the slave function, the zoom setting system is
SD or SF in accordance with the
automatically set for the Manual Zoom at 24mm position. The zooming position
system of the master flash you set.
Press the set
Set
can be selected manually to any other position available. In this mode, the
auto-off timer is recommended to set at 60min. or be cancelled (off). The
button or wait for 8 seconds to return to
sensing angle of the slave sensor is 100 approx.
M function screen.
19
20
In this case, reset this F. Stop on you camera.
Av. Mode Operation
As for the traditional type film cameras, no ISO information or F. Stop
The mode to be set on the camera:
or
information is transferred by the camera. In this case, set ISO value at the
v
Advanced function page of Di866 Mark II.
The flash light is automatically controlled by the photo sensor built-in the flash
Press set
unit instead of TTL metering. Select your desired F. Stop on Di866 Mark II and
page for Av mode.
Set
for 2 seconds, the screen goes to the Advanced Function
set this F. Stop on your camera. The intensity of flash light is automatically
controlled for the most proper exposure within the certain area of distance.
Set the camera mode, to
or
v on your camera.
Set the mode on Di866 Mark II. From the 6 icons screen,
select
Select
M / Av and set
Av and set
Set
Set
.
.
F. Stop is displayed in the screen in accordance with the
ISO setting on the camera.
Select
your desired F. Stop and set
Set
on the flash
unit.
Press on / off switch to lock the value. (Press it again to
release the lock)
Set the same F. Stop on your camera.
The display screen shows the F. Stop selected, the
ADVANCED CUSTOM SETTING
Advanced custom setting is prepared in this mode.
.
Sub Flash Function
page 14
Manual Zoom Setting
page 15
Universal Slave Function
page 19
In additional to the Manual power mode, the universal slave function
supports Av operation mode.
Setting Slave flash: Select the slave mode SD or SF and set the
desired F.stop and ISO speed on the Slave flash. As for setting
Master flash, follow to the instruction manual in the Universal slave
page at Manual power operation --- Page 19.
camera-subject maximum distance for the proper
exposure and the focal length set on the camera.
The flash light is automatically controlled within the
distance area. The shortest distance for the proper
exposure is approximately 1.0m (3ft.) from the camera to the subject.
The distance varies by changing the focal length and F. Stop set on Di866
Mark II. This Av. mode of Di866 Mark II is not coupled with camera’s
aperture setting. The aperture setting on the flash unit is not controlled by
the camera.
When changing the ISO setting on the camera, the F. Stop of the flash unit
is automatically reset for such corresponding ISO value.
21
22
Multiple Flash Mode (Repeat flash/Stroboscopic flash)
! NOTE
The mode to be set on the camera:
Repeating the flash illumination on the subject freezes the sequence of motion
in one frame of picture.
The shutter speed to be set on the camera is calculated in the following formula.
Number of flashes ÷ Frequency = Shutter Speed
In this mode, the power level, frequency and the number of flashes are to be
Example : To get 20 flashes at 10Hz
set on the flash unit in advance.
The shutter speed to be set on the camera is 2 seconds or longer.
Shutter for bulb setting is also available.
Power Ratio:
Uncontrolled manual power is provided in 5 steps, from 1/8 to 1/128 power.
Frequency :
20÷10=2
Guide Table for the number of flashes
Hz
1
2
3
4
5
6-7
10
11
Flash Times :
1/8
14
14
12
10
8
6
5
4
4
4
4
4
4
1 time to 90 times can be set.
1/16
30
30
30
20
20
20
10
8
8
8
8
8
8
1/32
60
60
50
40
30
25
20
12
12
12
12
12
12
1/64
90
90
80
70
50
35
25
20
20
20
20
20
20
1/128
90
90
80
70
50
35
25
20
20
20
20
20
20
1 Hz to 90 Hz frequency can be set.
Power
Set the camera mode to M on your camera.
Set the shutter speed on your camera in accordance with the guide table in
the next page.
Set the mode on Di866 Mark II. From the 6 icons screen, select
and set Set .
Value setting screen will appear with the default values
preset as shown.
In this mode, the reflector zooming function is
automatically set for option. Either Auto zoom or Manual
zoom setting is selectable.
Select
the function and choose
the desired value
one by one.
Press on / off switch to lock this condition.
Or press set
Set
or wait for 8 seconds to return the multi
8-9
12-14 15-19 20-50 51-90
! Caution
When using an external power pack, you may take continuous frames of
multi-exposure pictures. Do not repeat multiple flash more than 10
continuous frames.
Take an interval of 10 to 15 minutes between shots. Flash source may be
heated up and may cause serious damage to the flash unit.
Please note that the basic operation is however controlled by the main
batteries(battery magazine) in the flash unit and when the main batteries
are exhausted, flash control system does not work. Replace the batteries
when recycle time becomes longer than 20 seconds by main batteries only.
- ref. External Power Pack (page 36)
flash function screen.
The use of tripod is recommended for this flash mode.
23
24
Remote flash (Slave flash)
Wireless Remote Flash Mode
The mode to be set on the camera:
(Full Auto),
Av
(Program), Tv (Shutter priority),
(Aperture priority),
(Manual)
Di866 Mark II provides two possibilities of off camera wireless remote flash
system. This page explains Wireless Remote flash system. (The other system,
universal slave flash system, is prepared at M and Av. mode - Ref. page 19/ 22)
The flash unit placed on the camera, connected by TTL off-camera flash cord is
called “Master flash”. The master flash to be set is one unit only.
The flash unit placed off the camera is called “Slave Flash” (Canon type).
Multiple number of flashes can be set and controlled in 3 different groups (A, B
and C group). 4 channels are prepared for signal transmission between the
Master flash and the Remote flash.
Available combination of flash models and cameras
Wireless TTL Flash Pairing Chart
Master flash
Group Setting
Remote flash
Nissin Di866
Nissin Di866 Mark II
Canon 580EX
Canon 580EX
Built-in Camera flash
Nissin Di866 *
A*
Nissin Di866 Mark II
A:B
Nissin Di622 Mark II
A:B C
Canon 60D
Canon 420EX
(Wireless TTL ONLY)
Canon 430EX
Canon 7D
Canon 430EX
C
MR-14EX (Ring flash)
ST-E2 (Commander)
There is no limit of the number of slave flashes to set at one time.
It is however recommended to set maximum 3 pcs in one group, as it may
cause interference between flashes depending on the photographic conditions.
Canon 580EX
Canon 580EX
Use a flash stand to set the slave flash. The stand provides the flash shoe and
can stay either on the flat surface, or be placed on the tripod or light stand by
the screw provided at the bottom.
When setting Di866 Mark II to slave flash, it is recommended to cancel the
auto-off setting or set it to 60 minutes at the Custom Settings - Ref. page 33.
Refer your flash instruction manual for this function, which may differ according
to the flash model.
At Remote flash mode, Di866 Mark II is set automatically for manual zoom setting
and its reflector position is set for 24mm to cover the wider range of illumination.
It is possible to set the desired flash coverage angle manually by select button
.
Place the slave flash in consideration to;
1.The slave flash does not shoot its light directly into the camera lens.
2.The wireless flash sensor of the slave flash is not blocked.
3.The slave flash is usually not placed behind the master flash.
4.In the daylight synchronization, the sensor of slave flash could be
saturated by sunlight and its response will be extremely reduced. In this
case, the wireless TTL function may not result in success. Making a shade
to cover the sensor of slave flash is one of the ideas to help the situation.
Where is the Slave flash sensor?
Slave flash sensor is provided behind the front panel of Di866 Mark II at the
name of Nissin DIGITAL. The sensor’s sensing angle to respond to the
incoming light is about 100 degree.
A*
A:B
*MR-14EX / ST-E2 not supported
* A is equivalent to Canon master flash system ‘A+B+C’ mode
25
26
Single Group Slave Flash (Group A Setting)
Setting the Master flash
1. Navigate the cursor to Group A
The modes available on the Master flash are TTL and M mode.
2. Navigate the cursor to Flash mode and select mode: TTL or M
The master flash sets the signal transmission channel, flash reflector zooming
position, flash mode of the master flash itself and flash mode and value
adjustment of the slave flash at A, B and C respectively.
Selecting TTL
1. Navigate the cursor to the Value Adjustment and set the EV
In the main page
Select
compensation level.
Wireless mode.
2. Navigate the cursor to M (Master).
3. Select TTL or --- (flash-off) in the Flash Mode
In the Wireless page
Select
4. When TTL mode selected, move the cursor to the Value Adjustment and
Master mode.
set the EV compensation level.
5. Navigate the cursor to M (Master).
In the Master page
6. Select TTL or --- (FLASH OFF) in the Flash Mode.
Navigate the cursor and adjust the value according to the
7. When TTL mode selected, Navigate the cursor to the Flash Adjustment
instruction at the bottom bar.
and set the power ratio.
Cursor Navigation
Value Adjust
Selecting M
Channel Select
Select Channel: Ch1, Ch2, Ch3 & Ch4
Zoom Select
1.
Navigate the cursor to the Flash Adjustment and set the power ratio
2.
Navigate the cursor to M (Master).
3.
Select M or --- (FLASH OFF) in the Flash Mode.
4.
When M mode selected, navigate the cursor to the Flash Adjustment
and set the power ratio.
Select Zoom Mode: Auto, 24mm, 28mm, 35mm, 50mm,
70mm, 85mm, 105mm
Note: When setting --- (FLASH OFF) mode, the master flash may flash when
shutter released. This flash is however the monitoring flash (pre-flash) before the
Group Setting
Value Adjustment
Group
Ev compensation at TTL mode
M = Master Flash
Multiple Group Slave Flash (Group B & C Setting)
(-3.0Ev to +3.0Ev)
A = Group A
Group A MUST be set, in order to add Group B
Power Ratio at M mode
B = Group B
C = Group C
camera’s shutter opens and is not be exposed in the actual picture.
(1/1, 1/2, 1/4, 1/8, 1/16,
Flash Mode
1/32, 1/64, 1/128)
TTL = TTL Mode
M = Manual Mode
--- = Flash off
Adding Group B
When TTL mode selected in Group A 1.
Navigate the cursor to GROUP B, and select TTL in the operation mode
box.
27
2.
28
Navigate the cursor to Flash Adjustment and select the power level ratio
4.
Select M or --- (flash-off) in the Flash Mode.
between Group A and Group B.
5.
When M mode selected, navigate the cursor to the Flash Adjustment
^The power level ratio can be selected from 13 different combinations, such
and set the power ratio.
as A:B = 8:1 – 5.6:1 – 4:1 – 2.8:1 – 2:1 – 1.4:1 – 1:1 – 1:1.4 – 1:2 – 1:2.8 –
^This 3 group slave flash technology is recommended to shade off or remove the
1:4 – 1:5.6 and 1:8
shadow behind subject which may be caused by the lighting produced by Group
3.
Navigate the cursor to M (Master).
A and/or B.
4.
Select TTL or --- (flash-off) in the Flash Mode.
5.
When TTL mode selected, navigate the cursor to the Flash Adjustment and
set the EV Compensation.
When M mode selected in Group A
1. Navigate the cursor to GROUP B, and select M in the operation mode box.
2. Navigate the cursor to Flash Adjustment and select the power ratio
3. Navigate the cursor to M (Master).
4. Select M or --- (flash-off) in the Flash Mode.
5. When M mode selected, navigate the cursor to the Flash Adjustment
and set the power ratio..
Adding Group C
Group A & B (A:B) MUST be set, in order to add Group C.
^The group C is independently set out from the power ratio combination.
When TTL Mode selected in Group A & B:
1. Navigate the cursor to GROUP C, and select TTL in the Flash Mode.
2. Navigate the cursor to Flash Adjustment and select the EV compensation.
3.
Navigate the cursor to M (Master).
4.
Select TTL or --- (flash-off) in the Flash Mode.
5.
When TTL mode selected, navigate the cursor to the Flash Adjustment and
set the EV Compensation.
When M Mode selected in Group A & B:
1.
Navigate the cursor to GROUP C, and select M in the Flash Adjustment.
2.
Navigate the cursor to Flash Adjustment and select the power ratio.
3.
Navigate the cursor to M (Master).
29
30
Setting the Slave flash
SETTING THE SLAVE FLASH
Channel, Group and the flash reflector zooming position are to be set on the
Remote flash.
Group A
TTL and Manual mode is available on Remote Flash, which can however only
Group B
be set by the Master flash.
From the 6 icons screen, select
Select
R and set
Set .
and set
Set.
AF assist light starts blinking
every 2 seconds showing Di866 Mark II stands by in
Remote Flash mode .
Select
the line channel and set
Master Flash
the channel. 4
channels are available from 1 to 4.
Select
the line Group and set
the group.
3 groups are available from A to C.
Select
the line Zoom and set
zooming position.
When setting Di866 Mark II to the Remote mode, the
Group C
zoom setting system is automatically set at 24mm position.
The zooming position can be selected manually to any
CREATIVE FLASH LIGHTING:
other available position.
Set Master flash.
Press on/off switch to lock this condition. (Press it again to
Set Slave flash/ flashes.
release the lock).
Or press set
Set
Make sure the channel and its group setting are correct.
, the screen shows the 6 icons screen
and returns back to Remote setting page. The function and the value remain
recorded as set.
When placing more flashes, repeat the same operation procedures
instructed above.
Attach the Master flash to the camera and place the Slave flash/ flashes at any
desirable place within the system operation area, which is approximately 7 to
10 meters between the Master and Slave flash/ flashes depending on the
setting condition.
The group can be chosen freely from A, B or C, but the channel of this
bundle of wireless flash system is to be set in one common channel.
The flash mode and the value can not be set on the Remote flash, but they
are set by the Master flash only.
31
32
Custom settings
A variety of custom settings enable you to customize your Di866 Mark II.
From 6 icons, select
Custom setting mode and set
Select
the item to be customized and set
the
value to customize.
9 custom settings are prepared.
My TTL
Set
Auto Off
Auto off timing can be selected from 10min.
15min, 30min, 45min, 60min or off (cancel).
Firmware
A firmware upgrade service is available for the
Di866 Mark II, which provides a USB service
terminal (By local service/ local dealer) to upload
the latest software.
.
TTL Exposure level custom setting
TTL exposure level is accurately calibrated for standard
balance in accordance with Nissin’s standard. If any
adjustment is however required, or if you like to set your
own preferable level, it can be adjusted for about ±3Ev. by
every 1/3 steps.
Modeling
Illuminating the subject to find its lighting
efficiency.
A short pulse of flash light released by the test button
illuminates the subjects and monitors the lighting efficiency
on the subject.
Reset
All the customs setting are reset to the
default value and conditions which are
provided and set at the factory.
Buzzer
This is available for Wireless Remote mode.
When using Di866 Mark II as a slave remote
flash, a “beep” sound indicates the master flash
has triggered successfully.
Those customized value and conditions are effective on all modes and
memorized even when the flash unit is switched off.
To reset the customized value or conditions, select
Reset, choose
“Yes” and set Set . All the memorized data is cancelled and Di866 Mark II
is reset to the default value and condition.
Functions by Camera setting
You do not need to set the flash unit for these functions.
Display
Display can be set off if it’s not necessary.
To save battery energy, or imply to avoid the display illumination, the display
screen can be switched off when not in operation. Set it off, and the display
goes off in 8 seconds after the last operation. The display will not be woken
up by the camera’s shutter release. The display can only be woken up by the
operation button of Di866 Mark II.
Rotate
Cancel the rotating action and keep the image fixed.
The screen won’t rotate.
ft/meter
For the user who prefer distance indication by feet.
Select ft instead of meter.
33
FE.
Lock F.E Lock
Di866 Mark II offers this function at A and TTL
mode. Focus the main subject and press < >
button on the camera (or < FEL > button on
some cameras. Exposure value on the main
subject is memorized in the flash. Aim the viewfinder center over the
main subject and release the shutter.
34
OTHER FEATURES
Bounce Lighting
AF assist light emitter
Under the low light condition or in a dark place, AF assist light will automatically
emitt the red colored beam and illuminate the subject so that the camera can
easily focus the subject in darkness.
Fill-in reflector and Light diffusing panel built-in
For short distance or portrait flash photography, the light should not be too
sharp or too strong to the subject. Use fill-in reflector flash or diffuse the light.
When taking a picture of a baby or small children, do not shoot the flash
straight onto them. Bounce the light off the ceiling or wall so that it won’t scare
them.
When pointing the flash to a subject in front of the wall, it creates an
unexpected sharp shadow on the wall which results in poor picture quality.
Bounce the light off the ceiling or wall to soften the light over the subject, and
the shadow fades out.
Turn the flash head upwards or sideway. The wall or ceiling in this case should
be flat surface and white color is preferable. Colored ceiling or wall may reflect
its color on the subject.
External Power Pack Socket
If the subject is close(within 2 meter), turn the
flash head 90°upward and pull out the fill-in
reflector as shown in the picture.
Take a picture as usual. A blink of fill-in flash
freshens up the subject in natural image.
This small blink of flash is also useful when
taking a picture of baby without scaring him.
Pull out the light diffusing panel and place it
over the flash window as shown in the picture.
The diffusing panel softens the flash light and
creates a lively color effect upon the subject.
Since the light diffusing panel expands the
lighting area, it covers the range of 18mm of
focal length lens.
When using an external power source, the number of flashes is
increased and the recycling time is shortened. The following
external power pack is available as an option.
Di866 Mark II is
automatically
Nissin Power Pack PS 300
turned off when
repeating flash
260 flashes
Canon CP-E4
continuously over
20 to 30 times to protect the flash circuitry. It will be
automatically reset after 15minutes of stationary.
Please note that the basic operation is controlled by the main
batteries (battery magazine) in the flash unit and when the
main batteries are exhausted, the flash control system does not
work. Replace the batteries when recycle time becomes longer
than 20 seconds by main batteries only.
OVERHEAT
35
36
USB Service Port
SPECIFICATIONS
Tired of your flash no longer working whenever a new camera
comes onto the market ? A firmware upgrade service is
available for the Di866 Mark II, which provides a service
terminal to upload the latest software. A service charge for the
firmware upgrade will be applied, varying with different region.
Please check at your local dealer for details about the update
service.
X terminal
Di866 Mark II can be used with non-hotshoe cameras. Some
cameras provide a flash synchronization contact at x-terminal
instead of hotshoe. For this type of cameras, Di866 Mark II
has a x-terminal socket for flash synchronization. A standard
sync-cable in the market is usable.
Usable cameras
Canon ETTL / ETTL II flash system SLR and hotshoe type
Compact digital cameras-ref. Nissin official website for camera models
Guide No.
60 / 198 at 105mm focal length (ISO 100 m/ft)
40 / 132 at 35mm focal length (ISO 100 m/ft)
Wattage
83 Ws. at full power
Illumination coverage
24-105mm (18mm with diffuser panel built-in)
Power source
4 x LR6 batteries (Size AA Ni-MH or lithium batteries usable)
Battery life
150-1500 flashes according to the mode (with alkaline batteries)
Energy Saving
Come to Stand-by mode in 30 seconds, and Power off timer can be set
Recycle timer
5.5 seconds with fresh alkaline batteries for full power
Flash Exposure
ETTL/ ETTL II for Canon digital SLR cameras
Automatic exposure metering by external photo sensor
Manual exposure (Power ratio available)-Ref G.No. table
AF assist light
Effective range of approx. 0.7 to 10m / 2.3 to 33 ft.
Color Temperature
5600 K°at full power flash
Flash Duration
1/300 seconds (full power flash)
1/300-1/30,000 seconds (controlled flash)
FP flash for high speed synchronization
Wireless flash
Wireless TTL off camera flash system
Wireless Master mode
Off-camera shoe cord (Optional)
Wireless Remote mode
Di866 Mark II can be used together with Nissin SC-01 (Off Camera
Shoe Cord). The cord provides a TTL hot shoe at main body.
It enable to attach two flash units on the top of camera and the off
camera side at the same time.
Nissin SC-01
Shoe Cord
Slave flash function at external auto-exposure
Slave to digital pre-flash system
Slave to traditional single flash sytem
External Power Pack
Service socket for the external power pack (optional accessory)
Nissin Power Power Pack PS300
Canon Power Assist Pack CP-E4
USB service port
For firmware update service
USB cord is not included
Sync. Contact
Camera’s hot shoe-ETTL for Canon system
Traditional sync. System
X-terminal socket
(Fig.1)
Holding one flash unit
by hand and set away
from the camera
(Fig.2)
Dimensions
74 x 134 x 110mm (29.2 x 53 x 43.5 inch)
Weight
380g / 13.4oz
Using 2 flashes
together
* It is not possible to shoot two flashes at the same time.
37
38
Guide Number and Flash duration table
WARRANTY
Guide No. at manual exposure mode (ISO 100 in meters/feet)
In case of the following reasons of the defect, it may void the warranty. Please refer to
the respective warrantee condition for details which varies from different countries.
Flash Power Level
Zoom
position
Full
1/2
1/4
1/8
1/16
1/32
1/64
1/128
24mm
31
22
16
11
8
5.5
4
2.5
28mm
36
25
18
12.5
9
6.5
4.5
3
35mm
40
28
20
14
10
7
5
3.5
50mm
46
32
23
16
11.5
8
5.5
4
70mm
52
36
26
18
13
9
6.5
4.5
85mm
54
38
27
19
13.5
9.5
7
5
105mm
60
42
30
21
15
10.5
7.5
5.5
Flash
Duration
(second)
1/600
1/900
1/1500
1/3200
1/5000
1/9000
1/15000 1/22000
TROUBLE SHOOTING
1. The product is not used in accordance with the instruction of the owner's manual.
2. The product is repaired or modified by the one who is not an authorized repair
service provider.
3. When the product is used with the inapplicable cameras, lens or adaptors or such
accessories produced by the third party.
4. Fault or defect caused by fire, earthquake, flood, public pollution and such natural
accidents.
5. in the case that the product is stored in dust, moisture, extremely high temperature
or such poor conditions.
6. Scratch, blemish, crush or worn out by a violently use or treatment.
7. Guarantee card without the name of place purchased or the date of purchase
stamped, or no guarantee card.
The flash unit does not start charging.
Batteries are not correctly installed
>>> Install batteries to correct direction.
Batteries are exhausted
>>> Replace the batteries if the recycle time is beyond 20
The flash unit does not flash.
The flash unit is not firmly clipped on the camera
>>> Mount the flash unit firmly on the camera’s hot shoe.
The flash unit is automatically powered off
>>> Turn on the switch again.
The flash picture is overexposed or underexposed.
There is a reflective object or strong lighting near the subject.
>>> Use FE lock.
The unit is set for manual exposure mode at wrong distance
>>> Set to TTL mode or select other power level.
39
40