1
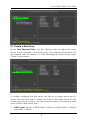
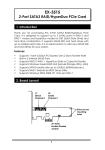
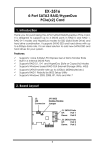
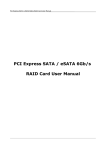
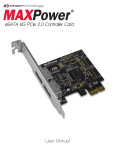
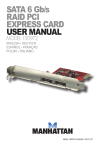
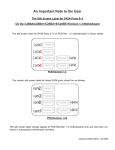
EX-3512
2-Port eSATA3 RAID PCIe Card
1. Introduction
Thank you for purchasing this 2-Port SATA3 RAID PCI PCIe Card. It is
designed to support up to 2 SATA3 ports in RAID 0 and RAID 1 modes.
It supports SATA3 hard drives with up to 6.0Gbps data rate. It is an
ideal solution to add new external SATA3 drives for your system.
Features:
Supports 1-lane 5.0Gb/s PCI Express Data Transfer Rate
Built-in 2 eSATA3 Ports
Supports RAID 0 and RAID 1 for the 2 SATA3 Ports
Supports Windows based RAID GUI
Supports SATA3 transfer rate up to 6.0Gb/s (600Mbytes/sec)
Supports RAID 1 Rebuild by BIOS Setup Utility
Supports Windows 2000, XP, Vista and Win 7
2. Board Layout
External LEDs
External
eSATA Port 1
External
eSATA Port 0
1
2-Port eSATA3 RAID PCIe Card
3. Hardware Installation
1.
2.
3.
4.
5.
6.
7.
Power down the computer, remove the computer cover.
Choose an unused PCI Express bus slot, unscrew and remove the slot
cover.
Place the SATA3 RAID PCIe Card into the slot. Carefully press the board
into the slot until it seats firmly.
Secure the SATA3 RAID PCIe Card with the slot cover screw.
Install the SATA cables from the SATA connectors to your SATA devices.
Carefully reinstall the computer cover. Insert and tighten the computer
cover screws.
Power up the PC and observe the monitor. The BIOS lists all Serial ATA
devices attached to the SATA3 RAID PCIe Card. For example:
Marvell 88SE91xx Adapter – BIOS Version x.x.x.xxxx
PCIe x1 5.0Gbps
Mode: CPU AHCI
Virtual Disk
No Virtual Disk!
Physical Disk
[ID]
[DISK Name]
[Size]
[Speed]
0
SATA ST32000641AS
1.83TB
6.0G
8
SATA ST32000641AS
1.83TB
6.0G
Press <Ctrl>+<M> to enter BIOS Setup or <Space> to continue
If the information displayed on your monitor is correct (the installed
devices are listed with the correct device name, etc.), congratulations!
You have successfully installed the SATA3 RAID PCIe Card in your
computer. If you want to configure your RAID drives, press and hold the 2
keys, Ctrl and M, to enter the BIOS Setup for this card. You can configure
the SATA RAID modes in the BIOS Setup.
4. Configuring a SATA Disk Array
Turn on your computer and press <Ctrl> and <M> keys to enter BIOS
Setup during the POST (Power-On Self-Test).
2
2-Port SATA3 RAID PCIe Card
4.1 Create a Disk Array:
Under Free Physical Disks, use the <Space> key to select the hard
drives to be included in the RAID array. The selected hard drive will
be marked with an asterisk (*). After selecting the hard drives, press
<Enter> to proceed.
To further configure the disk array, use the up or down arrow key to
move the selection bar to select an item in the right block of the
screen and press <Enter>. Set the required items in sequence and
press <Enter> after each step:
1.
RAID Level: Select a RAID level. Options include RAID 0 (Stripe)
and RAID 1 (Mirror).
3
2-Port eSATA3 RAID PCIe Card
2.
Stripe Size: Select the stripe block size. Options include 32 KB and
64 KB.
3.
Gigabyte Rounding: Select whether to permit the installation of a
replacement drive that is smaller than the failed drive when
performing a RAID 1 rebuild. Options include None, 1G, and 10G.
4.
Quick Init: Select whether to quickly erase old data on the hard
drives when creating the array.
5.
VD Name: Enter an array name with 1~10 letters (letters cannot
be special characters).
6.
Next: After completing the settings above, move to Next and
press <Enter> to begin creating the array. When prompted to
confirm whether to create this array, press <Y> to confirm or <N>
to cancel.
7.
When completed, you
Topology\Virtual Disks.
8.
Save the Settings and Exit. After you complete the RAID
configuration and before you exit the configuration screen, be
sure to press <F10> in the main screen. Press <Y> to confirm or <N>
to cancel.
9.
Now, you may proceed to create the SATA driver diskette (for
AHCI mode) and the installation of the SATA driver and operating
system
can
see
the
new
array
under
4.2 Delete the Disk Array:
To deleted the existing array, select the array on the main menu
(example: VD 0: New_VD) and press <Enter> to display the Delete
option. Press <Enter>. When prompted, press <Y> to confirm or <N> to
cancel.
5. Installing RAID Drivers and GUI
With the Marvell RAID utility (RAID GUI), you can setup an disk array or
view the current array status in the operating system. To install the
utility, insert the supplied driver CD (folders as the following picture).
4
2-Port SATA3 RAID PCIe Card
Please follow the following steps:
1.
Run the driver installer (drvSetup.exe) in
\SATA3\88SE9128\Drivers to install the RAID drivers
the
folder
2.
Reboot the system to let the drivers take effect.
3.
Run
the
RAID
GUI
installer
(\SATA3\88SE9128\Utility\MRUSetup.exe) to install the RAID Utility.
Note: After the installation, you must login the utility with the same
account name and password that you use to login the operating
system. If you did not set the account password before, click Login to
enter the Marvell RAID Utility directly.
5