1
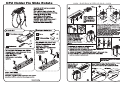
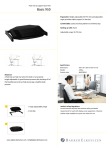
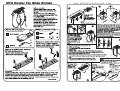
CPU Holder Fix Slide Rotate
``
Before assembly
Please spend some times to read
this and follow the procedures step
by step.
Some panels are viewed differently
from the exploded drawing below. This
is for extra clarity.
Do not discard any of the packaging
until you have checked all the parts and
the package of fittings. If you are
missing any of the parts, please contact
the store from which you purchased
your products. The staff will do their
best to help you.
(il: -
Fitting Check-List)—
Screw SS X6
X4
N
Lom
O
©
©
D
=
WE BE OE OE OE EE EE BE BE BE BE IE BE BE BE EE EE EE EE OE OE OE ay
* Note: As an option when needs ‘
: are for lower position 100mm.
‚ Please order Codeno 427-CS09
LiftConsole Click-System.
WE)
nn OE OE Em OE Em OE OE OE Em EE EE EE EE EEE EE EE EE EE EE mm og
e * I
“Note: As an option when needs are
. for lower position 65mm.
: Please order Codeno 427-CS08
: LiftConsole Click-System. “47
‘
и \
w ;
no
un ve,
“ o.
D TS s
«
` a
-
.
WOE OE OE OE OOO OOOO O O = = =
MN mE EEE EEE EE EE EEE EEE EE NE EN EN EN BN EN NEN NN NN m =
Regular cleaning with a clean dry cloth is usually sufficient, but for stubborn marks, wipe
over gently with a clean damp cloth. Never use strong detergents or abrasive cleaners
as these may damage the surface finish of your furniture. There are many small
components used in the construction of this unit. These loose items should be kept away
from young children while assembling your unit.
wwWw.bakkerelkhuizen.com
o DS
AZ 7
e ”
IE
Ss 7 >
Pu >
COS a No”
7 * y
7e SA
‘ 7
1.7 ,
! ¡7 Please take slider
2007 away first!
EQ Make 6 hole signs
NS =. > under the desk for the
INT site you want to set
o | up.
Lo Note:
| *Rubber stop is at the rear.
b.
The rope pierces through the
front of the beltlock (as
figure a. arrow) and strings
Stick 4 pcs of stoppers under the convex plate
corner in order to protect the CPU (as figure).
Make sure the following before assembling.
1.CPU is for vertical or horizontal. Refer to
drawing (a) or (b) and decide the placement of
direction for the convex plate.(Assembled
figure (a) in package already .)
2.According to the width of CPU to locate the
holes.(Assembled screw in the outside hold.)
After the step 1 & 2, secure the convex plate
and holder with 4 pcs screws.
as a circle. Putting the rope
on top of the plate (as the
figure b. location). Then
putting the CPU on with
care.
Adjust the length of the rope for CPU, the
method as following :
3-0)
1.Pull down one of the rope first and then
another rope.
CPU properly and avoid the rope loose.
Note :
x Do not move over-high when supporting a CPU.
* Supporting the CPU during the whole adjustment.
2.Repeat step 1, until the top of the CPU touches the stoppers.
3.Press down the beltlock cover (see figure right)in order to fit the
4.Piercing through the top of the hoop of the beltlock with the remaining
rope and the rope won't hang down to the ground. (see figure right)
Note:
*Make sure the spring set up on the pin.
*Set up pin in slide in order to
Put figure "a" Into
under the table. of slide.
Patent Pending J
prevention the revolver set take off.
eo Assembly: Take out:
gure и which A push into side them B Push A to slide bottom
already fixe into the other side hole then move B out.
CPU Holder Fix Slide Rotate
Tack for att Ni valt en produkt
fran Kondator
Agna garna nagra minuter att
Detta ar att steg for steg
underlátta monteringen.
Bifogat finns en lista pá de
paketet. Kontrollera noga
innehállet fóre montering !
|
>
: Skruv
Friktonsbelagg <
SN
Se
>
<<” ATT NOTERA: Vid behov kan
X1
* LiftFlex kompletteras med
Spännband X2 . distanser 100mm
\_ DA
hojd.Vanligen bestall Artnr
La
ATT NOTERA: Vid behov kan LiftFlex |
kompletteras med distanser 65mm
hojd.Vanligen bestall _
Artnr 427-CS08 Зря
LiftConsole med click- Eo
system.
TT MATER URL LL Ri ram 0 *.. 427-CS09 >,
LiffConsole med |
click-system.
mom Em Em OE OE OE OOOO OOOO O ыы *
Artnr 427-CS27
Rekommendationer:
Rengor regelbundet med en ren trasa.
Använd aldrig starka lôsningsmedel.
Ne Patent Pending
lasa denna monteringsanvisning.
tillbehor som skall finnas medi
4
Ovriga detaljer >
E. O. O; O; O O OO OOOO OOOO O Oy
a
2
A
= 4
``
X6
NM mE EEE EEE EEE EE EEE EE EN BE EN BE EN EN BN BN m m =
wwWw.bakkerelkhuizen.com
b.
(03).
<->
KS ~~
a
> „”
Lósgor sprintlástet och
drag ut sláden frán
skenan. Fást skenan
pá lámplig plats undet
bordet med bif skruv
i 16s-spannet (enl pilen
rikting, fig a) sa att 6gla
bleckens (01) krokar. For
Oglorna.
Dra igenom spannband (02)
erhalles. Hang upp resp ôgla '
enl (fig b) i upphangnings-
darefter in datorn forsiktigt i
> -
I
> 4
Bifogade 4st friktionsbelagg (04) skall fastas
©) lángst ut pá upphángningsbleckens konvexa sida.
1. LiftFlex ar fórmonterad fór vertikalt montage (a)
av dator. Justera vid behov
upphángningsbleckens yttre kant till ca 10-50 mm
MINDRE an datorns bredd, genom att lósgóra
skruvarna, samt dár efter áterdra dessa.
2. LiftFlex kan áven konverteras fór horisontalt
montage (b). Lósgor blecken helt, samt váxla sida
for uppha ngnins-bleckens atermontage pa
sladen. Justera bredd enl ovan.
Anvisningar for justering av spannbanden:
1. Drag at bada spannbanden (02)
2. Upprepa enl ovan tills datorn ovansida ligger stadigt mot
friktionsbelagen/upphangningsblecken.
3. Justera och stoppa in "0verblivet spannband" i dar avsedd ring.
4. Pressa darefter ned spannet pa laset.Detta sakerstaller
datorns position i spannbanden.
3-0)
Kontrollera att fjádern till lássprinten
finns pá plats.
Skjut in slade med
fastspand dator i
monterad slad-
sken under bordet<
a. A
För in lässprintens länga tapp (A) med fjäder i skenans
sidohäl. Pressa in tappen, samt för därefter in
lässprintens kortare tapp (B) i motstäende sidohäl.
Att lása att óppna