1
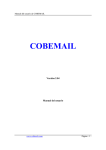
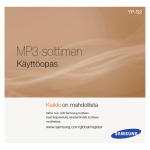
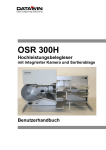
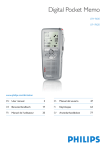
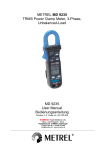
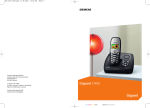
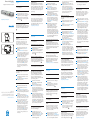
Barcode Module LFH 9294 English for Digital Pocket Memo 9600 / 9620 1 Installation Attach the barcode module Remove the memory card from the Digital Pocket Memo by pressing down on the memory card and releasing it. 2 Attach the barcode module by sliding it into the memory card slot (you will hear a click). Using the barcode module as USB keyboard device When using the barcode module while the Digital Pocket Memo is connected to the PC, the Digital Pocket Memo behaves like a USB keyboard device. The barcode information is transferred directly to the PC as if the barcode number is typed in digit by digit. www.philips.com/dictation Remove the barcode module To remove the barcode module, simultaneously press and hold both release buttons (left and right side) on the module and pull it from the Digital Pocket Memo. 3 Advanced configuration For information about customizing the barcode module, refer to the Advanced Barcode Module Configuration manual on the installation CD provided with your Digital Pocket Memo. You can also download the manual from www.philips.com/dictation. 2 1 2 2 Using the barcode module Add barcode information to your dictation The barcode module allows barcode scanning from a distance of up to 25 cm / 10 inches and supports barcode information with up to 30 digits. It includes a built-in memory card of 64 MB. Move the 4-position switch of the Digital Pocket Memo to the STOP position. 2 Press the BARCODE smart button and scan the barcode. When a barcode is recognized, the Digital Pocket Memo will beep and the barcode information is displayed on the LCD screen. 3 Press the OK smart button to confirm the barcode input. The Digital Pocket Memo returns to normal operation and displays the barcode information (the first 15 characters) for 1.5 seconds. The ┵ symbol on the LCD screen indicates that the current recording contains barcode information. Display barcode information To display previously recorded barcode information: Make sure that the 4-position switch of the Digital Pocket Memo is in the STOP position. 2 Press and hold the MENU button for at least two seconds. Deutsch 1 Installation Anschließen des Barcode-Moduls Entfernen Sie die Speicherkarte vom Digital Pocket Memo. 2 Schließen Sie das Barcode-Modul an, indem Sie es in den Steckplatz der Speicherkarte stecken (Sie hören ein Klicken). Entfernen des Barcode-Moduls Um das Barcode-Modul zu entfernen, drücken Sie beide Entriegelungsknöpfe (links und rechts) am Modul und ziehen Sie es vom Digital Pocket Memo ab. 2 Move the 4-position switch of the Digital Pocket Memo to the STOP position. 2 Press the BARCODE smart button and scan the barcode. When a barcode is recognized, the Digital Pocket Memo will beep. 3 The old barcode information is displayed. Press and hold the DELETE smart button for one second to delete the old barcode information, or press the BACK smart button to cancel. 4 The new barcode information is displayed. Press the OK smart button to add the new barcode information to the dictation. The Digital Pocket Memo returns to normal operation and displays the new barcode information (the first 15 characters) for 1.5 seconds. The ┵ symbol on the LCD screen indicates that the current recording contains barcode information. Stellen Sie den 4-FunktionsSchiebeschalter des Digital Pocket Memo auf STOP. 2 Drücken Sie den Smart-Button BARCODE, und scannen Sie den Barcode ein. Wird ein Barcode erkannt, gibt das Digital Pocket Memo ein Akustiksignal aus. 3 Die alten Barcode-Informationen werden angezeigt. Drücken Sie den Smart-Button LÖSCHEN, und halten Sie ihn eine Sekunde lang gedrückt, um die alten Barcode-Informationen zu löschen, oder drücken den SmartButton ZURÜCK, um den Vorgang abzubrechen. 4 Die neuen Barcode-Informationen werden angezeigt. Drücken Sie den Smart-Button OK, um die neuen Barcode-Informationen zum Diktat hinzuzufügen. Das Digital Pocket Memo wechselt wieder zum Normalbetrieb und zeigt die BarcodeInformationen (die ersten 15 Zeichen) 1,5 Sekunden lang an. Das Symbol ┵ auf dem LCD-Display weist darauf hin, dass die aktuelle Aufnahme BarcodeInformationen enthält. Verwenden des Barcode-Moduls als USB HID-Tastatur Wenn das Digital Pocket Memo am PC angeschlossen ist, verhält es sich wie eine USB HID-Tastatur. Barcode-Daten werden direkt auf den PC übertragen, so als würde die Barcode-Nummer Ziffer für Ziffer eingegeben. 3 Erweiterte Konfiguration Informationen zur Anpassung des Barcode-Moduls finden Sie im Handbuch „Erweiterte Konfiguration des BarcodeModuls“ auf der Installations-CD Ihres Digital Pocket Memo. Sie können das Handbuch auch unter www.philips.com/dictation herunterladen. 2 Verwenden des Moduls Hinzufügen von BarcodeInformationen zu Ihrem Diktat Mit dem Barcode-Modul können Sie aus einer Entfernung von bis zu 25 cm scannen. Es unterstützt Barcode-Daten mit bis zu 30 Ziffern. Das BarcodeModul wird mit einer integrierten 64 MB Speicherkarte geliefert. Stellen Sie den 4-FunktionsSchiebeschalter des Digital Pocket Memo auf STOP. 2 Drücken Sie den Smart-Button BARCODE und scannen Sie den Barcode ein. Wird ein Barcode erkannt, gibt das Digital Pocket Memo ein Akustiksignal aus, und die BarcodeInformationen werden auf dem LCDDisplay angezeigt. 3 Drücken Sie den Smart-Button OK um die Barcode-Eingabe zu bestätigen. Das Digital Pocket Memo wechselt wieder zum Normalbetrieb und zeigt die Barcode-Informationen (die ersten 15 Zeichen) 1,5 Sekunden lang an. Das Symbol ┵ auf dem LCD-Display weist darauf hin, dass die aktuelle Aufnahme Barcode-Informationen enthält. Overwrite barcode information Überschreiben von Barcodes Anzeigen von Barcode-Informationen Um zuvor aufgenommene BarcodeInformationen anzuzeigen: Vergewissern Sie sich, ob der 4‑Funktions-Schiebeschalter des Digital Pocket Memo auf STOP steht. 2 Drücken Sie die Taste MENU, und halten Sie sie mindestens zwei Sekunden lang gedrückt. Français 1 Installation Installer le lecteur de codes-barres émet un signal sonore et l‘information est affichée sur l‘écran. 3 Appuyez sur OK pour confirmer. Le Digital Pocket Memo revient en mode standard et affiche les 15 premiers caractères du code-barres pendant 1,5 seconde. Le symbole ┵ affiché sur l‘écran indique que l‘enregistrement actuel contient des informations venant d‘un code-barres. Afficher un code-barres Pour afficher un code-barres qui a déjà été enregistré : Vérifiez que l’interrupteur 4 positions du Digital Pocket Memo soit sur ARRET. 2 Appuyez sur la touche MENU pendant au moins deux secondes. Effacer un code-barres existant Mettez l’interrupteur 4 positions du Digital Pocket Memo sur ARRET. 2 Appuyez sur le bouton CODE BARRES et lisez le code-barres. Dès qu‘un code est reconnu, le Digital Pocket Memo émet un signal sonore. 3 L‘ancien code-barres est affiché. Appuyez sur SUPPRIMER pendant une seconde pour l‘effacer ou appuyez sur RETOUR pour annuler. 4 Le nouveau code-barres est maintenant affiché. Appuyez sur OK pour insérer le nouveau code-barres dans la dictée. Le Digital Pocket Memo revient en mode standard et affiche les 15 premiers caractères du code-barres pendant 1,5 seconde. Le symbole ┵ affiché sur l‘écran indique que l‘enregistrement actuel contient des informations venant d‘un code-barres. Utiliser le lecteur de codes-barres comme un clavier USB Lorsque le Digital Pocket Memo est connecté à un PC, il se comporte comme un clavier USB HID. Tout code-barres est transféré directement vers le PC comme s‘il était saisi chiffre par chiffre. 3 Configuration avancée Pour plus de détails sur le paramétrage du lecteur de codes-barres, reportez‑vous à la rubrique correspondante sur le CD d‘installation de votre Digital Pocket Memo. Vous pouvez également télécharger le manuel sur le site www.philips.com/dictation. Retirez la carte mémoire du Digital Pocket Memo. 2 Insérez le lecteur de codes-barres à l‘emplacement de la carte mémoire (vous entendrez un clic). Retirer le lecteur de codes-barres Appuyez sur les deux boutons de déverrouillage (côté gauche et côté droit du lecteur) et retirez le lecteur du Digital Pocket Memo. 2 2 Utilisation Español 1 Instalación Como insertar el módulo escáner de código de barras Retire la tarjeta de memoria del Digital Pocket Memo presionando la tarjeta de memoria y soltándola. 2 Encaje el módulo escáner de código de barras en el espacio de la tarjeta de memoria (se escuchará un ligero sonido al acoplarse). Insérer un code-barres dans une dictée L‘appareil permet de lire un code-barres jusqu‘à 25 cm de distance et reconnait les codes-barres composés de 30 chiffres maximum. Il est équipé en standard d‘une carte mémoire de 64 Mo. Mettez l’interrupteur 4 positions du Digital Pocket Memo sur ARRET. 2 Appuyez sur le bouton CODE BARRES et lisez le code-barres. Dès qu‘un code est reconnu, le Digital Pocket Memo Como retirar el módulo escáner de código de barras Para retirar el módulo escáner de código de barras presione a la vez los dos botones de ajuste (a la izquierda y a la derecha) y retírelo del Digital Pocket memo. 2 2 Uso del módulo escáner de código de barras Anexar información de un código de barras al dictado El módulo escáner de código de barras permite la lectura del código de barras de máximo 30 caracteres y a una distancia máxima de 25. Está provisto de una memoria interna de 64 MB. Ajuste el interruptor de 4 posiciones del Digital Pocket Memo en la posición STOP. 2 Presione el botón BARCODE (código de barras) y lea el código de barras. Cuando el aparato reconoce el código de barras se escuchará un sonido y la información de éste aparecerá en la pantalla del Digital Pocket Memo. 3 Presione el botón OK para aceptar la entrada del código de barras. El Digital Pocket Memo vuelve a la situación de funcionamiento normal y muestra durante 1,5 segundos los 15 primeros caracteres del código de barras. El símbolo ┵ en la pantalla del Digital Pocket Memo indica que la grabación actual contiene la información de código de barras y la información de éste aparecerá en la pantalla del Digital Pocket Memo. Como mostrar la información del código de barras A segúrese de que el interruptor de 4 posiciones se halla en posición STOP. 2 Mantenga presionado por lo menos dos segundos el botón MENU. Modificación de la información del código de barras Cerciórese de que el interruptor de 4 posiciones se halla en posición STOP. 2 Presione el botón BARCODE (código de barras) y lea el código de barras. Cuando el aparato reconoce el código de barras se escuchará un sonido. 3 Aparece en la pantalla la información del código de barras a modificar. Mantenga presionado por un segundo el botón DELETE (borrar) y se borrará la información del código de barras anterior. Si cambia de opinión presione el botón BACK (volver). 4 Aparecéra la nueva información del código de barras. Presione el botón OK para que la nueva información de código de barras se añada al dictado. El Digital Pocket Memo regresa al modo de funcionamiento normal y muestra la información del nuevo código de barras (los primeros 15 carácteres) por espacio de 1,5 segundos. El símbolo ┵ en la pantalla del Digital Pocket Memo indica que la grabación actual contiene información de código de barras. Uso del módulo escáner como teclado USB Si desea conectar el Digital Pocket Memo al ordenador, el Digital Pocket Memo funcionará como teclado USB. La información del código de barras se transmitirá directamente al ordenador como si escribieramos digito por digito el código de barras. 3 Configuración avanzada Para ajustar el módulo escáner de código de barras a su gusto, lea el capítulo Configuración avanzada del módulo escáner de código de barras que se halla en el CD. Este manual lo puede descargar en la siguiente dirección de web: www.philips.com/dictation. 5103 109 9667.1 © 2007 Royal Philips. All rights reserved. Version 2.0, 2007/06/12. are the property of Royal Philips or their respective owners. Specifications are subject to change without notice. Trademarks www.philips.com/dictation normale e viene evidenziata la nuova informazione (i primi 15 caratteri) per 1,5 secondi. Il simbolo ┵ sul display LCD significa che la registrazione attuale del codice barre contiene informazioni relative al codice a barre. Italiano 1 Installazione Inserimento del modulo per codice a barre Espellete la scheda di memoria dal Digital Pocket Memo premendo e rilasciando la scheda di memoria. 2 Inserite il modulo per codice a barre nell‘alloggiamento per la scheda di memoria (sentirete uno scatto). Espulsione del modulo per codice a barre Per espellere il modulo per codice a barre premete contemporeanamente tutte e due i pulsanti di rilascio (a destra e a sinistra) che si trovano sul modulo e togliete il modulo dal Digital Pocket Memo. 2 2 Utilizzo del modulo per L’utilizzo del modulo per codice a barre come tastiera USB In caso di collegamento del Digital Pocket Memo al computer, il Digital Pocket Memo funziona come strumento di tastiera USB. Le informazioni dei codici a barre vengono trasmesse direttamente al computer come se il codice a barre venisse scritto carattere per carattere. 3 Configurazione avanzata Per quanto concerne la personalizzazione del modulo per codici a barre, leggete il capitolo ”Configurazione del modulo per codici a barre avanzata” che si trova sul CD di installazione. Il presente manuale di istruzioni puó essere scaricato anche dall’indirizzo: www.philips.com/dictation. codice a barre Inserimento nella dettatura del codice a barre Il modulo per codice a barre rende possibile la lettura del codice a barre da una distanza al massimo di 25 cm, e la lettura d’un codice a barre contenente al massimo 30 caratteri. Il modulo dispone d’una memoria integrata di 64 MB. Posizionate l’interruttore a 4 posizioni del Digital Pocket Memo in posizione STOP. 2 Premete il pulsante BARCODE e fate leggere il codice a barre. Quando la macchina riconosce il codice a barre rilascia un segnale vocale e i caratteri numerici del codice a barre vengono evidenziati sul display LCD. 3 Premete il pulsante OK per confermare l’inserimento del codice a barre. Il Digital Pocket Memo ritorna alla posizione di funzionamento normale e vengono evidenziati i primi 15 segni del codice a barre per 1,5 secondi. Il simbolo ┵ sul display LCD significa che la registrazione attuale del codice barre contiene informazioni relative al codice a barre. Evidenziare le informazioni dei codici a barre Per visualizzare il codice a barre inserito dovete: Verificate se l’interruttore a 4 posizioni del Digital Pocket Memo é in posizione STOP. 2 Tenete premuto almeno per due secondi il pulsante MENU. Nederlands 1 Installatie De barcode module aansluiten Verwijder de geheugenkaart uit de Digitale Pocket Memo door de geheugenkaart in te drukken en vrij te geven. 2 Sluit de barcode module aan door hem in de gleuf voor de geheugenkaart te steken (u hoort een klik). Verwijder de barcode module Om de barcode module te verwijderen druk tegelijk beide knoppen van de module in (links en rechts), en trek de module uit de Digitale Pocket Memo. 2 2 Het gebruik van de barcode module Voeg streepjescode-informatie toe aan uw dictaat Met de barcode module kunnen streepjescodes gescand worden op een afstand tot 25 cm en wordt streepjescodeinformatie tot 30 getallen ingelezen. Wordt geleverd met een ingebouwde geheugenkaart van 64 MB. Schuif de 4-standen schakelaar van de Digitale Pocket Memo in de STOP positie. 2 Druk op de BARCODE toets en scan de streepjescode. Wanneer de streepjescode herkend werd, geeft de Digitale Pocket Memo een pieptoon en de streepjescode-informatie verschijnt op het LCD scherm. 3 Druk op de OK toets om de streepjescode-invoer te bevestigen. De Digitale Pocket Memo keert terug naar de normale bediening en toont de streepjescode-informatie (de eerste 15 karakters) gedurende 1,5 seconde. Het ┵ symbool op het LCD scherm geeft aan dat de huidige opname streepjescode-informatie bevat. Sovrascrivere le informazioni dei codici a barre Posizionate l’interruttore a 4 posizioni del Digital Pocket Memo in posizione STOP. 2 Premete il pulsante BARCODE e leggete i codice a barre. Riconoscendo il codice a barre il Digital Pocket Memo rilascia un segnale vocale. 3 Viene evidenziata l’informazione precedente del codice a barre. Tenete premuto per un secondo il pulsante DELETE, quindi le informazioni del precedente codice a barre vengono cancellate, o premete il pulsante EXIT se non volete farlo. 4 Viene evidenziata la nuova informazione del codice a barre. Premete il pulsante smart OK per aggiungere la nuova informazione del codice a barre alla dettatura. Il Digital Pocket Memo ritorna alla posizione di funzionamento Streepjescode-informatie tonen Om eerder opgenomen streepjescodeinformatie weer te geven: Zorg dat de 4-standen schakelaar van de Digitale Pocket Memo in de STOP positie staat. 2 Druk gedurende minstens 2 seconden de MENU toets in. Streepjescode-informatie overschrijven Schuif de 4-standen schakelaar van de Digitale Pocket Memo in de STOP positie. 2 Druk op de BARCODE toets en scan de streepjescode. Wanneer de streepjescode herkend werd, geeft de Digitale Pocket Memo een pieptoon. 3 De oude streepjescode-informatie wordt getoond. Druk de DELETE toets gedurende één seconde in om de oude streepjescode-informatie te verwijderen, of druk op de BACK toets om te annuleren. 4 De nieuwe streepjescode-informatie wordt getoond. Druk op de OK toets om de nieuwe streepjescodeinformatie toe te voegen aan het dictaat. De Digitale Pocket Memo keert terug naar de normale bediening en toont de nieuwe streepjescodeinformatie (de eerste 15 karakters) gedurende 1,5 seconde. Het ┵ symbool op het LCD scherm geeft aan dat de huidige opname streepjescodeinformatie bevat. De barcode module gebruiken als een toestel met USB toetsenbord Wanneer de barcode module gebruikt wordt terwijl de Digitale Pocket Memo is verbonden met een PC, dan gedraagt de Digitale Pocket Memo zich als een USB toetsenbord. De streepjescode-informatie wordt rechtstreeks naar de PC gestuurd alsof het streepjescodenummer getal per getal wordt ingetypt. 3 Geavanceerde configuratie Meer informatie over het aanpassen van de barcode module vindt u onder de betreffende rubriek op de installatie CD van uw Digitale Pocket Memo. U kunt de handleiding ook downloaden van www.philips.com/dictation. Suomi 1 Asennus Viivakoodimoduulin kiinnittäminen Poista muistikortti Digital Pocket Memosta painamalla muistikorttia alas ja vapauttamalla se. 2 Kiinnitä viivakoodimoduuli liu‘uttamalla se muistikorttipaikkaan. Moduuli napsahtaa kiinnittyessään. Viivakoodimoduulin irrottaminen Irrota viivakoodimoduuli pitämällä vasemmalla ja oikealla puolella olevia vapautuspainikkeita painettuina ja vetämällä se irti Digital Pocket Memosta. 2 Siirrä Digital Pocket Memon neliasentoinen kytkin STOP-asentoon. 2 Paina BARCODE (Viivakoodi) älypainiketta ja lue viivakoodi. Kun viivakoodi on tunnistettu, Digital Pocket Memo antaa äänimerkin ja viivakooditiedot näytetään LCDnäytössä. 3 Vahvista luetut viivakooditiedot painamalla OK-älypainiketta. Digital Pocket Memo palaa normaalitoimintotilaan ja viivakooditiedot (ensimmäiset 15 merkkiä) näytetään 1,5 sekunnin ajan. LCD-näytön ┵-symboli ilmaisee, että nauhoitus sisältää viivakooditietoja. Viivakooditietojen näyttäminen Aiemmin tallennettujen viivakooditietojen näyttäminen: Varmista, että Digital Pocket Memon neliasentoinen kytkin on STOP (Pysäytä) asennossa. 2 Pidä MENU (Valikko) painiketta painettuna kahden sekunnin ajan. Viivakooditietojen korvaaminen Siirrä Digital Pocket Memon neliasentoinen kytkin STOP (Pysäytä) asentoon. 2 Paina BARCODE (Viivakoodi) älypainiketta ja lue viivakoodi. Kun viivakoodi on tunnistettu, Digital Pocket Memo antaa äänimerkin. 3 Vanhat viivakooditiedot näytetään. Jos haluat poistaa vanhat viivakooditiedot, pidä DELETE (Poista) älypainiketta painettuna sekunnin ajan. Voit peruuttaa toiminnon painamalla EXIT (Sulje) älypainiketta. 4 Uudet viivakooditiedot näytetään. Lisää uudet viivakooditiedot saneluun painamalla OK-älypainiketta. Digital Pocket Memo palaa normaalitoimintotilaan ja uudet viivakooditiedot (ensimmäiset 15 merkkiä) näytetään 1,5 sekunnin ajan. LCD-näytön ┵-symboli ilmaisee, että nauhoitus sisältää viivakooditietoja. Viivakoodimoduulin käyttäminen USB-näppäimistönä Kun Digital Pocket Memo on kytketty tietokoneeseen, se toimii USBnäppäimistönä. Viivakooditiedot siirretään suoraan tietokoneeseen, aivan kuin viivakoodin numero syötettäisiin numero kerrallaan. 3 Lisäasetukset Saat lisätietoja viivakoodimoduulin mukauttamisesta Digital Pocket Memon asennus-CD-levyn viivakoodimoduulin lisäasetuksia koskevasta käyttöoppaasta. Opas on myös ladattavissa osoitteesta www.philips.com/dictation. Svenska 1 Installation 1 Tryck och på samma gång håll ned båda utlösningsknapparna (vänster och höger sida) på modulen och dra den ut ur DPMenheten. 2 2 Att använda streckkodsmodulen 2 Att lägga till streckkodsinformation till ditt diktat Streckkodsmodulen gör streckkodsavläsning möjlig från ett avstånd på 25 cm och stödjer streckkodsinformation med upp till 30 siffror. Den levereras med ett inbyggt minneskort på 64 MB. Flytta 4-positionsreglaget på Digital Pocket Memo (DPM) till STOP positionen. 2 Tryck på BARCODE knappen och läs av streckkoden. När en streckkod har registrerats, kommer DPMenheten att avge en signal och streckkodsinformationen visas på LCD skärmen. 3 Tryck på OK knappen för att godkänna streckkodens inmatning. DPMenheten återgår till normal drift och visar streckkodsinformationen (de första 15 tecknen) i 1,5 sekunder. Symbolen ┵ på LCD skärmen visar att den aktuella inspelningen innehåller streckkodsinformation. Att visa streckkodsinformation För att visa tidigare inspelad streckkodsinformation: Förvissa dig om att DPM-enhetens 4positionsreglage är i STOP positionen. 2 Tryck på och håll ned MENU knappen i minst två sekunder. Att ersätta gammal streckkodsinformation med ny Flytta DPM-enhetens 4positionsreglage till STOP positionen. 2 Tryck på BARCODE knappen och läs av streckkoden. När en streckkod är registrerad, skall DPM-enheten avge en signal. 3 Den gamla streckkodsinformationen visas. Tryck och håll ned DELETE knappen i 1 sekund för att ta bort den gamla streckkodsinformationen eller tryck på EXIT knappen för att avbryta. 4 Den nya streckkodsinformationen visas. Tryck på OK knappen för att lägga till den nya streckkodsinformationen till diktatet. DPM-enheten återvänder till normalläge och visar den nya streckkodsinformationen (de första 15 tecknen) i 1,5 sekunder. Symbolen ┵ på LCD skärmen indicerar att den aktuella inspelningen innehåller streckkodsinformation. Att använda streckkodsmodulen som USB tangentbordsenhet När DPM-enheten är inkopplad till datorn, uppför DPM-enheten sig som en USB tangentbordsenhet. Streckkodsinformationen överförs direkt till datorn som om streckkodsnumret skulle skrivs in tecken för tecken. Declaration of Conformity Tested to comply with FCC standards FOR HOME OR OFFICE USE Model Number: LFH 9294 Trade Name: Philips Barcode Module 9294 Responsible Party: Philips Speech Processing 2 Viivakoodimoduulin käyttäminen Viivakooditietojen lisääminen saneluun Viivakoodimoduulilla voidaan lukea viivakoodeja enintään 25 cm:n etäisyydeltä. Moduuli tukee enintään 30 merkin viivakooditietoja. Moduulissa on sisäänrakennettu 64 megatavun muistikortti. Montera streckkodsmodulen Ta bort minneskortet ur DPM-enheten genom att trycka ned minneskortet och sedan släppa det. 2 Montera streckkodsmodulen genom att skjuta in den i minneskortsplatsen (du skall höra ett knäppande ljud). 3 Avancerad konfiguration Ta bort streckkodsmodulen För att ta bort streckkodsmodulen: Address: 64 Perimeter Center East, Atlanta, GA 30346, USA Telephone number:888-260-6261 Website: För information angående streckkods modulens anpassning, gå till Handboken: Streckkodsmodulen - Avancerad Konfiguration på installation CD-n som levereras tillsammans med din DPM-enhet. Du kan också hämta handboken från www.philips.com/dictation. www.philips.com/dictation This device complies with Part 15 of the FCC Rules. Operation is subject to the following two conditions: 1) This device may not cause harmful interference. 2) This device must accept any interference received, including interference that may cause undesired operation.