1
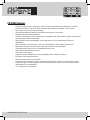
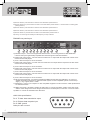
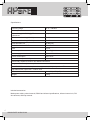
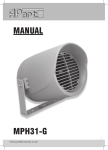
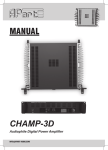
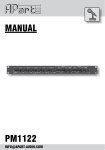
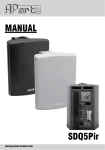
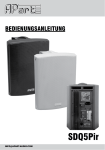
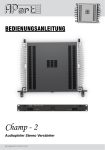
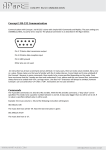
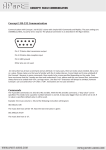
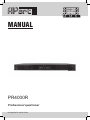
SLIMLINE
MANUAL
PR4000R
Professional quad tuner
[email protected]
SLIMLINE
PR4000R features
•
•
•
•
•
•
•
•
•
•
•
•
•
•
•
•
Versatile design, easy to integrate in rack mounted professional audio distribution systems,
stereo hifi systems, multi-room audio systems and computer controlled audio systems.
Removable 19 inch rack-ears (included).
Galvanically separated antenna and RS232 connectors to avoid hum.
Integrated antenna splitter/amplifier.
FM tuner with adaptive noise suppression. Compatible with cable antenna signal networks and
standard wire antennas (included).
Quad FM RDS tuner with adaptive noise suppression, 4 fully independent FM tuners
(PR4000R).
RDS information: program type, song name identification, radio station identification.
Standalone operation and/or remote controlled by infrared and/or RS232.
Adjustable audio output level, 4 independent stereo outs.
High class brushed aluminum front.
Low power consumption.
Attractive clearly readable dot matrix gas display and led status indicators.
Excellent real world performance.
Infrared remote control unit included.
Separate infrared minijack input for seamless integration in multi-room audio systems, allowing link through of infrared signals via the multiroom system (check your multi-room system’s
specifications for compatibility).
4 x 10 station memory presets.
2
WWW.APART-AUDIO.COM
SLIMLINE
Operation PR4000R
PR4000R front panel layout
1
11
2
4
6
8
3
5
7
9
10
13
12
15
14
16
17
18 20 22 24 26
19 21 23 25 27
28
1) Power knob / power led : flip the switch to turn the unit on and off. In standby mode, the power led lights up slightly dimmed. In
the off position the unit is fully turned off.
2) Tuner select button: push this button, and immediately afterward push button ‘18’, ‘20’, ‘22’ or ‘24’ (labeled T1 – T4) to select
tuner 1, 2 ,3 or 4. Led’s ‘13’, ‘14’, ‘15’ or ‘16’ will light up to indicate the selected tuner to be edited (T1 – T4).
3) Scan : push this button to automatically scan the stored preset radio stations, with every push on the scan button, you will jump
to the next preset. When you keep the button pushed for a few seconds, M-SCAN appears in the display and the tuner will
automatically scan all presets once.
4) Mono / stereo selector : use this switch to activate stereo or mono mode. In case of weak reception, mono mode will drastically
reduce noise. In case of stereo reception, the stereo led ‘12’ will light up.
5) Save button : push this button to save the currently selected radio station, push a numeric button (or button combination, see
below) afterwards and confirm your selection by pressing the save button a second time.
6) Search forward button : push this button to search for a radio station upward in the radio band.
7) Search downward button : push this button to search for a radio station downward.
8) + PRG TYPE : push this button to activate and display program type information if RDS is available. This has no function
when no RDS or PRG information is transmitted by the radio station. Led ‘10’ lights up when the function has been activated.
Activating this function will automatically deactivate the + INFO TEXT function.
9) + INFO TEXT : push this button to activate and display RDS information, such as song name identification. This has no function
when no RDS or PRG information is transmitted. Led ‘11’ lights up when the function has been activated. Activating this function
will automatically deactivate the + PRG TYPE function.
10) RDS PRG led : lights up when the + PRG TYPE function is activated.
11) RDS INFO led : lights up when the + INFO TEXT function is activated.
12) FM stereo led : lights up when FM reception is stereo.
13) T1 led: this led lights up when tuner 1 is selected for editing.
14) T2 led: this led lights up when tuner 2 is selected for editing.
15) T3 led: this led lights up when tuner 3 is selected for editing.
16) T4 led: this led lights up when tuner 4 is selected for editing.
17) Dot matrix gas display : multifunctional display showing radio station frequency and preset number or RDS information.
18) Numeric button 1/T1: push this button to select or save radio station preset number 1 or to select tuner 1 for editing (after
pushing button ‘2’).
19) Numeric button 6: push this button to select or save radio station preset number 6.
20) Numeric button 2/T2: push this button to select or save radio station preset number 2 or to select tuner 2 for editing (after
pushing button ‘2’).
21) Numeric button 7: push this button to select or save radio station preset number 7.
22) Numeric button 3/T3: push this button to select or save radio station preset number 3 or to select tuner 3 for editing (after
pushing button ‘2’).
3
[email protected]
SLIMLINE
23) Numeric button 8: push this button to select or save radio station preset number 8.
24) Numeric button 4/T4: push this button to select or save radio station preset number 4 or to select tuner 4 for editing (after
pushing button ‘2’).
25) Numeric button 9: push this button to select or save radio station preset number 9.
26) Numeric button 5: push this button to select or save radio station preset number 5.
27) Numeric button 10: push this button to select or save radio station preset number 10.
28) Tuning : turn left or right to manually tune the frequency in steps of 50 kHz.
PR4000R rear panel layout
1
2
3
4
5
6
7
8
9
10
11
12
13
1) FM antenna input : connect the supplied FM antenna here, or use the signal from a cable distribution
network. This input is galvanically separated from the audio ground and serial interface.
2) Output level control tuner 1: turn this control to match tuner 1’s output with the output level of other music
sources such as CD players.
3) Tuner 1 line level output on cinch connectors.
4) Output level control tuner 2 : turn this control to match tuner 2’s output with the output level of other music
sources such as CD players.
5) Tuner 2 line level output on cinch connectors.
6) Output level control tuner 3: turn this control to match tuner 3’s output with the output level of other music
sources such as CD players.
7) Tuner 3 line level output on cinch connectors.
8) Output level control tuner 4: turn this control to match tuner 4’s output with the output level of other music
sources such as CD players.
9) Tuner 4 line level output on cinch connectors.
10) IR control external input : connect the separately available IR extender here (PIR-REC), or connect a
suitable electrical IR signal from a multi-room audio system or other compatible system. Connector tip =
supply +, ring = signal, sleeve = GND.
11) RS232 port : connect your computer or other compatible equipment on this connector. Cable specifications
are mentioned below.
12) Mains fuse holder : this holder contains the mains fuse. In case of fuse failure, replace it only with a fuse
with the same voltage and current rating as mentioned on the back panel, in this case: T 315 mA L 250V~
13) Mains in: connect the included mains cable here.
rs232 Cable specifications
Pin 2: TX data: data transmission output
Pin 3: RX data: data reception input
Pin 5: GND: ground
Other pins are not used.
4
WWW.APART-AUDIO.COM
SLIMLINE
RS232 supported command list
-
set echo on/off : related to RS232 communication
-
set standby on/off : activate standby mode, wake up tuner from standby
-
set baudrate 2400/4800/9600/19200/38400 (19200 default value)
-
get info : display the current tuner settings
-
rcl preset XX : recall a previously stored preset radio station
-
str preset XX : store the current frequency at defined preset number
-
set select tuner X (1 to 4) : select the tuner to be controlled
-
set mantun XXX.XX : manually set the radio frequency
-
set stereo on/off : activate stereo/mono mode (FM operation only)
-
inc search : search radio station upward
-
dec search : search radio station downward
-
inc mantun : increase frequency by 1 step upward, FM 50 kHz, AM 9 kHz
-
dec mantun : decrease frequency by 1 step downward, FM 50 kHz, AM 9 kHz
-
get rdsinf ps : activate RDS reception of station name
-
get rdsinf rt : activate RDS reception of RDS text info
Note : X stands for a numeric value, e.g. XXX.XX could be 100.90. Commands not mentioned in
this list are not supported, however, these commands allow complete control of all tuner functions
via RS232. Default RS232 communication settings are : baud rate 38400, echo on, CR on, BS on,
valfb on (value feedback on).
Infrared codes :
102F4B
102F5D
102F59
102F52
102F55
102F51
102F4E
102F4D
102F49
102F98
102F1F
102F48
102F0F
QUAD
102F5A
4
102F5B
5
[email protected]
SLIMLINE
Specifications:
FM tuning range
87.5 – 108 MHz
Presets per tuner
4 x 10
FM sensitivity (26 dB S/N) @ 75 ohm
unbalanced
1.1µV
FM channel selectivity (200 kHz)
50 dB
FM channel selectivity (400 kHz)
70 dB
Audio S/N ratio FM
78 dB (IHF)
Audio bandwidth ± 1.5 dB
30 – 15 kHz
THD
<0.1%
Stereo separation
>50 dB @ 1 kHz
Power supply
230 VAC/50-60 Hz
Power consumption
max 10 VA
Power consumption standby mode
1 watt
Galvanically separated antenna and RS232 connectors
Integrated antenna splitter / amplifier
Quad FM RDS tuner with adaptive noise suppression, 4 fully independent FM tuners.
Adjustable audio output level : 4 stereo outs.
Dimensions L x W x H
484 (430) x 270 (245) x 44 mm
Weight
2.8 kg
Included accessories:
Mains power cable, printed manual, RS232 and infrared specifications, infrared control unit, FM
wire antenna, AM loop antenna.
6
WWW.APART-AUDIO.COM
SLIMLINE
Safety information:
•
Please check the carton box for any kind of damage on reception of the goods. In case of a
damaged carton, please contact your dealer before opening the carton.
•
!!!! Danger !!!! Exposure to extremely high noise levels may cause a permanent hearing
loss. Individuals vary considerably to noise induced hearing loss but nearly everyone will lose
some hearing if exposed to sufficiently intense noise for a sufficient amount of time. Therefore
it is recommended that all persons exposed to equipment capable of producing high sound
pressure levels, such as this amplifier, be protected by hearing protection while installing or
operating this unit.
•
Read all documentation before operating your equipment.
•
Keep all documentation for future reference.
•
Save the carton and packing material even if the equipment has arrived in good condition.
•
Should you ever need to ship the unit, use only the original factory packing.
•
Do not spill water or other liquids into or on the unit.
•
Make sure power outlets conform to the power requirements listed on the back of the unit.
•
Do not use the unit if the electrical power cord is frayed or broken.
•
Have gain controls on amplifiers turned down during power-up to prevent speaker damage if
there are high signal levels at the inputs.
•
Do not connect the inputs / outputs of amplifiers or consoles to any other voltage source, such
as a battery, mains source, or power supply, regardless of whether the amplifier or console is
turned on or off.
•
Power down & disconnect units from mains voltage before making connections.
•
Do not use the unit near stoves, heat registers, radiators, or other heat producing devices.
•
Do not remove the cover. Removing the cover will expose you to potentially dangerous
voltages.
•
In case of mal-function this device should be serviced by qualified service personnel only.
7
[email protected]
SLIMLINE
ANY SUGGESTION?
They are well appreciated and eventually rewarded!
Send your ideas or suggestions to
[email protected]
Company names, product names, and names of formats etc. are the trademarks or registered
trademarks of their respective owners.
© 2009 APart-Audio specifications subject to change without notice.
PR4000R is developed by
Audioprof nv
Lanteernhofstraat 90
BE-2100 Deurne
BELGIUM
8
WWW.APART-AUDIO.COM