1
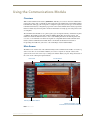
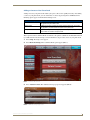
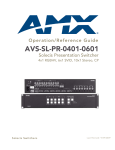
Communications Module User Guide
User Guide
Communications
Module
Voice and Video
Communication Systems
Last Revised: 12/03/2009
AMX Limited Warranty and Disclaimer
This Limited Warranty and Disclaimer extends only to products purchased directly from AMX or an AMX Authorized Partner which
include AMX Dealers, Distributors, VIP’s or other AMX authorized entity.
AMX warrants its products to be free of defects in material and workmanship under normal use for three (3) years from the date of
purchase, with the following exceptions:
•
Electroluminescent and LCD Control Panels are warranted for three (3) years, except for the display and touch overlay components are warranted for a period of one (1) year.
•
Disk drive mechanisms, pan/tilt heads, power supplies, and MX Series products are warranted for a period of one (1) year.
•
AMX lighting products are guaranteed to switch on and off any load that is properly connected to our lighting products, as long
as the AMX lighting products are under warranty. AMX also guarantees the control of dimmable loads that are properly connected to our lighting products. The dimming performance or quality there of is not guaranteed, impart due to the random combinations of dimmers, lamps and ballasts or transformers.
•
AMX software is warranted for a period of ninety (90) days.
•
Batteries and incandescent lamps are not covered under the warranty.
•
AMX AutoPatch Epica, Modula, Modula Series4, Modula CatPro Series and 8Y-3000 product models will be free of defects in
materials and manufacture at the time of sale and will remain in good working order for a period of three (3) years following the
date of the original sales invoice from AMX. The three-year warranty period will be extended to the life of the product (Limited
Lifetime Warranty) if the warranty card is filled out by the dealer and/or end user and returned to AMX so that AMX receives it
within thirty (30) days of the installation of equipment but no later than six (6) months from original AMX sales invoice date. The
life of the product extends until five (5) years after AMX ceases manufacturing the product model. The Limited Lifetime Warranty
applies to products in their original installation only. If a product is moved to a different installation, the Limited Lifetime Warranty
will no longer apply, and the product warranty will instead be the three (3) year Limited Warranty.
All products returned to AMX require a Return Material Authorization (RMA) number. The RMA number is obtained from the AMX
RMA Department. The RMA number must be clearly marked on the outside of each box. The RMA is valid for a 30-day period. After
the 30-day period the RMA will be cancelled. Any shipments received not consistent with the RMA, or after the RMA is cancelled, will
be refused. AMX is not responsible for products returned without a valid RMA number.
AMX is not liable for any damages caused by its products or for the failure of its products to perform. This includes any lost profits, lost
savings, incidental damages, or consequential damages. AMX is not liable for any claim made by a third party or by an AMX Authorized Partner for a third party.
This Limited Warranty does not apply to (a) any AMX product that has been modified, altered or repaired by an unauthorized agent or
improperly transported, stored, installed, used, or maintained; (b) damage caused by acts of nature, including flood, erosion, or earthquake; (c) damage caused by a sustained low or high voltage situation or by a low or high voltage disturbance, including brownouts,
sags, spikes, or power outages; or (d) damage caused by war, vandalism, theft, depletion, or obsolescence.
This limitation of liability applies whether damages are sought, or a claim is made, under this warranty or as a tort claim (including
negligence and strict product liability), a contract claim, or any other claim. This limitation of liability cannot be waived or amended by
any person. This limitation of liability will be effective even if AMX or an authorized representative of AMX has been advised of the
possibility of any such damages. This limitation of liability, however, will not apply to claims for personal injury.
Some states do not allow a limitation of how long an implied warranty last. Some states do not allow the limitation or exclusion of incidental or consequential damages for consumer products. In such states, the limitation or exclusion of the Limited Warranty may not
apply. This Limited Warranty gives the owner specific legal rights. The owner may also have other rights that vary from state to state.
The owner is advised to consult applicable state laws for full determination of rights.
EXCEPT AS EXPRESSLY SET FORTH IN THIS WARRANTY, AMX MAKES NO OTHER WARRANTIES, EXPRESSED OR
IMPLIED, INCLUDING ANY IMPLIED WARRANTIES OF MERCHANTABILITY OR FITNESS FOR A PARTICULAR PURPOSE. AMX
EXPRESSLY DISCLAIMS ALL WARRANTIES NOT STATED IN THIS LIMITED WARRANTY. ANY IMPLIED WARRANTIES THAT
MAY BE IMPOSED BY LAW ARE LIMITED TO THE TERMS OF THIS LIMITED WARRANTY. EXCEPT AS OTHERWISE LIMITED
BY APPLICABLE LAW, AMX RESERVES THE RIGHT TO MODIFY OR DISCONTINUE DESIGNS, SPECIFICATIONS, WARRANTIES, PRICES, AND POLICIES WITHOUT NOTICE.
AMX Software License and Warranty Agreement
•
LICENSE GRANT. AMX grants to Licensee the non-exclusive right to use the AMX Software in the manner described in this
License. The AMX Software is licensed, not sold. This license does not grant Licensee the right to create derivative works of the
AMX Software. The AMX Software consists of generally available programming and development software, product documentation, sample applications, tools and utilities, and miscellaneous technical information. Please refer to the README.TXT file on
the compact disc or download for further information regarding the components of the AMX Software. The AMX Software is subject to restrictions on distribution described in this License Agreement. AMX Dealer, Distributor, VIP or other AMX authorized
entity shall not, and shall not permit any other person to, disclose, display, loan, publish, transfer (whether by sale, assignment,
exchange, gift, operation of law or otherwise), license, sublicense, copy, or otherwise disseminate the AMX Software. Licensee
may not reverse engineer, decompile, or disassemble the AMX Software.
•
ACKNOWLEDGEMENT. You hereby acknowledge that you are an authorized AMX dealer, distributor, VIP or other AMX authorized entity in good standing and have the right to enter into and be bound by the terms of this Agreement.
•
INTELLECTUAL PROPERTY. The AMX Software is owned by AMX and is protected by United States copyright laws, patent
laws, international treaty provisions, and/or state of Texas trade secret laws. Licensee may make copies of the AMX Software
solely for backup or archival purposes. Licensee may not copy the written materials accompanying the AMX Software.
•
TERMINATION. AMX RESERVES THE RIGHT, IN ITS SOLE DISCRETION, TO TERMINATE THIS LICENSE FOR ANY REASON UPON WRITTEN NOTICE TO LICENSEE. In the event that AMX terminates this License, the Licensee shall return or
destroy all originals and copies of the AMX Software to AMX and certify in writing that all originals and copies have been
returned or destroyed.
•
PRE-RELEASE CODE. Portions of the AMX Software may, from time to time, as identified in the AMX Software, include PRERELEASE CODE and such code may not be at the level of performance, compatibility and functionality of the GA code. The
PRE-RELEASE CODE may not operate correctly and may be substantially modified prior to final release or certain features may
not be generally released. AMX is not obligated to make or support any PRE-RELEASE CODE. ALL PRE-RELEASE CODE IS
PROVIDED "AS IS" WITH NO WARRANTIES.
•
LIMITED WARRANTY. AMX warrants that the AMX Software (other than pre-release code) will perform substantially in accordance with the accompanying written materials for a period of ninety (90) days from the date of receipt. AMX DISCLAIMS ALL
OTHER WARRANTIES, EITHER EXPRESS OR IMPLIED, INCLUDING, BUT NOT LIMITED TO IMPLIED WARRANTIES OF
MERCHANTABILITY AND FITNESS FOR A PARTICULAR PURPOSE, WITH REGARD TO THE AMX SOFTWARE. THIS LIMITED WARRANTY GIVES LICENSEE SPECIFIC LEGAL RIGHTS. Any supplements or updates to the AMX SOFTWARE,
including without limitation, any (if any) service packs or hot fixes provided to Licensee after the expiration of the ninety (90) day
Limited Warranty period are not covered by any warranty or condition, express, implied or statutory.
•
LICENSEE REMEDIES. AMX's entire liability and Licensee's exclusive remedy shall be repair or replacement of the AMX Software that does not meet AMX's Limited Warranty and which is returned to AMX in accordance with AMX's current return policy.
This Limited Warranty is void if failure of the AMX Software has resulted from accident, abuse, or misapplication. Any replacement AMX Software will be warranted for the remainder of the original warranty period or thirty (30) days, whichever is longer.
Outside the United States, these remedies may not available. NO LIABILITY FOR CONSEQUENTIAL DAMAGES. IN NO
EVENT SHALL AMX BE LIABLE FOR ANY DAMAGES WHATSOEVER (INCLUDING, WITHOUT LIMITATION, DAMAGES
FOR LOSS OF BUSINESS PROFITS, BUSINESS INTERRUPTION, LOSS OF BUSINESS INFORMATION, OR ANY OTHER
PECUNIARY LOSS) ARISING OUT OF THE USE OF OR INABILITY TO USE THIS AMX SOFTWARE, EVEN IF AMX HAS
BEEN ADVISED OF THE POSSIBILITY OF SUCH DAMAGES. BECAUSE SOME STATES/COUNTRIES DO NOT ALLOW
THE EXCLUSION OR LIMITATION OF LIABILITY FOR CONSEQUENTIAL OR INCIDENTAL DAMAGES, THE ABOVE LIMITATION MAY NOT APPLY TO LICENSEE.
•
U.S. GOVERNMENT RESTRICTED RIGHTS. The AMX Software is provided with RESTRICTED RIGHTS. Use, duplication, or
disclosure by the Government is subject to restrictions as set forth in subparagraph ©(1)(ii) of The Rights in Technical Data and
Computer Software clause at DFARS 252.227-7013 or subparagraphs ©(1) and (2) of the Commercial Computer Software
Restricted Rights at 48 CFR 52.227-19, as applicable.
•
SOFTWARE AND OTHER MATERIALS FROM AMX.COM MAY BE SUBJECT TO EXPORT CONTROL. The United States
Export Control laws prohibit the export of certain technical data and software to certain territories. No software from this Site may
be downloaded or exported (i) into (or to a national or resident of) Cuba, Iraq, Libya, North Korea, Iran, Syria, or any other country to which the United States has embargoed goods; or (ii) anyone on the United States Treasury Department's list of Specially
Designated Nationals or the U.S. Commerce Department's Table of Deny Orders. AMX does not authorize the downloading or
exporting of any software or technical data from this site to any jurisdiction prohibited by the United States Export Laws.
This Agreement replaces and supersedes all previous AMX Software License Agreements and is governed by the laws of
the State of Texas, and all disputes will be resolved in the courts in Collin County, Texas, USA. For any questions concerning this Agreement, or to contact AMX for any reason, please write: AMX License and Warranty Department, 3000 Research
Drive, Richardson, TX 75082.
Table of Contents
Table of Contents
Using the Communications Module ....................................................................1
Overview .................................................................................................................. 1
Main Screen .............................................................................................................. 1
Using the Keypad to Place a Call .............................................................................. 3
Answering an Incoming Call...................................................................................... 3
Setup Screen............................................................................................................. 4
Adding a Contact to Your Phone Book ........................................................................... 5
Using Your Phone Book to Call a Contact ....................................................................... 6
Transferring a Call ........................................................................................................... 6
Monitoring a Touch Panel ............................................................................................... 6
Monitoring an Entry Communicator ................................................................................ 7
Setting the Image on the Entry Communicator............................................................... 8
Follow Me ................................................................................................................. 9
Adding an Extension ....................................................................................................... 9
Advanced Setup ..................................................................................................... 11
Modifying the Entry Communicator Settings ................................................................ 12
Voice Mail ............................................................................................................... 13
Communications Module User Guide
v
Table of Contents
vi
SIP Module User Guide
Using the Communications Module
Using the Communications Module
Overview
With a CSG Communications Gateway (FG2182-01, -02, -03), you can use an intercom-enabled touch
panel to place phone calls or communicate with another intercom-enabled touch panel or Metreau Entry
Communicator. Setting up your touch panel as a telephone requires that you set it up as one in the CSG
Communications Gateway configuration pages. Refer to the CSG Communications Gateway Operation/
Reference Guide and your touch panel’s manual for information on setting up your touch panel to work
as a telephone.
The Communications module acts as a phone agent to give touch panels and entry communicators phone
capabilities. The module provides basic telephony building blocks like call, answer, hang-up, and
transfer that enable the NetLinx master to create a customizable phone/intercom with the panel. Visit
www.amx.com for information on which touch panels are compatible with the CSG Communications
Gateway and the Communications module. Refer to the module documentation for details on
incorporating the module into your source code and loading it onto the NetLinx Master.
Main Screen
The Main screen contains most of the call functionality for the Communications module. Across the top
of the screen, there are several function buttons you can use to organize or call your contracts. The
options in the center of the screen vary according to the function button you press. Along the left side of
the screen are the call and panel options buttons.
Panel name
Call and panel options buttons
Function buttons
Index
Indicates the panel is connected
connected to a Communications Gateway
FIG. 1 Main screen
Communications Module User Guide
1
Using the Communications Module
The following options appear on the main screen:
Main Screen Options
2
Global PB
Displays all listings in the global phone book. The global phone book includes
all listings from all panels on the network.
Local PB
Displays all listings in the local phone book. The local phone book includes
only the listings on the panel you are currently using.
Keypad
Displays a keypad you can use to enter a phone number to call.
Voice Mail
Calls the voice mail for the extension of the touch panel. The Voice Mail button
blinks when you have a voice mail. See the Voice Mail section on page 13 for
more information.
Setup
Displays the Setup screen. See the Setup Screen section on page 4 for more
information.
Call
Initializes a call to the selected entry in the phone book or to the phone number
you enter in Keypad mode.
DND
Do Not Disturb. No calls or pages are accepted by the panel while in this mode.
Hold
Places an active call on hold. Pressing the button again takes the call off hold.
Redial
Dials the last number you called.
Transfer
Sends an active call to the selected phone book entry or to the phone number
you enter in keypad mode.
Flash
Switches between two connected calls.
Page All
Hold down this button to send a page to all panels. Release the button to stop
paging the panels.
Monitor
Press this button to monitor the panel you select from your phone book.
Monitor Entry
Press this button to monitor an entry communicator. When monitoring an entry
communicator, the images captured by the entry communicator’s video
camera stream onto the panel.
Volume
Use the slider bar to adjust the volume of the panel.
Mute
Press the mute button to turn off the volume on the panel.
Index
Displays all phone contacts. Press a letter in the alphabetic list to jump to the
corresponding entry in the list. If a contact beginning with the chosen letter
does not exist, you jump to the closest letter in the list.
Target icon
When the panel is connected to a communications gateway, a green target
icon appears in the lower right corner of the screen. If no target is present, the
panel does not have access to a communications gateway. Consult the CSG
Communications Gateway Operation/Reference Manual for more information.
Communications Module User Guide
Using the Communications Module
Using the Keypad to Place a Call
You can use your touch panel to place a call by using the keypad to manually enter a phone number. You
can manually enter a phone number on the Keypad screen (FIG. 2). Perform these steps to use the
keypad to place a call:
1. Press Keypad. The Keypad screen appears.
FIG. 2 Keypad screen
2. Use the keypad to enter the number you want to call.
3. Press Call. The number you entered is dialed.
An alternate method to place phone calls is by creating a phone contact list and dialing by accessing the
list. The following sections describe how to create a phone contact list and how to use it to place calls.
Answering an Incoming Call
When you receive an incoming call or someone presses the doorbell button at an entry communicator,
you have the option to answer the call or ignore it. An incoming call to your panel opens the Incoming
Call pop-up screen (FIG. 3). You can press the Answer button to accept the call or the Ignore button to
send the call to voice mail, if available.
FIG. 3 Incoming Call pop-up screen
Communications Module User Guide
3
Using the Communications Module
When the doorbell button is pressed at an entry communicator, your panel opens a pop-up screen
(FIG. 4) with options for the call. If no option is selected, the call terminates after 35 seconds.
FIG. 4 Entry Communicator Alert pop-up screen
The following options appear on the Entry Communicator Alert pop-up screen:
Entry Communicator Alert Pop-up Screen Options
Flash
Connects to the call at the entry communicator.
View
Streams the image from the camera on the entry communicator so you can see
who is at the door.
Ignore/Exit
Closes the pop-up screen without responding to the call.
Setup Screen
The Setup screen enables you to add or remove contacts from your panel’s phone book and make settings
adjustments to the entry communicator. You can access the Setup screen by pressing the Setup button.
The following options appear on the Setup screen:
Setup Screen Options
4
Phone Book Setup
Opens the Phone Book Setup screen which contains options to add, remove,
and modify contacts in your phone book.
Entry Communicator
Enables you to change the image that appears on the display on the entry
communicator. See the Setting the Image on the Entry Communicator section
on page 8 for more information.
Advanced Setup
Opens the Advanced Setup screen. See the Advanced Setup section on
page 11 for more information.
Communications Module User Guide
Using the Communications Module
Adding a Contact to Your Phone Book
Adding contacts to your phone book enables you to place calls to more quickly and easily. After adding
a contact to your phone book, you can view the list of contacts by pressing the Local PB button. The
following options appear on the Phone Book Setup screen:
Phone Book Setup Screen Options
Add New Contact
Opens the Add New Contact pop-up screen (FIG. 6). This pop-up screen does
not appear if the phone book is full.
Delete Contact
Enables you to select a contact to remove from the phone book. This option
only appears if you have at least one contact in the phone book.
Modify Contact
Opens the Modify New Contact pop-up screen. This option only appears if you
have at least one contact in the phone book.
These options for the Local Phone Book are identical to the options available for the Global Phone Book
(accessible from the Advanced Setup screen). Perform these steps to add a contact to your phone book:
1. Press Setup. The Setup screen appears.
2. Press Phone Book Setup. The Local Phone Book options appear (FIG. 5).
FIG. 5 Local Phone Book screen
3. Press Add New Contact. The Add New Contact pop-up screen appears (FIG. 6).
FIG. 6 Add New Contact pop-up screen
Communications Module User Guide
5
Using the Communications Module
4. Press the Name field to open an alphanumeric keypad. Using the keypad, enter the name of the
contact, and press Done to return to the Add New Contact pop-up screen.
5. Press the Number field to open a numeric keypad. Using the keypad, enter the phone number or
extension of the contact, and press Done to return to the Add New Contact pop-up screen.
6. Press Save. The contact now appears in your phone book.
To modify the entry, press Modify Contact on the Local Phone Book screen. The Modify Contact
pop-up screen appears. Repeat steps 4 through 6 to make any necessary changes.
Using Your Phone Book to Call a Contact
After adding contacts to your phone book, you can call any one of them by performing the following
steps:
1. Press Local PB. Your list of contacts appears in the center of the screen.
2. Press the contact you want to call.
3. Press Call. The panel dials the associated phone number.
Transferring a Call
You can transfer an active call to another phone number or contact in your phone book by pressing the
Transfer button. Perform these steps to transfer a call:
1. While on an active call, press Transfer. The panel’s phone book opens.
2. Select a contact from the phone book to which you want to transfer the call.
Monitoring a Touch Panel
You can use your touch panel to monitor another touch panel. Entry communicators cannot monitor
panels or other entry communicators. Perform these steps to monitor a touch panel:
1. Press Monitor. A pop-up screen opens with a list of panels.
2. Select a panel to monitor. FIG. 7 displays the message that appears on the panel you are monitoring.
FIG. 7 Message pop-up screen
6
Communications Module User Guide
Using the Communications Module
Monitoring an Entry Communicator
You can use a touch panel to monitor an entry communicator. When monitoring an entry communicator,
the images captured by the entry communicator’s video camera stream onto the panel. Perform these
steps to monitor an entry communicator:
1. Press Global PB. The Global Phone Book screen appears (FIG. 8).
FIG. 8 Global Phone Book
2. Press Monitor Entry. A pop-up screen opens with a list of entry communicators.
3. Select an entry communicator to monitor (FIG. 9).
FIG. 9 Select Entry Communicator
Communications Module User Guide
7
Using the Communications Module
The images captured by the video camera on the entry communicator stream onto the touch panel
(FIG. 10).
FIG. 10 Monitoring Entry Communicator
4. Press Exit to stop monitoring the entry communicator.
Setting the Image on the Entry Communicator
MET-ECOM-D model entry communicators have LED displays which can display various messages or
graphics. The Communications module enables you to easily select the image you want to display on the
LED. See the Metreau Entry Communicators Operation/Reference Guide for more information on
creating an image for the display.
FIG. 11 Set Image for Entry Communicators
8
Communications Module User Guide
Using the Communications Module
Perform these steps to set the image on the entry communicator:
1. Press Setup.
2. Press Entry Communicator. The Set Image for Entry Communicators screen appears (FIG. 11).
3. Press the corresponding entry communicator button repeatedly until you find the image you want.
Follow Me
Follow Me is a feature which allows a caller to reach you wherever you may be by forwarding your calls to a
list of predefined numbers until you are reached. If you cannot be reached, Follow Me transfers the caller to
your voicemail box.
FIG. 12 Follow Me
Adding an Extension
Follow these steps to add a Follow Me extention:
1. Press Setup.
2. Press Follow Me.
3. Press Add. The Add Follow Me pop-up appears (FIG. 13).
Communications Module User Guide
9
Using the Communications Module
FIG. 13 Add Follow Me pop-up
4. Use the numeric pad to enter an extension.
5. Press Done.
10
Communications Module User Guide
Using the Communications Module
Advanced Setup
The Advanced Setup screen enables you to set permissions for your panel and adjust the settings on your
entry communicator. FIG. 14 displays the Advanced Setup screen.
FIG. 14 Advanced Setup
The following options appear on the Advanced Setup screen:
Advanced Setup Screen Options
Allow this panel to be
Monitored
Toggles whether other panels can monitor this panel.
Allow this panel to Monitor
Toggles whether this panel can monitor other panels.
Disable all Entry
Communicators
Turns off all Metreau Entry Communicators. The Entry Communicators can still
be monitored by the panel, but no doorbell rings are heard by the panels.
Auto-Answer
Toggle whether you want the panel to automatically answer each incoming call.
Modify Door Adjustments
Enables you to change the settings on your Metreau Entry Communicator. See
the Modifying the Entry Communicator Settings section on page 12 for more
information.
Modify Global Phone Book
Enables you to make modifications to the global phone book. The options
available are identical to the options available for modifying the local phone
book.
Modify Panel Name
Enables you to change the name of the panel. Pressing this button opens an
alphanumeric keyboard screen you can use to enter the new name of the
panel. The panel name you enter is displayed in the global phone book of other
panels.
Reset all
Enables you to reboot all connected panels and entry communication devices.
Communications Module User Guide
11
Using the Communications Module
Modifying the Entry Communicator Settings
The Entry Communicator Adjustments pop-up screen enables you to change the microphone and
speaker levels in addition to other settings on your entry communicator. The following options appear in
the Entry Communicator Adjustments pop-up screen:
Entry Communicator Adjustments Pop-Up Screen Options
Mute buttons
Each corresponding turns off the sound from the microphone or speakers on
the entry communicator.
Volume arrows
The up-and-down arrows control the volume for the microphone and speaker
on the entry communicator.
Number Communicator will
Call
Sets the extension or phone number the entry communicator calls when its
doorbell button is pressed.
Disable Entry Communicator
Turns off the entry communicator. The Entry Communicator can still be
monitored by a touch panel, but no door rings are heard by the panel.
Follow these steps to modify your entry communicator settings:
1. Press Setup.
2. Press Advanced Setup. The Password pop-up screen appears (FIG. 15).
FIG. 15 Password pop-up screen
3. Enter the password, and press Done. The Advanced Setup screen appears (FIG. 14).
12
Communications Module User Guide
Using the Communications Module
4. Press Door Adjustments. The Entry Communicator Adjustments pop-up screen opens (FIG. 16).
FIG. 16 Entry Communicator Adjustments
5. Use the up-and-down arrows to adjust the microphone and speaker levels.
6. Press the Number Communicator will Call button to change the extension the communicator calls
when its button is pressed. A numeric keypad pop-up screen opens. Use the numeric keypad to enter
a new extension, and press Done.
7. Press the Disable Entry Communicator button to disable the entry communicator.
8. Press Done when you are finished changing the settings.
Voice Mail
The Voice Mail button at the top of the screen blinks whenever you have a voice mail. Pressing the voice
mail button accesses your voice mail and begins to play your messages.
Not all panels may be set up for voice mail. Voice mail for your extension is set up
while configuring the CSG Communications Gateway. Contact your administrator for
voice mail access and passwords.
Communications Module User Guide
13
Using the Communications Module
14
Communications Module User Guide
Using the Communications Module
Communications Module User Guide
15
12/09 ©2009 AMX. All rights reserved. AMX and the AMX logo are registered trademarks of AMX. AMX reserves the right to alter specifications without notice at any time.
It’s Your World - Take Control™
3000 RESEARCH DRIVE, RICHARDSON, TX 75082 USA • 800.222.0193 • 469.624.8000 • 469-624-7153 fax • 800.932.6993 technical support • www.amx.com