1
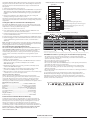
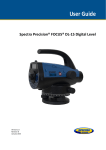
STOP!
This is an E-Maxx with a Castle Creations Brushless System pre-installed from the factory. It is designed to eliminate guesswork
and provide a truly Ready-To-Race® brushless powerhouse right out of the box. The E-Maxx is manufactured by Traxxas and is
backed by full Traxxas factory support. The installed Mamba Monster power system (electronic speed control, motor, on/off switch)
is manufactured by Castle Creations. All support for the power system will be handled directly by Castle Creations and will be
subject to Castle Creations’ warranty and service terms. Traxxas will not provide direct service and support for the installed
power system. If you cannot accept this product support arrangement, do not run the model or open any of the enclosed
materials. Return the model to your hobby dealer. Note that your hobby dealer absolutely cannot accept an item for return or
exchange after it has been run or is otherwise no longer in as-new condition.
The Power System is NOT WATERPROOF. Do not expose the power system to any type of water, condensation, or moisture.
Brushless Addendum
Quick Start Instructions
• Refer to supplied Castle Creations Mamba Monster instruction manual
for full operation details.
• Read and follow all operating instructions prior to running the model.
• The information on this addendum and in the Castle Creations Mamba
Monster instructions supersedes the information in the Traxxas E-Maxx
Owner’s Manual.
Your E-Maxx Brushless edition truck has been pre-programmed and
“bound” to the transmitter at the factory. Follow these instructions to
switch your model on:
1. Install the batteries in the transmitter as described in the E-Maxx
Owner’s Manual on page 11.
2. Install the batteries in the E-Maxx as described in the E-Maxx Owner’s
Manual on page 12.
3. Make certain the throttle trim
knob and throttle neutral
switch are set as shown (right).
4. Switch the transmitter on.
• Higher Speeds Require Greater Distance
The faster you drive your E-Maxx, the more quickly it will near the
limit of radio range. At 60mph, the truck will cover 88 feet every
second! It’s a thrill, but use caution to keep your model in range. If you
want to see your E-Maxx Brushless Edition achieve its maximum speed,
it is best to position yourself in the middle of the truck’s running area,
not the far end, so you drive the truck towards and past your position. In
addition to maximizing the radio’s range, this technique will keep your
model closer to you, making it easier to see and control.
No matter how fast you drive your E-Maxx, always leave adequate
space between you, the model, and others. Never drive directly
toward yourself or others.
• Slipper Clutch Break-In
The E-Maxx Brushless Edition’s slipper clutch requires a break-in
procedure to ensure consistent operation with the extremely high power
output of the included Castle Creations Mamba Monster brushless motor
system. The slipper clutch has been adjusted to the correct initial setting
for break-in. Follow these steps to ensure maximum performance and life
from your slipper clutch:
1. Make your first runs with the model using the stock gearing and 6- or
7-cell NiMH packs, or 2S LiPo packs.
Make sure the throttle
trim knob is centered.
Make sure the throttle
neutral is set to 50/50.
5. Switch the speed control on.
You will hear a short sequence of tones as ALL the LEDs blink.
The sequence will then repeat twice more, then the YELLOW LED
will remain illuminated.
6. With the E-Maxx’s wheels off the ground, confirm correct operation
of the throttle and steering system. Your E-Maxx is ready to drive.
ATTENTION! LiPo Battery Users
The E-Maxx Brushless Edition is programmed at the factory for use with LiPo
batteries. Your model will run properly with NiMH batteries. To obtain the
maximum performance from the included batteries refer to the Mamba
Monster manual included with your model for instructions on de-activating
the LiPo voltage cut off. If LiPo batteries are used be sure to reset the Mamba
Monster to the correct LiPo cutoff voltage for your batteries. Failure to
properly reset the Cutoff Voltage may lead to damage or failure of your LiPo
batteries. Never use LiPo batteries while Low-Voltage Detection is enabled.
• Make Sure The Axle Nuts Are Tight Before Each Run
Before operating your E-Maxx Brushless Edition,
take a moment to make sure the axle nuts are tight,
as they may have loosened during shipping. The
correct size axle-nut wrench is supplied with the
truck. Check the tightness of the axle nuts before
each run. The E-Maxx’s high speed and torque can
loosen the nuts over time if left unchecked.
2. Drive normally. The slipper clutch should slip momentarily when
accelerating aggressively on high-traction surfaces (you will hear a
whirring sound when the slipper clutch allows the spur gear to slip).
3. If excessive slippage is noticed (slipping that lasts for more than 3
seconds under hard acceleration), or the slipper clutch slips anytime
the throttle is applied at any lever, stop driving immediately. Let the
slipper clutch cool for 10-15 minutes. When the clutch is cool, testdrive the vehicle again. If you still experience excessive slippage, allow
the slipper to cool once more, then tighten the slipper nut ¼ turn (turn
the nut clockwise) and repeat the break-in process. Do not adjust the
slipper clutch before it has cooled. 4. Continue to run the vehicle and monitor slipper clutch performance as
noted above, and readjust if necessary. When the run is complete, the
slipper should be fully broken in.
After break-in, the slipper clutch is ready for any type of driving, with any
batteries up to 6S Lipo. Set the slipper clutch so it only slips for a moment
(if at all) under hard acceleration in high-traction conditions. If excessive
slippage is noticed, stop driving immediately. Continuing to drive with
a loose slipper will cause damage to the slipper unit. You must let the
slipper cool down to ambient temperature before tightening the slipper
nut and resuming driving.
TQ 2.4 Transmitter Binding Instructions
• Range-Testing the TQ2.4GHz Radio System
Before each running session with your model, you should range test your
radio system to ensure that it operates properly.
1. Turn on the radio system and check its operation as described on page
15 of the E-Maxx manual.
2. Have a friend hold the model securely by the wing and front bumper.
Make sure hands and clothing are clear of the wheels and other
moving parts on the model.
3. Walk away from the model with the transmitter until you reach the
farthest distance you plan to operate the model.
4. Operate the controls on the transmitter once again to be sure that the
model responds correctly.
5. Do not attempt to operate the model if there is any problem with the radio
system or any external interference with your radio signal at your location.
For proper operation, the transmitter and receiver must be electronically
‘bound.’ This has been done for you at the factory. Should you ever need
to re-bind the system, follow these instructions:
1. Install batteries in the E-Maxx and plug them into the speed control.
2. Press and hold the transmitter’s SET button as you switch transmitter
on. The SET LED will flash.
3. Press and hold the receiver’s SET button as you switch receiver on.
The SET LED will flash.
4. When both LEDs stop flashing (this will take just a moment or two),
the system is bound and ready for use. Confirm that the steering and
throttle operate properly before driving the model.
TQ 2.4 Transmitter Fail-Safe Operation
When bound to the transmitter, the 2.4GHz Micro Receiver automatically
sets its fail-safe position to throttle neutral. This means the receiver will
automatically return the throttle setting to neutral in the event of signal
loss due to interference, low battery power, or accidentally switching the
TRAXXAS. com
Traxxas, 1100 Klein Road, Plano, TX 75074, Phone: 972-265-8000, Fax: 972-265-8011, e-mail: [email protected]
KC1231-R02
091112
transmitter off while driving. When powered on, the receiver’s green LED
will glow to indicate Fail Safe mode is active. If the LED glows red, the Fail
Safe mode has been deactivated. Use these steps to reactivate the Fail
Safe system:
E-Maxx Brushless Gearing Chart
Spur Gear
1. Switch the transmitter and receiver on.
3. Release the SET button. The LED will now light green and glow
steadily, indicating Fail Safe mode is active.
Should you ever wish to deactivate the Fail Safe mode (for example, when
using a speed control that has its own Fail Safe circuitry), simply repeat the
steps above.
Pinion Gear
2. Press and hold the receiver’s SET button. The LED will flash once, then turn
off. Continue to hold the SET button. After about three seconds, the LED
will flash on and off. It will continue flashing as long as you hold the SET
button.
65
68
15
DNF
4.53
16
DNF
4.25
17
DNF
4.00
18
DNF
3.78
19 3.4225+mph
3.58
#5608 E-Revo
Brushless Edition
Pinion/Spur
3.40
20 3.25 18/65
Battery
21
Setting the TQ 2.4 Transmitter Throttle Endpoints
Nominal Voltage
The Traxxas TQ 2.4GHz radio system is pre-set at the factory and is ready
for use. If you wish to reprogram the receiver to make certain the throttle
endpoints are correctly set, follow the steps below.
mAh
1. Switch the transmitter and receiver on.
2. Press and hold the receiver’s SET button until the LED blinks red
once then switches off. Release the SET button.
3. Pull the throttle trigger to the full-throttle position and hold until the
receiver’s LED blinks red twice.
How Fast Do You Want To Go?
35+mph
40+mph*
50+mph
18/54
18/65
B Stock gearing
18/65
65mph
& Beyond
24/54 **
twin 6-Cell NiMH
(12 cell total)
twin 7-Cell NiMH
(14 cell total)
twin 2S LiPo
(4S total)
twin 3S LiPo
(6S total)
twin 3S LiPo
(6S total)
14.4V
16.8V
14.8V
22.2V
22.2V
4000+ mAh
5000+ mAh
5000+ mAh
5000+ mAh
3.10
22
Your Battery Selection and Pinion Gear
Selection Determines Your Speed.
3.24
NR
3000+3.09
mAh
Skill Level23
NR
DNF
24
NR
DNF
B
Optional included gearing (4S LiPo)
Recommended gearing for all battery types
Recommended gearing for 4S LiPo only
Not recommended
Does not fit
* With Included Optional Gearing
** 24T pinion not included. Optional gearing for high-speed running on smooth surfaces only.
E-Maxx Brushless Edition Recommended Speed Settings
4. Push the trigger to full brake and hold until the red LED blinks twice.
Your Battery Selection and Pinion Gear
Selection Determines Your Speed.
5. Return the trigger to neutral. The LED will blink three times then remain
on (the LED will shine green if Fail Safe is active, or red if Fail Safe is
disabled).
How Fast Do You Want To Go?
Note: although the vehicle will not respond to throttle commands during
this procedure, as a precaution it is recommended that the speed control
be unplugged from the receiver during programming.
Speed Control Programming Instructions
#3908 E-Maxx
Brushless Edition
Pinion/Spur
Battery
Nominal Voltage
mAh
The Castle Creations Mamba Max speed control should not need
reprogramming with normal use. However, if you install a different
radio system in your model, or change the transmitter’s throttleneutral setting from 50/50 to 70/30, you will need to reprogram the
speed control. Follow these instructions to reprogram the speed
control:
1.Install the batteries of your choice in the battery compartments and
plug the batteries into the speed control.
2. Switch on your transmitter.
3. Hold full throttle while you switch on the Mamba Monster controller.
After a few seconds, you will hear multiple tones and the
RED LED will light.
4. Hold full brake. After a few seconds, you will hear multiple tones
and the YELLOW LED will light.
5. Release the trigger to the neutral position. After a few seconds,
you will hear multiple tones and ALL THE LEDs will light.
6. Wait a few more seconds for the speed control to ‘arm,’ indicated by
a double-tone. You are now ready to drive.
Disconnect Batteries After Use
Always disconnect the batteries from the speed control when
you are finished using your vehicle. The switch on the speed control
only shuts off power to the receiver and servos. The speed control
continues to draw power as long as it is plugged in and may overdischarge your batteries if they are left connected to the speed control.
28+mph
25+mph
35+mph
40+mph*
50+mph
17/68
18/65
18/65
17/68
20/68
17/68
twin 6-Cell NiMH
(12 cell total)
twin 7-Cell NiMH
(14 cell total)
twin 2S LiPo
(4S total)
twin 3S LiPo
(6S total)
65mph
& Beyond
28/65 **
twin 3S LiPo
(6S total)
14.4V
16.8V
14.8V
22.2V
22.2V
3000+ mAh
3000+ mAh
5000+ mAh
5000+ mAh
5000+ mAh
Skill Level
* With Included Optional Gearing
** 28T pinion and 65T spur not included. Optional gearing for high-speed running on smooth surfaces with optional Talon tires only.
CAUTION: Read before operating your model with 65+mph gearing!
• The 28/65 ratio for use with 6S LiPo batteries is designed for maximum
speed on smooth surfaces only, with steady acceleration to full throttle and
optional Talon tires installed.
• Do not use this gear ratio for general driving.
• Avoid repetitive starting and stopping.
• Do not use the 28/65 ratio with NiMh batteries or low-capacity LiPo batteries.
5000mAh LiPo batteries are recommended.
• Allow the motor to cool between runs, and monitor motor temperature.
• Do not use the 28/65 gear ratio for off-road running or overheating and
damage may result.
• Do not allow the motor temperature to exceed 200° F or damage and motor
failure may result.
To accurately monitor motor temperature, Traxxas suggests the #4091
On-Board Temperature Gauge. The gauge features a large LCD screen, on/
off button for longer battery life, a min/max temp button, a Centigrade/
Fahrenheit button, and a clear Lexan splash guard. Visit your local dealer or
Traxxas.com for more information.
If you have questions or need technical assistance, call Traxxas at
Mamba Monster Specifications:
Cells..............................................................................18 NiCad / NiMH 6s LiPo
Continuous......................................................... More than you can handle!
Resistance..................................................................0.0003 Ohms per phase
Brake......................................................Proportional with adjustable curve
Reversible............................................................................... Yes - with lockout
Low Voltage Cutoff.................................................................. Programmable
Case Size......................................................................................2.2" x 1.9" x 1.4"
Weight with Wires.........................................................................................121g
Connector Type.............................................................................6.5mm bullet
1-888-TRAXXAS
(1-888-872-9927) (U.S. residents only)
Castle Creations Mamba Monster Warranty
Your Castle speed control is warrantied for one (1) year from date of
purchase to be free from manufacturing and component defects. This
warranty does not cover abuse, neglect, or damage due to incorrect
wiring, over-voltage, or overloading. If you have any questions,
comments or wish to return your Castle speed control for warranty or
non-warranty repair or replacement, please contact Castle Creations, Inc.
Castle Creations, Inc., 235 South Kansas Avenue, Olathe, KS 66061
Phone: (913) 390-6939, E-mail: [email protected]
www.castlecreations.com
TRAXXAS. com
Traxxas, 1100 Klein Road, Plano, TX 75074, Phone: 972-265-8000, Fax: 972-265-8011, e-mail: [email protected]