1
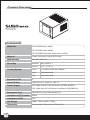
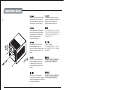
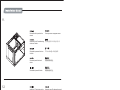
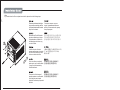
SUGO SERIES
SG05
Product Overview
SG05
Specification
Model No.
SST-SG05B (black, 300W)
SST-SG05W (white, 300W)
SST-SG05BB-450 (black, black interior, 450W)
Material
Plastic front panel, 0.6mm SECC body
Motherboard
Mini-DTX, Mini-ITX
Drive Bay
External
Slim optical x 1
Internal
3.5” x 1, 2.5”x 1
Front
1 x 120mm intake fan 1200rpm
Side
Oversized vents
Top
Oversized vents
Cooling System
Expansion Slot
2
Front I/O Port
USB2.0 port x 2, Audio x 1, MIC x 1
Power Supply
SFX 300W with 80 PLUS certification (SG05B, SG05W)
SFX 450W with 80 PLUS Bronze certification (SG05BB-450)
1
Expansion Card
Standard size long cards capable (9”)*
Limitation of CPU cooler
82mm
Limitation of PSU
SFX
Net Weight
300W: 3.52 kg, 450W: 3.58 kg
Dimension
222 mm (W) x 176 mm (H) x 276 mm (D)
Product Overview
Specifications of Power Supply
Max. DC Output 300W
Load Range
+3.3V
+5V
+12V1
+12V2
+5VSB
-12V
-5V
Max.(Amps)
20A
22A
14A
16A
2.5A
0.5A
-
Peak (Amps)
/
/
19A
19A
3A
-
-
Min.(Amps)
0.5A
0.5A
1A
1A
0A
0A
-
Range (%)
+/-5%
+/-5%
+/-5%
+/-5%
+/-5%
+/-5%
-
Ripple(mVp-p)
70mV
70mV
140mV
140mV
70mV
70mV
-
Combined +3.3, +5V
125W
Combined +12V
22A / 264W
Input Voltage
90V ~ 264V (Auto Range)
Connectors
1 x 24-pin motherboard connector (300mm)
1 x 4-pin ATX12V connector (400mm)
1 x 6-pin PCI-E connector (400mm)
1 x triple SATA connector (300mm +200mm +100mm)
1 x dual 4-pin IDE (300mm + 200mm)
1 x single floppy power connectors
(300mm + 200mm + 200mm)
Input Frequency Range 47Hz ~ 63Hz
PFC
Active PFC (PF>0.95 at full load)
Color
SECC
Efficiency
over 80% (20% to 100% loading)
Cooling System
Single 80mm fan
MTBF
100,000 hours at 25°C, full load
Noise Level
19 dBA minimum
Operating temperature
0 ~ 50°C
Dimension
125 mm (W) x 63.5 mm (H) x 100 mm (D)
Protection
Weight
Over current protection, Over power
protection,Over voltage protection, Short circuit Certification
940g
80 PLUS
Max. DC Output 450W
Load Range
+3.3V
+5V
+12V1
+12V2
+5VSB
-12V
-5V
Max.(Amps)
21A
22A
36A
-
2.5A
0.5A
-
Peak (Amps)
-
-
-
-
3A
-
-
Min.(Amps)
0.1A
0.2A
0.6A
-
0A
0A
-
Range (%)
+/-5%
+/-5%
+/-5%
-
+/-5%
+/-10%
-
Line Reg.(%)
+/-1%
+/-1%
+/-1%
-
+/-1%
+/-1%
-
Ripple(mVp-p)
70mA
70mA
140mV
-
70mV
140mV
-
Connectors
1
1
1
1
3
2
1
Active PFC (PF>0.95 at full load)
Color
Black(Lead-Free Paint)
Efficiency
82%~85%(20% to 100% loading)
Cooling System
Single 80mm silent fan
MTBF
100,000 hours at 25°C, full load
Noise Level
18dBA minimum
Operating temperature
10°C ~ 50°C
Dimension
125 mm (W) x 63.5 mm (H) x 100 mm (D)
Protection
Over current protection, Over power protection
Weight
1 kg
Certification
80 PLUS Bronze
Combined +3.3, +5V
120W
Combined +12V
36A / 432W
Input Voltage
90V ~ 265V
Input Frequency Range
47Hz ~ 63Hz
PFC
x
x
x
x
x
x
x
24 / 20-Pin motherboard connector(300mm)
8 / 4-Pin EPS / ATX 12V connector(400mm)
8/6-Pin PCIE connector(400mm)
6-Pin PCIE connector(550mm / 150mm)
SATA connector(300mm / 220mm / 100mm)
4-Pin Peripheral connector (300mm / 200mm)
4-Pin Floppy connector(300mm / 200mm / 200mm)
Over voltage protection, Under voltage protection
Short circuit protection
2
SLIM OPTICAL DRIVE (SOLD SEPARATELY)
3.5” HDD TRAY
3.5” HDD
(SOLD SEPARATELY)
PSU (300 / 450W)
2.5” HDD
(SOLD SEPARATELY)
TOP COVER
SLIM OPTICAL DRIVE TRAY
EXPANSION SLOTx 2
USB2.0
MOTHERBOARD (OPITON)
3.25 Bay
MIC.EARPHONE
12025 FAN
USB2.0
RESET BUTTON
POWER BUTTON
FILTER BKT
USB2.0 CONNECTOR
PICTURE
ITEM
SCREW A M2*2
PURPOSE
SECURE CD ROM
SCREW B M2*4
SECURE 2.5” HARD DEVICE
SCREW C M3*6
SECURE AND MOTHERBOARD
SCREW B M2*4
SECURE 3.5” HARD DEVICE
USB+5V
LP-
USB+5V
LP-
LP+
LP+
GND
GND
NC
PIN
PIN
POWER-CORD
-
FOOT-RUBBER
-
AC’97 CONNECTOR
MIC
MIC
AUD GND
MIC~BIAS
RET~R
PIN
RET~L
FPOUT~R
+5V
FPOUT~L
PIN
HD AUDIO CONNECTOR
WIRE TIE
-
AUD GND
PRESENCE
INSTALLATION GUIDE
-
SENSE1_RETURN
PIN
SENSE2_RETURN
PORTIL
PORT1R
PORT2R
SENSE_SEND
PORT2R
PIN
3
1.
Please remove the screws holding
the top cover with a screw driver,
then pull it toward the back to lift it
outward away from the chassis.
С помощью отвертки открутите
шурупы, удерживающие верхнюю
крышку, а затем снимите ее,
сдвинув назад и приподняв.
Bitte entfernen Sie die Schrauben
der oberen Abdeckung mit einem
Schraubenzieher und ziehen Sie
die Abdeckung nach hinten,
weg von dem Chassis.
상부 커버를 고정하고 있는 나사를
스크류 드라이버를 이용해 제거한 후,
뒤쪽으로 당겨 들어 올려, 케이스로
부터 제거합니다.
Veuillez retirer les vis tenant le
panneau supérieur avec un
tournevis, puis tirez-le vers l’arrière
afin de le soulever en dehors du
boîtier.
上部カバーを固定
しているネジをドライバーで外し、
カバーを後方に引いてケースから取
り外します。
繁体中文
Por favor, quite los tornillos que
sujetan la cubierta superior con
un destornillador, luego tire de
ella hacia atrás para quitarla del
chasis.
請以螺絲起子將鎖固上蓋的螺絲卸下,
並向後拉後提起以自機殼中取出.
简体中文
Rimuovere le viti del pannello
请以螺丝起子将锁固上盖的螺丝卸下,
superiore con un cacciavite, spingerlo 并向后拉后提起以自机箱中取出.
verso la parte posteriore e sollevarlo
per asportarlo dal telaio.
2.
Remove the screws holding the hard
drive bracket with a screw driver as
shown, then remove the cage
outward from the chassis.
С помощью отвертки открутите шурупы,
удерживающие кронштейн жесткого
диска, как показано на рисунке, и выньте
из корпуса корзину жесткого диска.
Entfernen Sie die Schrauben der
Festplattenhalterung mithilfe eines
Schraubenziehers wie abgebildet
und nehmen Sie die Halterung aus
dem Chassis.
하드디스크 브라켓을 고정하고 있는
나사를 스크류 드라이버를 이용해 그림과
같이 제거한 후, 케이지를 케이스
바깥으로 제거합니다.
Retirez les vis fixant le casier à
disques durs avec un tournevis
comme montré, puis retirez le
casier à l’extérieur du boîtier
図のようにハードディスクドライブブラケット
を固定しているネジをドライバーで外し、
ケースからケージを取り出します。
Retire los tornillos que sujetan el
bracket del disco duro con un
destornillador como se muestra,
luego saque la carcasa del chasis.
請依圖示先以螺絲起子將鎖固硬碟架的
螺絲卸下,再將硬碟架自機殼中取出.
繁体中文
简体中文
Rimuovere le viti che fissano la gabbia 请依图标先以螺丝起子将锁固硬盘架的
螺丝卸下,再将硬盘架自机箱中取出.
degli hard drive, quindi rimuoverla.
4
3.
Press the area as shown to release
the clips, then remove the front
panel.
Нажмите на указанные зажимы и
снимите переднюю панель.
Drücken Sie auf die Stelle wie
abgebildet, um die Klemmen zu
lösen und entfernen Sie die
Frontabdeckung.
그림에서와 같은 위치를 눌러 클립을
풀어준 후, 전면 패널을 제거합니다.
Appuyez sur la zone comme montré
pour détacher les clips, puis retirez
le panneau frontal.
図に示された場所を押してクリップを
開放し、フロントパネルを取り外します。
Presione la zona como se muestra
para soltar los enganches, luego
quite el panel frontal.
請依圖示輕按卡榫以卸下前面板.
Premere nell’area indicata per
sbloccare i fermi, quindi rimuovere
il pannello frontale
请依图示轻按卡榫以卸下前面板.
Remove the screws holding the
optical drive bracket with a screw
driver as shown, then remove the
bracket outward from the chassis.
С помощью отвертки открутите
шурупы, удерживающие кронштейн
оптического диска, как показано на
рисунке, и выньте кронштейн из корпуса.
Entfernen Sie die Schrauben der
Halterung für optische Laufwerke
mithilfe eines Schraubenziehers wie
abgebildet und nehmen Sie die
Halterung aus dem Chassis.
광드라이브 브라켓을 고정하고 있는
나사를 스크류 드라이버를 이용해
그림과 같이 제거 한후, 브라켓을
케이스 바깥쪽으로 제거합니다.
Appuyez sur la zone comme montré
pour détacher les clips, puis retirez
le panneau frontal.
図のように光学ドライブブラケットを
固定しているネジをドライバーで外
し、ケースからブラケットを取り外します。
Quite los tornillos que sujetan el
bracket del dispositivo óptico con un
destornillador como se muestra,
luego quite el bracket del chasis.
依圖示先以螺絲起子將鎖固光碟機架
的螺絲卸下,再將光碟機架自機殼中取出.
Rimuovere le viti che fissano il
supporto dei lettori ottici, quindi
rimuovere il supporto stesso.
依图标先以螺丝起子将锁固光驱架的
螺丝卸下,再将光驱架自机壳中取出.
繁体中文
简体中文
4.
繁体中文
简体中文
5
5.
Remove the screws as shown to
remove the slim optical drive cover.
Открутите шурупы, как показано на
рисунке, и снимите крышку тонкого
оптического привода.
Entfernen Sie die Schrauben wie
abgebildet und entfernen Sie die
Abdeckung des dünnen optischen
Laufwerks.
그림과 같이 나사를 제거해 슬림
광드라이브 커버를 제거합니다.
Retirez les vis fixant le casier du
lecteur optique avec un tournevis
comme montré, puis retirez le
casier à l’extérieur du boîtier
図のようにネジを外し、
光学スリムドライブのカバーを取
り外します。
繁体中文
Quite los tornillos como se muestra
para retirar la cubierta del dispositivo
óptico delgado.
請卸下圖示中的螺絲以將光碟機槽檔板
自機殼中取出.
Rimuovere le viti come mostrato
in figura per asportare il cover
del lettore ottico slim.
请卸下图标中的螺丝以将光驱槽文件板
自机壳中取出.
Remove the tab of optical drive
bay with a screw driver.
С помощью отвертки уберите накладку
отсека для оптического привода.
Entfernen Sie Klappe des optischen
Laufwerkschachtes mithilfe eines
Schraubenziehers.
스크류 드라이버를 이용해,
광드라이브 베이의 탭을 제거합니다.
Retirez l’attache de la baie du
lecteur optique avec un tournevis.
光学ドライブベイの
タブをドライバーで取り外します。
简体中文
6.
繁体中文
Tab
Quite la presilla de la bahía del
dispositivo óptico con un
destornillador.
請以螺絲起子折斷光碟機槽上的檔片.
Rimuovere la mascherina del bay
del lettore ottico con un cacciavite.
请以螺丝起子折断光驱槽上的文件片.
简体中文
6
7.
Install your motherboard into the
chassis as shown and secure with
included screws.
Установите материнскую плату в
корпус и закрепите ее прилагаемыми
шурупами.
Installieren Sie Ihr Motherboard im
Chassis und befestigen Sie es mit
den beiliegenden Schrauben.
그림과 같이 나사를 제거해 슬림
광드라이브 커버를 제거합니다.
Retirez l’attache de la baie du
lecteur optique avec un tournevis.
図のようにマザーボードをケースにインストールし、
付属のネジで固定します。
繁体中文
Instale su placa base en el chasis
como se muestra y asegúrela con
los tornillos incluidos.
將主機板裝入機殼內並以內附螺絲鎖固.
简体中文
8.
Posizionare la scheda madre nella
sua sede e fissarla con le viti in
dotazione.
将主机板装入机壳内并以内附螺丝锁固.
Install your slim optical drive
onto the bracket and secure
with included screws.
Установите тонкий оптический
привод в кронштейн и закрепите
прилагаемыми шурупами.
Installieren Sie Ihr dünnes optisches
슬림 광드라이브를 브라켓에 설치한
Laufwerk in der Halterung und
후 동봉된 나사로 고정시킵니다.
befestigen Sie es mit den beiliegenden
Schrauben.
Installez votre lecteur optique slim
sur le casier et fixez-le avec les vis
incluses.
光学スリムドライブをブラケットに
取り付け、付属のネジで固定します。
繁体中文
Instale su dispositivo óptico delgado
en el bracket y asegúrelo con los
tornillos incluidos.
將薄型光碟機裝入光碟機架並以內附
螺絲鎖固.
简体中文
Installare il lettore ottico slim nel
suo supporto e fissarlo con le viti
in dotazione.
7
将薄型光驱装入光驱架并以内附螺丝
锁固.
9.
Install your 2.5” hard drive onto the
optical drive bracket as shown and
secure with included screws.
(the maximum thickness of 2.5” hard
drive is 15mm).
Установите ваш 2,5-дюймовый жесткий
диск в кронштейн оптического привода,
как показано на рисунке, и закрепите
прилагаемыми шурупами.
(Максимальная толщина 2,5-дюймового
жесткого диска - 15 мм.)
Installieren Sie Ihre 2,5 Zoll Festplatte in
der optischen Laufwerkshalterung
wie abgebildet und befestigen Sie sie
mit den beiliegenden Schrauben.
(Die maximale Höhe der 2,5 Zoll
Festplatte ist 15mm.)
2.5” 하드 디스크를 그림에서와 같이
광드라이브 브라켓에 설치한 후 나사로
고정합니다. 2.5” 하드 드라이브의 최대
두께는 15mm 까지 설치 가능합니다.
Installez votre disque dur 2.5” sur le
casier du lecteur optique comme montré
et fixez-le avec les vis incluses.
(l’épaisseur maximum du disque dur
ne doit pas excéder 15mm).
図のように2.5”ハードディスクドライブを
光学ドライブブラケット上に取り付け、
付属のネジで固定します。
(2.5”ハードディスクドライブの最大厚さは15mm)
繁体中文
Instale su disco duro de 2,5” en el bracket
para dispositivos ópticos como se
muestra y asegúrelo con los tornillos
incluidos (el grosor máximo del disco
duro de 2,5” es de 15mm).
依圖示將您的2.5”硬碟裝入光碟機架上
並以內附螺絲鎖固
(2.5吋硬碟的最大厚度為15mm)
简体中文
Installare l’hard disk da 2,5” sul supporto
依图标将您的2.5”硬盘装入光驱架上并以
del lettore ottico come mostrato e fissarlo
内附螺丝锁固(2.5吋硬盘的最大厚度为15mm)
con le viti in dotazione. (il massimo spessore
supportato per hard disk da 2,5” è 15mm)
10.
Reinstall the optical drive bracket
into the chassis and secure with
screws (step 4)
Установите кронштейн оптического
привода в корпус и закрепите его
шурупами (шаг 4).
Installieren Sie die Halterung für
optische Laufwerke wieder im
Chassis und befestigen Sie sie
mit Schrauben (Schritt 4).
광드라이브 브라켓을 케이스에 재 설치한
후, 나사로 고정시킵니다. ( Step 4)
Réinstallez le casier du lecteur
optique dans le boîtier et fixez-le
avec des vis (étape 4)
光学ドライブブラケットをケースに戻
し、ネジで固定します。(ステップ 4)
繁体中文
Reinstale el bracket para dispositivos
ópticos en el chasis y asegúrelo
con tornillos (paso 4).
將光碟機架裝回機殼內並以步驟四卸下的
螺絲鎖固.
Reinstallare il supporto del lettore
ottico nello chassis e fissarlo con le
viti.
将光驱架装回机壳内并以步骤四卸下的
螺丝锁固.
简体中文
8
11.
Reinstall the front panel onto the
chassis.
Снова установите переднюю панель.
Installieren Sie die Frontabdeckung
wieder am Chassis.
전면 패널을 케이스에 재 설치합니다.
Réinstallez le panneau frontal sur
le boîtier.
フロントパネルをケースに戻します。
繁体中文
Reinstale el panel frontal en el
chasis.
將前面板裝回機殼上.
Reinstallare il pannello frontale.
将前面板装回机壳上.
Install your 3.5” hard drive onto the
bracket as shown and secure with
screws, then reinstall the bracket
into the chassis and secure with
screws.
Установите ваш 3,5-дюймовый жесткий
диск в кронштейн, как показано на
рисунке, закрепите его шурупами,
затем установите кронштейн обратно в
корпус и закрепите шурупами.
Installieren Sie Ihre 3,5 Zoll Festplatte
in der Halterung wie abgebildet und
befestigen Sie sie mit Schrauben.
Installieren Sie die Halterung wieder
im Chassis und befestigen Sie sie mit
Schrauben.
3.5” 하드 디스크를 그림에서와 같이
브라켓에 설치한후, 나사로 고정합니다.
이후, 브라켓을 케이스에 재 설치한 후,
나사로 고정시킵니다.
Installez votre disque dur 3.5” sur le
casier comme montré et fixez-le avec
des vis, puis remettez le casier dans
le boîtier et fixez le avec des vis.
図のように3.5”ハードディスクドライブをブラケットに
取り付け、ネジで固定します。
それからブラケットをケースに戻してネジで
固定します。
简体中文
12.
繁体中文
Instale su disco duro de 3,5” en el
請依圖示將您的3.5吋硬碟裝入光碟機
bracket como se muestra y asegúrelo 架上並以內附螺絲鎖固,再將光碟機架
con tornillos.
裝回機殼並以內附螺絲鎖固.
简体中文
Installare l’hard disk da 3,5” sul
supporto come mostrato e fissarlo con
le viti, quindi reinstallarlo nello chassis
e fissarlo con le viti.
9
请依图标将您的3.5吋硬盘装入光驱架
上并以内附螺丝锁固,再将光驱架装回
机箱并以内附螺丝锁固.
13.
Please remove the screws holding
the expansion card slot cover, and
remove it.
Открутите шурупы на крышке слота
карты расширения и снимите крышку.
Bitte entfernen Sie die Schrauben
der Expansionssteckplatzabdeckungen
und entfernen Sie sie.
확장슬롯 커버를 고정하고 있는 나사를
제거한 후 슬롯 커버를 제거합니다.
Veuillez retirer les vis fixant les
équerres des emplacements
d’extension, puis retirez-les selon
vos besoins.
拡張カードカバーを固定
しているネジを外し、カバーを取り外します。
繁体中文
Quite los tornillos que sujetan la
cubierta del zócalo de la tarjeta
de expansión y retírela.
請將鎖固擴充槽檔片的螺絲卸下,
再將擴充槽檔片卸下.
简体中文
Rimuovere le viti che che fissano
请将锁固扩充槽档片的螺丝卸下,
la mascherina dello slot delle
再将扩充槽档片卸下.
schede di espansione ed asportarlo.
14.
Install your graphics card or
expansion card.
Установите графическую карту или
карту расширения.
Installieren Sie Ihre Grafik- oder
andere Expansionskarte.
그래픽카드나 확장 카드를 설치합니다.
Installez vos cartes graphiques
ou d’extensions.
グラフィックスカードまたは
拡張カードをインストールします。
繁体中文
Instale su tarjeta gráfica o tarjeta
de expansión.
安裝您的顯示卡或擴充卡.
Installare la scheda grafica o la
scheda di espansione.
安装您的显示卡或扩充卡.
简体中文
15.
Reinstall the expansion card slot
cover and secure with screws.
Поместите на место крышку слота
карты расширения и закрепите ее
шурупами.
Installieren Sie die
Expansionssteckplatzabdeckung
wieder und befestigen Sie sie mit
Schrauben.
확장슬롯 커버를 재설치한 후 나사로
고정시깁니다.
Réinstallez la fixation des équerres
et fixez-le avec des vis.
拡張カードスロットカバーを戻
し、ネジで固定します。
繁体中文
Reinstale la cubierta del zócalo de
la tarjeta de expansión y fíjela con
tornillos.
裝回擴充槽檔片並以螺絲鎖固.
Reinstallare la mascherina e serrarlo
per mezzo delle viti.
装回扩充槽档片并以螺丝锁固.
简体中文
10
16.
After all cables and wirings are
connected, reinstall the top cover
and secure it.
Подключите все необходимые провода
и кабели, после чего поставьте на место
верхнюю крышку и закрепите ее шурупами.
Nachdem alle Kabel und Drähte
verbunden sind, installieren und
befestigen Sie wieder die obere
Abdeckung.
모든 케이블과 선들이 연결되었으면
상부 커버를 재 설치한 후 나사로
고정시킵니다.
Après avoir branché tous les câbles,
remettez le panneau supérieur et f
ixez-le.
全てのケーブルやリード線を接続
してから、上部カバーを元に戻してネジで
固定します。
繁体中文
Después de conectar todos los
cables, reinstale la cubierta superior
y fíjela.
請在確認所有線材都已正確連接後
裝回上蓋並以螺絲鎖固.
Dopo aver conesso tutti i cavi,
reinstallare il pannello superior e
fissarlo.
请在确认所有线材都已正确连接后装
回上盖并以螺丝锁固.
Attach the rubber standoff onto the
chassis appropriately as required.
Прикрепите к корпусу резиновые опоры.
Befestigen Sie den
Gummi-Abstandhalter am Chassis
wie benötigt.
고무 받침을 필요한만큼 케이스에
부착합니다.
Collez les pieds en caoutchouc
convenablement sous le boîtier
comme exigé.
必要に応じてケースにゴム製
スタンドを取り付けます。
简体中文
17.
繁体中文
Enganche la base de goma en el
chasis si es necesario.
依需求將橡膠腳墊適當地貼附於機殼上.
Applicare i piedini in gomma sul telaio.
依需求将橡胶脚垫适当地贴附于机箱上.
Installation complete.
Установка завершена.
Die Installation ist vollständig.
설치가 완료되었습니다.
Installation terminée.
インストール完了。
简体中文
18.
繁体中文
Instalación completa.
安裝完成.
Installazione completata.
安装完成.
简体中文
11
Notice
If you need to clean the filter or replace/remove the fan, please refer to the following steps:
1.
Please remove the screws holding the
top cover with a screw driver, and then
pull it toward the back and lift it outward
away from the chassis.
С помощью отвертки открутите
шурупы, удерживающие верхнюю
крышку, а затем снимите ее, сдвинув
назад и приподняв.
Bitte entfernen Sie die Schrauben
der oberen Abdeckung mit einem
Schraubenzieher und ziehen Sie
die Abdeckung nach hinten, weg
von dem Chassis.
상부 커버를 고정하고 있는 나사를 스크류
드라이버를 이용해 제거한 후, 뒤쪽으로
당겨 들어 올려, 케이스로 부터 제거합니다.
Veuillez retirer les vis fixant le
上部カバーを固定しているネジをドライバーで外
panneau supérieur avec un tournevis, し、カバーを後方に引いてケースから
puis tirez-le vers l’arrière afin de le 取り外します。
soulever en dehors du boîtier.
繁体中文
Quite los tornillos que sujetan la
請以螺絲起子將鎖固上蓋的螺絲卸下,
parte superior con un destornillador 並向後拉後提起以自機殼中取出.
y luego tire de ella hacia atrás y
levántela del chasis.
简体中文
请以螺丝起子将锁固上盖的螺丝卸下,
Rimuovere le viti che tengono il
pannello superiore con un cacciavite, 并向后拉后提起以自机箱中取出.
quindi spingerlo vesto la parte
posteriore e sollevarlo per asportarlo
dal telaio.
2.
Press the area as shown to release
the clips, then remove the front
panel.
Нажмите на указанные зажимы и
снимите переднюю панель.
Drücken Sie auf die Stelle wie
abgebildet, um die Klemmen zu
lösen und entfernen Sie die
Frontabdeckung.
그림에서와 같은 위치를 눌러 클립을
풀어준 후, 전면 패널을 제거합니다.
Appuyez sur la zone comme
montré pour détacher les clips,
puis retirez le panneau frontal.
図に示された場所を押してクリップを
開放し、フロントパネルを取り外します。
繁体中文
Presione la zona como se muestra
para soltar los enganches, luego
retire el panel frontal.
請依圖示輕按卡榫以卸下前面板.
Premere nell’area indicata per
sbloccare i fermi, quindi rimuovere
il pannello frontale.
请依图示轻按卡榫以卸下前面板.
简体中文
12
3.
Press the area as shown to remove
the filter.
Для того чтобы убрать фильтр,
нажмите на указанную область.
Drücken Sie die Stelle wie abgebildet,
um den Filter zu entfernen.
그림에서와 같은 위치를 눌러 필터를
제거합니다.
Appuyez sur la zone comme montré
pour détacher le filtre.
図に示された場所を押
してフィルタを外します。
繁体中文
Presione la zona como se muestra
para quitar el filtro.
請依圖示輕按以卸下濾網.
Premere nell’area indicate per
rimuovere il filtro.
请依图示轻按以卸下滤网.
Remove the 4 screws holding the
fan, and remove the fan from the
interior of the chassis. Then
reinstall the chassis by following the
previous steps in reverse order.
Открутите 4 шурупа, удерживающие
вентилятор, и выньте вентилятор из
корпуса. Затем соберите корпус,
проделав предыдущие шаги в
обратном порядке.
Entfernen Sie die 4
Befestigungsschrauben des Lüfters
und nehmen Sie den Lüfter aus dem
Chassis. Montieren Sie das Chassis
wieder, indem Sie die o.g. Schritte in
umgekehrter Reihenfolge durchführen.
팬을 고정하고 있는 4개의 나사를
제거한 후, 팬을 케이스 내부로 부터
제거합니다. 케이스 조립은 분해의
역순으로 하시면 됩니다.
Retirez les 4 vis fixant le ventilateur,
et retirez le ventilateur par l’intérieur
du boîtier. Puis remontez le boîtier
en suivant les étapes précédentes
dans l’ordre inverse.
ファンを固定しているネジ4本
を外し、ケースの内側からファンを
取り外します。その後は、逆の
手順でケースを元に戻します。
简体中文
4.
繁体中文
Quite los 4 tornillos que sujetan el 將鎖固風扇的四顆螺絲卸下後,
ventilador y luego retire el ventilador 自機殼內取出風扇。
del inter ior del cha s i s . Luego 再依照前述步驟反向安裝機殼.
reinstale el chasis siguiendo los pasos
previos en sentido inverso.
简体中文
Rimuovere le 4 viti che serrano la
将锁固风扇的四颗螺丝卸下后,
ventola e rimuoverla dal suo telaio, 自机箱内取出风扇。
quindi reinstallare il telaio seguendo 再依照前述步骤反向安装机箱.
i passaggi precedenti in ordine inverso.
13
July, 2010
G11212370