Transcript
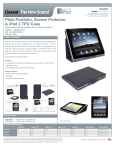
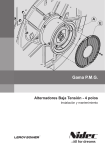
IMPORTANT: DO NOT SLIDE THE IPAD 2 IN! Please read instructions.
IMPORTANTE: NO LOS DESLICE EN EL IPAD 2! Por favor, lea las instrucciones.
IMPORTANT: N'Y FAITES PAS GLISSER IPAD 2! S'il vous plaît lire les instructions.
User Guide ISOUND-4582
PACKAGE CONTENTS:
• Plaid Portfolio
• Anti-glare Screen Protector
• User’s Guide/Warranty Card
• Registration Card
CONTENIDO DEL PAQUETE:
• Plaid Portfolio
• Protector de pantalla anti-reflejos
• Guía del usuario/
Tarjeta de garantía
• Tarjeta de registro
IMPORTANT: DO NOT SLIDE THE IPAD 2 OUT! Please read instructions.
IMPORTANTE: NO LOS DESLICE RETIRÁNDOLOS DEL IPAD 2! Por favor, lea las instrucciones.
IMPORTANT: N'Y FAITES PAS GLISSER IPAD 2.S'il vous plaît lire les instructions.
User Guide
CONTENU DU COFFRET:
• Plaid Portfolio
• Protecteur d'écran antireflet
• Guide d'utilisation/
Carte de garantie
• Carte d’enregistrement
ISOUND-4582
Thank you for purchasing the Plaid Portfolio! Installation and
removal of the iPad 2 is very easy once you get the hang of it.
Please follow the instructions below detailing the correct way to
insert and remove your iPad 2.
3
2
INSTRUCTIONS FOR INSTALLATION:
NOTE: The brackets are made to snap onto the iPad 2. Do not
slide in the iPad 2.
1. Place the bottom right corner of the iPad 2 into the bottom right
bracket of the Plaid Portfolio.
NOTE: The iPad 2’s speaker will line up with the Plaid Portfolio’s
speaker cut out.
2. Align the right side of the iPad 2 along the right bracket of the
Plaid Portfolio. Make sure the brackets are fully and tightly
covering the edges of the iPad 2.
1
3. Snap the top bracket of the Plaid Portfolio onto the top of the
iPad 2.
NOTE: Do not press the iPad 2 into the top bracket. Instead, pull
the bracket onto the iPad 2. Your fingers should be touching the
bracket and your thumbs on the iPad 2.
¡Gracias por comprar el Plaid Portfolio! La
colocación y la retirada del iPad 2 son muy
sencillas una vez que tenga práctica. Por
favor, siga las instrucciones que se dan a
continuación que detallan la forma correcta
de meter y sacar el iPad 2.
INSTRUCCIONES DE COLOCACIÓN:
NOTA: Los soportes están hechos
paraajustarse a presión sobre el iPad 2. No
los deslice en el iPad 2.
Nous tenons à vous féliciter pour votre
achat du Plaid Portfolio ! L'insertion et le
retrait de l'iPad 2 est très facile une fois
vous vous familiarisiez avec le produit.
Veuillez suivre les instructions ci-dessous
qui expliquent la façon correcte d'insertion
et de retrait de votre iPad 2.
INSTRUCTIONS D'INSERTION:
REMARQUE: Les supports se fixent su
iPad 2. N'y faites pas glisser iPad 2.
1. Coloque la esquina inferior derecha del
iPad 2 dentro del soporte inferior
derecho del Plaid Portfolio.
NOTA: El altavoz del iPad 2 estará
alineado con el recorte para el altavoz del
Plaid Portfolio.
1. Placez le coin inférieur droit de l'iPad 2
dans le support inférieur droit de l'étui
Plaid Portfolio.
REMARQUE: Le haut-parleur de l'iPad 2
s'aligne avec la découpe réservée au
haut-parleur dans l'étui Plaid Portfolio.
2. Alinee el lado derecho del iPad 2 a lo
largo del soporte derecho del Plaid
Portfolio. Compruebe que los soportes
cubren completa y firmemente los
bordes del iPad 2.
2. Alignez le côté droit de l'iPad 2 le long du
support droit de l'étui Plaid Portfolio.
Assurez-vous que les supports couvrent
complètement et de façon serrée les
bords de l'iPad 2.
3. Ajuste a presión el soporte superior del
Plaid Portfolio sobre la parte superior del
iPad 2.
NOTA: No empuje el iPad 2 dentro del
soporte superior. En su lugar, tire del
soporte sobre el iPad 2. Sus dedos
deberían tocar el soporte y sus pulgares
deberían estar sobre el iPad 2.
3. Fixez le support supérieur du Plaid
Portfolio sur la partie supérieur de l'iPad
2.
REMARQUE: N'enfoncez pas iPad 2 dans
le support supérieur. Faites plutôt glisser le
support dan iPad 2. Vos doigts doivent tenir
le support et vos pouces doivent pousser
iPad 2.
INSTRUCTIONS FOR REMOVAL:
NOTE: The brackets are made
to snap off the iPad 2. Do not
slide out the iPad 2.
1. Use both of your thumbs to
pop the top bracket off by
pushing it up and away.
2. Now you can easily remove
the iPad 2.
INSTRUCCIONES DE RETIRADA:
Los soportes están
hechos para liberarse a presión
del iPad 2. No los deslice
retirándolos del iPad 2.
NOTA:
1. Use sus dos pulgares para
liberar el soporte de la
presión empujándolo hacia
arriba y afuera.
2. Ahora puede sacar el iPad 2
fácilmente.
INSTRUCTIONS DE RETRAIT:
REMARQUE: Les supports se
fixent su iPad 2. N'y faites pas
glisser iPad 2.
1. Utilisez vos deux pouces pour
soulever le support supérieur
en le poussant vers le haut.
2. Vous pouvez maintenant
retirer facilement iPad 2.