1
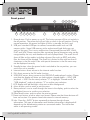
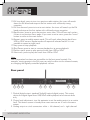
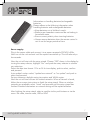
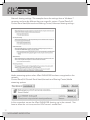
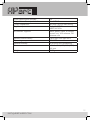
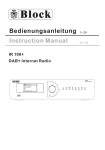
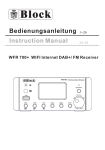
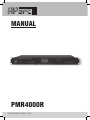
MANUAL
PMR4000R
1
[email protected]
Features
The APart PMR4000R is a professional multi source music player with integrated
FM RDS tuner, internet radio, UPnP and USB media player, compatible with MP3,
WMA, FLAC and WAV audio files. The unit is equipped with analog outputs,
optical digital output for the digital media player, wired Ethernet and Wifi 2.4G.
The unit can be remote controlled with the included handheld infrared remote
control. The maximum analog output level can be preset at the back to match the
output level of other audio sources. Because this device features a menu guided
setup and operation, it is very practical and user-friendly.
Important safety instructions
•Please check the packing for any kind of damage upon reception of the goods. If the
packing is damaged, please contact your dealer before opening it.
•Read all documentation before operating your equipment.
•Keep all documentation for future reference.
•Keep the carton and packing material, even if the equipment has arrived in good
condition.
•Should you ever need to send the unit back, use only the original factory packing.
•Do not spill water or other liquids on or into the unit.
•Make sure power outlets conform to the power requirements listed on the back of the
unit.
•Do not use the unit if the electrical power cord is damaged.
•Always operate the unit with the AC ground wire connected to the electrical system
ground.
•If there are high signal levels at the inputs, then please have gain controls on amplifiers
turned down during power-up to prevent speaker damage.
•Do not connect the inputs / outputs of amplifiers or consoles to any other voltage source,
Such as a battery, mains source, or power supply, regardless of whether the amplifier or
console is turned on or off.
•Power down and disconnect the units from the mains voltage before making connections.
•Do not use the unit near stoves, heat registers, radiators, or other heat-producing
devices.
•Do not remove the cover. Removing the cover will expose you to potentially dangerous
voltages.
•Do not drive the inputs with a signal level higher than that which is required to drive
equipment to full output.
•In case of malfunction this device should be serviced by qualified service personnel only.
2
WWW.APART-AUDIO.COM
Front panel
15
1
2
3
4
5
6
7
8
16 17 18 19 20
9
10 11 12 13 14
1. Power button. Push to power on or off. This button powers off the unit entirely in
the off position. The power led will not light up when in the off position. During
normal operation, the power led lights up blue, in standby, the led is red.
2. USB port: standard USB port to connect removable media such as USB
memory sticks. Some USB memory sticks and external hard disks may not
work on this port. This is not a malfunction. Recognized files are MP3, WMA,
FLAC and WAV. Please note that files containing special characters may not be
recognized by the unit, and therefore will not be played back. The scroll list will
show all files on the media, including unknown files such as JPEG and other
files, but these will be skipped. The scroll list is limited to files with less than 8
characters in the file name. Files with special characters in the file name may
not be displayed correctly.
3. Standby button: when the power knob is switched to the on position, you can
switch the unit to standby.
4. Internet button: direct access to the internet radio function.
5. FM: direct access to the FM radio function.
6. USB/UPnP server: direct access to the USB/UPnP media player function. Please
note that the display will show you both options: shared media = UPnP, USB
playback = USB. Use the rotary selector “9” to highlight “Shared media” or
“USB playback”, and push selector “9” to confirm your selection.
7. LCD display with led backlight: white text on blue background.
8. Menu button: push to enter or exit the menu.
9. Rotary selector: turn to scroll through the items in the display, push to select the
highlighted item or to confirm your selection.
10.Preset back button: push to select the previous preset.
11.Preset next button: push to select next preset. Please note that these buttons will
have no function if no presets have been stored in internal memory.
12.Info: Press the „INFO“ button repeatedly to browse through diverse
information. The type of information and whether information is displayed all
depends on the broadcasting station or connected media. The info button
works in all operating modes.
3
[email protected]
13.FM tune back: press to tune to a previous radio station: the tuner will search
down the FM band and stops at the first station with sufficiently strong
reception.
14.FM tune forward: press to tune to next station: the tuner will search up the FM
band and stops at the first station with sufficiently strong reception.
15.Back button: press to go to the previous menu item. This will have no function
if there is no previous menu page. If you want to exit a menu, press the “menu”
button to return to the main screen.
16.Repeat: press to enable repeat mode. This will work when playing back from
USB or UPnP servers. Repeat mode will repeat all selected tracks. It is not
possible to repeat a single track.
17.Stop: press to stop playback.
18.Play/Pauze: press to start or resume playback or to pause playback.
19.Previous track: press to play previous track from USB or UPnP.
20.Next track: press to play next track from USB or UPnP.
Note:
Not all operation functions are accessible via the front panel controls. For
example, storing presets in the FM tuner can only be done via the infrared remote,
or changing the digitally controlled playback volume.
Rear panel
1
2
3
4
5
6
7
8
1. Optical digital output: standard Toslink® optical digital output. This output
carries the digital signal from USB/UPnP media playback and internet radio
only.
2. Output level adjustment: turn this potmeter to set the analog output to a certain
level. This feature comes in handy when more sources are in use in the same
system.
3. Analog output on cinch connectors: white = left channel, red = right channel.
4
WWW.APART-AUDIO.COM
4. Network cable connector: connect to a normal computer network. For internet
radio playback, the network must have an accessible broadband internet
connection. The connector has 2 leds for diagnostic purposes: when connected
to a network, the green led will stay lit. When data is being transferred, the
orange led will blink.
5. Wifi antenna: connect the Wifi antenna here.
6. FM antenna: connect the standard FM antenna wire here. When you want to
connect the input to an antenna or cable distribution network, you need to
connect through a galvanic separation transformer designed for FM signals.
Never connect to a cable distribution network without separation transformer
because this may lead to unpredictable behavior and even system damage.
7. Mains fuse: replace only with a fuse of the same voltage and current rating:
250V/500 mAT
8. Mains inlet. Connect to a standard mains receptacle 230VAC/50-60Hz.
Getting started
FM Antenna:
Connect the tuner antenna using the wire antenna supplied with the unit. Under
normal conditions, the antenna will guarantee good reception of strong FM radio
stations. If necessary, connect to an amplified antenna or cable network using an
FM signal separation transformer. Never connect the antenna input to a powered
antenna or cable network without separation transformer. Failure to do so will
result in unpredictable behavior or even malfunction and system damage !
Signal output
Connect the analog output jacks to your system’s line input using standard RCA
cables. The analog output connectors carry the signals from the selected playback
media. Alternatively, connect the optical digital output to your digital playback
system. The optical digital jack is a standard Toslink® optical connector and
carries a digital SPDIF signal from the USB/UPnP/internet radio. Turn the output
level potmeter to a position that suits your needs.
5
[email protected]
Network:
Connect a standard RJ45 cable from your network router to the unit.
W-Lan:
For wireless operation, attach the antenna to the „Wi-Fi 2.4G Antenna“ connector
at the back of the unit. Your Wifi protection password may be required to access
the wireless network.
USB port:
Connect a standard USB memory stick here, formatted in FAT32 file system. Please
note that files and/or folders containing special characters in their names may not
be recognized by the unit, and therefore may not be played back. The scroll list will
show all files on the media, including unknown files such as JPEG and other files,
but these will be skipped. The scroll list is limited to files with less than 8 characters
in the file name. Files with special characters in the file name may not be displayed
correctly in the scroll list.
Example:
A music file with the name Aegaeis.mp3 will be recognized and played back.
The same music file with the name Aegäis.mp3 will not be recognized and will not
be played back because it contains an “ä”, this is a special character.
The same applies to files and folders with names containing more than 8
characters.
The information in the ID3 tag however will be displayed correctly.
The reproduction, duplication and copying of copyright protected material, as well
as the distribution,
circulation, public access to or even the rental of these, without explicit
authorization of the copyright holder, is strictly prohibited. The unit can only read
MP3, WMA, FLAC and WAV files.
Remote control:
The handheld infrared remote control requires two „AAA” batteries for operation.
Inserting/changing batteries:
Remove the battery compartment lid carefully.
Insert new batteries and ensure correct polarity, as graphically displayed inside the
compartment. Replace the battery lid carefully.
6
WWW.APART-AUDIO.COM
Information on handling batteries/rechargeable
batteries
Please adhere to the following information when
handling batteries and rechargeable batteries:
• Keep batteries out of children’s reach.
• Batteries are hazardous waste and do not belong in
household waste.
• Ensure correct polarity when inserting batteries.
• Always remove batteries when the remote control is
not in use for longer periods of time.
Power supply:
Plug in the power cable and connect it to a power receptacle 230V/50-60Hz.
Now turn on the unit and wait until the system has started up. This will take only a
few seconds.
Now the unit will start with the setup wizard. Choose “YES” shown in the display by
turning the rotary selector, highlight “Yes” and push the rotary selector to confirm
your selection.
Select the date time format: 12 hr or 24 hr time display, push to select, confirm
and proceed.
Auto update function: select “update from network” or “no update” and push to
select and proceed.
Set your timezone, daylight saving time option and WLAN region.
Now the unit will start to scan for wireless networks. When a network is found,
follow the on-screen instructions to finish the setup wizard. When no wireless
networks are available, select “wired” and proceed until the setup wizard has
finished. Detailed information on network settings will be explained below.
After finishing the setup wizard, select a module via the push buttons or via the
menu: FM radio, internet radio, USB or UPnP.
7
[email protected]
Music server: preparing the UPnP server(s)
UPnP technology can run on many media that support IP including ethernet. No
special device driver support is necessary. Common network protocols are used
instead. The UPnP architecture allows device-to-device networking of personal
computers, networked electronic devices and wireless devices. It is a distributed,
open architecture protocol based on established standards such as the Internet
Protocol Suite (TCP/IP).
A UPnP media server is the server (a ‘master’ device) that provides media library
information and streams media data (audio files) to UPnP-clients on the network. It
is a computer system or a similar digital appliance that stores supported music files
and shares these with other devices on the network.
In order to play music from a local network computer or device, you will have
to configure the computer or device to allow media sharing first. We will explain
how to set up the UPnP service on Windows 7 machines. Make sure that the UPnP
service and all network sharing related services are running, and check the sharing
settings in network and sharing center on your computer. Make sure the computer
and PMR4000R are connected to the same local area network and check the
settings of the router and media server.
In Windows 7: Control Panel\All Control Panel Items\Network and Sharing
Center\Advanced sharing settings:
Network discovery must be on.
File and printer sharing must be on.
Public folder sharing must be on.
Media streaming options: click “choose media streaming options”, when the
PMR4000R is connected to the same network and has received an IP address,
it will be shown in the list as follows: APart PMR4000R (followed by a unique
identifier). Select “Allowed” and save the changes. Click on “Customize” in the
dialog window and check the media streaming settings. Windows default sharing
settings do not always work as expected. Choose “Make all of the media in my
library available to this device” when in doubt.
When any of these settings is incorrect, the unit will not be able to discover your
media server(s) and shared media. Please note that redirected media folders
may not be detected by the UPnP device, depending on the network and firewall
settings implemented by network administrators. Storing the shared media folders
locally on the computer and adding them to your music library’s shared folders
may resolve this issue. Network firewalls may prevent accessing shared media. Ask
your network administrator for assistance in such cases.
8
WWW.APART-AUDIO.COM
Example:
The most commonly used UPnP server is Windows Media Player (Version 10
or later). Proceed as follows to set up media file sharing on most Windows 7
machines:
1. Make sure your PC is connected to the network and set it up as a UPnP server.
2. Ensure that the PMR4000R has been turned on and is connected successfully to
the same network.
3. Add supported audio files (MP3/WMA/FLAC or WAV) and/or folders you want
to share with your PMR4000R to your Windows Media Player’s media library.
Music player PMR4000R:
1. Select USB/UPnP-server.
2. Select Shared media: a list of connected UPnP servers will show up on the
display. If no servers are visible, check the settings on the computer or media
sharing device.
3. Select a server and click the rotary knob to confirm the selection. Select Music
or play lists and browse through the selection options. Always click on the rotary
selector to confirm your selection. Enjoy playback of the shared media files.
The reproduction, duplication and copying of copyright protected material, as well
as the distribution,circulation, public access to or even the rental of these, without
explicit authorization of the copyright holder, is strictly prohibited. The unit can only
read MP3, WMA, FLAC and WAV files from USB memory sticks and UPnP servers.
9
[email protected]
Network sharing settings. This example shows the settings from a Windows 7
computer and may be different from your specific system: Control Panel\All
Control Panel Items\Network and Sharing Center\Advanced sharing settings :
Media streaming options when APart PMR4000R has been recognized on the
network:
Control Panel\All Control Panel Items\Network and Sharing Center\Media
streaming options
In this screenshot we see the APart PMR4000R showing up in the network ! You
have to allow the unit to access the UPnP server’s media files !
10
WWW.APART-AUDIO.COM
Click “Customize” in the field showing the APart PMR4000R to check media
streaming settings.
Select “Make all of the media in my
library available to this device” instead
of “Use default settings”.
Normally this is optional, but when
your media files have been redirected
to a server location, or a network
connected hard disk (NAS), it may be
necessary to select this option.
It is possible to access media files and folders present on most so called network
drives (NAS). Consult the manuals of these devices to check if UPnP is supported
and how to configure media sharing. Usually the configuration settings of this kind
of network drives are accessible via a web browser.
UPnP is also supported on computers with other operating systems. Consult
the manuals or help files of these computers to figure out the settings for UPnP
operation.
The guidelines shown in this manual are for reference only and may differ from
your specific situation. Consult a network specialist or system administrator if you
fail to set up a UPnP server.
Basically the following rules are valid for computer based systems: check all
settings and start with basic troubleshooting. Don’t try to establish a UPnP system
if no network access is available, or if your router or computer firewall has been
set up to block all kinds of media sharing. Often, third party firewalls will prevent
access to media, making it difficult or even impossible to set up a working media
sharing system, even if the settings in your operating system or network look
perfectly ok. On some computers, services that are vital for UPnP operation have
been disabled for security reasons. Such machines can not be configured as UPnP
servers. Consult a computer or network specialist in these cases.
Some networks have restricted internet access. On such networks, internet radio
and/or UPnP operation may not be possible. When connecting to a network
via Wifi, make sure the unit is set up close to the wireless transmitter. Weak Wifi
reception usually results in limited connectivity and insufficient bandwidth. By
default, the PMR4000R may not detect weak Wifi access points. Consider using
wired Ethernet in case of doubt.
11
[email protected]
Connecting PMR4000R to a network:
You need a network connection via a wired or wireless router for “Internet radio“
and “UPnP” operation modes. The router must have a broadband internet
connection for internet radio operation and to perform software updates.
When you select “Internet radio“ or “UPnP” mode, PMR4000R will try to connect
to a network. If this is the first time that a connection has been made or previously
accessed networks are not accessible, then the “Network Wizard” will start. To
start the “Network Wizard” manually, select the following:
MENU > System settings > Network > Network Wizard
Once started you can enter the following information:
W-LAN region (select a country/select a region from the list)
Network name (select the desired network). An encrypted wireless network will
require a password.
Enter the network password: use the rotary control to move the cursor through the
displayed characters. Press the rotary control to confirm the selected character.
Select “BKSP“ to delete the last character selected.
Select “CANCEL“ to cancel your input.
Select “OK“ to confirm the entered name/code and to try to establish a connection
to the selected network.
The unit will return to the password entry window if no connection could be
established.
If your wireless router has a feature called “push button configuration”, you can
access the “PBC Wlan setup” menu on PMR4000R. Follow the instructions shown
on the display to proceed and finish automatic wireless setup. Please note that this
feature requires a PBC compatible Wlan router. Consult the manual of your Wlan
router if necessary.
Manually connecting to a network:
In the Main menu/System settings/Network/Manual settings you can select wired
or wireless setup.
All parameters must be entered manually, available networks are not shown. Use
the network setup wizard if you want to be able to select available networks.
Manual setup gives you access to more network specific parameters:
Select the preferred connection: wired or wireless.
Select if the Direct Host Configuration Protocol (DHCP) is to be used:
12
WWW.APART-AUDIO.COM
• DHCP enable: activates use and switches on the automatic reception of network
data.
• DHCP disable: deactivates use and carries on with the manual entry of network
data.
• IP settings: set the IP address and the subnet mask.
• Gateway address: set the gateway address.
• DNS: set the primary and secondary DNS address.
• SSID: set the wireless network identification.
• Authentication: set the preferred method of authentication: Open, Pre-shared
key (PSK), Wifi protected access (WPA) or WPA2.
• Encryption type: select the appropriate encryption type: Disabled (off) or
WEP (Wired equivalent Privacy) for open or PSK. TKIP (Temporal Key Integrity
Protocol) or AES (Advanced Encryption Standard).
• Key: now enter the code for the wireless network.
Entering names is done via the rotary control: highlight a character and press the
rotary control to enter the highlighted character.
• Select “BKSP” to delete the last character selected.
• Select “CANCEL” to cancel your input.
• Select “OK” to confirm and store the characters you entered.
Network profile:
If for any reason you want to delete a previously used network profile, enter the
main menu/system settings/network/network profile and selected the network
profile you want to delete. Press the rotary control to confirm the selection. The
network profile will be deleted.
Internet radio:
The internet radio allows you to listen to numerous internet radio stations
worldwide. Broadband internet access and a wired or wireless network connection
are necessary to use this feature.
You can store presets for easy access without the need to go through all possible
selection parameters. The last selected radio station will be maintained when
powering off the unit. A list of recently selected radio stations is also stored for easy
access to previously accessed stations.
Storing a radio station to memory:
10 memory presets are available for storing. Tune to an internet radio station.
Press and hold a numeric key 1 to 10 on the handheld remote until “Preset stored”
13
[email protected]
appears on the display. When the memory location was already occupied, the unit
will overwrite the selected location without further notification.
Selecting a preset: briefly press a numeric button on the remote or push
“<<PRESET” or “PRESET>>” on the unit’s front panel to select a preset. This
function is available only if more than one radio stations have been stored in the
internal memory.
Station information: Press the “INFO“ button repeatedly to browse through diverse
information. The type of information and whether information is displayed all
depends on the selected broadcasting station.
Search for a radio station:
Switch to internet radio. Make sure a network connection has been established
and broadband internet access is available.
Enter the menu/station list/stations.
You can now select a station based on location, genre, popularity and recently
added. Browse through the various options and select a station.
Internet radio portal:
The internet radio portal allows you to listen to internet radio through your
computer and lets you organize your favourite stations in folders.
The portal is free of charge.
To register your unit on this portal, you need an access code:
Search for the access code on your PMR4000R: in internet radio operation mode,
press the menu button, select “Station List”, scroll down to “Help” and select “Get
Access code”.
The unit now shows a code on the display. Write it down, you will need it to register
the unit on the web portal.
On your computer, open your web browser and enter this URL:
www.wifiradio-frontier.com
If this is your first visit, you will need to register by creating a login and a password.
Enter a valid email address and create a password, enter the access code from the
unit. Model name is : Jupiter
Confirm your data entry. Your account will be created instantly.
You can now browse internet radio stations online via the web portal, add them to
14
WWW.APART-AUDIO.COM
your favorites and organize the added stations in folders.
These folders and favourite stations will immediately show up on your PMR4000R.
To access the added favorites, press the menu button, select “Station List”, “My
Favourites”.
Now the folders with the added favourite stations you created online will show up
on the unit. You can select them via the Menu/Station List/My Favourites.
Please note that it is possible to create a new login, with a new access code. All
previously added stations will be lost and replaced by the last login you created for
the specific unit. The PMR4000R will automatically generate a new access code.
On the website, you can edit your login preferences, add another internet radio
unit to your account or synchronize your favourites with another internet radio unit.
General functions:
Software upgrade: you can search for a software update manually: enter the
menu, system settings, software update. You can also use the Auto-check setting.
When a new software version is available, you will be asked to download and
install it on the unit. By performing a software upgrade, all user settings are
maintained. Do not unplug the unit or power it off during a software upgrade.
Doing so will cause the unit to stop working.
Factory reset: If for any reason you would like to change the settings and want to
start all over again, press “menu”, scroll down to “System settings”, “Factory reset”
and select yes. Press the rotary selector to confirm. The unit will restart and will ask
you to start the setup wizard. Select “no” if you want to set up the unit manually.
Select “yes” for standard guided setup.
Note: If you have registered the unit on the internet portal, the registration will be
maintained.
Language: Select system settings, Languages and select the language that suits
you best. Available languages are: English, German, French, Italian and Spanish.
Time: select system settings, time/date and configure the time settings.
You can choose to automatically set the time from the internet or from radio.
Alternatively, enter the time and date manually. You can determine your time zone,
format and daylight saving settings here.
We advise you to set the time setting to automatic and to select the update from
network function if a broadband internet connection is available.
15
[email protected]
Remote control: the handheld remote control allows you to control all basic
features of the unit via infrared.
You will also need the remote to store FM radio and internet radio presets.
Additionally, you can control the unit’s volume digitally via the remote. Please note
that the volume setting will always be set to the max setting after cycling the power
or waking up the unit from standby. The maximum analog output level can be
preset using the volume knob at the back of the unit. Set the volume knob to adjust
the analog output level of the PMR4000R to be equal to the level of other sound
sources in your system.
Equalizer: the equalizer function is available on all modules. Set the equalizer to
suit your taste. Various presets are available. These presets can not be edited,
except the “My EQ” setting.
FM radio operation:
Press the FM button or select “FM“ in the main menu for FM radio operation.
Tuning to available radio stations:
Press the “FM TUNE>>|“ or “|<<FM TUNE” to start an automatic station search.
The search function will stop, once a station has been found. To interrupt the
automatic search function, press the encoder while the unit is searching.
You can manually correct the frequency gradually in 0.05 MHz steps by turning the
rotary encoder.
To access additional radio settings: press the “MENU” button:
Scan setting: Search for strong stations only “Yes or No”.
Audio setting: Listen in mono only “Yes or No”. Listening in mono is a viable
option when listening to a weak station. It will help to reduce reception noise.
Storing a radio station to memory:
10 memory presets are available for storing. Tune to a radio station. Press and
hold a numeric key 1 to 10 on the handheld remote until “Preset stored” appears
on the display. When the memory location was already occupied, the unit will
overwrite the selected location without further notification.
Selecting a preset: briefly press a numeric button on the remote or push
“<<PRESET” or “PRESET>>” on the unit’s front panel to select a preset.
16
WWW.APART-AUDIO.COM
This function is available only if more than one radio stations have been stored in
the internal memory.
Station information: Press the “INFO“ button repeatedly to browse through diverse
information. The type of information and whether information is displayed all
depends on the selected broadcasting station.
Note: for improved reception of weak FM radio stations, you can use an amplified
indoor or outdoor antenna (available in specialized shops). When an FM cable
network is available, it is possible to connect the unit to the cable network. Please
beware ! Amplified antennas or cable networks can cause severe ground loops,
and often foreign voltages are present on the signal lines.
In all cases, it is mandatory to use an FM separation transformer (available in
specialized shops) to galvanically separate the PMR4000R and all other units in
the audio chain from the external antenna or cable network. Failure to do so will
result in unpredictable behavior and might cause damage to the PMR4000R and
any other device connected to the system !!!
17
[email protected]
Technical specifications
USB/UPnP
Supported audio codecs
USB memory file system
USB memory capacity
S/N ratio
THD
Frequency range
MP3 32-320 kbps and variable
bitrate, WMA, FLAC, WAV, ID3
tags support
FAT, FAT32
up to 128GB
>90dB
<0.05%
20Hz - 20KHz
FM tuner
tuning range
Nr of presets
Sensitivity (26dB S/N) @ 75Ω unbalanced
Channel selectivity (67.5KHz)
Tuning step size
Audio S/N ratio FM
Audio bandwith +/-1.5dB
THD
Stereo separation
87.5 - 108MHz
10
1.0µV
40dB
50KHz
50dB
30 - 15KHz
<0.3%
>40dB @ 1KHz
Internet radio
Audio streams
Customizable favourites
Nr of presets
MP3 / WMA
via web portal
10
Wifi
2.4GHz
Authentication
Channels
802.11g
Open, Pre-shared key (PSK),
Wifi protected access (WPA) or
WPA2
selectable per country
Ethernet
Connector
standard RJ45 network port
General
Power supply
Power consumption
18
WWW.APART-AUDIO.COM
230 VAC/50Hz
max 30VA
Power consumption standby
Adjustable audio output level
Output impedance
Digital output
Accessories supplied
Remote control battery
Operating temperature
Relative humidity
Dimensions
Weight
1W
0 to 1VRMS
less than 1KΩ at max setting
Toslink® SPDIF format
16BIT/44.1KHz
Mains power cable, IR remote
control unit, Wifi antenna, FM
antenna wire
2 pcs type AAA type LR03
10-40°C
10 to 80% non-condensing
LxWxH: 484 (430)x325 (300)
x44 mm
3850g
19
[email protected]
ANY SUGGESTION?
They are well appreciated and eventually rewarded!
Send your ideas or suggestions to
[email protected]
Warranty info
APart-Audio warrants this product to be free of defects in material and workmanship for a period of
one year for parts and for a period of one year for labor from the date of original end-user purchase.
This warranty is valid only for the original end-user and cannot be transferred.
During the warranty period APart-Audio or one of its authorized service partners shall either repair
or replace any product, free of charge, that proves to be defective on inspection by APart-Audio or its
authorized service representative.
This warranty does not include, damages or product faults due to abuse, misuse or faulty installation.
Company names, product names, and names of formats etc. are the trademarks or registered
trademarks of their respective owners.
© 2011 APart-Audio specifications subject to change without notice.
developed by
Audioprof nv
Industriepark Brechtsebaan 8 bus 1
2900 Schoten
Belgium
20
WWW.APART-AUDIO.COM