1
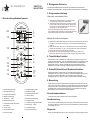
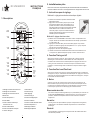
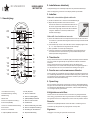
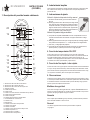
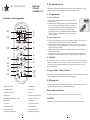
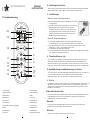
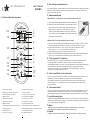
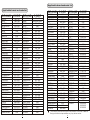
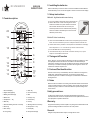
RC UNI/AIRC03
ENGLISH
INSTRUCTIONS
2. Installing the batteries
Remove the battery cover of the remote control and install two AA size batteries.
Install the battery cover. The time will appear in the left corner of the LCD display.
3. Set up instructions
Method A: digital automatic search set up.
1. Panel description
1
2
3
20
19
4
18
5
6
17
7
8
16
15
9
10
11
12
14
13
a) Turn on air conditioner and aim the remote control directly at it
b) Hold the "SET" button until the code changes in the mode
window.Then release it.The system will switch to automatic
search and the code will increase with 1 unit every two
seconds.Pay attention to the air conditioner.Keep searching
until the air conditioner automatically turns on/off. Press the
'ENTRY'key to finish set up.
Method B: direct code setup.
a) Refer to the CODE FORM and find the number corresponding with your brand.
Power on the air conditioner by hand. For example: INYCIN is code 188-190.
b) Hold the "SET" button( for about 3 seconds) until the code flashes in the display.
Press temperature "+" or "-" until the code you want to choose is shown.
c) Press “ENTER” and the code stops flashing.
d) Check whether the keys on the remote control work normally. If not, repeat
steps b-d until a suitable code is found.
4. Timing on/off function
Press “Timing on” key to increase the starting time for the air conditioner by 1 hour.
The displayed time is the time when the air conditioner will automatically be
switched on. Pressing “Timing off” key will delay the time the air conditioner will be
turned off by 1 hour each time the key is pressed. The timing function uses a 15 h
indication to show and set up the time.
5. Fast cool/Fast heat function
Press the “Fast cool” key to automatically set the air conditioner to 21 degrees C,
middle wind, automatic blowing direction. Or, press the “Fast heat” key to
automatically set the air conditioner to 27 degrees C, middle wind and automatic
blowing direction.
6. Notes
Make sure the air conditioner is in working order. Be aware that the remote control
cannot increase the function of the air conditioner. If the remote control will not be
used for a long time, make sure to remove the batteries to prevent damage to the
remote control.
1 Run mode display
11 Enter key
2 Signal sending display
12 Clock function key
3 Blowing direction display
13 SET
4 Model code
14 Timing on key
5 Temperature “-“ key
15 Fast heat key
6 Mode key
16 Fan key
7 Automatic blowing direction control key
17 Blowing direction control key
8 Power key
18 Temperature “+” key
9 Fast cool key
19 Fan display
10 Timing off key
20 Temperature display
Safety precautions:
To reduce risk of electric shock, this product should ONLY be opened by an
authorized technician if service is required. Disconnect the product from mains and
other equipment if a problem should occur.
Warranty:
No guarantee or liability can be accepted for any changes and modifications of the
product or damage caused due to incorrect use of this product.
General:
Designs and specifications are subject to change without notice.
1
2
RC UNI/AIRC03
DEUTSCH
ANLEITUNG
2. Einlegen der Batterien
Schieben Sie das Batteriefach auf und legen Sie 2 Batterien der Größe AA ein.
Schließen Sie das Batteriefach. Die Zeit erscheint in der linken Ecke im LCD Display.
3. Programmieranleitung
Methode A: automatische Suche
1. Beschreibung Bedienelemente
1
2
3
20
19
4
18
5
6
17
7
8
16
15
9
10
11
12
14
13
a) Schalten Sie die Klimaanlage ein und halten Sie die
Fernbedienung in Richtung der Klimaanlage.
b) Halten Sie die "SET" Taste bis der Code sich im Modus
Fenster ändert. Dann die Taste loslassen. Das System
schaltet dann in die automatische Suche und der Code
erhöht sich um 1 alle zwei Sekunden.
Achten Sie auf die Klimaanlage. Suchen Sie solange bis
sich die Klimaanlage automatisch ein/ausschaltet. Drücken
Sie die Taste 'ENTRY' um das Setup abzuschließen.
Methode B: direkte Code Eingabe
a) Schauen Sie in die CODE-FORM und suchen Sie die entsprechende Nummer für
Ihre Marke. z.B.: INYCIN ist Code 188 - 190. Schalten Sie das Klimagerät per
Hand ein.
b) Halten Sie die "SET" Taste ( für ca. 3 Sekunden) bis der Code im Display blinkt .
Drücken Sie Temperatur "+" oder "-" bis der gewünschte Code angezeigt wird.
c) Drücken Sie “OK” und der Code hört auf zu blinken.
d) Überprüfen Sie, ob alle Funktionen bedient werden können. Wenn nicht,
wiederholen Sie Schritt b-d solange, bis der richtige Code gefunden wurde.
4. Timer Ein/Aus Funktion
Drücken Sie die Taste “TIME ON” um die Startzeit um 1 Stunde zu erhöhen. Die
angezeigte Zeit ist die Zeit, zu der das Klimagerät automatisch eingeschalten wird.
Das Drücken der Taste “TIME OFF” verschiebt die Zeit zu der das Klimagerät
abgeschaltet wird um 1 Stunde, jedes Mal wenn die Taste betätigt wird. Die
Zeitfunktion verwendet zur Anzeige und Einstellung der Zeit eine 15h Anzeige.
5. Schnell Kühlen/Schnell Erwärmen Funktion
Drücken Sie die Taste “FAST COOL” zur automatischen Einstellung des
Klimagerätes auf 21°C, mittlerer Luftstrom, automatische Gebläserichtung. Oder,
drücken Sie die Taste “FAST HEAT” zur automatischen Einstellung des
Klimagerätes auf 27°C, mittlerer Luftstrom und automatische Gebläserichtung.
6. Bemerkung
1 Betriebsmodus Anzeige
11 OK (Bestätigung) Taste
2 Übertragungsanzeige
12 Zeitfunktion Taste
3 Luftstromstärke Anzeige
13 Programmiertaste “SET”
4 Modell Code Anzeige
14 Timer An Taste
5 Temperatur “-“ Taste
15 Schnell Erwärmen Taste
6 Betriebsmodus Taste
16 Ventilator Taste
7 Automatische Luftstromrichtung
17 Luftstromrichtung Kontrolltaste
18 Temperatur “+”Taste
Kontrolltaste
8 Ein/Aus Taste
19 Ventilator Anzeige
9 Schnell Kühlen Taste
20 Temperatur Anzeige
10 Timer Aus Taste
Stellen Sie sicher, dass das Klimagerät ordnungsgemäß funktioniert. Seien Sie
sich bewusst, dass die Fernbedienung nicht die Eigenschaften des Klimagerätes
erhöhen kann. Wenn die Fernbedienung längere Zeit nicht benutzt wird, sollten
Sie die Batterien für diese Zeit herausnehmen. Das verhindert eine mögliche
Beschädigung durch eventuell auslaufende Batterien.
Vorsichtsmassnahmen:
Vermeiden Sie Kontakt zu Wasser oder hoher Feuchtigkeit.
Gewährleistung:
Es kann keine Gewährleistung oder Haftung für Schäden übernommen werden,
die auf eigenmächtige Änderungen oder falscher Handhabung dieses Gerätes
zurückzuführen sind.
Allgemein:
Design und Spezifikationen können ohne vorherige Information geändert werden.
3
4
RC UNI/AIRC03
2. Installation des piles
INSTRUCTIONS
FRANÇAIS
Enlevez le couvercle du compartiment à piles de la télécommande et installez deux
piles AA. Installez le couvercle. L'heure apparaîtra sur le côté gauche de l'écran LCD.
3. Instructions pour le réglage
Méthode A: réglage de recherche automatique digitale.
1. Description
1
2
3
20
19
4
18
5
6
17
7
8
16
15
9
10
11
12
14
13
a) Allumez l'air conditionné et pointez la télécommande
directement dessus.
b) Appuyez sur le bouton "SET" jusqu'à ce que le code
change dans la fenêtre mode. Puis relachez-le. Le
système commutera la recherche automatique et le
code augmentera d'une unité toutes les deux secondes.
Faîtes attention à l'air conditionné. Restez sur la
recherche jusqu'à ce que l'air conditionné s'allume /
s'éteigne automatiquement. Appuyez sur la touche
"ENTRY" pour finir l'installation.
Méthode B: réglage direct des codes.
a) Référez-vous au CODE FORM et cherchez le numéro correspondant à votre
marque. Allumez l'air conditionné manuellement. Par exemple: pour INYCIN
le code est 188 190.
b) Appuyez sur le bouton "SET" (environ 3 secondes) jusqu'à ce que le code
clignote sur l'afficheur. Appuyez sur la température"+" ou "-" jusqu'à ce que le
code que vous voulez choisir s'affiche.
c) Appuyez sur “OK” et le code arrête de clignoter.
d) Vérifiez si les touches de la télécommande fonctionnent normalement. Si ce
n'est pas le cas, répétez les étapes b-d jusqu'à ce le bon code soit trouvé.
4. Fonction Timing on/off
Appuyez sur la touche “Timing on” pour augmenter de 1 heure le temps de
démarrage de l'air conditionné. L'heure affichée est l'heure à laquelle l'air
conditionné se mettra en marche automatiquement. En appuyant sur la touche
“Timing off” vous retarderez de 1 heure le moment que l'air conditionné doit
s'éteindre. La fonction timing utilise un indicateur de 15h pour afficher et régler
l'heure.
5. Fonction Fast cool/Fast heat
Appuyez sur la touche “Fast cool” pour régler automatiquement l'air conditionné à
21 degrés C, air moyen, orientation de l'air automatique. Ou, appuyez sur la touche
“Fast heat” pour régler automatiquement l'air conditionné à 27 degrés C, air moyen
et orientation de l'air automatique.
6. Notes
Assurez-vous que l'air conditionné est en bon état de fonctionnement. La
télécommande ne peut pas augmenter les fonctions/caractéristiques de l'air
conditionné. Si la télécommande reste inactive pendant une longue période,
retirez les piles pour éviter tout dommage pour la télécommande.
1 Affichage mode de fonctionnement
11 Touche Enter
2 Affichage du transmetteur
12 Touche horloge
3 Affichage de l'orientation de l'air
13 SET (réglage)
4 Mode code
14 Touche Timing on
5 Touche Température “-“
15 Touche chauffage rapide
6 Touche Mode
16 Touche ventilateur
7 Touche contrôle automatique
17 Touche contrôle orientation de l'air
18 Touche Température “+”
orientation de l”air
8 Touche d'alimentation
19 Affichage ventilateur
9 Touche refroidissement rapide
20 Affichage température
10 Touche Timing off
Mesures de sécurité:
Pour réduire le risque de décharge électrique, ce produit devra être ouvert en cas
de nécessité UNIQUEMENT par un technicien autorisé. Si vous constatez un
problème, débranchez le dispositif de la source de tension et de tout autre
équipement.
Garantie:
Aucune garantie ou responsabilité ne peut être acceptée si des changements,
modifications ou une mauvaise utilisation du produit auront occasionné des
dommages.
Général:
Les spécifications ou le design peuvent être amenés à des modifications sans
avertissement préalable.
5
6
RC UNI/AIRC03
NEDERLANDSE
INSTRUCTIES
2. Installatie van de batterij:
Verwijder het klepje van het batterijcompartiment en plaats twee AA batterijen.
Plaats het klepje terug. Linksonder in het display wordt de tijd zichtbaar.
3. Instellen:
Methode A: automatische digitale zoekfunctie.
1. Omschrijving:
a) Zet de airconditioner aan en richt hier de afstandsbediening op
b) Blijf de SET knop indrukken tot de code in het scherm
verandert en laat dan los. De automatische zoekfunctie zal
dan worden ingeschakeld. Elke twee seconden zal er een
code worden toegevoegd. Houd intussen de airconditioner
1
2
3
20
19
4
18
5
6
17
7
8
16
15
9
10
11
12
14
13
in de gaten. Slaat deze af, druk dan op ENTRY om de
installatie te beëindigen.
Methode B: direct instellen met een code.
a) Zoek in het CODE formulier het corresponderende nummer van het merk van de
airconditioner op. Schakel handmatig de airconditioner in. Bijvoorbeeld: INYCIN
is code 188-190.
b) Houd de SET knop vast voor 3 seconden tot de code in de display knippert. Druk
op '+' of '-' bij de temperatuur tot de gewenste code verschijnt.
c) Druk op “ENTER” en de code stopt met knipperen.
d) Controleer of de toetsen van de afstandsbediening overeenkomstig met de
airconditioner werken. Indien dit niet het geval is, herhaal dan stap b t/m d
totdat de passende code gevonden is.
4. Timerfunctie:
Druk op de toets om de timer in te schakelen (ON) en de startijd van de airconditioner
per uur in te stellen. De getoonde tijd is de tijd dat de airconditioner automatisch
inschakelt .
Druk op de toets om de timer uit te schakelen (OFF) en de stoptijd van de
airconditioner per uur in te stellen. Elke druk op de toets vervroegt de stoptijd met 1
uur. De timerfunctie toont een 15 uurindicatie om de instelling weer te geven.
5. Functie voor snel verwarmen en afkoelen:
Druk op de toets voor snel afkoelen om de airconditioner automatisch in te stellen op
21C, middelmatige blaaskracht en automatische blaasrichting. Druk op de toets voor
snel verwarmen om de airconditioner automatisch in te stellen op 27C, middelmatige
blaaskracht en automatische blaasrichting.
6. Opmerking:
Zorg ervoor dat de airconditioner naar behoren functioneert. De afstandsbediening
kan geen extra functionaliteit aan de airconditioner toevoegen. Verwijder de batterij,
om schade aan de afstandsbediening te voorkomen, indien de afstandsbediening
voor een langere tijd niet gebruikt wordt.
1 Airconditioner in werking
11 Enter (OK) toets
2 Afstandsbediening in werking
12 Toets voor klokfunctie
3 Blaasrichting
13 Toets voor instelling (SET)
4 Model code
14 Tijdklok (TIMER) inschakelen
Veiligheidsvoorschriften:
Om het risico van een elektrische schok te voorkomen, mag dit apparaat alleen,
indien nodig, geopend worden door een geautoriseerd servicebedrijf. Ontkoppel
het apparaat van stroom en randapparatuur, wanneer zich een probleem voordoet.
5 Toets voor temperatuurinstelling “-“
15 Toets voor snel verwarmen
6 Functietoets (MODE)
16 Ventilatortoets
7 Toets voor automatische blaasrichting
17 Toets om blaasrichting in te stellen
8 Aan/uit toets
18 Toets voor temperatuurinstelling “+”
9 Toets voor snel afkoelen
19 Aanduiding voor de blaaskracht
Algemeen:
10 Tijdklok (TIMER) uitschakelen
20 Temperatuuraanduiding
Wijzigingen in uitvoering en specificaties voorbehouden.
7
Garantie:
Garantie of aansprakelijkheid wordt niet aanvaardt als er veranderingen en/of
modificaties zijn aangebracht of bij onjuist gebruik van het product.
8
RC UNI/AIRC03
ISTRUZIONI
ITALIANO
2. Installazione delle batterie
Rimuovere la copertura del vano batterie ed inserire 2 batterie tipo AA (stilo).
Richiudere la copertura delle batterie. Sul display LCD nella parte sinistra comparirà
l'ora.
3. Impostazioni
1. Descrizione telecomando
Metodo A: ricerca del codice manuale.
1
2
3
20
19
4
18
5
6
17
7
8
16
15
9
10
11
12
14
13
1 Visualizzazione della modalità di funzionamento
2 Visualizzazione di invio dei comandi
3 Visualizzazione della direzione del flusso d'aria
4 Codice modello
5 Ta s t o t e m p e r a t u r a “ - “
6 Ta s t o M o d e
7 Ta s t o d i c o n t r o l l o a u t o m a t i c o d e l l a d i r e z i o n e d e l f l u s s o d ' a r i a
8 Ta s t o P o w e r ( o n / o f f )
9 Ta s t o d i r a f f r e d d a m e n t o r a p i d o
1 0 Ta s t o d i e s c l u s i o n e t i m e r
1 1 Ta s t o d i i n v i o
1 2 Ta s t o d i f u n z i o n e o r o l o g i o / t i m e r
13 SET (impostazione)
1 4 Ta s t o d i i n s e r i m e n t o t i m e r
1 5 Ta s t o d i r i s c a l d a m e n t o r a p i d o
1 6 Ta s t o v e n t i l a t o r e
1 7 Ta s t o d i c o n t r o l l o d e l l a d i r e z i o n e d e l f l u s s o d ' a r i a
1 8 Ta s t o t e m p e r a t u r a “ + “
19 Visualizzazione dell'intensità del flusso d'aria
20 Visualizzazione della temperatura
9
a) Accendere il condizionatore d'aria e puntare il telecomando
verso il condizionatore stesso
b) Premere e mantenere premuto il tasto “SET” fino a quando
il codice cambia nella finestra “mode”. Rilasciare il tasto. Il
sistema inizierà la ricerca automatica con l'incremento di 1
codice ogni due secondi. Fare ora attenzione al
condizionatore ed attendere fino a che il condizionatore
d'aria si accende (o si spegne). Premere il tasto 'ENTRY'
per memorizzare il codice corretto.
Metodo B: impostazione diretta del codice.
a) Consultare la LISTA CODICI e rilevare il numero corrispondente alla vostra marca.
Accendere il condizionatore manualmente. Per es.: INYCIN ha i cod. 188~190
b) Premere e mantenere premuto il tasto “SET” (per circa 3 secondi) fino a quando il
codice lampeggia sul display. Premere i tasti temperatura “+” o “-” fino a
selezionare il codice desiderato.
c) Premere “ENTER” ed il codice smetterà di lampeggiare.
d) Controllate che i tasti del telecomando funzionino correttamente. In caso contrario
ripetere le operazioni dal punto b al punto d fino a quando trovate il codice che
funziona correttamente.
4. Funzione Timer accensione / spegnimento
Premere il tasto “Timing on” per incrementare di 1ora (alla volta) l'accensione del
condizionatore. L'ora visualizzata sarà l'ora di accensione automatica del
condizionatore. Premere il tasto “Timing off” per incrementare di 1 ora (alla volta)
l'ora di spegnimento del condizionatore. La funzione timer si imposta e si visualizza
nella modalità 15h.
5. Raffreddamento rapido / Riscaldamento rapido
Premendo il pulsante “Fast cool” automaticamente verrà impostata la temperatura
a 21 gradi C, ventilazione media, e direzione del flusso automatica. Premendo il
pulsante “Fast heat” automaticamente verrà impostata la temperatura a 27 gradi
C, ventilazione media, e direzione del flusso automatica.
6. Note
Assicuratevi che il condizionatore sia funzionante. Sappiate che il telecomando non
può variare o migliorare le caratteristiche del vostro impianto. Se il telecomando non
viene utilizzato per un lungo periodo, assicuratevi di togliere le batterie per evitare
di danneggiare il telecomando stesso con la fuoriuscita dell'acido.
Precauzioni:
Nel caso sia necessario un intervento di manutenzione, per ridurre il rischio di
scossa elettrica, questo articolo deve essere aperto SOLO da tecnici esperti o
da personale qualificato.
Garanzia:
La garanzia sul prodotto decade qualora il prodotto sia stato manipolato o utilizzato
in modo improprio.
Generale:
Disegni e specifiche possono essere soggetti a cambiamento senza preavviso.
10
RC UNI/AIRC03
INSTRUCCIONES
(ESPAÑOL)
1. Descripción del panel del mando a distancia
2. Instalación de las pilas
Quite la tapa del compartimento de pilas del mando a distancia y coloque dos pilas
AA. Instale de nuevo la tapa. La hora aparecerá en la esquina izquierda de la
pantalla de LCD.
3. Instrucciones de ajuste
Método A: Ajuste de búsqueda de código manual.
1
2
3
20
19
4
18
5
6
17
7
8
16
15
9
10
11
12
14
13
a) Encienda el acondicionador y apunte el mando a distancia
hacia él.
B) Mantenga pulsado el botón “SET” hasta que el código cambie
en la ventana de modo. Suelte el botón. El sistema cambiará
a búsqueda automática y el código aumentará 1 paso cada 2
segundos. Preste atención al acondicionador. Siga buscando
hasta que el aparato se encienda o apague automáticamente.
Pulse la tecla “ENTRY” para finalizar el ajuste.
Método B: Ajuste de código automático.
a) Compruebe en el apartado CODE FORM el número correspondiente a su marca.
Encienda el acondicionador manualmente. Por ejemplo: INYCIN tiene el código
188-190.
b) Mantenga pulsado el botón “SET” (unos 3 segundos) hasta que el código parpadee
en la pantalla. Pulse temperatura “+” o “-“ hasta que aparezca el código deseado.
c) Pulse “OK” y el código dejará de parpadear.
d) Compruebe que las teclas del mando a distancia funcionan correctamente. Si no,
repita los pasos b) a d) hasta que se encuentre un código apropiado.
4. Función de temporizador ON / OFF
Pulse la tecla "Timing on" para incrementar 1 hora la hora de comienzo del
acondicionador de aire. La hora visualizada es la hora en que el acondicionador se
enciende automáticamente. Cada vez que se pulsa la tecla "Timing off", se
retrasará 1 hora el apagado del acondicionador. La función de temporizador utiliza
un indicador de 15 horas para visualizar y ajustar la hora.
5. Función de frío rápido / calor rápido
Pule la tecla “Fast cool” key para ajustar el acondicionador de aire automáticamente
en 21ºC, con flujo de aire intermedio y dirección de flujo de aire automática. O bien,
pulse la tecla "Fast heat" para ajustar el acondicionador automáticamente en 27ºC,
con flujo de aire intermedio y dirección de flujo de aire automática.
6. Observaciones
1 Visualización del modo de funcionamiento
2 Visualización de la emisión de señal
3 Visualización de la dirección del flujo de aire
4 Código de modelo
5 Tecla de temperatura “-“
6 Tecla de modo
7 Tecla de control de dirección automática de flujo de aire
8 Tecla de potencia/alimentación
9 Tecla de frío rápido
10 Tecla de desactivación de temporizador
11 Tecla 'ENTER' de confirmación
12 Tecla de reloj
13 SET (Ajuste)
14 Tecla de activación de temporizador
15 Tecla de calor rápido
16 Tecla de ventilador
17 Tecla de control de dirección de flujo de aire
18 Tecla de temperatura “+”
19 Visualización de ventilador
20 Visualización de temperatura
11
Asegúrese de que el aparato de aire acondicionado funciona correctamente. Tenga
en cuenta que el mando a distancia no aumenta las prestaciones del acondicionador.
Si el mando a distancia no se utiliza durante un período de tiempo largo, quite las
baterías para evitar cualquier daño al mando.
Medidas de seguridad
Para reducir el riesgo de descargas eléctricas, el aparato ÚNICAMENTE debe ser
abierto por personal cualificado. En caso de fallo, desconéctelo de la red y de otros
aparatos. No exponga el aparato al agua o humedad.
Garantía
No se acepta responsabilidad alguna por cambios y modificaciones del producto o
daños causados debido a su uso incorrecto.
General
Los diseños y especificaciones están sujetos a cambios sin preaviso.
Copyright ©
12
RC UNI/AIRC03
MAGYAR
NYELVÛ
HASZNÁLATI
2. Elem behelyezése
Távolítsa el az elemtartó fedelet és helyezze be az elemet ( 2db AA elem), majd
helyezze vissza a fedelet. A kijelzõ bal sarkában megjeleni az óra.
3. Programozás
A: automata keresõ.
1. Kijelzõ és funkciógombok
1
2
3
20
19
4
18
5
6
17
7
8
16
15
9
10
11
12
14
13
a) Kapcsolja be a légkondícionálót és a távirányítót irányítsa
közvetlenül rá
b) Tartsa lenyomva a "SET" gombot, míg a kód a mód ablakban
meg nem változik. Ekkor engedje el a gombot. A rendszer
automatikus keresésre vált, és a kód két másodpercenként
egy egységgel növekszik. Figyelje a légkondícionálót.
Folytassa a keresést, míg a légkondíconáló automatikusan
be/ki nem kapcsol. A beállítás befejezéséhez nyomja le az
"ENTRY" gombot.
B: direct kód bevitele.
a) Vegye elõ a kódtáblázatot és keresse ki készüléke gyártóját, a gyártó mellett
szereplõ kódot a következõképpen viheti be a készülékbe:.
b) Tartsa lenyomva a "SET" gombot (kb. 3 másodpercig) míg a kód villogni nem
kezd a kijelzõn. Nyomja a hõmérséklet "+" vagy "-" gombot, míg a választani
kívánt kód meg nem jelenik.
C) Majd nyomjon “ENTER” és a “code” villogása megszünik, a bevitt kódot a
távisrányító eltárolja.
d) Próbálja ki, hogy a távirányító az eltárolt kóddal megfelelõen müködteti e a
készüléket, ha nem, ismételje meg a b-d pontokat és vigyen fel egy új kódot.
4. Idõzítés
Nyomja meg a “Timing on” gombot és 1 óránként tudja növelni az idõzítést. A
kijelzõrõl leolvashatja a pontos idõt, amikor a légkondi bekapcsol. A “Timing
off” gomb megnyomásával állíthatja be az automata kikapcsolást. 15 órás
idõzítés állítható be.
5 Gyors hûtés / fûtés funkció
A “Fast cool” gomb megnyomásával automatikusan 21C fokra áll a légkondi, a“Fast
heat” gombbal pedig automatikusan 27C fokos levegõt fúj.
6. Megjegyzés
Ha a távirányítót hosszú ideig nem használja, vegye ki belõle az elemet, mert az
1 Bekapcsolt állapot
11 Belép gomb
elem kifolyása a távírányító meghibásodását okozhatja.
2 Jel küldés kijelzõ
12 Óra gomb
Biztonsági elõírások:
3 Irányított ventiláció
13 SET
4 Model kód
14 Idõzítés bekapcsolása
5 Hõmérsékletszabályzó “-“ gomb
15 Gyros fûtés gomb
6 Mode gomb
16 Ventilátor
7 Automata
17 Levegõ fújás iránya
8 Bekapcsoló gomb
18 Hõmérséklet “+”
9 Gyros hûtés gomb
19 Ventilátor kijelzõ
10 Idõzítés kikapcsolása
20 Hõmérséklet kijelzõ
13
Meghibásodás esetén a javítást bizza minden esetben szakemberre.
Jótállás:
Jótállást a gyártó csak a termék rendeltetésszerü használata esetén vállal.
14
RC UNI/AIRC03
SVENSK
INSTRUKTION
2. Isättning av batterier
Ta bort fjärrkontrollens batterilucka och sätt i två batterier av AA/R6-storlek. Sätt
tillbaka batteriluckan. Tiden visas nu i LCD-displayens vänstra hörn.
3. Inställningar
1. Panelbeskrivning
Metod A: digital automatisk sökning.
1
2
3
20
19
a) Sätt på luftkonditioneringen och rikta fjärrkontrollen direkt
mot aggregatet.
b) Håll "SET" knappen intryckt tills koderna ändras I fönstret.
Släpp knappen sedan. Systemet kommer ändra till
automatisk sökning och koden ökar med 1 enhet/ 2 sek.
Var uppmärksam på luftkonditioneringen. Kommer att
söka tills luftkonditioneringen stängs av/på. Tryck på
'ENTRY' knapp för att slutföra set up.
Metod B: direkt kodinställning
4
18
5
6
17
7
8
16
15
9
10
11
12
14
13
a) Leta i CODE FORM efter koden som motsvarar ditt märke. Starta
luftkonditioneringen för hand. Till exempel: INYCIN har kod 188-190.
b) Håll "SET" knappen( nertryckt I ca. 3 sek.) tills kod blinker I display. Tryck
temperature "+" eller "-" tills koden Ni önskar visas.
c) Tryck “ENTER” så slutar koden att blinka.
d) Kontrollera att fjärrkontrollens tangenter fungerar normalt. Upprepa annars steg
b d till dess att en lämplig kod är funnen.
4. Timerfunktion av / på
Tryck “Timing on” för att flytta fram luftkonditioneringens starttid med 1 timma. Den
visade tiden är tiden som återstår innan luftkonditioneringen automatiskt startar.
Genom att trycka “Timing off” fördröjs tiden innan den stannar med 1 timma för varje
knapptryck. Timerfunktionen använder en 15h indikering för att visa och ställa in tiden.
5. Snabbkylning / snabbvärmnings-funktion
Tryck “Fast cool” för att automatiskt ställa luftkonditioneringen till 21° C, mellanvind
och automatisk vindriktning. Tryck “Fast heat” för att automatiskt ställa
luftkonditioneringen till 27° C, mellanvind och automatisk vindriktning.
6. Notera
Försäkra dig om att luftkonditioneringen är i funktionsdugligt skick. Var medveten om
att fjärrkontrollen inte kan ge ytterligare funktioner hos luftkonditioneringen. Om
fjärrkontrollen inte används under en längre tid skall batterierna plockas ur för att
förhindra att den skadas.
1 Programläge
11 Entertangent
2 Signalsändning
12 Klockfunktion
3 Fläktriktning
13 SET
4 Modellkod
14 Timer på
5 Temperatur “-“
15 Snabbvärme
6 Lägesväljare
16 Fläkttangent
7 Automatisk vindriktningskontroll
17 Vindriktning
8 Ström
18 Temperatur “+”
9 Snabbkylning
19 Fläktdisplay
10 Timer av
20 Temperaturdisplay
15
Säkerhetsföreskrifter:
För att minska risken för elektriska stötar, bör denna produkt ENDAST öppnas av en
auktoriserad tekniker om service skulle behövas. Koppla bort produkten från
vägguttaget om problem skulle uppstå.
Garanti:
Ingen garanti eller skadestånd kan åberopas om produkten har ändrats eller
modifierats eller om produkten använts felaktigt.
Allmänt:
Design och specifikationer kan ändras utan förvarning.
16
RC UNI/AIRC03
KÄYTTÖOHJE
SUOMI
2. Paristojen asettaminen
Irrota kaukosäätimen paristokotelon kansi ja aseta paristokoteloon kaksi AA-kokoista
paristoa. Aseta paristokotelon kansi takaisin paikalleen. LCD-näytön vasempaan
reunaan tulee näkyviin aika.
3. Asennusohjeet
1. Kaukosäätimen kuvaus
Menetelmä A: digitaalinen automaattinen asettaminen
a) Laita ilmastointilaite päälle ja tähtää sitä kaukosäätimellä.
B) Pidä painettuna "SET" painiketta, kunnes koodit vaihtuvat
ikkunassa, sitten vapauta painike. Järjestelmä kytkeytyy
automaattiseen hakuun ja koodit rullaavat 2 sekunnin
1
2
3
20
19
4
18
5
6
17
7
8
16
15
9
10
11
12
14
13
välein. Seuraa ilmastointilaitteen toimintaa, jatka hakua
kunnes laite menee pois päältä. Paina 'ENTRY' painiketta
jättääksesi koodin muistiin.
Menetelmä B: koodin asettaminen suoraan.
a) Katso koodiluettelosta (CODE FORM) laitteen merkkiä vastaava numero. Kytke
ilmastointi päälle manuaalisesti. Esimerkiksi: INYCIN:n koodi on 188-190.
b) Paina "SET" painiketta(n. 3 sec.) kunnes koodi alkaa vilkkumaan. Paina
temperature "+" tai "-" kunnes haluamamme koodi näkyy.
c) Paina ENTER-painiketta ja koodi lopettaa vilkkumisen.
d) Tarkista, että kaukosäätimen painikkeet toimivat asianmukaisella tavalla. Mikäli
näin ei ole, toista vaiheita bd niin pitkään, kunnes oikea koodi löytyy.
4. Timing on/off -toiminto
Painamalla Timing on -painiketta, lisäät ilmastoinnin käynnistysaikaa yhdellä
tunnilla. Näytöllä näkyvä aika osoittaa ajan, jolloin ilmastointi kytkeytyy
automaattisesti päälle. Timing off -painiketta painamalla voidaan ilmastointilaitteen
käynnistysaikaa viivästyttää yhdellä tunnilla jokaista painallusta kohden.
Ajastustoiminnossa (timing) käytetään 15 tunnin merkintätapaa myös ajan
asetusten ja näytöllä esittämisen osalta.
5. Fast cool/Fast heat -toiminto
Fast cool -painiketta painamalla voidaan ilmavirta asettaa automaattisesti 21 °C:n
lämpötilaan, ilmavirta keskitasolle ja puhallussuunta automaattiseksi.
Vaihtoehtoisesti Fast heat -painiketta painamalla voidaan ilmastointi asettaa
automaattisesti 27 °C:n lämpötilaan, ilmavirta keskitasolle ja puhallussuunta
automaattiseksi.
6. Huomautukset
1 Run mode -näyttö
10 Timing off -painike
2 Signaalin lähetyksen näyttö
11 Enter-painike
Varmista, että ilmastointi on käyttökunnossa. Huomaa, että kaukosäädin ei paranna
ilmastointilaitteen ominaisuuksia. Poista paristot, mikäli kaukosäädin on poissa
käytöstä pidemmän aikaa, jotta kaukosäätimen vahingoittumiselta voitaisiin välttyä.
3 Puhallussuunnan näyttö
12 Clock function -painike
4 Mallin koodi
13 Asetuspainike (SET)
5 Painike lämpötilan
14 Timing on -painike
Laitteen saa avata AINOASTAAN valtuutettu huoltoteknikko, sillä asiantuntematon
15 Fast heat -painike
käsittely aiheuttaa sähköiskun vaaran. Irrota laite virtalähteestä ja muista laitteista,
16 Tuulettimen painike
jos sen käytössä ilmenee ongelmia.
laskemista varten
6 Mode-painike
7 Automaattisen puhallussuunnan
ohjauspainike
17 Puhallussuunnan ohjauspainike
18 Painike lämpötilan nostamista varten
8 Virtapainike
19 Tuulettimen näyttö
9 Fast cool -painike
20 Lämpötilanäyttö
Turvallisuusohjeet:
Takuu:
Takuuvastuu ja korvausvelvollisuus eivät kata sellaista tuotetta, johon on tehty
muutoksia tai jota on käsitelty asiaankuulumattomalla tavalla.
Yleistä:
Laitteiden malleja ja ominaisuuksia voidaan muuttaa ilman ennakkoilmoitusta.
17
18
RC UNI/AIRC03
NÁVOD K
POUŽITÍ
1. Popis panelu dálkového ovládání
2. Instalace baterií
Odstraòte bateriový kryt a vložte dva kusy baterií typu AA. Dbejte na správnost
polarity. Poté bateriový kryt opìt nasaïte. Ve spodním levém rohu LCD displeje se
objeví èasový údaj.
3. Nastavení kódu
Metoda A: automatické digitální nastavení kódu
1
2
3
20
19
4
Metoda B: pøímé nastavení kódem.
a) V seznamu kódù vyhledejte èíselnou kombinaci odpovídající znaèce vaší
klimatizace. Napø: pro zn. INYCIN je kód 188-190.
18
5
6
17
7
8
16
15
9
10
11
12
14
13
C) Pro potvrzení stisknìte tlaèítko “ENTER”.
d) Provìøte, zda tlaèítka na DO pracují správnì. V opaèném pøípadì opakujte
krok b d.
4. Nastavení èasu
Stisknutím tlaèítka “Timing on” nastavíte èas automatického sepnutí klimatizace.
Stisknutím “Timing off” dojde k anulování pøedem nastaveného èasu. Tato funkce
využívá 15 hodinového zobrazení èasu.
5. Funkce rychlého ochlazení/rychlé zahøátí
Stisknìte tlaèítko “Fast cool” pro automatické nastavení klimatizace na 21°C s
automatickou regulací foukání (støední síly). Nebo stisknìte “Fast heat” pro
automatické nastavení klimatizace na 27°C s automatická regulace foukání.
6. Poznámky
DO nemùže navýšit výkon klimatizace.
1 Zobrazení režimu
2 Pøenos signálu
3 Zobrazení pøímého foukání
4 Vzorový kód
5 Tlaèítko pro snížení teploty
6 Tlaèítko pro volbu režimu
7 Automatická regulace proudu vzduchuí
8 Zapnutí/ vypnutí
9 Tlaèítko pro rychlé snížení teploty
10 Zrušení funkce èasovaèe
11 Vstupní tlaèítko
12 Hodiny
13 Nastavení
14 Spuštìní funkce èasovaèe
15 Tlaèítko pro rychlé zvýšení teploty
16 Ventilátor
17 Regulace foukání
18 Tlaèítko pro zvýšení teploty
19 Stav ventilátoru
2 0 Te p l o t n í s t a v
19
Pokud nebudete dálkový ovladaè delší dobu používat, vyjmìte z nìj baterie,
zabráníte tak vyteèení elektrolytu a následnému poškození pøístroje.
BEZPEÈNOSTNÍ OPATØENÍ
Zaøízení nikdy sami neotvírejte, nepoškozujte ani jinak neupravujte - pro servis se
obra•te na kvalifikovaného technika. V pøípadì jakýchkoliv potíží odpojte nejprve
zaøízení od pøívodu el. proudu. Nevystavujte vlhkosti, zabraòte styku s vodou.
ZÁRUKA
Na jakékoliv zmìny èi úpravy výrobku ani na škody zpùsobené nesprávným použitím
výrobku se nevztahuje záruka ani odpovìdnost.
VŠEOBECNÁ USTANOVENÍ
Provedení a specifikace mohou být zmìnìny bez upozornìní.
V pøípadì opotøebování a následné likvidaci výrobku postupujte v souladu se
zákonem è. 185/2001 Sb.
20
Applicable brand and code list
Applicable brand and code list
BRAND
CODE
AKIRA
AUX
AUCMA
AIDELONG
AITE
AOLI
AOKE
BAIXUE
BEIJINGJINGDIAN
BOERKA
BORLER
BOSHIGAO
BOSHI
BIG-THUMB
CAIXING
CARRIER
CHANGLING
CHANGHONG
CHANGFENG
CHENGYUAN
CHUANGHUA
CHUNLAN
CHIGO
CONROWA
CORONA
CHANGFU
DAEWOO
DAIKIN
DAJINXING
DAOTIAN
DONGXINBAO
DONGXIA
DUNAN
ELECTROLUX
FEILU
FEIGE
FRESTECH
FUJITSU
GOLDSTAR
796-797
180-199
210-229
293-295
296-299
300
301-302
299
304
305-306
307
308-309
310
331
311
690-699
312-323
060-079
190
324
325-328
170-179
080-099
337-341
760-769
835-838
332-333
740-759
329,330
821-824
260-268
334-335
336
471-474
240-249
829-830
270-279
700-719
303
BRAND CODE
GALANZ
GREE
140-149
000,020-039
GEER
GLEE
GUQIAO
GUANGDA
HAIER
HICON
HITACHI
342-343
280
344
345-346
001-019
391-392
640-659
HISENSE
HONGYI
HUABAO
HUALING
HUAGAO
HUAWEI
HUAKE
HUAMEI
HUANGHE
HUIFENG
HUIFENG
HYUNDAI
INYCIN
JIALE
JIANGNAN
JMSTAR
JINBEIJING
JINDA
JINSONG
JOHNSO
KANGLI
KELONG
KLIMATAIR
KONKA
KRIS
KT02_D001
KT02_D002
230-239
347
100-109
150-169
348
281
349-350
351-352
353
354-356
357
780-789
475-483
358
359
360
361-362
491-492
363-365
282
368-370
110-119
797-800
366-367
804-805
283
284
285
286
287
KTY001
KTY002
KTY003
21
BRAND CODE
BRAND CODE
KTY004
KTY005
LIANGYU
LG
LITTLESWAN
LIKEAIR
LOREN-SEBO
MCQUAY
MD
MEILING
MINGXING,BOYIN
MITSUBISHI
NATIONAL
NISO
NISO
NIKKO
PANSONIC
PANDA
PINSHANG,XINHUABAO
QIXING
SHUANGLU
SIGMA
SOGO
SOVA
SONGXING
SOVA
SOYEA
SRTC
SUNBURG
TCL
TECO
TIANYUAN
TIANJINKONGTIAO
TOBO
TONGLI
TOSHIBA
TOYO
TRANE
UNI-AIR
UTTLEDUCK
WANBAO
WEILI
WEITELI
WHIRLPOOL
WUFENG
XILENG
XINLE
XINLING
XINGHE
YAIR
YAOMA
YIDONG
YORK
YUTU
ZHONGYI
ZUODAN
416-418
447
291
292
419
420
421-422
423
817-820
120-139
831-834
425-428
424
250-269
429-430
630-639
825-828
812-816
368-369
454-456
431-433
434-443
444
770-774
445-446
448-449
457-460
461
462-463
467-471
470
499
775-779
484-490
493-494
495
OTHER
496,498
806-809
839-999
RAYBO
ROWA
RICAI
RIJIANG
SACON
SANZUAN
SANYO NEC
SAMSUNG
SAST
SERENE
SHARP
SHAMEI
SHANXING
SHANGLING
SHENBAO
SHENGFENG
SHENGFENG\FEILU
SHINING
SHINCO
288
289
780
600-609
453
386-387
801-803
790-795
040-059
389-390
290
551-599
660-690
497
398-399
810-811
660-689
464-466
290
393
371-383
383-385
394
395-397
414
190
500-550
610-629
450-452
499
720-739
400
401-402
403-409
410-411
412
413
415
200-209
This company reserves the right to interpretation of the User's Manual.
Design and technical parameters may vary without notice.
22