1
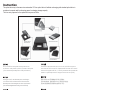
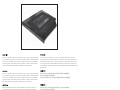
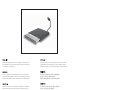
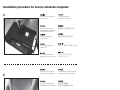
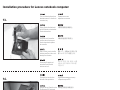
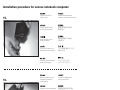
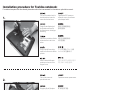
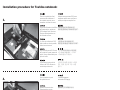
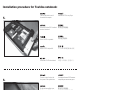
Issue Date : August, 2011
NO.G11214610
TS06 Manual
External USB slim optical drive enclosure with
2.5” SSD/HDD conversion tray
Installation and system optimization guide:
The following manual and guides were carefully prepared by the SilverStone
engineering team to help you maximize the potential of your SilverStone product.
Please keep this manual for future reference when upgrading or performing
maintenance on your system. A copy of this manual can also be downloaded
from our website at:
http://www.silverstonetek.com
1
Specifications
P.2
Instruction
P.3
Installation procedure (Lenovo)
P.7
Installation procedure (Toshiba)
P.16
Optical drive installation
P.27
TREASURE SERIES
TS06
External USB slim optical drive enclosure with
2.5” SSD/HDD conversion tray
Features
Enclosure built-in retractable USB 2.0 cable
Interchangeable optical drive slot to 2.5” SATA SSD or HDD
Compatible with 12.7mm slimline SATA optical drive
Improve laptop performance and capacity with extra hard drive
Enclosure Specifications
Enclosure Material
Color
Power Requirement
ODD Size Support
ODD Interface Support
Enclosure Interface
Operating System Support
Net Weight
Dimension
Plastic with diamond shape exterior
Black (TS06B), White (TS06W)
5Vdc from USB VBus
12.7mm optical disc drive
13Pin slimline SATA
Built-in retractable USB 2.0 cable
Windows XP, Vista, 7, Mac OS and Linux
150g
140mm x 132mm x 17mm
Conversion tray Specifications
Tray Material
Color
Drive Size Support
Drive Interface Support
Tray Interface
LED indicator
Net Weight
Dimension
Plastic
Black (TS06B), White (TS06W)
9.5mm thickness 2.5" HDD or SSD
22Pin SATA
13Pin slimline SATA
Green light for power on, Blue light for read/write access
50g
128mmx128mmx13mm
2
Instruction
The optical drive tray is the same size as standard 12.7mm optical drive to facilitate exchanging with standard optical drive in
a notebook computer and for enhancing speed or enlarging storage capacity.
The four main purposes for the optical drive tray are as follow:
Put a 2.5” SSD into the optical drive tray and set it as
an OS drive. It will provide up to 90%* increase in OS speed.
(* The increased speed depends on SSD performance)
Установите твердотельный диск 2,5” в лоток для DVD и настройте
его в качестве жесткого диска с операционной системой. Это на 90%*
повысит быстродействие ОС. (* Степень увеличения быстродействия
зависит от производительности твердотельного жесткого диска)
Anbringen einer für das Betriebssystem zuständigen
2,5“-SSD im DVD-Laufwerksschacht. Dies erhöht die
Betriebssystem-Geschwindigkeit um mehr als 90 Prozent*.
(*Der Geschwindigkeitszuwachs hängt von der SSD ab)
藉由TS06將2.5吋固態硬碟安裝至筆記型電腦內,
並作為開機磁碟,能有效提昇90%以上的作業系統速度。
(增加的效能將依據固態硬碟的性能而有所不同)
Mettre un SSD de 2,5" dans le plateau de DVD et le définir
comme disque dur de l'OS. Ceci permet d'améliorer de plus
de 90%* la vitesse de l'OS.
(* L'amélioration de la vitesse dépend des performances du SSD)
藉由TS06将2.5吋固态硬盘安装至笔记型计算机内,
并作为开机磁盘,能有效提升90%以上的操作系统速度。
(增加的效能将依据固态硬盘的性能而有所不同)
Poner un SSD de 2,5” en la bandeja del DVD y hacer que el sea el
disco duro del SO. Mejorará más de un 90%* la velocidad del SO.
(* La mejora de velocidad depende del rendimiento del SSD)
2.5” SSDをDVDトレイに入れ、OS HDD向けに設定します。
90%*以上OS速度を向上します。
(* 強化された速度はSSDパフォーマンスによって異なります)
Installare un SSD da 2,5” sul supporto ed impostarlo come
hard disk di sistema. La velocità del sistema operativo,
dipendentemente dalle prestazioni del disco allo stato solido,
può aumentare oltre il 90%.
2.5” SSD를 DVD 트레이에 넣고 OS HDD용으로 설정합니다.
이 경우 OS 속도가 90%* 이상 빨라집니다.
(* 빨라지는 속도의 정도는 SSD 성능에 따라 다름)
3
Put a 2.5” hard drive into the optical drive tray to be a second hard drive
for a notebook computer for increased storage capacity. Take out optical
drive from a notebook computer then install the second 2.5” hard drive
into the original optical drive tray for expansion. When two hard drives
copy each other, their speeds are faster and more efficient.
Установите жесткий диск 2,5” в лоток для DVD в качестве второго
жесткого диска для расширения объема памяти ноутбука. Извлеките
DVD-привод из ноутбука, а затем установите второй жесткий диск 2,5”
в лоток для DVD для расширения возможностей ноутбука. Когда два
жестких диска копируют друг друга, их быстродействие и производительность
возрастают.
Put a 2.5” hard drive into the optical drive tray to be a second hard drive
for a notebook computer for increased storage capacity. Take out optical
drive from a notebook computer then install the second 2.5” hard drive
into the original optical drive tray for expansion. When two hard drives
copy each other, their speeds are faster and more efficient.
藉由TS06將2.5吋傳統硬碟安裝至筆記型電腦的光碟機槽位,
改善以往捉襟見肘的硬碟空間。
原生的SATA傳輸介面,同時增加兩硬碟之間的資料傳輸速度。
Mettre un disque dur de 2,5" dans le plateau de DVD pour servir de
second disque dur et étendre la capacité de stockage de l'ordinateur
portable. Sortez le DVD de l'ordinateur portable, puis installez le second
disque dur 2.5" dans le plateau de DVD d'origine pour étendre l'ordinateur
portable d'un second disque dur. Lorsque deux disques durs se copient
l'un l'autre, leurs vitesses sont plus rapides et plus efficaces.
藉由TS06将2.5吋传统硬盘安装至笔记型计算机的光驱槽位,
改善以往捉襟见肘的硬盘空间。
原生的SATA传输接口,同时增加两硬盘之间的数据传输速度。
Poner un disco duro de 2,5” en la bandeja del DVD para convertirlo en un
2.5” HDDをDVDトレイに入れ、ノートPCの拡大ストレージ容量向
けとして2台目のHDDにします。 ノートPCからDVDを取り出し、
2台目の2.5” HDDを最初のDVDトレイに取り付け、ノートPC拡張
用の2台目のHDDにします。 2台のHDDを互いにコピーすると、そ
の速度は上がりより効率的になります。
segundo disco duro para una expansión de almacenamiento del portátil.
Saque el DVD del portátil y luego instale el segundo disco duro de 2,5” en
la bandeja del DVD para expandir el portátil. Cuando dos discos duros se
copian entre sí, sus velocidades son mayores y más eficientes.
Installare un hard disk da 2,5” nel supporto DVD per avere così un HDD
secondario, che aumenti la capacità di storage del notebook. Rimuovere
il DVD dal notebook e posizionare il secondo HDD da 2,5” nel supporto
originale, così da avere un secondo HDD. Spostare dati su due HDD
interni aumenta la velocità e l’efficienza di trasferimento dei dati stessi.
2.5” HDD를 DVD 트레이에 넣고 노트북 저장 용량 확장용
보조 HDD로 사용합니다. 노트북에서 DVD를 꺼낸 다음
보조 2.5” HDD를 원래의 DVD 트레이에 설치하여 노트북
확장용 보조 HDD로 사용합니다. 두 대의 HDD가 서로 복사할
경우, 속도가 빨라지고 효율성이 높아집니다.
4
SATA interface has hot-swap* feature so you can use this optical
drive tray as a removable backup enclosure. The transfer speed
of this removable backup enclosure is faster, more convenient and
more stable than an external hard drive.
(* hot-swap feature base on AHCI mode in Windows system)
L’intefaccia SATA possiede la caratteristica di hot-swap*; in questo modo
è possibile utilizzare questo prodotto come supporto di backup removibile.
La velocità di trasferimento dati con supporti removibili è maggiore e
notevolmente più stabile di quanto ottenibile con un HDD esterno.
(* la caratteristica di hot-swap dipende dalla modalità AHCI nei sistemi
basati su Microsoft Windows)
Die SATA-Schnittstelle hat ein Hot-Swap-Feature*, sodass Sie den
DVD-Laufwerksschacht für Backup-Zwecke mit der Möglichkeit eines
schnellen Festplattenwechsels benutzen können.
Die Übertragungsgeschwindigkeit ist auf diesem Wege höher und
stabiler als bei Verwendung einer extern angeschlossenen HDD.
Zudem ist die Angelegenheit bequemer.
(* Das Hot-Swap-Feature basiert auf dem AHCI-Modus in Windows)
SATA介面在開啟AHCI後,可支援熱插拔功能,
與TS06硬碟轉接架結合,便搖身一變成為最佳的備份產品,
傳輸速度及穩定性高於以往外接式硬碟。
L'interface SATA a une fonction d'échange à chaud*, de sorte que vous
pouvez utiliser ce plateau de DVD comme boîtier de sauvegarde amovible.
La vitesse de transfert de ce boitier de sauvegarde interne amovible est
plus rapide, plus pratique et plus stable que le disque dur externe.
(* la fonction d'échange à chaud est basée sur le mode AHCI du système
Windows)
SATA接口在开启AHCI后,可支持热插拔功能,
与TS06硬盘转接架结合,便摇身一变成为最佳的备份产品,
传输速度及稳定性高于以往外接式硬盘。
El interfaz SATA tiene la característica de cambio en caliente*, luego
se puede usar la bandeja del DVD como una carcasa extraíble para
almacenamiento. La velocidad de transferencia de esta carcasa interna
extraíble es mayor, más cómoda y más estable que un disco duro externo.
(*la característica de cambio en caliente se basa en el modo AHCI en el
sistema Windows)
SATAインターフェースにはホットスワップ*機能が搭載されているため、
このDVDトレイをリムーバブルバックアップ筐体として使用できます。
この退部リムーバブルバックアップ筐体の転送速度は、外部HDDより高速、
便利で、安定しています。 (* ホットスワップ機能はWindowsシステムの
AHCIモードに基づいています)
L’intefaccia SATA possiede la caratteristica di hot-swap*; in questo modo
è possibile utilizzare questo prodotto come supporto di backup removibile.
La velocità di trasferimento dati con supporti removibili è maggiore e
notevolmente più stabile di quanto ottenibile con un HDD esterno.
(* la caratteristica di hot-swap dipende dalla modalità AHCI nei sistemi
basati su Microsoft Windows)
SATA 인터페이스에는 핫 스왑* 기능이 있어 이 DVD 트레이를 이동식 백업
인클로저로 사용할 수 있습니다. 외부 HDD와 비교하여, 이 내부의 이동식
백업 인클로저는 전송 속도가 더 빠르고 편의성과 안정성이 더 우수합니다.
(* Windows 시스템의 AHCI 모드에 기반한 핫 스왑 기능)
5
Removed optical drive from a notebook computer can
be installed into the attached optical drive enclosure as
an external optical drive.
Извлеченный из ноутбука DVD можно установить в
прилагаемую DVD-панель и использовать корпус
внешнего DVD в качестве внешнего DVD-привода.
Ein vom Notebook ausgebautes DVD-Laufwerk kann
mittels des beigefügten, externen DVD-Gehäuses samt
Blende als externes DVD-Laufwerk verwendet werden.
移除筆記型電腦原有的薄型光碟機模組,
安裝於TS06的光碟機外接盒內,
隨即成為造型優雅的USB外接式光碟機。
Retirer le DVD d'un ordinateur portable peut l'installer
dans le panneau de DVD fourni et le boitier de DVD
externe breveté en tant que DVD externe.
移除笔记型计算机原有的薄型光驱模块,
安装于TS06的光驱外接盒内,
随即成为造型优雅的USB外接式光驱。
Extraer el DVD de un portátil, que puede ser instalado
ノートPCから取り外したDVDは、取り付けたDVD
パネルと特許取得の外部DVD筐体に取り付け、
外部DVDとして使用できます。
en un panel para DVD y carcasa externa para DVD para
así construir un DVD externo.
Il DVD rimosso dal notebook può essere installato
sul pannello DVD ed utilizzato come DVD esterno.
노트북에서 제거한 DVD는 제공된 DVD 패널과 특허를
받은 외부 DVD 인클로저에 외부 DVD로 설치할 수 있습니다.
6
Installation procedure for Lenovo notebook computer:
Please follow below procedure to exchange the notebook computer’s optical drive for conversion tray.
For notebook computer from other brands, please also refer to their user manuals for information on optical drive removal.
1.
2.
Please turn over the notebook
computer onto its back side.
Отвинтите винты, удерживающие
кронштейн вентилятора и извлеките
его из корпуса.
Bitte drehen Sie das Notebook
auf die Rückseite.
先將筆記型電腦翻至背面。
Veuillez retourner le portable
pour présenter sa face arrière.
先将笔记型计算机翻至背面。
Por favor, dele la vuelta al
portátil para ver la parte inferior.
ファンブラケットを保持しているネジ
をはずし、ケースから取り外します。
Girare il notebook dalla
parte posteriore.
팬브라켓을 고정하고 있는 나사를
제거하여, 케이스로 부터 제거 합니다.
There is an optical drive fixed
screw near the middle rear of
the notebook computer, use a
screwdriver to loosen the screw.
Найдите винт крепления DVD около
середины задней части ноутбука и с
помощью отвертки отверните его.
Es gibt eine Schraube in der Näher
der Notebookmitte, welche das
DVD-Laufwerk fixiert. Benutzen
Sie einen Schraubenzieher um
die Schraube zu lösen.
光碟機是藉由機背中間的螺絲固定,
請使用適當的螺絲起子將螺絲鬆開並取下。
Il y a une vis de fixation du DVD
près du milieu au dos du portable,
retirez-la avec tournevis.
光驱是藉由机背中间的螺丝固定,
请使用适当的螺丝起子将螺丝松开并取下。
Hay un tornillo para el DVD cerca ノートPCの裏のほぼ中央にDVDを固定
de la mitad de la parte trasera del しているねじがあります。ドライバー
portátil. Use un destornillador para でねじを外してください。
quitar el tornillo.
7
Circa al centro troviamo la vite
di blocco del DVD; utilizzare un
cacciavite per rimuoverla.
스크류드라이버를 사용하여 노트북의
후면 가운데 있는 DVD 고정 나사를
풉니다.
Installation procedure for Lenovo notebook computer:
3.
4.
Use a screwdriver to push the
optical drive out.
С помощью отвертки
вытолкните DVD наружу.
Benutzen Sie erneut einen
Schraubenzieher um das DVDLaufwerk herauszuschieben.
藉由螺絲起子將光碟機向外推出。
Utilisez un tournevis pour
extraire le DVD.
藉由螺丝起子将光驱向外推出。
Use un destornillador para
sacar el DVD.
ドライバーを使ってDVDを押し出します。
Utilizzare un cacciavite per
spingere il DVD verso l’esterno.
스크류드라이버를 사용하여
DVD를 밀어 꺼냅니다.
There is an eject hole on the
front panel of the optical drive.
На передней панели DVD имеется
отверстие для извлечения диска.
Es gibt ein Auswerfloch in der
Frontblende des DVD-Laufwerks.
取出薄型光碟機模組,
請在前方面板確認退片孔位置。
Il y a un trou d'éjection en
face avant du DVD.
取出薄型光驱模块,
请在前方面板确认退片孔位置。
Hay un agujero de eyección
en el panel frontal del DVD.
DVDの前部パネルに取り出し穴
があります。
E’ presente sul pannello frontale
del DVD un foro per lo sblocco ed
espulsione del vassoio interno.
DVD의 전면 패널에 배출
구멍이 있습니다.
8
Installation procedure for Lenovo notebook computer:
5.
Use a clip or sharp object to insert
into the eject hole and take apart
optical drive tray and optical drive
shell separately.
Вставьте скрепку или другой
остроконечный предмет в отверстие
для извлечения диска и снимите
лоток для DVD и корпус DVD.
Drücken Sie einen Clip oder einen 使用迴紋針頂住退片孔,
spitzen Gegenstand in das Loch
將光碟機托盤拉出。
um das DVD-Laufwerk von der
Außenhülle zu trennen.
Utilisez une pince ou un objet
pointu pour l'insérer dans le trou
et sortir le plateau de DVD et la
coque de DVD séparément.
使用回形针顶住退片孔,
将光驱托盘拉出。
Use un clip ó un objeto afilado
para insertarlo en el agujero de
eyección y separe la bandeja del
DVD y la carcasa del DVD.
クリップか先の尖った物体を使って取
り出し穴に差し込み、DVDトレイとDVD
シェルを別々に分けます。
클립이나 뾰족한 물체를 배출 구멍에
Utilizzare un oggetto appuntito,
inserendolo nel foro, per far uscire 넣어 DVD 트레이와 DVD 셸을 따로
분리합니다.
il vassoio.
6.
9
Переверните DVD на обратную сторону
Turn over optical drive onto its
и найдите четыре скобы в передней
back side to find the four hooks
inside the optical drive front panel. панели DVD.
Es gibt eine Schraube in der Näher
der Notebookmitte, welche das
DVD-Laufwerk fixiert. Benutzen
Sie einen Schraubenzieher um
die Schraube zu lösen.
檢查光碟機托盤背面,
可發現光碟機面板由4個卡鉤固定。
Retournez le DVD sur l'arrière,
puis repérez les quatre crochets
à l'intérieur du panneau avant du
DVD.
检查光驱托盘背面,
可发现光驱面板由4个卡钩固定。
Ponga el DVD boca abajo y verá
cuatro anclajes dentro del panel
frontal del DVD.
DVD を裏返しにして、DVD前面パネル
の内側の4つのフックを確認します。
Girare quindi il dvd ed identificare
i quattro ganci presenti all’interno
del pannello frontale.
후면이 보이게 DVD를 뒤집으면 DVD
전면 패널의 내부에 4개의 후크가
보입니다.
Installation procedure for Lenovo notebook computer:
7.
Please use a screwdriver to press Отверткой нажмите на скобу и
the hook and take apart the optical извлеките переднюю панель DVD.
drive front panel and optical drive
separately.
Drücken Sie bitte mit einem
請使用螺絲起子為輔助,
Schraubenzieher auf ein Häkchen 把卡鉤推出固定位置。
um das DVD-Laufwerk und die DVDFrontblende separat auseinanderzunehmen.
请使用螺丝起子为辅助,
Veuillez utiliser un tournevis pour
enfoncer le crochet et sortir la face 把卡钩推出固定位置。
avant du DVD et le DVD séparément.
8.
Por favor, use un destornillador
para presionar los anclajes y
separa el panel frontal del DVD
del DVD en sí.
ドライバーを使用してフックを押し、
DVD前面パネルとDVDを別々に分けます。
Usare quindi un cacciavite per
premere sui ganci per smontare
il pannello frontale ed il DVD
separatamente.
스크류드라이버로 후크를 눌러 DVD
전면 패널과 DVD 따로 분리합니다.
Then take apart other three hooks Затем отожмите три остальные скобы
gently to removing the optical drive для извлечения передней панели DVD.
front panel.
Lösen Sie dann die anderen drei
Häkchen Schritt für Schritt um die
DVD-Frontblende zu entfernen.
依相同方式將其餘3個卡鉤釋放,
將光碟機前面板與主體分離。
Démontez ensuite les trois autres
crochets l'un après l'autre pour
enlever la face avant du DVD.
依相同方式将其余3个卡钩释放,
将光驱前面板与主体分离。
Luego quite los otros tres anclajes 次に、他の3つのフックをゆっくり
gradualmente para quitar el panel 分解し、DVDの前面パネルを取り外
します。
frontal del DVD.
Smontare quindi gli altri tre ganci
per rimuovere gradatamente il
pannello frontale del DVD.
그리고 나서 세 개의 다른 후크를
차례로 분리하여 DVD 전면 패널을
제거합니다.
10
Installation procedure for Lenovo notebook computer:
9.
10.
Fasten the optical drive front panel Зафиксируйте переднюю панель
from left to right into the front panel DVD слева направо на скобах
передней панели универсального
hooks of the conversion tray.
лотка.
Fixieren Sie die DVD-Frontblende
von links nach rechts in den
Frontpanel-Häkchen des
Umrüstschachts.
將取下的光碟機面板由左至右
扣回TS06硬碟轉換架上。
Fixez la face avant du DVD de
gauche à droite dans les crochets
de la face avant du plateau de la
conversion.
将取下的光驱面板由左至右
扣回TS06硬盘转换架上。
Enganche el panel frontal del
DVD de izquierda a derecha en
los anclajes del panel frontal de
la bandeja de conversión.
左から右にDVD前面パネルを回し、
変換トレイの前面パネルフックに
締め付けます。
Assicurare il pannello frontale
da sinistra a destra sui ganci
del pannello del supporto di
conversione.
DVD 전면 패널을 왼쪽에서 오른쪽으로
밀어 전환 트레이의 전면 패널 후크에
넣어 고정합니다.
Press optical drive front panel
and ensure it is fixed tightly.
Нажмите на переднюю панель DVD,
чтобы ее надежно зафиксировать.
Üben Sie Druck auf die DVD按壓光碟機前面板以確認4組
Frontblende aus und vergewissern 卡鉤已鎖固穩定。
Sie sich, dass diese fest angebracht
ist.
Enfoncez la face avant du DVD
et assurez-vous de bien la fixer.
按压光驱前面板以确认4组
卡钩已锁固稳定。
Presione el panel frontal del
DVD y asegúrese de fijarlo bien.
DVD前面パネルを押してしっかり
固定していることを確認します。
Premere quindi il pannello frontale DVD 전면 패널을 눌러 단단히
고정합니다.
per fissarlo in modo sicuro.
11
Installation procedure for Lenovo notebook computer:
11.
12.
Take the 2.5” hard drive into
conversion tray.
Установите жесткий диск 2,5” в
универсальный лоток.
Platzieren Sie die 2,5“-Festplatte
im Umrüstschacht.
將2.5吋硬碟置入硬碟轉換架。
Prenez le disque dur 2,5" dans
le plateau de conversion.
将2.5吋硬盘置入硬盘转换架。
Ponga el disco duro de 2,5”
en la bandeja de conversión.
2.5”ハードドライブを変換
トレイの中に入れます。
Posizionare l’hard drive da 2,5”
nel supporto di conversione.
2.5” 하드 드라이브를 전환
트레이에 넣습니다.
Please push 2.5” hard drive from
back to front and connect tightly.
Переместите жесткий диск 2,5” сзади
вперед и надежно соедините.
Schieben Sie die 2,5“-Festplatte
bitte von hinten nach vorne, bevor
sie diese fest fixieren.
將2.5吋硬碟推入底部,
確認安裝連接正確。
Veuillez enfoncer le disque dur
2,5" par l'arrière vers l'avant et
le connecter correctement.
将2.5吋硬盘推入底部,
确认安装连接正确。
Por favor, empuje el disco duro
de 2,5” de atrás hacia delante y
conéctelo con firmeza.
後部から前部に2.5”ハードドライ
ブを押して、しっかり接続してく
ださい。
Premere quindi l’hard drive da
2,5” dalla parte posteriore verso
la parte frontale e connetterlo
saldamente.
2.5” 하드 드라이브를 뒤에서
앞으로 밀어 잘 맞게 연결합니다.
12
Installation procedure for Lenovo notebook computer:
13.
14.
Turn over the back side and use
attached screws to fix the drive in
conversion tray.
Переверните лоток и
закрепите его винтами.
Drehen Sie den Umrüstschacht
auf die Rückseite und schrauben
Sie das Laufwerk fest.
以螺絲將硬碟鎖固於轉接架上。
Retournez sur la face arrière
et utilisez les vis fournies pour
fixer le disque dans le plateau
de conversion.
以螺丝将硬盘锁固于转接架上。
Dele la vuelta y use los tornillos
incluidos para fijar el disco en la
bandeja de conversión.
裏返しにし、付属のねじを使用して変
換トレイのドライブに固定します。
Girare quindi il supporto ed
assicurare l’hard drive alla
struttura con le viti.
후면으로 뒤집은 다음 제공된 나사를
사용하여 전환 트레이에 드라이브를
고정합니다.
Take apart the iron slice from
the back of the optical drive.
Уберите металлическую пластинку
с обратной стороны DVD.
Zerlegen Sie das Eisenteil von der 卸除薄型光碟機後方的薄金屬片。
Rückseite des DVD-Laufwerks.
13
Démontez la section en fer à
l'arrière du DVD.
卸除薄型光驱后方的薄金属片。
Separe el trozo de hierro de
la parte posterior del DVD.
DVDの後部から鉄のスライスを外
します。
Smontare la lamina in ferro dalla
parte posteriore del DVD.
DVD의 후면에서 철재
슬라이스를 분리합니다.
Installation procedure for Lenovo notebook computer:
15.
16.
Fasten the iron slice on
the back of tray.
Закрепите металлическую
пластинку на боковой части лотка.
Fixieren Sie das Eisenteil
an der Schachtrückseite.
將薄金屬片鎖固於TS06硬碟
轉換架後方。
Serrez la section en fer à
l'arrière du plateau
将薄金属片锁固于TS06硬盘
转换架后方。
Fije el trozo de hierro en la
parte posterior de la bandeja.
トレイの後部に鉄のスライスを
締め付けます。
Assicurare la lamina alla parte
posteriore del supporto.
트레이의 후면에 철재
슬라이스를 고정합니다.
Slip the conversion tray into
the notebook computer’s
optical drive slot.
Установите универсальный
лоток в слот для DVD.
Schieben Sie den Umrüstschacht
in den Laufwerksschacht des
Notebooks.
將硬碟轉換架推入筆記型電腦
的光碟機槽位。
Faites glisser le plateau de
conversion dans l'emplacement
DVD de l'ordinateur portable.
将硬盘转换架推入笔记型电脑
的光驱槽位。
Deslice la bandeja de conversión
en el zócalo de DVD del portátil.
変換トレイをノートPCのDVD
スロットに素早く入れます。
Far scorrere il supporto di
conversione all’interno dello
slot DVD del notebook.
노트북의 DVD 슬롯에 전환
트레이를 밀어 넣습니다.
14
Installation procedure for Lenovo notebook computer:
17.
18.
15
Please ensure it connects with
the notebook tightly.
Riposizionare la vite di
blocco del DVD.
Vergewissern Sie sich bitte,
dass eine feste Verbindung
mit dem Notebook herrscht.
請確認硬碟轉換架已安裝穩固。
Veuillez vous assurer qu'il est
bien connecté au portable.
请确认硬盘转换架已安装稳固。
Por favor, asegúrese de que
se conecta bien con el portátil.
ノートPCにしっかり接続している
ことを確認してください。
Assicurarsi che la connessione
avvenga in modo saldo.
전환 트레이가 노트북에 잘
맞게 연결되었는지 확인합니다.
Fasten the screws near the
middle back of the notebook
computer.
Заверните винты средней части
задней панели ноутбука.
Drehen Sie die Schrauben in
der Nähe der Notebookmitte ein.
將底部的螺絲鎖回原位,
硬碟轉換架安裝完畢。
Serrez les vis près du milieu
de l'arrière du portable.
将底部的螺丝锁回原位,
硬盘转换架安装完毕。
Apriete los tornillos cerca de
la mitad de la parte trasera
del portátil.
ノートPC後部のほぼ中央にあ
るねじを締め付けます。
Riposizionare la vite di blocco
del DVD.
노트북 후면의 가운데 부근에
있는 나사를 고정합니다.
Installation procedure for Toshiba notebook:
For notebook computer from other brands, please also refer to their user manuals for information on optical drive removal.
1.
2.
Turn over the notebook onto its
back side and turn loosen the
screws from the back cover.
Переверните DVD-привод на
обратную сторону и установите
прилагаемую панель.
Drehen Sie das Notebook auf
die Rückseite und lösen Sie
die Schrauben der rückseitigen
Abdeckung.
將筆記型電腦翻至背面並
鬆開背蓋螺絲。
Retournez le portable sur l'arrière
et démontez les vis de la face
arrière.
将笔记型电脑翻至背面并
松开背盖螺丝。
Ponga el portátil boca abajo y
saque los tornillos de la cubierta
posterior.
ノートPCを裏返して入り、後部
カバーからねじを緩めます。
Girare il notebook dalla parte
posteriore e svitare le viti che
tengono il cover.
후면이 보이도록 노트북을 뒤집고
후면 커버의 나사를 풉니다.
Take out the screws and
open the back cover.
Переместите панель справа налево.
Entnehmen Sie die Schrauben
und öffnen Sie die rückseitige
Abdeckung.
卸下螺絲並取下背蓋。
Sortez les vis et ouvrez
le capot arrière.
卸下螺丝并取下背盖。
Saque los tornillos y abra
la cubierta posterior.
ねじを取り除き、後部カバ
ーを開きます。
Rimuovere le viti ed aprire
il cover posteriore.
나사를 빼내고 후면 커버를 엽니다.
16
Installation procedure for Toshiba notebook:
3.
There is an optical drive fixed
screw near the middle rear of
the notebook computer, use a
screwdriver to loosen the screw.
Найдите винт крепления DVD около
середины задней части ноутбука и с
помощью отвертки отверните его.
Es gibt eine Schraube in der Näher 光碟機是藉由機背中間的螺絲固定,
der Notebookmitte, welche das
請使用適當的螺絲起子將螺絲鬆開並取下。
DVD-Laufwerk fixiert. Benutzen
Sie einen Schraubenzieher um
die Schraube zu lösen.
Il y a une vis de fixation du DVD
près du milieu au dos du portable,
retirez-la avec tournevis.
光驱是藉由机背中间的螺丝固定,
请使用适当的螺丝起子将螺丝松开并取下。
Hay un tornillo para el DVD cerca ノートPCの裏のほぼ中央にDVDを固定
de la mitad de la parte trasera del しているねじがあります。ドライバ
portátil. Use un destornillador para ーでねじを外してください。
quitar el tornillo.
4.
17
Circa al centro troviamo la vite
di blocco del DVD; utilizzare un
cacciavite per rimuoverla.
스크류드라이버를 사용하여 노트북의
후면 가운데 있는 DVD 고정 나사를
풉니다.
Use a screwdriver to push
the optical drive out.
С помощью отвертки
вытолкните DVD наружу.
Benutzen Sie erneut einen
Schraubenzieher um das
DVD-Laufwerk
herauszuschieben.
藉由螺絲起子將光碟機向外推出。
Utilisez un tournevis pour
extraire le DVD.
藉由螺丝起子将光驱向外推出。
Use un destornillador para
sacar el DVD.
ドライバーを使ってDVDを押し出します。
Utilizzare un cacciavite per
spingere il DVD verso l’esterno.
스크류드라이버를 사용하여 DVD를
밀어 꺼냅니다.
Installation procedure for Toshiba notebook:
5.
6.
Take the optical drive out of
the notebook computer
Извлеките DVD из ноутбука.
Entfernen Sie das DVD-Laufwerk
aus dem Notebook.
取出薄型光碟機模組。
Sortez le DVD du portable.
取出薄型光驱模块。
Saque el DVD del portátil.
ノートPCからDVDを取り外します。
Rimuovere il DVD dal notebook.
DVD를 노트북에서 분리합니다.
There is an eject hole on the
front panel of the optical drive.
На передней панели DVD имеется
отверстие для извлечения диска.
Es gibt ein Auswerfloch in der
Frontblende des DVD-Laufwerks.
取出薄型光碟機模組,
請在前方面板確認退片孔位置。
Il y a un trou d'éjection en
face avant du DVD.
取出薄型光驱模块,
请在前方面板确认退片孔位置。
Hay un agujero de eyección
en el panel frontal del DVD.
DVDの前部パネルに取り出し穴
があります。
E’ presente sul pannello frontale
del DVD un foro per lo sblocco ed
espulsione del vassoio interno.
DVD의 전면 패널에 배출
구멍이 있습니다.
18
Installation procedure for Toshiba notebook:
7.
Use a clip or sharp object to insert
into the eject hole and take apart
optical drive tray and optical drive
shell separately.
Вставьте скрепку или другой
остроконечный предмет в отверстие
для извлечения диска и снимите
лоток для DVD и корпус DVD.
Drücken Sie einen Clip oder einen 使用迴紋針頂住退片孔,
spitzen Gegenstand in das Loch
將光碟機托盤拉出。
um das DVD-Laufwerk von der
Außenhülle zu trennen.
Utilisez une pince ou un objet
pointu pour l'insérer dans le trou
et sortir le plateau de DVD et la
coque de DVD séparément.
使用回形针顶住退片孔,
将光驱托盘拉出。
Use un clip ó un objeto afilado
para insertarlo en el agujero de
eyección y separe la bandeja del
DVD y la carcasa del DVD.
クリップか先の尖った物体を使って取
り出し穴に差し込み、DVDトレイとDVD
シェルを別々に分けます。
클립이나 뾰족한 물체를 배출 구멍에
Utilizzare un oggetto appuntito,
inserendolo nel foro, per far uscire 넣어 DVD 트레이와 DVD 셸을 따로
분리합니다.
il vassoio.
8.
Переверните DVD на обратную сторону
Turn over optical drive onto its
и найдите четыре скобы в передней
back side to find the four hooks
inside the optical drive front panel. панели DVD.
Es gibt eine Schraube in der Näher 檢查光碟機托盤背面,
der Notebookmitte, welche das
可發現光碟機面板由4個卡鉤固定。
DVD-Laufwerk fixiert. Benutzen
Sie einen Schraubenzieher um
die Schraube zu lösen.
19
Retournez le DVD sur l'arrière,
puis repérez les quatre crochets
à l'intérieur du panneau avant du
DVD.
检查光驱托盘背面,
可发现光驱面板由4个卡钩固定。
Ponga el DVD boca abajo y verá
cuatro anclajes dentro del panel
frontal del DVD.
DVD を裏返しにして、DVD前面パネル
の内側の4つのフックを確認します。
Girare quindi il dvd ed identificare
i quattro ganci presenti all’interno
del pannello frontale.
후면이 보이게 DVD를 뒤집으면 DVD
전면 패널의 내부에 4개의 후크가
보입니다.
Installation procedure for Toshiba notebook:
9.
Please use a screwdriver to press Отверткой нажмите на скобу и
the hook and take apart the optical извлеките переднюю панель DVD.
drive front panel and optical drive
separately.
Drücken Sie bitte mit einem
請使用螺絲起子為輔助,
Schraubenzieher auf ein Häkchen 把卡鉤推出固定位置。
um das DVD-Laufwerk und die DVDFrontblende separat auseinanderzunehmen.
请使用螺丝起子为辅助,
Veuillez utiliser un tournevis pour
enfoncer le crochet et sortir la face 把卡钩推出固定位置。
avant du DVD et le DVD séparément.
10.
Por favor, use un destornillador
para presionar los anclajes y
separa el panel frontal del DVD
del DVD en sí.
ドライバーを使用してフックを押し、
DVD前面パネルとDVDを別々に分けます。
Usare quindi un cacciavite per
premere sui ganci per smontare
il pannello frontale ed il DVD
separatamente.
스크류드라이버로 후크를 눌러 DVD
전면 패널과 DVD 따로 분리합니다.
Then take apart other three hooks Затем отожмите три остальные скобы
gently to removing the optical drive для извлечения передней панели DVD.
front panel.
Lösen Sie dann die anderen drei
Häkchen Schritt für Schritt um die
DVD-Frontblende zu entfernen.
依相同方式將其餘3個卡鉤釋放,
將光碟機前面板與主體分離。
Démontez ensuite les trois autres
crochets l'un après l'autre pour
enlever la face avant du DVD.
依相同方式将其余3个卡钩释放,
将光驱前面板与主体分离。
Luego quite los otros tres anclajes 次に、他の3つのフックをゆっくり
gradualmente para quitar el panel 分解し、DVDの前面パネルを取り外
します。
frontal del DVD.
Smontare quindi gli altri tre ganci
per rimuovere gradatamente il
pannello frontale del DVD.
그리고 나서 세 개의 다른 후크를
차례로 분리하여 DVD 전면 패널을
제거합니다.
20
Installation procedure for Toshiba notebook:
11.
12.
Fasten the optical drive front panel Зафиксируйте переднюю панель
from left to right into the front panel DVD слева направо на скобах
передней панели универсального
hooks of the conversion tray.
лотка.
Fixieren Sie die DVD-Frontblende
von links nach rechts in den
Frontpanel-Häkchen des
Umrüstschachts.
將取下的光碟機面板由左至右
扣回TS06硬碟轉換架上。
Fixez la face avant du DVD de
gauche à droite dans les crochets
de la face avant du plateau de la
conversion.
将取下的光驱面板由左至右
扣回TS06硬盘转换架上。
Enganche el panel frontal del
DVD de izquierda a derecha en
los anclajes del panel frontal de
la bandeja de conversión.
左から右にDVD前面パネルを回し、
変換トレイの前面パネルフックに
締め付けます。
Assicurare il pannello frontale
da sinistra a destra sui ganci
del pannello del supporto di
conversione.
DVD 전면 패널을 왼쪽에서 오른쪽으로
밀어 전환 트레이의 전면 패널 후크에
넣어 고정합니다.
Press optical drive front panel
and ensure it is fixed tightly.
Нажмите на переднюю панель DVD,
чтобы ее надежно зафиксировать.
Üben Sie Druck auf die DVD按壓光碟機前面板以確認4組
Frontblende aus und vergewissern 卡鉤已鎖固穩定。
Sie sich, dass diese fest angebracht
ist.
Enfoncez la face avant du DVD
et assurez-vous de bien la fixer.
按压光驱前面板以确认4组
卡钩已锁固稳定。
Presione el panel frontal del
DVD y asegúrese de fijarlo bien.
DVD前面パネルを押してしっかり
固定していることを確認します。
Premere quindi il pannello frontale DVD 전면 패널을 눌러 단단히
고정합니다.
per fissarlo in modo sicuro.
21
Installation procedure for Toshiba notebook:
13.
14.
Take the 2.5” hard drive into
conversion tray.
Установите жесткий диск 2,5”
в универсальный лоток.
Platzieren Sie die 2,5“-Festplatte
im Umrüstschacht.
將2.5吋硬碟置入硬碟轉換架。
Prenez le disque dur 2,5" dans
le plateau de conversion.
将2.5吋硬盘置入硬盘转换架。
Ponga el disco duro de 2,5”
en la bandeja de conversión.
2.5”ハードドライブを変換
トレイの中に入れます。
Posizionare l’hard drive da 2,5”
nel supporto di conversione.
2.5” 하드 드라이브를 전환
트레이에 넣습니다.
Please push 2.5” hard drive from
back to front and connect tightly.
Переместите жесткий диск 2,5” сзади
вперед и надежно соедините.
Schieben Sie die 2,5“-Festplatte
bitte von hinten nach vorne, bevor
sie diese fest fixieren.
將2.5吋硬碟推入底部,
確認安裝連接正確。
Veuillez enfoncer le disque dur
2,5" par l'arrière vers l'avant et
le connecter correctement.
将2.5吋硬盘推入底部,
确认安装连接正确。
Por favor, empuje el disco duro
de 2,5” de atrás hacia delante y
conéctelo con firmeza.
後部から前部に2.5”ハードドライ
ブを押して、しっかり接続してく
ださい。
Premere quindi l’hard drive da
2,5” dalla parte posteriore verso
la parte frontale e connetterlo
saldamente.
2.5” 하드 드라이브를 뒤에서
앞으로 밀어 잘 맞게 연결합니다.
22
Installation procedure for Toshiba notebook:
15.
16.
Turn over the back side and use
attached screws to fix the drive in
conversion tray.
Переверните лоток и
закрепите его винтами.
Drehen Sie den Umrüstschacht
auf die Rückseite und schrauben
Sie das Laufwerk fest.
以螺絲將硬碟鎖固於轉接架上。
Retournez sur la face arrière
et utilisez les vis fournies pour
fixer le disque dans le plateau
de conversion.
以螺丝将硬盘锁固于转接架上。
Dele la vuelta y use los tornillos
incluidos para fijar el disco en la
bandeja de conversión.
裏返しにし、付属のねじを使用して変
換トレイのドライブに固定します。
Girare quindi il supporto ed
assicurare l’hard drive alla
struttura con le viti.
후면으로 뒤집은 다음 제공된 나사를
사용하여 전환 트레이에 드라이브를
고정합니다.
Take apart the iron slice from
the back of the optical drive.
Уберите металлическую пластинку
с обратной стороны DVD.
Zerlegen Sie das Eisenteil von der 按卸除薄型光碟機後方的薄金屬片。
Rückseite des DVD-Laufwerks.
23
Démontez la section en fer à
l'arrière du DVD.
卸除薄型光驱后方的薄金属片。
Separe el trozo de hierro de
la parte posterior del DVD.
DVDの後部から鉄のスライスを外
します。
Smontare la lamina in ferro dalla
parte posteriore del DVD.
DVD의 후면에서 철재
슬라이스를 분리합니다.
Installation procedure for Toshiba notebook:
17.
18.
Fasten the iron slice on
the back of tray.
Закрепите металлическую
пластинку на боковой части
лотка.
Fixieren Sie das Eisenteil
an der Schachtrückseite.
將薄金屬片鎖固於TS06硬碟
轉換架後方。
Serrez la section en fer à
l'arrière du plateau.
将薄金属片锁固于TS06硬盘
转换架后方。
Fije el trozo de hierro en la
parte posterior de la bandeja.
トレイの後部に鉄のスライスを
締め付けます。
Assicurare la lamina alla parte
posteriore del supporto.
트레이의 후면에 철재
슬라이스를 고정합니다.
Slip the conversion tray into
the notebook computer’s
optical drive slot.
Установите универсальный
лоток в слот для DVD.
Schieben Sie den Umrüstschacht
in den Laufwerksschacht des
Notebooks.
將硬碟轉換架推入筆記型電腦
的光碟機槽位。
Faites glisser le plateau de
conversion dans l'emplacement
DVD de l'ordinateur portable.
将硬盘转换架推入笔记型电脑
的光驱槽位。
Deslice la bandeja de conversión
en el zócalo de DVD del portátil.
変換トレイをノートPCのDVD
スロットに素早く入れます。
Far scorrere il supporto di
conversione all’interno dello
slot DVD del notebook.
노트북의 DVD 슬롯에 전환
트레이를 밀어 넣습니다.
24
Installation procedure for Toshiba notebook:
19.
20.
25
Please ensure it connects with
the notebook tightly.
Riposizionare la vite di
blocco del DVD.
Vergewissern Sie sich bitte,
dass eine feste Verbindung
mit dem Notebook herrscht.
請確認硬碟轉換架已安裝穩固。
Veuillez vous assurer qu'il est
bien connecté au portable.
请确认硬盘转换架已安装稳固。
Por favor, asegúrese de que
se conecta bien con el portátil.
ノートPCにしっかり接続している
ことを確認してください。
Assicurarsi che la connessione
avvenga in modo saldo.
전환 트레이가 노트북에 잘
맞게 연결되었는지 확인합니다.
Fasten the screws near the
middle back of the notebook
computer.
Заверните винты средней части
задней панели ноутбука.
Drehen Sie die Schrauben in
der Nähe der Notebookmitte ein.
將底部的螺絲鎖回原位,
硬碟轉換架安裝完畢。
Serrez les vis près du milieu
de l'arrière du portable.
将底部的螺丝锁回原位,
硬盘转换架安装完毕。
Apriete los tornillos cerca de
la mitad de la parte trasera
del portátil.
ノートPC後部のほぼ中央にあ
るねじを締め付けます。
Riposizionare la vite di blocco
del DVD.
노트북 후면의 가운데 부근에
있는 나사를 고정합니다.
Installation procedure for Toshiba notebook:
21.
Установите крышку на место
Put the cover back and fasten
screws on the notebook computer. и заверните винты.
Platzieren Sie die Abdeckung auf
dem Notebook wieder und drehen
Sie die Schrauben an.
將電腦背蓋鎖回以完成安裝。
Remettez le capot arrière et
serrez les vis sur le portable.
将计算机背盖锁回以完成安装。
Vuelva a poner la cubierta y
fije los tornillos del portátil.
カバーを元に戻し、ノートPC
にねじを締め付けます。
Riposizionare il cover ed
assicurarlo nuovamente
con le viti.
커버를 원래의 위치에 놓고
나사를 조여 노트북에 고정합니다.
26
Optical drive installation instruction:
Please follow below procedure to install optical drive into external enclosure
1.
Turn over optical drive onto its
back side and put on the attached
panel.
Переверните DVD-привод на
обратную сторону и установите
прилагаемую панель.
Drehen Sie das DVD-Laufwerk auf 取出TS06包裝中的光碟機面板,
die Rückseite und setzen Sie die
並將自筆記型電腦抽出的薄型
beigefügte Blende ein.
光碟機翻至背面。
取出TS06包装中的光驱面板,
Retournez le DVD sur l'arrière
et mettez-le sur le panneau fourni. 并将自笔记型电脑抽出的薄型
光驱翻至背面。
Ponga el dispositivo DVD boca
abajo y coloque el panel adjunto.
DVDドライブを裏返しにし、付属
のパネルをその上に置きます。
Girare il DVD dalla parte posteriore 후면이 보이도록 DVD 드라이브를
뒤집고 제공된 패널을 올려 놓습니다.
e posizionarlo sul pannello.
2.
27
Install the panel from right to left.
Переместите панель справа налево.
Installieren Sie die Blende
von rechts nach links.
由右向左將面版安裝至光碟機上。
Installez le panneau de
droite à gauche.
由右向左将面版安装至光驱上。
Instale el panel de derecha
a izquierda.
右から左にパネルを取り付けます。
Installare il pannello da
destra verso sinistra.
패널을 오른쪽에서 왼쪽으로
설치합니다.
Optical drive installation instruction:
3.
4.
Take out the external enclosure
and pull out USB cable from top
right corner.
Снимите внешний корпус и
извлеките кабель USB из
верхнего правого угла.
Entnehmen Sie die externe
Abdeckung und ziehen Sie
das USB-Kabel von der oberen
rechten Ecke heraus.
將USB纜線由光碟機外接盒右方拉出。
Sortez le boîtier externe et tirez
un câble USB à partir du coin
supérieur droit.
将USB缆线由光驱外接盒右方拉出。
Saque la carcasa externa y
saque el cable USB por la
esquina superior derecha.
外部筐体を取り外し、右上からUSB
ケーブルを引き抜きます。
Estrarre il contenitore esterno
e tirare il cavo USB dall’angolo
in alto a destra.
외부 인클로저를 꺼내 상단 오른쪽
모서리에서 USB 케이블을 당겨
꺼냅니다.
Pull out USB cable completely.
Полностью извлеките USB-кабель.
Ziehen Sie das USB-Kabel
komplett heraus.
將USB纜線完全拉出外接盒外。
Tirez le câble USB complètement.
将USB缆线完全拉出外接盒外。
Saque el cable USB por completo. USBケーブルを完全に取り出します。
Estrarre completamente
il cavo USB.
USB 케이블을 완전히 뽑습니다.
28
Optical drive installation instruction:
5.
6.
29
Put in optical drive.
Установите в DVD-привод.
Bringen Sie es am
DVD-Laufwerk an.
將薄型光碟機放入外接盒內。
Mettez dans le lecteur de DVD.
将薄型光驱放入外接盒内。
Meta el dispositivo DVD.
DVDドライブを取り付けます。
Posizionare all’interno il
drive DVD.
DVD 드라이브에 넣습니다.
Press optical drive to the bottom.
Нажмите на DVD-привод до конца.
Drücken Sie das DVD-Laufwerk
nach unten.
將薄型光碟機推入至外接盒底部。
Installez le panneau de
droite à gauche.
将薄型光驱推入至外接盒底部。
Presione el dispositivo DVD
en el fondo.
DVDドライブを下に押しつけます。
Spingere il DVD drive
verso il fondo.
바닥에 닿을 때까지 DVD
드라이브를 누릅니다.
Optical drive installation instruction:
7.
Fasten the cover with two screws.
Закрепите крышку двумя винтами.
Fixieren Sie die Abdeckung
mit zwei Schrauben.
將光碟機以2顆螺絲鎖固,
完成外接光碟機安裝步驟。
Fixez le capot avec deux vis.
将光驱以2颗螺丝锁固,
完成外接光驱安装步骤。
Fije la cubierta con dos tornillos.
カバーを2本のねじで締め付けます。
Assicurare il cover con due viti.
두 개의 나사를 사용하여
커버를 고정합니다.
30