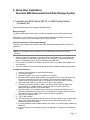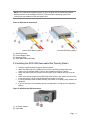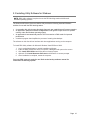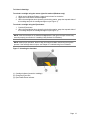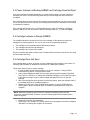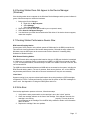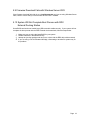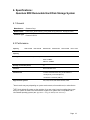
1
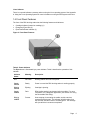
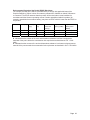
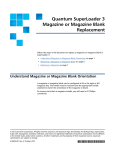
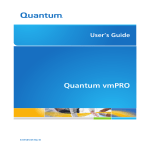
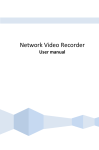
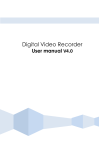
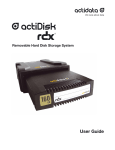
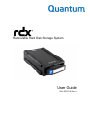
Removable Hard Disk Storage System
User Guide
PN 6-67057-02 Rev A
Table of Contents
1. Introduction
1.1 Overview .....................................................................................................................................3
1.2 Capacity and Transfer Rate........................................................................................................4
1.3 Supported Media ........................................................................................................................4
1.4 Supported Operating Systems ...................................................................................................5
1.5 Software......................................................................................................................................5
1.6 Front Panel Features ..................................................................................................................6
2. Quick Start Installation
2.1 Installing the RDX Internal (SATA or USB) Docking Station (Customer Kit) .............................8
2.2 Installing the RDX USB Removable Docking Station .................................................................9
2.3 Installing Utility Software for Windows .....................................................................................10
3. Using the Quantum RDX Removable Hard Disk Storage System
3.1 Operating the RDX Docking station .........................................................................................11
3.2 Handling the RDX Cartridges ...................................................................................................11
3.3 Loading and Unloading Cartridges ...........................................................................................11
4. Using the Quantum RDX Removable Disk Utility
4.1 Overview ...................................................................................................................................14
4.2 Using the Removable Disk Utility .............................................................................................14
5. Troubleshooting
5.1 Power Indicator is OFF .............................................................................................................15
5.2 Power Indicator is Steady AMBER ...........................................................................................15
5.3 Power Indicator is Blinking AMBER, and the Cartridge Does Not Eject ..................................16
5.4 Cartridge Indicator is Steady AMBER ......................................................................................16
5.5 Cartridge Does Not Eject ..........................................................................................................16
5.6 Docking Station Does Not Appear in the Device Manager (Windows) ....................................17
5.7 Docking Station Performance Seems Slow..............................................................................17
5.8 Write Error ................................................................................................................................18
5.9 Firmware Download Fails with Windows Server 2003 .............................................................18
5.10 System Will Not Complete Boot Process with RDX External .................................................18
6. Specifications
6.1 General .....................................................................................................................................19
6.2 Performance .............................................................................................................................19
6.3 Reliability ..................................................................................................................................20
6.4 Physical ....................................................................................................................................20
6.5 Power........................................................................................................................................20
6.6 Environmental ...........................................................................................................................21
7. Regulatory
7.1 Environmental ...........................................................................................................................22
7.2 Emissions .................................................................................................................................22
Appendix A: Using the Linux Operating System
A.1 Overview ..................................................................................................................................24
A.2 Linux Compatibility ...................................................................................................................24
A.3 Using the RDX Docking Station with Linux ..............................................................................25
A.4 Troubleshooting .......................................................................................................................26
Page
2
1. Introduction:
Quantum RDX Hard Disk Storage System
1.1 Overview
Quantum RDX® storage is a removable, ruggedized, hard disk drive system. It features backup
application compatibility, a high speed transfer rate for fast backups, portable cartridges, and a
high level of data reliability. The storage system is available with an internal SATA or USB device
(see Figure 1) or external USB device (see Figure 2).
Figure 1: RDX Internal Docking Station
Internal Docking Station (SATA or USB)
Figure 2: RDX External Docking Station
External USB Docking Station
Page
3
1.2 Capacity and Transfer Rates
The capacity and transfer rate of the Quantum RDX storage system are outlined in the table
below (see Table 1). The capacity and transfer rate will vary depending on the RDX cartridge type
used.
Table 1: Capacity and Transfer Rates
Capacity
RDX 160 GB
RDX 320 GB
RDX 500 GB
RDX 640 GB
RDX 750 GB
RDX 1.0 TB
Native
Capacity
160 GB
320 GB
500 GB
640 GB
750 GB
1.0 TB
Average sustained transfer rate (MBs/sec)1
USB 2.0: 25 MB/s
SATA: 45 MB/s
USB 3.0: 230MB/s
Average access time (msec)
15
Function
Removable disk drive
Command set
• Packet command feature set, per ATA/ATAPI-7
• SCSI primary commands (SPC-2)
• SCSI block commands (SBC-2)
Supported file systems
2
ext2, ext3, FAT32, Mac OS Extended, NTFS
1
Actual results may vary depending on system environments, drive media used, or other factors.
2
NTFS is the default file system on the cartridge. If you are using Linux, the cartridge that comes
with your system will need to be reformatted to support a file system that is compatible with a
Linux-based operating system (see the section “RDX Cartridge File System Considerations” in
the appendix).
1.3 Supported Media
The RDX system supports any RDX cartridge. RDX cartridges are available in different capacity
configurations, depending on your storage requirements.
Page
4
1.4 Supported Operating Systems
The RDX storage system is supported on the following operating systems:
•
•
•
Microsoft ® Windows®
o Windows Server 2003 R2—Standard, Professional, Small Business
o Windows Server 2008 R2—Standard, Professional, Small Business
o Windows Vista SPI—32- and 64-bit Business
o Windows XP—Home and Professional
o Windows 7
Linux3
o CentOS Linux—v4.2, Kernel v2.6.9
o Fedora Core S—Kernel v2.6
o RHEL 3.0—Update 7
o RHEL 4.0—Update 3
o RHEL 5.0—Update 3
o RHEL 6.1/SP1
o SLES 9—Service Pack 3 x64
o SLES 10—x64
o SLES 11, SP1
Mac
o Mac OS X—10.4 or newer
3
Only the newest Linux versions are fully compatible with the USB 3.0 docks. All older versions of
Linux will support the USB 3.0 dock at USB 2.0 speeds.
1.5 Software
GoProtect® Backup Software
The RDX storage system works with industry backup applications that support removable disk
media. See your backup software manual for instructions on backing up data.
Windows Software
The RDX User Guide and Utilities CD provides essential Windows software for use with the RDX
system. The RDX software for Windows installs:
•
•
•
•
A removable disk utility that provides basic diagnostic test capabilities and a firmware
upgrade
An application update that enables the Eject button to operate correctly under the Windows
operating system
An application that allows the right-click eject function to operate in user-mode under the
Windows operating system
An application that automatically sets the SATA connection to DMA mode for improved
performance
See Section 2.3 Installing Utility Software for Windows and Section 4.2 Using the Removable
Disk Utility for more information on these applications.
Page
5
Linux Software
There is no special software necessary when running the Linux operating system. See Appendix
A: Using the Linux Operating System for more information on using the RDX system with Linux.
1.6 Front Panel Features
The front of the RDX docking station has the following features and indicators:
•
•
•
Cartridge Indicator (located on cartridge) (1)
Emergency Eject Hole (2)
Eject Button/Power Indicator (3)
Figure 3: Front Panel Features
Table 2: Power Indicator
The Eject button is illuminated by a power indicator. Table 2 describes the operation of this
indicator.
Indicator
Status
Meaning
Description
OFF
No Power
Docking station does not have power.
Steady
GREEN
Ready
Power is on and the RDX docking station is working properly.
Blinking
GREEN
Ejecting
Cartridge is ejecting.
Steady
AMBER
Fault
RDX docking station has detected a fault condition. For more
information, run a diagnostic application (see Section 4.2 Using
the Removable Disk Utility).
Blinking
AMBER
Prevent
Host computer is accessing the media, and the user has
pressed the Eject button. The indicator will blink amber for a
few seconds, and then return to a steady green. The cartridge
will eject after the host access completes.
Page
6
Table 3: Cartridge Indicator
The cartridge indicator displays the current status of the cartridge. Table 3 describes the
operation of this indicator.
Indicator
Status
Meaning
Description
OFF
Not Ready
Cartridge is not inserted properly or the docking station has no
power.
Steady
GREEN
Blinking
GREEN
Ready
Cartridge is ready.
Activity
Reading, writing, or seeking is occurring.
Steady
AMBER
Fault
RDX docking station has detected a cartridge fault condition.
For more information, run a diagnostic application (see Section
4.2 Using the Removable Disk Utility).
Page
7
2. Quick Start Installation:
Quantum RDX Removable Hard Disk Storage System
2.1 Installing the RDX Internal (SATA or USB) Docking Station
(Customer Kit)
This section describes how to install the RDX Internal drive.
Before You Begin
The RDX docking station ships ready to install in a standard 5.25-inch half-height drive bay.
Depending on your computer you may need a standard (flat blade) or Philips screwdriver to
remove the computer cover and install the drive in your computer.
Important Information on Electrostatic Damage
To protect your computer and docking station from electrostatic damage (ESD), follow these
guidelines:
NOTE: Your computer must be plugged into a grounded electrical outlet to be properly
grounded.
•
•
•
Before you open your computer or remove the RDX docking station from its antistatic bag,
ground yourself by touching the metal chassis of your computer or some other grounded
object. For optimal protection, use an electrostatic grounding strap.
Do not touch any printed circuit boards or electronic chips on your RDX docking station or in
your computer.
Turn your computer and any peripheral devices off before installing the RDX docking station.
Installation Instructions
1
2
3
4
Carefully unpack the docking station and accessories.
Turn off the computer.
Open the computer cover, using a screwdriver if necessary.
Mount the docking station. Slide the RDX docking station into an unused drive bay until
the bezel is flush with the front of the computer. Secure the docking station using
mounting screws, being careful not to over-tighten the screws (see Figure 4 below).
5 Attach the power cable to the power connector (see Figure 4 below).
6 Connect the data cable (SATA or USB) to the data connector (SATA or USB) - see
Figure 4 below. For USB installation, connect the other end of the cable to the
appropriate USB connector on the motherboard.
7 Check all cables in your computer system. Before you reinstall your computer cover,
ensure that all cables are correctly routed, so that they will not bind or become crimped.
Also, make sure that no cables have loosened during the installation.
8 Replace your computer cover.
9 Turn on the computer.
10 (For SATA units only.) During power-up press the F2 key, or other hot key, to enter BIOS
setup mode. Enable the SATA port connected to your RDX docking station. Save
changes and exit from the BIOS.
11 If running Windows install the RDX software (see Section 2.3 Installing Utility Software for
Windows).
12 If you are using the Linux operating system, see Appendix A: Using the Linux Operating
System.
Page
8
NOTE: If you install a new operating system on your computer with an RDX docking station
attached, make sure the cartridge is removed. This prevents the operating system from
confusing the removable drive with the system drive.
Figure 4: RDX Internal Connectors
Internal SATA Docking Station
(1)
(2)
(3)
(4)
Internal USB Docking Station
Mounting Screws
Power Adapter Cable
Mounting Holes
SATA Data Cable/USB Cable
2.2 Installing the RDX USB Removable Disk Docking Station
1
2
3
4
5
6
Carefully unpack the docking station and accessories.
Attach the USB cable to the USB port on the back of the RDX docking station and
connect it to an available USB 2.0 port on the computer (see Figure 5 below).
Attach the power cable to the power connector (see Figure 5 below) and plug it into an
outlet.
Select a convenient location for the RDX External drive that is flat, sturdy, level and close
to the host server. The drive can be oriented horizontally or vertically.
If running Windows install the RDX software (see Section 2.3 Installing Utility Software for
Windows).
If you are using the Linux operating system, see Appendix A: Using the Linux Operating
System.
Figure 5: RDX External USB Connectors
(1) AC Power Adapter
(2) USB Cable
Page
9
2.3 Installing Utility Software for Windows
NOTE: RDX Utility software is required to use the RDX docking station with Microsoft
Windows operating systems.
The Quantum RDX User Guide and Utilities CD provides the following essential Windows
software for use with the RDX docking station:
•
•
•
•
A removable disk utility that provides basic diagnostic test capabilities and firmware upgrades
An application update that enables the Eject button and right-click eject function to operate
correctly under the Windows operating system
An application that automatically sets the SATA connection to DMA mode for improved
performance
A software program that simplifies the process of creating data backups
The software on this disc will not interfere with other applications running on the computer.
To install RDX Utility software for Microsoft Windows Vista/XP/Server 2003:
1.
2.
3.
4.
5.
Log in as the Administrator to enable installation privileges.
Insert the RDX Utilities disc into the computer; a dialog box will open on the screen.
Click Install RDX Utilities and follow the on-screen prompts.
Optional: Click Install Quantum GoProtect and follow the on-screen prompts.
Once installation is complete, restart the computer.
Your new RDX system is ready for use. Refer to the backup software manual for
instructions on backing up data.
Page 10
3. Using the Quantum RDX Removable Hard Disk
Storage System
3.1 Operating the RDX System
This section describes typical activities involved in operating and maintaining the RDX system.
For instructions on using your backup software, see the manual that came with your software.
3.2 Handling the RDX Cartridges
Although RDX cartridges are rugged, it is always a best practice to take extra care not to drop
them when handling. This will ensure data integrity and long life. Observe the following
precautions:
•
•
•
•
•
Store cartridges in their protective cases when you are not using them.
Do not stack RDX cartridges.
Keep cartridges away from dust, dirt, and moisture.
Avoid direct sunlight, heat sources, temperature extremes, and rapid changes in temperature.
Never try to force the cartridge into the docking station. If it is difficult to insert, check the
orientation and ensure correct alignment, using the keyed corner as a guide.
3.3 Loading and Unloading Cartridges
The front of your docking station has an opening for inserting RDX cartridges. A protective door
covers the opening. Below and to the right of the door is the power indicator that doubles as a
cartridge-Eject button.
To Load a Cartridge
Insert the cartridge in the docking station with the keyed corner facing the upper left corner of the
docking station and the write-protect tab on the back right (see Figure 6). The cartridge only fits in
one orientation. Push the cartridge gently into the docking station until it locks in place with a
clicking sound.
Figure 6: Loading the Cartridge
(1) Keyed Corner
(2) Write Protect Tab
Page 11
To Unload a Cartridge
To unload a cartridge using the mouse right-click method (Windows only):
1
2
3
While running Windows Explorer, locate the drive letter for the device.
Right-click on the device and select Eject.
When the cartridge has been ejected by the docking station, grasp the exposed sides of
the cartridge and pull the cartridge straight out (see Figure 7).
To unload a cartridge using the Eject button:
1
2
Push the Eject button.
When the cartridge has been ejected by the docking station, grasp the exposed sides of
the cartridge and pull the cartridge straight out (see Figure 7).
NOTE: If the RDX software is not installed the Eject button and right-click eject method may
not work properly (see Section 2.3 Installing Utility Software for Windows).
NOTE: Under proper operation, the drive bay will make an audible noise during the ejection
process. If the cartridge does not eject, see Chapter 5 Troubleshooting for more details.
Figure 7: Unloading the Cartridge
(1) Cartridge Indicator (located on cartridge)
(2) Emergency Eject Hole
(3) Eject Button/Power Indicator
Page 12
To Emergency Eject a Cartridge
CAUTION: Do not emergency eject an RDX cartridge while the cartridge activity indicator is
flashing.
If the cartridge does not eject using either the Eject button or the right-click eject methods, use
the following emergency eject hole method to recover the cartridge:
1
2
3
4
If you are using the RDX Internal docking station, turn off your computer. If using the
RDX External docking station, unplug the power cable.
Insert a large straightened paper clip (or similar object) into the Emergency Eject Hole
(see Figure 7). Do not insert the object in the hole at an angle. Keep the object straight
and apply some force to eject the cartridge.
When the cartridge has been ejected by the docking station, grasp the exposed sides of
the cartridge and pull the cartridge straight out (see Figure 7).
Restart your computer to reset the RDX docking station. If using the RDX External
docking station, plug in the power cable for the docking station and then restart your
computer.
Page 13
4. Using the Quantum RDX Removable Disk Utility
4.1 Overview
The RDX Utility is a Windows application that allows you to diagnose problems with your RDX
docking station. With the utility, you can:
•
•
•
•
Identify the RDX docking station attached to your computer
Retrieve device and cartridge status information
Test the docking station and the cartridge
Upgrade docking station firmware
4.2 Using the Removable Disk Utility
To run the RDX Utility for Windows:
Click Start > All Programs > RDX > RDX Utility.
For instructions on using the removable disk utility, click Help.
If the software is not installed on your computer, see Section 2.3 Installing Utility Software for
Windows for installation instructions.
Page 14
5. Troubleshooting:
Quantum RDX Removable Hard Disk Storage System
5.1 Power Indicator is OFF
RDX Internal Docking Station
If the power indicator is off, the RDX Internal docking station does not have power. If this
happens, follow these steps to verify the cable connections in the rear of the docking station:
1
2
3
Turn off the computer.
Check the power and data cable connections in the rear of the docking station.
Turn on the computer.
RDX External Docking Station
If the power indicator is off, the RDX External docking station does not have power. If this
happens, follow these steps to verify the cable connections in the rear of the docking station:
1
2
3
Check the power connection at the back of the docking station.
Check that the power adapter is plugged into an outlet.
If the power adaptor is plugged into an outlet strip make sure that it is turned on.
Low Power Mode (USB 3.0 External only)
If the USB cable is unplugged from the USB 3.0 External dock, the dock will enter Low Power
Mode and the dock power light will turn OFF.
If a cartridge is in the dock when the unit goes into Low Power Mode, push the Eject button to
eject the cartridge.
The dock will resume normal operation once the USB cable is reconnected to the computer.
5.2 Power Indicator is Steady AMBER
If the power indicator is a steady amber, the RDX docking station is not working properly. The
error is due to one of the following conditions:
•
•
The docking station cannot eject the cartridge due to an obstruction.
The internal electronics are damaged or malfunctioning.
Follow these steps to remove a stuck cartridge:
1
2
3
4
If you are using the RDX Internal docking station, turn off your computer. If you are using
the RDX External docking station, unplug the power cable.
Insert a large straightened paper clip (or similar object) into the Emergency Eject Hole
(see Figure 7 in Section 3.3 Loading and Unloading Cartridges). Do not insert the object
in the hole at an angle. Keep the object straight and apply some force to eject the
cartridge.
When the cartridge has been ejected by the docking station, grasp the exposed sides of
the cartridge and pull the cartridge straight out.
Restart your computer to reset the RDX docking station. If using the RDX External
docking station, plug in the power cable for the docking station and then restart your
computer.
Page 15
5.3 Power Indicator is Blinking AMBER and Cartridge Does Not Eject
If the power indicator is blinking amber after you press the Eject button, the Host computer is
accessing the media. The RDX docking station will eject the cartridge after the Host access
completes.
If the cartridge does not eject after the Host computer access completes, you may not be running
the correct utility software. See Section 2.3 Installing Utility Software for Windows for instructions
on installing the software.
If the cartridge still does not eject, use Windows Explorer to eject the cartridge. In Windows
Explorer, right-click on the drive letter for the RDX docking station (i.e. F:), and select Eject.
5.4 Cartridge Indicator is Steady AMBER
The cartridge indicator is located on the front of the cartridge. If this indicator is amber, the
cartridge is not working properly. The error is due to one of the following conditions:
•
•
•
The cartridge is not compatible with the RDX docking station.
The cartridge has been severely damaged.
The cartridge has not been fully inserted.
Run the removable disk utility to obtain more information about the failure. See Section 4.2 Using
the Removable Disk Utility.
5.5 Cartridge Does Not Eject
If the cartridge does not eject, verify that you have installed the utility software. See Section 2.3
Installing Utility Software for Windows for instructions on installing the software.
Follow these steps to remove a stuck cartridge:
1 If using the RDX Internal docking station, turn off your computer. If using the RDX
External docking station, unplug the power cable.
2 Insert a large straightened paper clip (or similar object) into the Emergency Eject Hole
(see Figure 7 in Section 3.3 Loading and Unloading Cartridges). Do not insert the object
in the hole at an angle. Keep the object straight and apply some force to eject the
cartridge.
3 When the cartridge has been ejected by the docking station, grasp the exposed sides of
the cartridge and pull the cartridge straight out.
4 Restart your computer to reset the RDX docking station. If using the RDX External
docking station, plug in the power cable for the docking station and then restart your
computer.
NOTE: When the emergency eject is used, the computer's operating system will lose
recognition of the RDX media. Therefore, one of the following options can be performed to
restore recognition.
•
•
Restart the computer (recommended).
Follow steps 1-4 in Section 5.6 Docking Station Does Not Appear in the Device Manager
(Windows) if re-starting the computer is not desired.
Page 16
5.6 Docking Station Does Not Appear in the Device Manager
(Windows)
If the docking station does not appear in the Windows Device Manager and the power indicator is
green, follow these steps to rescan the hardware:
1
2
3
4
Bring up the Device Manager:
a. Right-click on My Computer.
b. Select Manage.
c. Select Device Manager.
Right-click on the top folder (this should be your computer’s name).
Select Scan for Hardware Changes.
You should see your RDX device listed under Disk drives. If the device does not appear,
restart the computer.
5.7 Docking Station Performance Seems Slow
RDX Internal Docking Station
Some system SATA ports do not by default operate in DMA mode for the RDX Internal device.
This results in slower performance and weaker data protection. Reinstall the utility software for
Windows to set the SATA ports to the correct mode. Refer to Section 2.3 Installing Utility
Software for Windows section.
RDX External Docking Station
The RDX External device may appear slow based on the type of USB port the device is attached
to. Make sure your docking station is connected to a USB 2.0 or USB 3.0 port instead of a USB
1.1 port. For best performance, connect directly to a USB 2.0 or USB 3.0 root hub on the PC, and
not an external hub.
The USB bus shares bandwidth between all USB devices connected to the system, including the
RDX External docking station. The use of cameras, flash memory devices, etc. on the USB bus
may decrease performance of the device. Remove extra devices if they are not necessary.
Linux Users
Systems running Linux may see reduced performance when doing backups on RDX cartridges
configured for FAT32. For best performance, configure the file system on the RDX cartridges for
ext2 or ext3. See Appendix A.3 Using the RDX System with Linux.
5.8 Write Error
If the backup application reports a write error, follow these steps:
1
2
3
Verify that the write protect switch on the cartridge is set to the “unlock” position.
Check the cartridge indicator on the front of the cartridge. If this indicator is amber, the
cartridge is not working
properly. This may be due to
severe damage to the cartridge. Run the RDX utility software to obtain more information
about the failure.
Replace the cartridge if the error persists.
Page 17
5.9 Firmware Download Fails with Windows Server 2003
If the firmware download fails with the error invalid parameter and you are using Windows Server
2003, check to ensure that you have at least Service Pack 1 installed.
5.10 System Will Not Complete Boot Process with RDX
External Docking Station
Some BIOS versions do not handle large USB removable media correctly. If your system will not
complete the boot process with the RDX External device attached, follow the steps below:
1
2
3
4
Make sure you are using the latest BIOS for your system.
Disable USB boot in the BIOS and retry.
Attempt to eject the cartridge and retry boot, or boot with the RDX device disconnected.
If you are using a FAT32-formatted cartridge, reformatting to another file system may fix
the problem.
Page 18
6. Specifications:
Quantum RDX Removable Hard Disk Storage System
6.1 General
Manufacturer
Quantum Corp
Model Names
RDX-SATA, RDX-USB-INT, RDX-USB, RDX-USB3-INT, and RDX-USB3
Internal SATA, Internal USB 2.0, External USB 2.0, Internal USB 3.0, and
External USB 3.0
Interface Type
6.2 Performance
Capacity
RDX 160 GB
RDX 320 GB
RDX 500 GB
RDX 640 GB
RDX 750 GB
RDX 1.0 TB
Native
Capacity
160 GB
320 GB
500 GB
640 GB
750 GB
1.0 TB
Average sustained transfer rate (MBs/sec)1
USB 2.0: 25 MB/s
SATA: 45 MB/s
USB 3.0: 230MB/s
Average access time (msec)
15
Function
Removable disk drive
Command set
• Packet command feature set, per ATA/ATAPI-7
• SCSI primary commands (SPC-2)
• SCSI block commands (SBC-2)
Supported file systems
2
ext2, ext3, FAT32, Mac OS Extended, NTFS
1
Actual results may vary depending on system environments, drive media used, or other factors.
2
NTFS is the default file system on the cartridge. If you are using Linux the cartridge that comes
with your system will need to be reformatted to support a file system that is compatible with a
Linux-based operating system (see Appendix A.3 Using the RDX System with Linux).
Page 19
6.3 Reliability
Unrecoverable error
rate
MTBF
1 error per 10^14 bits read
550,000 hours
6.4 Physical
RDX Internal Docking Station
RDX External Docking
Station
Form
Factor
5.25 inch half-height internal
External
Height
41.4 mm (1.63 inch)
51.8 mm (2.04 inch)
Width
146.0 mm (5.75 inch)
109.8 mm (4.32 inch)
86.6 mm (3.4 inch)
Depth
171.9 mm (6.77 inch) including
bezel
177.5 mm (7.00 inch)
including bezel
119.18 mm (4.69
inch)
Weight
635 g (1.40 lbs)
540 g (1.19 lbs)
173 g (0.38 lbs)
RDX Media
Removable
Cartridge
23.68 mm (0.93
inch)
6.5 Power
Voltage Tolerance
Internal RDX Docking Station
+5VDC ±5% (SATA and USB)
+12VDC ±10% (USB)
External RDX Docking Station
+12VDC ±10%
Power Consumption
(Typical/Peak)
7.5W/13W (SATA)
6.6W/20W (USB)
6.6W/13W
AC Adapter
N/A
Universal Adapter 100-240 VAC,
50-60Hz input
Page 20
6.6 Environmental
RDX Docking Station
Operational
Non-Operational
Temperature
10° to 40°C
-40° to 65°C
Thermal Gradient
10°C/hour
20°C/hour
Relative Humidity
20% to 80%, non-condensing
10% to 90%, non-condensing
Maximum Wet Bulb
Temperature
29°C, non-condensing
38°C, non-condensing
Altitude
-50 ft to 10,000 ft
-50 ft to 35,000 ft
Vibration
sine vib 0.25G peak, 3-200 Hz
random vib 1.54G RMS
Shock
half sine 31G @ 2.6ms
half sine 71G @ 2 ms
Page 21
7. Regulatory:
Quantum RDX Removable Hard Disk Storage System
7.1 Environmental
•
•
WEEE: product is registered and labeled as not appropriate for common disposal.
RoHS: all materials and processes used in the system meet the limits for compliance.
7.2 Emissions
•
•
•
•
•
(USA) This device complies with part 15 of the FCC Rules. Operation is subject to the
following two conditions: (1) This device may not cause harmful interference, and (2) this
device must accept any interference received, including interference that may cause
undesired operation.
This equipment has been tested and found to comply with the limits for a Class A digital
device, pursuant to part 15 of the FCC Rules. These limits are designed to provide
reasonable protection against harmful interference when the equipment is operated in a
commercial environment. This equipment generates, uses, and can radiate radio
frequency energy and, if not installed and used in accordance with the instruction
manual, may cause harmful interference to radio communications. Operation of this
equipment in a residential area is likely to cause harmful interference in which case the
user will be required to correct the interference at their own expense.
(Europe) Meets the CE requirements as specified in EMC Directive 89/336/EEC, CISPR
22 & CISPR 24/.
(Australia & New Zealand) C-Tick
(Japan) This is a Class A product. In a domestic environment this product may cause
radio interference, in which case the user may be required to take corrective actions.
VCCI-A
(Taiwan) This is a Class A Information Product; when used in residential environment, it
may cause radio frequency interference. Under such circumstances, the user may be
requested to take appropriate countermeasures.
Page 22
Environmental Protection Use Period (EPUP) Disclaimer:
The number provided as the EPUP is provided solely to comply with applicable laws of the
People’s Republic of China. It does not create any warranties or liabilities on behalf of Quantum
to customers. The EPUP assumes that the product will be used under normal conditions in
accordance with the Quantum operating manual. Certain assemblies inside this product (for
example, assemblies that contain a battery) may have an EPUP which is lower than the EPUP on
this product.
Part Name
Chassis
PCBA
Enclosure
Lead (Pb)
O
X
O
Mercury
(Hg)
O
O
O
Cadmium
(Cd)
O
O
O
Hexavalent
Chromium
(Cr(VI))
O
O
O
Polybrominated
biphenyl (PBB)
O
O
O
Polybrominated
diphenylether
(PBDE)
O
O
O
O: Indicates that the content of the toxic and hazardous substance in all the homogeneous
materials of the part is below the concentration limit requirement as described in SJ/T 113632006.
X: Indicates that the content of the toxic and hazardous substance in at least one homogeneous
material of the part exceeds the concentration limit requirement as described in SJ/T 11363-2006.
Page 23
Appendix A: Using the Linux Operating System
Quantum RDX Removable Hard Disk Storage System
A.1 Overview
This document describes the use of RDX removable disk docking stations on Linux operating
systems. There are two models of the RDX docking station: an internal SATA version and an
external USB version. Both the SATA and USB models support Linux.
A.2 Linux Compatibility
There are a large number of possible Linux distributions that will natively support the RDX
docking stations natively. The Linux distributions listed in the table below have been tested and
found compliant (see Table 1).
Table 1: Compatibility
Linux Distribution1
RDX Internal SATA
RDX External USB
RHEL 3.0 Update 7
Supported
Supported
RHEL 4.0 Update 3
Supported
Supported
RHEL 5.0 Update 3
Supported
Supported
RHEL 6.1/SP1
Supported
Supported
SLES 9 Service Pack 3 x64
Not Supported
Supported
SLES 10 x64
Supported
Supported
SLES 11 SP1
Supported
Supported
SLES – SUSE Linux Enterprise Server (Novell)
RHEL – Red Hat Enterprise Linux
SLES 9 Service Pack 3 does not support SATA ATAPI devices and therefore does not support
the RDX Internal SATA product.
1
Only the newest Linux versions are fully compatible with the USB 3.0 docks. All other older versions of
Linux will support the USB 3.0 dock at USB 2.0 speeds.
Page 24
A.3 Using the RDX System with Linux
RDX Cartridge File System Considerations
The RDX cartridge is formatted as NTFS at point of sale. NTFS format does not allow writes in a
Linux operating system. Your cartridge must be reformatted to a different file system supported
by Linux, such as FAT32, ext2, or ext3, etc. Please refer to the man pages for fdisk and mkfs for
detailed instructions on how to manipulate partition tables and create file systems on Linux. If
you are creating multiple partitions on a cartridge, see the Eject section below.
•
•
•
The choice of the file system also has significant impact on backup performance. Ext3
typically gives the best overall performance.
The FAT32 file system has a 4 GB file size limit, which can limit archive sizes when using tar.
Some system BIOS do not handle FAT32 formatted disk volumes correctly and may hang on
boot. This typically occurs when USB boot is enabled in the BIOS. See Section 5.10 System
Will Not Complete Boot Process with RDX External for more information.
NOTE: Although mkfs will allow format of unpartitioned media, we recommend always using
fdisk to create partitioned media before formatting. Issues exist with the 2.4 kernel and
umount when using un-partitioned media.
Automount
A cartridge must be mounted to be accessible by the backup application. Some Linux
distributions include pre-configured automount for removable disks, while others may require user
configuration. Please refer to the man pages for automount for more information.
Eject
If the cartridge is mounted, the Eject button on the RDX drive will not work properly. Use the eject
command to unmount and eject the cartridge.
NOTE: The eject command cannot properly handle unmount if multiple partitions are present
on a removable disk. Each mounted partition must be unmounted manually, or the eject
command will fail.
Backup With tar
The tar command works with RDX docking stations by writing the archive to a file on the
cartridge. Use the tar -M option to create archives which span multiple cartridges on the RDX
docking station. For spanning removable disk cartridges use the tar -M -L size option (where size
is the cartridge capacity in kilobytes) when creating multiple-volume backups. For more
information, refer to the man page for tar.
Page 25
A.4 Troubleshooting
SCSI Device Status
To find out whether the RDX drive is recognized by the system, issue the following command:
cat
/proc/scsi/scsi
This will print out a list of all the SCSI devices in the system. The list should include any RDX
drives recognized by the system. If the RDX docking station is not listed, check cable
connections and power supplies (and BIOS settings for the SATA product.)
e2fsck File System Check Fails
If the e2fsck program is unable to successfully complete the file check of an ext2/ext3 cartridge,
check to make sure you have the latest version of e2fsprogs installed. Under certain
circumstances, earlier versions (pre 1.35) of e2fsck included with some distributions are unable
to complete the file systems check.
Product Registration and Support
For product registration and support, go to www.quantum.com/ServiceandSupport
Copyrights
When writing to an RDX cartridge, make sure you are not infringing any copyrights. When
backing up software, please make sure that you are not infringing any software copyrights for that
product.
Quantum and the Quantum logo are trademarks of Quantum Corp. All other brand, product
names, trademarks, or registered trademarks are the property of their respective owners.
RDX is a registered trademark of Tandberg Data ASA.
Page 26