1
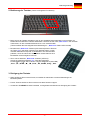
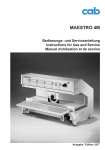
1. Installation der Tastatur 1.1 System-Voraussetzungen Diese Tastatur erfordert einen PC mit USB- oder PS/2-Anschluss und einem der folgenden Betriebssysteme: Windows 98SE / ME / 2000 / XP / Vista Für die Installation der Tastatur unter den o.g. Betriebssystemen benötigen Sie KEINEN speziellen Treiber! 1.2 Anschluss der Tastatur an den PC Um Ihre Tastatur zu installieren, führen Sie bitte folgende Schritte aus: • USB Schließen Sie Ihre Tastatur einfach über eine freie USB-Buchse an Ihren Rechner an. • PS/2 Ist kein USB-Anschluss an Ihrem Rechner verfügbar, können Sie Ihre Tastatur auch über PS/2 anbinden: Fahren Sie hierzu Ihren Rechner herunter. Schließen Sie den beiliegenden Adapter an den USB-Stecker der Tastatur und dann an die violette PS/2-Tastaturbuchse an Ihrem Rechner an (NICHT an die grüne Mausbuchse!). Nun starten Sie Ihren Rechner neu. • Alle aktuellen Betriebssysteme mit Unterstützung für Plug & Play werden Ihre Tastatur automatisch erkennen und die erforderlichen Treiber laden. Unter Umständen folgen Sie bitte den Anweisungen auf Ihrem Bildschirm. In manchen Fällen ist gemäß den Bildschirmanweisungen die Installations-CD Ihres Betriebssystems erforderlich. Ältere Betriebssysteme unterstützen nicht immer das automatische Erkennen von USB- oder PS/2- Geräten. Haben Sie Ihre Tastatur angeschlossen und macht sich genau dieser Fehler bei Ihnen bemerkbar, so haben Sie folgende Möglichkeiten zur Lösung dieses Problems: • Machen Sie ein Update Ihres Betriebssystems und beginnen wieder mit Schritt 1.2 • Kontrollieren Sie bei USB-Anbindung, ob Ihr BIOS-System USB-Tastaturen unterstützt*. Manche Hersteller bieten BIOS-Updates im Internet zum Downloaden an. • Sollten System-Updates erfolglos bleiben, so empfiehlt es sich, die Tastatur mal an einen anderen PC mit gleichem Betriebssystem zu testen, um ein Hardware-Defekt des Eingabegerätes auszuschließen. * Einzelheiten entnehmen Sie der Dokumentation Ihres PCs. Version 1.0 (2007/07/18) ● © 2007 by MaxPoint Handelsges mbH -1- Bedienungsanweisung 2. Bedienung der Tastatur (Tasten mit doppelten Funktionen) Virtueller Ziffernblock • Beim Layout der Tastatur handelt es sich um ein spezielles Platz sparendes Layout mit dem von Notebooks her bekannten virtuellen Ziffernblock. Drücken Sie die Taste „Num Lock“ in der obersten Tastenreihe, um den virtuellen Ziffernblock ein- bzw. auszuschalten. (Tasten erhalten die blau aufgedruckten Bedeutungen – „Num Lock“ Status-LED leuchtet) • Bei aktivierter „Num Lock“-Funktion (LED leuchtet) können Sie auch die Taste „Fn“ in der linken unteren Ecke gedrückt halten, um den virtuellen Ziffernblock temporär zu deaktivieren. Das ist besonders praktisch, wenn Sie neben den vielen Zahlen zwischendurch auch Buchstaben schnell eingeben möchten. • Ohne vorher aktivierter „Num Lock“-Funktion (LED aus) steuert die gedrückt gehaltene „Fn“-Taste die integrierten Positionstasten genau wie bei einem externen Ziffernblock (siehe Bild) „Pos1“, „ “, „Bild “, „ “, „ “, „Ende“, „ “, „Bild “, „Einfg“, „Entf“ 3. Reinigung der Tastatur • Staub entfernen Sie mit einem Pinsel, mit sanfter Druckluft oder mit einem Staubsauger mit Bürstenkopfdüse. • Feinen Schmutz entfernen Sie mit einem nicht allzu feuchten Lappen. • Verwenden Sie KEINE scharfen Putzmittel, Lösungsmittel oder Benzin zur Reinigung der Tastatur. Irrtümer und Auslassungen vorbehalten -2- 1. Installation of the Keyboard 1.1 Conditions of the system This keyboard requires a PC with USB or PS/2 connection and one of the following operating systems: Windows 98SE / ME / 2000 / XP / Vista For installation of your keyboard with the above mentioned operating systems you do not need a special driver! 1.2 Connection of the keyboard to the PC In order to install your keyboard, please perform the following steps: • USB Connect simply your keyboard to a free USB port on your computer. • PS/2 If your PC has no USB-connection, you can connect your keyboard also to PS/2: Shut down your PC. Collect the enclosed adapter to the USB-plug of your keyboard and then to the violet PS/2-keyboard jack on your PC (NOT to the green mouse jack!). Now start your PC again. • All state-of-the-art operating systems with Plug & Play support will recognize your keyboard automatically and load the required drivers. If applicable, please follow the instructions on your screen. In certain cases, the installation CD of your operating system might be required according to the instructions on the screen. Older operating systems do not always support automatic hardware recognition. If you have attached your keyboard, and exactly this error occurs on your system, you have the following alternatives to solve the problem: • Perform an update of your operating system and return to Step 1.2 • Check in case of USB-connection whether your BIOS system supports USB keyboards*. Some main board manufacturers offer BIOS up-dates on the Internet for downloading. • Should your system-updates keep out of success, it is recommendable to test the keyboard with an other PC with the same operating system to rule out a hardware damage. * Refer to the documentation of your PC for details. Version 1.0 (2007/07/18) ● © 2007 by MaxPoint Handelsges mbH -3- Operation Manual 2. How to use the Keyboard (Keys with double functions) virtual numeric keypad • The layout of the keyboard is a special space-saving layout with the same virtual numeric keypad also used in notebook keyboards: Press the „Num Lock“ key in the top key row in order to switch the virtual numeric keypad function on and off. (Characters depicted in blue are assigned to the keys – „Num Lock“ status-LED is lighting) • The integrated numeric keypad is activated when the „Num Lock“ function has been typed (LED is lighting). If the "Fn" key is being kept pressed simultaneously, you can temporary de-activate the virtual numeric keypad. This is particularly convenient to quickly enter letters apart from numbers. • Without the „Num Lock“ key having been pressed (LED off), the "Fn" key kept pressed will control the integrated position keys in the same way as an external keypad (please refer to the picture) „Home“, „ “, „PgUp“, „ “, „ “, „End“, „ “, „PgDn“, „Ins“, „Del“ 3. How to clean the keyboard • Remove dust with a brush, with soft compressed air, or with a vacuum cleaner with brush head nozzle. • Remove fine dirt with a not-too-damp cloth. • DO NOT use any aggressive detergents, solvents, or gasoline in order to clean the keyboard. E&OE -4- 1. Installation du clavier 1.1 Demandes au système Ce clavier demande un PC avec connexion USB ou PS/2 et un des systèmes d’exploitation suivants: Windows 98SE / ME / 2000 / XP / Vista Pour l’installation de clavier avec des systèmes d’exploitation mentionnés ci-dessus, vous n’avez pas besoin de pilote spécial. 1.2 Installation du clavier à l’ordinateur Pour installer votre clavier, exécutez les pas suivants : • USB Branchez simple votre clavier à une borne USB libre sur votre ordinateur. • PS/2 Si vous n’avez pas de port USB de connecteur clavier sur votre PC, vous pouvez le connecter grâce à l’adaptateur de USB / PS2 : Eteignez votre PC, il vous suffit de mettre l’adaptateur USB à votre clavier et puis votre PS/2 clavier jack en couleur violet sur votre PC. (Ne pas mettre ce qui est en couleur verte de la souris). Ensuite, redémarrez votre PC. • Toes systèmes d’exploitation actuels qui supportent « Plug & Play » reconnaîtront votre clavier automatiquement et lanceront les pilotes nécessaires. Le cas échéant, suivez les instructions sur votre écran. Il est possible la CD d’installation de votre système d’exploitation sera nécessaire conformement aux instructions sur l’écran. Les systèmes plus vieux ne supportent pas toujours la reconnaissance automatique de matériel. Si vous avez connecté votre clavier, y exactement cet erreur apparaît chez vous, vous aurez les possibilités suivantes pour solutionner ce problème : • Mettez votre système d’exlpoitation à jour er retournez à Pas 1.2 • Au cas où connexion USB vérifiez que votre système d’exploitation et BIOS supportent des claviers USB*. Plusieurs fabricants offrent des actualisations de BIOS dans l’Internet pour télécharge. • Dans le cas que votre système n’a pas réussi de mettre à jour, il devrait tester votre clavier sur un autre PC avec même système d’exploitation pour exclure un dégât de disc dur. *Consultez le documentation de votre PC pour détails. Version 1.0 (2007/07/18) ● © 2007 by MaxPoint Handelsges mbH -5- Manuel d’Utilisation 2. Utilisation du Clavier (Touches avec un fonction double) Le bloc numérique virtuel • La disposition de clavier est une disposition spécial économe d’espace avec le bloc numérique virtuel des claviers de portatif : Appuyez la touche « VerrNum » dans la rangée de touches suprême pour activer le bloc numérique virtuel et une deuxième fois pour le désactiver (pour que les touches prennent les sens des caractères imprimés en bleu). • Avec active « VerrNum » fonction (diode lumineuse brille) vous pourriez aussi tenir la touché « Fn » dans le coin inférieur gauche pressée pour une désactivation temporaire du bloc numérique virtuel. Ceci sera particulièrement pratique si vous voudriez entrer des letters rapidement à côté beaucoup de nombres. • Sans l’activation précédente de la touche « VerrNum » (diode lumineuse éteindue), la touche « Fn » qui reste appuyée règle les touches de position intégrées autant que lors de le bloc numérique externe (cf image) « », « », « », « », « », « fin », « », « », « Inser », « Suppr » 3. Nettoyage du Clavier • Ôtez poussière en utilisant un pinceau, d’air comprimé doux, ou un aspirateur à buse-brosse. • Ôtez saleté subtile en utilisant un chiffon pas trop mouillé. • NE PAS utiliser des nettoyants agressifs, des solvants, ou d’essence pour nettoyer le clavier. Reservados errores y omisiones -6- Federal Communications Commission (FCC) Notice This device complies with Part 15 of the FCC rules. Operation is subject to the following two conditions (1) This device may not cause harmful interference, and (2) This device must accept any interference received, including interference that may cause undesired operation. This equipment has been tested and found to comply with the limits of a Class B digital device, pursuant to Part 15 of the FCC Rules These limits are designed to provide reasonable protection against harmful interference in a residential installation This equipment generates, uses and can radiate radio frequency energy and, if not installed and used in accordance with the instructions, may cause harmful interference to radio communications, However, there is no guarantee that interference will not occur in particular installations If this equipment does cause harmful interference to radio or television reception, which can be determined by turning the equipment off and on, the user is encouraged to try to correct the interference by one or more of the following measures: 1. Reorient / Relocate the receiving antenna. 2. Increase the distance between the mouse and receiver. 3. Connect the equipment into an outlet on a circuit different from that the receiver is connected. CAUTION: Change or modifications not expressly approved by the manufacturer responsible for compliance could void the user's authority to operate the equipment. Version 1.0 (2007/07/18) ● © 2007 by MaxPoint Handelsges mbH -7-