1
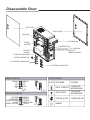
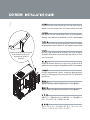
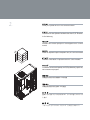
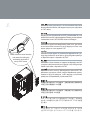
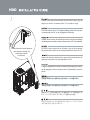
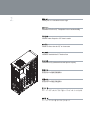
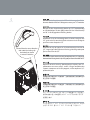
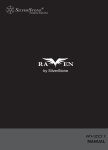
2 MANUAL Product Overview 2b Specification: Material: High-strength plastic front panel & aluminum accent, SECC body Motherboard: ATX, Micro ATX Driver Bay: External 5.25" x 4, 3.5” x 1, Internal 3.5” x 5 Cooling System: Front - 1 x 120mm fan slot, Rear - 1 x 120mm exhaust fan, Top - 1 x 120mm or 1 x 140mm fan slot Expansion Slot : 7 Front I/O Port: USB2.0 x 2, Audio x 1, MIC x 1 Power Supply: 1 x Optional standard PS2 (ATX) Dimension: 483 mm ( D ) x 200 mm ( W ) x 438mm ( H ) Disassemble Chart LEFT PANEL RIGHT PANEL 12025 FAN 5.25” DRIVE BAY ATX MB (OPTION) POWER BUTTON 3.5” DRIVE BAY RESET BUTTON FRONT I/O USB2.0*2+SPK+MIC PS2 PSU (OPTION) 3.5” DRIVE BAY (HIDDEN) 3.5” FDD LOCKING CLIP 5.25” DEVICE LOCKING CLIP 3.5” DEVICE LOCKING CLIP PARTS PACKAGE USB2.0 CONNECTOR USB+5V LPLP+ GND NC USB+5V LPLP+ GND PHOTO Pin PORT1L PORT1R PORT2R SENSE_SEND PORT2L PURPOSE METAL STANDOFF FOR SECURE MOTHERBOARD SCW-PW-M3*6 FOR SECURE MOTHERBOARD SCW-HW- #6-32*6 FOR SECURE PSU Pin HD AUDIO CONNECTOR AUD GND PRESENCE# SENSE1_RETURN NO PIN SENSE2_RETURN PART NAME Pin MANUAL - CD ROM Please follow the arrow direction and turn the locking clip 90 degree to remove outward from 5.25” device bracket as shown Bitte drehen Sie den Verschlußclip um 90° in die angegebene Richtung, und entnehmen Sie die Blende vom 5,25" Laufwerkskäfig Veuillez suivre le sens de la flèche et tournez le clip de verrouillage de 90 degrés pour retirer le casier 5.25” vers l’extérieur comme montré Please follow the arrow direction and rotate the locking clip vertically as shown to remove it Por favor, siga la dirección de la flecha y gire el clip de agarre 90 grados para sacarlo del bracket para dispositivos de 5,25” como se muestra Seguire la direzione della freccia e girare il clip di chiusura di 90 gradi per rimuovere il supporto del dispositivo da 5.25” come mostrato 1 Следуя направлению стрелки, поверните фиксирующую клипсу на 90 градусов и выньте кронштейн 5,25-дюймового устройства 䂟ձ೪⼎✻ㆁ丁ᮍᮟ䔝ᑺᕠᇛᠷ㞾য়㺱㕂ᶊপߎ 䇋ձ⼎✻ㆁ༈ᮍᮟ䕀ᑺৢᇚᠷ㞾য়㺙㕂ᶊপߎ ೇߩࠃ߁ߦǃⶶॄߩᮍߦᕧߞߡᅮ⫼ࠢ࠶ࡊࠍᑺಲߒߡ ā࠺ࡃࠗࠬࡉࠤ࠶࠻ࠍপࠅߎߒ߹ߔ 䞈䖐ⵝ䛙㜄♤⢰⦐䇭䆨⫱㡸⓸䏴㛨Ἤ⫰Ḱᵍ㢨ā ♈ⵈ㢨㏘⽀⢰䁇㡸ⵈᾙ㯱㡰⦐㥐ᶤ䚝⏼␘ Install your optical drive or 5.25” device as shown Installieren Sie das Optische Laufwerk oder einen 5,25" Einschub in die Halterung Installez votre lecteur optique ou votre appareil 5.25” comme montré 2 Instale su dispositivo óptico o dispositivo de 5,25” como se muestra Installare l’unità ottica o il dipositivo da 5.25” come mostrato Установите оптический привод или 5,25-дюймовое устройство, как показано на рисунке 䂟ձ೪⼎ᅝ㺱ᙼⱘܝ″য়㺱㕂 䇋ձᷛᅝ㺙ᙼⱘܝ偅য়㺙㕂 ೇߩࠃ߁ߦܝᄺ࠼ࠗࡉ߹ߚߪā࠺ࡃࠗࠬࠍࠗࡦࠬ࠻࡞ ߒ߹ߔ Ἤ⫰ḰGᵍ㢨Gṅ☐⢰㢨⽀⇌G␘⪬G\UY\ˉG㣙㾌⪰G㣙㵝䚝⏼␘ Reinstall the locking clip onto the 5.25” device bracket, then follow the arrow direction and turn it 90 degree to secure your optical drive or 5.25” device Bringen Sie den Verschlussclip am 5,25" Laufwerkshalter an, und drehen Sie ihn um 90° in die angegebene Richtung um das optische Laufwerk bzw. Ihren 5,25" Einschub sicher zu befestigen Réinstallez le clip de verrouillage dans le casier 5.25”, puis suivez le sens de la flèche et tournez le de 90 degrés pour fixez votre lecteur optique ou votre appareil 5.25” Reinstale el clip de agarre en el bracket para dispositivos de 5,25”, luego siga la dirección de la flecha y gírelo 90 grados para fijar su dispositivo óptico ó dispositivo de 5,25” Please follow the arrow direction and rotate the locking clip horizontally as shown to secure 5.25” device Reinstallare il clip di chiusura sul supporto del dispositivo da 5.25” e seguire la direzione della freccia girando il clip di 90 gradi per fissare l’unitá ottica o dispositivo da 5.25” Верните на место клипсу, фиксирующую кронштейн 5,25дюймового устройства, затем, следуя направлению стрелки, поверните ее на 90 градусов, чтобы закрепить оптический привод или 5,25-дюймовое устройствоda 5.25”. 3 䂟ձ೪⼎ᇛᠷ㺱ಲয়㺱㕂ᶊˈϺձ✻ㆁ丁丁ᮍᮟ䔝ᑺ ҹ䥪Ϟᙼⱘܝ″য়㺱㕂 䇋ձᷛᇚᠷ㺙ಲয়㺙㕂ᶊˈᑊձ✻ㆁ༈༈ᮍᮟ䕀ᑺ ҹ䫕Ϟᙼⱘܝ偅য়㺙㕂 ā࠺ࡃࠗࠬࡉࠤ࠶࠻ߦᅮ⫼ࠢ࠶ࡊࠍ᠏ߒǃⶶॄߩᮍ ߦᕧߞߡᑺಲߒߡܝᄺ࠼ࠗࡉ߹ߚߪā࠺ࡃࠗࠬࠍ ᅮߒ߹ߔ ⦐䇭䆨⫱㡸G\UY\ˉG♈ⵈ㢨㏘G⽀⢰䁇㜄G㣠㣙㵝䚐G䟸SG䞈䖐G ⵝ䛙㡰⦐G`W⓸G─⥘SGṅ☐⢰㢨⽀⇌G\UY\ˉG☐⢰㢨⽀⪰GḔ㥉㐐䇩⏼␘ HDD Please follow the arrow direction and turn the locking clip 90 degree to remove it outward from 3.5” hard drive cage Zum entnehmen des 3,5" Festplattenkäfigs drehen Sie bitte den Verschlussclip um 90° in die angegebene Richtung Veuillez suivre le sens de la flèche et tournez le clip de verrouillage de 90 degrés pour retirer le casier à disques durs 3.5” vers l’extérieur Por favor, siga la dirección de la flecha y gire el clip de agarre 90 grados para sacarlo de la carcasa para discos duros de 3,5” Please follow the arrow direction and rotate the locking clip vertically as shown to remove it Seguire la direzione della freccia e girare il clip di chiusura di 90 gradi per rimuovere il box del dispositivo da 3.5” Следуя направлению стрелки, поверните фиксирующую клипсу на 90 градусов и выньте корзину для 3,5-дюймового жесткого диска 䂟ձ೪⼎✻ㆁ丁ᮍᮟ䔝ᑺᕠᇛᠷ㞾য়㺱㕂ᶊপߎ 1 䇋ձ⼎✻ㆁ༈ᮍᮟ䕀ᑺৢᇚᠷ㞾য়㺙㕂ᶊপߎ ೇߩࠃ߁ߦǃⶶॄߩᮍߦᕧߞߡᅮ⫼ࠢ࠶ࡊࠍᑺಲߒߡ āࡂ࠼࠺ࠖࠬࠢ࠼ࠗࡉࠤࠫࠍপࠅߎߒ߹ߔ 䞈䖐Gⵝ䛙㜄G♤⢰G⦐䇭䆨⫱㡸G`W⓸G䏴㛨GZU\ˉG䚌☐☐⢰㢨⽀G 䀴㢨㫴⪰GⵈᵍG㯱㡸G㥐ᶤ䚝⏼␘ Install your 3.5” hard drive into the cage Installieren Sie Ihre 3,5” Festplatten in den Laufwerkskäfig Installez votre disque dur 3.5” dans le casier Instale su disco duro de 3,5” en la carcasa Installare l’hard disk da 3.5” hard nel box Установите 3,5-дюймовый жесткий диск в корзину ᅝ㺱ᙼⱘয়⹀㟇⹀ᶊЁ ᅝ㺙ᙼⱘয়⹀Ⲭ㟇⹀ⲬᶊЁ 2 āࡂ࠼࠺ࠖࠬࠢ࠼ࠗࡉࠍࠤࠫߦࠗࡦࠬ࠻࡞ߒ߹ߔ ZU\ˉG䚌☐G☐⢰㢨⽀⪰G䀴㢨㫴㜄G㣙㵝䚝⏼␘ Reinstall the locking clip onto the 3.5” hard drive cage, then follow the arrow direction and turn it 90 degree to secure your 3.5” hard drive Bringen Sie den Verschlussclip wieder am 3,5" Festplattenkäfig an und befestigen Sie den Käfig indem Sie den Verschlussclip um 90° in die angegebene Richtung drehen Réinstallez le clip de verrouillage dans le casier à disques durs 3.5”, puis suivez le sens de la flèche et tournez le de 90 degrés pour fixez votre disque dur 3.5” Reinstale el clip de agarre en la carcasa de discos duros de 3,5”, luego siga la dirección de la flecha y gírelo 90 grados para fijar su disco duro de 3,5” Please follow the arrow direction and rotate the locking clip horizontally as shown to secure hard drive Reinstallare il clip di chiusura sul box del dispositivo da 3.5” e seguire la direzione della freccia girando il clip di 90 gradi per fissare l’hard disk da3.5” Верните на место клипсу, фиксирующую корзину для 3,5дюймового жесткого диска, затем, следуя направлению стрелки, поверните ее на 90 градусов, чтобы закрепить 3,5дюймовый диск 䂟ձ೪⼎ᇛᠷ㺱ಲয়⹀ᶊˈϺձ✻ㆁ丁丁ᮍᮟ䔝ᑺҹ 䥪Ϟᙼⱘয়⹀ 䇋ձᷛᇚᠷ㺙ಲয়⹀Ⲭᶊˈᑊձ✻ㆁ༈༈ᮍᮟ䕀ᑺҹ 䫕Ϟᙼⱘয়⹀Ⲭ 3 āࡂ࠼࠺ࠖࠬࠢ࠼ࠗࡉࠤࠫߦᅮ⫼ࠢ࠶ࡊࠍ᠏ߒǃ ⶶॄߩᮍߦᕧߞߡᑺಲߒߡāࡂ࠼࠺ࠖࠬࠢ࠼ࠗࡉ ࠍᅮߒ߹ߔ ⦐䇭䆨⫱㡸GZU\ˉG䚌☐G☐⢰㢨⽀G䀴㢨㫴㜄G㣙㵝䚐G䟸SG䞈䖐G ⵝ䛙㡰⦐G`W⓸G䏴㛨GZU\ˉG䚌☐G☐⢰㢨⽀⪰GḔ㥉䚝⏼␘ October, 2008 NO:G11208580