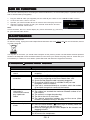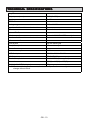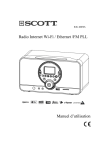
1
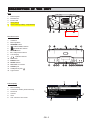
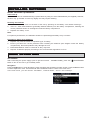
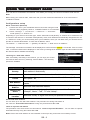
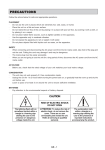
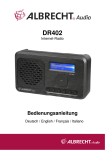
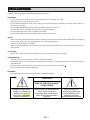
PRECA
UTIONS
PRECAUTIONS
Follow the advice below for safe and appropriate operations.
PLACEMENT
·
Do not use the unit in places which are extremely hot, cold, dusty, or humid.
·
Place the unit on a flat and even surface.
·
Do not restrict the airflow of the unit by placing it in a place with poor ventilation, covering it with a cloth, or
placing it on a carpet.
·
Do not place naked flame sources, such as lighted candles on the unit.
·
Use the unit only in moderate climates (not in tropical climates).
·
Do not expose the unit to rain or splash it with water.
·
Do not place objects filled with liquids such as vases, on the unit.
SAFETY
·
When connecting and disconnecting the AC power cord from the AC mains outlet, take hold of the plug and
not the cord. Pulling the cord may damage it and may be dangerous.
·
The plug must be easily accessible.
·
When you are not going to use the unit for a long period of time, disconnect the AC power cord from the AC
mains outlet.
AC VOLTAGE
·
Before use, check that the rated voltage of your unit matches your local voltage.
CONDENSATION
·
The unit may not work properly if it has condensation inside.
·
Unplug the unit for 1 to 2 hours before turning the power back on, or gradually heat the room up and dry the
unit before use.
·
Leave a space of at least 5 cm around the unit to ensure sufficient ventilation.
·
Do not obstruct the ventilation openings
BATTERIES
·
Pay attention to the environmental aspects of battery disposal.
CAUTION
RISK OF ELECTRIC SHOCK
DO NOT OPEN
The lightning flash with an
arrowhead symbol within a
trangle is a warning sign
alerting the user to the
presence of dangerous
voltage inside the unit.
ATTENTION: To reduce the risk of
electric shock, do not remove the
cover. There are no user
serviceable parts inside the unit.
Refer all servicing to qualified
personal.
GB - 1
The exclamation mark
within a triangle is a
warning sign alerting the
user to the presence of
inportant instructions
accompanying the product.
TABLE OF CONTENTS
PRECAUTIONS---------------------------------------------------------------------------------------------------------------------------------1
TABLE OF CONTENTS-----------------------------------------------------------------------------------------------------------------------2
BOX CONTENTS--------------------------------------------------------------------------------------------------------------------------------2
FEATURES---------------------------------------------------------------------------------------------------------------------------------------2
DESCRIPTION OF THE UNIT--------------------------------------------------------------------------------------------------------------3
INSTALLATION-----------------------------------------------------------------------------------------------------------------------------------4
CONNECTIONS--------------------------------------------------------------------------------------------------------------------------------4
INSTALLING BATTERIES---------------------------------------------------------------------------------------------------------------------5
BASIC OPERATIONS-----------------------------------------------------------------------------------------------------------------------5-6
USING THE FM RADIO ---------------------------------------------------------------------------------------------------------------------7
USING THE INTERNET RADIO ----------------------------------------------------------------------------------------------------------8
AUX IN FUNCTION----------------------------------------------------------------------------------------------------------------------------9
MAINTENANCE---------------------------------------------------------------------------------------------------------------------------------9
TROUBLE SHOOTING GUIDE-------------------------------------------------------------------------------------------------------------9
TECHNICAL SPECIFICATIONS-----------------------------------------------------------------------------------------------------------10
BO
X CONTENTS
BOX
1.
2.
Main unit
Wall bracket consisting of a base and two
crosspieces to be attached to the unit
3.
4.
5.
RJ45 Ethernet cable
Screws (8x) and plastic dowels (4x)
Instruction manual
FEA
TURES
FEATURES
This unit let you enjoy thousands of Internet radio stations as well as your favorite local FM stations, with following
features:
·
You can listen to web radio stations even when your PC is off. vTuner live internet radio service provides
more than 11,000 stations from all over the world and more than 10,000 regularly updated podcasts.
·
Connect the unit to your Internet network with an Ethernet cable.
·
You can store up to five Web radio stations and five local FM stations.
·
The AUX IN jack enables you to connect an external audio device to your radio and use it as a docking
station.
·
Clock, alarm and snooze functions (wake-up to the source you select).
·
The blue back-light on the tactile controls varies according to the ambient light.
·
The unit can be mounted on a wall.
·
Firmware can easily be upgraded via the Internet.
Note:
Due to continuous improvements, the features may be subject to change without notice. You should upgrade
the firmware regularly by browsing through the menus: Main menu -> Settings -> Update firmware. Please
download the latest version of the instruction manual from http://www.awox.com/Downloads/scott/.
GB - 2
DESCRIPTION OF THE UNIT
Back
1.
2.
3.
4.
5.
Ethernet jack
FM antenna
Power cord
Tilting stand
Time back up battery compartment
Unit front view
1.
2.
3.
4.
5.
6.
7.
8.
9.
10.
11.
12.
13.
14.
14.
15.
Tweeters
Main speakers
SNOOZE button
( ) ON/STANDBY button
ALARM OFF button
ALARM button
P1--- P5 preset buttons
LCD display
/
up/down buttons
OK button
BACK button
SLEEP button
VOLUME +/- buttons
AUX IN jack
Headphones jack
Light sensor
1
LCD display
1.
2.
3.
4.
5.
6.
Menu heading
Connection status (wired Internet)
Scroll bar
Volume
Time
The content of the menu
2
6
3
5
GB - 3
4
INST
ALLA
TION
INSTALLA
ALLATION
Using the stand
It is already fixed to the unit. You can adjust the angle
of the stand (1).
1
2
3
2
Using the wall mounting bracket
Remove the stand from the unit by sliding it back and
slightly lifing the clip. Use the screws to attach the two
cross-pieces (2) onto the back of the unit. Fix the
central base (3) onto the wall with the screws and dowels
and then click the unit onto the base.
1
CONNECTIONS
Note: In order to avoid any malfunctions, do not turn the
unit on before making the connections.
Connection with an Ethernet cable
Connect the unit to the broadband Internet using an RJ45
Ethernet cable (supplied) via the router and broadband modem
(cable/DSL) as illustrated. Follow the instructions given in
your router’smanual to ensure a proper Internet connection.
If you do not have a router, you should connect the unit
directly to the modem. Switch the modem off and back on
again to connect to the Internet.
Connecting the unit to the mains power supply
Insert the AC mains adapter into an AC mains outlet with a
100-240V AC ~ 50/60Hz power source.
Connecting an external audio device (e.g. MP3 player)
Connect the line out or headphones jack on an external
audio device (such as a MP3 player) to the unit’s AUX IN
jack with an AUX IN cable (not supplied).
Connecting headphones
Plug the headphones (not supplied) into the unit’s
headphones jack for private listening. The speaker output
will be shut off automatically.
GB - 4
RJ45 ETHERNET CABLE
MODEM
ROUTER
INTERNET
DATA PORT
INST
ALLING B
ATTERIES
INSTALLING
BA
Install time back up batteries
Time back up
The clock time can be maintained during a power failure by using 2 x AAA/ LR03 batteries (not supplied). However,
the time may go forward or back very slightly and may require resetting.
Inserting the batteries
1. Remove the battery cover on the back of the unit by pressing on the battery cover whilst removing it.
2. Insert 2 x AAA/ LR03 batteries (preferably alkaline batteries) into the battery compartment, following the
correct polarities shown on the diagram inside the battery compartment.
3. Replace the battery cover.
Note:
For optimum performance, the batteries should be replaced approximately every 6 months
Precautions when using batteries
1. Replace only with the same or equivalent type of battery.
2. Ensure you follow the correct polarities when installing the batteries (see diagram inside the battery
compartment). Reversed polarities may damage the unit.
3. Exhausted batteries must be removed as they may leak.
4. Dispose of batteries properly according to the environmental regulations in force.
B
ASIC OPERA
TIONS
BASIC
OPERATIONS
ON/ STANDBY
After connecting the power supply (refer to previous section - CONNECTIONS), press the (
button to turn on the unit or go to standby mode.
) ON/STANDBY
Navigation
Press the , button to scroll through the menu and press the OK button to select an item. Press the BACK button
to return to previous menu. Press and hold down the BACK button to return to the main menu.
In the main menu, you can choose: “FM Radio”, “Internet Radio”, “Aux In” and “Settings”.
GB - 5
“Settings” menu:
Setting
Description
“Enable”:
“Time”:
Alarm
Time
Time zone
Sleep
Connection
“Max volume”
Set the alarm time.
“ Audio Source”:
Select an audio source for the alarm:
‘Default Buzzer”, “FM presets”, “Internet
radio presets”.
“Volume”:
Select the alarm volume mode: “Constant
volume” and “Gentle wake” (volume
increases gradually).
Automatic:
Manual:
24/12 hour:
Automatic time set.
Adjust the clock time manually.
Select the 24 or 12 hour display.
Select the time zone for your region.
Select a time between 10 and 90 minutes before the radio
automatically goes to standby. The unit will automatically go to
standby once the set time has ended. (Note: You can press the
SLEEP button to enter this menu.)
Set the configuration of the Ethernet connection
Set the maximum volume level
Update
firmware
Update firmware via the Internet
Language
Select the on-screen-display language.
“Information”:
“Reset”:
Display
Enable or disable the alarm function.
Display various information such as the serial number, network
status, MAC address, etc..
Reset all settings to default values.
Ambience:
EQ
3D mode:
Select EQ mode: Normal, Rock, Jazz,
Classical, Pop or Mega Bass.
3D sound effect.
The “Connection” (P1), “Update firmware” (P2), “Information” (P3) andĀReset ” (P4) and “Max
volume” (P5) options can be hidden for hotel guests(In the Settings menu, press the SNOOZE button
and within 1 sec, press the preset button corresponding to the option you want to hide, as indicated above.)
GB - 6
TIME set
Setting the clock
1. Select Settings -> Time -> Manual. The clock time will be displayed.
2. Press the , button to adjust the hour and press the OK button
to confirm.
3. Repeat the step (2) to adjust the minutes.
Setting the alarm time
1. Select Settings -> Alarm -> Time. The alarm time will be displayed.
2. Follow the steps (2) to (3) in “Setting the clock” to set the alarm time.
Thise unit allows you to choose the sound to which you would like to wake up.
1. To enable the alarm function, select “Settings” ->”Alarm” -> “Enable” and
if necessary, set the alarm time. Press the OK button to confirm.
2. To select the alarm source, choose “Source”: “Default Buzzer”,
“FM presets”, “Internet radio presets”.
3. The unit will come on at the set time with the selected audio source.
button to stop the alarm and it will sound again the
4. Press the
next day at the same time.
5. To disable the alarm completely, select “Settings” -> “Alarm” -> “Enable” and press the OK button to
confirm.
Note:
Press the ALARM button to go straight to the alarm setting menu. The default alarm source is the buzzer. To select
alarm volume mode “Constant volume” or “Gentle wake”, enter “Settings” -> ”Alarm” -> ”Volume” and then
select one of the two options. When “Constant volume” mode is selected, a menu will appear for you to adjust the
alarm volume.
SNOOZE function
When the alarm sounds, press the SNOOZE button to stop the alarm and it will sound again after 8 minutes. This
snooze function can be repeated for up to one hour. To cancel SNOOZE function and repeat the alarm the next day,
button.
press the
USING THE FM RADIO
This mode allows you to listen to local FM radio stations.
Listen to FM radio
1. Press the
button to turn on the unit.
2. Select FM Radio -> Tune.
3. To search automatically, press the
or
button and then release to start
searching.
4. To search manually, press the OK button once to go to manual search mode
and then press the or
button to search for a station. Press the OK button
again to return to automatic tuning.
For optimum reception
When listening to a FM radio station, extend and position the antenna wire to
achieve optimum reception.
Preset FM radio stations
You can store up to five FM stations.
1. To store the current station, press and hold down one of the preset buttons P1
to P5. The icon
will appear.
2. Repeat step (1) to store other stations.
Listen to a preset FM station
Directly with the preset buttons P1 to P5
In FM radio mode, press one of the preset buttons P1 to P5 to listen to the preset
station.
Via the “FM presets” menu
Select “FM Radio” -> “FM presets” and then the desired preset station. Press
the OK button to confirm.
GB - 7
USING THE INTERNET RADIO
Your unit can be connected to an Ethernet. This allows you to enjoy the vTuner live Internet radio service.
Note:
Before using your Internet radio, make sure that you have read and understood all of the instructions in
“CONNECTIONS”.
Configurations setup
Wired connection (Ethernet)
1.
Connect the unit to your broadband Internet connection using an RJ45
Ethernet cable (supplied). Refer to “CONNECTIONS” for more details.
2.
Select “Settings” -> “Connection” -> “Ethernet” -> “Automatic
mode (DHCP)” or “STATIC IP”.
Depending on your Internet connection type, select “Automatic mode (DHCP)” or “STATIC IP” to enable the unit
to connect to the Internet. In “Automatic mode (DHCP)” mode, an IP address is automatically assigned to the unit.
In “STATIC IP” mode, you must manually enter your IP address, which you can obtain from your Internet service
provider or network administrator. To enter the IP address, select:
“IP address” -> “network mask” -> “gateway IP address” -> “DNS server IP address”
The message “Connection successful” will be displayed to confirm that the Internet is connected. If this is not the
case, “Connection failed” will be displayed. In this case try entering the IP address again and also make sure that
the network cable is available and working.
Listening to a web radio station
After successfully connecting to the Internet, you can enjoy the vTuner
live internet radio service by selecting “Internet Radio”. The following
options are available:
Options
Descriptions
Country
The unit can automatically detect the country it is in and display the web
radio stations in that country.
Location
Select a country and then select a web radio station in that country.
Format
This option allows you to choose a format: “News”, “Comedy”, “Dance”
and “Sports”. etc.
New Stations
Go straight to the new stations that have been added since the last
update.
Most Popular
Stations
Select the most listened-to stations.
Podcasts By
Genre
Select your favorite type of podcast such as “Arts Entertainment”,
“Lifestyle”, “Music”, “Talk”, “TV” and “Variety”.
Podcasts By
Location
Select the country or region from which your podcasts are broadcast.
Preset web radio stations
You can store up to five web radio stations. The procedure for storing web station is
the same as “Preset FM radio stations” using the preset buttons P1 to P5.
Listen to a preset web station
The procedure is the same as the one described in “Listen to a preset FM station” . You can listen to a preset
web station directly using the buttons P1 to P5.
Notes: Some web radio stations do not broadcast 24 hours per day, and some are not always on-line.
GB - 8
AUX IN FUNCTION
This unit has a AUX IN jack for connecting an external audio device, such as an MP3 player or portable CD player
with an AUX IN cable (not supplied).
1.
2.
3.
4.
Plug the AUX IN cable (not supplied) into the AUX IN jack. Refer to the “CONNECTIONS” section.
In the main menu, select “Aux IN”.
Operate your external audio device as usual to select and play the music.
Adjust the volume controls on both your external audio device and this
unit to the desired volume level.
Note:
In AUX IN mode, this unit cannot display any music information (e.g. track no.)
for your external audio device.
MAINTENANCE
Care and maintenance
To clean the casing, unplug the unit and wipe off dust and stains with a soft, damp cloth. Do not use benzene, thinner
or similar chemicals.
If at any time in the future you should need to dispose of this product, please note that waste electrical products
should not be disposed of with household waste. Find out where your nearest recycling centre is. Check with your
local authority or retailer for more details. (Waste Electrical and Electronic Equipment Directive)
TROUBLE SHOOTING GUIDE
Problems
1. Noise or distorted
sound
2. No Internet
connection
3.
The Internet
connection is
successful but cannot
play a particular
station
4. The unit or display has
a fault
5. No sound
Recommendations
FM Radio
1.1 Extend and position the FM antenna wire to achieve the best
reception.
Internet Radio
2.1 Make sure that you have configured your home network
correctly by connecting to the same network from a PC.
2.2 Check that the Ethernet cable is properly plugged in.
2.3 Ensure that a DHCP server is available or that you have
configured a static IP address.
2.4 If the unit is connected directly to a modem, switch the modem
off and back on again to connect to the Internet.
3.1 The station does not broadcast 24 hours per day.
3.2 The station has reached the maximum allowed number of online listeners.
3.3 The station is no longer broadcasting.
3.4 The link on the unit is out of date.
3.5 The Internet connection between you and the server (often
located in a different country) is too slow.
General
4.1 Press the ON/STANDBY ( ) button to go to Standby mode and
press it again to turn the unit back on.
4.2 Reset by unplugging the AC mains adapter for few seconds and
plugging it back in.
5.1 Adjust the volume.
5.2 Disconnect the headphones.
GB - 9
TECHNICAL SPECIFICA
TIONS
SPECIFICATIONS
Amplifier
Output power (r.m.s)
10 W (2 x 5W)
Speakers
3” 8 Ohm
FM Radio
Tuning range
87.5 – 108 MHz
Number of stations that can be stored
5
FM antenna
External wire antenna
Internet Radio
Wired connection
Network 10/100 RJ 45 Ethernet jack
Number of stations that can be stored
5
Other connections
AUX IN jack
3.5 mm stereo jack
Headphones jack
3.5 mm stereo jack
General
Power consumption
24 W
AC/DC adapter
AC 100 – 240V ~ 50/60Hz
DC Output
DC IN 12V/ 2A
Time back-up batteries
2 x AAA/LR03 (Not supplied)
Dimensions
165 (H) x 365(W) x 137 (D) mm
Weight (with AC/DC adapter)
2 Kg
Note: Due to continuing improvements, the technical specifications are subject to
change without notice.
GB - 10