1
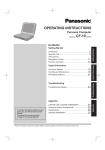
OPERATING INSTRUCTIONS
Cradle
Model No.
CF-VEBD11 Series
Contents
Introduction.................................................................. 4
Precautions................................................................. 5
Names and Functions of Parts.................................... 7
Connecting / Disconnecting......................................... 8
Using the Drive.......................................................... 11
Troubleshooting......................................................... 14
Specifications............................................................ 16
Please read these instructions carefully before using this product, and save this manual for future use.
For U.S.A.
Federal Communications Commission Radio Frequency Interference Statement
Note: This equipment has been tested and found to comply with the limits for a Class A digital device, pursuant to Part
15 of the FCC Rules. There limits are designed to provide reasonable protection against harmful interference when the
equipment is operated in a commercial environment. This equipment generates, uses, and can radiate radio frequency
energy and, if not installed and used in accordance with the instruction manual, may cause harmful interference to radio
communications. Operation of this equipment in a residential area is likely to cause harmful interference in which case
the user will be required to correct the interference at his own expense.
●●Reorient or relocate the receiving antenna.
●●Increase the separation between the equipment and receiver.
●●Connect the equipment into an outlet on a circuit different from that to which the receiver is connected.
●●Consult the Panasonic Service Center or an experienced radio/TV technician for help.
Warning
To assure continued compliance, use only shielded interface cables when connecting to a computer or peripheral.
Also, any changes or modifications not expressly approved by the party responsible for compliance could void the
user’s authority to operate this equipment.
This device complies with Part 15 of the FCC Rules.
Operation is subject to the following two conditions:
(1)This device may not cause harmful interference, and
(2)This device must accept any interference received, including interference that may cause undesired operation.
This device is Class A verified to comply with Part 15 of FCC Rules when used with Panasonic Notebook Computer.
Responsible Party: Panasonic Corporation of North America
One Panasonic Way
Secaucus, NJ 07094
Tel No:1-800-LAPTOP5 (1-800-527-8675)
6-M-1
For Canada/Pour le Canada
Canadian ICES-003
This Class A digital apparatus complies with Canadian ICES-003.
Cet appareil numérique de la classe A est conforme à la norme NMB-003 du Canada.
7-M-2
For Europe
Interface Cable
Use of an interface cable longer than 3 m {9.84 feet} is not recommended.
11-E-1
Warning
This is a class A product. In a domestic environment this product may cause radio interference in which
case the user may be required to take adequate measures.
Do not use other than the specified AC Adaptor (Model No. CF-AA5713A).
2
Declaration of Conformity (DoC)
“Hereby, Panasonic declares that this Cradle is in compliance with the essential requirements
and other relevant provisions of EU Council Directives.”
Authorised Representative:
Panasonic Testing Centre
Panasonic Marketing Europe GmbH
Winsbergring 15, 22525 Hamburg, Germany
18-E-0
<Only for model with CD/DVD Drive>
CAUTION!
THIS PRODUCT UTILIZES A LASER.
USE OF CONTROLS, ADJUSTMENTS OR PERFORMANCE OF PROCEDURES OTHER THAN THOSE SPECIFIED
HEREIN MAY RESULT IN HAZARDOUS RADIATION EXPOSURE.
DO NOT OPEN COVERS AND DO NOT REPAIR YOURSELF.
REFER SERVICING TO QUALIFIED PERSONNEL.
The following label is put on the bottom of the cradle.
12-E-1
Information on Disposal for Users of Waste Electrical & Electronic Equipment (private households)
This symbol on the products and/or accompanying documents means that used electrical and electronic products should not be mixed with general household waste.
Please dispose of this item only in designated national waste electronic collection schemes, and not in the
ordinary dust bin.
For business users in the European Union
If you wish to discard electrical and electronic equipment, please contact your dealer or supplier for further information.
Information on Disposal in other Countries outside the European Union
This symbol is only valid in the European Union.
If you wish to discard this product, please contact your local authorities or dealer and ask for the correct method of
disposal.
36-E-1
For Australia
Warning
This is a class A product. In a domestic environment this product may cause radio interference in which case the user
may be required to take adequate measures.
3
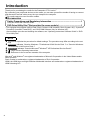
Introduction
Thank you for purchasing the cradle for the Panasonic CF-D1 series*1.
By connecting your peripheral devices to the cradle, you can save yourself the trouble of having to connect
and disconnect several cables every time you transport the computer.
*1
This cradle cannot be used for other models.
Accessories
Safety Precautions and Regulatory Information.......................................................1
<Only for model with CD/DVD Drive>
DVD Drive Utility Disc*2(Not provided for some models.).........................................1
This contains the programs used to install “Roxio CreatorTM LJB (hereafter, Roxio Creator LJB)”, “CyberLink
PowerDVD (hereafter, PowerDVD)”, and “DVD-RAM Software (only for Windows XP)”.
About software overview and installing the software, see “Operating Instructions Software Guide” in “DVD
Drive Utility Disc”.
*2
NOTE
●●This manual explains the procedure for default settings. The procedure may differ according to the settings.
indicates “Genuine Windows 7 Professional 32-bit Service Pack 1” or “Genuine Windows
●●
7 Professional 64-bit Service Pack 1”.
indicates “Genuine Microsoft Windows XP Professional Service Pack 3”.
●●
:
Page
in
these
Operating Instructions.
●●
●● : Reference to the on-screen manuals of the computer.
Windows 7
Windows XP
®
®
®
®
Microsoft ® and Windows® are registered trademarks of Microsoft Corporation in the United States and/or
other countries.
Roxio Creator is trademarks or registered trademarks of Rovi Corporation.
HDMI, the HDMI logo and High-Definition Multimedia Interface are trademarks or registered trademarks of
HDMI Licensing LLC.
4
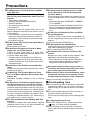
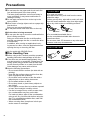
Precautions
●●If a Malfunction or Trouble Occurs, Immedi-
ately Stop Use
If a Malfunction Occurs, Immediately Unplug
the AC Plug and Remove the Unit From This
Product
• This product is damaged
• A foreign object is inside this product
• Smoke is emitted
• An unusual smell is emitted
• Unusually hot
Continuing to use this product while any of the
above conditions are present may result in fire or
electric shock.
• If a malfunction or trouble occurs, immediately
unplug the AC plug and remove the unit from
this product. Then, contact your technical support office for repair.
Do Not Touch This Product and Cable When It
Starts Thundering
Electric shock may result.
Do Not Place Containers of Liquid or Metal
Objects on Top of This Product
If water or other liquid spills, or if paper clips,
coins, or foreign matter get inside this product, fire
or electric shock may result.
• If foreign matter has found its way inside, immediately unplug the AC plug and remove this
product from the unit. Then contact your technical support office.
Do Not Place This Product on Unstable Surfaces
If balance is lost, this product may fall over or drop,
resulting in an injury.
Do Not Keep This Product Wherever There
is a Lot of Water, Moisture, Steam, Dust, Oily
Vapors, etc.
Otherwise, possibly resulting in fire or electric
shock.
Do Not Leave This Product in High Temperature Environment for a Long Period of Time
Leaving this product where it will be exposed to
extremely high temperatures such as near fire or
in direct sunlight may deform the cabinet and/or
cause trouble in the internal parts. Continued use
in such a resulting condition may lead to shortcircuiting or insulation defects, etc. which may in
turn lead to a fire or electric shocks.
Use Only the Specified AC Adaptor With This
Product
Using an AC adaptor other than the one supplied
(supplied with the unit or one sold separately as
an accessory) may result in a fire.
●●
●●
●●
●●
●●
●●
●●Do Not Connect a Telephone Line, or a Net-
work Cable Other Than the One Specified,
Into the LAN Port
If the LAN port is connected to a network such as
the ones listed below, a fire or electric shock may
result.
• Networks other than 1000BASE-T, 100BASETX or 10BASE-T
• Phone lines (IP phone (Internet Protocol Telephone), Telephone lines, internal phone lines
(onpremise switches), digital public phones,
etc.)
Do Not Turn the Volume Up Too Loud When
Using Headphones
Listening at high volumes that overstimulate the
ear for long periods of time may result in loss of
hearing.
<Only for model with CD/DVD Drive>
Do Not Look Into the CD/DVD Drive
Looking directly at the internal laser light source
may result in damage to eyesight.
<Only for model with CD/DVD Drive>
Do Not Use Discs That Are Cracked or Deformed
Because the discs rotate at high speeds, damaged discs may break apart causing injury.
• Discs that are not round and discs that have
been repaired using adhesives are similarly
dangerous, and so should not be used.
●●
●●
●●
●●Using this product continuously in a hot en-
vironment will shorten the product life. Avoid
use in these types of environments.
When using in hot or cold environment, some
peripherals may fail to work properly. Check
the operation environment of the peripherals.
●●
<Only for model with CD/DVD Drive>
Drive Handling Care
●●Do not expose the drive to excessive smoke that
may leave a residue, e.g., oil smoke, or tobacco
smoke. Doing so can shorten the life of the drive
lens.
We recommend cleaning the drive lens with an
air puffer used for camera lenses.
(Do not use any spray-type of lens cleaning products.)
●●
When opening/closing the tray
When the computer is on, use the eject button
( page 11) or eject through Windows.
When inserting or removing a disc, be careful
not to touch the lens and other parts of the laser
pickup.
●●
●●
5
Precautions
●●Do not leave the tray open and do not touch the
lens and other parts of the laser pickup.
The laser pickup and disc can become dusty in
some conditions. It may cause malfunction in
reading or writing.
Do not apply excessive force to the tray in the
open position.
Never insert a foreign object such as a paper clip
into the drive.
Doing so may cause malfunction.
Do not place items other than discs on the tray.
●●
●●
To clean discs
<For read-only discs>
Wipe discs with a dry, soft cloth from the center
toward the edge.
If discs get very dirty, wipe with a moist, soft cloth
from the center toward the edge, then wipe again
with a dry cloth to take up remaining moisture.
●●
While the drive is being accessed
Do not open the tray or move the cradle while the
drive is being accessed.
Doing so could cause the disc to shift position
and this may damage the disc, or cause the drive
to malfunction.
In addition, after running an application involving access to a disc, close the application before
opening the tray or removing the disc.
●●
<Only for model with CD/DVD Drive>
Disc Handling Care
●●Before using a disc, carefully read the operating/
handling instructions and package of the disc.
●●If the discs are not handled appropriately, they
may become dirty or scratched. Furthermore the
writing speed may get slower and the data may
not be correctly written on or read from the disc.
Other damage may cause a drive failure.
Note the following precautions.
• Do not touch the disc surface (the side with no
printing).
• Keep the disc surface clean and free from dirt,
dust, fingerprints and scratches.
• Do not write on the surface of the disc with a
ballpoint pen or other writing instrument.
• Do not attach stickers to discs.
• Do not drop, bend, or place heavy objects on
top of discs.
• Do not place or store discs in locations exposed
to heat, direct sunlight, humidity or dust.
• If a disc is brought from a cold to a warm location, condensation may form on the disc.
For read-only discs, wipe off the condensation
using a soft, dry, lint-free cloth before using the
disc. For recordable/rewritable discs, wait until
the condensation dries.
• When not using discs, keep them in their protective cases or cartridges.
●●
6
<For recordable/rewritable discs>
Use the recordable/rewritable disc cleaner to
clean these discs.
Do not use a cloth, CD cleaners or any other such
cleaners under any circumstances.
How to hold a disc
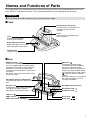
Names and Functions of Parts
The cradle allows your peripheral devices to function exactly as if they were connected directly to the computer. (Refer to “Description of Parts” in the “Operating Instructions” accompanying the computer.)
CAUTION
●●Do not touch the cradle connector, pins or terminals of the cradle.
Front
Expansion Bus Connector
Connect this to the expansion bus
connector on the rear of the
computer.
Lever
Press down on this when
removing the computer.
Latch
When the lever is depressed, the
latch is released.
Angle Adjustment Button
Adjust the angle of the computer
while holding this button down.
CD/DVD Drive
<Only for model with CD/DVD Drive>
Rear
HDMI Connector:
Connector for HDMI compatible digital display.
It is not compatible with the analog display.
The display specifications of the maximum
resolution, etc. that can be output differ
according to the specifications of the device
connected.
For details, refer to the specifications of the
device connected.
AC Adaptor Storage Compartment
The AC adaptor and cord can be stored
here.
Security Lock
A Kensington cable can be connected.
For further information, read the
manual that comes with the cable.
VGA Port :
Connect the external display
compatible with analog interface.
For how to switch the output
destination when both an external
display (analog) and HDMI display
are connected to the cradle, refer to
Reference Manual “External
Display” .
When the computer is connected to
the cradle, the VGA port on the
computer is disabled.
AC Adaptor Storage Cover
Microphone Jack :
Headphone Jack :
LAN Port :
USB 2.0 Ports :
DC-IN Jack :
USB 2.0 Port (Pass Through) :
Serial Port :
DC IN 15.6V
7
Connecting / Disconnecting
CAUTION
●●Do not connect or disconnect the cradle while the computer is powered on or in the sleep (
standby (
Windows XP
) or hibernation mode.
Connecting
A.Power off the computer, and disconnect all cables from the computer.
B.Open the cover of the expansion bus connector on the rear of the
computer.
C.Connect the AC adaptor that came with the computer to the
cradle and plug the other end into an AC outlet.
CAUTION
●●Refer to the “Operating Instructions” accompanying computer
for information on proper handling of the AC adaptor and AC
cord.
NOTE
●●
The AC adaptor can be stored in the AC adaptor storage compartment.
Open the AC adaptor storage cover. Place the AC adaptor with
its label side facing forward, and its AC inlet side toward the
left. Also, place the AC adaptor within the heat sink and the
protrusion. Finally, align the core on the DC cord to the groove
as illustrated.
Label side
AC inlet
Core
D.Align the protrusions on the cradle with the corresponding indentations on the bottom of the computer, and insert the computer to
the cradle.
CAUTION
●●Do not connect the computer to the cradle while the AC adaptor or other cables is connected to the computer.
●●Do not attempt to make connections if there is any object
between the computer and the cradle. Doing so could damage
the computer and the cradle.
8
Windows 7
)/
E.Insert the expansion bus connector on the cradle into the computer’s expansion bus connector.
Set the computer back against the cradle so that the computer
and the cradle are securely connected.
CAUTION
●●While connecting the computer to the cradle:
• Do not attempt to move the cradle.
• It is impossible to remove the battery pack.
If the computer malfunctions while the cradle is attached, disconnect the cradle and check to see if the
computer operates normally. If the computer operates normally, the cradle may be malfunctioning. Contact your technical support office.
●●
Adjusting the Angle
While pressing down the angle adjustment button, push or pull the upper part
of the computer as illustrated to obtain the most suitable angle.
Avoid touching the LCD while adjusting the angle.
There are five levels for angle adjustment.
Disconnecting
A.Power off the computer.
B.Hold down the lever in the direction of the arrow.
C.Pull the computer toward you.
Disconnect the extension bus connector on the computer from the extension bus connector on the cradle.
④
③
②
D.Lift up the computer to remove it from the cradle.
E.Close the cover of the extension bus connector on the rear of the computer.
9
Connecting / Disconnecting
CAUTION
●●If the computer is connected to the cradle, connect the AC adaptor and the LAN cable to the jack and
port on the cradle. You cannot use the LAN port on the computer. Note that the AC adaptor can also be
connected to the DC-IN jack of the computer.
Do not connect/disconnect peripheral devices in sleep ( Windows 7 ) / standby ( Windows XP ) or hibernation.
●●
●●
Windows XP
If a printer that is connected to a USB port is disconnected, devices connected to the other USB ports
may stop functioning.
If this occurs, restart the computer.
When using the USB 2.0 port, confirm that [USB Port] is set to [Enable] in the [Advanced] menu of the
Setup Utility on the computer.
For more information about the settings and preparations of the peripheral devices, refer to the peripheral
devices’ own operating instructions.
When connecting the external display to either of the ports, lines or letters may blur. In that case, lower
the resolution.
Connect headphones to the computer or to the cradle. Do not connect two sets of headphones to the
computer and the cradle.
●●
●●
●●
●●
10
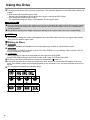
Using the Drive
<Only for model with CD/DVD Drive>
Setting a Disc
A.Turn on the computer.
B.Press the eject button (A) and slowly pull out the tray.
A C
C.Insert/Remove the disc.
• To insert
Set the disc with the label side up and press the center of the
disc until it clicks in place.
• To remove
Press on the center spindle (B) and carefully lift up the edge of
the disc.
D.Close the tray.
Do not press the eject button.
B
NOTE
●●To remove a disc when the computer is powered off, insert a pointed object (e.g., the bent-out tip of a
paper clip) into the emergency hole (C). Pushing it to the end allows the tray to come out.
●●If the vibration of the drive is excessive, check the disc.
●●For AutoPlay CD/DVD:
• If an AutoPlay CD/DVD does not start after the computer resumes from ( Windows 7 ) sleep /
( Windows XP ) standby or hibernation, remove the disc from the drive and then reinsert it after waiting
15 seconds.
• An AutoPlay CD/DVD may start during file access depending on the status of the disc.
When playing back video from a disc, playback may not be smooth in some conditions.
●●
Power-saving Mode
If the drive is not accessed for 30 seconds, the drive motor will automatically be shut down to reduce the
power consumption. When the drive is accessed again, the drive motor is turned on. In this case, reading of
the disc data will take approximately 30 seconds.
To play DVD-Video or MPEG2 files
Install the DVD playback software using “DVD Drive Utility Disc”.
For information on how to install the software, refer to “Operating Instructions Software Guide” with “DVD
Drive Utility Disc”.
Region Code Setting
DVD-Videos are allocated to region codes according to where they are sold. To play a DVD-Video, the player’s software and the drive must have the corresponding region code.
e.g.,
For U.S.A. and Canada: “1”
For Europe: “2”
11
Using the Drive
●●The region code of the drive is not set at purchase. The operation depends on the DVD-Video that is first
played.
• DVD-Video with a specific region code:
The drive will automatically be set at the same region code as the DVD-Video.
• DVD-Video with multiple region codes:
The screen to change the region code appears. Set the region code.
CAUTION
●●You can change the region code setting up to five times including the initial setting. Be extremely careful
because you cannot change the region code anymore after the fifth change, even if you reinstalled the
operating system.
Any problem resulting from illegal changing or altering of the region code is the user’s responsibility.
●●
NOTE
●●The screen to change the region code appears when the DVD-Video has only one region code and the
drive is set for another region code.
Writing to Discs
●●
Windows 7 includes the standard function that enables you to write or rewrite data to a disc.
●●
Windows 7
Windows 7
You can copy a CD/DVD or create a music CD, data CD/DVD, etc. by installing “Roxio Creator LJB” using the “DVD Drive Utility Disc”.
●●
Windows XP
Writing software is required to write data to a disc other than DVD-RAM.
Install “DVD-RAM Software” and “Roxio Creator LJB” using “DVD Drive Utility Disc”.
page 17)
Be sure to use discs conforming to the proper write speeds. (
If the write operation is to involve a long period of time, be sure to connect the AC adaptor of the computer. If the battery power runs low and the power of the computer is cut, the write operation may end in
failure.
You can read from/write to the following discs.
●●
●●
●●
12
●●You can read from the following discs.
*1
*2
DVD-RAM: Only non-cartridge type or removable cartridge type can be used.
Does not support DVD-RW Ver.1.0.
●●Recommended discs for writing
• The quality of written data depends on the disc.
<CD-R>
• TAIYO YUDEN Co., Ltd.
<CD-RW/High-Speed CD-RW>
• MITSUBISHI KAGAKU MEDIA CO., Ltd.
<Ultra-Speed CD-RW>
• MITSUBISHI KAGAKU MEDIA CO., Ltd.
<DVD-R>
• Panasonic Corporation
• MITSUBISHI KAGAKU MEDIA CO., Ltd.
• TAIYO YUDEN Co., Ltd.
<DVD-R DL>
• MITSUBISHI KAGAKU MEDIA CO., Ltd.
• TAIYO YUDEN Co., Ltd.
●●DVD discs you can use for writing
<DVD-R for General>
• 1X-SPEED (4.7 GB)
• 1-2X-SPEED (4.7 GB)
• 1-4X-SPEED (4.7 GB)
• 1-8X-SPEED (4.7 GB)
• 1-16X-SPEED (4.7 GB)
<DVD-R DL>
• 2-4X-SPEED (8.5 GB)
• 2-8X-SPEED (8.5 GB)
<DVD-RW>
• 1X-SPEED (4.7 GB/9.4 GB)
• 1-2X-SPEED (4.7 GB/9.4 GB)
• 2-4X-SPEED (4.7 GB/9.4 GB)
• 2-6X-SPEED (4.7 GB/9.4 GB)
<DVD-RAM>
• 2X-SPEED (4.7 GB/9.4 GB)
• 2-3X-SPEED (4.7 GB/9.4 GB)
• 2-5X-SPEED (4.7 GB/9.4 GB)
<DVD-RW>
• MITSUBISHI KAGAKU MEDIA CO., Ltd.
• Victor Company of Japan, Limited
<DVD-RAM>
• Panasonic Corporation
• HITACHI MAXELL, Ltd.
<+R / +RW>
• MITSUBISHI KAGAKU MEDIA CO., Ltd.
<High Speed +RW>
• MITSUBISHI KAGAKU MEDIA CO., Ltd.
<+R DL>
• MITSUBISHI KAGAKU MEDIA CO., Ltd.
<+R>
• 1-2.4X-SPEED (4.7 GB)
• 1-4X-SPEED (4.7 GB)
• 1-8X-SPEED (4.7 GB)
• 1-16X-SPEED (4.7 GB)
<+R DL>
• 2.4X-SPEED (8.5 GB)
• 2.4-8X-SPEED (8.5 GB)
<+RW>
• 1-2.4X-SPEED (4.7 GB)
• 1-4X-SPEED (4.7 GB)
<High-Speed +RW>
• 3.3-8X-SPEED (4.7 GB)
13
Troubleshooting
Devices connected to the USB 2.0 ports
do not operate.
Power can be turned on, however, Windows does not start up normally.
The computer does not resume (return)
from sleep ( Windows 7 ) / standby
( Windows XP ) or hibernation.
The computer does not power off (Windows does not shut down).
Nothing is displayed or the display does
not appear properly on the external display connected to the HDMI terminal.
<Only for model with CD/DVD Drive>
The computer does not recognize the
drive.
Cannot access to the disc.
Cannot play disc or read data from it.
●●Turn off the computer, disconnect it from the cradle, and
then reconnect it to the cradle and turn it on again.
●●Disconnect peripheral devices, such as a USB memory.
If disconnecting the peripheral devices can start up Windows, the problem may be with the peripheral devices.
Contact the manufacturer of such devices.
●●Make sure the AC adaptor is connected to the DC-IN jack of
the cradle, and turn the computer on.
●●If a peripheral is connected, disconnect it, and then shut
down.
If it is possible to shut down when the peripheral is disconnected, then there may be a problem with the peripheral.
Contact the manufacturer of such devices.
●●The HDMI compatible display does not support the HDMI
connection on the computer.
When the HDMI compatible display does not support the
HDMI connection on the computer, the screen may appear
blurry, or the output destination may not be switched by the
display driver.
●●Restart the computer.
●●Power off the computer, then remove and connect the computer again.
●●Is the disc loaded on the tray correctly?
●●Is the disc bent, scratched, or dirty?
●●An error may occur if, after the tray has been closed or op-
eration has been resumed from the ( Windows 7 ) sleep /
( Windows XP ) standby or hibernation, the drive is accessed
before the hard disk drive indicator goes off. Also, an error
may occur if the drive is accessed by the application software automatically. In this case, remove the disc, reinsert it,
and try again. ( page 11)
“Roxio Creator LJB” does not work properly
●●Is writing software other than “Roxio Creator LJB” installed?
Uninstall the writing software other than “Roxio Creator
LJB.”
Windows XP
●●Be sure to disable writing to CDs/DVDs.
Right-click [(x:)]*1 in [start] - [My Computer], click [Properties]
- [Recording], then remove the check mark for [Enable CD
recording on this drive].
(Remove the check mark for [Enable CD recording on this
drive] every time a new user is added.)
*1
“x” is the drive letter. You can change the letter to suit your
preference.
14
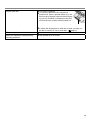
Cannot eject disc.
●●Turn on the computer.
●●To remove a disc when the computer is
powered off, insert a pointed object (e.g., the
bent-out tip of a paper clip) into the emergency hole (A). Pushing it completely to the end
will free the tray so that it can be pulled out.
A
●●If a disc with fingerprints or other dirt is used, you may not
be able to remove it. Use a clean disc. (
The disc tray does not close.
Other disc operation (reading/writing/
rewriting) problems
page 6)
●●Do not touch the eject button when closing the tray.
●●Use another drive or media.
15
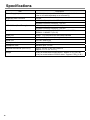
Specifications
Item
Description
Power Supply Input
DC15.6 V (Use the specified AC adaptor supplied with the computer or one sold separately as an accessory.)
Expansion Bus Connector
100-pin
USB 2.0 Port
USB 2.0 × 5 (complies with USB 2.0)
*1
Allowable current for each port : 500 mA
USB 2.0 Port (Pass Through)
*1
USB 2.0 × 1 (complies with USB 2.0)
Allowable current for each port : 500 mA
16
LAN Port
IEEE802.3ab 1000BASE-T, IEEE802.3u 100BASE-TX,
IEEE802.3 10BASE-T (RJ-45)
HDMI Port*1*2
HDMI × 1 For exclusive use with HDMI standard
VGA Port
Mini Dsub 15-pin female (Analog interface)
Serial Port
RS-232C Dsub 9-pin
Microphone Jack
Miniature jack, 3.5 DIA
Headphone Jack
Miniature jack, 3.5 DIA
Physical Dimensions (W x H x D)
Approx. 292 mm x 233 mm x 284 mm
{Approx. 11.5” x 9.2” x 11.2”}
Weight
<Only for model with CD/DVD drive> : Approx. 5.1 kg {11.2 lb.}
<Only for model without CD/DVD drive> : Approx. 5.0 kg {11 lb.}
<Only for model with CD/DVD drive>
Item
CD/
DVD
Drive
Continuous
Data Transfer
Speed*3*4
Description
Reading*5
●DVD-RAM*6: 5X (Max.) ●DVD-R*7: 8X (Max.)
●DVD-R DL: 8X (Max.) ●DVD-RW: 8X (Max.)
●DVD-ROM: 8X (Max.) ●+R: 8X (Max.) ●+R DL: 8X (Max.)
●+RW: 8X (Max.) ●High Speed +RW: 8X (Max.)
●CD-ROM: 24X (Max.) ●CD-R: 24X (Max.) ●CD-RW: 24X (Max.)
●High-Speed CD-RW: 24X (Max.)
●Ultra-Speed CD-RW: 24X (Max.)
Writing*8
●DVD-RAM*6: 5X (Max.) ●DVD-R*7: 8X (Max.)
●DVD-R DL: 6X (Max.) ●DVD-RW: 6X (Max.) ●+R: 8X (Max.)
●+R DL: 6X (Max.) ●+RW: 4X (Max.)
●High Speed +RW: 8X (Max.) ●CD-R: 24X (Max.) ●CD-RW: 4X
●High-Speed CD-RW: 10X ●Ultra-Speed CD-RW: 16X (Max.)
Supported
Reading
Discs/ Format
●DVD-ROM (Single Layer, Dual Layer) ●DVD-Video
●DVD-R*7 (1.4 GB, 3.95 GB, 4.7 GB)*9 ●DVD-R DL (8.5 GB)*9
●DVD-RW (Ver.1.1/1.2 1.4 GB, 2.8 GB, 4.7 GB, 9.4 GB)*9
●DVD-RAM*6 (1.4 GB, 2.6 GB, 2.8 GB, 4.7 GB, 5.2 GB, 9.4 GB)*9
●+R (4.7 GB)*9 ●+R DL (8.5 GB)*9 ●+RW (4.7 GB)*9
●High Speed +RW (4.7 GB)*9 ●CD-Audio
●CD-ROM (XA compatible) ●CD-R
●Photo CD (multiple session compatible) ●Video CD
●CD-EXTRA ●CD-RW ●High-Speed CD-RW
●Ultra-Speed CD-RW ●CD-TEXT
Writing
Buffer underrun error prevention function
*1
*2
*3
*4
*5
*6
*7
*8
*9
●DVD-RAM*6 (1.4 GB, 2.8 GB, 4.7 GB, 9.4 GB)*9
●DVD-R (1.4 GB, 4.7 GB for General)*9 ●DVD-R DL (8.5 GB)*9
●DVD-RW (Ver.1.1/1.2 1.4 GB, 2.8 GB, 4.7 GB, 9.4 GB)*9
●+R (4.7 GB)*9 ●+R DL (8.5 GB)*9 ●+RW (4.7 GB)*9
●High Speed +RW (4.7 GB)*9 ●CD-R ●CD-RW
●High-Speed CD-RW ●Ultra-Speed CD-RW
Supported
Does not guarantee operation of all USB and HDMI-compatible peripherals.
When connecting the HDMI compatible display, specifications such as maximum resolutions available to output
differ, depending on the specifications of the connected devices. See the specifications of the connected device for
details.
Data transfer speeds indicate values measured by Panasonic Corporation. The data transfer rate of DVD per 1X
speed is 1,350 KB/s. The data transfer rate of CD per 1X speed is 150 KB/s.
Performance of CD-R, CD-RW, DVD-RAM, DVD-R, DVD-R DL, DVD-RW, +R, +R DL, and +RW cannot be
guaranteed depending on writing status and recording format. Also, some data cannot be played back depending
on the disc, settings, and environment being used.
If an unbalanced disc (e.g., a disc with which the balance has been displaced from the center) is inserted, the
speed may become slower if there are large vibrations while the disc is rotating.
Only non-cartridge type or removable cartridge type can be used.
DVD-R is compatible with 4.7 GB (for General) playback. DVD-R (for Authoring) playback is compatible with discs
recorded using Disc-at-Once recording.
Depending on the disc, the writing speed may become slower.
1 GB = 1,000,000,000 bytes. Your operating system or some application software will report as fewer GB.
17
Panasonic Corporation
Panasonic Solutions Company
3 Panasonic Way, Panazip 2F-5, Secaucus, NJ 07094
Panasonic Canada Inc.
5770 Ambler Drive Mississauga, Ontario L4W 2T3
Importer’s name & address pursuant to the EU GPSD (General Product Safety Directive) 2001/95/EC Art.5
Panasonic Computer Products Europe, Panasonic Marketing Europe GmbH
Hagenauer Straße 43
65203 Wiesbaden
Germany
55-E-1
Web Site : http://panasonic.net/
パナソニック株式会社 IT プロダクツビジネスユニット
〒 570-0021 大阪府守口市八雲東町一丁目 10 番 12 号
© Panasonic Corporation 2011
PS0811-0
PCE0336A_XP/7