1
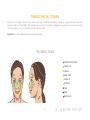
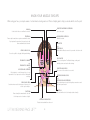
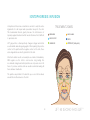
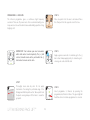
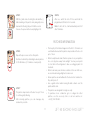
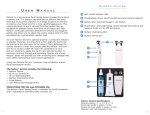
user guide If you have any questions, or if you experience any difficulties please call our Rio Careline on: 01242 702345 or email us at: [email protected] introduction The Rio Lift 60 Second Face Lift features 2 treatment methods to tone, lift and rejuvenate. FARADIC FACIAL TONING uses EMS (Electrical Muscle Stimulation) technology. The pulses do all the hard work for you as they gently tone and tighten sagging facial features and rejuvenate the skin. IONTOPHORESIS INFUSION uses the collagen & retinol patches. The active ingredients are infused deep into the skin to help reduce the appearance of fine lines and wrinkles and help increase skin elasticity. • Please read all instructions thoroughly and retain for future reference. • Do NOT use if you are pregnant or if you have any of the following: pacemaker, heart disorder, receiving treatment for low blood pressure, epilepsy, diabetes, multiple sclerosis, or if you are recovering from an operation. • Take particular care of the ball contacts location when moving near the eye. Ensure the ball contacts touching the skin are at least 1cm away from the eye at all times. • Do NOT use on areas of skin with disorders such as rosacea, pustular acne, abraded skin, sensitive skin, or over scars, moles or varicose veins. • If the gel or patches come into contact with the eyes, rinse thoroughly with water. If irritation persists, consult a doctor. • Keep out of reach of children and pets. ! 1 1-IN-FALI-UK/2.2 Precautions battery INFORMATION KNOW YOUR LIFT UNIT 1 To fit the battery, release the clip and open the battery cover. Connect a PP3 9V alkaline battery ensuring the + terminal is as shown. Ensure the _ battery + release ribbon is underneath the battery and replace cover ensuring it is shut firmly in place. rear view • If the unit is left unused for a long period of time, remove the battery. _ + 2 • Please ensure that the batteries are disposed of in the correct manner in accordance with local authority requirements. 3 4 5 • Do NOT use rechargeable batteries. _ + PATCH TEST 6 Important: Always do a patch test with the conductive gel on an inconspicuous area of your skin for possible skin reaction. Wait 24 hours. If irritation occurs do not continue treatment. 1Ball contacts (-) and (+) Programme/On/Off light 2 Programme/On/Off button 3 Likewise, if you have a skin reaction when first using the collagen and retinol patches, do not continue treatment. 4 Power increase button (+) 5 Power decrease button (–) 6Battery compartment 2 FARADIC FACIAL TONING Practised for over 40 years in beauty salons, faradic facial toning uses EMS (Electrical Muscle Stimulation) to gently contract and relax facial muscles to help tone, lift and tighten. This stimulation also increases local circulation, bringing more oxygen to the skin cells and removing toxins more rapidly, to leave the skin feeling refreshed and rejuvenated. Important: Use a mirror during treatment to help with positioning. TREAT M ENT ZON ES FOREHEAD AND BROW UNDER EYE CHEEKS NASO LABIAL LOWER LIP UPPER LIP CHIN NECK BEHIND EAR 3 TREAT M ENT ZON ES FOREHEAD AND BROW Position one contact just above the end of your eyebrow, centred between the eyebrow and hairline. Angle the unit so the other contact sits centrally between the brow and hairline. CHEEKS UNDER EYE Use the line where your delicate under eye skin meets your eye socket bone as a guide, position one contact on this line and directly under the centre of your eye. The other contact should follow the contour outwards. NASO LABIAL Position contact resting under and following the diagonal slope of the cheekbone. You may need to adjust the position slightly to find the best contact points for your specific face shape, this is when you have a strong contraction with less tingling. Naso labial lines occur between the nose and corners of the mouth. Position one contact on the ‘apple’ of your cheek and the other diagonally below this following the natural line and parallel to your naso labial lines. Again, you may need to slightly adjust the position until you find the strongest contraction. 4 UPPER & LOWER LIP NECK Position contacts symmetrically just above lip edge. Increase power to give a good contraction. Repeat this just under the lower lip. If your lips appear to pull unevenly to one side this is natural. Position contacts in a line below the earlobe. For best position, keep contacts in line but slide the unit forward or backward slightly until you find the strongest contraction. Move to the centre of the neck just under the jawline. Increase the power and slide the unit back slightly until you find the best position. CHIN BEHIND EAR Position contacts just off your hairline as high up as you can without touching your ears. Great for a really strong contraction right through the neckline. Follow naso labial line diagonally down and position contact either side on the edge of the jaw. Increase power to find the best contraction. You may need to move the position slightly. 5 US ING YOUR UNIT For best results we recommend following the faradic facial toning regime every day for the first few weeks, alternating between programmes 1 and 2 each day. Afterwards, use as required to maintain good tone. STEP 1 Apply a generous amount of conductive gel to each of the ball contacts. Apply plenty of conductive gel to ensure good contact with the skin. To begin with the pulses give a mild tingling sensation and as the intensity is increased you will notice muscle contractions. The muscle contractions are smooth and each contraction will start with a slow rise, hold itself in a contracted position for a few seconds and then gently relax. There are 17 power levels in total. We recommend starting on a low power level on each treatment area and building up until muscle contractions are felt. STEP 2 Rhythmic muscle contractions to condition muscles with a short interval between each pulse. Muscle contractions last 2 seconds followed by a 3 second pause. There are 17 power levels in total. We recommend starting on a low power level on each treatment area and build up until muscle contractions are felt. Turn the unit on by pressing the programme/on/off button, the light will turn green. The unit will start in programme 1, the programme/on/off light will flash once. Note: To select programme 2, press the programme/ on/off button once more. The green light will flash twice to indicate programme 2 is selected. PROGRAMME 2 - TAP TONING STEP 3 Rapid stimulating action. The pulsing massage action lasts 5 seconds followed by a 3 second pause. Onto clean skin, position both ball contacts for treating the first area. PROGRAMME 1 - FIRMING 6 US ING YOUR UNIT HANDY TIPS STEP 4 Increase power by pressing the (+) button and move the position of the ball contacts if necessary until you feel definite muscles contractions. If this is uncomfortable, decrease power by pressing the (–) button. • Your teeth may feel slightly sensitive during treatment, this is perfectly normal. • Effective face toning and firming is based on a light and gentle stimulating massage on your face muscles. Should you experience any discomfort, you should add more conductive gel, reduce the intensity by pressing the (-) button, or remove the unit from the area being treated. Note: You will need to adjust the intensity level when treating different areas of the face. • Start at a low level to begin with until you get used to the sensation. STEP 5 • The forehead requires higher intensity levels. Press the (-) button several times before returning to the facial area. Hold the LIFT unit in position for 60 seconds to complete treatment of the area. After 60 seconds, reduce the power level before moving onto the next treatment area. STEP 6 After use, switch the unit off. Press and hold the Programme/On/Off button for 2 seconds. Note: If unit is left on, it will automatically switch off after 10 minutes. 7 know your MUSCLE GROUPS While using your face, you may be aware of certain muscles being exercised. This is a helpful guide to help you decide which ones they are? LEVATOR PALPEBRAE SUPERIORIS Opens the eyelid. NASALIS Used to twitch the nose and flare the nostrils. CORRUGATOR SUPERCILII Wrinkles forehead. FRONTALIS Draws scalp forward, raises eyebrows and wrinkles brow. Very important for expression, this muscle raises the brows and wrinkles the forehead. MASSETER and TEMPORALIS Works with the Masseter muscle to open and close the mouth. ORBICULARIS OCULI Closes the eyelid for sleeping, blinking and winking. BUCCINATOR Presses teeth together. Facilitates blowing, sucking and whistling actions and assists with chewing. ZYGOMATICUS MINOR and ZYGOMATICUS MAJOR and LEVATOR LABII SUPERIOR Work together to control the upper lip, so is very important for lots of expressions such as smiling and sneering. LEVATOR ANGULI ORIS Lifts corners of the mouth to form a smile. DEPRESSOR ANGULI ORIS and DEPRESSOR LABII INFERIORIS Affects facial expression by effecting tiny movements around the lower lip and mouth. ORBICULARIS ORIS Sometimes known as the kissing muscle because it is used to pucker the lips. MENTALIS Lifts and wrinkles skin of chin and protrudes lower lip. PLATYSMA Draws lower lip downward and to the side Used in expressions of sadness or fright. STERNOCLEIDOMASTOID Rotates the head and flexes the neck. 8 IONTOPHORESIS INFUSION TREATMENT ZONES Iontophoresis Infusion uses small micro currents to carry the active ingredients for skin repair and rejuvenation deep into the skin. This transdermal infusion greatly increase the effectiveness of topically applied treatments which would otherwise find it difficult to penetrate skin. LIFT gel patches contain positively charged collagen and retinol as anti-wrinkle and anti-ageing agents. When placing the positive contact on the patch and the negative contact on the skin, these active ingredients are directly ‘pulled’ into the skin. Short-term visible results can usually be seen almost immediately. With regular use the effects can become long lasting. We recommend collagen and retinol patches are only used once in 24 hours. If you have sensitive skin we would recommend leaving 48 hours between treatments. The patches are profiled to fit under the eye, across the forehead, around the mouth and across the chin. 9 FOREHEAD NASO LABIAL CROW’S FEET CHIN UNDER EYE UPPER LIP (fold patch) PROGRAMME 3 - INFUSION 2 STEP 2 Place one patch onto the area to be treated. Place the other patch on the opposite side of the face. The infusion programme gives a continuous high frequency sensation. There are 10 power levels. We recommend starting on a low power level on each treatment area and building up until a strong tingling is felt. IMPORTANT: For infusion you must remember which ball contact is which polarity. The (+) ball contact, should remain on the patch while the (-) ball contact remains on the skin. 3 STEP 3 Apply a generous amount of conductive gel to the (-) ball contact. Always apply plenty of conductive gel to ensure good contact with the skin. STEP 1 1 Thoroughly clean and dry skin. Do not apply moisturisers. Tear along the perforated edge of the Collagen and Retinol patch sachet. Take a patch from the plastic casing and peel off the liners to reveal the gel patch. 4 STEP 4 Select programme 3, Infusion, by pressing the programme/on/off button 3 times. The green light will flash three times to indicate programme 3 is selected. 10 STEP 5 5 8 With the (-) ball contact touching the skin and the (+) ball remaining on the patch, slowly and gently move back and forth along the patch for 60 seconds. STEP 8 After use, switch the unit off. Press and hold the programme/on/off button for 2 seconds. Note: If unit is left on, it will automatically switch off after 10 minutes. Increase the power until a steady tingling is felt. patches INFORMATION • The majority of the infusion happens in the first 5–15 minutes on each treatment area, but the patches may remain on the face for up to 1 hour. • Retinol easily breaks down, therefore please store your patches in a cool dry place away from sunlight. You may even prefer to store them in the refrigerator to have a cooling gel patch for treatment. • Retinol can make your skin more sensitive to the sun. After use, we recommend using a high factor sunscreen. • Ensure patches are well adhered to the face before treatment so they don’t peel off. • Use a gentle motion when moving the ball contacts over the patch and the skin. • The patches are designed for single use only. • To purchase more conductive gel or collagen & retinol patches, use the accessory form or call our careline on: +44 (0) 1242 702345. STEP 6 6 Repeat the process across the other patch. Continue treatment by alternating between patches for 10–30 minutes (5–15 minutes on each patch). STEP 7 7 60 The patches may remain on the face for up to 1 hour to continue gently infusing. After removing patches, you can massage any residue into your skin. 11 GENERAL INFORMATION Disposal • The unit may be cleaned by wiping with a damp cloth. Do NOT use solvents or detergents. The Waste of Electrical and Electronic Equipment (WEEE) Directive (2002/96/) has been put in place to recycle products using best available recovery and recycling techniques to minimise the impact on the environment, saving energy and resources and avoiding hazardous materials from going to landfill. • Do NOT immerse the unit in water. • Do NOT dissemble or repair. There are no user serviceable parts inside the unit. If you have any problems using the product, contact our Customer Care Department. The product is classed as Electrical or Electronic equipment so please ensure that at the end of the life of this product it is disposed of in the correct manner in accordance with local authority requirements. It must NOT be disposed of with household waste. • If the unit is damaged do not use it. • Do NOT use near to shortwave or microwave equipment. • If you experience unexpected behaviour of this product then it is possible some external electromagnetic interference is responsible e.g. electric motors/loudspeakers. You should remove this source and restart the product to restore full operation. Customer Care If you have any questions, or if you experience any difficulties please call our Careline on: 01242 702345 or email us at: [email protected] To register your two year guarantee online visit: wwww.riobeauty.com/warranty_online.htm 12 Rio health, beauty and fitness products incorporate the latest technology to help you achieve the best results. To ensure complete satisfaction we constantly review the performance of our products working in partnership with customers and researchers. As part of this programme we welcome your comments and suggestions which can be sent to us at the address below. www.riobeauty.com UK Rio, Dezac and LIFT 60 Second Face Lift are trademarks of The Dezac Group Ltd © The Dezac Group Ltd 2012 Manufactured by The Dezac Group Ltd PO Box 17, Cheltenham, England GL53 7ET 1-IN-FALI-UK/2.2