1
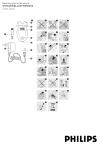
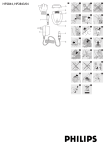
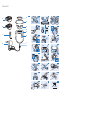
HP6609
1
A
2
3
4
5
6
7
8
9
10
11
12
13
14
15
16
17
18
19
20
21
22
23
24
25
C
D
B
E
F
G
L
H
K
I
J
English
Introduction
Congratulations on your purchase and welcome to
Philips! To fully benefit from the support that Philips offers,
register your product at www.philips.com/welcome.
With your new epilator you can remove unwanted hair
quickly, easily and effectively. It is suitable for removing hair
from your legs, underarms and bikini line.
The rotating discs catch even the shortest hairs (down to
0.5mm) and pull them out by the root.
The hairs that grow back are soft and thin. Epilating with
this new appliance leaves your skin smooth and hair-free
for several weeks.
This epilator comes with the following attachments:
Hair-lifting attachment with massage
element
This attachment lifts flat-lying hairs, even the shortest
ones. Its massage element minimises the pulling sensation
and soothes the skin after the hairs have been removed.
Opti-start cap with massage element
The opti-start cap with massage element allows you to
epilate with optimal efficiency and gentleness. It ensures
ideal contact with the skin and optimal positioning of the
appliance, so that hairs are removed effectively in one
stroke. The massage element gives you a relaxing and
pleasant sensation during epilation.
Sensitive area cap
The sensitive area cap has been specially designed to
epilate sensitive areas, such as your underarms and bikini
line. It minimises the pulling sensation of epilation in
sensitive areas with long-lasting results.
Trimming head and comb
The trimming head has been designed for styling sensitive
areas, the bikini line in particular. With the trimming head
and comb you can trim hair to a length of 4mm, which is
also the ideal length for epilation. If you use the trimming
head without the comb, you can use it to style your bikini
line just the way you want. Contouring your bikini line has
never been easier.
General description (Fig. 1)
A Hair-lifting attachment with massage element
B Opti-start cap with massage element
C Trimming comb
D Trimming head
E Sensitive area cap
F Epilating discs
G Epilating head
H On/off slide
- O = off
- I = normal speed
- II = high speed (only to be used for epilating head)
Note: Speed II does not work when the trimming head is
attached.
I Socket for appliance plug
J Small plug
K Adapter
L Cleaning brush
Important
Read this user manual carefully before you use the
appliance and save it for future reference.
-
-
Danger
Keep the appliance and the adapter dry.
Do not use the appliance near or over a washbasin
or bath filled with water (Fig. 2).
Do not use the appliance in the bath or in the
shower (Fig. 3).
If you use the appliance in the bathroom, do not use
an extension cord (Fig. 4).
Warning
Only use the appliance in combination with the
adapter supplied.
Do not use the appliance or the adapter if it is
damaged.
If the adapter is damaged, always have it replaced
with one of the original type in order to avoid a
hazard.
The adapter contains a transformer. Do not cut
off the adapter to replace it with another plug, as
this causes a hazardous situation.
This appliance is not intended for use by persons
(including children) with reduced physical, sensory
4203.000.4330.1
-
-
-
-
-
or mental capabilities, or lack of experience and
knowledge, unless they have been given supervision
or instruction concerning use of the appliance by a
person responsible for their safety.
Children should be supervised to ensure that they
do not play with the appliance.
Caution
Only epilate the underarms and bikini line with the
sensitive area cap attached.
This appliance is only intended for removing women’s
body hair on areas below the neck: underarms, bikini
area and legs. Do not use it for any other purpose.
To prevent damage and injuries, keep the running
appliance (with or without attachment) away
from scalp hair, eyebrows, eyelashes, clothes, threads,
cords, brushes etc.
Do not use the appliance on irritated skin or skin
with varicose veins, rashes, spots, moles (with hairs)
or wounds without consulting your doctor first.
People with a reduced immune response or people
who suffer from diabetes mellitus, haemophilia or
immunodeficiency should also consult their doctor
first.
Your skin may become a little red and irritated the
first few times you use the epilator. This phenomenon
is absolutely normal and quickly disappears. As
you use the appliance more often, your skin gets
used to epilation, skin irritation decreases and
regrowth becomes thinner and softer. If the irritation
has not disappeared within three days, we advise you
to consult a doctor.
Do not use the epilating head, trimming
head, attachments or comb if they are damaged or
broken, as this may cause injury.
Electromagnetic fields (EMF)
This Philips appliance complies with all standards
regarding electromagnetic fields (EMF). If handled
properly and according to the instructions in this user
manual, the appliance is safe to use based on scientific
evidence available today.
Using the appliance
Note: Clean the epilating head before first use.
Epilation tips
-
-
-
-
-
When you use the appliance for the first time, we
advise you to try it out on an area with only light hair
growth to get accustomed to the epilation process.
Epilation is easier just after taking a bath or shower.
Make sure your skin is completely dry when you
start epilating.
Make sure your skin is clean, entirely dry and free
from grease. Do not use any cream before you start
epilating.
Epilation is easier and more comfortable when the
hair has the optimum length of 3–4 mm. If the hairs
are longer, we recommend that you either shave first
and epilate the shorter regrowing hairs after 1 or 2
weeks, or that you use the trimming head with the
comb to pre-cut hairs to this ideal length.
When you epilate for the first time, we advise you to
epilate in the evening, so that any reddening that
develops can disappear overnight.
While epilating stretch your skin with your free hand.
This lifts up the hairs and helps to minimise the
pulling sensation.
For optimal performance, place the appliance on
the skin at right angles (90°) with the on/off slide
pointing in the direction in which you are going to
move the appliance. Guide the appliance across the
skin against the direction of hair growth in a slow,
continuous movement without exerting any pressure.
On some areas, e.g. the underarms, hair may grow in
different directions. In this case, it may be helpful to
move the appliance in different directions to achieve
optimal results.
To relax the skin, we advise you to apply a
moisturising cream after epilation.
Fine hair that regrows might not grow up to the
skin surface. The regular use of an exfoliating sponge
or cream (e.g. during showering) helps to prevent
ingrowing hair as the gentle scrubbing action
removes the upper skin layer and fine hair can get
through to the skin surface.
When you use the hair-lifting attachment with
massage element or the opti-start cap with massage
element, make sure that the massage element or
the comb always stays in contact with the skin. The
massage element stimulates and relaxes the skin for a
gentler epilation. Connecting the appliance
1 Insert the appliance plug into the appliance (Fig. 5).
2 Insert the adapter into the wall socket.
Epilating the legs
We advise you to start epilating with the opti-start cap
with massage element. The opti-start cap with massage
element ensures maximum skin contact and allows you
to epilate your legs more quickly and efficiently. After
a few sessions, you can use the epilating head with
the hair-lifting attachment with massage element. This
attachment ensures optimal hair lifting, relaxes the skin
and minimises the pulling sensation of epilation.
Only use the opti-start cap with massage element and
the hair-lifting attachment with massage element on
your legs.
1 Put the desired attachment (opti-start cap with
massage element or hair-lifting attachment with
massage element) on the epilating head (Fig. 6).
The procedure for placing the attachments onto the
appliance is the same for all attachments.
2 Select the desired speed to switch on the
appliance (Fig. 7).
Preferably use speed II. Switch to speed I for areas with
little hair growth, for hard-to-reach areas and for areas
where bones are located directly beneath the skin, such
as knees and ankles.
3 Stretch the skin with your free hand to make the
hairs stand upright.
4 Place the epilator perpendicularly onto the skin
with the on/off slide pointing in the direction in
which you are going to move the appliance (Fig. 8).
5 Move the appliance slowly over the skin, against the
direction of hair growth.
Press the appliance lightly onto the skin.
Epilating the underarms and bikini line
Your epilator comes with a sensitive area cap that
reduces the number of active epilating discs. This makes
the appliance ideal for epilating the sensitive areas of the
body, such as the underarms and bikini line. The first few
times you use the appliance, these areas are particularly
sensitive to pain, but after repeated use the pain sensation
diminishes.
Note:You get the best results in the most comfortable
way when the hairs are not too long (approx. 4mm). If the
hairs are longer, you can trim them to this length with the
trimming head and comb (see section ‘Trimming sensitive
areas with the trimming head and comb’ in this chapter). 1 Thoroughly clean the area to be epilated to remove
any residues of deodorant, cream etc. Then dab the
area dry.
2 Put the sensitive area cap on the epilating
head (Fig. 9).
3 Switch on the appliance.
Preferably use speed II. Switch to speed I for areas with
little hair growth and for hard-to-reach areas.
4 Stretch the skin with your free hand. When epilating
the underarms, raise your arm to stretch the skin.
5 Place the appliance perpendicularly onto your skin,
with the on/off slide pointing in the direction in
which you are going to move the appliance.
6 Move the appliance slowly over the skin, against the
-
direction of the hair growth.
Epilate your bikini line as shown in the figure (Fig. 10).
Epilate your underarms as shown in the figure. Move
the appliance in different directions (Fig. 11).
Trimming sensitive areas with the trimming
head and comb
Use the trimming head to trim the hair on your
underarms and bikini line to a length of 4mm.
Note:The trimming head can only be used at speed setting I.
2/7
1 Push the epilating head in the direction of the
arrows on the back of the appliance (1) and remove
it from the appliance (2) (Fig. 12).
2 Put the trimming head on the appliance (1) and
push it against the direction of the arrows on the
back of the appliance (2) to fix it (Fig. 13).
3 Put the comb on the trimming head.
4 Switch on the appliance (Fig. 14).
Note: Speed II does not work when the trimming head is
attached.
5 Stretch the skin with your free hand.
6 Move the appliance against the direction of hair
growth. Make sure the surface of the comb always
stays in contact with the skin (Fig. 15).
7 When you have finished trimming, switch off the
appliance and remove the comb.
Styling with the trimming head.
To style your bikini line, use the trimming head without
the comb. Styling without the comb results in a hair
length of approx. 0.5-1mm. You can be as creative as you
like when you style your bikini line. You can even draw
and cut out a template, e.g. a heart shape, which you can
use to create a personal style.
Note:The trimming head can only be used at speed setting I.
1 Push the epilating head in the direction of the
arrows on the back of the appliance (1) and remove
it from the appliance (2) (Fig. 12).
2 Put the trimming head on the appliance (1) and
push it against the direction of the arrows on the
back of the appliance (2) to fix it (Fig. 13).
Note:We advise you not to put the comb on the trimming
head.
3 Switch on the appliance (Fig. 14).
Note: Speed II does not work when the trimming head is
attached.
4 Shake the epilating head/trimming
head firmly (Fig. 24).
Dry the epilating/trimming head thoroughly with a tea
towel.
Note: Make sure the epilating head/trimming head is
completely dry before you place it back onto the appliance. Replacement
All parts of the appliance can be replaced. If you need to
replace one or more of the following parts, go to your
Philips dealer or an authorised Philips service centre:
- appliance itself
- epilating head
- sensitive area cap
- opti-start cap with massage element
- hair-lifting attachment with massage element
- trimming head
- comb
- cleaning brush
- adapter
Environment
- Do not throw away the appliance with the normal
household waste at the end of its life, but hand it in
at an official collection point for recycling. By doing
this, you help to preserve the environment (Fig. 25).
Guarantee & service
If you need service or information or if you have a
problem, please visit the Philips website at www.philips.
com or contact the Philips Consumer Care Centre
in your country (you find its phone number in the
worldwide guarantee leaflet). If there is no Consumer
Care Centre in your country, go to your local Philips
dealer.
Troubleshooting
This chapter summarises the most common problems
you could encounter with the appliance. If you are unable
to solve the problem with the information below, contact
the Consumer Care Centre in your country.
Problem
Cause
Solution
Poor epilating results.
You move the
appliance in the wrong
direction.
Move the appliance against the direction of hair growth, with
the on/off slide pointing in the direction in which you move the
appliance.
You place the epilating
head on the skin at the
wrong angle.
Make sure that you place the appliance on the skin at an angle
of 90° (see chapter ‘Using the appliance’).
You used a (depilatory)
cream prior to epilation.
Make sure your skin is clean, entirely dry and free from grease.
Do not use any cream before you start epilating.
The hairs are too short.
Sometimes hairs are too short to be caught. The optimal length
for easy removal of the hairs is 3-4mm. The hairs that are not
caught during this session will be long enough to be removed
when you epilate the next time. You can also try to catch the
hairs by moving the appliance across the skin a few more times.
The sensitive area cap
is on the epilating head
when you epilate your
legs.
Do not use the sensitive area cap when you epilate your legs,
as the cap reduces the number of active epilating discs. NB:
Never use the epilator without the sensitive area cap when
you epilate your underarms or bikini line.
The appliance does
not work.
The socket to which the
appliance is connected is
not live.
Make sure the socket is live. If you have connected the epilator
to the socket in a bathroom cabinet, you may need to switch
on the bathroom light to activate the socket.
I cannot select speed
setting II.
The trimming head is
attached. The trimming
head can only be used at
speed setting I.
Select speed setting I when you use the trimming head.
I cannot remove the
trimming head/
epilating head from
the appliance.
You try to pull it straight
off.
Push the epilating head/trimming head in the direction of the
arrows on the back of the appliance before you pull it off the
appliance (see chapter ‘Cleaning and maintenance’).
4 Move the appliance towards the desired contour
of your bikini line, against the direction of hair
growth. Touch the skin lightly with the trimming
head (Fig. 16).
Cleaning and maintenance
Note: Make sure the appliance is switched off and
unplugged before you start to clean it.
Never use scouring pads, abrasive cleaning agents or
aggressive liquids such as petrol or acetone to clean the
appliance.
-
Never rinse the appliance or the adapter under the
tap (Fig. 17).
Keep the appliance and the adapter dry (Fig. 18).
Cleaning the attachments
1 Remove any attachment (sensitive area cap,
-
opti-start cap with massage element, hair-lifting
attachment with massage element) from the
epilating head (Fig. 19).
Remove the trimming comb by pulling it off the
trimming head (Fig. 20).
2 Remove loose hairs from the attachment with the
cleaning brush.
3 Rinse the attachment under the tap while turning it.
4 Dry the attachment before you use or store it.
Cleaning the epilating head/trimming head
1 Push the epilating head/trimming head in the
direction of the arrows on the back of the
appliance (1) and remove it (2) (Fig. 12).
2 Remove loose hairs with the cleaning
brush (Fig. 21).
3 Rinse the epilating head/trimming head under the
-
tap for 5-10 seconds while turning it (Fig. 22).
Pull the front cover off the trimming head to remove
any hair that has accumulated inside the trimming
head (Fig. 23).
4203.000.4330.1
3/7
Italiano
Introduzione
Congratulazioni per l’acquisto e benvenuti in Philips! Per
trarre il massimo vantaggio dall’assistenza Philips, registrate
il vostro prodotto su www.philips.com/welcome.
Il nuovo epilatore consente di eliminare i peli superflui in
modo semplice, rapido ed efficace. Questo epilatore è
particolarmente indicato per eliminare i peli delle gambe,
delle ascelle e della zona bikini.
I dischi rotanti consentono di catturare anche i peli più
corti (0,5 mm) e di rimuoverli alla radice.
I peli ricrescono quindi più morbidi e sottili. Questo
nuovo apparecchio assicura una pelle morbida e liscia per
settimane.
Questo epilatore viene fornito con i seguenti accessori:
Accessorio per il sollevamento del pelo con
elemento massaggiante
Questo accessorio consente di sollevare anche i peli
più corti. L’elemento massaggiante riduce al minimo la
sensazione di strappo ed esercita un effetto calmante
riducendo la sensazione di fastidio successiva all’epilazione.
Testina per prime epilazioni con elemento
massaggiante
La testina per prime epilazioni con elemento
massaggiante consente un’epilazione ottimale per
efficienza e delicatezza. Garantisce un contatto ideale con
la pelle e un posizionamento eccellente dell’apparecchio
che consente di rimuovere i peli in un solo passaggio.
L’elemento massaggiante garantisce una sensazione più
piacevole durante l’epilazione.
Testina per le zone sensibili
La testina per le zone sensibili è progettata specificamente
per l’epilazione di queste zone, come le ascelle e la zona
bikini. Riduce al minimo la sensazione di strappo e vi
garantisce risultati duraturi.
Testina di regolazione e pettine
La testina di regolazione è stata progettata per la rifinitura
delle zone sensibili e della zona bikini in particolare.
La testina di regolazione e il pettine consentono di
uniformare la lunghezza dei peli fino a 4 mm ovvero la
misura ideale per procedere all’epilazione. Se la testina di
regolazione viene utilizzata senza il pettine, potete rifinire
la zona bikini come preferite. Lo styling della zona bikini
non è mai stato tanto semplice.
Descrizione generale (fig. 1)
A Accessorio per il sollevamento del pelo con
elemento massaggiante
B Testina per prime epilazioni con elemento
massaggiante
C Pettine regola altezze
D Testina di regolazione
E Testina per le zone sensibili
F Dischi di epilazione
G Testina epilatoria
H Cursore on/off
- O = spento
- I = velocità normale
- II = velocità alta (da utilizzare solo con la testina
epilatoria)
Nota La velocità II non funziona quando si utilizza la testina
di regolazione.
I Presa per spinotto
J Spinotto
K Adattatore
L Spazzolina per la pulizia
Importante
Prima di utilizzare l’apparecchio, leggete attentamente il
presente manuale e conservatelo per eventuali riferimenti
futuri.
-
-
Pericolo
Non bagnate l’apparecchio e l’adattatore.
Non utilizzare l’apparecchio in prossimità o al
di sopra di lavabi o vasche da bagno contenenti
acqua (fig. 2).
Non utilizzare l’apparecchio nella vasca da bagno o
nella doccia (fig. 3).
Se l’apparecchio viene utilizzato in bagno, non
utilizzare una prolunga (fig. 4).
Avvertenza
Utilizzate l’apparecchio esclusivamente con
l’adattatore in dotazione.
4203.000.4330.1
-
-
-
-
-
-
Non utilizzate l’apparecchio o l’adattatore se sono
danneggiati.
Nel caso in cui l’adattatore fosse danneggiato, dovrà
essere sostituito esclusivamente con un adattatore
originale al fine di evitare situazioni pericolose.
L’adattatore contiene un trasformatore. Non tagliate
l’adattatore per sostituirlo con un’altra spina onde
evitare situazioni pericolose.
L’apparecchio non è destinato a persone (inclusi
bambini) con capacità mentali, fisiche o sensoriali
ridotte, fatti salvi i casi in cui tali persone abbiano
ricevuto assistenza o formazione per l’uso
dell’apparecchio da una persona responsabile della
loro sicurezza.
Adottate le dovute precauzioni per evitare che i
bambini giochino con l’apparecchio.
Attenzione
Per l’epilazione delle ascelle e della zona bikini
utilizzate esclusivamente la testina per le zone
sensibili in dotazione.
Questo apparecchio è adatto per la rimozione dei
peli nelle seguenti aree: ascelle, area bikini e gambe.
Non utilizzatelo per altri scopi.
Al fine di evitare danni o lesioni, tenete l’apparecchio
in funzione (con o senza accessori) lontano da
capelli, ciglia, sopracciglia, vestiti, fili, corde, spazzole,
ecc.
Non utilizzate l’apparecchio su pelle irritata o in
caso di vene varicose, eruzioni cutanee, foruncoli,
nei (con peli), ferite o escoriazioni senza previo
consulto medico. In caso di risposta immunitaria
ridotta, nei pazienti affetti da diabete mellito, emofilia
o immunodeficienza, è consigliabile chiedere il parere
del medico.
Le prime volte che userete l’epilatore, la pelle
potrebbe arrossarsi o irritarsi leggermente. Si tratta
di un fenomeno del tutto normale e destinato a
scomparire rapidamente, non appena la pelle si sarà
abituata all’epilazione e i peli saranno più sottili e
morbidi. Qualora l’irritazione persista per più di tre
giorni, consultate il medico.
Non utilizzate la testina epilatoria, la testina di
regolazione o gli accessori se sono danneggiati o rotti,
poiché potrebbero causare lesioni.
Campi elettromagnetici (EMF)
Questo apparecchio Philips è conforme a tutti gli
standard relativi ai campi elettromagnetici (EMF). Se
utilizzato in modo appropriato seguendo le istruzioni
contenute nel presente manuale utente, l’apparecchio
consente un utilizzo sicuro come confermato dai risultati
scientifici attualmente disponibili.
Modalità d’uso dell’apparecchio
Nota Pulite la testina epilatoria prima di utilizzarla la prima
volta.
Suggerimenti per l’epilazione
-
-
-
-
Se viene utilizzato l’apparecchio per la prima volta, si
consiglia di cominciare con una zona in cui la crescita
dei peli è limitata per potersi abituare a questo
metodo di epilazione.
L’epilazione risulta più facile se effettuata subito
dopo la doccia o il bagno. Assicurarsi che la pelle sia
perfettamente asciutta prima di iniziare l’epilazione.
Assicurarsi che la pelle sia pulita, asciutta e priva di
sostanze grasse. Non applicare alcuna crema prima
dell’epilazione.
L’epilazione è più semplice e comoda quando i peli
non sono più lunghi di 3-4 mm. Se i peli sono più
lunghi, si raccomanda di rasare prima la parte e poi
epilare i peli ricresciuti dopo 1 o 2 settimane, oppure
di utilizzare la testina di regolazione con il pettine per
tagliare prima i peli alla lunghezza ideale.
Vi consigliamo di effettuare la prima epilazione la
sera per consentire a eventuali rossori di scomparire
durante la notte.
Durante l’epilazione, tendete la pelle con la mano
libera: questo semplice accorgimento consente di
sollevare i peli per ridurre al minimo la sensazione di
strappo.
Per ottenere risultati perfetti, posizionate
l’apparecchio ad angolo retto (90°) sulla pelle con
il cursore on/off rivolto in avanti e fatelo scorrere
in modo lento e continuo nella direzione contraria
a quella di crescita dei peli senza esercitare alcuna
pressione.
-
-
-
In alcune zone, come ad esempio le ascelle, non tutti
i peli crescono dalla stessa parte. In questo caso,
per ottenere risultati ottimali, potrebbe essere utile
muovere l’apparecchio in più direzioni.
Per rilassare la pelle, dopo l’epilazione vi consigliamo
di applicare una crema idratante.
I peli più sottili potrebbero ricrescere sotto pelle.
Se utilizzate regolarmente una spugna o una crema
esfoliante (es.: durante la doccia) potete evitarlo in
quanto il delicato effetto scrubbing rimuove lo strato
superiore della pelle consentendo ai peli di crescere
normalmente.
Quando utilizzate l’accessorio per il sollevamento
del pelo con elemento massaggiante o la
testina per prime epilazioni con elemento
massaggiante, assicuratevi che l’elemento
massaggiante o il pettine siano sempre a contatto
con la pelle in quanto questi accessori stimolano
e rilassano la pelle per garantire un’epilazione più
delicata. Alimentazione dell’apparecchio
1 Inserite lo spinotto nell’apparecchio (fig. 5).
2 Inserite l’adattatore nella presa a muro.
Epilazione delle gambe
Iniziate l’epilazione con la testina per prime epilazioni
con elemento massaggiante. Questa testina assicura il
contatto ottimale con la pelle e vi consente di depilare le
gambe più velocemente ed efficacemente. Dopo alcune
sessioni, potete utilizzare la testina epilatoria dotata di
accessorio per il sollevamento del pelo ed elemento
massaggiante. Questo accessorio assicura il sollevamento
ottimale del pelo, rilassa la pelle e riduce al minimo la
sensazione di strappo.
Sulle gambe, utilizzate esclusivamente la testina
per prime epilazioni con elemento massaggiante e
l’accessorio per il sollevamento del pelo con elemento
massaggiante.
1 Inserite l’accessorio desiderato (testina per prime
epilazioni con elemento massaggiante o accessorio
per il sollevamento del pelo con elemento
massaggiante) sulla testina epilatoria (fig. 6).
La procedura di inserimento degli accessori
sull’apparecchio è sempre la stessa.
2 Selezionate la velocità desiderata per accendere
l’apparecchio (fig. 7).
Vi consigliamo di utilizzare la velocità II. Passate alla
velocità I per le zone difficili da raggiungere, con pochi peli
e in prossimità di ginocchia e caviglie.
3 Tendere la pelle con la mano libera per sollevare i
peli.
4 Appoggiate l’epilatore perpendicolarmente sulla
pelle, con il cursore on/off rivolto nella direzione in
cui si fa scorrere l’apparecchio (fig. 8).
5 Fate scorrere l’apparecchio lentamente sulla pelle,
nel senso opposto alla crescita dei peli.
Esercitare una leggera pressione.
Epilazione delle ascelle e della zona bikini
L’epilatore è dotato di una testina per le zone sensibili in
grado di ridurre il numero dei dischi epilatori in funzione.
Questo meccanismo consente di epilare delicatamente
le parti più sensibili del corpo, ad esempio ascelle e zona
bikini. Durante le prime epilazioni, queste zone possono
essere particolarmente sensibili al dolore, ma dopo alcuni
utilizzi questa sensazione tende a diminuire.
Nota I risultati migliori solitamente si ottengono quando i
peli non sono troppo lunghi (circa 4 mm). Se i peli sono più
lunghi, potete regolarli utilizzando la testina di regolazione
e il pettine (consultate la sezione “Regolazione delle aree
sensibili con la testina di regolazione e il pettine” in questo
capitolo). 1 Pulite accuratamente la zona da epilare rimuovendo
tutti i residui di deodorante, crema, ecc. Quindi
asciugatela perfettamente.
2 Inserite la testina per le zone sensibili sulla testina
epilatoria (fig. 9).
3 Accendete l’apparecchio.
Vi consigliamo di utilizzare la velocità II. Passate alla
velocità I per le zone con pochi peli e difficili da
raggiungere.
4/7
4 Tendete la pelle con la mano libera. Durante
l’epilazione delle ascelle, sollevate il braccio per
tendere la pelle.
5 Appoggiate l’epilatore perpendicolarmente sulla
pelle con il selettore on/off rivolto nella direzione
in cui si fa scorrere l’apparecchio.
6 Fate scorrere l’apparecchio lentamente sulla pelle
-
nel senso opposto alla crescita dei peli.
Epilate la zona bikini come indicato nella
figura (fig. 10).
Epilate le ascelle come indicato nella figura. Spostate
l’apparecchio in più direzioni (fig. 11).
Regolazione delle aree sensibili con la testina
di regolazione e il pettine
Utilizzate la testina di regolazione per regolare i peli delle
zone ascelle e bikini a una lunghezza massima di 4 mm.
Nota La testina di regolazione può essere utilizzata solo a
velocità I.
1 Spingete la testina epilatoria nella direzione
delle frecce sul retro dell’apparecchio (1) e
rimuovetela dall’apparecchio (2) (fig. 12).
-
Rimuovete il pettine di regolazione estraendolo dalla
testina epilatoria (fig. 20).
7 Una volta terminata la regolazione, spegnete
l’apparecchio e rimuovete il pettine.
Styling con la testina di regolazione.
Per eseguire lo styling della zona bikini, utilizzate la
testina di regolazione senza pettine per ottenere peli di
una lunghezza minima di 0,5-1 mm. È perfino possibile
disegnare e riprodurre una forma particolare, ad esempio
un cuore, per creare uno stile personale.
Nota La testina di regolazione può essere utilizzata solo a
velocità I.
1 Spingete la testina epilatoria nella direzione delle
frecce sul retro dell’apparecchio (1) e rimuovetela
dall’apparecchio (2) (fig. 12).
2 Inserite la testina di regolazione sull’apparecchio (1)
e spingetela in direzione delle frecce incise sul retro
(2) per bloccarla in posizione (fig. 13).
Nota Vi consigliamo di non inserire il pettine sulla testina di
regolazione
3 Accendete l’apparecchio (fig. 14).
Nota La velocità II non funziona quando si utilizza la testina
di regolazione.
4 Muovete l’apparecchio seguendo il contorno
desiderato della zona bikini e sfiorate delicatamente
la pelle con la testina di regolazione (fig. 16).
Pulizia e manutenzione
Nota Prima di pulire l’apparecchio, verificate che sia spento
e scollegato dalla presa di corrente.
Non usate prodotti o sostanze abrasive o detergenti
aggressivi, come benzina o acetone, per pulire
l’apparecchio.
-
Non immergere l’apparecchio o l’adattatore
nell’acqua (fig. 17).
Non bagnate l’apparecchio e l’adattatore (fig. 18).
Pulizia degli accessori
1 Rimuovete qualsiasi accessorio (testina per le zone
sensibili, testina per prime epilazioni con elemento
massaggiante, accessorio per il sollevamento del
pelo con elemento massaggiante) dalla testina
epilatoria (fig. 19).
4203.000.4330.1
Assicurarsi che la
pelle sia pulita, asciutta e priva di sostanze
grasse. Non applicare
alcuna crema prima
dell’epilazione.
I peli sono
troppo corti.
A volte i peli sono
troppo corti per
l’epilazione. La lunghezza ottimale per
la loro rimozione è
di 3-4 mm. I peli che
non vengono tolti
durante l’applicazione verranno epilati
la volta successiva
quando raggiungeranno la lunghezza
indicata. Potete anche
provare a passare
più volte l’apparecchio sulla pelle
per rimuoverli più
efficacemente.
Quando eseguite l’epilazione
delle gambe, la
testina per le
zone sensibili si
trova sulla testina epilatoria.
Non utilizzate la
testina per le zone
sensibili per epilare
le gambe in quanto
si riduce il numero
dei dischi epilatori
in funzione. NB: non
utilizzate l’epilatore
senza la testina le
zone sensibili per
epilare le ascelle o la
zona bikini.
L’apparecchio non
funziona.
La presa di
corrente a cui
è collegato
l’apparecchio
non funziona.
Assicurarsi che la
presa di corrente
funzioni. Se l’epilatore
viene collegato a una
presa di corrente
disponibile sul
mobiletto del bagno,
potrebbe essere
necessario spegnere
la luce del bagno per
attivare la presa.
L’impostazione II non
può essere
selezionata.
La testina di
regolazione
è inserita
sull’apparecchio.
La testina di
regolazione può
essere utilizzata
solo a velocità I.
Selezionate la
velocità I quando
utilizzate la testina di
regolazione.
Non è
possibile
rimuovere la testina
epilatoria/di
regolazione
dall’apparecchio.
Avete cercato
di rimuoverla in
modo eccessivamente brusco.
Spingete la testina
epilatoria/di regolazione nella direzione
delle frecce sul retro
dell’apparecchio
prima di rimuoverla
(consultate il capitolo
“Pulizia e manutenzione”).
mentre lo ruotate.
4 Asciugatelo prima di utilizzarlo o di riporlo.
Pulizia della testina epilatoria e della testina
di regolazione
1 Spingete la testina epilatoria/di regolazione nella
direzione delle frecce sul retro dell’apparecchio (1)
e rimuovetela dall’apparecchio (2) (fig. 12).
2 Rimuovete i peli residui con la spazzola per la
pulitura in dotazione (fig. 21).
3 Lavate la testina epilatoria/di regolazione sotto
-
l’acqua corrente per 5-10 secondi (fig. 22).
Estraete il rivestimento anteriore dalla testina di
regolazione per rimuovere eventuali accumuli di peli
dall’interno (fig. 23).
4 Scuotete in modo deciso la testina epilatoria/di
Nota Assicuratevi che la testina epilatoria/di regolazione sia
completamente asciutta prima di riposizionarla
sull’apparecchio. Sostituzione
Tutti i componenti dell’apparecchio possono essere
sostituiti. Se è necessario sostituire uno o più dei
componenti riportati di seguito, rivolgetevi al vostro
rivenditore Philips o a un centro autorizzato Philips:
- apparecchio
- testina epilatoria
- testina per le zone sensibili
- testina per prime epilazioni con elemento
massaggiante
- accessorio per il sollevamento del pelo con elemento
massaggiante
- testina di regolazione
- Comb
- spazzolina per la pulizia
- adattatore
Tutela dell’ambiente
- Per contribuire alla tutela dell’ambiente, non
smaltite l’apparecchio con normali i rifiuti
domestici, ma consegnatelo a un centro di raccolta
autorizzato (fig. 25).
Garanzia e assistenza
Se avete bisogno di assistenza o informazioni o in caso
di problemi, visitate il sito Web Philips all’indirizzo www.
philips.com oppure contattate il Centro Assistenza Clienti
Philips del vostro Paese (per conoscere il numero di
telefono consultate l’opuscolo della garanzia). Se nel
vostro Paese non esiste un Centro Assistenza Clienti,
rivolgetevi al vostro rivenditore Philips.
Risoluzione dei guasti
In questo capitolo vengono riportati i problemi più
ricorrenti legati all’uso dell’apparecchio. Se non riuscite
a risolvere i problemi con le informazioni seguenti, vi
preghiamo di contattare il Centro Assistenza Clienti
Philips del vostro paese.
che la superficie del pettine sia sempre a contatto
con la pelle (fig. 15).
Avete utilizzato
una crema (per
la depilazione)
prima dell’epilazione.
3 Sciacquate l’accessorio sotto l’acqua corrente
3 Inserite la testina di regolazione e il pettine.
4 Accendete l’apparecchio (fig. 14).
5 Tendete la pelle con la mano libera.
6 Muovete l’apparecchio contropelo ed assicuratevi
Soluzione
peli all’interno dell’accessorio.
regolazione (fig. 24).
Asciugate la testina epilatoria/di regolazione con un
panno.
Nota La velocità II non funziona quando si utilizza la testina
di regolazione.
Causa
2 Aiutandovi con l’apposita spazzolina, rimuovete i
2 Inserite la testina di regolazione sull’apparecchio
(1) e spingetela in direzione delle frecce incise sul
retro (2) per bloccarla in posizione (fig. 13).
Problema
Problema
Causa
Soluzione
Epilazione poco
accurata.
Avete azionato
l’apparecchio nella direzione sbagliata.
Utilizzate l’apparecchio in senso
opposto rispetto alla
crescita dei peli con
il selettore on/off
rivolto nella direzione
in cui si fa scorrere
l’apparecchio.
Avete posizionato la testina
epilatoria sulla
pelle a un’angolazione errata.
Posizionate l’apparecchio sulla pelle
con un angolo di 90°
(consultate il capitolo
“Modalità d’uso dell’apparecchio”).
5/7
Türkçe
Giriş
Ürünümüzü satın aldığınız için teşekkür ederiz; Philips’e
hoş geldiniz! Philips’in sunduğu destekten tam faydalanmak
için lütfen ürününüzü şu adresten kaydedin: www.philips.
com/welcome.
Yeni Philips epilatörünüz ile cildinizdeki istenmeyen
tüylerden etkili, çabuk ve kolayca kurtulabilirsiniz. Özellikle
bacak, koltuk altı ve bikini çizgisindeki tüyler için idealdir.
Dönen diskler en kısa tüyleri bile (0,5 mm’ye kadar)
kökünden kolayca alır.
Tüyler yeniden çıkarken daha yumuşak ve ince olur. Bu
yeni epilasyon cihazı ile cildiniz haftalarca pürüzsüz ve
tertemiz kalacaktır.
Bu cihaz aşağıdaki aparatlarla birlikte verilir:
Masaj üniteli tüy kaldırma aparatı
Bu aparat düz bir şekilde yatan en kısa tüyleri bile kaldırır.
Masaj ünitesi çekilme hissini en aza indirger ve tüy
alındıktan sonra cildi rahatlatır.
Masaj üniteli Opti-start başlığı
Masaj üniteli opti-start başlığı epilasyon işlemini optimum
verimlilik ve rahatlıkla yapmanıza olanak sağlar. Cihazın
ideal cilt temasını ve düzgün şekilde yerleşmesini, böylece
tüylerin tek seferde etkili bir şekilde alınmasını sağlar. Masaj
ünitesi epilasyon sırasında size dinlendirici ve rahatlatıcı bir
duygu verir.
Hassas bölge başlığı
Hassas bölge başlığı özellikle koltuk altları ve bikini çizgisi
gibi hassas bölgelerin epilasyonu için tasarlanmıştır. Hassas
bölgelerde çekilme hissini azaltır ve uzun süreli sonuçlar
sağlar.
Düzeltme başlığı ve tarak
Düzeltme başlığı özellikle bikini çizgisi gibi hassas
bölgelerin düzeltilmesi için tasarlanmıştır. Düzeltme başlığı
ve tarak ile tüylerinizi epilasyon için de ideal bir uzunluk
olan 4 mm’ye düzeltebilirsiniz. Düzeltme başlığını tarak
olmadan kullanırsanız, bikini çizginize istediğiniz şekli
vermekte kullanabilirsiniz. Bikini çizginizi düzeltmek hiç bu
kadar kolay olmamıştı.
Genel açıklamalar (Şek. 1)
A Masaj üniteli tüy kaldırma aparatı
B Masaj üniteli Opti-start başlığı
C Düzeltici tarak
D Düzeltme başlığı
E Hassas bölge başlığı
F Epilasyon diskleri
G Epilasyon başlığı
H Açma/kapama sürgüsü
- O = kapalı
- I = normal hız
- II = yüksek hız (sadece epilasyon başlığı için kullanılır)
Dikkat: Düzeltme başlığı takıldığında Hız II çalışmaz.
I Cihaz fişi soketi
J Küçük fiş
K Adaptör
L Temizleme fırçası
Önemli
Cihazı kullanmadan önce bu kullanım kılavuzunu okuyun
ve gelecekte de başvurmak üzere saklayın.
-
-
-
Tehlike
Cihazı ve adaptörü kuru olarak saklayın.
Cihazı su dolu banyo küveti yakınında ya da içinde
kullanmayın (Şek. 2).
Cihazı banyo ya da duş yaparken kullanmayın (Şek. 3).
Eğer cihazı banyoda kullanacaksanız, uzatma kablosu
kullanmayın (Şek. 4).
Uyarı
Cihazı sadece cihazla beraber verilen adaptör ile
birlikte kullanın.
Hasar gören cihazı veya adaptörü kullanmayın.
Adaptör hasarlıysa, bir tehlikeyi önlemek için mutlaka
orijinal modeli ile değiştirildiğinden emin olun.
Adaptörde bir dönüştürücü bulunmaktadır. Tehlikeli
bir duruma sebep olabileceğinden, adaptörü başka bir
fişle değiştirmek için kesmeyin.
Bu cihaz, güvenliklerinden sorumlu kişilerin nezareti
veya talimatı olmadan, fiziksel, motor ya da zihinsel
becerileri gelişmemiş veya bilgi ve tecrübe açısından
yetersiz kişiler tarafından (çocuklar da dahil)
kullanılmamalıdır.
Küçük çocukların cihazla oynamaları engellenmelidir.
4203.000.4330.1
-
-
-
-
-
Dikkat
Koltuk altlarını ve bikini bölgesini temizlemek için
hassas bölge başlığını kullanın.
Bu cihaz kadınların boyun bölgesinden aşağıdaki
vücut tüylerinin alınması için belirtilen bölgelerde
kullanılmak üzere tasarlanmıştır: koltuk altları, bikini
bölgesi ve bacaklar. Başka bir amaç için kullanmayın.
Cihaz çalışır durumdayken (aparatlı veya
aparatsız) herhangi bir kaza veya hasarı önlemek için,
saçlarınızdan, kirpik ve kaşlarınızdan ayrıca kıyafet, fırça,
kablo vb.’den uzak tutun.
Cilt tahriş olmuşsa ya da ciltte varis, kızarıklıklar,
lekeler, benler (üzeri tüylü) veya yaralar varsa, cihazı
doktorunuza danışmadan önce kullanmayın. Düşük
bağışıklık tepkisi, şeker hastalığı, hemofili ya da
bağışıklık sistemi yetmezliği olan kişiler de öncelikle
doktorlarına danışmalıdır.
Cihazı ilk birkaç kullanışınızda cildiniz kızarabilir ve
tahriş olabilir. Bu çok normal bir durum olup, zamanla
hızla azalacaktır. Cihazı daha sık kullandıkça, cildiniz
epilasyona alışkanlık kazanacak, tahriş azalacak ve
yeni çıkan tüyler daha ince ve yumuşak olacaktır.
Cildinizdeki tahriş 3 gün içerisinde geçmediyse, bir
doktora başvurmanızı öneririz.
Yaralanmaya yol açabileceği için, hasarlı veya
bozuksa epilasyon başlığını, düzeltme başlığını, diğer
başlıkları ve tarağı kullanmayın.
Elektromanyetik alanlar (EMF)
Bu Philips cihazı elektromanyetik alanlarla (EMF) ilgili
tüm standartlarla uyumludur. Bu cihaz, gereği gibi ve
bu kılavuzdaki talimatlara uygun şekilde kullanıldığında,
bugünün bilimsel verilerine göre kullanımı güvenlidir.
Cihazın kullanımı
Dikkat: Epilasyon başlığını ilk kullanımdan önce temizleyin.
Epilasyon ipuçları
-
-
-
-
-
Size tavsiyemiz, ilk defa epilasyon yapıyorsanız, ilk
olarak daha az miktarda tüy bulunan bir bölüm
üzerinde deneyerek cihaza alışmanızdır.
Epilasyonun banyodan veya duştan sonra yapılması
daha kolay ve rahat olacaktır. Ancak cildinizin
tamamen kuru olmasına dikkat ediniz.
Cildinizin temiz, kremsiz ve kuru olduğundan emin
olunuz. Epilasyondan önce krem sürmeyiniz.
Epilasyon işlemi tüy uzunluğu 3–4 mm olduğunda
daha kolay ve rahat uygulanır. Tüyler daha uzunsa,
uygulama yapılacak bölgeyi tıraş edip1-2 hafta sonra
epilasyon yapmanızı veya düzeltme başlığını kullanarak
tüyleri önceden ideal uzunluğa getirmenizi öneririz.
İlk defa epilasyon yaptığınızda, işlemi akşam
uygulamanızı öneririz, böylece meydana gelen
kızarıklık gece ortadan kalkacaktır.
Epilasyon yaparken cildinizi boştaki elinizle gerin. Bu,
tüyleri kaldıracak ve çekilme hissini azaltacaktır.
En iyi performans için, cihazı cilt üzerine dik açıyla
(90°), açma/kapama sürgüsü cihazın hareket
ettirileceği yönü gösterecek şekilde yerleştirin. Cihazı,
cilt üzerinde tüylerin uzama yönüne ters doğrultuda,
yavaş, sürekli hareketlerle ve herhangi bir baskı
uygulamadan hareket ettirin.
Koltuk altı gibi bazı bölgelerde tüyler farklı
doğrultularda uzayabilir. Bu durumda, cihazı farklı
yönlerde uygulamak en iyi sonuçların elde edilmesine
yardımcı olabilir.
Cildi rahatlatmak için, epilasyondan sonra nemlendirici
krem uygulamanızı tavsiye ederiz.
Tekrar uzayan ince tüyler cilt üstüne ulaşamayabilir.
Masaj süngeri veya kremi (örn. duş sırasında) düzenli
kullanıldığında, hassas ovma hareketi sayesinde cildin
üst katmanının alınmasını ve tekrar uzayan tüyün cilt
yüzeyine erişebilmesini sağlayarak, tüylerin içe doğru
uzamasını engelleyecektir.
Masaj üniteli tüy kaldırma aparatını veya masaj üniteli
opti-start başlığını kullandığınızda, masaj ünitesinin
veya tarağın cildinizle sürekli olarak temas ettiğinden
emin olun. Masaj ünitesi daha hassas bir epilasyon için
cildi canlandırır ve rahatlatır. Cihazın bağlantısı
1 Cihazın fişini cihaza takın (Şek. 5).
2 Adaptörü duvar prizine takın.
Bacak Epilasyonu
Epilasyona masaj üniteli opti-start başlığını kullanarak
başlamanızı öneriyoruz. Masaj üniteli opti-start başlığı,
maksimum cilt teması sayesinde bacaklarınıza daha çabuk
ve daha verimli bir epilasyon yapmanızı sağlar. Birkaç seans
sonrasında epilasyon başlığını, masaj üniteli tüy kaldırma
aparatıyla birlikte kullanabilirsiniz. Bu aparat tüylerin en
iyi şekilde kaldırması sağlar, cildi rahatlatır ve epilasyonun
verdiği çekme hissini azaltır.
Masaj üniteli opti-start başlığını ve masaj üniteli tüy
kaldırma başlığını sadece bacaklarınızda kullanın.
1 İstediğiniz aparatı (masaj üniteli opti-start
başlığı veya masaj üniteli tüy kaldırma başlığı)
epilasyon başlığına takın (Şek. 6).
Aparatların cihaza takılması için uygulanan prosedür bütün
aparatlar için aynıdır.
2 İstediğiniz hızı seçerek cihazı çalıştırın (Şek. 7).
Hız II ayarını kullanmanızı tavsiye ederiz. Tüylerin ince
olduğu ve ulaşılması güç alanlar ile kemikli bölgeler (diz
kapağı ve ayak bileği gibi) için hız I ayarını seçin.
3 Epilasyon sırasında, tüylerin yukarı doğru kalkması
için cildinizi diğer elinizle geriniz.
4 Epilasyon cihazını dikey, açma/kapama düğmesi
hareket ettireceğiniz yöne doğru bakacak şekilde
cildinizin üzerine yerleştirin (Şek. 8).
5 Cihazı cildiniz üzerinde, tüylerin çıkış yönünün
tersine doğru yavaşça gezdirin.
Cihazı cildinize hafifçe bastırın.
Koltuk altı ve bikini bölgesi için epilasyon
Epilasyon cihazınız aktif epilasyon disklerinin sayısını azaltan
bir hassas bölge başlığıyla birlikte gelir. Bu, cihazı koltuk
altları ve bikini çizgisi gibi vücudun hassas bölgeleri için
ideal hale getirir. Cihazın ilk birkaç kullanımında, özellikle
bu bölgeler acıya karşı hassastır fakat düzenli kullanım acı
hissini azaltacaktır.
Dikkat:Tüyler çok uzun olmadığında (yaklaşık 4 mm) en
iyi sonuçları, en rahat biçimde elde edersiniz.Tüyler daha
uzunsa, düzeltme başlığını ve tarağı kullanarak tüyleri
düzeltebilirsiniz (bkz. bu bölümdeki ‘Hassas bölgelerin
düzeltme başlığı ve tarak ile düzeltilmesi’ kısmı). 1 Epilasyon uygulanacak bölgeyi iyice temizleyin
ve deodorant, krem, vs. kalıntılarını uzaklaştırın.
Ardından, uygulama bölgesini silerek kurutun.
2 Hassas bölge başlığını epilasyon başlığına
takın (Şek. 9).
3 Cihazı açın.
Hız II ayarını kullanmanızı tavsiye ederiz. Tüylerin az uzadığı
ve zor erişilen bölgeler için hız I ayarını kullanın.
4 Boştaki elinizle cildinizi gerin. Koltuk altınıza
epilasyon uygularken, kolunuzu kaldırarak cildinizi
gerin.
5 Epilatörü cildinizin üzerine dik bir konumda
yerleştirerek, açma/kapama düğmesi cihazı hareket
ettireceğiniz yöne bakacak şekilde cihazı çalıştırın.
6 Cihazı cildiniz üzerinde, tüylerin çıkış yönünün
-
tersine doğru yavaşça gezdirin.
Şekilde görüldüğü gibi bikini bölgesini epilasyon
yapın (Şek. 10).
Koltuk altınıza şekilde görüldüğü gibi epilasyon
uygulayın. Cihazı farklı yönlerde hareket
ettirin (Şek. 11).
Hassas bölgelerin düzeltme başlığı ve tarakla
düzeltilmesi
Koltuk altı ve bikini çizgisindeki tüyleri 4 mm uzunluğa
getirmek için düzeltme başlığını kullanın.
Dikkat: Düzeltme başlığı sadece hız I ayarında kullanılabilir.
1 Epilasyon başlığını cihazın arka kısmında bulunan
okların yönünde itin (1) ve başlığı cihazdan çıkarın
(2) (Şek. 12).
2 Düzeltme başlığını cihaza takın (1) ve sabitlemek
için cihazın arkasındaki okların ters yönünde
itin (2) (Şek. 13).
3 Tarağı düzeltme başlığının üzerine takın.
4 Cihazı açın (Şek. 14).
Dikkat: Düzeltme başlığı takıldığında Hız II ayarı kullanılmaz.
5 Eliniz ile cildinizi gerin.
6 Düzeltici başlığı tüy uzama yönünün tersi yönde
hareket ettirin. Tarak aparatı yüzeyinin cildinizle her
zaman temas ettiğinden emin olun (Şek. 15).
6/7
7 Düzeltme işleminiz bittiğinde cihazı kapatın ve tarağı
çıkarın.
Düzeltme başlığıyla şekillendirme.
Bikini çizginizi şekillendirmek için, düzeltme başlığını
taraksız kullanın. Taraksız şekillendirme sonucunda
yaklaşık 0,5-1 mm uzunluğunda tüyler kalır. Bikini çizginizi
şekillendirirken istediğiniz kadar yaratıcı olabilirsiniz. Hatta
isterseniz kalp şekli gibi özel şablonlar çizip keserek, kendi
tarzınızı yaratabilirsiniz.
Dikkat: Düzeltme başlığı sadece hız I ayarında kullanılabilir.
1 Epilasyon başlığını cihazın arka kısmında bulunan
okların yönünde itin (1) ve başlığı cihazdan çıkarın
(2) (Şek. 12).
2 Düzeltme başlığını cihaza takın (1) ve sabitlemek
için cihazın arkasındaki okların tersi yönde
itin (2) (Şek. 13).
Dikkat: Düzeltme başlığına tarak takmamanızı öneririz.
3 Cihazı açın (Şek. 14).
Dikkat: Düzeltme başlığı takıldığında Hız II ayarı kullanılmaz.
4 Cihazı bikini bölgesinin istediğiniz kıvrımı
üzerinde, tüy uzama yönünün tersine hareket
ettirin. Düzeltme başlığını cildinize hafifçe
dokundurun (Şek. 16).
Temizlik ve bakım
Çevre
- Kullanım ömrü sonunda, cihazı normal ev atıklarınızla
birlikte atmayın; bunun yerine, geri dönüşüm için
resmi toplama noktalara teslim edin. Böylece,
çevrenin korunmasına yardımcı olursunuz (Şek. 25).
Garanti ve Servis
Servise ya da daha fazla bilgiye ihtiyaç duyarsanız veya bir
sorunla karşılaşırsanız, www.philips.com.tr adresindeki
Philips Internet sitesini ziyaret edin veya ülkenizde
bulunan Philips Müşteri Merkezi ile iletişim kurun (telefon
numarasını dünya çapında geçerli garanti belgesinde
bulabilirsiniz). Ülkenizde bir Müşteri Merkezi yoksa, yerel
Philips bayiine başvurun.
Sorun giderme
Bu bölümde, cihazda en sık karşılaşabileceğiniz
sorunlar özetlenmektedir. Sorunu aşağıdaki bilgilerle
çözemiyorsanız, bulunduğunuz ülkedeki Müşteri Hizmetleri
Merkezi ile iletişim kurun.
Sorun
Neden
Çözüm
Epilasyon
yetersiz.
Cihazı
yanlış yönde hareket
ettiriyorsunuz.
Cihazı, açma/kapama sürgüsü
hareket ettirdiğiniz yöne bakacak
şekilde, tüylerin çıkış yönünün
tersine hareket ettirin.
Epilasyon
başlığını cildinize yanlış açıyla
yerleştiriyorsunuz.
Cihazı cildinize 90° açı yapacak
şekilde yerleştirdiğinizden emin
olun (bkz. ‘Cihazın kullanılması’
bölümü).
Epilasyondan önce
(tüy dökücü) krem
kullanmışsınız.
Cildinizin temiz, kremsiz ve kuru
olduğundan emin olunuz. Epilasyondan önce krem sürmeyiniz.
Tüyler çok
kısadır.
Bazen tüyler alınamayacak kadar
kısa olabilir. Tüyler en iyi 3-4 mm
uzunluktayken alınabilir. Bu seansta alınamayan tüyler bir sonraki
epilasyon seansında alınabilecek
uzunluğa gelecektir. Ayrıca,
cihazı cildiniz üzerinde birkaç
kez hareket ettirerek de tüyleri
yakalamaya çalışabilirsiniz.
Bacaklarınıza epilasyon
uygularken
hassas bölge başlığı
epilasyon
başlığında
kalmış.
Aktif epilasyon disklerinin sayısını
azalttığından, hassas bölge başlığı
bacaklarınızda epilasyon yaparken
kullanılmamalıdır. Dikkat: Koltuk
altı ya da bikini bölgesinde epilasyon yaparken, epilasyon cihazını
mutlaka hassas bölge başlığıyla birlikte kullanın.
Cihaz
çalışmıyor
Cihazın
bağlı olduğu prizde
elektrik
yoktur.
Prizin çalıştığından emin olun.
Epilatörü banyo dolabındaki prize
bağladıysanız, prizi çalıştırmak
için dolabın lambasını açmanız
gerekebilir.
Hız
II ayarını
seçemiyorum.
Düzeltme
Düzeltme başlığını kullanırken hız
başlığı
I ayarını seçin.
takılıdır.
Düzeltme
başlığı
sadece hız
I ayarında
kullanılabilir.
Dikkat: Cihazı temizlemeye başlamadan önce kapalı ve
prizden çekilmiş olduğundan emin olun.
Cihazı temizlemek için ovalama bezleri, benzin veya
aseton gibi aşındırıcı temizlik ürünleri veya zarar verici
sıvılar kullanmayın.
-
Cihazı ya da adaptörü kesinlikle musluk altında
yıkamayın (Şek. 17).
Cihazı ve adaptörü kuru olarak saklayın (Şek. 18).
Aparatların temizlenmesi
1 Epilasyon başlığından bütün aparatları (hassas bölge
-
başlığı, masaj üniteli opti-start başlığı, masaj üniteli
tüy kaldırma başlığı) çıkarın (Şek. 19).
Düzeltme tarağını düzeltme başlığından çekerek
çıkarın (Şek. 20).
2 Temizlik fırçasıyla aparatta kalan tüyleri temizleyin.
3 Aparatı döndürerek musluk altında yıkayın.
4 Kullanmadan veya saklamadan önce aparatı
kurulayın.
Epilasyon başlığının/düzeltme başlığının
temizlenmesi
1 Epilasyon başlığını/düzeltme başlığını cihazın arka
kısmında bulunan okların yönünde itin (1) ve
cihazdan çıkarın (2) (Şek. 12).
2 Temizlik fırçasıyla kalan tüyleri temizleyin (Şek. 21).
3 Epilasyon başlığını/düzeltme başlığını yaklaşık
-
5-10 saniye musluğun altında döndürerek
yıkayın (Şek. 22).
Düzeltme başlığının içine giren tüyleri temizlemek için
düzeltme başlığının ön kapağını çekin (Şek. 23).
4 Epilasyon başlığını/düzeltme başlığını iyice
silkeleyin (Şek. 24).
Epilasyon/düzeltme başlığını bir bezle iyice kurulayın.
Dikkat: Cihaza geri yerleştirmeden önce epilasyon/düzeltme
başlığının tamamen kuru olduğundan emin olun. Değiştirme
Cihazın bütün parçaları değiştirilebilir. Aşağıdaki
parçalardan bir veya daha fazlasını değiştirmek istiyorsanız,
Philips bayinize veya yetkili Philips servis merkezine gidin:
- cihazın kendisi
- epilasyon başlığı
- hassas bölge başlığı
- masaj üniteli opti-start başlığı
- masaj üniteli tüy kaldırma aparatı
- düzeltme başlığı
- tarak
- temizleme fırçası
- adaptör
4203.000.4330.1
Sorun
Neden
Çözüm
Düzeltme
başlığı/
epilasyon
başlığını cihazdan
çıkaramıyorum.
Doğrudan
çekip
çıkarmayı
deniyorsunuz.
Epilasyon başlığını/düzeltme
başlığını cihazdan çekmeden
önce cihazın arka tarafındaki
oklar yönünde itin (bkz. ‘Temizlik
ve bakım’ bölümü).
7/7