1
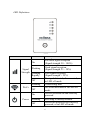
EW-7438RPn User Manual 07-2012 / v1.2 COPYRIGHT Copyright © Edimax Technology Co., Ltd. all rights reserved. No part of this publication may be reproduced, transmitted, transcribed, stored in a retrieval system, or translated into any language or computer language, in any form or by any means, electronic, mechanical, magnetic, optical, chemical, manual or otherwise, without the prior written permission from Edimax Technology Co., Ltd. Edimax Technology Co., Ltd. makes no representations or warranties, either expressed or implied, with respect to the contents hereof and specifically disclaims any warranties, merchantability, or fitness for any particular purpose. Any software described in this manual is sold or licensed as is. Should the programs prove defective following their purchase, the buyer (and not this company, its distributor, or its dealer) assumes the entire cost of all necessary servicing, repair, and any incidental or consequential damages resulting from any defect in the software. Edimax Technology Co., Ltd. reserves the right to revise this publication and to make changes from time to time in the contents hereof without the obligation to notify any person of such revision or changes. The product you have purchased and the setup screen may appear slightly different from those shown in this QIG. For more information about this product, please refer to the user manual on the CD-ROM. The software and specifications are subject to change without notice. Please visit our website www.edimax.com for updates. All brand and product names mentioned in this manual are trademarks and/or registered trademarks of their respective holders. Edimax Technology Co., Ltd. Add: No. 3, Wu-Chuan 3rd Rd., Wu-Ku Industrial Park, New Taipei City, Taiwan Tel: +886-2-77396888 Email: [email protected] Notice According to GNU General Public License Version 2 This product includes software that is subject to the GNU General Public License version 2. The program is free software and distributed without any warranty of the author. We offer, valid for at least three years, to give you, for a charge no more than the costs of physically performing source distribution, a complete machine-readable copy of the corresponding source code. Contents Contents ............................................................................................................. 1 Chapter I: Product Information ...................................................................... 2 1-1 Introduction ..................................................................................................... 2 1-2 Safety Information ........................................................................................... 3 1-3 Package Contents ............................................................................................. 4 1-4 Familiarizing Yourself with Your New Wi-Fi Extender .................................. 5 Chapter II: Extender mode .............................................................................. 8 2-1 Extender Mode Quick Installation Guide ........................................................ 8 2-1-1 Hardware WPS Button Setup ............................................................. 10 2-1-2 Web browser quick setup ................................................................... 14 2-2 Extender Mode Advanced Settings................................................................ 21 2-2-1 Connecting to the web configuration menu ....................................... 21 2-2-2 Home .................................................................................................. 23 2-2-3 WPS Setting ....................................................................................... 25 2-2-4 Advanced Settings .............................................................................. 28 2-2-5 MAC Address Filtering ...................................................................... 32 2-2-6 System Settings .................................................................................. 38 2-3 Resetting the Extender with the Hardware Reset Button .............................. 46 Chapter III: Appendix .................................................................................... 47 3-1 Configuring TCP/IP on PC ............................................................................ 47 3-1-1 Windows XP IP Address Setup: ......................................................... 47 3-1-2 Windows Vista/Windows 7 IP address setup: .................................... 48 3-2 Specifications................................................................................................. 51 3-3 Glossary ......................................................................................................... 52 3-4 Technical Support Information ...................................................................... 55 1 Chapter I: Product Information 1-1 Introduction Thank you for purchasing this universal Wi-Fi extender! The ultra-compact design with built-in power allows you to install this extender anywhere, and receive excellent network performance in extending Wi-Fi signals and wireless coverage. Other features of this Wi-Fi extender include: Extend the wireless signal inside your home or office. Ultra-compact design while maintaining excellent network performance. LED signal indicator to easily find the best location placement for Wi-Fi signal extension and optimal wireless performance. Hardware WPS (Wi-Fi Protected Setup) button for easy installation and wireless security. 2 1-2 Safety Information In order to ensure the safety of users and this device, please follow the following safety instructions: 1. This Wi-Fi extender is designed for indoor use only. DO NOT expose this device to direct sunlight, rain, or snow. 2. DO NOT put this device in or near hot or humid places, such as the kitchen or bathroom. Also, do not leave this Wi-Fi extender in a car during the summer. 3. Do not allow children to put any small parts of this Wi-Fi extender in their mouths, as it could cause serious injury or could even be fatal. If they throw this Wi-Fi extender, it will be damaged. PLEASE KEEP THIS WI-FI EXTENDER OUT THE REACH OF CHILDREN! 4. This Wi-Fi extender will become hot after a period of use (this is normal and is not a malfunction). DO NOT put the Wi-Fi extender on paper, cloth, or other flammable materials after the Wi-Fi extender has been used for a long time. 5. There are no user-serviceable parts inside the Wi-Fi extender. If you find that the Wi-Fi extender is not working properly, please contact your dealer of purchase and ask for help. DO NOT disassemble the Wi-Fi extender by yourself, warranty will be voided. 6. If the Wi-Fi extender falls into water, DO NOT USE IT AGAIN UNTIL YOU SEND THE DEVICE TO THE DEALER OF PURCHASE FOR INSPECTION. 3 1-3 Package Contents Before you start to use this Wi-Fi extender, please check if there’s anything missing from the package, and contact your dealer of purchase to claim any missing items: z z z z z 1 x Wi-Fi extender 1 x Ethernet cable 1 x Access key card 1 x Quick installation guide 1 x CD with user manual and multi-language QIG 4 1-4 Familiarizing Yourself with Your New Wi-Fi Extender Interface Descriptions A B C Item A Item Name LAN Port B Reset / WPS C ON/OFF Description 10/100M Ethernet LAN Port with Auto-MDI/MDI-X. Connects to a computer, switch or hub for local network sharing. Resets the extender to factory default settings (clears all settings) or starts the WPS function. Press this button and hold for 10 seconds to restore all settings to factory defaults. Press this button for less than 5 seconds to start the WPS function. This is the power on/off switch. If you want to switch off the extender, flip the switch to OFF. 5 LED Definitions LED Name LED Status Description Excellent signal reception On (Signal strength 50 – 100%) Flashing Signal Strength Flashing Rapidly Off Flashing Wi-Fi Off On Power Flashing Off Good signal reception (Signal strength 25 – 50%) Poor signal reception (Signal strength < 25%) No signal detected, disconnected, or in LED off mode Transferring data Wi-Fi not activated or in LED off mode Device switched on and correctly powered Resetting to factory defaults Device not powered, not correctly powered, or in LED off mode 6 On Flashing WPS Flashing Rapidly Off LAN On Flashing Off WPS connection established WPS in progress (waiting for another WPS device’s connection) WPS error No WPS connection established or in LED off mode LAN port connected LAN activity (transferring data) LAN port not connected 7 Chapter II: Extender mode In extender mode, the Wi-Fi extender receives a wireless signal from a root wireless access point or router. It then repeats the signal it receives. This repeated signal can then be detected and used by other wireless devices, such as notebook computers, smartphones, and tablet computers. This extends wireless signal coverage and helps solve problems with wireless dead zones. This chapter will show you how to quickly install this device with Wi-Fi Protected Setup, and how to set up the extender with the browser based user interface. 2-1 Extender Mode Quick Installation Guide It is recommended that you first set up this extender somewhere close to the root wireless access point, and then move this extender to another location for optimal Wi-Fi extension. After installation is complete and the wireless connection is established, you can then move this extender to the location you wish to install it. 8 (2) (1) Plug the Wi-Fi extender into a power outlet close to the root wireless access point and switch it on (1). The extender will automatically initialize. In a few seconds, the Power LED ( seconds later, the Wi-Fi LED ( ) will light up. Approximately 30 ) will begin to flash rapidly and irregularly (2). This indicates initialization is complete. Please do not proceed to the next step until these conditions are fulfilled. You can establish a wireless connection via the hardware WPS button or using the web UI interface. If your broadband router or access point also has a WPS button, we recommend using the WPS button to establish a connection. It is faster, secure, and does not require a computer. Using WPS button Using web UI - please go to section 2-1-1 - please go to section 2-1-2 9 2-1-1 Hardware WPS Button Setup 1. Press and hold the WPS button on the extender for 2 seconds, until the WPS LED starts flashing. WPS button WPS LED 2. Press the WPS button on the root wireless access point within 2 minutes to establish a connection. The amount of time the button should be held down will vary between different routers, some will work with a quick press, while others may require holding the button down for 2 seconds or more. 10 Notte: This WP PS button poosition on th his access point p is an eexample, diffferent devicces may havve different WPS buttonn positions. If the access poiint you wishh to connectt to does not have a harrdware WPS S button, yo ou mayy be able too use its webb configurattion menu’ss WPS functtion to estaablish a connnection. Allternatively, you can log in to this extender’s webb UI to set up u the devicce (for moree details, pleease refer too ‘2-1-2 Weeb Broowser Quickk Setup’) W signaal from thee root wireeless accesss Whhen the exttender dettects the WPS poiint, the folllowing seequence off LED flasshes will occur: o Phase Phase 1 Phase 2 Phase 3 Phase 4 DONE E WPS LED L Sequ uence Blinks approxim mately 5 mes to 7 tim Turns OFF O Turn baack ON so olid Turns OFF O Turn baack ON so olid W WPS LED 11 me Approxiimate Tim 10 to 14 seconds 3 secondds 20 seconnds 14 seconnds Continuoous S connectiion has been successfully estaablished, tthe Signall Whhen a WPS Strength LED ED will alsso light upp in orangee. Sig gnal LED Notte: If the WPS W LED coontinues to blink b in twoo-second inttervals witthout movinng on to Phaase 2, then the t Wi-Fi exxtender did not detect the WPS signaal from the access a pointt. Please retturn to step (2). If an a error occuurred, the WPS W LED will w flash rappidly. Please wait for the WPS LED to deactivaate and try again a from step s (1). 5 minutes m afterr a WPS connnection haas been estabblished, thee WPS LED D willl automatically deactivvate. This iss intended behavior. Thhe WPS connnection bettween the exxtender and d the wirelesss access pooint will rem main active. d (3) Please moove the exxtender to the location you wiish to use it (a good h and d insert thhis extendeer into a place will bee the center of your house) wer outlet on the waall. The wiireless con nnection to t the roott access po oint pow willl be reestaablished auutomaticaally. Youu can checck the ‘Siggnal’ LED D status to see the siignal recepption levell. Steeady light: Flaashing: Flaashing rapiidly: Excellent E G Good P Poor Notte: If the Signal LED is off, it meaans this locaation is out of the wirreless signall range of your y wireless broadbandd router or aaccess pointt, 12 please move thhis extenderr closer to th he broadbannd router unntil the extender can reeceive a siggnal from th he broadbannd router andd extend its signnal. The quick installation setup is now done, you can refer to ‘2-2 Extender mode Advanced Settings’ to login to the web UI for other advanced settings. 13 2-1-2 Web browser quick setup Before you can connect to the extender and start configuration procedures, your computer must be able to get an IP address automatically (use dynamic IP address). If it’s set to use static IP address, or you’re unsure, please refer to ‘Chapter III: Appendix, 3-1 Configuring TCP/IP on PC’ to set your computer to use dynamic IP address. 1. Use an Ethernet cable to connect your computer’s Ethernet port and the Wi-Fi extender’s Ethernet port. Or connect your computer to the extender through a wireless connection. Search for the available Wi-Fi networks in the area and connect to “extender******”, where ****** is a series of numbers and letters. For example, in the following example, you would connect to “extender3a8270”. 14 Notte: If you arre using Wiindows 7 an nd the follow wing appearrs, please clicck “Connectt the networrk without setting s it upp”. Please doo not click “OK K”. Notte: If you have accidenntally clickeed “OK”, yoou will see tthe followin ng. Pleease click “C Cancel”, andd then returrn to step 1. W extennder. Therre are two 2. Now you should bee connecteed to the Wi-Fi w confiiguration interface: i ways to access the web 15 Meethod 1 (W Windows PCs P only)): Open your web w browseer and inpput the acccess key inn the addreess bar to log t the exteender’s weeb configuuration inteerface. in to Notte: The acceess key can be found on the accesss key card iin the box an nd on the Wi-Fi extender. http://exteender3a82270 httpp://extendeer3a8270 Meethod 2 (W Windows, Macintossh, and Liinux): Entter the exttender’s deefault IP address a (19 92.168.2.22) into youur browserr’s adddress bar. 16 t be prrompted too log in. The T defaultt usernamee is “admiin” 3. You will then and the deefault passsword is “1234”. “ Cllick “OK”” to continnue. w start detecting d available Wi-Fi W netw works auttomatically y. 4. iQ Setup will All the deetected Wii-Fi netwoorks will be b displayeed in the liist. Select the one to whhich you wish w to connnect and click “Next” to conntinue. If th he Wi-Fi nettwork you wish to connect to does not appear, a cliick “Refreesh” to search again or trry movingg the exten nder closeer to the rooot wirelesss access point. 17 Notte: If you have set the SSID on yo our root AP to be hidden, please ty ype in the t informattion manuallly. Setup exxtender man nually b promptted to enteer the exteender’s SSID and the access 5. You will be point’s wiireless seccurity key. The defau ult extendder SSID is the root wireless access a poinnt’s SSID plus the last l six chaaracters off the extender’s access key. k You may m keep th he defaultt SSID, orr enter a neew one. w seccurity keyy, input thee same keyy as the exxisting Wi-Fi For the wireless network in the “Keyy” field. Click C “NE EXT” to coontinue. Notte: The exteender must have the sam me Wi-Fi password as the root wirreless access point. Enttering an inccorrect passsword will rresult in the extender failinng to connecct to the roo ot access poiint, or your computer nternet throuugh the exteender. failling to connnect wirelesssly to the In Youu may chooose to save the setup paage to your browser b boookmarks listt, for easier acceess in the futture. This option is turnned on by ddefault. 18 6. After youu click “NE EXT’ the Wi-Fi W Exttender willl start to vverify the wireless key k with your y associated acceess point and a will shhow you result withhin 2 minuutes. The setup page will indiicate if thee test has been succcessful. If the follow wing page appears, click c “NEX XT” to continue: PPLY” to complete the setup. 7. Click “AP w seconds for f Wi-Fi extender to t reboot. 8. Please waait for few c mputer willl disconneect from th he your com 9. After the reboot is complete, r to it wirellessly by selecting s thhe extender’s extender. You can reconnect y list off Wi-Fi neetworks. SSID in your 19 Notte: After thee wireless connection c between b thee extender aand the wirreless broaddband routerr is establish hed, the exttender becom mes a DHC CP clieent and will receive its IP address from the broadband rouuter automatically. If you want to log in to o the web UI U of the exttender, pleaase refeer to ‘2-2 Exxtender Moode Advanceed Settings’’ for more innformation. 20 2-22 Extenderr Mode Addvanced Settings S 2-22-1 Conneccting to thhe web connfiguration n menu Theere are twoo ways to connect to t the web b configuraation menuu. Meethod 1 (W Windows PCs P only)) Aftter conneccting to thee Wi-Fi exxtender, op pen a new w web brow wser wind dow (IE E, Firefox, Chrome etc.) e and innput the extender’s access key (in the form mat http:///extender*******) innto addresss bar, thenn press thee ENTER keyy: http://extende h r3a8270 Windows, Macintossh, and Liinux): Meethod 2 (W Aftter conneccting to thee Wi-Fi exxtender, op pen a new w web brow wser wind dow (IE E, Firefox, Chrome, Safari etc.) and enteer the exteender’s deefault IP adddress (192.168.2.2) into your browser’ss address bar. b o which method m youu use, the Wi-Fi exttender willl prompt you y Reggardless of to enter e a useer name annd passwoord. The deefault userr name is ‘admin’ and a passsword is ‘1234’. ‘ Cllick the ‘O OK’ button n to continnue. 21 The configuration screen will appear shortly: 22 2-2-2 Home The status and information of this Wi-Fi extender will be displayed here. To access the ‘Home’ menu, click ‘Home’ on the left. You should see something similar to the following screen (the contents will vary depending on your actual settings): You can click the ‘Show Active Clients’ button to show all connected wireless clients. 23 Notte: When yoou click thee ‘Show Acttive Clients’ button, a nnew browseer winndow will apppear. Som me browsers automatically block poop-up winndows, so please disablle pop-up blocking or you y will nott be able to usee the ‘Show Client’ featture. 24 2-2-3 WPS Setting You can configure WPS (Wi-Fi Protected Setup) here. By using WPS, you can quickly establish a secure connection between this Wi-Fi extender and other wireless devices that also support WPS. To access the ‘WPS Settings’ menu, click ‘WPS Settings’ on the left. The following setup page will appear: The description of every setup item is listed as follow: 25 Item Enable WPS WPS Status Device PIN Code SSID Authentication Mode Passphrase Key Config Mode Configure via Push Button Input Client PIN Code Description You can enable or disable the WPS feature. Disabling WPS here will also disable the hardware WPS button. WPS is enabled by default. Shows the security setting status of WPS. If the Wi-Fi extender’s security has been configured, whether manually or automatically through the WPS button, the WPS status entry will be ‘Configured’. This is an 8-digit number for WPS PIN-style configuration. When another WPS-compatible device wishes to connect to this Wi-Fi extender and supports PIN type WPS, input this number into the wireless device to establish a connection. Shows the SSID of this Wi-Fi extender. Shows the authentication mode of this Wi-Fi extender. The key is shown in asterisks (*) to indicate wireless security is properly set. There are ‘Registrar’ and ‘Enrollee’ modes for the WPS connection. When ‘Registrar’ is enabled, the wireless clients will follow the extender’s wireless settings for WPS connection. When ‘Enrollee’ mode is enabled, the extender will follow the wireless settings of the wireless router for WPS connection. Click ‘Start PBC’ to start Push-Button style WPS setup procedures. This Wi-Fi extender will wait for WPS requests from another wireless device for 2 minutes. The ‘WPS’ LED on the Wi-Fi extender will blink for 2 minutes while this Wi-Fi extender waits for incoming WPS requests. Please input the PIN code of the wireless client you wish to connect to, and click the ‘Send PIN’ button. 26 The ‘WPS S’ LED on n the Wi-F Fi extender will blin nk while thiss Wi-Fi ex xtender waaits for inccoming WPS requuests. Notte: For WPS S2.0 compliance speciffications, WEP W and WP PA-PSK do nott support WP PS connections. Some wireless deevices may follow the lateest WPS2.0 specificatioons, so we do d not recom mmend usinng WEP or WP PA-PSK, to avoid WPS S interoperab bility probleems. 27 2-2-4 Advanced Settings You can configure advanced wireless settings on this page. Please note that these settings should not be configured by novice users. Configure these settings only when you understand what you’re doing. To access the ‘Advanced Settings’ menu, click ‘Advanced Settings’ on the left. The following setup page will appear: 28 Item Description Fragment Threshold Set the fragment threshold. Do not modify the default value if you don’t know what this does, default value is 2346. RTS Threshold Set the RTS threshold. Do not modify the default value if you don’t know what this does, default value is 2347. Beacon Interval Set the beacon interval. Do not modify the default value if you don’t know what this does, default value is 100. DTIM Period Configures DTIM (Delivery Traffic Indication Message) send period. Default value is 3. Data Rate Select the wireless data transfer speed. When you select a value here, this extender will refuse to establish connections with wireless clients using other speeds. N Data Rate Channel Width Preamble Type It’s recommended you select ‘Auto’, which will allow this Wi-Fi extender to adjust speeds automatically. Select wireless data transfer speeds by MCS0 to MCS7. MCS stands for Modulation and Coding Scheme, which represents different speeds when the bandwidth is 20MHz or 40MHz. It’s recommended to select ‘Auto’, which will allow this Wi-Fi extender to adjust speeds automatically. Select the wireless channel width, 20MHz or 40MHz. 40MHz provides better network speed for 802.11n wireless clients. However, if there are 802.11b/g clients connecting to this Wi-Fi extender, it will switch to 20MHz mode automatically. Set the preamble type, do not modify the default value if you don’t know what this does, default 29 Broadcast ESSID WMM CTS Protect TX Power Enable LED off mode setting is ‘Short Preamble’. When set to ‘enabled’, every wireless device will be able to scan for and find this Wi-Fi extender; when set to ‘disabled’, only wireless clients that know the extender’s exact SSID can connect to the extender. Setting this to ‘disabled’ will help improve security. Enable or disable Wireless Multi-Media. When enabled, the Wi-Fi extender will give priority to multimedia related network applications so they will have better performance. This feature provides CTS (Clear to Send) protection when transferring data. It’s recommended to select ‘Auto’ for this option. Select wireless transmission power level, from 10% to 100%. When connected wireless clients are not too far from this Wi-Fi extender, then it is not necessary to select a higher power level. Higher power levels may allow other people to break into your wireless network when you have a bad password or no password. Enable or disable the Wi-Fi extender’s LED lights. Check ‘Enable LED OFF Mode’ to set up LED behavior: Turn off all LED indicators: disable all LED lights Turn off all LED indicators except the power LED: all LED lights will be disabled, except the ‘POWER’ LED When you finish changing the settings on this page, click the ‘APPLY’ button. You’ll see the following message: 30 If you wish to continue configuring this Wi-Fi extender, click the ‘CONTINUE’ button; if you want to save changes and apply the changes, click the ‘APPLY’ button. You’ll be prompted to wait for approximately 30 seconds before you can reconnect to the Wi-Fi extender. 31 2-2-5 MAC Address Filtering This Wi-Fi extender can use its MAC address filter to only allow wireless users with certain MAC addresses to connect. This will enhance security because you can make a ‘white list’ in advance, to only allow users on the list to use this Wi-Fi extender. Clients not on this white list cannot connect to the extender, even if the user knows the password. To access the ‘MAC Filtering’ menu, click ‘MAC Filtering’ on the left. The following setup page will appear: 32 Item Enable Wireless Access Control MAC Address Comment Add Clear Delete Selected Delete All Reset Select Description Check this box to enable MAC filtering. If you don’t check this box, anyone who knows the wireless password can connect to this Wi-Fi extender. Input the MAC address of the clients you wish to add to the white list. Please input only 12 hexadecimal characters here, without : (colon) or - (dash) characters every 2 characters. If you don’t know how to get the MAC address of a network client, please see tips below. Input any descriptive text about this MAC address, so you can remember the purpose of this entry. You can input up to 20 alphanumerical characters in this field. Add this MAC address to the list. Clear the ‘MAC Address’ and ‘Comment’ fields. Delete MAC address(es) with the ‘Select’ box checked. Delete all MAC addresses in the list. You’ll be prompted to confirm deletion first. Uncheck all checked boxes. All entered MAC addresses will be listed here. To delete a MAC address from the list, check the box of the MAC address you wish to delete first. You can select more than one MAC address here. When you finish changing the settings on this page, click the ‘APPLY’ button. You’ll see the following message: If you wish to continue configuring this Wi-Fi extender, click the ‘CONTINUE’ button; if you want to save changes and apply the changes, 33 click the ‘APPLY’ button. You’ll be prompted to wait for 30 seconds before you can reconnect to this Wi-Fi extender. TIP: If you don’t know the MAC address of your computer or wireless device, you can follow the following procedure: For wireless devices and computers which are connected to this Wi-Fi extender already, you can click the ‘Show Active Clients’ button in the ‘Home’ setting page. Their MAC address will be displayed in the ‘MAC Address’ field. If you still can’t identify the MAC address of your computer, you can follow the following procedure: Click the network icon located at the lower-right corner, then click ‘Open Network and Sharing Center’. 34 Select the connection that you’ll be using to connect to the Wi-Fi extender (in this example, ‘Local Area Connection’): Click the ‘Details…’ button. 35 The MAC address of the selected network device will be displayed here as ‘Physical Address’. 36 37 2-2-6 System Settings You can change the settings of several system-level parameters on this page, including the administrator password, and IP address. To access the ‘System Settings’ menu, click ‘System Settings’ on the left. 38 The following setup page will appear: Password Settings The default password of this extender is 1234, and it’s displayed on the login prompt when accessed from a web browser. There’s a security risk if you don’t change the default password, since everyone can see it. This is very important when you have wireless functions enabled. 39 Item Current Password New Password Re-Enter Password Description To change the password, you have to input the current password first. Input the new password here. You can use any combination of letters, numbers, and symbols up to 20 characters. Input the new password again for confirmation. 40 Management IP Item IP Address Description Input the IP address of the LAN / Wi-Fi port of this Wi-Fi extender. NOTE: Please remember this IP address. If you forget this IP address and you didn’t use the DHCP server function to assign IP addresses to clients, you’ll not be able to connect to this Wi-Fi extender, and you’ll need to clear all settings and passwords to reset the IP address back to the default value ‘192.168.2.2’.( Press the WPS button and hold for 10 seconds to restore all settings to factory defaults) Subnet Mask Gateway Address Input the subnet mask of the IP address you’re using. Input the network’s gateway IP address. Generally you can use ‘0.0.0.0’ (default value) since this Wi-Fi extender will access the Internet via a WAN port. DHCP Server Item DHCP Server Description Choose “Enabled” to activate DHCP server functionality, “Disabled” to deactivate it. Default Gateway Domain Name Server IP Start IP End IP Domain Name Lease Time Enter the IP address of the default gateway. Enter the IP address of the domain name server. Enter the starting IP address. Enter the end IP address. Enter the domain name for the device. Select the lease time of the DHCP server. 41 When you finish changing the settings on this page, click the ‘APPLY’ button. You’ll see the following message: If you wish to continue configuring this Wi-Fi extender, click the ‘CONTINUE’ button; if you want to save changes and apply the changes, click the ‘APPLY’ button. You’ll be prompted to wait for 30 seconds before you can reconnect to this Wi-Fi extender. 42 2-2-7 Configuration You can back up and restore the configuration of this Wi-Fi extender, so you can recall all settings in a very short time, without going through the process of configuration again. This feature is especially useful when you need to use this Wi-Fi extender in different places, such as at home and in a hotel. To access the ‘Configuration’ menu, click ‘Configuration’ on the left. Configuration Tool The following setup page will appear: Item Backup Settings Restore Settings Description Click the ‘Save’ button to save the current settings to a file on your computer. If you want to upload a saved configuration file to the Wi-Fi extender, please click the ‘Browse’ button to 43 Reset to Factory Default select a saved configuration file on your computer. Then click the ‘Upload’ button to change the current settings to saved ones. To reset all settings of this Wi-Fi extender to factory defaults, including the password. You’ll be prompted to confirm the settings reset: Click ‘OK’ if you really want to restore all settings, or click ‘Cancel’ to abort. Upgrade The software running in this Wi-Fi extender (i.e. ‘firmware’) can be upgraded to improve the functionality of this Wi-Fi extender. You can visit our website to look for the latest firmware file. Then download the latest firmware file and save it on your computer, then upload it to this Wi-Fi extender. 44 Item m Descriptioon Broowse Select a firmware fi file f saved on o your coomputer. c the ‘A APPLY’ button b to start s the firrmware Whhen you arre ready, click upggrade. Noote: DO NOT N TURN N OFF OR R UNPLU UG THE D DEVICE WH HILE THE E UPGRA ADE IS IN N PROGRE ESS. Resset W extennder is nott working properly, resetting it Whhen you thhink this Wi-Fi mayy help. y’ button. You’ll Y be prompted d to To reset this Wi-Fi exttender, click ‘Apply r connfirm the reset: K’ button to reset thhe Wi-Fi extender, e o click ‘C or Cancel’ to Click the ‘OK aboort. 45 2-33 Resettingg the Extennder with the Hardw ware Reseet Button y find thhat the exttender is not n behavin ng as expeected, it m may help to o If you reseet the deviice. To resset the exttender, preess the WP PS/Reset bbutton and d holld it down for 10 secconds, unttil the Pow wer LED ( ) beginns to flash h, thenn release the t buttonn. The exteender will begin its initializatiion processs. Whhen the Poower LED ( Wi--Fi LED ( ) stopps flashing g and stayys on steaddily, and th he ) startss flashing rapidly, th hen the deevice has ssuccessfully reinnitialized and a is readdy for furtther config guration. WPS S/Reset button Notte: To reset the device,, hold down n the WPS/R Reset buttonn and do nott releease it until the Power LED beginss to flash, which w shouldd take aroun nd 10 seconds. Reeleasing thee button too early may result r in unintended behhavior, suchh as the exteender enterin ng WPS connnection moode. 46 Chapter III: Appendix 3-1 Configuring TCP/IP on PC 3-1-1 Windows XP IP Address Setup: 1. Click the ‘Start’ button (it should be located at lower-left corner of your computer), then click control panel. Double-click the Network and Internet Connections icon, click Network Connections, then double-click Local Area Connection, the Local Area Connection Status window will appear, and then click ‘Properties’ 2. Select ‘Obtain an IP address automatically’ and ‘Obtain DNS server address automatically’, then click ‘OK’. 47 3-1-2 Windows Vista/Windows 7 IP address setup: 1. Click the ‘Start’ button (it should be located at the lower-left corner of your computer), then click control panel. Click View Network Status and Tasks, and then click Manage Network Connections. Right-click Local Area Network, then select ‘Properties’. The Local Area Connection Properties window will appear, select ‘Internet Protocol Version 4 (TCP / IPv4)’, and then click ‘Properties’ 48 2. Select ‘Obtain an IP address automatically’ and ‘Obtain DNS server address automatically’, then click ‘OK’. 49 50 3-2 Specifications SoC + RF: Realtek RTL8196CS+ RTL8192CE Flash: 2MB SDRAM: 16MB LAN Port: 10/100M UTP Port x 1 Power: 5VDC, 1A Switching Power Module Inside Dimension: 46.5(W) x 73(H) x 41(D) mm excluding power plug Transmit Power: 11n: 13dBm±1.5dBm, 11g: 14dBm±1.5dBm, 11b: 17dBm±1.5dBm Temperature: 32~104°F (0 ~ 40°C) Humidity: 10-90% (Non Condensing) Certification: FCC, CE 51 3-3 Glossary 1. What is the IEEE 802.11g standard? 802.11g is the new IEEE standard for high-speed wireless LAN communications, and provides for up to 54 Mbps data rates in the 2.4 GHz band. 802.11g is quickly becoming the next mainstream wireless LAN technology for home, office and public networks. 802.11g defines the use of the same OFDM modulation technique specified in IEEE 802.11a for the 5 GHz frequency band and applies it in the same 2.4 GHz frequency band as IEEE 802.11b. The 802.11g standard requires backward compatibility with 802.11b. The standard specifically calls for: A. A new physical layer for the 802.11 Medium Access Control (MAC) in the 2.4 GHz frequency band, known as the extended rate PHY (ERP). The ERP adds OFDM as a mandatory new coding scheme for 6, 12 and 24 Mbps (mandatory speeds), and 18, 36, 48 and 54 Mbps (optional speeds). The ERP includes the modulation schemes found in 802.11b including CCK for 11 and 5.5 Mbps and Barker code modulation for 2 and 1 Mbps. B. A protection mechanism called RTS/CTS that governs how 802.11g devices and 802.11b devices interoperate. 2. What is the IEEE 802.11b standard? The IEEE 802.11b Wireless LAN standard subcommittee, which formulates the standard for the industry. The objective is to enable wireless LAN hardware from different manufactures to communicate. 3. What does the IEEE 802.11 feature support? This product supports the following IEEE 802.11 functions: z z z z z z CSMA/CA plus Acknowledge Protocol Multi-Channel Roaming Automatic Rate Selection RTS/CTS Feature Fragmentation Power Management 4. What is Ad-hoc? An Ad-hoc integrated wireless LAN is a group of computers, each with a Wireless LAN card, connected as an independent wireless LAN. Ad-hoc wireless LAN is applicable at a departmental scale for 52 a branch or SOHO operation. 5. What is Infrastructure? An integrated wireless and wireless and wired LAN is called an Infrastructure configuration. Infrastructure is applicable to enterprise scale for wireless access to central database, or wireless application for mobile workers. 6. What is BSS ID? A specific Ad-hoc LAN is called a Basic Service Set (BSS). Computers in a BSS must be configured with the same BSS ID. 7. What is WEP? WEP is Wired Equivalent Privacy, a data privacy mechanism based on a 40 bit shared key algorithm, as described in the IEEE 802 .11 standard. 8. What is TKIP? TKIP is a quick-fix method to quickly overcome the inherent weaknesses in WEP security, especially the reuse of encryption keys. TKIP is involved in the IEEE 802.11i WLAN security standard. 9. What is AES? AES (Advanced Encryption Standard), a chip-based security method, has been developed to ensure the highest degree of security and authenticity for digital information, wherever and however communicated or stored, while making more efficient use of hardware and/or software than previous encryption standards. It is also included in the IEEE 802.11i standard. Compared with AES, TKIP is a temporary protocol for replacing WEP security until manufacturers implement AES at the hardware level. 10. Can wireless products support printer sharing? Wireless products perform the same function as LAN products. Therefore, wireless products can work with Netware, Windows 2000, or other LAN operating systems to support printer or file sharing. 11. Can the information be intercepted while transmitting over the air? WLAN features two-fold protection in security. On the hardware side, as with Direct Sequence Spread Spectrum technology, it has the inherent security feature of scrambling. On the software side, WLAN series offer an encryption function to enhance security and Access Control. Users can set it up depending upon their needs. 53 12. What is DSSS? What is FHSS? And what are their differences? Frequency-hopping spread-spectrum (FHSS) uses a narrowband carrier that changes frequency in a pattern that is known to both transmitter and receiver. Properly synchronized, the net effect is to maintain a single logical channel. To an unintended receiver, FHSS appears to be short-duration impulse noise. Direct-sequence spread-spectrum (DSSS) generates a redundant bit pattern for each bit to be transmitted. This bit pattern is called a chip (or chipping code). The longer the chip is, the greater the probability that the original data can be recovered. Even if one or more bits in the chip are damaged during transmission, statistical techniques embedded in the radio can recover the original data without the need for retransmission. To an unintended receiver, DSSS appears as low power wideband noise and is rejected (ignored) by most narrowband receivers. 13. What is Spread Spectrum? Spread Spectrum technology is a wideband radio frequency technique developed by the military for use in reliable, secure, mission-critical communication systems. It is designed to trade off bandwidth efficiency for reliability, integrity, and security. In other words, more bandwidth is consumed than in the case of narrowband transmission, but the trade off produces a signal that is, in effect, louder and thus easier to detect, provided that the receiver knows the parameters of the spread-spectrum signal being broadcast. If a receiver is not tuned to the right frequency, a spread –spectrum signal looks like background noise. There are two main alternatives, Direct Sequence Spread Spectrum (DSSS) and Frequency Hopping Spread Spectrum (FHSS). 14. What is WPS? WPS stands for Wi-Fi Protected Setup. It provides a simple way to establish unencrypted or encrypted connections between wireless clients and access point automatically. Users can press a software or hardware button to activate the WPS function, and WPS-compatible wireless clients and access points will establish a connection by themselves. There are two types of WPS: PBC (Push-Button Configuration) and PIN code. 54 3-4 Technical Support Information Support documentation is available on the enclosed CD and on our global websites. USA Website: http://www.edimax.us Email: [email protected] Europe Website: http://www.edimax.eu/en/index.php Email: [email protected] UK Website: http://www.edimax.co.uk Email: [email protected] Germany Website: http://www.edimax-de.eu Email: [email protected] France Website: http://www.edimax.fr Email: [email protected] Middle East Website: http://edimax-me.com Email: [email protected] China Website: http://www.edimax.com.cn Email: [email protected] Taiwan Website: http://www.edimax.com.tw Email: [email protected] 55 56