1
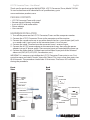
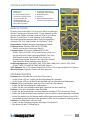
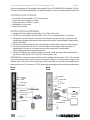
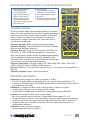
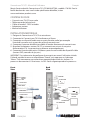
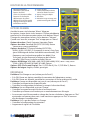
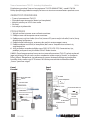
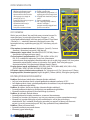
LCD TV
Converter/
Tuner
user
manual
Model 176156
English
Deutsch
Español
FRANçAIS
POLSKI
MAN-176156-UM-ML1-1106-05-0
LCD TV Converter/Tuner • User Manual English
Thank you for purchasing the MANHATTAN® LCD TV Converter/Tuner, Model 176156.
To view a datasheet with a detailed list of specifications, go to
www.manhattan-products.com.
package contents
• LCD TV Converter/Tuner with stand
• Remote control (battery included)
• 8-pin to HD15 and audio cables
• Power adapter
• User manual
hardware installatioN
1. Turn off the power on the LCD TV Converter/Tuner and the computer monitor.
2. Connect the LCD TV Converter/Tuner to the computer and the monitor.
3. Connect the sound enclosure or any other device that has a sound input jack (such
as a sound card’s Line In port) to the converter/tuner’s Line Out port.
4. Connect the cable TV antenna to the converter/tuner’s antenna input.
5. Connect the AC/DC power adapter to the converter/tuner, then plug the power
adapter into an AC power outlet. The converter/tuner will automatically power up.
6. Connect the Video and/or S-Video Input to the Video Ouput jack of the selected
video unit (DVD, VCD, VCR, PS2, Gamestation, etc.).
IMPORTANT: It is necessary to initialize the LCD TV Converter/Tuner prior to use. First,
go to the menu and select “Search,” then click “Menu.” This starts a one-time auto-scan
of all channels. The procedure should take 5-10 minutes. The Status LED will blink
during the procedure.
Back
View
Front
View
speaker
POWER /
STATUS
LEDs
sound card
Audio input
Audio input
to pc
vga card display
CVBS VIDEO
S-Video input
lcd/crt
ir window
vga interface
ANT
2
ENGLISH
remote control buttons & key identification
1
2
3
4
5
6
7
8
9
Mute on/off
Power on/off
Channel number keys
Single/double/triple digit
Return to previous channel
System time display
Current channel/info display
Default picture settings
Menu enter/exit
menu options
10 Video source
11 Channel up/down, volume
up/down and menu select
12 Multiple-picture preview
13 Resolution
14 Picture-In-Picture activation with
left and right positioning
2
1
3
4
5
Press the “Menu” button to use the menu. Press the “Channel
6
8
up/down” buttons to highlight the option you want, then
7
press “Menu” to select that option. Press the “Volume up/
9
10
down” buttons to change the values/settings of the menu
option, then highlight “Exit” and press “Menu” when done.
11
Color options: Brightness; Contrast; Saturation; Hue.
Video options: Standard (PAL/NTSC/SECAM); Return (up to
previous menu level).
Channel options: TV System Standard (NTSC/PAL, M/PAL,
12
13
N/PAL, B-G/PAL, D-K depending on the tuner); Auto Scan
(for channel viewing: high speed recommended); Full Scan
14
(full frequency scan: low speed); Fine Tune (for finely
adjusting the frequency of the current channel); Skip (the
current channel); Return.
Display options: VGA (640 x 480); SVGA (800 x 600); XGA (1024 x 768); SXGA (1280 x 1024);
W1440S; W1280S; W1440P; Return.
OSD options: Pos. X (On-Screen Display movie X); Pos. Y (On-Screen Display movie Y);
Return.
Language options: English; Chinese; Portuguese.
troubleshooting
Problem: No picture or sound (not even “noise”).
• If the Power LED is off, check the connection of the AC/DC power adapter.
• If the Power LED is on, check the connections to the monitor and sound device.
Problem: The picture is okay, but there is no sound (not even “noise”).
• Check the connection to the sound device.
• Check the volume settings (including the Mute function).
Problem: The sound is okay, but there is no picture.
• Check the connection between the monitor and the LCD TV Converter/Tuner.
• Check that the monitor is on and not in a power-saving mode.
• Confirm that the monitor can support high resolution: Press “Res” and wait a moment
to see if it’s okay, or press “Res” again to change to a different setting.
Problem: There is no color in the picture.
• Check the Saturation setting.
• Increase the TV cable signal.
ENGLISH
3
LCD TV Konverter/Tuner • Handbuch Deutsch
Vielen Dank für den Kauf des MANHATTAN® LCD TV Konverters/Tuners, Modell 176156.
Das Datenblatt mit einer vollständigen Liste aller Eigenschaften und Spezifikationen
finden Sie auf www.manhattan-products.com.
Lieferumfang
•LCD TV Konverter/Tuner
• Fernbedienung inkl. Batterie
• VGA- und Audioanschlusskabel
• Netzteil
• Handbuch
hardware installatioN
1. Schalten Sie den LCD TV Konverter/Tuner sowie Ihren PC-Monitor aus.
2. Schließen Sie den LCD TV Konverter/Tuner an Ihren PC und Monitor an.
3. Verbinden Sie ein beliebiges Audiogerät, das über eine Eingangsbuchse verfügt
(z. B. der Eingang einer Soundkarte) mit dem Ausgang des Konverters/Tuners.
4. Verbinden Sie die Kabel-TV-Antenne mit dem Antenneneingang des Konverters/
Tuners.
5. Schließen Sie den Konverter/Tuner mit dem Netzteil an eine Steckdose an. Der
Konverter/Tuner startet automatisch.
6. Verbinden Sie den Video- und/oder S-Video-Eingang mit dem Videoausgang
des gewünschten Ausgabegeräts (DVD-Player, Videorekorder, Spielekonsole etc.).
WICHTIG: Der LCD TV Konverter/Tuner muss vor der ersten Verwendung konfiguriert
werden. Markieren Sie im Menü “Search” und drücken Sie die Menu-Taste, was einen
einmaligen Autoscan aller Kanäle ausführt. Dieser Vorgang dauert etwa 5-10 Minuten,
die Status-LED blinkt währenddessen.
Back
View
Front
View
speaker
POWER /
STATUS
LEDs
sound card
Audio input
Audio input
to pc
vga card display
CVBS VIDEO
S-Video input
lcd/crt
ir window
vga interface
ANT
4
DEUTSCH
Tasten & Funktionen der Fernbedienung
1
2
3
4
5
6
7
8
9
Stummschaltung ein/aus
Power ein/aus
Kanaltasten
Ein-/zwei-/dreistelliger Kanal
Zurück zum vorherigen Kanal
Systemzeit einblenden
Kanalinfo einblenden
Standard-Bildeinstellungen
Menü öffnen/schließen
menÜ optionen
10 Videoquelle
11 Vorheriger/nächster Kanal,
lauter/leiser u. Menüauswahl
12 Multi-Bildvorschau
13 Auflösung
14 Bild-in-Bild-Aktivierung mit
Positionierung für links und rechts
2
1
3
4
5
Drücken Sie auf die “Menu”-Taste, um ins Menü zu gelangen.
6
8
Mit den “Vorheriger/nächster Kanal” -Tasten können Sie die
7
gewünschte Option markieren und mit “Menu” auswählen.
9
10
Mit den “Lauter/leiser”-Tasten können Sie Einstellung
der jeweiligen Menüoption ändern. Nach Fertigstellung,
markieren Sie “Exit” und drücken Sie die “Menu” -Taste.
11
Farboptionen: Helligkeit; Kontrast; Farbsättigung; Farbton.
Videooptionen: Standard (PAL/NTSC/SECAM);
Return (zurück zum vorherigen Menü).
12
13
Kanaloptionen: TV System Standard (NTSC/PAL,
M/PAL, N/PAL, B-G/PAL, D-K je nach Tuner); Auto Scan
14
(zur Kanalansicht: High Speed empfohlen); Full Scan
(Vollfrequenzsuche: Low Speed); Fine Tune (zur
Feinabstimmung der Frequenz des aktuellen Kanals);
Skip (aktuellen Kanal überspringen); Return.
Auflösungsoptionen: VGA (640 x 480); SVGA (800 x 600); XGA (1024 x 768); SXGA
(1280 x 1024); W1440S; W1280S; W1440P; Return.
OSD-Optionen: Pos. X (On-Screen Display Film X); Pos. Y (On-Screen Display Film Y); Return.
Menüsprachen: Englisch; Chinesisch; Portugiesisch.
Problemlösungen
Problem: Kein Bild oder Ton (auch kein “Rauschen”).
• Ist die Power-LED aus, prüfen Sie die Verbindung des Netzteils.
• Ist die Power-LED an, prüfen Sie die Verbindung von Monitor und Audiogerät.
Problem: Bild ist vorhanden, aber kein Ton (auch kein “Rauschen”).
• Prüfen Sie die Verbindung des Audiogeräts.
• Prüfen Sie die Lautstärkeeinstellungen (inklusive Stummschaltung).
Problem: Sound ist vorhanden, aber kein Bild.
• Prüfen Sie die Verbindung zwischen Monitor und dem LCD TV Konverter/Tuner.
• Prüfen Sie, ob der Monitor eingeschaltet ist und sich nicht im Stromsparmodus befindet.
•Achten Sie darauf, dass Ihr Monitor hohe Auflösungen unterstützt: Drücken Sie auf “Res”
und warten Sie einen Moment oder drücken Sie “Res” für eine andere Einstellung erneut.
Problem: Das Bild bleibt schwarz-weiß.
• Prüfen Sie die Farbsättigungseinstellungen (“Saturation”).
• Verstärken Sie das TV-Kabelsignal.
DEUTSCH
5
Convertidor/Sintonizador TV de LCD • Manual del usuario Español
Gracias por comprar el Convertidor/Sintonizador TV de LCD MANHATTAN®, Modelo 176156.
Para ver una ficha técnica detallada y con especificaciones, visite www.manhattan-products.com.
Contenido del Paquete
• Convertidor/Sintonizador LCD a TV con base
• Control remoto (batería incluida)
• Cables de 8 pines a DB15 y audio
• Adaptador de corriente
• Manual de usuario
Instalacion de hardware
1. Apague el Convertidor/Sintonizador LCD a TV y el monitor.
2. Conecte el Convertidor/Sintonizador LCD a TV a la computadora y el monitor.
3. Conecte la caja de Sonido o cualquier otro dispositivo que tenga un conector de
sonido (por ejemplo el puerto de una tarjeta de sonido) al convertidor/Sintonizador
puerto de Salida.
4. Conecte el cable antena de TV al convertidor/sintonizador al puerto antena input.
5. Conecte el adaptador de CA/CC al convertidor/sintonizador, ahora conecte el
adaptador de corriente a la toma de corriente de pared. El convertidor/
sintonizadorencedera automaticamente.
6. Conecte el Video y/o entrada S-Video al jack de salida de video seleccionado de la
fuente de video (DVD, VCD, VCR, PS2, Gamestation, etc.).
IMPORTANTE: Es necesario para inicializar el Convertidor/Sintonizador LCD a TV antes de
su uso. En primer lugar, vaya al menú y selecciona “Buscar”, a continuación, haga clic en
“Menú”. Así se inicia una sola vez de auto-análisis de todos los canales. El procedimiento
debería tener en 5-10 minutos. El LED de estado parpadeará durante el procedimiento.
Back
View
Front
View
speaker
POWER /
STATUS
LEDs
sound card
Audio input
Audio input
to pc
vga card display
CVBS VIDEO
S-Video input
lcd/crt
ir window
vga interface
ANT
6
español
BOTONES DE CONTROL REMOTO Y CLAVE DE INDENTIFICACION
1
2
3
4
5
6
7
8
9
Mute Encendido/Apagado
Encendido/Apagado
Canal Teclas Númericas
Digito sencillo/doble/triple
Regresar al canal anterior
Sistema Visualizacion Hora
Canal Actual/Información
Configuracion imagen Default
Menu entrar/Salir
10 Origen de Video
11 Canal arriba/abajo, volumen
arriba/abajo y seleccione Menu
12 Vista Previa Multiples imagenes
13 Resolución
14 Picture-In-Picture con activación
de posición izquierda y derecha
opciones de menu
2
1
3
4
5
Presione el botón “Menu” para acceder al Menú. Presione el
6
8
7
botón “Channel up/down” para resaltar la opcíon que desee,
despues presione “Menu” para elegir la opción. Presione el
9
10
boton “Volumen up/down” para cambiar los valores de
configuración, luego seleccione “Exit” y presione “Menu”
cuando este completado.
11
Opciones de Color: Brillo; Contraste; Saturación; Matiz.
Opciones de Video: Estandard (PAL/NTSC/SECAM); Retorno
(hasta el nivel del Menu anterior).
12
13
Opciones de Canal: Sistema de TV estándar (NTSC/PAL, M/
PAL, N/PAL, B-G/PAL, DK dependiendo del sintonizador),
14
Auto Scan (para ver canales: de alta velocidad recomendada);
Análisis completo (frecuencia de barrido completo: baja
velocidad); Fine Tune (para el ajuste fino de la frecuencia del
canal actual), salto (el canal actual); Retorno.
Opciones de Pantalla: VGA (640 x 480); SVGA (800 x 600); XGA (1024 x 768); SXGA
(1280 x 1024); W1440S; W1280S; W1440P; Retorno.
Opciones OSD: Pos. X (en pantalla la película X), pos. Y (On-Screen Display película Y);
Retorno.
Opciones Languaje: Ingles, Chino; Portuguese
PrEGUNTAS FRECUENTES
Problema: No hay imagen o sonido (ni siquiera el “ruido”).
• Si el LED de encendido está apagado, revise la conexión del adaptador AC / DC.
• Si el LED de alimentación está encendida, compruebe las conexiones para el monitor
y el dispositivo de sonido.
Problema: La imagen está bien, pero no hay sonido (ni siquiera el “ruido”).
• Compruebe la conexión con el dispositivo de sonido.
• Compruebe la configuración de volumen (incluyendo la función de Mute.
Problema: El sonido está bien, pero no hay imagen.
• Revise la conexión entre el monitor y Convertidor/Sintonizador LCD a TV.
• Compruebe que el monitor está encendido y no en un modo de ahorro de energía.
• Confirme que el monitor puede soportar alta resolución: Pulse “Res” y esperar un
momento para ver si está bien, o presione “Res” de nuevo para cambiar a una
configuración diferente.
Problema: No hay color en la imagen.
• Compruebe el ajuste de saturación.
español
7
Convertisseur TV LCD • Manuel de l’utilisateur Français
Merci d’avoir acheté le Convertisseur TV LCD MANHATTAN®, modèle 176156. Pour la
feuille de données avec une liste de spécification détaillée, visitez
www.manhattan-products.com.
Contenu du pack
• Convertisseur TV LCD avec socle
• Télécommande (pile incluse)
• Câbles 8 broches - DB15 et audio
• Adaptateur secteur
• Manuel utilisateur
installatioN matérielle
1. Éteignez le Convertisseur TV LCD et votre écran.
2. Connectez le Convertisseur TV à l’ordinateur et l’écran.
3. Connectez un dispositif audio avec un port d’entrée audio (par exemple
l’entrée d’une carte son) au port de sortie du convertisseur.
4. Connectez l’antenne de télévision câblée à l’entrée d’antenne du convertisseur.
5. Branchez l’adaptateur secteur CA/CC au convertisseur et puis à une prise
d’alimentation CA. Le convertisseur démarre automatiquement.
6.Connectez l’entrée vidéo et/ou S-Video au port de sortie vidéo du dispositif vidéo
(Lecteur DVD, consoles de jeu, etc.).
IMPORTANT: Il est nécessaire de configurer le convertisseur avant l’utilisation initiale.
D’abord, accédez le menu et sélectionnez “Search,” puis appuyez sur le bouton
“Menu”. Cela commence une recherche automatique de toutes les chaînes. Ce
processus dure environ 5-10 minutes. La DEL Status clignote pendant le processus.
Back
View
Front
View
speaker
POWER /
STATUS
LEDs
sound card
Audio input
Audio input
to pc
vga card display
CVBS VIDEO
S-Video input
lcd/crt
ir window
vga interface
ANT
8
FRANçAIS
Boutons de la télécommande
1
2
3
4
5
6
7
8
9
Muet activé/désactivé
Alimentation (dés-)activée
Boutons de chaîne
Chaîne à un/deux/trois chiffres
Retourner à la chaîne préc.
Afficher temps de système
Afficher info sur chaîne actuelle
Réglages de l’image par défaut
Ouvrir/fermer le menu
options de menu
10 Source de vidéo
11 Chaîne précédente/prochaine,
volume et sélection au menu
12 Aperçu à images multiples
13 Résolution
14 Activation image-en-image avec
positionnement gauche et droit
2
1
3
4
5
Accédez le menu via le bouton “Menu”. Marquez
6
8
7
les options à votre choix via les boutons “Chaîne précédente/
prochaine” et sélectionnez cette option via le bouton “Menu”.
9
10
Changez les paramètres/valeurs via les boutons “Volume”.
Quand vous avez fini, marquez “Exit” et appuyez sur “Menu”.
11
Options de couleur: Clarté; Contraste; Saturation; Teinte.
Options de vidéo: Standard (PAL/NTSC/SECAM); Return
(retourner au menu précédent).
Options de chaîne: TV System Standard (NTSC/PAL,
12
13
M/PAL, N/PAL, B-G/PAL, D-K respectif au tuner); Auto Scan
(pour l’affichage de chaîne: Haut débit recommandé); Full
14
frequency scan (recherche complète: bas débit); Fine
Tune (pour ajuster finement la fréquence de la chaîne
actuelle); Skip (Passer la chaîne actuelle); Return.
Options d’affichage: VGA (640 x 480); SVGA (800 x 600); XGA (1024 x 768); SXGA
(1280 x 1024); W1440S; W1280S; W1440P; Return.
Options OSD (On-Screen Display): Pos. X (OSD film X); Pos. Y (OSD film Y); Return.
Options de langue: Anglais; chinois; portugais.
Dépannage
Problème: Pas d’image ou son (même pas de “bruit”).
• Si la DEL Power est éteinte, contrôlez la connexion de l’adaptateur secteur.
• Si la DEL Power est allumée, contrôlez les connexions à l’écran et dispositifs audio.
Problème: L’image est disponible mais pas le son (même pas de “bruit”).
• Contrôlez la connexion au dispositif audio.
• Contrôlez la configuration de volume (y compris la fonction Muet).
Problème: Son est disponible, mais pas l’image.
• Contrôlez la connexion entre l’écran et le convertisseur.
• Contrôlez que l’écran est allumé et pas au mode économisant l’énergie.
•Assurez-vous que l’écran prend en charge des hautes résolutions: Appuyez sur “Res”
et attendez un moment pour voir si cela marche ou appuyez sur “Res” à nouveau
afin de changer la configuration.
Problème: Il n’y a pas de couleur sur l’image.
• Contrôlez la configuration de saturation.
• Augmentez le signal de TV câblée.
FRANçAIS
9
Tuner z konwerterem TV/LCD • Instrukcja Użytkownika
Polski
Dziękujemy za zakup Tunera z konwerterem TV/LCD MANHATTAN®, model 176156.
Pełną specyfikację produktu znajdą Państwo na stronie www.manhattan-products.com.
Zawartość opakowania
• Tuner z konwerterem TV/LCD
• Pilot zdalnego sterowania (bateria w komplecie)
• Kabel 8-pinowy na HD15 oraz audio
• Zasilacz
• Instrukcja użytkownika
PODŁĄCZANIE
1. Wyłącz zasilanie tunera oraz zasilanie monitora.
2. Podłącz tuner do komputera oraz monitora.
3.Podłącz port wyjścia Audio (Line Out) tunera DO portu wejścia Audio (Line In) karty
dźwiękowej komputera.
4. Podłącz kabel telewizyjny antenowy do wejścia antenowego tunera.
5.Podłącz adapter zasilania (w komplecie) do tunera. Urządzenie uruchomi się
automatycznie.
6.Jeśli posiadasz urządzenie Video typu DVD, VCD, VCR, PS2, Gamestation, itp.,
podłącz je do portu wejścia Video i/lub S-Video tunera.
UWAGA: Przed rozpoczęciem korzystania z tunera/konwertera TV/LCD należy wykonać
jego inicjalizację. W tym celu z menu urządzenia wybierz opcję „Search”, a następnie
kliknij „Menu”. Rozpocznie się jednorazowy proces automatycznego wyszukiwania
kanałów, który może zająć 5-10 minut. W trakcie przeszukiwania kanałów dioda
„Status” powinna migać.
Panel
Tylny
Panel
Przedni
Diody Zasilanie/
Status
Głośniki
Wyjście Audio
Karta dźwiękowa
Wejście Audio
Wejście Audio
Wejście Audio
Wejście VGA
Zasilanie DC 7.5V/1A
Do komputera
Karta graficzna VGA
CVBS Video
Wejście S-Video
lcd/crt
Odbiornik
podczerwieni
Do monitora
Wyjście VGA
Interfejs VGA
Wejście
Antenowe
10
POLSKI
OPIS FUNKCJI PILOTA
1
2
3
4
5
6
7
8
Wyłączenie/włączenie dźwięku
Włączenie/wyłączenie tunera
Klawisze wyboru programu
Wprowadzanie numeru kanału
składającego się z więcej niż
jednej cyfry, np. 35
Powrót do poprzedniego programu
Wyświetlanie czasu
Wyświetlanie informacji o
aktualnym kanale
Domyślnie ustawienia obrazu
9 Wejście do/wyjście z Menu
10 Źródło sygnału wideo
11 Przyciski zmiany programów (+/-),
regulacji głośności oraz opcji menu
12 Podgląd wielu kanałów w jednym
oknie
13 Zmiana rozdzielczości
14 PiP – aktywacja funkcji “obraz w
obrazie”. Left/Right –
pozycjonowanie podglądu lewa/
prawa strona obrazu
OPCJE MENU
2
1
3
6
4
5
7
8
Wciśnij przycisk „Menu”, aby wejść do menu ustawień tunera. Po
menu poruszmy się używając przycisków „Program +/-„. Aby
9
10
wybrać podświetloną opcję, wciskamy przycisk „Menu”. Przyciskami
„Głośność +/-„ zmieniamy parametry danej opcji menu. Aby
11
zatwierdzić zmiany, wybieramy pozycję „Exit” i wciskamy przycisk
„Menu”.
Color options (ustawienia obrazu): Brightness (jasność); Contrast
12
13
(kontrast); Saturation (nasycenie); Hue (barwa).
Video options (opcje video): Standard (PAL/NTSC/SECAM); Return
(powrót do wyższego poziomu menu).
14
Channel options (opcje kanałów): (NSTC/PAL, M/PAL, N/PAL, B-G/
PAL, D-K; w zależności od tunera); Auto Scan (skanowanie
automatyczne; do przeglądania kanałów zaleca się tryb szybki: high speed); Full Scan (pełne
skanowanie częstotliwości, zaleca się tryb wolny: low speed); Fine Tune (precyzyjne
dostrajanie kanału); Skip (pominięcie danego kanału); Return.
Display options (opcje wyświetlania): VGA (640 x 480); SVGA (800 x 600); XGA (1024 x 768);
SXGA (1280 x 1024); W1440S; W1280S; W1440P; Return.
OSD options (opcje wyświetlania menu na ekranie): Pos. X (pozycja na osi X); Pos. Y (pozycja na osi Y); Return.
Language options (ustawienia języka): English (angielski); Chinese (chiński); Portuguese (portugalski).
ROZWIĄZYWANIE PROBLEMÓW
Problem: Brak obrazu lub dźwięku (również dźwięku zakłóceń).
• Jeśli nie świeci dioda zasilania, sprawdź podłączenie adaptera zasilania AC/DC.
•Jeśli dioda zasilania świeci, sprawdź podłączenia do monitora i karty dźwiękowej oraz
sprawdź podłączenie głośników.
Problem: Jest obraz, ale nie ma dźwięku (również dźwięku zakłóceń).
• Sprawdź podłączenie do karty dźwiękowej oraz podłączenie głośników.
• Sprawdź ustawienia głośności (również funkcję wyciszenia).
Problem: Jest dźwięk, ale brak obrazu.
• Sprawdź połączenie między monitorem, a tunerem/ konwerterem.
• Sprawdź, czy monitor jest włączony i czy nie jest ustawiony w trybie oszczędzania energii.
•Sprawdź, czy monitor obsługuje wysokie rozdzielczości: wciśnij przycisk zmiany
rozdzielczości “Res” i odczekaj chwilę, aby sprawdzić, czy pojawi się obraz; jeśli obraz nie
pojawi się, wciśnij ponownie przycisk “Res”, aby spróbować innej rozdzielczości.
Problem: Obraz jest czarno-biały.
• Sprawdź ustawienia nasycenia obrazu.
• Wzmocnij sygnał telewizyjny.
POLSKI
11
WASTE ELECTRICAL & ELECTRONIC EQUIPMENT
Disposal of Electric and Electronic Equipment
(applicable in the European Union and other European countries with separate collection systems)
ENGLISH
This symbol on the product or its packaging indicates that this product shall not be treated as
household waste. Instead, it should be taken to an applicable collection point for the
recycling of electrical and electronic equipment. By ensuring this product is disposed of
correctly, you will help prevent potential negative consequences to the environment
and human health, which could otherwise be caused by inappropriate waste handling
of this product. If your equipment contains easily removable batteries or accumulators,
dispose of these separately according to your local requirements. The recycling of materials will help
to conserve natural resources. For more detailed information about recycling of this product,
contact your local city office, your household waste disposal service or the shop where you purchased
this product. In countries outside of the EU: If you wish to discard this product, contact your local
authorities and ask for the correct manner of disposal.
deutsch
Dieses auf dem Produkt oder der Verpackung angebrachte Symbol zeigt an, dass dieses Produkt
nicht mit dem Hausmüll entsorgt werden darf. In Übereinstimmung mit der Richtlinie 2002/96/EG
des Europäischen Parlaments und des Rates über Elektro- und Elektronik-Altgeräte (WEEE) darf
dieses Elektrogerät nicht im normalen Hausmüll oder dem Gelben Sack entsorgt werden. Wenn
Sie dieses Produkt entsorgen möchten, bringen Sie es bitte zur Verkaufsstelle zurück oder zum
Recycling-Sammelpunkt Ihrer Gemeinde.
ESPAñOL
Este símbolo en el producto o su embalaje indica que el producto no debe tratarse como residuo
doméstico. De conformidad con la Directiva 2002/96/CE de la UE sobre residuos de aparatos
eléctricos y electrónicos (RAEE), este producto eléctrico no puede desecharse con el resto de
residuos no clasificados. Deshágase de este producto devolviéndolo al punta de venta o a un punta
de recogida municipal para su reciclaje.
FRANçAIS
Ce symbole sur Ie produit ou son emballage signifie que ce produit ne doit pas être traité comme un
déchet ménager. Conformément à la Directive 2002/96/EC sur les déchets d’équipements électriques
et électroniques (DEEE), ce produit électrique ne doit en aucun cas être mis au rebut sous forme de
déchet municipal non trié. Veuillez vous débarrasser de ce produit en Ie renvoyant à son point de
vente ou au point de ramassage local dans votre municipalité, à des fins de recyclage.
Italiano
Questo simbolo sui prodotto o sulla relativa confezione indica che il prodotto non va trattato come
un rifiuto domestico. In ottemperanza alla Direttiva UE 2002/96/EC sui rifiuti di apparecchiature
elettriche ed elettroniche (RAEE), questa prodotto elettrico non deve essere smaltito come rifiuto
municipale misto. Si prega di smaltire il prodotto riportandolo al punto vendita o al punto di raccolta
municipale locale per un opportuno riciclaggio.
Polski
Jeśli na produkcie lub jego opakowaniu umieszczono ten symbol, wówczas w czasie utylizacji nie wolno
wyrzucać tego produktu wraz z odpadami komunalnymi. Zgodnie z Dyrektywą Nr 2002/96/WE w
sprawie zużytego sprzętu elektrycznego i elektronicznego (WEEE), niniejszego produktu elektrycznego
nie wolno usuwać jako nie posortowanego odpadu komunalnego. Prosimy o usuniecie niniejszego
produktu poprzez jego zwrot do punktu zakupu lub oddanie do miejscowego komunalnego punktu
zbiórki odpadów przeznaczonych do recyklingu.
12
WARRANTY INFORMATION
english — For warranty information, go to www.manhattan-products.com/warranty.
deutsch — Garantieinformationen finden Sie unter www.manhattan-products.com/warranty.
ESPAñOL — Si desea obtener información sobre la garantía, visite www.manhattan-products.com/warranty.
FRANçAIS — Pour consulter les informations sur la garantie, visitez www.manhattan-products.com/warranty.
Polski — Informacje dotyczące gwarancji znajdują się na stronie www.manhattan-products.com/warranty.
Italiano — Per informazioni sulla garanzia, accedere a www.manhattan-products.com/warranty.
EN MéXICO: Poliza de Garantia MANHATTAN — Datos del importador y responsable ante el consumidor
IC Intracom México, S.A. de C.V. • Av. Interceptor Poniente # 73, Col. Parque Industrial La Joya, Cuautitlan
Izcalli, Estado de México, C.P. 54730, México. • Tel. (55)1500-4500
La presente garantía cubre los siguientes productos contra cualquier defecto de fabricación en sus
materiales y mano de obra.
A. Garantizamos los productos de limpieza, aire comprimido y consumibles, por 60 dias a partir de la fecha
de entrega, o por el tiempo en que se agote totalmente su contenido por su propia función de uso,
lo que suceda primero.
B. Garantizamos los productos con partes moviles por 3 años.
C. Garantizamos los demas productos por 5 años (productos sin partes moviles), bajo las siguientes
condiciones:
1. Todos los productos a que se refiere esta garantía, ampara su cambio físico, sin ningún cargo para
el consumidor.
2. El comercializador no tiene talleres de servicio, debido a que los productos que se garantizan no
cuentan con reparaciones, ni refacciones, ya que su garantía es de cambio físico.
3. La garantía cubre exclusivamente aquellas partes, equipos o sub-ensambles que hayan sido instaladas
defábrica y no incluye en ningún caso el equipo adicional o cualesquiera que hayan sido adicionados
al mismo por el usuario o distribuidor.
Para hacer efectiva esta garantía bastara con presentar el producto al distribuidor en el domicilio donde
fue adquirido o en el domicilio de IC Intracom México, S.A. de C.V., junto con los accesorios contenidos
en su empaque, acompañado de su póliza debidamente llenada y sellada por la casa vendedora
(indispensable el sello y fecha de compra) donde lo adquirió, o bien, la factura o ticket de
compra original donde se mencione claramente el modelo, numero de serie (cuando aplique) y
fecha de adquisición. Esta garantia no es valida en los siguientes casos: Si el producto se hubiese
utilizado en condiciones distintas a las normales; si el producto no ha sido operado conforme a los
instructivos de uso; ó si el producto ha sido alterado o tratado de ser reparado por el consumidor ó
terceras personas.
13
FEDERAL COMMUNICATIONS
COMMISSION REGULATORY STATEMENT
FCC Class B
This equipment has been tested and found to comply with the limits for a Class B
digital device, pursuant to Part 15 of Federal Communications Commission (FCC) Rules.
These limits are designed to provide reasonable protection against harmful interference
in a residential installation. This equipment generates, uses and can radiate radio frequency
energy, and if not installed and used in accordance with the instructions may cause harmful
interference to radio communications. However, there is no guarantee that interference
will not occur in a particular installation. If this equipment does cause harmful interference
to radio or television reception, which can be determined by turning the equipment off
and on, the user is encouraged to try to correct the interference by one or more of the
following measures:
• Reorient or relocate the receiving antenna.
• Increase the separation between the equipment and the receiver.
• Connect the equipment to an outlet on a circuit different from the receiver.
• Consult the dealer or an experienced radio/TV technician for help.
R&TTE
english
This device complies with the requirements of the R&TTE Directive 1999/5/EC.
deutsch
Dieses Gerät enspricht der Direktive R&TTE Direktive 1999/5/EC.
ESPAñOL
Este dispositivo cumple con los requerimientos de la Directiva R&TTE 1999/5/EC.
FRANçAIS
Cet appareil satisfait aux exigences de la directive R&TTE 1999/5/CE.
Polski
Urządzenie spełnia wymagania dyrektywy R&TTE 1999/5/EC.
Italiano
Questo dispositivo è conforme alla Direttiva 1999/5/EC R&TTE.
14
MANHATTAN® offers a complete line of PC Components, Peripherals, Cables and Accessories.
Ask your local computer dealer for more information or visit
www.manhattan-products.com.
All products mentioned are trademarks or registered trademarks of their respective owners.
MANHATTAN® bietet ein vollständiges Sortiment an PC-Komponenten, Peripherie, Kabel und Zubehör.
Weitere Informationen erhalten Sie von Ihrem Händler oder auf
www.manhattan-products.com.
Alle genannten Produkt- oder Firmennamen sind eingetragene Marken
oder Marken der jeweiligen Firmen.
MANHATTAN® ofrece una línea completa Componentes para PC, Periféricos, Cables y Accesorios.
Consulte a su distribuidor local para más información ó visitenos
www.manhattan-products.com.
Todos los productos mencionados son marcas comerciales o marcas registradas de sus
respectivos propietarios.
MANHATTAN® offre un assortiment complet de composants de PC, des périphériques,
des câbles et des accessoires
www.manhattan-products.com.
Tous les produits mentionnés sont des marques commerciales ou des marques déposées
de leurs propriétaires respectifs.
MANHATTAN® to kompletna linia Komponentów PC, Peryferiów, Kabli oraz Akcesoriów.
Poproś lokalnego dealera o więcej informacji lub odwiedź stronę
www.manhattan-products.com.pl.
Wszystkie nazwy handlowe i towarów są nazwami i znakami towarowymi
zastrzeżonymi odpowiednich firm odnośnych właścicieli.
MANHATTAN® offre una linea completa di componenti per PC, periferiche, cavi e accessori.
Chiedi maggiori informazioni al tuo rivenditore di computer o visita il sito
www.manhattan-products.com.
Tutti i prodotti sopracitati sono marchi di fabbrica o marchi registrati depositati dai proprietari.
15
Copyright © MANHATTAN