1
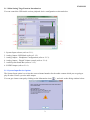
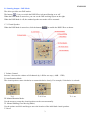
ENGLISH
For Vista/Win7
Make sure your headset is plugged-in. Otherwise you will see the following dialog.
1.1 Installation
• Insert the driver CD and double click on the setup.exe file if the auto run is disabled. Press “Cancel” if you
want to quit the installation.
•
Start the driver installation and press “Next” to go to the next step.
Make sure you the headset is plugged in to the USB audio card before you install the driver. Otherwise, the
•
driver may not install.
When the installation is complete, we recommend you restart your computer.
•
1.2 Remove the driver
• Double click on “Programs/Uninstall a program” in the Windows Control Panel.
•
•
•
Select “USB PnP Sound Device” item, and then click the “Uninstall/Change” button.
Start the un-installation process.
When the process is finished, we recommend you restart your computer to completely remove the driver.
2.0 Open Software CPL
After you have finished rebooting your PC, you will find USB PnP Sound Device software CPL icon on the
system tray bar.
•
You can open the CPL by double-clicking on the icon.
If the tray icon does not appear in your system tray, just go to the Windows control panel and double click on
•
the “USB PnP Sound Device” CPL icon to open it.
The control panel will appear.
•
How to show the CPL icon in the system tray?
•
1. Open the software control panel.
2. Go to “Information” page.
3. Check “Show the audio configuration icon in the system tray.”
1
ENGLISH
2.1 “Main Setting” Page Function Introduction
You can control the USB Audio various playback device configuration as shown below.
1. System Input selector (refer to 2.1.1).
2. Analog Output –DSP Mode (refer to 2.1.2).
3. Analog Output – Headphone Configuration (refer to 2.1.3).
4. Analog Output – Digital Volume control (refer to 2.1.4).
5. Audio System Status Bar (refer to 2.1.5).
6. S/PDIF Output (refer to 2.1.6).
2.1.1 System Input Device Options
The System Input option is to select the correct channel number for the audio content which you are going to
play in order to have a precise audio output.
You can get a better concept by clicking on the Information icon (
2
), and refer to the dialog window below.
ENGLISH
2.1.2Analog Output – DSP Mode
The driver provides two DSP modes.
The button (
) lets you switch the DSP Effect Advanced Setting on or off.
When the DSP Mode is turned on, you can see the DSP working layout on the right.
When the DSP Mode is off, the standard speaker test mode will be resumed.
1.7.1 Virtual Speaker
When the DSP Mode is turned on, click the button (
) to enable the DSP Effect as shown.
I. Volume Control:
Increase / decrease the volume of all channels by 1 dB for one step. (+4dB - 17dB)
II. Auto Rotation Mode:
The virtual speakers rotate clockwise or counterclockwise slowly. For example, if clockwise is selected:
T=0
T=0.25 sec
III. Manual Rotation Mode:
Use the mouse to rotate the virtual speakers on the screen manually.
IV. Manual Shifting (Free Moving Mode):
Use the pointer and click-and-drag to move the location of the individual virtual speakers.
V. Reset:
3
T= 1 sec
ENGLISH
Reset the location of virtual speakers / virtual listener to default.
VI. Virtual Speaker:
Each virtual speaker virtualizes one channel of the 7.1 channel speakers in the real world.
VII. Virtual Listener:
The virtual listener virtualizes your position.
VIII. Volume indicator:
Indicate values for each channel.
•
When the DSP Mode is turned on, click the button (
) to enable the DSP Effect. The effect icon will
be displayed in the DSP Effect section on the right.
2.1.3Analog Output – Speaker/HP Configuration and Sound Testing
Click the Advanced settings button (
•
Advanced settings – Headphone
•
Swap headphone left/right output
Manual Sound Testing:
) to set the advanced headphone setting.
Click the Headphone/Speaker diagram to test sound output sound manually.
2.1.4 Speaker/Headphone Output – Volume Control
CPL provides the volume control function, click the “Digital Volume” Button (
) to enable the volume
control bar.
• Volume Control Bar:
•
Use the volume control bar to adjust the sound value for the headphone.
Volume Reset Button:
Click the “Reset” Button to return the headphone sound value to the default setting.
2.1.5 Audio System Status Bar
CPL provides a status bar to indicate the Audio system status.
•
Analog Channel – Indicate the audio system status of Analog Output.
2.1.6 S/PDIF Output – S/PDIF Output Switch
The USB Multi-Channel Audio Device supports digital output. Click “S/PDIF Enable button” (
it.
• Digital Audio 48 KHz – 48KHz 2CH digital PCM Data Output.
2.2“Mixer” Page Function Introduction
The built-in mixer controls the volume / recording / monitoring (A-A path).
2.2.1 Playback and A-A path Mixer
1. Playback configuration:
Indicate Speaker or Headphone device.
2. Peak Meter:
4
) to enable
ENGLISH
Indicate the instantaneous level of an audio signal.
3. Volume Control:
Set the sound level or A-A path volume.
4. Mute/ Un-Mute Control:
Select mute/un-mute.
Mute - button is un-lit x (
Un-Mute - button is lit (
).
).
2.2.2 Recording Mixer
1. Active Recording Device:
Indicate the recording resource device.
2. Volume Controller:
Control the volume by individual recording device.
3. Recording Device Selector:
Click the selector to set the recording source.
Un-available - button is un-lit (
).
Available - button is lit (
).
4. Mic Boost:
Click on Mic-Boost button (
) and then check the Mic-boost item to increase the microphone volume.
2.2.3 Playback Device Introduction
You have several options to control the volume in this panel, including adjusting the volume level, muting and
reducing the volume.
1. Digital Output:
The volume control can adjust the playback device which is the default device.
(Click the right button on the USB Audio tray icon in the system tray and click on “Multimedia Properties” to
open the sound property page to set the playback default device.
When the Default device is “Speakers”, the “Digital Output” volume bar can adjust the volume level for the
“Speakers”.
When the Default device is “Digital Output”, the “Digital Output” volume bar can adjust the volume level for
the “Digital Output” device.
2. Speakers:
Control the “Speakers” device volume level.
3. Microphone:
Control the (A-A path) of the “Microphone-in” device. The A-A path is the Microphone-in to Speaker-Out
analog loop path.
2.2.4 Recording Device Introduction
You have several options for controlling the volume in this panel, including adjusting the volume level and
selecting the default recording device.
5
ENGLISH
Microphone:
For the volume level of the “Microphone” device, plug-in the microphone and select (
and start to record sound.
) as the default device,
2.3 “Effect” Page Function Introduction
The features in this page provide various sound effects.
•
Environment
Select an “Environment option button” or “Environment option list” for emulation that is implemented by
producing the sound reflection and reverberation.
• Environment Size
You can change the “Environment size button” to simulate a larger or smaller space (default is medium). You
feel the changes of space.
Equalizer (EQ) 10-Band
Select a preset mode for the equalizer that is designed accordingly. There are 12 preset modes such as Bass,
•
Treble, Live, Rock, Jazz, etc.
You can change the gain setting for each band and give it a name in the following blank. Click “+” to add your
new setting into the “User Defined” list. Click “-” to delete the settings.
2.4 “Karaoke and Magic VoiceTM” Page Function Introduction
These functions let you experience voice processing. It is also great to use on VOIP applications and Karaoke
speaker systems.
1. Click “ON” button to turn on the voice processing.
2. Click “Reset” button to return all settings to default volume.
3. Magic Voice Function Area – Provide “Microphone Echo” and “Magic Voice” functions. (refer to 2.4.1)
4. Karaoke Function Area - Provide “Key Shifting” and “Voice Cancellation” functions. (refer to 2.4.2)
2.4.1 Magic Voice Area
1. Microphone Echo:
When singing a song, you may need the Voice Echo to make the singing more euphonious. You can select
“Microphone Echo” to get the effect and adjust the volume of the echo sound. The range is -12dB to +12dB.
For the first time when you turn on the function, the driver will select the microphone input as the recording
source. Click “OK” to close this window as follows.
2. Magic Voice:
When you are talking to your friends using Messenger, VOIP, online game applications, you can use “Magic
VoiceTM” effects in the pull-down menu for fun. Only one voice type can be chosen at a time.
When “Magic Voice™” is selected; the layout will be shown as followed. There are five options: Default (no
effect), Monster, Cartoon, Male, and Female styles.
2.4.2 Karaoke Function Area
1. Key-Shifting:
6
ENGLISH
You can enable Key-Shifting for the Karaoke VCD or the music to make it suitable for your voice pitch. The
range is -4 to +4 semitones.
2. Vocal Cancellation:
If the music source includes the original singer’s voice, try “Vocal Cancellation” function to cancel it (0~100).
However, the effect doesn’t always work, as it depends on the recording method of the source. Usually, this is
not needed for Karaoke VCD or CD, which do not have a singer’s voice.
2.5 “Information” Page Introduction
This page records the driver information and the technologies’ trademark logo. You can get both
hardware/software details and also legal information references here.
1. Trademark logo placement.
2. Show the audio configuration icon in the system tray option.
3. Hardware and software information.
4. Control Panel Version.(Ver.2.0.01.05)
5. Genius Web Site. (URL:www.geniusnet.com)
2.6 “Tray Icon” Function Introduction
Open the “CPL Tray Icon Function List” by clicking the right button on the system tray icon.
1. Open:
Click on “Open” to restore the USB Audio Software CPL.
2. Volume Mixer:
Click on “Volume Control” to open the Windows Volume Mixer if you want to separately control the volume
of your speakers and other sound devices or programs using this Volume Mixer.
3. Windows Media Player:
Click on “Windows Media Player” to open the Microsoft Windows Media Player.
4. Sound Recorder:
Because the CM101 doesn’t support the microphone, when click “Sound Recorder” and a pop-up a message
will appear as below.
5. Multimedia Properties:
Open the Windows multimedia properties to select the working sample rate and bit rate on the property page.
•
Playback
1. Select the “Speakers” device and click the “properties” button.
2. Click the tag of “Advanced”, enter the advanced page, and click the Dropdown list to open default format
support list as shown below.
3. Follow the same steps to change the sample rate and bit rate for “Digital-Output” device or other playback
•
devices.
Recording
1. Select the Microphone device and click the “Properties” button.
2. Click the tag of “Advanced”, enter the advanced page, and click the dropdown list to open default format
support list as shown below.
7
ENGLISH
3. Follow the same steps to change the sample rate and bit rate for other recording devices.
6. Exit:
Click “Exit” to exit the icon tray from the system tray.
8