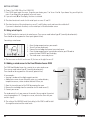
1
SAFEGUARD
SAFEGUARD
TOTALGUARD
TOTALGUARD
tm
ENGLISH
USER’S GUIDE
20071 / 20070228 • SAFEGUARD TM / TOTALGUARDTM ALL RIGHTS RESERVED 훿 2007
INDEX
Introduction
Safety warnings
BASIC OPTIONS
1.
1.1
1.2
Your Marmitek surveillance system _________________________________________________________________
Important properties_____________________________________________________________________________________
Signal range____________________________________________________________________________________________
2.
2.1
The security console _________________________________________________________________________________ 7
Installing the console ____________________________________________________________________________________ 8
2.1.1 Connecting the telephone wire ______________________________________________________________________ 8
2.1.2 Connecting the AC adapter _________________________________________________________________________ 8
2.1.3 Installing the emergency batteries____________________________________________________________________ 8
Mounting the security console ____________________________________________________________________________ 9
The menus _____________________________________________________________________________________________ 9
2.3.1 Choosing your language ___________________________________________________________________________ 10
2.3.2 The menu in English _______________________________________________________________________________ 11
2.2
2.3
3.
3.1
5
6
7
Installing remote controls ___________________________________________________________________________
Key Chain Remote Control KR21 __________________________________________________________________________
3.1.1 Using the Key Chain Remote Control _________________________________________________________________
3.1.2 Registering the Key Chain Remote Control ____________________________________________________________
Comfort Remote Control SH624 (standard with TotalGuard, optional with SafeGuard) _____________________________
3.2.1 Using the Comfort Remote Control __________________________________________________________________
3.2.2 Registering the Comfort Remote Control______________________________________________________________
12
12
12
12
13
13
13
4.3
Installing the sensors ________________________________________________________________________________
Door/Window Sensor DS90 _______________________________________________________________________________
4.1.1 Mounting the Door/Window Sensor DS90_____________________________________________________________
4.1.2 Using the Door/Window Sensor _____________________________________________________________________
4.1.3 Registering a Door/Window Sensor __________________________________________________________________
Motion Detector MS90 __________________________________________________________________________________
4.2.1 Mounting the Motion Detector MS90 ________________________________________________________________
4.2.2 Using the Motion Detector__________________________________________________________________________
4.2.3 Registering a Motion Detector_______________________________________________________________________
Smoke Detector SD10 /SD90______________________________________________________________________________
14
14
14
14
15
15
15
16
16
17
5.
5.1
5.2
5.3
Setting up the security console (SC9000) ____________________________________________________________
Setting the clock ________________________________________________________________________________________
Storing phone numbers __________________________________________________________________________________
Recording your own message _____________________________________________________________________________
17
17
18
18
6.
6.1
6.2
6.3
6.4
6.5
Using the security system ___________________________________________________________________________
Setting the alarm _______________________________________________________________________________________
Panic alarm ____________________________________________________________________________________________
What happens when the alarm goes off? ___________________________________________________________________
Disarming the system ____________________________________________________________________________________
Error messages _________________________________________________________________________________________
19
19
20
21
21
21
3.2
4.
4.1
4.2
2
MARMITEK
INDEX
7.
7.1
7.2
7.3
7.4
7.5
7.6
7.7
7.8
7.9
Prevention and comfort - ‘Home Automation’ _______________________________________________________
Introduction ____________________________________________________________________________________________
Addressing your modules_________________________________________________________________________________
Installing the LM12 Lamp/Dimmer Module __________________________________________________________________
Alarm functions of the Lamp/Dimmer Modules ______________________________________________________________
Comfort functions of the KR21 Key Chain Remote Control ____________________________________________________
Comfort functions of the SH624 Comfort Remote Control ____________________________________________________
Comfort functions of the security console___________________________________________________________________
Setting the timer ________________________________________________________________________________________
Clearing the timer settings _______________________________________________________________________________
22
22
23
23
23
23
24
24
24
25
EXTRA OPTIONS
8.
8.1
8.2
8.3
Advanced system functions__________________________________________________________________________
Setting the delays _______________________________________________________________________________________
Clearing the memory of your security system ________________________________________________________________
Changing the access code (PIN) ___________________________________________________________________________
26
26
26
27
9.
9.1
9.2
9.3
9.4
9.5
9.6
9.7
Advanced security functions_________________________________________________________________________
Disarming the siren for silent alarm ________________________________________________________________________
Arming the chime _______________________________________________________________________________________
Using wired inputs ______________________________________________________________________________________
Adding a wired sensor to the Door/Window Sensor DS90 _____________________________________________________
Emergency sensors ______________________________________________________________________________________
Deregistering a Door/Window Sensor ______________________________________________________________________
Deregistering a Motion Detector___________________________________________________________________________
27
27
27
28
28
29
29
30
10.
10.1
10.2
10.3
10.4
10.5
10.6
Advanced Home Automation functions______________________________________________________________
Checking the status of the security system __________________________________________________________________
Installing an extra siren (Marmitek PH7208) _________________________________________________________________
Using an external universal siren___________________________________________________________________________
Transceiver function _____________________________________________________________________________________
All Home Automation functions at a glance _________________________________________________________________
Basic address for Home Automations functions ______________________________________________________________
30
30
30
31
31
31
31
11.
11.1
11.2
11.3
11.4
Telephone functions _________________________________________________________________________________
Calling the security system _______________________________________________________________________________
Activating the call-in function _____________________________________________________________________________
Operating the alarm functions via an outside phone __________________________________________________________
Operate lights and equipment via an outside phone __________________________________________________________
33
33
33
34
34
12.
Changing the batteries ______________________________________________________________________________ 34
13.
Frequently asked questions__________________________________________________________________________ 36
Tabels ________________________________________________________________________________________________ 37
Technical data________________________________________________________________________________________ 38
SAFEGUARD / TOTALGUARD
3
INTRODUCTION
Introduction
Thank you for purchasing this Marmitek security product. Marmitek security systems are made with care and are of the highest
quality. Please read this user manual carefully and follow up all the instructions.
In this user manual you will find texts marked with a ☺ sign. These texts contain extra information about the functions and can be
skipped.
Safety warnings
• To prevent short circuits, this product should only be used inside and only in dry spaces. Do not expose the components of your
security system to rain or humidity. Do not use the product close to a bath, swimming pool etc.
• Only connect the adapters to the mains after you have checked whether the mains voltage corresponds with the value on the
type tags. Never connect an adapter or cable when it is damaged. In that case, contact your supplier.
• Batteries: keep batteries out of the reach of children. Dispose of batteries as chemical waste. Never use old and new batteries
or different types of batteries together. Remove the batteries when you are not using the system for a longer period of time.
Check the polarity (+/-) of the batteries when inserting them in the product. Wrong positioning can cause an explosion.
• Do not expose the components of your systems to extremely high temperatures or direct sunlight.
• Do not open the product: The device contains live components. The product should only be repaired or serviced by a qualified
repairman.
• In case of improper usage or if you have opened, altered and repaired the product yourself, all guarantees expire. Marmitek
does not accept responsibility in the case of improper usage of the product or when the product is used for purposes other
than specified. Marmitek does not accept responsibility for additional damage other than covered by the legal product
responsibility.
• This product is not a toy. Keep out of reach of children.
4
MARMITEK
BASIC OPTIONS
1. Your Marmitek surveillance system
The contents of your set:
The Marmitek SafeGuard system is an effective security system for your home. In this kit you will find the following components:
1.
2.
3.
4.
5.
6.
Security console SC9000
Motion Detector MS90
Door/Window Sensor DS90
Key Chain Remote Control KR21
AC adapter
Accessories: batteries, telephone wire, telephone plug
2
3
4
SAFEGUARD / TOTALGUARD
1
Marmitek SafeGuard-system
5
BASIC OPTIONS
3
2
1
Marmitek TotalGuard-systeem
The Marmitek TotalGuard system is identical to the SafeGuard system, but also contains components for prevention and comfort.
The TotalGuard system also contains the following components:
1. Lamp/Dimmer Module LM12
2. Comfort Remote Control SH624
3. One extra DS90 Door/Window Sensor
☺ All components of the TotalGuard system are available separately and are compatible with the SafeGuard system.
1.1 Important properties
• Receive a telephone message in case of an emergency, wherever you are. The built-in telephone dialler can dial six different
telephone numbers.
• The person called receives a spoken message indicating a burglary or fire alarm is in progress.
• Intelligent sensor control: the console checks functions and battery status.
• Menu control in your own language makes installation and configuration easy.
• Use the phone to listen to what is causing the alarm in your home.
• You can register up to 30 wireless sensors with the console.
6
MARMITEK
BASIC OPTIONS
•
•
•
•
You can use up to 16 wireless remote controls.
2 inputs for wired sensors.
Silent alarm possible (no siren).
By calling the system, you can control the system remotely and check the status. The TotalGuard also lets you switch on the
lights.
• Prevention: Your lights are switched on and off in such a way that it appears as if you are home.
1.2 Signal range
The sensors have an open field range of 100 m. Walls, ceilings and other large object will influence the range. The range depends
on your personal living conditions, but is usually between 15 and 30 m.
One other factor that can decrease the range is the presence of other distorting high-frequency signals on the same frequency
(433MHz). RF wireless headphones and wireless speakers can influence the range. They cannot cause a false alarm. Wireless
phones or networks do not influence the system.
2. The security
console
(1)
(2)
(3)
(4)
(5)
(6)
(7)
(8)
(9)
(10)
(11)
(12)
(13)
(14)
(15)
(16)
(17)
(18)
10
Display.
ARM HOME button
Alarm function for when
7
you are at home. All
6
8
Door/Window Sensors are
activated, but the Motion
Detectors remain unarmed.
ARM AWAY button
Full alarm. All sensors are
activated.
ARMED Indicator
Lights up when the alarm is
switched on.
BATTERY Indicator
Lights up when the backup batteries are empty or
not installed.
4 5
1
2 3
18 11 9
16
13
Telephone connection.
AC adapter connection.
14
15
17
12
Wired inputs.
Tamper contact.
Emergency battery compartment.
Console buttons.
Menu Start - Call up the menu or step up in the menu.
Menu Start - Call up the menu or step down in the menu.
ON - Switch on a Marmitek X-10 Module (see 7.7).
OFF - Switch off a Marmitek X-10 Module (see 7.7).
OK - Confirm setting.
Clear/bypass - Clear the setting, go up one level in the menu, Bypass function for switching of a sensor.
Built-in microphone.
SAFEGUARD / TOTALGUARD
7
BASIC OPTIONS
Display:
1 2 3 4 5 6 7 8 9 10 11 12 13 14 15 16
2
17 18 19 20 21 22 23 24 25 26 27 28 29 30 31 32
1
3
1
1. Zone numbers
Every sensor represents a so-called zone in the system. There are 30 zones for wireless sensors (numbers 1-30 on the display)
and 2 zones for wired sensors (numbers 31 and 32 on the display).
Zone numbers on: Door or window is open.
Zone number flashing slowly: There is a problem with the sensor (6.5).
Zone number flashing quickly: The sensor has been switched off with the Bypass function (6.5).
2. Chime
Chime is switched on when the system is switched off. When this function is activated, you hear a pleasant ding-dong when
someone enters the house (9.2).
3. Space for menu texts and clock
2.1 Installing the console
2.1.1 Connecting the telephone wire
Open the top compartment on your console. Connect the telephone wire to the corresponding connection (6). You can fixate the
wire by looping it behind the hooks on the back of the console.
In case of an analogue phone connection
Insert the other end of the telephone wire into the telephone plug included and connect this to your telephone socket.
☺ In case of an ISDN connection
The console cannot be connected directly to an ISDN connection! If you are using ISDN, you need to connect the alarm system
to an analogue connection of your ISDN console. The telephone wire included, without the plug, fits directly into the analogue
input of your ISDN console. If there are no analogue inputs, please use a converter (check with your telecom supplier). You will
most likely have to dial a 0 on the console to get an outside line. This 0 needs to be programmed in with the telephone
numbers to be able to dial out (see 5.2). You also need to keep in mind that with ISDN in the case of a power failure your
alarm system can no longer dial out. The connection can only be guaranteed with an analogue line.
2.1.2 Connecting the AC adapter
Connect the AC adapter to the corresponding connection (7). Plug the adapter into a 230V wall socket. You can fixate the wire
by looping it behind the hooks on the back of the console. When connecting the adapter and opening the top compartment of
your console, you will see the word ‘TAMPER’ on the display. After closing the compartment, enter your PIN code (factory settings
0000, see 8.3) to remove the word ‘TAMPER’. The display will now read ‘DISARMED’ and you will hear a double tone to confirm.
☺ Please use the AC adapter included in the set
2.1.3 Installing the emergency batteries
Insert 4 AA batteries in the battery compartment (10). Do not forget to check the polarity (+/-).
Preferably use alkaline batteries (not rechargeable batteries). After inserting the batteries and closing the compartment, enter your
PIN code (factory settings 0000, see 8.3) to remove the word ‘TAMPER’. The display will now read ‘DISARMED’ and you will hear
a double tone to conf
8
MARMITEK
BASIC OPTIONS
2.2 Mounting the security console
Choose a good space for the console and make sure you have a wall socket (230V) and a telephone connection close by. For
optimal range it is best to mount the console central to the objects you wish to secure. This ensures that the distance between
the console and the sensors is as short as possible and the range will be sufficient.
Please also ensure that:
1. the console is not placed close to large metal object (radiators, oven, etc.);
2. you have easy access to the console;
3. the console is not too close to other electronic equipment, such as your telephone system, computer or TV.
You can place the console on any flat surface (table, etc.) or mount it onto the wall.
Mounting the console onto the wall
The console can be mounted onto the wall using two screws. On the back of the console you will find two slot holes (heart to
heart distance 96mm). Fitting screws are included in the set.
Setting the console on a flat surface
The rubber caps make sure the console will not move around when using the console.
2.3 The menus
After connecting the console, the display will read ‘HOME CONTROL’. The time will be displayed on the bottom line (for setting
the time, see 5.1).
☺ If you do not see the words HOME CONTROL but TAMPER, you need to close the top compartment on the console. After
closing the compartment, enter your PIN code (factory settings 0000, see 8.3) to remove the word ‘TAMPER’. The display will
now read ‘DISARMED’ and you will hear a double tone to confirm. Then the text HOME CONTROL will be shown.
SAFEGUARD / TOTALGUARD
9
BASIC OPTIONS
2.3.1 Choosing your language
All menu items are displayed in English. You can choose any of the other available languages. You can do this as follows:
To access the menu, press the menu or menu button. The display will now read ‘ENTER PIN’.
ENTER PIN
Enter the 4-digit PIN code (factory setting 0000. See 8.3 for changing the PIN code). For every digit entered, a * will appear on
the display. When the PIN code has been entered correctly, the first menu item will show up on the display.
1. INSTALL
Use the menu buttons / to go to menu item 7. Options. Press OK to select this menu item. You can also go to this menu item
directly by pressing a 7 on the number pad.
7. OPTIONS
Use the menu buttons / to go to menu item Languages. Press OK to select this submenu item.
LANGUAGES
Use the menu buttons / to select your language. Press OK to confirm.
ENGLISH
Press Clear and then 1 (=Yes) to quit the menu.
QUIT MENU
1.YES 2.NO
10
MARMITEK
BASIC OPTIONS
☺ Attention: This English language user manual will only use the English menu items.
2.3.2 The menu in English
The menu items in the English language menu are:
1. INSTALL
2. SET CLOCK
3. PHONE NUMS
Registering and deregistering sensors and remote controls.
Setting the clock (5.1).
Setting the phone numbers (5.2).
Submenu:
PHONE 1
PHONE 2
PHONE 3
PHONE 4
PHONE 5
PHONE 6
4. MESSAGE
Submenu:
Recording and checking your own spoken message (5.3).
1. RECORD
Record your own spoken message
2. REPLAY
Listen to your own spoken message
5. NEW PIN
Change your PIN code (8.3).
6. MEMORY CLEAR
Clear all sensors, remote controls, timers or settings (8.2).
Submenu:
7. OPTIES
Submenu:
CLEAR ALL SENSORS
CLEAR ALL REMOTES
CLEAR ALL TIMERS
MASTER RESET
Remove a registered sensor.
Remove a registered remote control.
Remove all timer settings at once.
Clear the memory.
Submenu:
CHIME - CHIME ON/CHIME OFF Chime on/off when system off (9.2). When the chime is switched on,
the display will show a symbol.
SIREN - SIREN ON/SIREN OFF
Switch off siren for silent alarm (9.1).
HOUSECODE
Change the HouseCode for Home Automation functions (10.6).
UNITCODE
Change the UnitCode for Home Automation functions (10.6).
ANSWER TYPE
ANSWER ON/ANSWER OFF/VOICE MAIL (11.2).
SENSOR MODE
Use sensors as emergency sensor. See (9.5).
LANGUAGE
ENGLISH/FRANÇAIS/DEUTSCH/NEDERLANDS/ITALIANO/ESPANOL/
PORTUGUES/SVENSKA/ROMANA/TÜRKÇE.
8. DELAYS
Submenu:
ENTRY DELAY
EXIT DELAY
9. SET TIMER
Submenu:
DIAL DELAY
ANSWER DELAY
The time you get to switch off the system after entering your house (8.1).
The time you get before the system is switched on when you leave
your house (8.1).
Delay before the system calls out in case of an alarm (8.1).
Delay before the system picks up the phone when dialling in (8.1).
NEW TIMER
Setting a new timer (7.8).
SAFEGUARD / TOTALGUARD
11
BASIC OPTIONS
3. Installing remote controls
3.1 Key Chain Remote Control KR21
1. CONTROLE INDICATOR
Lights up when the remote control transmits radio signals when
pressing the buttons. If the indicator light is not very bright, the
batteries should be replaced.
2. ARM
Switches on the alarm in Arm Away mode (all sensors activated).
3. DISARM
Switches off the security system.
4. LIGHTS ON
Switches on your light modules (7.5).
5. LIGHTS OFF
Switches off your light modules (7.5).
7+8. PANIC
If the (red) buttons 7 and 8 are pressed together, the panic alarm is
activated (6.2).
9. BATTERY COMPARTMENT
The battery compartment can be found in the remote control.
1
2
3
4
5
9
7
8
3.1.1 Using the Key Chain Remote Control
1. BATTERIES
A new KR21 contains fully charged batteries.
2. ACTIVATING THE KR21.
Keep the ARM button on your remote control pressed for 4 seconds. Release the button. The remote control has now
chosen a unique code, which can be registered with your console.
☺ When pressing the ARM button the LED should flash quickly a few times. When the LED lights up and stays lit, you need to
reactivate the KR21
3.1.2 Registering the Key Chain Remote Control
1. To access the menu, press the menu or menu button. The display will now read ‘ENTER PIN’.
2. Enter your 4-digit PIN code (factory setting 0000. See 8.3 for changing the PIN code). For every digit entered, a * will appear
on the display.
3. When the PIN code has been entered correctly, the word ‘INSTALL’ will show up on the display.
4. Press OK. The display now reads ‘INSTALL ZONE’.
5. Press the ARM button on your key chain remote control. The console will beep to confirm. The display will read ‘RMOT 1 SET’.
☺ If you have more than 1 remote control installed, it will read e.g. RMOT 2 SET, RMOT 3 SET, … RMOT 16 SET. You can register
up to 16 remote controls.
6. Repeat step 5 for every remote control you wish to register.
7. Press CLEAR to go back to the main menu. Press CLEAR again to quit the menu. To confirm your choice, press 1 for Yes or 2
for No. If you choose Yes, you will quit the menu. If you choose No, you go back to the main menu.
☺ You can also remove remote controls from the menu, e.g. when you have lost a remote control. This method is described in 8.2.
☺ Read chapter 12 for information on replacing the batteries..
12
MARMITEK
BASIC OPTIONS
3.2 Comfort Remote Control SH624 (standard with TotalGuard, optional with SafeGuard, art. no. 09170)
1. PANIC
With this red button the panic alarm can be activated immediately.
2. CONTROL INDICATOR
Lights up when the remote control transmits radio signals when pressing the
buttons.
If the indicator light is not very bright, the batteries should be replaced.
3. CONTROL BUTTONS
For operating the security system and for the comfort functions (see 7.6).
4. DIMMER BUTTON (see 7.6)
5. MODUS SWITCH
Switch to the SEC setting to use the security functions. For settings 1 and 2, see
7.6.
SWITCH IN SEC SETTING:
ARM HOME: The security system is partly armed. All door/widow sensors
are activated, while the motion detectors are switched off.
ARM AWAY: The security system is fully armed. All sensors are activated.
DISARM:
Switches off the security system.
6. HOUSECODE SWITCH
Leave the switch set to A for now (see 10.6 for more information).
1
6
3.2.1 Using the Comfort Remote Control
1. INSERTING THE BATTERIES
IMPORTANT: When inserting the batteries, the switch should not be in setting 2!
Open the battery compartment on the back of the remote control and insert the
batteries (4x AAA, alkaline). Do not forget to check the polarity (+/-). Close the compartment.
2. ACTIVATING THE SH624
Press the ‘PANIC’ button.
2
3
4
5
3.2.2 Registering the Comfort Remote Control
1. To access the menu, press the menu or menu button. The display will now read ‘ENTER PIN’.
2. Enter your 4-digit PIN code (factory setting 0000. See 8.3 for changing the PIN code). For every digit entered, a * will appear
on the display.
3. When the PIN code has been entered correctly, the word ‘INSTALL’ will show up on the display.
4. Press OK. The display now reads ‘INSTALL ZONE’.
5. Set the switch to SEC. Press the ARM HOME button on your Comfort Remote Control. The console will beep to confirm. The
display will read ‘RMOT 2 SET’.
a. If you have more than 2 remote controls installed, it will read e.g. RMOT 3 SET, RMOT 4 SET, … RMOT 16 SET. You can
register up to 16 remote controls.
6. Repeat step 5 for every remote control you wish to register.
7. Press CLEAR to go back to the main menu. Press CLEAR again to quit the menu. To confirm your choice, press 1 for Yes or 2
for No. If you choose Yes, you will quit the menu. If you choose No, you go back to the main menu.
☺ Read chapter 12 for information on replacing the batteries.
SAFEGUARD / TOTALGUARD
13
BASIC OPTIONS
4. Installing the sensors
4.1 Door/Window Sensor DS90
1. Transmitter part.
2. Magnet contact.
3. Control Indicator – Lights up when a signal is
transmitted.
4. Screw for opening the sensor.
5. Switch for entry delays.
6. Connection for extra wired contact (9.4).
7. Battery compartment.
8. Screw holes for mounting the sensor.
9. Tamper contact.
4
8
7
3
5
9
8
6
4.1.1 Mounting the Door/Window Sensor DS90
1. Open the casing by removing screw (4). Mount
the transmitter part on the frame of your door
or window. Do not close the casing yet.
2
1
2. Mount the magnet on the moving part of your
door of window. Make sure that the arrows on
the transmitter part (see the lid!) and the magnet are facing each other when the door or window is closed. Keep the distance
between the transmitter part and the magnet (when door or window is closed) as small as possible (max. 4 mm).
☺ If your window or doorframe is slightly countersunk, you can also place
the transmitter part and the magnet at a 90-degree angle.
☺ Once you have decided on a definite place for the sensor, we advise to also
fix the magnet with screws (included).
☺ Aluminium/synthetic frames
Place the sensor as high as possible: This gives the best range. Mark the place
for the transmitter and the magnet. Do not place the magnet directly on a
metal surface. In case of metal frames, or synthetic frames with a metal core,
place a piece of wood or plastic (min. 5mm thick) between the magnet and
the frame. On metal frames the space between the sensor and the magnet
should be no more than 3mm when the window or door is closed.
☺ Sliding windows
In case of sliding windows the sensor and magnet should NOT be allowed to slide along each other horizontally. Place the
sensor and magnet in such a way that when closing the window the magnet and sensor approach each other vertically.
4.1.2 Using the Door/Window Sensor
1. If you have not yet opened the transmitter, please do so now by unscrewing screw (4).
2. Insert the batteries (2xAAA, alkaline) into the battery compartment. Do not forget to check the polarity.
3. Set the switch for entry delay (5) to MIN when you have installed the sensor on a window and on MAX when the sensor is
installed on a door. When the switch is set to MAX, you have time to open and close the door (standard setting 30 sec). This
delay to enter your house and switch off the system without triggering the alarm can be altered (see 8.1). If you want an
instant alarm (on e.g. the backdoor), set the switch to MIN.
4. Keep the tamper contact (9) on the transmitter pressed for 4 seconds. Release the button. The door/window sensor has now
chosen a unique code, which can be registered with your console.
14
MARMITEK
BASIC OPTIONS
4.1.3 Registering a Door/Window Sensor
1. To access the menu, press the menu or menu button. The display will now read ‘ENTER PIN’.
2. Enter your 4-digit PIN code (factory setting 0000. See 8.3 for changing the PIN code). For every digit entered, a * will appear
on the display.
3. When the PIN code has been entered correctly, the word ‘INSTALL’ will show up on the display.
4. Press OK.
5. Open your door or window. The console will beep to confirm. The display will read ‘ZONE 1 SET’.
☺ A memory space for a sensor is called a zone. If you have more than 1 sensor installed, it will read e.g. ZONE 2 SET, ZONE 3
SET, … ZONE 30 SET.
☺ You can choose in which zone you want to install the sensor. If you want to install the sensor in zone 3, press 3 on the number
pad before executing step 5.
☺ You will find a table in which you can write down which zone contains which sensor at the back of this user manual. We
advise you to write down which sensor you have registered in which zone
6. Repeat step 5 for every door/window sensor you wish to register.
7. Press CLEAR to go back to the main menu. Press CLEAR again to quit the menu. To confirm your choice, press 1 for Yes or 2
for No. If you choose Yes, you will quit the menu. If you choose No, you go back to the main menu.
☺ Read chapter 12 for information on replacing the batteries.
4.2 Motion Detector MS90
1. Battery compartment.
2. Control Indicator – Lights up when a signal is
transmitted.
3. TEST button.
4. Sensitivity switch 1/2 – In setting 1 the sensor
will instantly react to movement, in setting 2
the sensor is less sensitive and will only react
after registering two movements.
5. Tamper contact.
4.2.1 Mounting the Motion Detector MS90
The motion detector works by detecting changes
in temperature. Do not mount the detector too
close to a heater or air conditioner.
2
4
3
5
1
The motion detector has a range of 6-10 m and an angle of 90°. Because of the special lens the sensor ‘looks down’. Always
mount the MS90 at a height of about 180 cm from the floor and place it in such a way that the detector can cover the area you
want to secure. The mounting bracket can be placed at an angle (90°) or directly against the wall.
SAFEGUARD / TOTALGUARD
15
BASIC OPTIONS
4.2.2 Using the Motion Detector
1. Open the battery compartment and insert the batteries (2x AA, alkaline).
2. Keep the TEST button (3) pressed for about 4 seconds. The LED will flash once. Release the button. The LED will flash twice.
The motion detector has now chosen a unique code, which can be registered with your console.
3. Place the motion detector upside down so that it cannot detect any movement during registration.
Test mode: Testing the location of your motion detector
1. Set the switch to 1.
2. Press the TEST button (3) until the indicator (2) flashes twice.
3. Wait 20 seconds.
4. Walk in front of the sensor. The indicator (2) lets you know when a movement has been detected. This allows you to check
whether the sensor has been mounted on the right place.
5. Press the TEST button again to be able to use the sensor as normal.
☺ After 2 minutes the motion detector will go back to the normal mode.
4.2.3 Registering a Motion Detector
1. To access the menu, press the menu or menu button. The display will now read ‘ENTER PIN’.
2. Enter your 4-digit PIN code (factory setting 0000. See 8.3 for changing the PIN code). For every digit entered, a * will appear
on the display.
3. When the PIN code has been entered correctly, the word ‘INSTALL’ will show up on the display.
4. Press OK. The display will read ‘INSTALL ZONE’.
5. Press the TEST button of the motion detector or turn it around, so that the sensor will detect movement. The console will beep
to confirm. The display will read ‘ZONE …’. SET’.
☺ A memory space for a sensor is called a zone. If you have more than 1 sensor installed, it will read e.g. ZONE 2 SET, ZONE 3
SET, … ZONE 30 SET.
☺ You can choose in which zone you want to install the sensor. If you want to install the sensor in zone 3, press 3 on the number
pad before executing step 5.
☺ You will find a table at the back of this user manual in which you can write down which zone contains which sensor. We
advise you to write down which sensor you have registered in which zone.
6. Repeat step 5 for every motion detector you wish to register.
7. Press CLEAR again to quit the menu. To confirm your choice, press 1 for Yes or 2 for No. If you choose Yes, you will quit the
menu. If you choose No, you go back to the main menu.
☺ Read chapter 12 for information on replacing the batteries.
16
MARMITEK
BASIC OPTIONS
4.3 Smoke Detector SD10 / SD90
The Marmitek Smoke Detector will make sure you are warned in case of a fire. When
you’re at home, the built-in siren will be triggered. Combined with your security system the
internal siren, the telephone dialler and the lights will be activated. This gives you an
optimal warning and makes sure your exits are well lit. If you are away from home, you will
receive a warning via your mobile phone.
☺ The telephone message indicates that the emergency sensor is triggered and that it is
not the burglar alarm. This is done by adding an extra message to your own spoken
telephone message. This standard message (4 languages: English, German, French,
Dutch) is pre-programmed into your system.
Consult the user manual for your smoke alarm for instructions on using
the smoke alarm with your security system.
5. Setting up the security console (SC9000)
5.1 Setting the clock
1. To access the menu, press the menu or menu button. The display will now read ‘ENTER PIN’.
2. Enter your 4-digit PIN code (factory setting 0000. See 8.3 for changing the PIN code). For every digit entered, a * will appear
on the display.
3. When the PIN code has been entered correctly, the word ‘INSTALL’ will show up on the display.
4. Use the menu buttons / to go to menu item 2. SET CLOCK. Press OK to select this menu item. You can also go to this
menu item directly by pressing a 2 on the number pad.
5. Use the number pad to enter the new time (24 hour notation), followed by OK. The display now reads ‘INSTALL’.
6. Press CLEAR again to quit the menu. To confirm your choice, press 1 for Yes or 2 for No. If you choose Yes, you will quit the
menu. If you choose No, you go back to the main menu.
☺ If you press CLEAR while entering the time, the time entered will be deleted.
SAFEGUARD / TOTALGUARD
17
BASIC OPTIONS
5.2 Storing phone numbers
The Marmitek SC9000 console is equipped with a telephone dialler. In the case of an alarm up to 6 telephone numbers can be
dialled. All persons called will be able to listen to the message you have recorded (5.3). The message needs to be confirmed by
the person answering the phone by pressing a 0 on their phone. The telephone dialler then knows the next number does not
need to be called.
You are not allowed to use emergency numbers, i.e. the police, unless you have been granted special permission.
First make a list with the phone numbers you want to enter, in the order they need to be dialled. If you have connected the
console via an ISDN phone system, you may need to add a 0 in front of the telephone number to get an external line.
1. To access the menu, press the menu or menu button. The display will now read ‘ENTER PIN’.
2. Enter your 4-digit PIN code (factory setting 0000. See 8.3 for changing the PIN code). For every digit entered, a * will appear
on the display.
3. When the PIN code has been entered correctly, the word ‘INSTALL’ will show up on the display.
4. Use the menu buttons / to go to menu item 3. PHONE NUMS. Press OK to select this menu item. You can also go to this
menu item directly by pressing a 3 on the number pad.
5. Use the menu buttons / to go to the memory space where you want to enter a telephone number (PHONE 1, PHONE 2 …
PHONE 6).
6. Press OK when you have arrived at the memory space. After pressing OK at PHONE 1, the display will read SET PH 1.
7. Enter the telephone number. Press the OFF button for a dial pause (use a dial pause between the extra 0 and the telephone
number when the console is connected to an ISDN phone system. A small letter ‘P’ can now be seen on the display).
8. Press OK. You will now automatically go to the next memory space.
9. Press CLEAR again to quit the menu. To confirm your choice, press 1 for Yes or 2 for No. If you choose Yes, you will quit the
menu. If you choose No, you go back to the main menu.
☺ If you press CLEAR while entering a telephone number, the number entered will be deleted.
☺ If you program less than 6 numbers, the console will try to contact you at these numbers several times in case of an alarm.
As soon as the call is confirmed, the console will stop dialling out.
5.3 Recording your own message
You can record your own message that will be used by the telephone dialler. The message can be up to 12 seconds long. Make
sure the message is not too short, because this will cause a long silence when the message is played.
☺ Example: This is the security system of ...... Press 0 after this message to hear what is going on in my house.
Please take the steps that we agreed.
1. To access the menu, press the menu or menu button. The display will now read ‘ENTER PIN’.
2. Enter your 4-digit PIN code (factory setting 0000. See 8.3 for changing the PIN code). For every digit entered, a * will appear
on the display.
3. When the PIN code has been entered correctly, the word ‘INSTALL’ will show up on the display.
4. Use the menu buttons / to go to menu item 4. MESSAGE. Press OK to select this menu item. You can also go to this menu
item directly by pressing a 4 on the number pad.
5. Press 1 for RECORD.
6. The display will now read ‘PLEASE WAIT’.
7. When the display reads ‘SPEAK NOW’ you can record your message (max. 12 seconds). The distance to the microphone should
be no more than 30 cm.
8. After recording, wait until the RECORD/REPLAY menu comes up again.
18
MARMITEK
BASIC OPTIONS
9. Press 2 (REPLAY) to listen to the message you have just recorded.
10.Press CLEAR again to quit the menu. To confirm your choice, press 1 for Yes or 2 for No. If you choose Yes, you will quit the
menu. If you choose No, you go back to the main menu.
6. Using the security system
6.1 Setting the alarm
The system has two different alarm functions:
ARM AWAY: Full alarm. All sensors are activated.
ARM HOME: Partial alarm. All door/window sensors are activated, but the motion detectors are not armed. This
means you can walk around in your home, while the ‘shell’ of the house is protected.
Switching on the ARM AWAY function
ARMED AWAY
Via the console
Press the ARM AWAY button on the console. The system will be activated after a short delay
(delay can be set, see exit delay 8.1). During the delay you will hear a couple of tones at the same pitch.
☺ After switching the system to ARMED AWAY mode, the entry delay will be used for DS90 Door/Window Sensors (DS90 switch
set to MAX) when you enter the house. This means you have enough time to switch off the system via the console without
triggering the alarm. The delay times can be changed, see 8.1.
Via the Key Chain Remote Control KR21
Press the ARM button. The alarm is switched on instantly.
Please note: Make sure the front door is closed when you switch on the device.
Via the Comfort Remote Control SH624
Set the switch to SEC. Press the ARM AWAY button. The alarm is switched on instantly.
SAFEGUARD / TOTALGUARD
19
BASIC OPTIONS
Switching on the ARM HOME function
ARMED HOME
Via the console
Press the ARM HOME button on the console. The alarm is switched on instantly.
Via the Key Chain Remote Control KR21
You cannot switch on the ARM HOME function with your remote control.
Via the Comfort Remote Control SH624
Set the switch to SEC. Press the ARM HOME button. The alarm is switched on instantly.
6.2 Panic alarm
The panic alarm can be switched on in case of an emergency, independent of whether the security system is switched on or off.
☺ The telephone message indicates the emergency sensor is triggered and that it is not the burglar alarm. This is done by adding
an extra message to your own spoken telephone message. This standard message (4 languages: English, German, French,
Dutch) is pre-programmed into your system.
You can activate the panic alarm in two ways:
1. Activate the alarm via the KR21 Key Chain Remote Control
Keep the bottom two buttons of the remote control pressed. The panic alarm is instantly triggered.
Depending on the console settings the siren will be triggered or not (see 9.1).
20
MARMITEK
BASIC OPTIONS
2. Activate the alarm via the SH624 Comfort Remote Control
Press the red PANIC button. The panic alarm is instantly triggered. Depending on the console settings the
siren will be triggered or not (see 9.1).
6.3 What happens when the alarm goes off?
1. Siren
The built-in siren will be triggered. You can choose to turn the siren off (silent alarm, see 9.1). If the console is working on the
emergency batteries, the siren will not be used, to save battery power.
2. The telephone dialler
After the last digit of the first telephone number has been dialled, the spoken message will be played back and repeated
several times. If the call is answered by pressing 0, the console will stop calling. If the call is not answered, the second up to the
sixth number are dialled until one of these calls is confirmed by pressing 0. The person who receives the phone call can listen to
what is going on in the building for one minute. The siren is switched off while you are listening.
The console will remain on alert. If the alarm goes off again later, the telephone dialler will be activated again.
6.4 Disarming the system
Press DISARM on your remote control. The display will indicate the zone that is causing the alarm. To remove this message, press
ARM and then DISARM.
You can also switch off the system by entering your PIN code on the number pad of the console. After entering your PIN code the
display will read ‘DISARMED’.
6.5 Error messages
If a zone number is slowly flashing on the display, this means the system has noticed an error with that sensor. Possible causes are
empty batteries (see chapter 12), range problems (1.2) or the sensor has been tampered with (opened up).
The status of all sensors is checked after the security system is switched on. If a problem is found, you will hear the two-tone
‘problem signal’. If a sensor (e.g. zone 9) indicates there is a problem, a message is shown on the display.
An open window or door:
OPEN ZONE 9
A tamper message:
TAMPER ZONE 9
Empty batteries or range problems: PROBLEM ZONE 9
You need to solve the tamper problem before switching on the system (e.g. by closing the top compartment on the console).
☺ Both the console and the DS90 and MS90 are equipped with a tamper contact. If anyone tries to open the console or sensor while
the alarm is activated, the alarm will be triggered. If the alarm is NOT activated, you will see an error message on the console display.
In all other cases you can choose not to activate the sensor concerned (bypass). You need to press CLEAR while the error message
is shown and then activate the alarm again. The zone indicator of the sensor concerned will now flash quickly.
If there are more sensors causing problems, the information on the next sensor will be displayed.
The bypass is valid until you switch off the alarm (Disarm).
SAFEGUARD / TOTALGUARD
21
BASIC OPTIONS
7. Prevention and comfort - ‘Home Automation’
7.1 Introduction
Marmitek Home Automation makes your home more comfortable, saves energy and offers security, both when you are at home
and away. For some people Home Automation means setting the lights with the same remote control they use for the TV; for
others it is a completely computerised system that adjusts to their way of life. Marmitek offers you the choice.
You Marmitek system is equipped with functions to secure your home. The system uses an intelligent process to control the
lighting in your house, so that it appears as if you are at home.
The Marmitek X-10 technology also offers you several so-called comfort functions. You can e.g. wirelessly control lamps
connected to Marmitek Lamp/Dimmer Modules with your remote control or via the number pad on your console.
Every lamp controlled by the system needs to be equipped with a Marmitek X-10 module. The LM12 Lamp/Dimmer Module from
the TotalGuard set is such a module (optional for the SafeGuard, art. no. is country specific, see www.marmitek.com/plug-in).
These modules are easy to install (Plug & Play) and are also available separately, which means you can expand the system as you
wish.
A few of our Marmitek Plug & Play modules:
LM12
AM12
LM15
LM12 Lamp/Dimmer Module Plug-in module to switch and dim lighting.
AM12 Device/Switch Module. Plug-in module to switch lighting and electrical equipment.
LM15 Bayonet Lamp Module Bayonet or Screw-In Module to switch lighting.
More information on these modules can be found on www.marmitek.com/plug-in or you can contact your dealer.
22
MARMITEK
BASIC OPTIONS
7.2 Addressing your modules
An address can be set for every Marmitek X-10 module. This address consists of a HOUSECODE (A-P) and a
UNITCODE (1-16). The HOUSECODE of all your components needs to be set to the same letter code (keep all
the HOUSECODES set to A. See 10.6 for more information.). With the UNITCODE you can give every module
its own number, so that they can be individually controlled (via the number pad on your console or with the
SH624 Comfort Remote Control).
7.3 Installing the LM12 Lamp/Dimmer Module (standard for TotalGuard,
optional for SafeGuard)
1. HOUSECODE SWITCH
To set up the system address. Leave the switch set to A.
2. UNITCODE SWITCH
To set up the module number. Leave the switch set to 1.
1
2
3
4
3. WALL SOCKET
To connect the lamps you want to switch using the module.
4. FUSE
The fuse protects the lamp/dimmer module against a power overload. If the fuse blows,
it can only be replaced by another fuse of the same type.
INSTALLATION LM12:
Plug the lamp/dimmer module into a free wall socket and plug your lamp (40-300W) into the module.
To avoid damage, do not plug in any other loads - such as household equipment or TL/PL lights into the module. Please use an AM12 Device/Switch module or a LM15 Bayonet Lamp Module for these types of loads.
7.4 Alarm functions of the Lamp/Dimmer Modules
When switching on the system via the console, the lamps on A1 and A2 will be switched on during the exit delay. As soon as the
system is activated, the lamp will be switched off.
When switching on the alarm via your remote control, the lamps will be switched on and off quickly to indicate the system is
activated (comparable to the alarm system on your car).
In the case of an alarm the lights connected to lamp/dimmer modules with addresses A1 and A2 will flash. After 4 minutes the
lights will remain on.
7.5 Comfort functions of the KR21 Key Chain Remote Control
☺ Switch and dim lights remotely. Switch the garden lamps on from your bedroom when you hear
suspicious noises.
Press the ‘LIGHTS ON’ button. The lamps on addresses A1 and A2 will be switched on.
Press the ‘LIGHTS OFF’ button. The lamps on addresses A1 and A2 will be switched off.
SAFEGUARD / TOTALGUARD
23
BASIC OPTIONS
7.6 Comfort functions of the SH624 Comfort Remote Control
☺ Switch and dim lights remotely. Switch the garden lamps on from your bedroom
when you hear suspicious noises.
2
2
Switch (4) SEC setting:
The bottom five buttons (1) are used to switch the Marmitek X-10 modules with
corresponding addresses (UnitCodes 1-5).
1
Use the green button (3) to dim lamps connected to a lamp/dimmer module.
ALL LIGHTS ON (2):
ALL LIGHTS OFF (2):
To switch on all lamp/dimmer modules with one press of
a button.
To switch off all the modules (both lamp and device modules)
with one press of a button.
3
5
4
SWITCH (4) IN SETTING 1:
1 ..... 8: To switch Marmitek X-10 Home Automation modules with corresponding
addresses (UnitCodes 1-8).
SWITCH (4) IN SETTING 2:
9 .....16: To switch Marmitek X-10 Home Automation modules with corresponding addresses (UnitCodes 9-16).
Leave the HouseCode switch (5) set to A for now (see 10.6 for more information).
7.7 Comfort functions of the security console
You can also control the modules using the console. If you do not see a menu, the console is in HOME CONTROL mode. The
display will read HOME CONTROL. To control a module with UnitCode 1, press 1 followed by ON or OFF.
If you want to control module 12, press 1, then 2, followed by ON or OFF.
7.8 Setting the timer
You can turn on the lighting at pre-programmed times, so that it appears as if you are at home.
1. To access the menu, press the menu or menu button. The display will now read ‘ENTER PIN’.
2. Enter your 4-digit PIN code (factory setting 0000. See 8.3 for changing the PIN code). For every digit entered, a * will appear
on the display.
3. When the PIN code has been entered correctly, the word ‘INSTALL’ will show up on the display.
4. Use the menu buttons / to go to menu item 9. SET TIMER. Press OK to select this menu item. You can also go to this menu
item directly by pressing a 9 on the number pad.
5. The display will read ‘NEW TIMER’. Press OK.
☺ Use the menu buttons / to check timers you previously set. The top menu item is always called NEW TIMER,
unless all 12 timers have been set.
6. The display will read UNIT NUMBER. Use the number pad to enter the UNITCODE of the desired module (1-16). Example: If you
enter 12, the display will read TIMER 12 ON. The lowest line will read " : ".
7. Enter the time you want to lights to be switched on (24 hour notation). If you make a mistake, press CLEAR. Press ON when
you only want to enter the time the lights need to be switched on.
8. Press OK. The display now reads TIMER 12 OFF. The lowest line will read " : ".
24
MARMITEK
BASIC OPTIONS
9. Enter the time you want to lights to be switched off (24 hour notation). If you make a mistake, press CLEAR. Press OK when
you do not want to enter a switch-off time.
10.The bottom line on the display now reads 1. DAILY.
11. Use the menu buttons / to select:
1. DAILY:
2. ONCE ONLY:
3. RANDOM:
The timer setting is executed daily.
The timer setting is only used today.
The timer setting is executed daily, but varies within the hour
entered (if you entered 20:30, the time may vary between 20:00 and 20:59).
4. ARMED ONLY: The timer setting is only executed when the system is in ARMED AWAY mode.
12.Make your choice and press OK. The display now reads ‘NEW TIMER’.
13.Press CLEAR again to quit the menu. To confirm your choice, press 1 for Yes or 2 for No. If you choose Yes, you will quit the
menu. If you choose No, you go back to the main menu.
7.9 Clearing the timer settings
1. To access the menu, press the menu or menu button. The display will now read ‘ENTER PIN’.
2. Enter your 4-digit PIN code (factory setting 0000. See 8.3 for changing the PIN code). For every digit entered, a * will appear
on the display.
3. When the PIN code has been entered correctly, the word ‘INSTALL’ will show up on the display.
4. Use the menu buttons / to go to menu item 9. SET TIMER. Press OK to select this menu item. You can also go to this menu
item directly by pressing a 9 on the number pad.
5. The display will read ‘NEW TIMER’.
6. Use the menu buttons / to check timers you set before. The timers are shown in the following format:
12 ON 12:40
OFF 18:30
7. When a timer is shown, you can press CLEAR to delete the timer.
8. You need to confirm your choice (CLEAR TIMER). Press1 for Yes and 2 for No.
9. Press CLEAR again to quit the menu.
SAFEGUARD / TOTALGUARD
25
EXTRA OPTIONS
8. Advanced system functions
8.1 Setting the delays
You can set a number of delay times via the menu DELAYS:
ENTRY DELAY
EXIT DELAY
ANSWER DELAY
DIAL DELAY
The time you get to switch off the system after entering your house (factory setting 30 seconds).
The time you get before the system is switched on when you leave your house (factory setting 60 seconds).
Delay before the system picks up the phone when dialling in (11.2, factory setting 5 seconds).
Delay before the system calls out in case of an alarm (factory setting 30 seconds).
Setting the delays:
1. To access the menu, press the menu or menu button. The display will now read ‘ENTER PIN’.
2. Enter your 4-digit PIN code (factory setting 0000. See 8.3 for changing the PIN code). For every digit entered, a * will appear
on the display.
3. When the PIN code has been entered correctly, the word ‘INSTALL’ will show up on the display.
4. Use the menu buttons / to go to menu item 8. DELAYS. Press OK to select this menu item. You can also go to this menu
item directly by pressing an 8 on the number pad.
5. Select ENTRY DELAY, EXIT DELAY, ANSWER DELAY or DIAL DELAY and press OK.
6. Enter the time required (1-99 seconds). Press OK. Press CLEAR to delete the values entered.
7. Press CLEAR again to quit the menu.
☺ The entry delay only works for the DS90 Door/Window Sensor if set to MAX. MS90 motion detectors will respond instantly.
8.2 Clearing the memory of your security system
You can delete sensors, remote controls, timers or all settings via the menu MEMORY CLEAR.
☺ The PIN code is never erased. This code can only be reset by a Marmitek Authorised Service Center.
1. To access the menu, press the menu or menu button. The display will now read ‘ENTER PIN’.
2. Enter your 4-digit PIN code (factory setting 0000. See 8.3 for changing the PIN code). For every digit entered, a * will appear
on the display.
3. When the PIN code has been entered correctly, the word ‘INSTALL’ will show up on the display.
4. Use the menu buttons / to go to menu item 6. MEMORY CLEAR. Press OK to select this menu item. You can also go to this
menu item directly by pressing a 6 on the number pad.
5. Select CLEAR ALL SENSORS, CLEAR ALL REMOTES, CLEAR ALL TIMERS or MASTER RESET.
6. You are now asked to CONFIRM CLR. Press 1 for Yes or 2 for No.
7. Press CLEAR again to quit the menu.
CLEAR ALL SENSORS
CLEAR ALL REMOTES
CLEAR ALL TIMERS
MASTER RESET
26
emove a registered sensor.
Remove a registered remote control or SD10 smoke detector.
Remove all timer settings at once.
Clear the memory
MARMITEK
EXTRA OPTIONS
8.3 Changing the access code (PIN)
The access code is your personal secret code. After changing this code, you are the only one who has access to the settings on
the console. You also use this code to disarm the alarm via the number pad. Make sure you memorise the code, because only a
Marmitek Authorised Service Center can help you reset the code to the factory setting (0000). The Service Center will charge you
for resetting the console.
To access the menu, press the menu or menu button. The display will now read ‘ENTER PIN’.
Enter your 4-digit PIN code (factory setting 0000). For every digit entered, a * will appear on the display.
When the PIN code has been entered correctly, the word ‘INSTALL’ will show up on the display.
Use the menu buttons / to go to menu item 5. NEW PIN. Press OK to select this menu item. You can also go to this menu
item directly by pressing a 5 on the number pad.
5. Enter your new PIN code (4 digits). The new PIN can be seen on the display. Check if you entered the correct PIN code and
press OK.
6. Press CLEAR again to quit the menu. To confirm your choice, press 1 for Yes or 2 for No. If you choose Yes, you will quit the
menu. If you choose No, you go back to the main menu.
1.
2.
3.
4.
9. Advanced security functions
9.1 Disarming the siren for silent alarm
You can set the security system to raise the alarm without sounding the siren (just the telephone dialler and lighting). In case of a
burglary, the built-in siren will not be activated (N.B., other sirens installed will still work). The siren is turned on in the factory
settings.
1. To access the menu, press the menu or menu button. The display will now read ‘ENTER PIN’.
2. Enter your 4-digit PIN code (factory setting 0000. See 8.3 for changing the PIN code). For every digit entered, a * will appear
on the display.
3. When the PIN code has been entered correctly, the word ‘INSTALL’ will show up on the display.
4. Use the menu buttons / to go to menu item 7. OPTIONS. Press OK to select this menu item. You can also go to this menu
item directly by pressing a 7 on the number pad.
5. Use the menu buttons / to go to menu item SIREN. Press OK to select this menu item.
6. Choose 1 for SIREN ON or 2 for SIREN OFF.
7. Press CLEAR again to quit the menu. To confirm your choice, press 1 for Yes or 2 for No. If you choose Yes, you will quit the
menu. If you choose No, you go back to the main menu.
9.2 Activating the chime
The console can, when switched off, sound a chime – ding-dong – when a door armed with a door/window sensor is opened.
This ensures that you will always hear if someone is entering your house or small children open a door. This function is activated
in the factory settings.
1. To access the menu, press the menu or menu button. The display will now read ‘ENTER PIN’.
2. Enter your 4-digit PIN code (factory setting 0000. See 8.3 for changing the PIN code). For every digit entered, a * will appear
on the display.
3. When the PIN code has been entered correctly, the word ‘INSTALL’ will show up on the display.
4. Use the menu buttons / to go to menu item 7. OPTIONS. Press OK to select this menu item. You can also go to this menu
item directly by pressing a 7 on the number pad.
5. Use the menu buttons / to go to menu item CHIME. Press OK to select this menu item.
SAFEGUARD / TOTALGUARD
27
EXTRA OPTIONS
6. Choose 1 for CHIME ON or 2 for CHIME OFF.
7. Press CLEAR again to quit the menu. To confirm your choice, press 1 for Yes or 2 for No. If you choose Yes, you will quit the
menu. If you choose No, you go back to the main menu.
8. If you see a note () on the display, the chime is activated.
☺ The chime function also works for the wired inputs on zones 31 and 32.
☺ The chime function of the wired inputs on zones 31 and 32 always works and cannot be switched off.
If you want to deactivate the chime, use the wired input of the door/window sensor.
9.3 Using wired inputs
The SC9000 console has two inputs for wired sensors. These sensors need to be of type NC (normally closed contacts).
There should not be any power on these inputs (potential-free).
Connecting a wired sensor:
1.
2.
3.
4.
5.
Open the top compartment on your console.
You will see two wired inputs.
Remove the wire bridge and connect your wired sensor.
Close the top compartment of your console and enter your PIN code to
remove the word TAMPER from the display.
The wired sensor is now ready for use.
☺ The two screws on the left are for zone 32, the two on the right for zone 31.
9.4 Adding a wired sensor to the Door/Window Sensor DS90
The DS90 Door/Window Sensor has a contact for an extra wired sensor.
These sensors need to be of type NC (normally closed contacts).
There should not be any power on this contact (potential-free).
1
A few examples:
• Securing a window with multiple magnetic contacts.
• Adding extra sensors to your Marmitek system, e.g. smoke detectors,
temperature sensors, sensors to detect electrical failures, etc.
1. Open the transmitter part of the DS90 by removing the screw.
2. Remove the wire bridge from the connection for the wired sensor (2).
3. Connect your sensor.
The wired contact has its own zone on the console. You can register the contact
using the procedure in 4.1.3 (to register a sensor, activate the alarm with your
sensor in step 5).
☺ The setting of the MIN/MAX switch (entry delay) of the DS90 is valid for both
the magnetic contact and the wired sensor.
28
2
MARMITEK
EXTRA OPTIONS
9.5 Emergency sensors (always mode)
Your system also gives you the option to turn any sensor registered with the system into a so-called emergency sensor. An emergency
sensor will also activate the security system when the system is not switched on. When an emergency sensor triggers an alarm, you
will hear ‘Alarm cause by emergency sensor’ before the spoken message you recorded.
A few examples:
• A panic button connected to the wired input on the console.
• A door or window that should not be opened at any time.
• A temperature or level sensor that warns you when a certain value or level is exceeded.
Transforming a sensor:
1. To access the menu, press the menu or menu button. The display will now read ‘ENTER PIN’.
2. Enter your 4-digit PIN code (factory setting 0000. See 8.3 for changing the PIN code). For every digit entered, a * will appear on
the display.
3. When the PIN code has been entered correctly, the word ‘INSTALL’ will show up on the display.
4. Use the menu buttons / to go to menu item 7. OPTIONS. Press OK to select this menu item. You can also go to this menu
item directly by pressing a 7 on the number pad.
5. Use the menu buttons / to go to menu item SENSOR MODE. Press OK to select this menu item.
6. The display now reads SET ALWAYS SENSORS. You can see on your display (top and bottom) which zones and sensors have been
registered.
1 2 3 4 5 6 7 8 9 10 11 12 13 14 15 16
SET ALWAYS
SENSORS
17 18 19 20 21 22 23 24 25 26 27 28 29 30 31 32
7. If you want to turn zone 31 into an emergency sensor, enter 31 on the number pad and press OK. Zone number 31 will start
flashing.
8. If you also want to turn zone 5 into an emergency sensor, enter 5 on the number pad and press OK. Zone number 5 will start
flashing.
9. If you want to turn zone 31 into a normal sensor again, enter 31 on the number pad and press OK. Zone 31 will stop flashing.
10.Press CLEAR again to quit the menu.
☺ Make sure the DS90 Door/Window Sensor is set to MIN if you want the message to be passed on without a delay (see 8.1).
9.6 Deregistering a Door/Window Sensor
1. To access the menu, press the menu or menu button. The display will now read ‘ENTER PIN’.
2. Enter your 4-digit PIN code (factory setting 0000. See 8.3 for changing the PIN code). For every digit entered, a * will appear
on the display.
3. When the PIN code has been entered correctly, the word ‘INSTALL’ will show up on the display.
4. Press OK.
5. Enter the number of the zone you want to erase on the number pad and press CLEAR.
6. You are asked to confirm CLEAR ZONE 1. YES 2. NO.
7. Press 1 to erase the zone. The zone number is shown on the display.
8. Press CLEAR again to quit the menu.
☺ Zones 31 and 32 cannot be erased.
SAFEGUARD / TOTALGUARD
29
EXTRA OPTIONS
9.7 Deregistering a Motion Detector
1. To access the menu, press the menu or menu button. The display will now read ‘ENTER PIN’.
2. Enter your 4-digit PIN code (factory setting 0000. See 8.3 for changing the PIN code). For every digit entered, a * will appear
on the display.
3. When the PIN code has been entered correctly, the word ‘INSTALL’ will show up on the display.
4. Press OK.
5. Enter the number of the zone you want to erase on the number pad and press CLEAR.
6. You are asked to confirm CLEAR ZONE 1. YES 2. NO.
7. Press 1 to erase the zone. The zone number is shown on the display.
8. Press CLEAR again to quit the menu.
☺ Zones 31 and 32 cannot be erased.
10.Advanced Home Automation functions
In chapter 7 you learnt how to use the Marmitek X-10 Home Automation options of your security system. But there is a lot more.
Marmitek not only has the Plug & Play modules described, but a large number of built-in switches, sun blind switches, remote
controls and special modules which can be used in combination with your security system. With these modules you can control
nearly everything that is electrically powered in your home via your security system. See www.marmitek.com (Product group Home
Automation) for more information.
Your system has a few extra standard functions that use the Marmitek X-10 system:
10.1 Checking the status of the security system
Set a Marmitek X-10 module to address B1. This Home Automation module is now automatically switched on as soon as the
security system is activated. When the system is disarmed, the module is also switched off. Example: You can connect a table lamp
to this X-10 module. If the system is activated, this lamp is always turned on. This means you can instantly see if the system is
activated when you are outside.
10.2 Installing an extra siren (Marmitek PH7208, art. no. 08929)
Set the siren PH7208 to address A1. To avoid false alarms, the system waits 20 seconds after triggering the alarm before the siren
is activated. The siren will give a piercing two-tone signal for 4 minutes. After these 4 minutes the siren is automatically switched
off (or sooner if the alarm is switched off).
ATTENTION: When using a Marmitek security system, the extra sirens will always work in case of an alarm, even when the system
is set to silent alarm! The Siren PH7208 is meant for indoor use and can be plugged into any wall socket.
30
MARMITEK
EXTRA OPTIONS
10.3 Using an external universal siren
You can also add sirens and warning lights that are not part of the Marmitek range. Please use a separately available Marmitek
AD10 (art. no. 08933), AW12 (09463) or the AM12 (art. no. country specific, see www.marmitek.com/plug-in).
Set this module to address B2. The module is switched on in case of an alarm and switched off after 4 minutes.
10.4 Transceiver function
The Marmitek X-10 range contains several wireless remote controls that you can use to control your Marmitek X-10 modules
(such as a universal remote control for your TV, audio equipment and Marmitek X-10). These remote controls use the RF system,
which means the remote control signal goes through walls and ceilings. See www.marmitek.com/x10wireless for more
information. Your console will convert these remote control RF signals to X-10 signals and transmit them via the mains. You can
then control the Marmitek X-10 modules using these transmitters.
10.5 All Home Automation functions at a glance
Name
Description
Module set to address
Comfort lighting
You can switch your lighting using the buttons Lights ON and
Lights OFF on your key chain remote control.
A1 and A2
Exit delay
Lights are switched on during the exit delay.
A1 and A2
Alarm lighting
In the case of an alarm, the lights will flash during 4 minutes and
then remain on.
A1 and A2
Status indicator
The lights are switched on when the system is set to ARM AWAY.
B1
External Siren PH7208
Extra 110dB siren.
Extra universal siren
Connect your own siren to a Marmitek AM12 or AD10 module.
A1 or A2
B2
This table uses the unchanged settings for the basic console address.
10.6 Basic address for Home Automations functions
The basic address is set to control multiple Home Automation modules on the SC9000. The standard basic address is A1. The A in
this address is called the HouseCode. The HouseCode of the console, the remote controls and the Home Automation modules all
have to have the same letter. The 1 in the basic address is called the UnitCode. If your neighbours also have a Marmitek security
system, it may be necessary to change the basic addresses and the addresses of your Marmitek X-10 modules.
If you change the HouseCode of the console, the addresses for the Home Automation functions also change. Example: You
change the HouseCode from A into C.
SAFEGUARD / TOTALGUARD
31
EXTRA OPTIONS
Name
Description
Module set to address
Comfort lighting
Reacts to the Lights ON and Lights OFF button on your key chain
remote control.
C1 and C2
Exit delay
Lights are switched on during the exit delay.
C1 and C2
Alarm lighting
In the case of an alarm, the lights will flash during 4 minutes and
then remain on.
C1 and C2
Status indicator
The lights are switched on when the system is set to ARM AWAY.
D1
External Siren PH7208
Extra 110dB siren.
Extra universal siren
Connect your own siren to a Marmitek AM12 or AD10 module.
C1 or C2
D2
To change the HouseCode:
1. To access the menu, press the menu or menu button. The display will now read ‘ENTER PIN’.
2. Enter your 4-digit PIN code (factory setting 0000. See 8.3 for changing the PIN code). For every digit entered, a * will appear
on the display.
3. When the PIN code has been entered correctly, the word ‘INSTALL’ will show up on the display.
4. Use the menu buttons / to go to menu item 7. OPTIONS. Press OK to select this menu item. You can also go to this menu
item directly by pressing a 7 on the number pad.
5. Use the menu buttons / to go to menu item HOUSECODE. Press OK to select this menu item.
6. Use the menu buttons / to select the desired HouseCode and press OK.
7. Press CLEAR again to quit the menu.
Did you already have several Marmitek X-10 modules installed before installing the security system? Then you may need to change
the basic UnitCode for the system. This means you do not need to change the addresses of the existing system.
If you change the UnitCode of the console, the addresses for the Home Automation functions also change. Example: You change
the UnitCode from 1 into 5:
Name
Description
Comfort lighting
Reacts to the Lights ON and Lights OFF button on your key chain
remote control.
A5 and A6
Exit delay
Lights are switched on during the exit delay.
A5 and A6
Alarm lighting
In the case of an alarm, the lights will flash during 4 minutes
and then remain on.
A5 and A6
Status indicator
The lights are switched on when the system is set to ARM AWAY.
External Siren PH7208
Extra 110dB siren.
Extra universal siren
Connect your own siren to a Marmitek AM12 or AD10 module.
32
Module set to address
B5
A5 or A6
B6
MARMITEK
EXTRA OPTIONS
☺ If you set the UnitCode for the console to e.g. A16, the comfort lighting will get addresses A16 and A1.
To change the UnitCode:
1. To access the menu, press the menu or menu button. The display will now read ‘ENTER PIN’.
2. Enter your 4-digit PIN code (factory setting 0000. See 8.3 for changing the PIN code). For every digit entered, a * will appear
on the display.
3. When the PIN code has been entered correctly, the word ‘INSTALL’ will show up on the display.
4. Use the menu buttons / to go to menu item 7. OPTIONS. Press OK to select this menu item. You can also go to this menu
item directly by pressing a 7 on the number pad.
5. Use the menu buttons / to go to menu item UNITCODE. Press OK to select this menu item.
6. Use the menu buttons / to select the desired UnitCode and press OK.
7. Press CLEAR again to quit the menu.
11. Telephone functions
11.1 Calling the security system
The SC9000 alarm system is equipped with a call-in function. This means that you can ring your console remotely via any
telephone or mobile phone. You can also control your lights and devices via your phone. The system has a built-in speech chip
that guides you through the menus.
11.2 Activating the call-in function
The call-in function is switched off in the factory settings. You can switch the function on via the menu OPTIONS/ANSWER TYPE.
You can choose one of the following three options:
ANSWER ON:
Call-in activated. The time delay before the console answers the phone can be set in the menu DELAYS/ANSWER DELAY (see 8.1).
The standard delay is 30 seconds. If you use an answer phone or voice mail, we advise you to use option 3: VOICE MAIL.
ANSWER OFF:
the call-in function is deactivated (standard setting).
VOICE MAIL:
Call-in activated. Choose this option when you use the standard voicemail system offered by your telecom supplier. To access the
console, ring your home number twice. Let the phone ring for 10 seconds the first time. Hang up the phone and ring the number
again after 10 seconds, but within 30 seconds. The console will answer the phone.
Setting the call-in function:
1. To access the menu, press the menu or menu button. The display will now read ‘ENTER PIN’.
2. Enter your 4-digit PIN code (factory setting 0000. See 8.3 for changing the PIN code). For every digit entered, a * will appear
on the display.
3. When the PIN code has been entered correctly, the word ‘INSTALL’ will show up on the display.
4. Use the menu buttons / to go to menu item 7. OPTIONS. Press OK to select this menu item. You can also go to this menu
item directly by pressing a 7 on the number pad.
5. Use the menu buttons / to go to menu item ANSWER TYPE. Press OK to select this menu item.
6. You can now select ANSWER ON, ANSWER OFF or VOICE MAIL.
7. Use the menu buttons / to go to the desired menu item and press OK.
8. Press CLEAR again to quit the menu.
SAFEGUARD / TOTALGUARD
33
EXTRA OPTIONS
11.3 Operating the alarm functions via an outside phone
1.
2.
3.
4.
5.
Call your home number. The console will answer.
You will hear ‘Please enter PIN’. Enter your PIN code.
If your PIN is correct, you will hear ‘PIN accepted’. If your PIN is incorrect, you will hear ‘Error’.
Press 0 followed by * to activate your security system.
Press 0 followed by # to deactivate your security system.
When you press 9 9 followed by *, the console will do a status check:
The status can be:
ARMED HOME:
ARMED AWAY:
DISARMED:
EMERGENCY ALARM:
ALARM IN ZONE 3:
The system is set to ARM HOME mode.
The system is set to ARM AWAY mode.
The system is switched off.
The alarm has been triggered by a PANIC BUTTON on a remote control or a Marmitek SD10
Smoke Detector.
(example with zone 3). The alarm has been triggered by the sensor in zone 3
(wireless sensor or emergency sensor).
11.4 Operate lights and equipment via an outside phone
1.
2.
3.
4.
5.
Call your home number. The console will answer.
You will hear ‘Please enter PIN’. Enter your PIN code.
If your PIN is correct, you will hear ‘PIN accepted’. If your PIN is incorrect, you will hear ‘Error’.
Press 4 *: The Marmitek X-10 module with UnitCode 4 will be switched on. You will hear ‘4 ON’ to confirm.
Press 4 #: The Marmitek X-10 module with UnitCode 4 will be switched off. You will hear ‘4 OFF’ to confirm.
12. Changing the batteries
When used normally the batteries in sensors and remote controls last about a year. The life span of batteries does depend on how
often a sensor is activated.
Preferably use alkaline batteries, but never rechargeable batteries (rechargeable batteries are not strong enough and will go flat
within a few months, even when they are seldom used).
Console – 4xAA batteries
The emergency batteries in the console ensure that even during a power cut the entire system stays operational for another 12
hours (if there is no alarm).
• If there is an alarm during a power cut, the console will not activate the siren to save battery power. The telephone dialler
works normally.
• If there is a power cut and the emergency batteries are flat, all settings are stored, because these are programmed into a nonvolatile memory (EEPROM). The clock will need to be reset.
• When you decide to turn off the security system for a longer period (e.g. renovation work), remove the batteries from the
console to avoid them going flat.
• If the emergency batteries are empty or not installed, the BATTERY indicator on the console will flash.
• If you open up the battery compartment to change the batteries, the word ‘TAMPER’ will be visible on the display. After
inserting the batteries and closing the compartment, enter your PIN code (factory settings 0000, see 8.3) to remove the word
‘TAMPER’.
34
MARMITEK
EXTRA OPTIONS
Key Chain Remote Control KR21 – 2x CR2016 batteries
De KR21 wordt geleverd met volle batterijen. Wanneer de indicator op de KR21 zwak gaat branden, dienen de batterijen
vervangen te worden.
• A new KR21 contains fully charged batteries. If the indicator light on the KR21 is not very bright, the batteries should be
replaced.
• Open the remote control (back) with your nails or a small screwdriver. Use CR2016, 3V lithium batteries (2x).
• To retain the unique code for your remote control, the batteries need to be replaced within 30 seconds.
• If after replacing the batteries the console does not respond to your remote control, press the ARM button on your remote
control for 4 seconds to reactivate the remote. Then release the button. You now need to reregister the remote control, using
the procedure described in 3.1.2.
☺ When pressing the ARM button the LED should flash quickly a few times. When the LED lights up and stays lit, you need to
reactivate the KR21.
☺ To avoid losing a memory space, you can remove the old code for your remote control from the memory (see 8.2).
Comfort Remote Control SH624 – 4x AAA batteries
Wanneer de indicator op de SH624 zwak gaat branden, dienen de batterijen vervangen te worden.
• If the indicator light on the SH624 is not very bright, the batteries should be replaced.
• First set the switch on the front of the remote control to SEC. Now open the battery compartment on the back of the remote
control and replace the batteries within 30 seconds.
• If the console does not respond to your remote control after replacing the batteries, press the PANIC button on your remote
control. You now need to reregister the remote control, using the procedure described in 3.1.2.
☺ To avoid losing a memory space, you can remove the old code for your remote control from the memory (see 8.2).
Door/Window Sensor DS90 – 2x AAA batteries
The console checks the battery status of the DS90 sensor. If the batteries are too weak, the console will indicate a ‘PROBLEM’ and
the zone number will flash.
• Normally the unique code of the sensor will remain in the memory (if you replace the batteries within 30 seconds). After
replacing the batteries you can check whether the sensor still has its unique code. You do this by opening the door or window.
If the sensor has remembered its code, the console display will read ZONE x OPEN (zone number for x). If nothing happens, the
door/window sensor needs to be reregistered (see 4.1.3). Delete zones you do not use anymore (see 9.6) or install the sensor in
the same zone as before.
Motion Detector MS90 – 2x AA batteries
The console checks the battery status of the MS90 sensor. If the batteries are too weak, the console will indicate a ‘PROBLEM’ and
the zone number will flash.
• Normally the unique code of the sensor will remain in the memory (if you replace the batteries within 30 seconds). You can
check this by setting your system to ARMED AWAY. If the sensor has remembered its code, the alarm will go off when you
walk past the sensor. If nothing happens, you need to reregister the motion detector (see 4.2.3). Delete the zone (see 9.7) and
reregister the sensor (see 4.2.3).
SAFEGUARD / TOTALGUARD
35
EXTRA OPTIONS
13. Frequently asked questions
Why does the security system not work?
Check whether you see any text on the console display. If not: check whether the AC adapter is connected to the mains, whether
the electrical wire is plugged into the adapter and whether the plug is connected to the console.
Check whether you can control the system via the console. If so, check whether the remote control works by checking whether
the control indicator on the remote control flashes when you press e.g. the ARM button.
Change the batteries if necessary and reinstall the remote control.
What to do if a zone indicator flashes slowly?
One of the sensors or motion detectors has not contacted the base console for a longer time. Check the batteries in the sensor or
motion detector. Erase the zone and reregister the sensor. Move the sensor so that the signal can reach the console.
If an error is found while setting the alarm, you will hear a repeated two-tone ‘error signal’. If a sensor indicates there is a
problem (e.g. window opened), you can choose not to activate this sensor.
While the two-tone ‘error signal’ can be heard, you need to press the CLEAR button and reset the alarm. The zone indicator of
the sensor concerned flashes quickly.
What to do if a zone indicator flashes quickly?
You have pressed the CLEAR button to activate the security system while a sensor or motion detector indicated an error. Solve the
problem (i.e. close the window, replace the batteries) before activating the zone.
What to do if you hear a repetitive one-tone signal when activating the alarm?
This is normal. When activating the alarm there is an exit delay of one minute to leave your house. You can alter this delay (see
8.1). After one minute the tone will stop and the system will be switched on.
What if you cannot switch the light on or off using the Lights ON or Lights OFF button on the remote control?
Make sure the HouseCode on the console is set to A and the UnitCode to 1 (see 10.6). Set the dials on your lamp/dimmer
module to HouseCode A and UnitCode 1.
Make sure the lamp connected to the lamp/dimmer module is on and the lamp is working. Use a different wall socket. Check
whether the indicator of the remote control flashes when you press the button. If necessary replace the battery/ies.
When using multiple phases in your house, you may need to couple these phases for Marmitek X-10 signals. See
www.marmitek.com/x10signal for more information.
What if you cannot register the SH624 Comfort Remote Control with the console?
Remove the batteries from the remote control. Keep one of the buttons pressed for a few seconds. Set the switch to SEC. Replace
the batteries. Press the PANIC button until the indicator starts flashing. Reregister the remote control with the console.
What to do in case of a false alarm?
Do not mount motion detectors in direct sunlight. Mount motion detectors in such a way they are not aimed at a heater or other
heat source.
Is the MS90 pet-friendly?
No. The MS90 is not specifically pet-friendly. These motion detectors do exist (not wireless). Your security system has an extra
input for wired sensors (see 9.3). You can also connect the sensor to the external contact of the DS90 sensor (9.4).
36
MARMITEK
TABEL SENSORS
Sensor Nr.
1 _________
2 _________
3 _________
4 _________
5 _________
6 _________
7 _________
8 _________
9 _________
10 ________
11 ________
12 ________
13 ________
14 ________
15 ________
16 ________
17 ________
18 ________
19 ________
20 ________
21 ________
22 ________
23 ________
24 ________
25 ________
26 ________
27 ________
28 ________
29 ________
30 ________
31 ________
32 ________
Location
_____________________________________________________________________________
_____________________________________________________________________________
_____________________________________________________________________________
_____________________________________________________________________________
_____________________________________________________________________________
_____________________________________________________________________________
_____________________________________________________________________________
_____________________________________________________________________________
_____________________________________________________________________________
_____________________________________________________________________________
_____________________________________________________________________________
_____________________________________________________________________________
_____________________________________________________________________________
_____________________________________________________________________________
_____________________________________________________________________________
_____________________________________________________________________________
_____________________________________________________________________________
_____________________________________________________________________________
_____________________________________________________________________________
_____________________________________________________________________________
_____________________________________________________________________________
_____________________________________________________________________________
_____________________________________________________________________________
_____________________________________________________________________________
_____________________________________________________________________________
_____________________________________________________________________________
_____________________________________________________________________________
_____________________________________________________________________________
_____________________________________________________________________________
_____________________________________________________________________________
_____________________________________________________________________________
_____________________________________________________________________________
Sensor type
____________________
____________________
____________________
____________________
____________________
____________________
____________________
____________________
____________________
____________________
____________________
____________________
____________________
____________________
____________________
____________________
____________________
____________________
____________________
____________________
____________________
____________________
____________________
____________________
____________________
____________________
____________________
____________________
____________________
____________________
Wired input 1
Wired input 2
TABEL TELEPHONE NUMBERS
Memory position
1 ___________________
2 ___________________
3 ___________________
4 ___________________
5 ___________________
6 ___________________
Telephone number
Name
_____________________________ __________________________________________________________
_____________________________ __________________________________________________________
_____________________________ __________________________________________________________
_____________________________ __________________________________________________________
_____________________________ __________________________________________________________
_____________________________ __________________________________________________________
SAFEGUARD / TOTALGUARD
37
TECHNICAL DATA
SC9000 MAIN UNIT
Supply:
230VAC 50 Hz, 4 x AA back-up
battery - 24-hour stand-by.
Supply current :
< 80 mA capacitive
Signal transmission:
> 5Vpp in 5 Ohm at 120 kHz ± 1 kHz
X-10 transmission:
1 pulse burst at 0˚, 60˚ and 120˚
Sends X-10 Key codes: On, Off.
RF receiver frequency: 433.92 MHz
Certification:
TBR21 approved telephone selector
Integrated siren:
95 dB (A)
Capacity:
Up to and incl.: 30 sensors
(door/ window, motion sensors
and/or broken glass sensors)
2 wired inputs and 16 remote controls.
Memory:
6 telephone numbers, (non-volatile)
each max. 16 digits
Control panel:
For control of 16 zones and/or macros.
Ambient temperature: - 10° C to + 50° C (operation)
- 20° C to + 70° C (storage)
Dimensions:
220x140x40mm
MOTION DETECTOR MS90
Power :
2x AA battery
RF Range:
Up to 100m free field,
up to 30m through walls and ceilings
PIR range:
180º - 6 meter,
in a straight line - 12 meter
Dimensions:
76x100x42mm
Frequency:
433.92 MHz
KR21E KEY CHAIN REMOTE
Power :
2x CR2016 3V Lithium battery
Range:
Up to 100m free field,
up to 30m through walls and ceilings
Dimensions:
38x57x12mm
Frequency:
433.92 MHz
Standard for TotalGuard, optional for SafeGuard:
COMFORT REMOTE CONTROL SH624
Power :
4x AAA battery
Range:
Up to 100m free field,
up to 30m through walls and ceilings
Dimensions:
123x22x70mm
Frequency:
433.92 MHz
LM12 LAMP MODULE
Supply voltage:
230V ±10% 50 Hz
Supply current :
< 20 mA capacitive
Making capacity:
40W to 300W
(normal light bulbs only)
Dimmer Speed:
4.4s from 100% to 0% ±0.2s
Signal sensitivity:
15 mVpp min 50 mVpp max at
120 kHz
Input impedance:
> 55 Ohm (L - N) at 120 kHz
Ambient temperature: -10° C to + 50° C (operation)
-20° C to + 70° C (storage)
Dimensions:
52x122x33mm (without plug)
DOOR/WINDOW SENSOR DS90
Power :
2x AAA battery
Range:
Up to 100m free field,
up to 30m through walls and ceilings
Dimensions:
44x86x20mm
Frequency:
433.92 MHz
38
MARMITEK
DECLARATION OF CONFORMITY
Hereby, Marmitek BV, declares that this SC9000 is in compliance with the essential
requirements and other relevant provisions of the following Directives:
Directive 1999/5/EC of the European Parliament and of the Council of 9 March 1999 on radio equipment and
telecommunications terminal equipment and the mutual recognition of their conformity
Council Directive 89/336/EEC of 3 May 1989 on the approximation of the laws of the Member States relating to
electromagnetic compatibility
Council Directive 73/23/EEC of 19 February 1973 on the harmonization of the laws of Member States relating to
electrical equipment designed for use within certain voltage limits
MARMITEK BV - PO. BOX 4257 - 5604 EG EINDHOVEN - NETHERLANDS
Environmental Information for Customers in the European Union
European Directive 2002/96/EC requires that the equipment bearing this symbol on the product and/or its packaging must not be disposed of with unsorted
municipal waste. The symbol indicates that this product should be disposed of separately from regular household waste streams. It is your responsibility to dispose
of this and other electric and electronic equipment via designated collection facilities appointed by the government or local authorities. Correct disposal and
recycling will help prevent potential negative consequences to the environment and human health. For more detailed information about the disposal of your old
equipment, please contact your local authorities, waste disposal service, or the shop where you purchased the product.
The following copyrights and trademarks are applicable:
Marmitek is a trademark of Marmidenko BV
SafeGuard is a trademark of Marmitek BV
TotalGuard is a trademark of Marmitek BV
All rights reserved.
Copyright and all other proprietary rights in the content (including but not limited to model numbers, software, audio, video, text and photographs) rests with Marmitek B.V.
Any use of the Content, including without limitation, distribution, reproduction, modification, display or transmission without the prior written consent of Marmitek is strictly
prohibited. All copyright and other proprietary notices shall be retained on all reproductions.