1
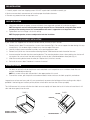
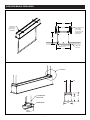
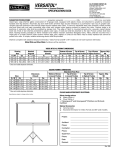
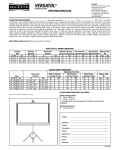
The
POWER In
PRESENTATION PRODUCTS
Instruction Book for
®
ADVANTAGE MANUAL WITH CSR
(Controlled Screen Return)
DA-LITE SCREEN COMPANY, INC.
3100 North Detroit Street
Post Office Box 137
Warsaw, Indiana 46581-0137
Phone: 574-267-8101
800-622-3737
Fax: 574-267-7804
www.da-lite.com
e-mail: [email protected]
PRE-INSTALLATION
1. Carefully unpack case from shipping carton. DO NOT unpack fabric and roller assembly yet.
2. Make sure to recheck measurement of case for proper installation clearance.
3. Remove any protective foam or tape from case.
CASE INSTALLATION
1. Hang case and attach to support structure with bolts. See suggested methods of installation on page 2.
NOTE: Carriage bolts can be installed anywhere along the length of the case. The head of the carriage bolt slides into the
variable-position mounting channel. It is recommended that the center is supported on cases longer than 7 feet.
2. Tighten bolts until trim flange is flush with ceiling.
NOTE: For proper operation, screen assembly must be level after installation.
SCREEN AND ROLLER ASSEMBLY INSTALLATION
If your screen was shipped with the motor and roller already installed, skip this section.
1. Remove access door. First remove the 2 screws from the ends (Fig.1). Be sure to support the door during this step
to avoid injury. Lift the door slightly and pull away from the edge of the case.
2. Carefully unpack screen and roller assembly. Leave packing paper on roller.
3. Remove two 1/4-20 nuts from one roller mounting bracket. Slide bracket towards the end of the case.
4. Insert one end of the roller into the mounting bracket. The mounting brackets have a foam pad that the slat bar will
rest against. Be sure to install the roller assembly so the slat bar is positioned below these pads (Fig. 2).
5. Slide the mounting bracket onto the roller pin. Replace the 1/4-20 nuts securely.
6. Re-install the access door. Procedure is reverse of removal.
OPERATING SCREEN
1. Pull down on pull bail until desired picture area is obtained. Lock into position as on a window shade. Be sure
surface is locked before releasing.
NOTE: this screen will not lock into position in the upper portion of its travel.
2. To re-roll the screen, pull the picture surface down about 6 inches and start the fabric up quickly and release.
Large picture surfaces are heavy and will start up too slowly to prevent the locking pawl from catching unless help is
provided. If the locking pawl catches pull the picture surface down and start the surface up rapidly.
The CSR feature of this screen will allow the fabric to retract rapidly until about the last 6-12 inches of travel then it will
slow and retract gently into the case.
FIGURE 2
FIGURE 1
SLAT BAR
FOAM PAD
REMOVE 2 SCREWS TO
REMOVE ACCESS DOOR
MOUNTING BRACKET
1
ADVANTAGE MANUAL INSTALLATION
9-1/4"
VARIABLE
POSITION
MOUNTING
CHANNEL
6-1/16"
3/8" THREADED
ROD (NOT
INCLUDED)
ATTACHED TO
MOUNTING
BRACKET
6-3/8"
SELF-TRIMMING
FLANGE
FINISHED
CEILING
7-3/4"
SEE DETAIL A
3.41"
3/8" THREADED ROD
(NOT SUPPLIED)
6.42"
7.75"
HANGER BRACKET
DETAIL A
2
7.95"
Printed in U.S.A.
3
85778 Rev. 6/07