1
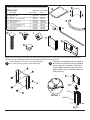
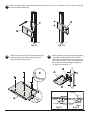
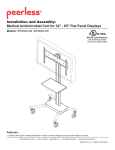
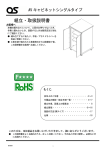
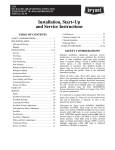
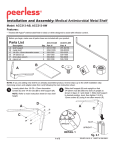
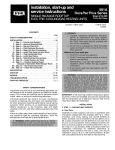
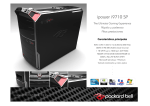
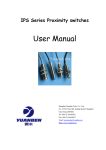
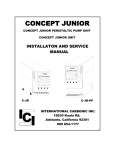
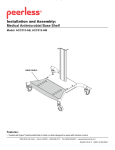
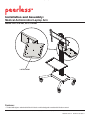
Installation and Assembly:
Medical Antimicrobial Laptop Arm
Model: ACC314-AB, ACC314-AW
LAPTOP ARM
Features:
• Treated with Agion® antimicrobial finish in black or white designed to assist with infection control.
2300 White Oak Circle • Aurora, Il 60502 • (800) 865-2112 • Fax: (800) 359-6500 • www.peerlessmounts.com
ISSUED: 09-22-11 SHEET #: 009-9061-1
Before you begin, make sure all parts shown are included with your product.
Parts List
A
B
C
D
E
F
G
H
I
K
L
D
Description
laptop tray
laptop tray clamp
T-knob
1/4" - 20 x 1 3/4" carriage bolt
plastic grommet
screen mount bracket
shelf support
1/4 x 12 mm decorative screw
1/4 - 20 mm square nut
button bumper
allen wrench
H
Qty.
1
1
1
1
2
1
1
7
4
5
1
ACC314-AB
Part #
009-S1227
009-S1020
590-1057
520-1017
590-1074
201-S1156
009-S1230
520-2325
530-1050
590-1209
560-9646
ACC314-AW
Part #
009-S2227
009-S2020
590-1057
520-1017
590-1074
201-S2156
009-S2230
520-2325
530-1050
590-1209
560-9646
B
A
E
C
L
I
F
G
K
NOTE: If you are adding a new shelf to an already assembled product, reverse steps up to the shelf installation step
(removing screen and adapter plate from cart) following the main instruction sheet.
1
Loosely attach four 1/4-20 x 12mm screws (H) and
four 1/4-20 nuts (I) to screen mount bracket (F).
2
Slide screen mount bracket (F) onto upright so
that 1/4-20 nuts (I) slide into slots of upright as
shown in figure 2.1 and detail 1. Slide screen
mount bracket to desired position, level, then
tighten 1/4-20 x 12mm screws (H) using 4 mm
allen wrench (L).
F
I
I
F
H
H
H
SLOT
DETAIL 1
UPRIGHT
fig 2.1
2 of 4
ISSUED: 09-22-11 SHEET #: 009-9061-1
3
Attach self support (G) to screen bracket bracket (F) as shown in fig. 3.1. Insert three 1/4-20 x 12 mm screws (H)
into screen mount bracket (F).
H
F
G
fig 3.1
4
fig 3.2
Attach two grommets (E) to back of laptop tray (A),
and attach five button bumpers (K) to the top of
laptop tray (A) as shown below.
5
Attach laptop tray (A) to shelf support (G) using
clamp (B), carriage bolt (D) and T-knob (C).
Hook tabs of clamp (B) into slots of laptop tray
(A) as shown in fig. 5.1, then secure clamp and
tray around shelf using carriage bolt (D) and
T-knob (C) as shown fig. 5.2.
B
A
E
C
D
T-KNOB
A
CLAMP
fig 5.1
3 of 4
CARRIAGE
BOLT
fig 5.2
ISSUED: 09-22-11 SHEET #: 009-9061-1
Recommended Cleaning Guidelines
The following procedures are not guaranteed to
control infection. An infection control administrator or
epidemiologist should be consulted regarding cleaning
procedures and processes.
WARNING
• To avoid risk of electric shock, do not expose
electrical components to water, cleaning solutions or
other potentially corrosive liquids or substances.
Most painted components will withstand cleaning by
commonly used, diluted, non-abrasive solutions such
as quaternary ammonia compounds, ammonia enzyme
cleaners, and bleach or alcohol solutions. However,
it is recommended that any surface be tested in an
inconspicuous area prior to determine the propensity for
discoloration.
• Do not use flammable cleaners on product surfaces
due to close proximity of electrical power and
equipment.
• Pen or permanent and dry erase markers can be
removed with 91% isopropyl alcohol and a soft cloth.
• Iodine stains can be removed with commonly used
cleaners and a soft cloth.
• Never use steel wool or other abrasive materials that will
damage the surface finish.
• Do not use Acetone, mineral spirits, abrasive cleansers,
paint thinner or any other harsh or toxic chemicals to clean
your product. These solvents will damage the surface
finish.
4 of 4
ISSUED: 09-22-11 SHEET #: 009-9061-1
© 2011, Peerless Industries, Inc. All rights reserved.
All other brand and product names are trademarks or registered trademarks of their respective owners.
Peerless Industries, Inc.
2300 White Oak Circle
Aurora, Il 60502
www.peerlessmounts.com