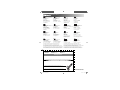
1
Activity Control
Activity Control - die Staublupe für Ihre Bodenreinigung kontrolliertes Reinigen sichtbar gemacht.
Activity Control visualisiert die Aufnahme von gefährlichem Feinstaub.
DE
GB
FR
NL
Bedienungsanleitung ....... 2
Floor nozzle with dust sensor
Operating Manual ............ 3
Suceur avec capteur de poussière
Mode d’emploi ................. 4
Vloermondstuk met stofsensor
Bedieningshandleiding .... 5
Tobera de suelo con sensor de polvo
Manual de instrucciones .. 6
IT
RUS
SK
SI
HU
Bocchetta con sensore della polvere
Istruzioni d’uso ................ 7
Напольная насадка с датчиком пыли
Инструкция по эксплуатации.. 8
Podlahová s prachovým senzorom
Návod na obsluhu ........... 9
Talna šoba s senzorjem za prah
Navodila za uporabo ..... 10
CZ
PL
HR
DK
Podlahovou hubici s Prachovým
Návod k obsluze ............ 12
Ssawka do podłóg z czujnikiem kurzu
Instrukcja obslugi........... 13
Sapnica za pod sa senzorom
Uputa za upotrebu......... 14
Gulvdyse med støvsensor
Betjeningsvejledning...... 15
Porérzékelős padlótisztító fej
Kezelési útmutató .......... 11
Roya-13137 • A4 (ohne AS) • 19.03.2010
ES
Bodendüse mit Staubsensor
BA_Activity alle Sprachen.indd 1
19.03.2010 09:14:31
Bedienungsanleitung
Operating Manual
DE Activity Control
Activity Control GB
Sicherheitshinweise
Safety instructions
Zur Bedienungsanleitung
Zu den Batterien
Lesen Sie diese Bedienungsanleitung
vollständig durch, bevor Sie mit dem
Gerät arbeiten. Bewahren Sie die Anleitung gut auf. Das Gerät darf nur im
Haushalt eingesetzt werden. Es ist für
eine gewerbliche Nutzung nicht geeignet.
Hebt Tipps und Informationen für Sie
hervor.
Das Gerät wird mit drei Batterien Typ
AAA 1,5 V betrieben.
■ Batterien können bei Verschlucken
lebensgefährlich sein. Bewahren
Sie deshalb Batterien und Gerät
für Kleinkinder unerreichbar auf.
Wurde eine Batterie verschluckt,
nehmen Sie unverzüglich medizinische Hilfe in Anspruch.
■ Die Batterien nicht ins Feuer werfen oder hohen Temperaturen
aussetzen. Es besteht Explosionsgefahr.
■ Bei falscher Anwendung kann Flüssigkeit aus den Batterien austreten. Diese kann zu Hautreizungen
führen. Vermeiden Sie den Kontakt
mit der Flüssigkeit. Bei Kontakt die
Lieferumfang
1. Funktionsweise
2. Vorbereitungen
Ersatzteile
Die Activity Control Bodendüse mit
Staubsensor erweitert den Funktionsumfang Ihres Bodenstaubsaugers. Der
Staubsensor in der Bodendüse misst
während des Saugens die Staubkonzentration in der aufgesaugten Luft.
Die farbigen LEDs zeigen Ihnen die
Menge des aufgesaugten Schmutzes
vom Boden an:
1. Packen Sie das Gerät und alle Zubehörteile aus und überprüfen Sie
den Inhalt auf Vollständigkeit.
Zubehörteile sowie Ersatzteile können
nachbestellt werden. Diese erhalten
Sie bei den Firmen:
Service-Versand Ina Riedmüller
Frankenstraße 34
89233 Neu-Ulm
DEUTSCHLAND
Tel.: +49 - 7307 - 51 75
Fax: +49 - 7307 - 41 56
[email protected]
Hinweise
Wichtige Hinweise für Ihre Sicherheit
sind wie folgt gekennzeichnet:
WARNUNG:
Warnt vor Gefahren für Ihre Gesundheit und zeigt mögliche Verletzungsrisiken auf.
HINWEIS:
5
2
3
4
1
1
Abb. 1
1 Bodendüse mit Umschalter ,,Teppich/Hartboden“
2 EIN-Schalter und LED-Anzeige
3 Batteriefach
4 Batterien 3 x 1,5 V Typ: AAA, NiCd
5 Saugrohr-Anschlussstutzen (Modellabhängig in 2 Varianten: Innendurchmesser 32 mm oder 35 mm)
Rote LEDs leuchten
Starke Verschmutzung
2
Orange LEDs leuchten
Mittlere Verschmutzung
3
Gelbe LEDs leuchten
Leichte Verschmutzung
4
■
■
■
Flüssigkeit mit viel Wasser abspülen. Wenn die Flüssigkeit in die
Augen gelangt, sofort 10 min. mit
Wasser ausspülen und unverzüglich einen Arzt aufsuchen.
Nehmen Sie Batterien aus dem Gerät heraus, wenn diese verbraucht
sind oder Sie das Gerät länger
nicht benutzen. So vermeiden Sie
Schäden, die durch Auslaufen entstehen können.
Benutzen Sie keine verschiedenen
Batterietypen, -marken oder welche mit unterschiedlicher Kapazität.
Werfen Sie verbrauchte Batterien
nicht in den Hausmüll. Entsorgen
Sie diese umweltgerecht.
Warnung:
Verpackungsmaterialien dürfen nicht
zum Spielen verwendet werden. Es
besteht Erstickungsgefahr.
2. Öffnen Sie das Batteriefach (Abb.
1/3) mit Hilfe einer kleinen Münze.
3. Setzen Sie 3 Batterien AAA 1,5 V
(Abb. 1/4) ein. Achten Sie dabei
auf die richtige Polung (+ / -).
4. Legen Sie den Batteriefachdeckel
auf und drücken Sie ihn an, bis er
hörbar einrastet.
HINWEIS:
Wenn die roten LEDs abwechselnd
blinken, sind die Batterien verbraucht.
Entnehmen Sie die verbrauchten Batterien und setzen Sie drei neue Batterien Typ AAA 1,5 V wie beschrieben
ein.
Grüne LED leuchtet
Sauber
Abb. 2
Das Gerät arbeitet wie eine Staublupe.
Der intelligente Staubsensor erkennt gestochen scharf, ob und wo der Fußboden bereits gereinigt ist. Activity Control
zeigt ihnen Ihren Reinigungserfolg an.
5. Stecken Sie das untere Ende des
Saugrohrs Ihres Bodenstaubsaugers in den Saugrohr-Anschlussstutzen (Abb. 1/5) der Bodendüse.
Das Gerät ist nun einsatzbereit.
3. Bedienung
4. Parkhaken wechseln
Technische Daten
1. Schalten Sie den Staubsensor Ihrer Bodendüse ein. Drücken Sie
dazu den EIN-Schalter (Abb. 1/2).
2. Schalten Sie Ihren Bodenstaubsauger ein. Beachten Sie dabei die
Bedienungsanleitung Ihres Bodenstaubsauger-Modells.
3. Saugen Sie den Untergrund. Beachten Sie dabei die farbige LEDAnzeige an der Bodendüse (Abb.
2) und passen Sie Ihr Saugverhalten entsprechend der Anzeige an.
4. Schalten Sie den Bodenstaubsauger aus, wenn Sie ihn nicht mehr
benutzen. Beachten Sie dabei die
Bedienungsanleitung Ihres Bodenstaubsauger-Modells.
Bei Bedarf können Sie den Parkhaken
an der Rückseite der Bodendüse austauschen (modellabhängig). So können
Sie die Bodendüse mit Staubsensor
mit anderen Royal-Bodenstaubsaugern (modellabhängig) verwenden.
1. Drehen Sie die Bodendüse so, dass
Sie auf die Unterseite schauen.
Geräteart:
HINWEIS:
Etwa 2 min. nachdem der Bodenstaubsauger ausgeschaltet ist, schaltet die Bodendüse mit Staubsensor
automatisch aus.
1
2
Entsorgung
Abb. 3
2. Lösen Sie die Schraube (Abb. 3/2)
am Parkhaken (Abb. 3/1).
3. Entnehmen Sie den Parkhaken
und setzen Sie den neuen Parkhaken passgenau in die dafür vorgesehene Vertiefung.
4. Schrauben Sie die Schraube ein
und ziehen Sie diese fest an.
2
BA_Activity alle Sprachen.indd 2-3
Bodendüse mit Staubsensor
Modell:
Activity Control
[M023 (-0/.../-9)]
Batterien:
3 x 1,5 V Typ: AAA, NiCd
Spannungs- 4,5 V / 1150 mAh
versorgung:
Gewicht:
ca. 630 g
Gerät und Batterien dürfen
nicht zusammen und nicht über
den Hausmüll entsorgt werden.
Nehmen Sie die Batterien wie
unter „2. Vorbereitungen“ beschrieben aus dem Gerät und
entsorgen Sie Gerät und Batterien getrennt voneinander und
umweltgerecht.
Kinder
■ Lassen Sie das Gerät nicht unbe-
■
aufsichtigt und verwenden Sie es
mit größter Vorsicht, wenn Kinder
oder Personen, die die Gefahren
nicht einschätzen können, in der
Nähe sind.
Kinder oder Personen, die die Gefahren nicht einschätzen können,
dürfen das Gerät nicht benutzen.
Bewahren Sie es unzugänglich
auf.
Bestimmungsgemäße
Verwendung
■ Das Gerät dient ausschließlich als
Bodendüse mit Staubsensor zur
Erweiterung des Funktionsumfangs
eines Royal-Bodenstaubsaugers.
Service Center Feuerbach KG
Corneliusstr. 75
40215 Düsseldorf
DEUTSCHLAND
Tel.: +49 - 211 - 38 10 07
Fax: +49 - 211 - 37 04 97
[email protected]
www.dirtdevil-service.de
Störungen
Bevor Sie das Gerät an den Royal
Appliance Kundendienst einschicken,
überprüfen Sie anhand der folgenden
Tabelle, ob Sie den Fehler selbst beseitigen können.
Fehler
Ursache, Lösung
Gerät schal- Batterien verbraucht.
tet nicht ein Neue Batterien Typ
AAA 1,5 V einsetzen.
Rote LEDs
blinken abwechselnd
Batterien verbraucht.
Neue Batterien Typ
AAA 1,5 V einsetzen.
SERVICE-HOTLINE
0180 501 50 50 *
In Deutschland stehen wir Ihnen
für Fragen, Anregungen oder bei
Problemen gerne zur Verfügung.
Mo.-Fr. 8-20 Uhr
Regarding the operating
manual
Regarding the batteries
■ Do not throw the batteries into fire
or subject to high temperatures.
There is a risk of explosion.
Take the batteries out of the appliance when they are dead or when
you are no longer using the appliance. This will help avoid any damage from battery leakage.
Do not use different battery types
or brands or batteries of differing
capacities.
Do not throw used batteries into
the domestic waste. Dispose of
them in an environmentally friendly
way.
Children
■ Never leave the appliance unat-
NOTE:
The appliance is operated with three
type AAA 1.5 V batteries.
■ Batteries can be life-threatening if
swallowed. For this reason, keep
batteries and appliance away from
small children. If a battery was
swallowed, immediately seek medical attention.
■ If used wrongly, fluid can leak from
the batteries. This can cause skin
irritations. Avoid any contact with
the fluid. If you experience contact
with the fluid, rinse with lots of water. If the fluid comes into contact
with your eyes, rinse immediately
for 10 min. with water and find a
doctor straightaway.
Scope of delivery
1. Modes of function
2. Preparations
Spare parts
The Activity Control floor nozzle with
dust sensor expands the scope of functions of your cylinder vacuum cleaner.
The dust sensor in the floor nozzle
measures the dust concentration in
the vacuumed in air while vacuuming.
The coloured LED displays show you
the amount of dirt vacuumed up from
the floor:
1. Unpack the appliance and all accessory parts and check that the
contents are complete.
Accessory parts and spare parts can
be reordered. You can get these from
the following companies:
►Royal Appliance Int. GmbH International Service
Read this operating manual through
completely before working with the
appliance. Keep the operating manual
safe. The appliance may only be operated in households. It is not suitable
for industrial or commercial use.
Instructions
Important instructions for your safety
are marked as follows:
WARNING:
Warns against hazards for your
health and indicates possible risks
of injury.
Highlights tips and information for
you.
5
2
3
4
1
Fig. 1
1 Floor nozzle with „Carpet/hard
floor“ switch
2 ON switch, LED displays
3 Battery compartment
4 Batteries 3 x 1.5 V Type: AAA,
NiCd
5 Suction tube connection piece
(Model-dependent in 2 variants:
Inner diameter 32 mm or 35 mm)
1
Red LED light up
Heavy soiling
2
Orange LED light up
Medium soiling
3
Yellow LED light up
Light soiling
4
Green LED lights up
Clean
Fig. 2
The device works like a dust magnifying glass. The intelligent dust sensor
recognises as sharp as a pin sharp
whether and where the floor has already been cleaned. Activity Control
shows you your cleaning results.
■
■
■
Warning:
Packaging material must not be used
to play with. There is a danger of suffocation.
2. Open the battery compartment (Fig.
1/3) with the aid of a small coin.
3. Insert the three type AAA 1.5 V batteries (Fig. 1/4). When doing so,
pay attention to the correct polarity
(+ / -).
4. Replace the battery compartment
cover and press down on it until it
audibly clicks.
NOTE:
If the red LED blink alternately, then the
batteries are dead. Remove the dead
batteries and insert three new type
AAA 1.5 V batteries as described.
5. Plug the lower end of the suction tube of your cylinder vacuum
cleaner into the suction tube connection piece (Fig. 1/5) of the floor
nozzle. The appliance is now ready
for operation.
3. Operating
4. Changing the parking hook
1. Switch on the dust sensor of your
floor nozzle. In order to do so,
press the ON switch (Fig. 1/2).
2. Switch on your cylinder vacuum
cleaner. In doing so, observe the
operating manual of your cylinder
vacuum cleaner model.
3. Vacuum the surface. In doing so,
observe the coloured LED on the
floor nozzle (Fig. 2) and adjust your
vacuuming behivour according to
the display.
4. Switch off the cylinder vacuum
cleaner when you are no longer
using it. In doing so, observe the
operating manual of your cylinder
vacuum cleaner model.
You can replace the parking hook on
the back side of the floor nozzle as
necessary (model-dependent). So you
can use the floor nozzle with dust sensor with other Royal cylinder vacuum
cleaners (model-dependent).
1. Turn the floor nozzle with dust sensor so that you can see the underside.
NOTE:
Fig. 3
2. Loosen and remove the screw (Fig.
3/2) on the parking hook (Fig. 3/1).
Approximately 2 minutes after the
cylinder vacuum cleaner has been
switched off, the floor nozzle with dust
sensor automatically switches off.
1
2
3. Remove the parking hook and
place the new parking hook so that
it fits exactly into the depression
provided for it.
4. Screw in the screw and tighten it
firmly.
Technical data
Type of
Floor nozzle with dust
appliance: sensor
Model:
Activity Control
[M023 (-0/.../-9)]
Batteries: 3 x 1.5 V Type: AAA, NiCd
Supply
4.5 V / 1150mAh
voltage:
Weight:
approx. 630 g
■
tended, and use it with the greatest of care if children or persons
who cannot assess the risks are
nearby.
Children or persons who cannot
assess the risks may not use the
appliance. Store it so it is inaccessible.
Intended use
■ The appliance serves exclusively
as a floor nozzle with dust sensor
for the expansion of the scope of
functions of a Royal cylinder vacuum cleaner.
Faults
Before sending the appliance to Royal
Appliance Customer Services, use the
following table to check whether you
can correct the malfunctions yourself.
Malfunction
Appliance
does not
switch on
Cause, Solution
Red LED
blinking
alternately
Batteries are dead.
Insert new batteries
type AAA 1.5 V.
Batteries are dead.
Insert new batteries
type AAA 1.5 V.
Waste disposal
Appliance and batteries must
not be disposed of together or
in domestic waste. Remove the
batteries from the appliance as
described in ‚2. Preparations‘
and dispose of the appliance
and batteries separately in an
environmentally friendly manner.
* 0,14 € /Min. aus dem deutschen Festnetz
(deutscher Mobilfunkhöchstpreis 0,42€ /Min.)
3
19.03.2010 09:14:51
International Service
DE
Royal Appliance International GmbH
Abt. Kundenservice
Itterpark 5-7
40724 Hilden
DEUTSCHLAND
Tel.: +49 - 2103 - 20 07 10
Fax: +49 - 2103 - 20 07 77
www.dirtdevil.de
CZ
TD MEDJIMURKA D.D.
Trg Republike 6
40000 Čakovec
HRVATSKA
Tel.: +385 - 40 - 31 27 60
Fax: +385 - 40 - 32 86 61
Zmugg Elektronik Service
und Vertriebges. M.b.H.
Fabriksgasse 27
8020 Graz
ÖSTERREICH
Tel: +43 - 316 - 77 21 20
Fax: +43 - 316 - 77 21 20 10
CH
Z.E.S. Goes B.V.
T.a.v. afd. Service
Pearyweg 1
4462 GT Goes
NEDERLAND
Tel: +31 - 113 - 24 07 00
Fax: +31 - 113 - 24 07 50
[email protected]
ES
DK
Le Cygne electronic service spol. s r.o.
Jablonecká 722/8
190 00 Praha 9
ČESKÁ REPUBLIKA
Tel: +420 - 28 68 83 940
Fax: +420 - 28 68 85 064
[email protected]
HR
BE
AT
Scandia Serviceteknik A/S
Hedeager 5
2605 BRØNDBY
DANMARK
Tel: +45 - 43 20 27 10
Fax: +45 - 43 20 27 19
HU
FR
Royal Appliance Espana, SL
Royal, Dirt Devil, Stellar
C/CRONOS, Nº 20 , PORTAL 2 ,3º 13
28037 Madrid
ESPAÑA
Tel: +34 - 902 - 43 06 63
Z.E.S. Goes B.V.
T.a.v. afd. Service
Pearyweg 1
4462 GT Goes
NEDERLAND
Tel: +31 - 113 - 24 07 00
Fax: +31 - 113 - 24 07 50
[email protected]
PYC
RUS
ООО РТЦ „Совинсервис“
127081 г. МОСКBА
Ясный проезд, д. 10
РОССИЙСКАЯ ФЕДЕРАЦИЯ
Тел.: +7 - 495 - 47 39 003
OOO RTC „Sovinservice“
127081 MOSCOW
Jasny proezd, 10
ROSSIJSKAJA FEDERAZIJA
Tel.: +7 - 495 - 47 39 003
OPM France Nant’Est entreprise
33 rue du bois Briand
44316 Nantes cdx 3
FRANCE
Tel. +33 - 2 - 40 49 64 25
Fax +33 - 2 - 40 93 96 22
www.opm-france.com
PL
NL
Aspico Kft.
Puskás Tivadar út.4.
9027 Győr
MAGYARORSZÁG
Tel.: +36 - 96 - 51 12 91
[email protected]
Finissimo AG
Landquartstr. 32
9320 Arbon
SCHWEIZ
Tel. +41 - 71 - 227 99 93
Fax. +41 - 71 - 227 99 94
www.finissimo.ch
[email protected]
SI
SERV-SERWIS Sp. z o.o.
ul. Poniatowskiego 4/1
45-049 OPOLE
POLSKA
Tel: +48 - 77 - 45 36 139
Fax: +48 - 77 - 45 36 138
Mail: [email protected]
SK
Strojinc Ciril s.p.
Koseskega ul. 1a
1000 LJUBLJANA
SLOVENIJA
Tel: +386 -1- 42 28 489
Aspico Slovakia s r.o.
Kracanska 40/104
92901 Dunajská Streda
SLOVAKIA
Tel: +421 - 31 - 55 11 815
► Detaillierte Garantiehinweise siehe Bedienungsanleitung des Bodensaugers.
► Detailné pokyny k záruke nájdete v návode na obsluhu podlahového vysávača.
► For detailed warranty information see the vacuum cleaner operating manual.
► Za podrobne garancijske pogoje si preberite navodila za uporabo talnega sesalnika.
► Consignes détaillées de garantie voir mode d‘emploi de l‘aspirateur.
► A garancia lebonyolításával kapcsolatos részletes útmutatások a padló porszívó kezelési útmutatójában.
► Voor gedetailleer-de informatie over de garantie zie gebruiksaanwijzing van de stofzuiger.
► Detailní pokyny k záruce viz návod k obsluze podlahového vysavače.
► Consulte las indicaciones de la garantía en el Manual de instrucciones de la aspiradora rodante.
► Instrukcja obsługi odkurzacza zawiera szczegółowe wskazówki dotyczące gwarancji.
► Per indicazioni dettagliate di garanzia, vedi le istruzioni d‘uso dell‘aspiratore per pavimenti.
► Podrobnije napomene u vezi jamstva pogledajte u uputama za uporabu usisavača za pod.
► Полную информацию о гарантии см. в инструкции по эксплуатации напольного пылесоса.
► Detaljeret information om garantien findes i bejteningsvejledningen til gulvstøvsugeren.
Garantiekarte
Warranty Card
Carte de garantie
Garantiekaart
Tarjeta de garantía
Scheda di garanzia
Гарантийная карточка
Záručný list
Garancijski list
Garancialevél
Záruční list
Karta gwarancyjna
Jamstveni list
Garantibevis
Activity Control
Stempel und Unterschrift des Händlers / Stamp and signature of the dealer / Tampon et signature du revendeur / Stempel en handtekening van de handelaar /
Sello y firma del vendedor / Timbro e firma del rivenditore / Печать и подпись продавца / Pečiatka a podpis predajcu / Žig in podpis trgovca / A kereskedés
bélyegzője és aláírása / Razítko a podpis prodejce / Pieczątka i podpis sprzedawcy / Pečat i potpis trgovca / Forhandlerens stempel og underskrift
Fehlerbeschreibung / Fault description / Description du défaut / Beschrijving van de fout / Descripción del fallo /
Descrizione dell‘anomalia / Описание неисправности / Popis poruchy / Opis napake / Hiba leírása /
Popis poruchy / Opis usterki / Opis greške / Fejlbeskrivelse
Kaufdatum / Date of purchase / Date d’achat / Koopdatum / Fecha de compra / Data di acquisto / Дата покупки /
Dátum zakúpenia / Datum nakupa / Vásárlás napja / Datum zakoupení / Data zakupu / Datum kupnje / Købsdato
BA_Activity alle Sprachen.indd 16
www.dirtdevil.de
19.03.2010 09:15:06