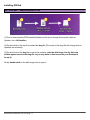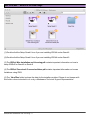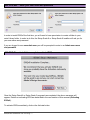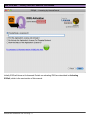
1
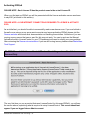
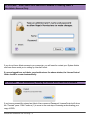
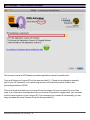
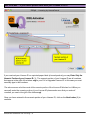
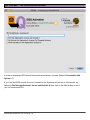
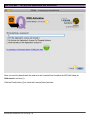
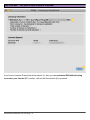
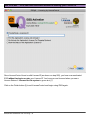
ID2Qv6 Mac Installation and Licensing
Copyright © 2011 Markzware
ID2Qv6 Mac Installation and Licensing
1
ID2Qv6 Mac Activation, Deactivation & Reactivation
1.1
Installing ID2Qv6
4
1.2
Activating ID2Qv6
10
1.3
Deactivating and Uninstalling ID2Qv6 for Mac
22
1.4
Reactivating ID2Qv6 after installing an update or re-downloading the
application
30
ID2Qv6 Mac Activation, Deactivation &
Reactivation
ID2Qv6 Mac Installation and Licensing - 3
Installing ID2Qv6
001 ID2Q Mac - Expanding the ZIP file
(1) Find or download the ID2Q Installer/Updater zip file (even though this may be called an
Updater, it is a full installer)
(2) Double-click on the zip file to extract the dmg file (The name of the dmg file will change as free
updaters are released)
(3) Double-click on the dmg file to extract its contents (note the disk image icon for this step
seldom appears next to the dmg file, so you may have to hunt around on your Desktop to
locate it).
Finally double-click on the disk image icon to open it.
ID2Qv6 Mac Installation and Licensing - 4
002 ID2Q Mac - What's in the DIsk Image
(1) Double-click the Setup Quark 8 icon if you are installing ID2Qv6 under Quark 8
(2) Double-click the Setup Quark 9 icon if you are installing ID2Qv6 under Quark 9
(3) The ID2Qv6 Mac Installation and Licensing.pdf contains important information on how to
setup ID2Qv6 for Quark 8 or Quark 9
(4) The ID2Qv6 Overview & Conversion Notes.pdf contains important information on known
limitations using ID2Q
(5) The View Files folder is where the data for the installers resides. Please do not tamper with
this folder unless instructed to do so by a Markzware Technical Support Representative.
ID2Qv6 Mac Installation and Licensing - 5
003 ID2Q Mac - Start the Setup Quark 8 Install or Setup Quark 9 Install
To start the installation of ID2Qv6 for Quark 8 or 9 click on the Install button.
004 ID2Q Mac - Select the folder where Quark 8 or Quark 9 is installed
Once you start the installation you will prompted to locate the folder where your copy of Quark 8 or
Quark 9 is installed. Simply highlight the folder where your copy of Quark 8 or 9 is located in the
Choose a Folder window and then click on the Choose button to continue.
ID2Qv6 Mac Installation and Licensing - 6
005 ID2Q Mac - Enter your user name and password
In order to install ID2Qv6 the first time, you will need to have permission to create a folder in your
main Library folder. In order to do this, the Setup Quark 8 or Setup Quark 9 installer will ask you for
your user name and password.
If you are logged in as a non-admin user you will be prompted to enter in an Admin user name
and password.
006 ID2Q Mac - Installation complete, activate ID2Q
Once the Setup Quark 8 or Setup Quark 9 program has completed, the above message will
appear. Details on activating ID2Q are described in the next section of this manual (Activating
ID2Qv6).
To activate ID2Q immediately, click on the Activate button.
ID2Qv6 Mac Installation and Licensing - 7
007 ID2Q Mac - Warning when attempting to activate ID2Q
Depending on how your system is setup, you may receive a warning message after you click on
the Activate button as shown in step 006. If you do receive this warning message, please click on
Open to continue with the activation process.
You may also find the LicenseControl icon is bouncing up and down in your Dock because of the
warning message shown above. If nothing appears to be happening after you click on the Activate
button, please check your Dock for the LicenseControl icon.
ID2Qv6 Mac Installation and Licensing - 8
008 ID2Q Mac - Initially ID2Q will show as Unlicensed
Initially ID2Q will show as Unlicensed. Details on activating ID2Q are described in Activating
ID2Qv6, which is the next section of this manual.
ID2Qv6 Mac Installation and Licensing - 9
Activating ID2Qv6
PLEASE NOTE - Each License ID has the product name in the actual License ID.
When you first start up ID2Qv6 you will be presented with the license activation screen as shown
in step 001 (a bit later in this section).
PLEASE NOTE: A LIVE INTERNET CONNECTION IS REQUIRED TO LICENSE & ACTIVATE
ID2Q
As an initial test, you should be able to successfully reach www.derman.com. If you are behind a
firewall or are using a proxy server and encounter any issues activating ID2Qv6 please visit the
Derman website and review their documentation on handling these issues. At this time if you are
running a proxy server that uses a .pac file, this may not work. You can try and use the Manual
Activation mode in LicenseControl, or your IT Department will need to modify your proxy settings.
After reviewing the Derman documentation if you are still having issues, please contact Markzware
Tech Support.
P1 ID2Q Mac - Initial LIcense Control WIndow if installing under a Non-Admin
Account Only
The very first time you run a product that uses LicenseControl (in this case ID2Qv6), you will see
the screen above, explaining what is required to setup LicenseControl. This screen should not
appear if you are logged into an Admin account.
ID2Qv6 Mac Installation and Licensing - 10
P2 ID2Q Mac - Enter Admin User name and Password if installing under a
Non-Admin Account Only
If you do not have Admin access to your computer, you will need to contact your System Admin
and have them assist you in setting up LicenseControl.
If you are logged in as an Admin. you should not see the above window, the LicenseControl
folder should be created automatically.
P3 ID2Q Mac - After successfully entering the Admin User name and Password
If you have successfully entered an Admin User name and Password, LicenseControl will show
the "Created" pane. Click Continue (1) to move to the next step of licensing and activating your
copy of ID2Q.
ID2Qv6 Mac Installation and Licensing - 11
P4 ID2Q Mac - If you enter a non Admin User name and Password
If you enter an incorrect user name and password you will see the message above. Please make
sure that you entered the Admin User name and Password correctly. If you are unable to get past
this message you will need to contact your System Admin and have them assist you in setting up
LicenseControl.
ID2Qv6 Mac Installation and Licensing - 12
Forcing Manual Licensing for users behind a Proxy Server
If you are behind a proxy server, you may be able to activate using the Manual Licensing feature
built into LicenseControl. You will still need to be able to connect to the internet using a web
browser in order to perform a Manual Licensing procedure. If you run into this situation and require
assistance, please contact Markzware Technical Support.
ID2Qv6 Mac Installation and Licensing - 13
001 ID2Q Mac - Initial Activation Window
The license process for ID2Q starts up another application named LicenseControl.
Copy and Paste your License ID into the area provided (1) . Please do not attempt to manually
type in your full License ID as it is quite long and you will most likely make a mistake, thus
preventing activation of ID2Q.
There is a single area where your License ID can be entered, but you can enter it in one of two
ways. If you received a boxed product with your License ID printed on a paper label, you can enter
just the numeric portion of your License ID. If you received your License ID electronically you can
copy and paste the entire License ID into the area provided (1).
ID2Qv6 Mac Installation and Licensing - 14
002 ID2Q Mac - If you have a printed label with your License ID on it
If you received your LIcense ID on a printed paper label (a boxed product) you may Enter Only the
Numeric Portion of your License ID (1). The numeric portion of your License ID are all numbers
that appear to the right of the letters sngl in your Full or Upgrade License ID. In this case you must
manually type in the numbers.
The above screen shot has most of the numeric portion of the License ID blocked out. When you
manually enter the numeric portion of your License ID please make sure that you enter all
numbers you see to the right of the letters sngl.
Once you have entered in the numeric portion of your License ID, click on the Next button (2) to
continue.
ID2Qv6 Mac Installation and Licensing - 15
003 ID2Q Mac - If you received your License ID electronically
If you received your LIcense ID electronically Paste Your Entire License ID into the area provided
(1). Please make sure that you have no leading or trailing SPACE characters as these will cause
the License ID to show as invalid and you will receive an error. (Space characters are invisible
characters.)
Once you have copied and pasted your entire License ID into the appropriate area, click on the
Next button (2) to continue.
ID2Qv6 Mac Installation and Licensing - 16
004 ID2Q Mac - Incorrect License ID entered
If you mistype or make a mistake entering your License ID, the screen above will appear. Since the
License ID is so long, it is always best to copy and paste the code, instead of manually trying to
type it in. You can copy and paste your code from the email you received after making your online
purchase.
The most common errors when entering a License ID are:
1. Having leading or trailing spaces
2. Typing sng1 instead of sngl
3. Stripping out the pipe characters (these are the vertical lines in your full License ID)
If entering only the numeric portion of your License ID in most cases you will need to manually
type in the numbers.
ID2Qv6 Mac Installation and Licensing - 17
005 ID2Q Mac - Entering a Correct License ID & Activating your license
After clicking the Next button (as shown in either step 002 or step 003 of this section) you will see
the above window if you have entered a properly formatted code
(1) Select the "Activate the License" radio button
(2) Click on the Next button
** Note - The image above is a sample and part of the License ID has been blocked out. On your
computer you should see your entire License ID in the top of the window (3)
ID2Qv6 Mac Installation and Licensing - 18
006 ID2Q Mac - For Boxed Product Customers Only
If you entered a boxed product code you will be presented with an extra screen when you activate
the product. The fields in red are required.
Please enter accurate information, as this information is used to assist and contact you should you
report any licensing issues. If you enter incorrect information here, there is a very good chance you
will need to re-purchase ID2Q if you contact us for Tech Support as we will not have a valid and
accurate record of who you are and how to contact you.
Once you have filled in at least your name and email, click on the Send Information button (1) to
continue.
ID2Qv6 Mac Installation and Licensing - 19
007 ID2Q Mac - License Agreement
After clicking on the Next button in step 005 or the Send Information button in step 006 you will be
presented with the Software License Agreement.
If you do not agree with the Software License Agreement you will not be able to license and use
ID2Q.
If you click on the "I agree to the above stated terms" button (1), the LicenseControl application will
connect to the LicenseControl server via the internet to finalize your license validation and license
ID2Q for use on your system.
ID2Qv6 Mac Installation and Licensing - 20
008 ID2Q Mac - ID2Q is Licensed, close License Control
After clicking on the "I agree to the above stated terms" button in step 007 you will be returned to
the License Activation Screen.
(1) If your License ID code was validated the License Status for ID2Q will now show as "Licensed
for this system" in green text
(2) Click on the Finish button to close and exit the LicenseControl application.
ID2Qv6 Mac Installation and Licensing - 21
Deactivating and Uninstalling ID2Qv6 for Mac
Why would you need to deactivate ID2Q?
1) You are retiring a computer and want to run ID2Q on a new replacement computer.
2) You want to change which computer you run ID2Q on.
3) You are sending your computer out for repair, or are planning a repair (like installing a new boot
drive or motherboard)
**You may deactivate and reactivate ID2Q as many times as you wish. But you as the user
are responsible for managing your License ID. If you know you are going to replace a
computer, please make sure and deactivate ID2Q before retiring the computer. This will allow
you to reactivate ID2Q on your new computer.
001 ID2Q Mac - Bring up LicenseControl for ID2Q
To begin the deactivation process, select License Control… (1) from the Markzware/ID2Q menu.
ID2Qv6 Mac Installation and Licensing - 22
002 ID2Q Mac - The LicenseControl Window
In order to deactivate ID2Q it must first be active and show a License Status of Licensed for this
System (1)
If you feel that ID2Q should show as Licensed for the System and it shows as Unlicensed, try
selecting Find this Application's License and Activate It, then click on the Next button to see if
you can reactivate ID2Q.
ID2Qv6 Mac Installation and Licensing - 23
003 ID2Q Mac - Deactivate ID2Q
Select De-Activate this Application's License (I'm Changing Systems) (1). Then click on the
Next button (2) to continue.
Important - You must be connected to the internet in order to deactivate ID2Q.
ID2Qv6 Mac Installation and Licensing - 24
004 ID2Q Mac - De-Activation Confirmation Message
If you have successfully deactivated ID2Q you will see the above confirmation screen. Once
deactivated, you can use your ID2Q License ID on another system.
If you want to re-activate ID2Q you will need to have your License ID available, so it is best to enter
it into a text file and copy-and-paste it into the required area when reactivating ID2Q.
Click the OK button (1) to continue.
ID2Qv6 Mac Installation and Licensing - 25
005 ID2Q Mac - You are now deactivated and unlicensed
Once you are fully deactivated, the status on the LicenseControl window for ID2Q will show as
Unlicensed in red text (1).
Click the Finish button (2) to close the LicenseControl window.
ID2Qv6 Mac Installation and Licensing - 26
006 ID2Q Mac - Confirmation of deactivation (optional)
If you wish to make sure you are deactivated and unlicensed, select Show the Status of this
Application's License ID (1) and then click on the Next button (2) to view the results.
You must be connected to the internet to perform the above actions.
ID2Qv6 Mac Installation and Licensing - 27
007 ID2Q Mac - No activated license for this application
You should receive the above message that there are no activated licenses for this application.
Click the OK button (1) to close this window and return to the main LicenseControl window.
ID2Qv6 Mac Installation and Licensing - 28
008 ID2Q Mac - You are now deactivated and unlicensed
Click the Finish button (1) to close the LicenseControl window.
If you wish to reactivate ID2Q, you will need to re-enter your License ID. To re-activate ID2Q,
simply start up Quark 8 or 9 and the above LicenseControl window should appear. You can then
re-enter your License ID.
Please remember that you must deactivate ID2Q on one computer in order to re-activate it on
another computer. If you have a multi seat license this may not be necessary, but if you are
running a single user license you will need to deactivate on one computer in order to activate
ID2Q on an other computer.
Once you have deactivated ID2Q, you may wish to run the Remove program from the Setup Quark
8 or Setup Quark 9 installer programs. This will physically remove ID2Q from your computer. If you
deactivate ID2Q and do not remove the XTension, every time you restart Quark you will be
prompted by LicenseControl to enter your ID2Q License. As this tends to become annoying, you
may actually wish to remove ID2Q from your computer.
ID2Qv6 Mac Installation and Licensing - 29
Reactivating ID2Qv6 after installing an update or re-downloading the
application
Why or when would you need to reactivate ID2Q?
Whenever you replace the actual ID2Q XTension file you will usually need to reactivate ID2Q. This
most commonly occurs when you install a free updater for ID2Q.
Reactivation of ID2Q DOES NOT REQUIRE you to enter your License ID again.
001 ID2Q Mac - ID2Q shows as Unlicensed, Check Status of License ID
The most common reason that ID2Q will show as Unlicensed is when you install an update to
ID2Q. If you install an update please follow the steps in this section to get up and running quickly.
If ID2Q ever shows as Unlicensed and you feel that it should show as licensed, first check to see if
a License ID has been stored for your copy of ID2Q.
To do this select the Show the Status of this Application's License ID button (1) and then click on
the Next button (2)
ID2Qv6 Mac Installation and Licensing - 30
002 ID2Q Mac - You have a valid license to reactivate
If you have a License ID stored as shown above (1), then you can reactivate ID2Q without having
to re-enter your License ID. To do this, click on the Done button (2) to proceed.
ID2Qv6 Mac Installation and Licensing - 31
003 ID2Q Mac - You do not have a valid License ID to reactivate
If you do not have a valid License ID stored to reactivate, you will see the above error screen after
you run the Show the Status of this Application's License ID routine. In order to reactivate ID2Q
you will need to re-enter your full License ID or the numeric portion of your License ID as
described in the Activating ID2Q section of this manual.
ID2Qv6 Mac Installation and Licensing - 32
004 ID2Q Mac - Reactivate if a License ID was found in step 002
If step 002 returned a License ID, then to reactivate select the Find this Application's License and
Activate It radio button (1) and then click on the Next button (2) to proceed.
ID2Qv6 Mac Installation and Licensing - 33
005 ID2Q Mac - Agree to the License Agreement
In order to re-activate ID2Q you must agree with the terms of the License Agreement. To proceed
click on the I agree to the above stated terms button (1).
ID2Qv6 Mac Installation and Licensing - 34
006 ID2Q Mac - ID2Q has been reactivated without re-entering your License ID
Since LicenseControl found a valid License ID (as shown on step 002), you have now reactivated
ID2Q without having to re-enter your License ID. You know you are licensed when you see a
License Status of Licensed for this system in green text (1)
Click on the Finish button (2) to exit LicenseControl and begin using ID2Q again.
ID2Qv6 Mac Installation and Licensing - 35