1
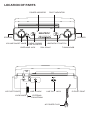
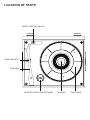
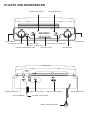
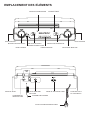
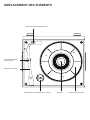
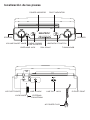
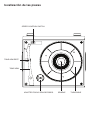
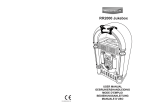
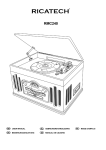
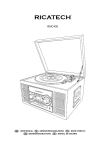
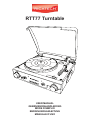
RTT77 Turntable
USER MANUAL
GEBRUIKERSHANDLEIDING
MODE D’EMPLOI
BEDIENUNGSANLEITUNG
MANUALE D’USO
English
WARNING :
TO PREVENT FIRE OR SHOCK HAZARD, DO NOT EXPOSE THIS
APPLIANCE TO RAIN OR MOISTURE. DO NOT REMOVE COVER.
PILOT LAMPS SOLDERED IN PLACE. NO USER SERVICEABLE
PARTS INSIDE. REFER SERVICING TO QUALIFIED SERVICE
PERSONNEL.
CAUTION
RISK OF ELECTRIC SHOCK
DO NOT OPEN
The lighting flash with arrowhead symbol, within an
equilateral triangle, is intended to alert user to the presence of uninsulated
“dangerous voltage” within the
product’s enclosure that may
be of sufficient magnitude to
constitute risk of electric
shock to persons.
CAUTION: TO REDUCE THE RISK OF
ELECTRIC SHOCK, DO NOT REMOVE
COVER (OR BACK). NO USER SERVICEABLE PARTS INSIDE. REFER
SERVICING TO QUALIFIED SERVICE
PERSONNEL.
The exclamation point within
an equilateral triangle is intended to alert user to the
presence of important
operating and maintenance
(servicing) instruction in the
literature accompanying
the appliance.
“Ventilation not being impeded.”
“Do not exposed to dripping or splashing and that no objects filled with liquids, such
as vases, shall be placed on the apparatus.”
Specification
FREQUENCY
POWER SOURCE
ANTENNA
POWER CONSUMPTION
SPEAKER SIZE
SPEAKER OHM
SPEAKER WATT
POWER OUTPUT
REPLACEMENT NEEDLE
: FM 88 -108 MHz
AM 530 - 1600 KHz
: AC 230V - 50Hz
: External antenna for FM
Built-in ferrite bar for AM
: 12W
: 2” x 3” Dynamic type x 2
: 4 ohm
: 3-5W
: 1.2W x 2
: NP1
* DESIGN AND SPECIFICATIONS SUBJECT TO CHANGE WITHOUT NOTICE.
IMPORTANT SAFEGUARDS FOR AUDIO PRODUCTS
PLEASE READ CAREFULLY THE FOLLOWING IMPORTANT SAFEGUARDS THAT ARE
APPLICABLE TO YOUR EQUIPMENT.
1. Read Instructions - All the safety and operating instructions should be read before
the appliance is operated.
2. Retain Instructions - The safety and operating instructions should be retained for
future reference.
3. Heed Warnings - All warnings on the appliance and in the operating instructions
should be adhered to.
4. Follow Instructions - All operating and use instructions should be followed.
5. Water and Moisture - The appliance should not be used near water-for example, near
a bathtub,washbowl,kitchen sink,laundry tub, in a wet basement, or near a
swim ming pool and the like.
6. Carts and Stands - The appliance should be used only with a cart or stand that is
recommended by the manufacturer.
6A.An appliance and cart combination should be moved with care. Quick stops,
excessive force, and uneven surfaces may cause the appliance and cart
combination to overturn.
7. Wall or Ceiling Mounting - The appliance should be mounted to a wall or ceiling
only as recommended by the manufacturer.
8. Ventilation - The appliance should be situated so that its location or position does
not interfere with-its proper ventilation.For example, the appliance should not be
situated on a bed, sofa, rug,or similar surface that may block the ventilation
openings or, placed in a built-in installation, such as a bookcase or cabinet that may
impede the flow of air through the ventilation openings.
9. Heat - The appliance should be situated away from heat sources such as
radiators,heat registers, stoves,or other appliances (including amplifiers) that
produce heat.
10.Power Sources - The appliance should be connected to a power supply only of the
type described in the operating instructions or as marked on the appliance.
11.Grounding or Polarization - Precautions should be taken so that the grounding or
polarization means of an appliance is not impeded.
12.Power - Cord Protection - Power-supply cords should be routed so that they are not
likely to be walked on or pinched by items placed upon or against them, paying
particular attention to cords at plugs, and the point where they exit from the
appliance.
13.Cleaning - The appliance should be cleaned only as recommended by the
manufacturer.
14.Antenna -This product is designed for use with the antenna attached and should not
be connected to any other external antennas.
15.Non-use Periods - The power cord of the appliance should be unplugged from the
outlet when left unused for a long period of time.
16.Object and Liquid Entry - Care should be taken so objects do not fall and liquids
are not spilled into the enclosure through openings
17.Damage Requiring Service - The appliance should be serviced by qualified service
personnel when:
A. The power-supply cord of the plug has been damaged;or
B. Objects have fallen, or liquid has been spilled into the appliance;or
C. The appliance has been exposed to rain;or
D. The appliance does not appear to operate normally or exhibits a marked change inperformance, or
E. The appliance has been dropped, or the enclosure damaged.
18.Servicing - The user should not attempt to service the appliance beyond that described
in the operating instructions. All other servicing should be referred to qualified service personnel.
LOCATION OF PARTS
POWER INDICATOR
FM.ST INDICATOR
SPEAKER
SPEAKER
VOLUME ON/OFF KNOB
RADIO/ PHONO/
LINE IN SWITCH
EARPHONE JACK
LID PIVOT POINTL
LOCK HINGE
AM\FM\FM.ST SWITCH
DIAL SCALE
LINE IN JACK
LINE OUT JAC K
EXTERNAL
FM ANTENNA
AC POWER PLUG
TUNING KNOB
ID PIVOT POINT
LOCATION OF PARTS
SPEED CONTROL SWITCH
TONE ARM REST
TONE ARM
ADAPTER FOR 45 RPM RECORDS
SPINDLE
TURNTABLE
Unpacking
1 Remove packing materials from unit.
Note: Save all packing materials.
2 Remove plastic bag covering radio.
3 Remove AC Adaptor from packing.
4 Untie antenna wire on back of radio.
5 Remove black tie-wrap from under the tone arm.
6 Remove white protective needle cover by gently pulling towards the front of the unit.
7 Install the top lid onto the unit
8 Untie the FM antenna and allow it to hang down in a straight line for optimum FM reception.
If you have trouble tuning in an FM Station, move the external FM antenna for best
reception. Do not connect FM antenna to outside antenna
Power Source
1. Unwind the AC POWER CORD at the back of the unit and connect it to a power outlet.
2. Plug A/C cord into appropriate outlet.
Lid Installation
1 Flip the LID LOCK HINGE towards the back of the unit.
2 Position LID over the turntable and press the lid onto
the LOCK HINGE as shown below.
3 As you press the lid into place, align the PIVOT PINS on
the LID with the LID PIVOT POINTS as shown below.
4 Press the LID all the way in until the PIVOT PINS snap into
the LID PIVOT POINTS and the LOCK HINGE clicks into place.
click
Turntable Operation
Turn the unit on by rotating the VOLUME ON/OFF KNOB located on the front panel
to the ON position
1 Set the FUNCTION SWITCH to PHONO mode.
2 Set the SPEED CONTROL SWITCH to the desired speed (33 1/3, 45 or 78 rpm).
Place your record onto the turntable.
3 Move the TONE ARM slightly to the right side until you hear a click sound to activate the turntable.
4 Move the TONE ARM by hand over the record to the point you want the record to start. Adjust the
VOLUME ON/OFF KNOB to your desired listening level.
5 At the end of the record, the TONE ARM will stop automatically. You must return
the TONE ARM to the arm rest by hand.
ACCESSORY SUPPLIED:
Adaptor for 45 rpm records
This adaptor allows you to play 45 RPM records.
1 Place the 45 RPM adaptor over the spindle.
2 Gently place your 45 RPM record onto the turntable.
3 Follow the steps under turntable operation to your record.
Radio Operation
1 Set the FUNCTION SWITCH to RADIO mode.
2 Set the AM / FM / FM.ST SWITCH to the desired Band.
3 Select the desired radio station by rotating TUNING KNOB .
4 Adjust the VOLUME ON/OFF KNOB to the desired sound level.
Antenna
Antenna: for FM reception, the unit is provided with a FM WIRE ANTENNA , move the wire until the
reception is clear and with no interferences. For AM reception, the unit is provided with a directional
build-in ferrite antenna. Rotate the set to find the position in which the best reception is obtained. Do
not connect the EXTERNAL FM ANTENNA to any outside antenna.
Auxiliary Output
1 You can connect your radio to different sources using the auxiliary output.
2 Plug Auxiliary cables (not supplied) into the LINE OUT JACK.
3 Connect the other end of the Auxiliary cables into the input on your desired component.
4 See the owners’ manual for the component for correction operation.
NOTE: The Auxiliary Output is a passive signal level output only and will not power speakers.
Auxiliary Input
1 You can connect external components to your unit by using the Auxiliary Input.
2 Plug Auxiliary cable into the LINE IN JACK on the back of your unit.
3 Set the FUNCTION SWITCH to LINE IN mode
4 Plug the other end of the Auxiliary cable into the output jack on your desired external componet
5 Check the volume level of your external component.
6 See operator’s manual for correct operation of the external component.
Headphone Jack Operation
1 Connect headphones to the Headphone Jack
2 Adjust volume to the desired listening level.
NOTE: When using headphones, the sound to
the unit speakers will be cut off.
NOTE: Headphones not included with unit.
Headphone jack
The sound from all speakers is cut off
Troubleshooting
There is no Power
1 Make sure radio is plugged in correctly.
2 The unit is not turned on: Rotate the VOLUME ON/OFF KNOB from the OFF
position past the “click” to turn on the unit.
There is no Sound
1 Check the volume level by turning the VOLUME ON/OFF KNOB.
2 Make sure headphones are not connected to the unit.
3 Check the position of the FUNCTION SWITCH.
Turntable will not work
1 Make sure the FUNCTION SWITCH is set to phono.
2 Try moving the tone arm to the right until you hear a click.
3 Make sure the protective needle cover is removed.
Recycling
This crossed bin symbol on the appliance indicates that the product, at the end of
its life must be disposed of seperatly from domestic waste, either by taking it to a
seperate waste disposal site for electric and electronic appliance or by returning it
to your dealer when you buy another similar. The user responsible for taking the
appliance to a special waste disposal site at the end of its life. If the disused
appliance is collected correctly as separate waste, it can be recycled, treated and
disposed of ecologically,this avoids a negative impact on both the enviroment and health, and
contributed toward the recycling of the product’s materials. For further information regarding the
waste disposal service available, contact your local waste disposal agency or the place of purchase.
CUSTOMER SUPPORT
You can contact the Ricatech customer service when you have a question or a problem with your
Ricatech product. You can contact us by telephone and email.
Email
For customer support by email, please sent a email to
[email protected] Please make sure that you mention the model number and serial number of
the product, mention your name & address and describe your question or problem clearly.
Telephone
For customer support by telephone, please dial +32 3 3265694. One of our service staff will be ready
to serve you. For full procedure please visit the website of Ricatech at: www.ricatech.com
Hereby, Ricatech B.V. declares that this turntable is in compliance with the essential
requirements and other relevant provisions of Directive 1999/5/EC.
Ricatech B.V.
Cornusbaan 1
2908 KB Capelle a/d IJssel
The Netherlands
Nederlands
WAARSCHUWING :
STEL HET APPARAAT NIET BLOOT AAN REGEN OF VOCHT OM GEVAAR VOOR BRAND
OF EEN ELEKTRISCHE SCHOK TE VOORKOMEN. DE BEHUIZING NIET VERWIJDEREN.
CONTROLELAMPJES ZIJN OP HET APPARAAT GESOLDEERD. GEEN DOOR DE
GEBRUIKER TE ONDERHOUDEN ONDERDELEN AAN DE BINNENKANT. LAAT
ONDERHOUD OVER AAN GEKWALIFICEERD ONDERHOUDS PERSONEEL.
CAUTION
RISK OF ELECTRIC SHOCK
DO NOT OPEN
Het symbool van de bliksemflits
met pijlkop, in een gelijk
zijdige driehoek, is bedoeld om
de gebruiker attent te maken op
de aanwezigheid van niet-geïsoleerde “gevaarlijke spanning” in
de behuizing van het product die
zo hoog kan zijn dat ze gevaar
voor een elektrische schok
betekent voor personen.
OPGELET: OM HET GEVAAR VOOR
EEN ELEKTRISCHE SCHOK TE
VERMINDEREN, BEHUIZING (OF
ACHTERKANT) NIET VERWIJDEREN.
GEEN DOOR DE GEBRUIKER TE
ONDERHOUDEN ONDERDELEN AAN
DE BINNENKANT. LAAT ONDERHOUD
OVER AAN GEKWALIFICEERD
ONDERHOUDS- PERSONEEL.
Het uitroepteken in een
gelijkzijdige driehoek is bedoeld om de gebruiker attent
te maken op de aanwezigheid
van een belangrijke instructie
voor bediening en onderhoud
(service) in de documentatie
bij het apparaat.
“Ventilatie niet belemmeren.”
“Niet blootstellen aan druipende of spattende vloeistoffen en geen voorwerpen met
vloeistoffen, zoals vazen, op het apparaat plaatsen.”
Specificaties
FREQUENTIE
VOEDINGSBRON
ANTENNE
STROOMVERBRUIK
SPEAKER AFMETING
SPEAKER OHM
SPEAKER WATT
UITGANGSVERMOGEN
VERVANGINGS NAALD
: FM 88 -108 MHz
AM 530 - 1600 KHz
: AC 230V - 50Hz
: Externe antenne voor FM
Ingebouwde ferrietstaaf voor AM
: 12W
: 2” x 3” Dynamisch type x 2
: 4 ohm
: 3-5W
: 1.2W x 2
: NP1
*SPECIFICATIES EN UITERLIJK KUNNEN WORDEN GEWIJZIGD ZONDER KENNISGEVING.
BELANGRIJKE VOORZORGSMAATREGELEN VOOR AUDIOPRODUCTEN
LEES AANDACHTIG DE VOLGENDE BELANGRIJKE VOORZORGSMAATREGELEN DIE VAN
TOEPASSING ZIJN OP UW APPARATUUR.
1. Instructies lezen - Alle veiligheids - en bedieningsinstructies moeten worden gelezen voordat het
apparaat wordt gebruikt.
2. Instructies bewaren - De veiligheids- en bedieningsinstructies moeten worden
bewaard voor raadpleging in de toekomst.
3. Aandacht besteden aan waarschuwingen - Alle waarschuwingen op het apparaat
en in de bedieningsinstructies moeten in acht worden genomen.
4. Instructies opvolgen - Alle bedienings- en gebruiksinstructies moeten worden
opgevolgd.
5. Water en vocht - Het apparaat mag niet worden gebruikt in de buurt van water, bijvoorbeeld nabij
een badkuip, wasbak, gootsteen, wastobbe, in een vochtige kelder of nabij een zwembad en
dergelijke.
6A. Karretjes en staanders - Het apparaat mag alleen worden gebruikt met een karretje of staander
aanbevolen door de fabrikant.
6A.Een apparaat op een karretje moet voorzichtig worden verplaatst. Bruusk stoppen, overmatige
kracht en oneffen oppervlakken kunnen het karretje met apparaat doen omkantelen.
7. Wand- of plafondbevestiging - Het apparaat mag aan een wand of plafond alleen worden
bevestigd volgens de aanbevelingen van de fabrikant.
8. Ventilatie - De plaats en de stand van het apparaat mogen correcte ventilatie niet belemmeren.
Het apparaat mag bijvoorbeeld niet op een bed, sofa, vloerkleed of dergelijk oppervlak worden
geplaatst aangezien de ventilatieopeningen kunnen worden geblokkeerd; en evenmin in een
ingebouwde installatie zoals een boekenrek of kast aangezien de luchtstroom door de
ventilatieopeningen kan worden belemmerd.
9. Warmte - Het apparaat moet verwijderd zijn van warmtebronnen zoals radiators, warmteregisters,
kachels of andere toestellen (inclusief versterkers) die warmte produceren.
10. Voedingsbronnen - Het apparaat mag alleen worden aangesloten op een voeding van het type
beschreven in de bedieningsinstructies of aangegeven op het apparaat.
11. Aarding of polarisatie - Er moeten voorzorgsmaatregelen worden genomen zodat de middelen
voor aarding of polarisatie van een apparaat niet worden belemmerd.
12. Voeding - Netsnoerbescherming – Netsnoeren moeten zodanig worden geleid dat de kans om
erop te trappen of ze te knellen met voorwerpen die erop of ertegen staan minimaal is, met
bijzondere aandacht voor netsnoeren aan stekkers en op de plaats waar ze het apparaat verlaten.
13. Reiniging - Het apparaat mag alleen worden gereinigd volgens de aanbevelingen van de
fabrikant.
14. Dit product is ontworpen voor gebruik met de bevestigde antenne en mag niet worden
aangesloten op andere externe antennes.
15. Perioden van niet gebruik - Het netsnoer van het apparaat moet uit het stopcontact worden
getrokken wanneer het apparaat lange tijd niet wordt gebruikt.
16. Voorwerpen en vloeistoffen in het apparaat - U dient voorzichtig te zijn dan er geen
voorwerpen vallen of vloeistoffen worden gemorst in de behuizing via openingen
17. Schade die onderhoud vereist - Het apparaat moet door gekwalificeerd onderhoudspersoneel
worden onderhouden wanneer:
A. Het netsnoer van de stekker beschadigd is; of
B. Voorwerpen zijn gevallen of vloeistoffen zijn gemorst in het apparaat; of
C. Het apparaat werd blootgesteld aan regen; of
D. Het apparaat niet normaal lijkt te werken of de prestaties opvallend zijn gewijzigd; of
E. Het apparaat is gevallen, of de behuizing beschadigd is.
18.Onderhoud - De gebruiker mag niet proberen onderhoud van het apparaat uit te voeren behalve
het onderhoud beschreven in de bedieningsinstructies. Alle andere onderhoudswerkzaamheden
moeten worden uitgevoerd door gekwalificeerd onderhoudspersoneel.
PLAATS VAN ONDERDELEN
FM.ST-INDICATOR
VOEDINGSINDICATOR
LUIDSPREKER
LUIDSPREKER
VOLUME AAN/UIT-KNOP
RADIO/ PHONO/
LINE IN- SCHAKELAAR
OORTELEFOONAANSLUITING
DEKSELDRAAIPUNT
SLUITSCHARNIER
AM\FM\FM.ST-SCHAKELAAR
AFSTEM SCHAAL
LINE IN-AANSLUITING
LINE OUT-AANSLUITING
EXTERNE FM-ANTENNE
WISSELSTROOMSTEKKER
AFSTEM KNOP
DEKSELDRAAIPUNT
PLAATS VAN ONDERDELEN
TOERENTALREGELAAR
TOONARMSTEUN
TOONARM
ADAPTER VOOR 45-TOERENPLATEN
SPIL
DRAAITAFEL
Uitpakken
1 Verwijder het verpakkingsmateriaal van het apparaat.
Opmerking: Bewaar al het verpakkingsmateriaal.
2 Neem de radio uit de plastic zak.
3 Neem de wisselstroomadapter uit de verpakking.
4 Maak de antennedraad op de achterzijde van de radio los.
5 Verwijder de zwarte tie-wrap onder de toonarm.
6 Verwijder de witte naaldbescherming door ze voorzichtig naar de voorzijde van het apparaat te
trekken.
7 Plaats het bovendeksel op het apparaat
8 Maak de FM-antenne los en laat ze neerhangen in een rechte lijn voor optimale FM-ontvangst. Als
u moeilijk kunt afstemmen op een FM-zender, verplaatst u de externe FM-antenne voor een betere
ontvangst. Sluit de FM-antenne niet aan op een buitenantenne
Voedingsbron
1. Wikkel het WISSELSTROOMSNOER op de achterzijde van het apparaat af en sluit het aan op
een stopcontact.
Het deksel aanbrengen
1 Klap het DEKSELSLUITSCHARNIER naar de achterzijde van het apparaat.
2 Plaats het DEKSEL boven de draaitafel en druk het deksel op het
SLUITSCHARNIER zoals hieronder getoond.
click
3 Lijn bij het aanbrengen van het deksel de DRAAIPENNEN op het
DEKSEL uit met de DEKSELDRAAIPUNTEN zoals hieronder getoond.
4 Druk het DEKSEL volledig in tot de DRAAIPENNEN in de DEKSELDRAAIPUNTEN klikken en het
SLUITSCHARNIER op zijn plaats vastklikt.
Bediening van de draaitafel
Schakel het apparaat in door de VOLUME AAN/UIT-KNOP op het voorpaneel naar de stand AAN te
draaien
1 Zet de FUNCTIESCHAKELAAR op PHONO-modus.
2 Zet de TOERENTALREGELAAR op het gewenste toerental (33 1/3, 45 of 78 toeren). Leg uw plaat
op de draaitafel.
3 Beweeg de TOONARM lichtjes naar rechts tot u een “klikgeluid” hoort om de draaitafel te activeren.
4 Breng de TOONARM handmatig op de plaat op het punt waar u het afspelen van de plaat wilt
starten. Stel de VOLUME AAN/UIT-KNOP in op het gewenste luisterniveau.
5 Aan het einde van de plaat stopt de TOONARM automatisch. U moet de TOONARM handmatig
terugplaatsen in de armsteun.
MEEGELEVERD ACCESSOIRE :
Adapter voor 45-toerenplaten
Deze adapter maakt het mogelijk 45-toerenplaten af te spelen.
1 Plaats de 45-toerenadapter op de spil.
2 Leg uw 45-toerenplaat voorzichtig op de draaitafel.
3 Volg de stappen onder bediening van de draaitafel voor uw plaat.
Bediening van de radio
1 Zet de FUNCTIESCHAKELAAR op RADIO-modus.
2 Zet de AM / FM / FM.ST-SCHAKELAAR op de gewenste golfband.
3 Selecteer de gewenste radiozender door aan de AFSTEMKNOP te draaien.
4 Stel de VOLUME AAN/UIT-KNOP in op het gewenste geluidsniveau.
Antenne
Antenne: voor FM-ontvangst is het apparaat uitgerust met een FM-DRAADANTENNE, verplaats de
draad tot de ontvangst zuiver en zonder storingen is. Voor AM-ontvangst is het apparaat uitgerust
met een ingebouwde ferrietstaaf-richtingsantenne. Draai het toestel om de positie met optimale
ontvangst te vinden. Sluit de EXTERNE FM-ANTENNE niet aan op een buitenantenne.
Hulpuitgang
1 U kunt uw radio aansluiten op verschillende bronnen via de hulpuitgang.
2 Sluit hulpkabels (niet meegeleverd) aan op de LINE OUT-AANSLUITING.
3 Sluit het andere uiteinde van de hulpkabels aan op de ingang op de gewenste component.
4 Zie de gebruikershandleiding bij de component voor correcte bediening.
OPMERKING: De hulpuitgang is slechts een uitgang met passief signaalniveau en voedt geen
luidsprekers.
Hulpingang
1 U kunt externe componenten aansluiten op uw apparaat via de hulpingang.
2 Sluit een hulpkabel aan op de LINE IN-AANSLUITING op de achterzijde van uw apparaat.
3 Zet de FUNCTIESCHAKELAAR op LINE IN-modus
4 Sluit het andere uiteinde van de hulpkabel aan op de uitgangsaansluiting op de gewenste
component
5 Controleer het volumeniveau van de externe component.
6 Zie de gebruikershandleiding voor correcte bediening van de externe component.
Headphone jack
De hoofdtelefoonaansluiting gebruiken
1 Sluit een hoofdtelefoon aan op de hoofdtelefoonaansluiting
2 Stel het volume in op het gewenste luisterniveau.
OPMERKING: wanneer u een hoofdtelefoon gebruikt,
wordt het geluid naar de luidsprekers van het apparaat onderbroken.
OPMERKING: hoofdtelefoon niet meegeleverd met het apparaat.
The sound from all speakers is cut off
Problemen oplossen
Er is geen stroomtoevoer
1 Controleer of de stekker van de radio correct is aangesloten.
2 Het apparaat is niet ingeschakeld: draai de VOLUME AAN/UIT-KNOP vanaf de stand UIT voorbij
de “klik” om het apparaat in te schakelen.
Er is geen geluid
1 Controleer het volumeniveau door aan de VOLUME AAN/UIT-KNOP te draaien.
2 Controleer of er geen hoofdtelefoon is aangesloten op het apparaat.
3 Controleer de stand van de FUNCTIESCHAKELAAR.
Draaitafel werkt niet
1 Controleer of de FUNCTIESCHAKELAAR op phono staat.
2 Beweeg de toonarm naar rechts tot u een klik hoort.
3 Controleer of de naaldbescherming verwijderd is.
KLANTENONDERSTEUNING
U kunt contact opnemen met Ricatech klantenservice als u een vraag of een probleem heeft met uw
Ricatech product. U kunt contact met ons opnemen per telefoon en e-mail.
E-mail
Voor klantenondersteuning per e-mail, gelieve een e-mail te sturen naar [email protected]. Zorg
ervoor dat u het modelnummer en het serienummer van het product vermeldt, onder vermelding van
uw naam & adres en een duidelijke omschrijving van uw vraag of probleem.
Telefoon
Voor telefonische klantenondersteuning belt u naar
+32 3 3265694. Een van onze servicemedewerkers zal u dan te woord staan. Voor de volledige
procedure kunt u terecht op de website van Ricatech: www.ricatech.com
Hereby, Ricatech B.V. declares that this turntable is in compliance with the essential
requirements and other relevant provisions of Directive 1999/5/EC.
Ricatech B.V.
Cornusbaan 1
2908 KB Capelle a/d IJssel
The Netherlands
AVERTISSEMENT :
POUR ÉVITER TOUT RISQUE D’INCENDIE OU D’ÉLECTROCUTION, N’EXPOSEZ PAS
CET APPAREIL À LA PLUIE OU À DE L’HUMIDITÉ. NE PAS RETIRER LE COUVERCLE.
LES LAMPES PILOTES SONT SOUDÉES À LEUR EMPLACEMENT. NE CONTIENT
AUCUNE PIÈCE RÉPARABLE PAR L’UTILISATEUR. CONFIEZ LES RÉVISIONS AU
PERSONNEL DE SERVICE QUALIFIÉ.
CAUTION
RISK OF ELECTRIC SHOCK
DO NOT OPEN
La lumière clignotante, avec le
symbole en pointe de flèche dans
un triangle équilatéral, a pour
but d’avertir l’utilisateur de la
présence d’une « tension
dangereuse » non isolée à
l’intérieur de l’appareil, assez
puissante pour constituer un
risque d’électrocution.
ATTENTION : POUR RÉDUIRE LE
RISQUE D’ÉLECTROCUTION, NE PAS
RETIRER LE COUVERCLE (OU LE
DOS). NE CONTIENT AUCUNE PIÈCE
RÉPARABLE PAR L’UTILISATEUR.
CONFIEZ LES RÉVISIONS AU
PERSONNEL DE SERVICE QUALIFIÉ.
Le point d’exclamation dans
un triangle équilatéral prévient
l’utilisateur de la présence
d’instructions importantes
d’opération et de maintenance
(réparation) dans les textes
accompagnant l’appareil.
«La ventilation ne doit pas être entravée.»
«Ne pas exposer à un ruissellement ou à un éclaboussement, et veiller à ce qu’aucun objet
contenant un liquide, par exemple un vase, ne soit placé sur l’appareil.»
Caractéristiques techniques
FRÉQUENCE
: FM 88 -108 MHz
AM 530 - 1600 KHz
ALIMENTATION
: AC 230V - 50Hz
ANTENNE
: Externe antenne voor FM
Ingebouwde ferrietstaaf voor AM
CONSOMMATION TAILLE DES HAUT-PARLEURS OHM : 12W
CONSOMMATION TAILLE DES HAUT-PARLEURS
: 2” x 3” Dynamisch type x 2
OHM DES HAUT-PARLEUR
: 4 ohm
PUISSANCE DE SORTIE
: 3-5W
TENSION DES HAUT-PARLEURS
: 1.2W x 2
AIGUILLE DE REMPLACEMENT
: NP1
*LA CONCEPTION ET LES CARACTÉRISTIQUES TECHNIQUES SONT SUJETTES À
MODIFICATION SANS PRÉAVIS.
INSTRUCTIONS DE SECURITE IMPORTANTES POUR PRODUITS AUDIO
VEUILLEZ LIRE ATTENTIVEMENT LES INSTRUCTIONS SUIVANTES APPLICABLES
A VOTRE EQUIPEMENT
1. Lisez les instructions – Lisez toutes les instructions de sécurité et d’utilisation avant de
vous servir de l’appareil.
2. Conservez les instructions – Conservez les instructions de sécurité et
d’utilisation pour vous y référer ultérieurement.
3. Tenez compte des avertissements – Suivez tous les avertissements et
instructions d’utilisation de l’appareil.
4. Suivez les instructions – Suivez toutes les instructions de fonctionnement
et utilisation.
5. Eau et humidité – Cet appareil ne doit pas être utilisé à proximité de pointsd’eau, comme par
exemple près de baignoires, lavabos, éviers ou lavoirs, sur surfaces mouillées ou près d’une
piscine.
6. Chariots et supports – Utilisez cet appareil uniquement avec des chariots ou supports
recommandés par le fabricant.
6A. Déplacez avec précaution l’ensemble chariot et appareil. Les arrêts rapides, l’excès de
force ou les surfaces irrégulières peuvent renverser le chariot.
7. Support mural ou de plafond – Placez cet appareil uniquement sur les supports muraux ou de
plafond recommandés par le fabricant.
8. Ventilation – Cet appareil doit être placé de façon à ne pas compromettre une bonne ventilation.
Par exemple, il ne doit pas être placé sur un lit, un divan, tapis ou surface semblable, qui puisse
bloquer les ouvertures de ventilation. Ne le placez pas non plus dans des placards, sur des
étagères ou armoires, qui puissent empêcher l’air de circuler par les ouvertures de ventilation.
9. Chaleur – Cet appareil doit être situé loin de sources de chaleur, telles que radiateurs,
chauffe-eaux, convecteurs ou autres appareils qui dégagent de la chaleur (y compris les
amplificateurs).
10.Courant – Cet appareil doit être branché uniquement au courant décrit dans le mode d’emploi ou
à celui décrit sur l’appareil lui-même.
11.Prise de terre ou polarisation – On doit prendre des précautions pour s’assurer que la prise de
terre ou la polarisation de l’appareil ne soient pas perturbées.
12.Protection du câble électrique – Les câbles électriques doivent être correctement placés pour
ne pas être piétinés ni aplatis avec des objets placés dessus ou contre ceux-ci. On doit prêter une
attention tout spéciale à la partie du câble proche de la prise et au connecteur de l’appareil.
13.Nettoyage – Vous devez nettoyer cet appareil uniquement comme le recommande le fabricant.
14.Ce produit a été conçu pour être utilisé avec une antenne intégrée et ne doit être connecté à au
cune autre antenne extérieure.
15.Périodes sans utilisation – Lorsque vous ne devez pas utiliser cet appareil pendant de longues
périodes, débranchez-le de la prise de courant.
16.Entrée d’objets et de liquides – Evitez que des objets ou liquides ne tombent à travers les
ouvertures du boîtier.
17.Dommages qui nécessitent réparation – Cet appareil doivent être apportés au service
technique si :
A.Le câble électrique ou la fiche sont endommagés.
B.Des objets ou liquides sont tombés à l’intérieur de l’appareil.
C.L’appareil a été exposé à la pluie.
D.L’appareil ne fonctionne pas normalement ou montre un changement dans son fonctionnement.
E.L’appareil est tombé ou le boîtier est endommagé. .
18. Réparations - L’usager ne doit pas tenter de réparer l’appareil au-delà de ce qui est décrit dans
le présent manuel. Tout le reste doit être réalisé par un personnel d’entretien compétent.
EMPLACEMENT DES ÉLÉMENTS
VOYANT D’ALIMENTATION
VOYANT FM.ST
HAUT-PARLEUR
HAUT-PARLEUR
BOUTON VOLUME ON/OFF
PRISE CASQUE
POINT DE PIVOT
CHARNIÈRE DE
VERROUILLAGE
SÉLECTEUR RADIO /
PHONO/ ENTRÉE LIGNE
SÉLECTEUR AM\FM\FM.ST
CADRAN GRADUÉ
BOUTON DE RÉGLAGE
PRISE D’ENTRÉE
PRISE DE SORTIE DE LIGNE
DE LIGNE
ANTENNE FM EXTERNE
FICHE D’ALIMENTATION SECTEUR
POINT DE PIVOT
DU COUVERCLE
EMPLACEMENT DES ÉLÉMENTS
SÉLECTEUR DE CONTRÔLE DE LA
SUPPORT DU BRAS
DE LECTURE
BRAS DE LECTURE
ADAPTATEUR POUR DISQUES 45 TOURS
BROCHE
PLATEAU DE LECTURE
Déballage
1 Retirez les matériaux d’emballage de l’appareil. Remarque: Conservez tous
les matériaux d’emballage.
2 Retirez le sac en plastique recouvrant la radio.
3 Sortez l’adaptateur secteur du paquet.
4 Dénouez le câble de l’antenne à l’arrière de la radio.
5 Retirez l’emballage noir en-dessous du bras de lecture.
6 Retirez le couvercle de protection blanc de l’aiguille en tirant doucement vers l’avant de l’appareil.
7 Installez le couvercle supérieur sur l’appareil
8 Dénouez l’antenne FM et laissez-la pendre en ligne droite pour obtenir une réception FM optimale.
Si vous rencontrez des problèmes pour ajuster une station FM, déplacez l’antenne FM externe
pour accroitre la qualité de la réception. Ne pas brancher l’antenne FM à une antenne extérieure
Source d’alimentation
1. Déroulez le cordon d’alimentation secteur à l’arrière de l’appareil et branchez-le à
une prise électrique.
2. Branchez le cordon d’alimentation secteur dans une prise appropriée.
Installation du couvercle
1 Tournez la charnière de verrouillage du couvercle vers l’arrière de l’appareil.
click
2 Positionnez le couvercle au-dessus du plateau de lecture et appuyez
le couvercle sur la charnière de verrouillage comme indiqué ci-dessous.
3 Pendant que vous poussez le couvercle pour le mettre en place,
alignez la broche de pivot du couvercle avec les points de pivot du
couvercle comme indiqué ci-dessous.
4 Appuyez à fond sur le couvercle jusqu’à ce que les broches de pivot s’enclenchent
dans les points de pivot du couvercle et de la charnière de verrouillage.
Utilisation du plateau de lecture
Mettez l’appareil sous tension en basculant le bouton VOLUME ON/OFF situé sur le panneau avant
sur la position ON.
1 Réglez le sélecteur de fonction sur le mode PHONO.
2 Réglez le sélecteur de contrôle de la vitesse sur la vitesse désirée (33 1/3, 45 ou 78 rpm).
Placez votre disque sur le plateau de lecture.
3 Pour activer le plateau de lecture, déplacez doucement le bras de lecture vers le côté droit jusqu’à
ce que vous entendiez un clic.
4 Déplacez à la main le bras de lecture sur le disque, à l’endroit où vous souhaitez faire démarrer la
lecture. Ajustez le bouton VOLUME ON/OFF au niveau d’écoute de votre choix.
5 À la fin du disque, le bras de lecture s’arrête automatiquement. Vous devez alors replacer à la main
le bras de lecture sur son support.
ACCESSOIRE FOURNI :
Adaptateur pour les disques 45 tours
Cette adaptateur vous permet de lire des disques 45 tours.
1 Placez l’adaptateur 45 tours sur la broche.
2 Placez en douceur votre disque 45 tours sur le plateau de lecture.
3 Suivez les étapes décrites dans la section sur l’utilisation du plateau de lecture.
Utilisation de la radio
1 Réglez le sélecteur de fonction sur le mode RADIO.
2 Réglez le sélecteur AM / FM / FM.ST sur la bande de votre choix.
3 Sélectionnez la station radio de votre choix en tournant le bouton de réglage.
4 Ajustez le bouton VOLUME ON/OFF au niveau de son de votre choix.
Antenne
Antenne: pour la réception FM, l’appareil est fourni avec une antenne filaire FM; déplacez le câble
jusqu’à obtenir une bonne réception sans interférence. Pour la réception AM, l’appareil est fourni
avec une antenne ferrite intégrée directionnelle. Pivotez-la pour trouver la position dans laquelle vous
obtiendrez la meilleure réception. Ne pas brancher l’antenne FM externe à une antenne extérieure.
Sortie auxiliaire
1 Vous pouvez connecter votre radio à différentes sources à l’aide de la sortie auxiliaire.
2 Branchez un câble auxiliaire (non fourni) dans la prise de sortie de ligne.
3 Connectez l’autre extrémité du câble auxiliaire à l’entrée du dispositif de votre choix.
4 Reportez-vous au mode d’emploi du dispositif en question pour connaître l’utilisation correcte. RE
MARQUE : La sortie auxiliaire est uniquement une sortie à niveau de signal passif et elle
n’alimente pas les haut-parleurs.
Entrée auxiliaire
1 Vous pouvez connecter des dispositifs externes à votre appareil à l’aide de l’entrée auxiliaire.
2 Branchez le câble auxiliaire dans la prise d’entrée de ligne à l’arrière de votre appareil.
3 Réglez le sélecteur de fonction sur le mode d’entrée de ligne
4 Connectez l’autre extrémité du câble auxiliaire à la prise de sortie du dispositif externe de votre
choix
5 Vérifiez le niveau de volume de dispositif externe.
6 Reportez-vous au mode d’emploi du dispositif externe pour savoir comment l’utiliser correctement.
Prise casque
Le son de tous les haut-parleurs est coupé
Utilisation de la prise casque
1 Connectez un casque audio à la prise casque
2 Ajustez le volume au niveau d’écoute de votre choix.
REMARQUE : Lorsque vous utilisez un casque, le son émit par les haut-parleurs de l’appareil est
coupé.
REMARQUE : Aucun casque audio n’est fourni avec l’appareil.
Résolution des problèmes
Il n’y a pas d’alimentation
1 Vérifiez que la radio est correctement branchée.
2 L’appareil n’est pas sous tension: Mettez l’appareil sous tension en basculant le bouton VOLUME
ON/OFF à partir de la position OFF jusqu’au «clic».
Il n’y a pas de son
1 Vérifiez le niveau du volume en tournant le bouton VOLUME ON/OFF.
2 Veillez à ce qu’aucun casque audio ne soit branché à l’appareil.
3 Vérifiez la position du sélecteur de fonction.
Le plateau de lecture ne fonctionne pas
1 Veillez à ce que le sélecteur de fonction soit réglé sur phono.
2 Essayez de déplacer le bras de lecture vers la droite jusqu’à ce que vous entendiez un clic.
3 Veillez à ce que le couvercle de protection de l’aiguille soit retiré.
SERVICE CONSOMMATEUR
Vous pouvez contacter le service consommateur de Ricatech si vous avez une question ou un
problème avec votre produit Ricatech. Vous pouvez nous contacter par téléphone ou par email.
Email
Pour une assistance par email, veuillez nous écrire à l’adresse [email protected].
Assurez-vous de bien nous communiquer le numéro de modèle et le numéro de série du produit,
vos nom et adresse ainsi qu’une description claire de votre problème ou votre question.
Téléphone
Pour contacter le service consommateur par téléphone,
composez le +32 3 3265694. Un membre de notre personnel se tiendra à votre service.
Pour toutes les procédures, rendez vous sur le site web de
Ricatech : www.ricatech.com
Hereby, Ricatech B.V. declares that this turntable is in compliance with the essential
requirements and other relevant provisions of Directive 1999/5/EC.
Ricatech B.V.
Cornusbaan 1
2908 KB Capelle a/d IJssel
The Netherlands
WARNUNG:
UM FEUER ODER STROMSCHLAG ZU VERMEIDEN, SETZEN SIE DIESES GERÄT NIE
REGEN ODER FEUCHTIGKEIT AUS. ENTFERNEN SIE NICHT DIE ABDECKUNG. DIE
KONTROLLLEUCHTEN SIND VERLÖTET. IM GERÄT BEFINDEN SICH KEINE VOM
BENUTZER ZU WARTENDEN TEILE. ÜBERLASSEN SIE DIE WARTUNG
QUALIFIZIERTEM KUNDENDIENST PERSONAL.
CAUTION
RISK OF ELECTRIC SHOCK
DO NOT OPEN
Das Symbol eines Blitzes mit
Pfeilspitze in einem gleichseitigen
Dreieck soll den Benutzer auf
die im Gehäuse des Produkts
vorhandene, nicht isolierte
“gefährliche Spannung” hinweisen, welche so stark sein
kann, dass sie eine Gefahr für
Personen darstellt.
VORSICHT: UM DAS RISIKO EINES
STROMSCHLAGS ZU VERMEIDEN,
ENTFERNEN SIE NICHT DIE ABDECKUNG (ODER DIE RÜCKVERKLEIDUNG).
IM GERÄT BEFINDEN SICH KEINE VOM
BENUTZER ZU WARTENDEN TEILE.
ÜBERLASSEN SIE DIE WARTUNG
QUALIFIZIERTEM KUNDEN
DIENSTPERSONAL.
Das Ausrufezeichen in einem
gleichseitigen Dreieck soll den
Benutzer auf das Vorhandensein von wichtigen Betriebsund Wartungshinweisen in
der dem Gerät beiliegenden
Unterlagen aufmerksam
machen.
“Die Belüftung darf nicht behindert werden”. „Halten Sie das Gerät von tropfenden oder
spritzenden Dingen fern und achten Sie darauf, dass keine Gegenstände, die mit
Flüssigkeiten gefüllt sind, wie z.B. Vasen, auf dem Gerät platziert werden.“
Spezifikation
FREQUENZ
STROMQUELLE
ANTENNE
STROMVERBRAUCH
LAUTSPRECHERGRÖSSE
LAUTSPRECHER-WIDERSTAND
LAUTSPRECHERLEISTUNG
AUSGANGSLEISTUNG
ERSATZNADEL
: FM 88 -108 MHz
AM 530 - 1600 KHz
: AC 230V - 50Hz
: Externe Antenne für UKW integrierte
Ferritstange für MW
: 12W
: 2” x 3” Dynamischer Typ x 2
: 4 ohm
: 3-5W
: 1.2W x 2
: NP1
*DESIGN UND SPEZIFIKATIONEN KÖNNEN SICH OHNE VORHERIGE ANKÜNDIGUNG ÄNDERN.
WICHTIGE SICHERHEITSHINWEISE FÜR AUDIOGERÄTE
BITTE LESEN SIE SORGFÄLTIG DIE FOLGENDEN WICHTIGEN SICHERHEITSHINWEISE,
DIE FÜR IHRE GERÄTE GELTEN.
1 Lesen Sie die Anleitungen - Alle Sicherheits- und Bedienungsanleitungen sollten gelesen
werden, bevor das Gerät betrieben wird.
2 Bewahren Sie die Anleitungen auf - Die Sicherheits-und Bedienungsanleitungen
sollten für zukünftige Fragen aufbewahrt werden.
3 Beachten Sie die Warnungen - Alle Warnhinweise auf dem Gerät und in der
Bedienungsanleitung sollten beachtet werden.
4 Befolgen Sie die Anweisungen - Alle Bedienungs-und Gebrauchsanleitungen
sollten befolgt werden.
5 Wasser und Feuchtigkeit - Das Gerät sollte nicht in der Nähe von Wasser verwendet werden- wie
z.B. in der Nähe einer Badewanne, Wasch- und Spülbecken, Waschmaschine, in einem feuchten
Keller oder in der Nähe eines Schwimmbad und dergleichen.
6 Wagen und Gestelle - Das Gerät sollten nur mit einem Wagen oder Gestell benutzt werden, die
vom Hersteller empfohlen werden.
6A Ein Gerät auf einem Wagen sollte mit Vorsicht bewegt werden. Schnelles Anhalten, übermäßige Krafteinwirkung und unebene Oberflächen können zum Umkippen des Geräts und dem Wagen
führen.
7 Wand-oder Deckenmontage - Das Gerät sollte an einer Wand oder Decke nur so montiert
werden, wie vom Hersteller empfohlen.
8 Belüftung - Das Gerät muss so aufgestellt werden, dass der Standort oder die Position nicht die
einwandfreie Belüftung verhindert. Zum Beispiel sollte das Gerät nicht auf einem Bett, Sofa,
Teppich oder einer ähnlichen Oberfläche, die die Lüftungsöffnungen blockieren könnte, platziert
oder in eine fest eingebaute Vorrichtung, z.B. einem Bücherregal oder Schrank, wo der Luftstrom
durch die Lüftungsöffnungen behindert werden könnten, gestellt werden.
9 Wärme - Das Gerät sollte von Wärmequellen, wie Heizkörpern, Wärmespeichern, Öfen oder
anderen Geräten (einschließlich Verstärkern), die Wärme erzeugen, entfernt liegen.
10 Stromquellen - Das Gerät sollte nur an eine solche Stromversorgung angeschlossen werden,
wie sie in der Bedienungsanleitung beschrieben oder auf dem Gerät markiert ist.
11 Erdung oder Polarisation - Vorsichtsmaßnahmen sollten ergriffen werden, damit die Erdung oder
Polarisation eines Geräts nicht behindert wird.
12 Strom - Kabelschutz - Stromkabel sollten so gelegt werden, dass man nicht auf sie tritt oder sie
von Gegenständen, die auf ihnen abgestellt sind, zusammengedrückt werden. Besonderes
Augenmerk gilt den Kabelstücken an der Steckdose und am Gerät selbst.
13 Reinigung - Das Gerät sollte nur wie vom Hersteller empfohlen gereinigt werden.
14 Dieses Produkt ist für den Gebrauch mit der beigefügten Antenne konzipiert und sollten nicht´an
externe Antennen angeschlossen werden.
15 Nicht-Verwendungs - Perioden – Das Netzkabel des Geräts sollte aus der Steckdose gezogen
werden,wenn das Gerät für eine längere Zeit ungenutzt bleibt.
16 Eindringen von Gegenständen oder Flüssigkeiten - Achten Sie darauf, dass keine
Gegenstände und keine Flüssigkeiten durch die Öffnungen des Geräts in das Gerät gelangen.
17 Schäden die Reparatur erfordern - Das Gerät sollte von qualifiziertem Fachpersonal gewartet werden, wenn:
A. Das Netzkabel des Steckers beschädigt wurde; oder
B. Gegenstände oder Flüssigkeiten in das Geräteinnere gelangt sind; oder
C. Das Gerät Regen ausgesetzt wurde; oder
D. Das Gerät scheinbar nicht ordnungsgemäß funktioniert oder sich in seiner Leistung deutlich
verändert hat; oder
E. Das Gerät fallengelassen wurde oder das Gehäuse beschädigt wurde.
18 Wartung - Der Benutzer sollte nicht versuchen, das Gerät, über die in den
Bedienungsanleitungen beschriebenen Hinweise hinaus, zu warten. Jede weitere Wartung sollte
von qualifiziertem Fachpersonal durchgeführt werden.
ÜBERSICHT DER BEDIENUNGSELEMENTE
POWER-ANZEIGE
UKW.ST-ANZEIGE
LAUTSPRECHER
LAUTSTÄRKE AN/AUS-REGLER
LAUTSPRECHER
RADIO/ PHONO/ LINEIN-SCHALTER
KOPFHÖRERBUCHSE
DECKEL-DREHPUNKT
VERRIEGELUNGS
SCHARNIER
MW\UKW\UKW.ST-SCHALTER
EINSTELLSKALA
LINE-IN-BUCHSE
LINE-OUT-BUCHSE
EXTERNE UKW-ANTENNE
NETZSTECKER
EINSTELLKNOPF
DECKELDREHPUNKT
ÜBERSICHT DER BEDIENUNGSELEMENTE
DREHZAHLREGLER-SCHALTER
TONARMABLAGE
TONARM
ADAPTER FÜR SCHALLPLATTEN MIT 45 U/MIN
SPINDEL
PLATTENTELLER
Auspacken
1. Entfernen Sie die Verpackung des Geräts.
Hinweis: Bewahren Sie alle Verpackungsmaterialien auf.
2. Entfernen Sie die Plastikhülle, die das Radio bedeckt.
3. Entfernen Sie die Verpackung des Netzteils.
4. Lösen Sie den Antennendraht auf der Rückseite des Radios.
5 .Entfernen Sie den schwarzen Kabelbinder unter dem Tonarm.
6. Entfernen Sie den weißen Nadelschutz, indem Sie ihn vorsichtig Richtung Vorderseite des Geräts
ziehen.
7. Installieren Sie den oberen Deckel auf das Gerät
8. Lösen Sie die UKW-Antenne und lassen Sie sie gerade nach unten hängen, um optimalen
UKW-Empfang zu erzielen. Wenn Sie Probleme beim Einstellen eines UKW-Senders haben,
verschieben Sie die externe UKW-Antenne für den besten Empfang. Schließen Sie die
UKW-Antenne nicht an die externe Antenne an
Stromquelle
1. Rollen Sie das NETZKABEL an der Rückseite des Geräts ab und stecken
Sie es in eine Steckdose.
2. Stecken Sie das Netzkabel in eine passende Steckdose.
Installation des Deckels
1 Klappen Sie das DECKEL-VERRIEGELUNGSSCHARNIER in Richtung
der Rückseite des Geräts.
click
2 Positionieren Sie den DECKEL über den Plattenteller und drücken
Sie den Deckel auf das VERRIEGELUNGSSCHARNIER, so wie unten abgebildet.
3 Während Sie den Deckel platzieren, richten Sie die DREHBOLZEN auf
dem DECKEL mit den DECKEL-DREHPUNKTEN aus, so wie unten abgebildet.
4 Drücken Sie den DECKEL so tief hinein, bis die DREHBOLZEN in die DECKEL DREHPUNKTE
einrasten und das VERRIEGELUNGSSCHARNIER ebenfalls einrastet.
Plattenspielerbetrieb
Schalten Sie das Gerät durch Drehen des LAUTSTÄRKE AN/AUS-REGLERS, welcher sich auf der
vorderen Bedienplatte befindet, in die AN-Position an.
1. Stellen Sie den FUNKTIONSSCHALTER auf den PHONO-Modus.
2. Setzen Sie den DREHZAHLREGLER-SCHALTER auf die gewünschte Geschwindigkeit
(33 1/3, 45 oder 78 Umdrehungen pro Minute). Platzieren Sie Ihre Schallplatte auf dem Plattenteller.
3. Bewegen Sie den TONARM etwas zur rechten Seite, bis Sie ein Klicken zur Aktivierung des
plattentellers hören.
4. Bewegen Sie den TONARM mit der Hand über die Schallplatte, bis zu dem Punkt, an dem Sie die
Schallplatte starten möchten. Stellen Sie den LAUTSTÄRKE AN/AUS-REGLER auf Ihren
gewünschten Lautstärkepegel ein.
5. Am Ende der Schallplatte wird der TONARM automatisch gestoppt. Sie müssen den TONARM mit
der Hand zur Tonarmablage zurücksetzen.
MITGELIEFERTES ZUBEHÖR :
Adapter für Schallplatten mit 45
Umdrehungen pro Minute
Dieser Adapter ermöglicht Ihnen, Schallplatten mit 45 U/min abzuspielen.
1. Platzieren Sie den 45 U/min-Adapter über der Spindel.
2. Legen Sie Ihre 45 U/min-Schallplatte vorsichtig auf den Plattenteller.
3. Folgen Sie den Schritten unter Plattenspieler-Betrieb.
Radiobetrieb
1 Stellen Sie den FUNKTIONSSCHALTER auf RADIO-Modus.
2 Stellen Sie den MW/UWW/UKW.ST-SCHALTER auf das gewünschte Band.
3 Wählen Sie die gewünschte Radiostation durch Drehen des EINSTELLKNOPFES.
4 Stellen Sie den LAUTSTÄRKE AN/AUS-REGLER auf Ihren gewünschten Lautstärkepegel ein.
Antenne
Antenne: Für den UKW-Empfang ist das Gerät mit einer UKW-DRAHTANTENNE ausgestattet.
Bewegen Sie den Draht, bis der Empfang klar und ohne Störungen ist. Für den MW Empfang ist das
Gerät mit einer eingebauten Richtungs-Ferritantenne ausgestattet. Drehen Sie das Gerät, um die
Position zu finden, in der der beste Empfang zu erreichen ist. Schließen Sie die EXTERNE
UKW-ANTENNE nicht an Außenantennen an.
AUX-Ausgang
1 Sie können Ihr Radio mit verschiedenen Quellen verbinden, indem Sie den AUX-Ausgang
verwenden.
2 Stecken Sie die AUX-Kabel (nicht mitgeliefert) in die LINE-OUT-BUCHSE.
3 Stecken Sie die anderen Enden der AUX-Kabel in die Eingangsbuchse Ihrer gewünschten
Komponente.
4 Schauen Sie in das Benutzerhandbuch der Komponente, um einen korrekten Betrieb zu
gewährleisten.
HINWEIS : Der AUX-Ausgang ist ein passiver Signalpegelausgang und kann die Lautsprecher
nicht mit Strom versorgen.
AUX-Eingang
1 Sie können Ihr Radio mit externen Komponenten verbinden, indem Sie den AUX-Eingang
verwenden.
2 Stecken Sie das AUX-Kabel in die LINE-IN-BUCHSE auf der Rückseite des Geräts.
3 Stellen Sie den FUNKTIONSSCHALTER auf den LINE-IN-Modus
4 Stecken Sie das andere Ende des AUX-Kabels in die Ausgangsbuchse Ihrer gewünschten
externen Komponente.
5 Überprüfen Sie die Lautstärke der externen Komponente.
6 Schauen Sie in das Benutzerhandbuch der externen Komponente,
Kopfhörerbuchse
um einen korrekten Betrieb zu gewährleisten.
Kopfhörer-Betrieb
Der Ton aller Lautsprecher wird abgeschaltet.
1 Schließen Sie die Kopfhörer an die Kopfhörerbuchse an
2 Stellen Sie die Lautstärke auf Ihren gewünschten Hörpegel ein.
HINWEIS : Bei Verwendung der Kopfhörer wird der Ton zu den Lautsprechern des Gerätes
abgeschaltet.
HINWEIS : Kopfhörer werden nicht mitgeliefert.
Fehlersuche
Es gibt keine Stromzufuhr
1 Vergewissern Sie sich, dass das Netzkabel richtig eingesteckt ist.
2 Das Gerät ist nicht eingeschaltet: Schalten Sie das Gerät durch Drehen des LAUTSTÄRKE
AN/AUS-REGLERS von der AUS in die AN-Position.
Es gibt keinen Ton
1 Überprüfen Sie die Lautstärke durch Drehen des LAUTSTÄRKE AN/AUS-REGLERS.
2 Vergewissern Sie sich, dass keine Kopfhörer an das Gerät angeschlossen sind.
3 Prüfen Sie die Position des FUNKTIONSSCHALTERS.
Plattenspieler funktioniert nicht
1 Vergewissern Sie sich, dass der FUNKTIONSSCHALTER auf Phono gestellt ist.
2 Versuchen Sie den Tonarm nach rechts zu bewegen, bis Sie ein Klicken hören.
3 Vergewissern Sie sich, dass die schützende Nadelabdeckung entfernt ist.
KUNDENBETREUUNG
Sollten Sie eine Frage haben oder ein Problem mit Ihrem Ricatech-Produkt auftauchen, können Sie
den Ricatech-Kundenservice kontaktieren. Sie können uns per Telefon und E-Mail erreichen.
E-Mail
Senden Sie uns für die Kundenbetreuung per E-Mail bitte eine E-Mail an [email protected].
Achten Sie bitte darauf, dass Sie Ihre Modellnummer und die Seriennummer des Produkts angeben,
teilen Sie uns außerdem Ihren Namen & Ihre Adresse mit und beschreiben Sie Ihre Frage oder
problem deutlich.
Telefon
Für Kundenbetreuung per Telefon wählen Sie bitte
+32 3 3265694. Ein Mitarbeiter aus unserem Serviceteam wird Ihnen gern behilflich sein.
Besuchen Sie für ein vollständiges Verfahren die Webseite von Ricatech unter: www.ricatech.com
Hereby, Ricatech B.V. declares that this turntable is in compliance with the essential
requirements and other relevant provisions of Directive 1999/5/EC.
Ricatech B.V.
Cornusbaan 1
2908 KB Capelle a/d IJssel
The Netherlands
ESPAÑOL
PRECAUCIONES :
PARA PREVENIR PELIGRO DE FUEGO O DE GOLPES, NO EXPONER
EL APARATO A LA LLUVIA O A LA HUMEDAD. NO QUITAR LA TAPA.
LOS PILOTO DE LUZ EST N SOLDADOS. S LO HAN DE MANIPULAR
EL APARATO PERSONAL DE MANTENIMIENTO CUALIFICADO.
CAUTION
RISK OF ELECTRIC SHOCK
DO NOT OPEN
The lighting flash with arrowhead symbol, within an
equilateral triangle, is intended to alert user to the presence of uninsulated
“dangerous voltage” within the
product’s enclosure that may
be of sufficient magnitude to
constitute risk of electric
shock to persons.
CAUTION: TO REDUCE THE RISK OF
ELECTRIC SHOCK, DO NOT REMOVE
COVER (OR BACK). NO USER SERVICEABLE PARTS INSIDE. REFER
SERVICING TO QUALIFIED SERVICE
PERSONNEL.
The exclamation point within
an equilateral triangle is intended to alert user to the
presence of important
operating and maintenance
(servicing) instruction in the
literature accompanying
the appliance.
“Ventilation not being impeded.”
“Do not exposed to dripping or splashing and that no objects filled with liquids, such
as vases, shall be placed on the apparatus.”
ESPECIFICACIONES
ESPECIFICACIONES
RANGO DE FRECUENCIA
CONSUMO DE ENERG A
FUENTE DE ENERG A
ANTENA
ALTAVOZ
AGUJA DE RECAMBIO
: FM 88 - 108MHz
AM 530 - 1600 KHz
: 12W
: AC 230V - 50Hz
: ANTENA EXTERNA PARA FM
BARRA INCORPORADA PARA AM
: 2” x 3” TIPO DIN MICO x 2,
4 Ohm, 12W x 2
: NP1
* DESIGN AND SPECIFICATIONS SUBJECT TO CHANGE WITHOUT NOTICE.
INSTRUCCIONES DE SEGURIDAD IMPORTANTES PARA
PRODUCTOS DE AUDIO
POR FAVOR LEA CON ATENCIÓN LAS SIGUIENTES INSTRUCCIONES DE SEGURIDAD
APLICABLES A SU EQUIPO.
1. Lea las instrucciones – Lea todas las instrucciones de seguridad y uso antes de
utilizar el aparato.
2. Guarde las instrucciones – Guarde las instrucciones de seguridad y uso para
futuras referencias.
3. Tenga en cuenta las advertencias – Siga todas las advertencias e instrucciones
de uso del aparato.
4. Siga las instrucciones – Siga todas las instrucciones de funcionamiento y uso.
5. Agua y humedad – Este aparato no debe usarse cerca del agua, por ejemplo cerca de bañeras,
lavabos, fregaderos o pilas, en superficies mojadas o cerca de una piscina.
6. Carritos y soportes – Utilice este aparato sólo con carritos o soportes recomendados por el
fabricante.
6A.Desplace el conjunto de carrito y aparato con cuidado. Las paradas rápidas, el exceso de fuerza
o las superficies irregulares pueden hacer que el carrito vuelque.
7. Soporte de pared o techo – Coloque este aparato únicamente sobre soportes de pared o techo
recomendados por el fabricante.
8. Ventilación – Este aparato debe colocarse de forma que su posición no interfiera en una
ventilación adecuada. Por ejemplo, no debe colocarse sobre una cama, sofá, alfombra o superficie
similar, que pueda bloquear las aberturas de ventilación; tampoco lo coloque en lugares
empotrados, como estanterías o armarios, que puedan impedir que el aire fluya por las aberturas
de ventilación
9. Calor – Este aparato debe situarse lejos de fuentes de calor, como radiadores, calentadores,
estufas o demás aparatos (incluidos amplificadores) que desprendan calor.
10.Corriente – Este aparato debe conectarse sólo a la corriente descrita en las instrucciones
de funcionamiento o a la que se describe en el propio aparato.
11. Toma de tierra o polarización – Deben tomarse precauciones para asegurarse de que
la toma de tierra o la polarización del aparato no se impiden.
12.Protección del cable de corriente – Los cables de la corriente deben estar correctamente
colocados para que no se pisen ni se aplasten con objetos colocados sobre o contra ellos.
Se debe prestar especial atención a la parte del cable cercana al enchufe y al conector del
aparato.
13.Limpieza – Debe limpiar este aparato solamente como recomienda el fabricante.
14.Este producto está diseñado para usarse con la antena acoplada y no debe conectarse ninguna
otra antena exterior.
15.Periodos sin uso – Cuando no vaya a utilizar este aparato durante periodos de tiempo
prolongados, desenchúfelo de la corriente.
16.Entrada de objetos y líquidos – Tenga cuidado de que no caigan objetos ni líquidos a través de
las aberturas de la carcasa.
17.Daños que precisan reparaciones – Este aparato debe llevarse al servicio técnico cuando:
A. El cable de la corriente o la clavija estén dañados.
B. Hayan caído objetos o líquidos dentro del aparato.
C. El aparato se haya expuesto a la lluvia.
D. El aparato no funcione normalmente o muestre algún cambio en su funcionamiento.
E. El aparato se haya caído o la carcasa esté dañada.
18. Reparaciones — El usuario no debe intentar reparar el aparato más allá de lo descrito
en el presente manual. Todo lo demás debe realizarlo personal de mantenimiento cualificado.
localización de las piezas
POWER INDICATOR
FM.ST INDICATOR
SPEAKER
SPEAKER
VOLUME ON/OFF KNOB
RADIO/ PHONO/
LINE IN SWITCH
EARPHONE JACK
LID PIVOT POINTL
LOCK HINGE
AM\FM\FM.ST SWITCH
DIAL SCALE
LINE IN JACK
LINE OUT JAC K
EXTERNAL
FM ANTENNA
AC POWER PLUG
TUNING KNOB
ID PIVOT POINT
localización de las piezas
SPEED CONTROL SWITCH
TONE ARM REST
TONE ARM
ADAPTER FOR 45 RPM RECORDS
SPINDLE
TURNTABLE
DESEMPAQUETAR EL TOCADISCOS
1. SACAR TODOS LOS MATERIALES DE LA UNIDAD (NOTA: GUARDAR TODOS
LOS MATERIALES DE EMBALAJE).
2. SACAR CON CUIDADO EL APARATO DEL CORCHO PROTECTOR Y
SACARLO DE LA BOLSA DE PL STICO.
3. AUNQUE EL DISCO SE PUEDE OIR CON LA TAPA ADJUNTA Y ABIERTA, ES
RECOMENDABLE TIRARLA.
4. QUITAR EL PROTECTOR BLANCO DE LA AGUJA, TIRANDO SUAVEMENTE
HACIA LA PARTE DELANTERA DEL APARATO.
FUENTE DE ENERGÍA
DESENROLLAR EL ADAPTADOR DE CORRIENTE (LOCALIZADO EN EL INTERIOR DE LA CAJA).
PRIMERO CONECTAR LA PARTE PEQUE A DEL FINAL DEL ADAPTADOR A LA PARTE DE ATR S
DEL TOCADISCOS. ENTONCES ENCHUFAR LA OTRA PARTE A LA CORRIENTE.
INSTALACI N DE LA TAPA
1. GIRAR LA BISAGRA DE LA TAPA HACIA ATR
2. PORNER LA TAPA SOBRE EL PLATO Y PRESIONE
EL REGULADOR DE LA BISAGRA, TAL Y COMO
INDICA EL DIBUJO.
3. A MEDIDA QUE PRESIONA LA TAPA EN SU LUGAR,
ANIVELE LOS PASADORES COMO SE INDICA A
CONTINUACI N.
4. PRESIONE LA TAPA HASTA EL FONDO HASTA QUE
LOS PASADORES ENCAJEN EN SU SITIO.
click
PARA UTILIZAR EL TOCADISCOS
1. GIRAR EL BOT N VOLUMEN ON-OFF, SITUADO EN EL PANEL FRONTAL,A LA POSICI N ON.
2. AJUSTAR EL INTERRUPTOR FUNCTION AL MODO PHONE.
3. COLOCAR EL CONTROL DE VELOCIDAD EN LA POSICI N DESEADA (33 1/3, 45 ó 78 RPM).
4. COLOCAR EL BRAZO DEL TOCADISCOS MUY DESPACIO SOBRE EL DISCO.
EL TOCADISCOS EMPEZAR A GIRAR AUTOM TICAMENTE.
5. PONER EL BRAZO MANUALMENTE EN EL PUNTO DEL DISCO EN EL QUE
QUER IS QUE EMPIECE. AJUSTAR EL VOLUMEN DESEADO.
6. CUANDO LLEGUE AL FINAL DEL DISCO, EL TOCADISCOS TODAV A SEGUIR GIRANDO. DEB
IS VOLVER A COLOCAR EL BRAZO MANUALMENTE A SU POSICI N INICIAL.
ACCESORIOS: ADAPTADOR PARA DISCOS DE 45 RPM
PARA ESCUCHAR LOS DISCOS DE 45 RPM, COLOQUE EL
ADAPTADOR EN LA BASE GIRATORIA SPINDLE.
PARA USAR LA RADIO
1. AJUSTAR EL INTERRUPTOR FUNCTION AL MODO RADIO.
PARA ENCENDER LA RADIO PULSAR POWER ON/OFF
2. PONER LA BANDA DESEADA AM/FM/FM.ST
3. ESCOGER UNA EMISORA GIRANDO EL BOT N TUNING
4. PARA AJUSTAR EL VOLUMEN CON EL BOT N VOLUME ON/OFF3.
ANTENA
PARA RECEPCI N DE FM, EL APARATO VIENE CON UNA CABLE DE ANTENA, MOVER EL
CABLE HASTA TENER UNA BUENA RECEPCI N. PARA RECEPCI N DE AM, EL APARATO VIENE
CON UNA ANTENA DIRECCIONAL. GIRAR PARA ENCONTRAR UNA BUENA POSICI N Y NO
CONECTAR LA ANTENA EXTERNA
SALIDAS DE AUDIO
1. CONECTE LOS CABLES AUXILIARES (NO INCLUIDOS) EN LA CLAVIJA LINE OUT Y
CONECTE EL OTRO EXTREMO A OTRA UNIDAD EXTERNA.
2. COMPROBAR QUE EL VOLUMEN DE LA UNIDAD EXTERNA.
3. PARA M S INFORMACI N, CONSULTAR EL MANUAL DE LA UNIDAD EXTERNA.
AURICULARES
PARA ESCUCHAR LA UNIDAD CON AURICULARES (NO INCLUIDOS). CONECTAR LOS
AURICULARES EN SU ENTRADA DEL APARATO. UNA VEZ CONECTADO, S LO SE ESCUCHAR
A TRAV S DE LOS AURICULARES.
Salida Auxiliar
1 Se puede conectar la radio a las diferentes fuentes utilizando la salida auxiliar.
2 cables Plug auxiliar (no suministrado) en la salida LINE OUT.
3 Conecte el otro extremo de los cables de auxiliar a la entrada en el componente deseado.
4 Véase el manual del propietario para el componente de operación de corrección.
NOTA: La salida auxiliar es una salida de señal de nivel de pasivos y no se los altavoces de
potencia.
Entrada auxiliar
1 Puede conectar los componentes externos a la unidad mediante la entrada auxiliar.
2 Enchufe auxiliar del cable en la toma LINE IN en la parte posterior de su unidad.
3 Coloque el selector de línea en modo
4 Conecte el otro extremo del cable auxiliar en la toma de salida en su componet externo deseado
5 Compruebe el nivel de volumen de su componente externo.
6 Véase el manual del operador para el correcto funcionamiento del componente externo.
Toma de auriculares de operación
Toma de auriculares
1 Conecte los auriculares al conector de auriculares
2 Ajuste el volumen al nivel deseado.
NOTA: Al usar audífonos, el sonido
los altavoces de la unidad será cortada.
El sonido de todos los altavoces se corta
NOTA: auriculares no vienen incluidos con la unidad.
Solución de problemas
No hay energía
1 Asegúrese de que la radio está conectado correctamente.
2 La unidad no está encendida: Gire la perilla VOLUME / OFF desde el principio
posición más allá del “clic” para encender la unidad.
No hay sonido
1 Compruebe el nivel de volumen girando la perilla VOLUME / OFF.
2 Asegúrese de que los auriculares no están conectados a la unidad.
3 Compruebe la posición del selector de función.
Giradiscos no funciona
1 Asegúrese de que el selector está ajustado a phono.
2 Trate de mover el brazo del tocadiscos a la derecha hasta que oiga un clic.
3 Asegúrese de que la cubierta protectora se retira la aguja.
ATENCIÓN AL CLIENTE
En caso de dudas o problemas con su producto Ricatech, puede contactar con el servicio de
atención al cliente de Ricatech. Puede ponerse en contacto con nosotros por teléfono o correo
electrónico.
Correo electrónico
Para recibir asistencia técnica por correo electrónico, escriba a [email protected]. Asegúrese
de mencionar el nombre del modelo y número de serie del producto. Mencione asimismo su nombre
y dirección y describa claramente su pregunta o problema.
Teléfono
Para ponerse en contacto con el servicio de atención al cliente por teléfono, marque +32 3 3265694.
Uno de los miembros de nuestro personal se pondrá a su disposición. Para más información sobre el
procedimiento completo, visite el sitio web de Ricatech en: www.ricatech.com
Hereby, Ricatech B.V. declares that this turntable is in compliance with the essential
requirements and other relevant provisions of Directive 1999/5/EC.
Ricatech B.V.
Cornusbaan 1
2908 KB Capelle a/d IJssel
The Netherlands