1
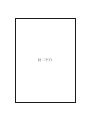
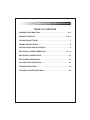
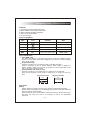
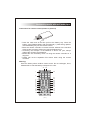
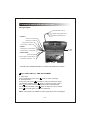
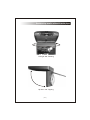
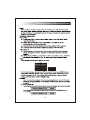
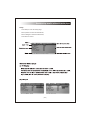
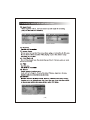
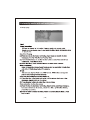
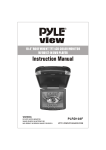
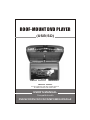
ROOF-MOUNT DVD PLAYER
( USB / SD )
9" TFT LCD COLOR MONITOR
MODE
V
PLAY
STOP
V
WARNING! HAZARD!
DO NOT OPERATE THIS UNIT UNLESS VEHICLE
IS PARKED IN SAFE AND LEGAL AREA.
USER'S MANUAL
Compatible with
DVD/SVCD/DVCD/VCD/CD/MP3/MP4/JPG/DivX
封二空白
Roofmounting monitor with multi-media player
TABLE OF CONTENTS
GENERAL INFORMATION . . . . . . . . . . . . . . . . . . . . . . . . . . . . . . 2-4
REMOTE CONTROL . . . . . . . . . . . . . . . . . . . . . . . . . . . . . . . . . 5 & 6
OPERATION BUTTONS. . . . . . . . . . . . . . . . . . . . . . . . . . . . . . . . . . 7
WIRING INSTALLATION . . . . . . . . . . . . . . . . . . . . . . . . . . . . . . . . . 8
DVD/SD CARD/USB LOCATIONS . . . . . . . . . . . . . . . . . . . . . . . . . . 9
MULTIDISC PLAYER OPERATION. . . . . . . . . . . . . . . . . . . . . . 10-14
MULTIDISC PLAYER SETUP . . . . . . . . . . . . . . . . . . . . . . . . . . . . . 15
MP3 PLAYER OPERATION . . . . . . . . . . . . . . . . . . . . . . . . . . . . . . 18
SD CARD/USB OPERATION . . . . . . . . . . . . . . . . . . . . . . . . . . . . . 19
TROUBLE SHOOTING. . . . . . . . . . . . . . . . . . . . . . . . . . . . . . . . . . 19
TECHNICAL SPECIFICATIONS . . . . . . . . . . . . . . . . . . . . . . . . . . 20
Roofmounting monitor with multi-media player
Please read the manual carefully before using and keep it well for your
future reference.
Important instruction for safely:
For your safety, do not turn on, watch or operate the unit while driving. In
some countries and regions, it may be against the laws. The product is
comprised of many precision electronic components. Self-renovation or
disassembling may cause malfunction to the device.
Note:
To reduce the risk of fire or electric shock, do not expose this product to
rain or moisture.
High voltage inside! Do not open or dismantle the unit. Do not repair
yourself. Refer servicing to qualified personnel.
The product is a laser product. Make sure to read instruction manual
before operating.
Do not try to open the covers to avoid direct laser radiation.
When the cover of the unit is opened or the interlocking system gets
unlocked, the laser light can be visible. Direct vision of laser beam is
hazardous to your eyes.
In order to prolong the life of the unit which has a large scale of integrate
circuits and precision pick-up device, Frequent turn ON/OFF might
damage the unit. More than 5 seconds interval is required.
Note:
LCD may have a few color dots, which is common for the matrix display
technology, and doesn't indicate defects or faults.
2
Roofmounting monitor with multi-media player
Features:
1. The display unit has built in DVD player.
2. Built in USB 2.0 host and SD card reader.
3. Built in wireless FM Audio transmitter.
4. Built in IR Audio transmitter.
5. AV input channel
Discs for playback
Type
Icon
Content
Size
DVD
Video & Audio (dynamic image)
12cm / 8cm
VCD
Video & Audio (dynamic image)
12cm / 8cm
CD
Audio
12cm / 8cm
MP3
MP3
Audio
12cm / 8cm
MP4
MP4
Video & Audio (dynamic image)
12cm / 8cm
Disc-related terms
Title (DVD only)
The main film content or accompanying feature content or additional feature
content, or music album. Each title is assigned a title reference number enabling
you to locate it easily.
Chapter (DVD only)
Sections of a picture or a musical piece that are smaller than titles.
A title is composed of one or several chapters. Each chapter is assigned a
chapter number, enable you to locate the chapter you want. Depending on the
disc, no chapters may be recorded.
Track (Video CD and audio CD only)
Sections of a picture or a musical piece on a video CD or an audio CD.
Each track is assigned a track number, enabling you to locate the track you
want.
Diagram of DVD disc
Disc
Diagram of VCD/CD
Disc
Title
Chapeter
Track
Precaution
Safety
Please check the voltage in the car as the machine required before playing.
Please hold the plug tightly, and avoid dragging the power cords when insert the
plug in or pull out it from the jack.
This machine has laser system which is harmful for the eyes, please do not open
the crust. Any repair you need, it is necessary to ask for the specialized
personnel.
3
Roofmounting monitor with multi-media player
Placement
The storage temperature ranges from -30°C to -75°C, operating temperature
ranges from -10°C to 55°C.
Please keep the pick-up clean and away the dust. If so, the cleaning disc can help
deal with this problem. For detailed operation instructions for cleaning the pick-up,
you can consult the user's manual of pick-up cleaning disc.
Do not expose this unit to rain or moisture. Avoid dropping or impact to the unit.
Vapor on convex mirror and trouble shooting
There's liquid on convex mirror in following cases, but it is normal phenomena.
Due to sudden change in temperature and car air-conditioner is turned ON their
will be a vapor formation on convex mirror. To de-vaporize it please take out the
disc and power ON the unit about one hour.
Please wipe the machine with soft and dry cloth dipped optional washing liquor in
case of scratching the screen.
Note
Handling discs:
Do not touch the playback side of the disc. Hold the disc by the edges so that
fingerprints will not get on the surface.
Do not stick paper or tape on the disc.
Storing discs:
After playing, store the disc in its case.
Do not expose the disc to direct sunlight or sources of heat, or leave it in a parked
car exposed to direct sunlight, as there may be a considerable temperature
increase inside the car.
Cleaning discs:
Fingerprints and dust on the disc can cause poor picture quality and sound
distortion. Before playing, clean the disc with a clean cloth. Wipe the disc from the
center out. Do not use strong solvents such as alcohol, benzine, thinner.
Brief Instructions
Checking the accessories
remote controller
user's manual
rubber pillow
1
1
6
4
Roofmounting monitor with multi-media player
Instructions for remote control (shown as pictures)
Pull
Push
* Press the catch and at the time pull out the battery tray. Insert the
battery, type CR2025 battery with the stamped (+) mark facing upward.
Insert the battery tray into the remote control.
* Direct the remote controller to infrared receiver window of the machine
within 60 and 3 meters, without any barriers between them.
* Commonly, the life-span of the batteries is about one year, always
replace the old set of new batteries.
* Please take out the battery when not using the remote controller for a
long time.
* Please pull out the separation film before when using the remote
controller.
Warning:
Store the battery where children cannot reach. Do not recharges, short,
disassemble or heat the battery or dispose it in a fire.
30
29
28
1
2
3
4
5
6
7
8
9
10
27
26
25
24
23
22
21
20
19
11
12
13
14
18
17
16
15
5
Roofmounting monitor with multi-media player
REMOTE CONTROL FUNCTION
1. POWER button: Press the POWER key to turn the power ON/OFF.
2. NUMBER button: In the DVD/SD/USB mode by pressing these button you can
directly select the program. In TV mode, you can directly select the TV channel.
3. SUBTITLE button: muti-subtitle select.
4. DISPLAY button: show information about DVD/SD/USB/TV.
5. AUDIO button: muti-language select.
6. ANGLE button: muti-angle select.
7. UPWARD button: In DVD/SD/USB mode, press it to select the menu or program.
In TV mode, press to search upwards the TV channel.
8. SETUP button
9. ENTER button
10. LEFTWARD button: Press it to leftward select the menu or program.
11. CONSOLE button: Press CONSOLE that will display the select subtitle:
BRIGHTNESS-CONTRAST-SATURATION-HUE-FM-IR-RESET.
12. DOWNWARD button: In DVD/SD/USB mode, press it to select down the menu
or program. In TV mode, press it to select down the channel.
13.14. VOLUME button: Press the button to increase or decrease the volume.
15.16. PREVIOUS/NEXT button.
17.18. FAST BACKWARD/FAST FORWARD button.
19. STOP button: Press STOP for memory stop, press STOP twice to stop playing.
20. RIGHTWARD button: Press it to rightward select the menu or program.
21. PLAY button: Press once, it plays or pause.
22. AUTO/ZOOM button: in the DVD/SD/USB mode, press it the picture can be
zoomed. In the TV mode, press it to auto search TV channel.
23. REPEAT button: In the playing mode, press it to perform the repeated playing.
24. MUTE button: Press the key to turn on and off the volume output.
25. PROGRAM button.
26. SLOW button.
27. SEARCH button.
28. AV/TV/DVD button: Select among these three modes.
29. TITLE button.
30. MENU PBC button.
6
Roofmounting monitor with multi-media player
MONITOR DESCRIPTION:
SD Card Slot
USB Port
16 15 14 13
12 11 10 9
9" TFT LCD COLOR MONITOR
MODE
V
1 2
3 4
PLAY
STOP
V
5
6 7 8
1. REMOTE WINDOW
2. POWER BUTTON
3. VOLUME DOWN
4. MENU (PRESS TO DISPLAY OSD BRIGHTNESS, CONTRAST....CONTROL)
5. VOLUME UP
6. MODE
7. PLAY/PAUSE ( IN TV MODE ,PRESS TO SELECT DOWN TV CHANNEL)
8. STOP
9. RETURN
10,11. RIGHT/LEFT DIRECTION CURSOR
12. OPEN (PRESS TO FLIP DOWN YOUR SCREEN)
13. LIGHT SWITCH AND TIME ADJUSTMENT
14,15. UP/DOWN MENU OR PROGRAM SELECTION
16. RETURN
7
Roofmounting monitor with multi-media player
Wiring Diagram
YELLOW RCA (V OUT)
WHITE RCA (AUDIO OUT)
RED RCA (AUDIO OUT)
AV INPUT:
WHITE RCA (L AUDIO IN)
RED RCA ( R AUDIO IN)
YELLOW RCA (VIDEO 1 IN)
YELLOW RCA ( VIDEO 2 IN)
POWER:
RED WIRE (+12V SWITCHED)
BLACK WIRE (-12V GROUND)
9" TFT LCD COLOR MONITOR
DOME LAMPS:
BLUE: GROUND
YELLOW WIRE: + DOOR SWITCH
RED WIRE: CONSTANT +12V
MODE
V
PLAY
STOP
V
* FOR BETTER UNDERSTANDING ALL WIRES ARE PROPERLY TAGED.
key: LIGHT SWITCH / TIME ADJUSTMENT
A. Light switch
During initialization mode; Press
shortly to switch on/off light.
B. Time adjustment
During any mode, Press
3 seconds to enter time adjustment mode.
The HOUR is twinkling, Press
shortly to adjust the correct number
Press
3 seconds to finish hour adjustment and adjust MINUTE.
The MINUTE is twinkling, Press
shortly to adjust the correct number.
Press
3 seconds again to finish time adjustment.
Note: This machine is suitable to some types of the car not all types.
8
Roofmounting monitor with multi-media player
9" TFT LCD COLOR MONITOR
MODE
V
PLAY
STOP
V
Left-right 360° Rotating
Up-dwon 105° Flipping
9
Roofmounting monitor with multi-media player
2x
2x
4x
4x
8x
16 x
8x
16 x
10
32 x
32 x
Roofmounting monitor with multi-media player
DVD
AV1
TV
AV2
SD
MEDIA
USB SLOT
11
Roofmounting monitor with multi-media player
12
Roofmounting monitor with multi-media player
13
Roofmounting monitor with multi-media player
Press CONSOLE button and you will be able to change the factory settings for Brightness,
Contrast, Color and Hue levels and you can adjust FM transmitter and IR frequency as well
with +/- buttons.
Note: By selecting RESET you will return to factory de fault settings.
14
Roofmounting monitor with multi-media player
Setup
Press Setup to enter into Setup page,
Move Up/Down to select the desired item,
Move Left/Right to select the desired item,
Press Enter to confirm
15
Roofmounting monitor with multi-media player
Preference setup
16
Roofmounting monitor with multi-media player
Passward
17
Roofmounting monitor with multi-media player
TV Setup page
18
Roofmounting monitor with multi-media player
SD/USB
Trouble shooting
- Please check if DVD has not been placed backwards
- Check if disc is dirty or schratched.
- Make sure if there is no moisture inside the unit (disconnect the unit for one hour)
- Disconnect the power cord and reconnect to reset the unit form any wrong setting.
19
Roofmounting monitor with multi-media player
FM Frequency
87.7~89.1MHz
20
封三空白
Thank you for purchasing the TFT LCD color monitor/DVD. To enjoy the features of
this device and to ensure years of trouble-free operation, please read this manual
carefully and follow the instructions.
WARNING:
Hazard do not operate this unit unless vehicle is parked in safe and legal area.