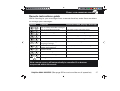
1
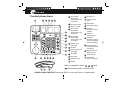
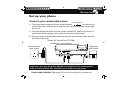
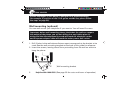
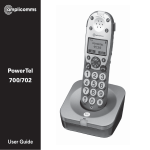
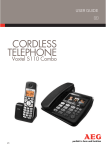
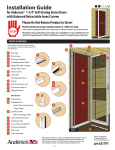
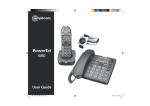
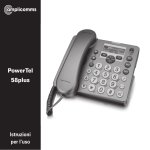
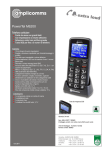
PowerTel
68 Plus
User Guide
At a glance
Please open this page for an ‘At a glance’ guide to your PowerTel 68 Plus
AT A GLANCE
Corded phone base
20
1
2
3
4
1 One−touch
button M1
(emergency call
number 1)
5
2 Answer on/off
3 Save number
4 One−touch
6
7
8
9
10
19
18
17 16 15 14
button M2
(emergency call
number 2)
5 One−touch
button M3
(emergency call
number 3)
6 Skip to next
message
11
7 Display
12
8 Skip to previous
13
9 Quickdial
message
10 R−button
11 Redial/Pause
13 Play/Pause
14 Incoming call
light
15 Handsfree
16 Handsfree light
17 Increase
receiver volume
+40 dB
18 Receiver
volume light
19 Handset
receiver volume
control (located
under handset)
20 Handset hook
(used when wall
mounted)
21 Ringer volume
slide control
22 Tone control
23 Handsfree
volume control
12 Delete
23 22
21
Buttons detailed under 2 , 3 , 6 and
8 are located under a plastic flap.
Helpline 0844 800 6503 (See page 32 for costs and hours of operation)
2
Helpline 0844 800 6503 (See page 32 for costs and hours of operation)
CONTENTS
Getting started .................................... 5
Emergency calls/One-touch dialling 17
Check box contents ............................. 6
Emergency calls ................................. 18
Set up your phone ............................... 7
Store an emergency/
one touch number ............................. 18
Wall mounting (optional) ..................... 8
Making and receiving calls ............... 11
Make a call .......................................... 12
End a call ............................................ 12
Take a call ........................................... 12
Last number redial............................. 12
Boost the handset earpiece volume . 12
Adjust the handset earpiece volume 13
Adjust the tone ................................... 13
Adjust the ringer volume .................. 13
Inserting photos to label your
one-touch buttons ............................. 18
Removing the cover for the
one-touch buttons ............................. 19
Dial an emergency/
one touch number ............................. 18
Using your answering machine ....... 21
Switch answering machine
on or off .............................................. 22
Handsfree feature .............................. 13
Set the answering
machine language ............................. 22
Use handsfree calling ........................ 14
Set the day and time ......................... 22
Use a headset (not included) ............ 14
Record your outgoing message ....... 23
Power failure – what to do ................ 14
Using your quick dial memory ........ 15
To restore the pre-recorded
outgoing message ............................. 23
Store a quick dial number.......................16
Set the answer delay ......................... 24
Dial a quick dial number.................... 16
Record a memo.................................. 24
Helpline 0844 800 6503 (See page 32 for costs and hours of operation)
3
CONTENTS
Listen to messages or memos.......... 24
Safety information ............................. 36
Delete a single message or memo ... 25
Disposal .............................................. 38
Delete all messages and memos...... 25
Maintenance and guarantee ............. 39
Memory full ........................................ 25
Declaration of Conformity.................40
Remote access to your
answering machine ........................... 26
Index ................................................... 41
Switch the answering machine
on remotely ........................................ 26
Call in to check your messages ........ 26
Remote instructions guide ................ 27
Room monitoring............................... 27
Answering machine
display indicators ............................... 28
Use on a private branch exchange .. 29
To set the recall time ......................... 30
Insert a dialling pause ....................... 30
Using additional services .................. 30
Help and support............................... 31
Troubleshooting guide ...................... 32
General information .......................... 35
4
Helpline 0844 800 6503 (See page 32 for costs and hours of operation)
Getting started
Helpline 0844 800 6503 (See page 32 for costs and hours of operation)
5
GETTING STARTED
Getting started
Important: please make sure you’ve read the safety information on page 36
before you set up your phone.
Check box contents
You should have:
t
t
t
t
t
DPSEFEQIPOFCBTF
IBOETFUBOEIBOETFUDBCMF
QPXFSBEBQUFS
UFMFQIPOFDBCMF
XBMMNPVOUJOHCSBDLFU
Important: use only the power adapter and telephone line cord supplied
with your PowerTel 68 Plus otherwise your phone may not work.
6
Helpline 0844 800 6503 (See page 32 for costs and hours of operation)
GETTING STARTED
Set up your phone
Connect your corded phone base
DC 9V 300mA
on the back of
1. Plug the power adapter into the socket marked
your phone base and the other end into the mains power wall socket and
switch on.
2. Plug the telephone cable into the socket marked TEL.LINE on the back of
your phone base and the other end into the phone wall socket.
3. Plug one end of the handset cable into the handset and the other end into
the side of the base.
Socket for Vibrate Pad (PTV100)
available as an accessory
Mains power
wall socket
Telephone
wall socket
1
2
Important: use only the power adapter and telephone line cord supplied
with your PowerTel 68 Plus otherwise your phone may not work.
Helpline 0844 800 6503 (See page 32 for costs and hours of operation)
7
GETTING STARTED
Private exchanges: if your phone is going to use a private exchange
(for example, if you have to dial ‘9’ to get an outside line, please follow
the steps on page 30).
Wall mounting (optional)
You can wall mount your telephone if you want to. You will need 2 screws.
Important: before wall mounting, please check that: the wall can support
the weight of the phone, you are not drilling into any hidden pipes or
wiring and that the telephone line cord will reach the telephone socket
and the power adapter cable will reach the mains power wall socket.
1. Drill 2 holes in the wall whose distance apart corresponds to the bracket to be
used. See the wall mounting template at the back of this guide for reference.
2. Insert the screws, leaving about 5mm protruding from the wall on which to
hang the phone.
Wall mounting bracket
8
Helpline 0844 800 6503 (See page 32 for costs and hours of operation)
GETTING STARTED
3. Position the telephone on the bracket, fit the screws in the slots and slide the
telphone downwards a little.
4. Rotate the handset hook in the handset cradle 180˚ so that it sticks upwards.
This holds the handset in place when wall mounted.
Handset hook
Your PowerTel 68 Plus phone is now ready for use!
Helpline 0844 800 6503 (See page 32 for costs and hours of operation)
9
10
Helpline 0844 800 6503 (See page 32 for costs and hours of operation)
Making and
receiving calls
Helpline 0844 800 6503 (See page 32 for costs and hours of operation)
11
MAKING AND RECEIVING CALLS
Making and receiving calls
Make a call
1. Lift the handset or press
to dial using handsfree mode.
2. Enter the number you wish to call using your base keypad.
3. End your call by putting the handset back in its cradle or by pressing
using handsfree mode.
if
End a call
Simply put the handset back in its base cradle or press
if using handsfree mode.
Take a call
Simply lift the handset or press
to answer in handsfree mode.
Last number redial
Your phone stores the last number you’ve dialled.
1. Lift the handset or press
to dial using handsfree mode.
2. Press
. The last number you called will be dialled.
Boost the handset earpiece volume
To boost the handset earpiece volume to +40dB, press
.
Note: your phone can produce very high sound when the amplification is
switched on. Please take care if the phone is used by others with normal hearing.
12
Helpline 0844 800 6503 (See page 32 for costs and hours of operation)
MAKING AND RECEIVING CALLS
Adjust the handset earpiece volume
You can adjust the handset earpiece volume when the +40dB amplification is
activated by adjusting the control located underneath the handset
.
Adjust the tone
To adjust the tone produced by the handset earpiece, use the slide control on
the right-hand side of the phone’s base
.
Note: you can only adjust the tone when the +40dB amplification
is activated.
Adjust the ringer volume
To adjust the ringer volume, use the slide control on the right-hand side of the
phone’s base
.
Handsfree feature
Use the handsfree feature to talk to your caller without holding the handset or
to let other people in the room listen to the conversation.
Note: the +40dB amplification feature and handset volume and tone controls
will not work when using handsfree.
Helpline 0844 800 6503 (See page 32 for costs and hours of operation)
13
MAKING AND RECEIVING CALLS
Use handsfree calling
To switch handsfree mode on and off, simply press
.
To adjust the handsfree volume, use the slide control switch on the right-hand
side of the phone’s base
.
Use a headset (not included)
Simply plug your headset into the headset socket marked
side of the phone’s base and press the
button.
on the left-hand
Note: when using a headset, the +40dB amplification feature will not work.
Power failure – what to do
If your mains power fails, you can still use your phone to make and receive
calls. Any messages/memos that were recorded will be retained, however you
will need to reset the day and time.
If the power was not restored within approximately 1 hour then any numbers
stored under the emergency/one-touch buttons (M1, M2 and M3) will be lost.
You will need to store these numbers again.
14
Helpline 0844 800 6503 (See page 32 for costs and hours of operation)
Using your quick
dial memory
Helpline 0844 800 6503 (See page 32 for costs and hours of operation)
15
USING YOUR QUICK DIAL MEMORY
Using your quick dial memory
You can store 10 telephone numbers (max. 16 digits) under each of the quick dial
memory buttons:
to
.
Store a quick dial number
1. Lift the handset and press the
button (located under the plastic flap).
2. Enter the phone number you want to store using the keypad and press
3. Press the button under which you want to store the number, you have a
choice of buttons
to
.
4. Replace the handset, the entry has been saved.
Dial a quick dial number
1. Lift the handset or press
2. Press the
to dial using handsfree.
button.
3. Press the button (
to
) under which you stored the quick dial number.
The phone number will be dialled automatically.
Note: you cannot delete a quick dial entry once you have stored it but you can
overwrite it by storing a new number under the same button.
16
Helpline 0844 800 6503 (See page 32 for costs and hours of operation)
.
Emergency calls/
One-touch dialling
Helpline 0844 800 6503 (See page 32 for costs and hours of operation)
17
EMERGENCY CALLS/ONE-TOUCH DIALLING
Emergency calls
You can use the emergency call buttons to call the emergency services
exchange or to contact specific people in the event of an emergency.
Note: there are several emergency services exchanges available. In some
countries, these may be subject to a charge. You can also use the phone as
a private emergency call device within the family.
Store an emergency/one−touch number
You can use the one−touch dialling buttons M1, M2 and M3 for normal direct
dialling or as memory locations for the emergency call function. Each telephone
number can be a maximum of 16 digits.
1. Lift the handset and press the
button (located under the plastic flap).
2. Enter the phone number you want to store and press
.
3. Press the one-touch button under which you want to store the number,
either: 4 , 4 or 4 .
4. Replace the handset, the entry has been saved.
Inserting photos to label your one-touch buttons
You can insert photos or symbols under the transparent covers of the 3
one−touch dialling buttons to label them. See page 19 for instructions.
18
Helpline 0844 800 6503 (See page 32 for costs and hours of operation)
EMERGENCY CALLS/ONE-TOUCH DIALLING
Removing the cover for the one-touch buttons
Grip the cover between your thumb and index finger and remove it as shown in
the diagram below. Insert the required picture or photograph under the cover
and replace it back on the button.
Dial an emergency/one-touch number
1. Lift the handset or press
to dial using handsfree.
2. Press the one-touch button you require:
automatically.
4
,
4
or
4
. The number is dialled
Note: you cannot delete a one-touch number once you have stored it but
you can overwrite it by storing a new number under the same button.
Helpline 0844 800 6503 (See page 32 for costs and hours of operation)
19
20
Helpline 0844 800 6503 (See page 32 for costs and hours of operation)
Using your
answering
machine
Helpline 0844 800 6503 (See page 32 for costs and hours of operation)
21
USING YOUR ANSWERING MACHINE
Using your answering machine
Follow these easy steps to set up and use your answering machine.
Once you’ve switched your answering machine on, when you receive any
messages, the indicator will flash and the number of messages will be displayed.
Switch answering machine on or off
To switch your answering machine on and off, simply press the
(located under the plastic flap).
button
Set the answering machine language
You have a choice of three languages: English, German or French.
1. Disconnect the power adapter from the mains power wall socket and then
reconnect it.
2. Press and hold the
buttons (located under the plastic flap).
3. After the announcement release the buttons.
4. Use the
to confirm it.
button to select the language and press
Note: after changing the language you will need to set the day and time.
Set the day and time
to activate programming mode.
1. Press and hold
button until you hear the correct day
2. Repeatedly press and release the
announced and press
to confirm.
22
Helpline 0844 800 6503 (See page 32 for costs and hours of operation)
USING YOUR ANSWERING MACHINE
button until you hear the correct
3. Repeatedly press and release the
to confirm.
hour announced and press
4. Repeatedly press and release the
button until you hear the correct
minute announced and press the
button. The day and time you set will
be announced.
Note: if there is a power failure, you will need to set the day and time again.
Record your outgoing message
You can change the default answering message to your own. Your outgoing
message can be up to 60 seconds long.
1. Press and keep holding the
button. After the beep begin to speak your
message.
2. Release the
button when you’ve finished.
3. Check your outgoing message is how you want it but pressing
to hear it.
Note: if you want to change your own recorded outgoing message, simply
record another one following the instructions above and your existing
message will be over written.
To restore the pre-recorded outgoing message
1. Press and hold the
button.
2. After the beep, release the button. The pre-recorded message is restored.
Helpline 0844 800 6503 (See page 32 for costs and hours of operation)
23
USING YOUR ANSWERING MACHINE
Set the answer delay
You can choose either 2 or 6 rings before your answering machine answers any
incoming call or you can choose Time Saver. Time Saver saves you the cost
of the call if you’re calling in from elsewhere to pick up any messages: if your
answering machine answers after 2 rings you have new messages, if it answers
after 5 rings you have no new messages. Therefore, you can hang up after 3
rings knowing you have no new messages and you won’t be charged for the call.
2/6/TS
1. Use the switch
on the underside of the phone to select either 2 or 6
rings or TS for (Time Saver).
Record a memo
You can record memo messages for yourself or other members of the
household which can be played back like normal messages.
For instructions on how to record a memo, see page 27.
Listen to messages or memos
Playback is in the order messages or memos were received. New messages
are played before old ones. The time and date of each message or memo is
announced before playback.
24
Helpline 0844 800 6503 (See page 32 for costs and hours of operation)
USING YOUR ANSWERING MACHINE
Here are some functions you may find useful:
t
t
t
t
UPQMBZUIFNFTTBHFQSFTT
UPTUPQQMBZCBDLQSFTT
UPSFQFBUQMBZCBDLPGUIFNFTTBHFQSFTT
UPQMBZUIFQSFWJPVTNFTTBHFQSFTTBOEIPME
t UPQMBZUIFOFYUNFTTBHFQSFTT
Delete a single message or memo
1MBZUIFNFTTBHFPSNFNPZPVXBOUUPEFMFUFCZQSFTTJOH
2. Press the
.
CVUUPOEVSJOHQMBZCBDLPGUIFNFTTBHFPSNFNPUPEFMFUFJU
Delete all messages and memos
Note: all messages/memos will be deleted. Any new messages/memos will
be retained.
1. Press and hold the
CVUUPO
:PVXJMMIFBSBCFFQUPDPOåSNBMMNFTTBHFTBOENFNPTIBWFCFFOEFMFUFE
Memory full
5IFNBYJNVNSFDPSEJOHUJNFJTNJOVUFT5IFNBYJNVNMFOHUIPGB
NFTTBHFJTNJOVUFT8IFOUIFNFNPSZJTGVMMOPGVSUIFSNFTTBHFTBSF
SFDPSEFE:PVMMOFFEUPEFMFUFTPNFPGZPVSNFTTBHFTPSNFNPTCFGPSFBOZ
OFXNFTTBHFTDBOCFSFDPSEFE
Helpline 0844 800 6503 (See page 32 for costs and hours of operation)
25
USING YOUR ANSWERING MACHINE
Remote access to your answering machine
You can call your answering machine from another Touchtone™ telephone to
hear your messages and operate other functions when you’re away from home.
You need to use a 3 digit PIN code to access your answering machine. The 3
digit PIN code can be found on a label on the underside of the telephone.
Switch the answering machine on remotely
If you left the house and forgot to switch your answering machine on you can
do it remotely from another phone.
1. Dial your own phone number from a remote phone. After 10 rings your
answer machine will switch on and take your call.
2. Enter your 3 digit PIN during the outgoing message.
3. Press
then
to switch the answering machine on. You will hear two
beeps to confirm that the answering machine is now switched on.
Call in to check your messages
1. Dial your own phone number from the remote phone.
2. Enter your 3 digit PIN during the outgoing message.
3. You can now manage your messages using your keypad (see remote
instructions guide on the next page).
26
Helpline 0844 800 6503 (See page 32 for costs and hours of operation)
USING YOUR ANSWERING MACHINE
Remote instructions guide
While listening to your messages from a remote location, enter these numbers
to manage your messages.
Button
Function
Functions when playing a message
Play all newly recorded messages
Play all recorded messages
Play back current message again
Deleting all messages
Delete the current message
Stop the message currently being played
Play the previous message
Record/Stop recording an
outgoing message
Record/Stop recording a memo
Play the next message
Repeat playback of current message
Switch the answering
machine on/off
Room monitoring 30 sec.
Stop room monitoring
Placing the telephone on−hook ends remote access
Note: remote access will automatically be cancelled if no buttons
are pressed within 20 seconds.
Helpline 0844 800 6503 (See page 32 for costs and hours of operation)
27
USING YOUR ANSWERING MACHINE
Room monitoring
You can use the remote access feature to switch the microphone in the
answering machine on in order to listen for noises and monitor the room in
which the answering machine is located. See the ‘Remote instructions guide’ on
page 27.
Answering machine display indicators
Display
Description
––
Answering machine is switched off
00
Answering machine is switched on, no messages recorded
0X
Answering machine is switched on, 0X messages recorded
Toggle between –– and 00
(or OX)
The day/time setting has been lost and needs to be reset
rA
Recording an outgoing message
PA
Recording a message
dE
Message deleted during playback
Ln
Remote access
FL
Memory full
28
Helpline 0844 800 6503 (See page 32 for costs and hours of operation)
Use on a private
branch exchange
Helpline 0844 800 6503 (See page 32 for costs and hours of operation)
29
USE ON A PRIVATE BRANCH EXCHANGE
Use on a private branch exchange
If your phone’s on an exchange (e.g. you need to dial 9 to get an outside line),
you can transfer calls and use call back by using the
button. You’ll need to
check your private exchange manual to find out which timing to use for your
exchange. You can choose two recall timings: 100ms (Short) and 300ms (Long).
To set the recall time
100/300
1. Use the sliding switch R
100ms or 300ms.
on the underside of the phone to set either
Insert a dialling pause
If you have to dial a number for an outside line and it takes a while to connect,
you can insert a pause so you don’t have to wait to hear the dialling tone.
To insert a dialling pause, simply enter the number you usually dial for an
outside line and then press
.
Using additional services
Your phone should be able to support services such as call waiting and
conference calls. You’ll need to check with your telephone network provider for
further information on these services.
30
Helpline 0844 800 6503 (See page 32 for costs and hours of operation)
Help and support
Helpline 0844 800 6503 (See page 32 for costs and hours of operation)
31
HELP AND SUPPORT
Help and support
If you need some help and you’re in the UK, please first check and see if your
problem can be solved using the troubleshooting guide below. If it can’t, please
call us on 0844 800 6503 (using a UK landline, at the time of going to print: calls
cost 6p for connection charge and then 5p a minute. Mobile costs may vary).
Lines are open Monday to Friday, 9am to 5pm, excluding public holidays.
If you’ve a claim on your 2-year guarantee, please contact your supplier.
Some issues may simply be resolved by disconnecting the power to the unit.
In such instances the power to the main base station should be switched off
for about 20 minutes. After which reconnect everything to determine if this
has resolved the issue.
Troubleshooting guide
I can’t make phone calls
1. Make sure the phone cable is connected properly. If it is, there may be
a fault. Please make sure you’re using the phone cable that came with
your phone.
2. Check the power’s plugged in, switched on and working.
3. Test the phone line and socket by using another phone.
32
Helpline 0844 800 6503 (See page 32 for costs and hours of operation)
HELP AND SUPPORT
My phone doesn’t ring
Check that the ringer is on. See page 13.
There is interference in the earpiece and/or internet
connection is very slow when using the phone
You must plug the phone into the wall socket via an ADSL filter if you have
broadband internet on your phone line.
My answering machine won’t record messages or memos
1. Check that your answering machine is connected and switched on.
See page 22.
2. Answering memory may be full. See page 25.
My remote access isn’t working
1. Check you’re using the correct remote access PIN. See page 26.
2. Make sure you’re using a Touchtone™ phone.
Helpline 0844 800 6503 (See page 32 for costs and hours of operation)
33
34
Helpline 0844 800 6503 (See page 32 for costs and hours of operation)
General information
Helpline 0844 800 6503 (See page 32 for costs and hours of operation)
35
GENERAL INFORMATION
Safety information
Please make sure you read this User Guide carefully.
Intended use
This phone is suitable for use on a public telephone network. Any other use is
considered unintended use. Unauthorised modification or reconstruction isn’t
permitted. Do not open the device and attempt any repair work yourself.
Phone location
Make sure your phone:
t
t
t
t
t
JTPOBESZýBUBOETUBCMFTVSGBDF
JTOUBUSJQIB[BSEXJUIJUTQPXFSDBCMF
JTOUPCTUSVDUFECZGVSOJUVSF
JTBUMFBTUPOFNFUSFGSPNPUIFSFMFDUSJDBMBQQMJBODFT
JTOUFYQPTFEUPTNPLFEVTUWJCSBUJPODIFNJDBMTNPJTUVSFIFBUBOE
direct sunlight.
Power supply
Important: use only the power adapter supplied with your PowerTel 68 Plus.
If you have a mains power failure you can still use your phone to make and
receive calls, see page 14.
36
Helpline 0844 800 6503 (See page 32 for costs and hours of operation)
GENERAL INFORMATION
Energy efficient power adapter
The included mains adapter meets the eco-design requirements
of the European Union (Directive 2005/32/EG). Thus, its power
consumption is considerably lower, both in operated as well as in
non-operated mode, compared with the mains adapter of previous design.
Medical equipment
Do not use your phone:
t OFBSFNFSHFODZPSJOUFOTJWFDBSFNFEJDBMFRVJQNFOU
t EVSJOHBOFMFDUSJDBMTUPSN
It is recommended that if you have a pacemaker fitted you check with a medical
expert or your health adviser before using this product
Hearing aid compatibility
You phone works with most popular hearing aids. However, given the wide
range of hearing aids available, we can’t guarantee that your phone will
function fully with every hearing aid.
Important: your phone can produce very high sound when Boost is switched
on. Please take care if the phone is used by others with normal hearing.
Helpline 0844 800 6503 (See page 32 for costs and hours of operation)
37
GENERAL INFORMATION
Disposal
You are obliged to dispose of consumable goods properly in accordance with
the applicable legal regulations.
symbol on this product indicates that electrical and electronic
The
apparatus and batteries must be disposed of separately from domestic
waste at suitable collection points provided by the public waste
authorities. Batteries can also often be disposed of at the point of sale.
Packaging materials must be disposed of according to local regulations.
38
Helpline 0844 800 6503 (See page 32 for costs and hours of operation)
GENERAL INFORMATION
Maintenance and guarantee
Maintenance
t 1MFBTFDMFBOZPVSFRVJQNFOUTTVSGBDFTXJUIBTPGUýVGGGSFFDMPUI
t /FWFSVTFDMFBOJOHBHFOUTPSTPMWFOUT
Guarantee
amplicomms equipment is produced and tested according to the latest
production methods. The implementation of carefully chosen materials and
highly developed technologies ensure trouble free functioning and a long
service life. The terms of the guarantee do not apply where the cause of the
equipment malfunction is the fault of the telephone network operator or any
interposed private branch extension system. The terms of the guarantee do not
apply to the rechargeable batteries or power packs used in the products. The
period of guarantee is 24 months from the date of purchase.
All deficiencies resulting from material of production faults which occur during
the period of guarantee will be eliminated free of charge. Rights to claims under
the terms of guarantee are annulled following intervention by the purchaser
or third parties. Damage caused as a result of improper handling or operation,
incorrect positioning or storing, improper connection or installation, Acts of
God or other external influence are not covered by the terms of guarantee.
Helpline 0844 800 6503 (See page 32 for costs and hours of operation)
39
GENERAL INFORMATION
In the case of complaints, we reserve the right to repair or replace defect
parts or provide a replacement device. Replacement parts or devices become
our property.
Rights to compensation in the case of damage are excluded where there is no
evidence or intent or gross negligence by the manufacturer.
If your equipment shows signs of defect during the period of guarantee, please
return to the sales outlet in which you purchased the amplicomms equipment
together with the purchase receipt. All rights to claims under the terms of
guarantee in accordance with this agreement must be asserted exclusively with
regard to your sales outlet.
Two years after the purchase of our products, claims under the terms of
guarantee can no longer be asserted.
Declaration of conformity
This device fulfils the requirements stipulated in the EU directive:
1999/5 EU directive on radio equipment and telecommunications
terminal equipment and the mutual recognition of their conformity.
Conformity with the above mentioned directive is confirmed by the CE symbol
on the device.
To view the complete Declaration of Conformity, please refer to the free
download available on our website www.amplicomms.eu
40
Helpline 0844 800 6503 (See page 32 for costs and hours of operation)
Index
Helpline 0844 800 6503 (See page 32 for costs and hours of operation)
41
INDEX
A
Adjusting the handsfree volume 14
Adjusting the earpiece volume 13
Answer delay 24
Answering machine 22
B
Boosting the earpiece volume 12
C
Call in to check messages 26
Check the contents of the box 6
Connecting the base 7
D
Day/time 22
Declaration of Conformity 40
Delete messages 25
Dialling pause 30
Dialling phone numbers from
a quickdial button 16
E
Earpiece volume 12, 13
End a call 12
42
G
Guarantee 39
H
Handsfree 13
Headset use 14
Help 32
L
Language 22
Last number redial 12
Listening to your messages 24
M
Maintenance 39
Making a call 12
Memo 24
Memory full 25
P
Pause 30
PIN 26
Play messages 24
Power failure 14
Private branch exchanges 30
Helpline 0844 800 6503 (See page 32 for costs and hours of operation)
INDEX
Q
Quickdial 16
R
Recall 30
Record a memo 24
Record your outgoing message 23
Redial 12
Remote access 26
U
Using a headset 14
Using remote access 26
Using the answering machine 22
V
Volume 13, 14
W
Wall mounting your telephone 8-9, 45
Restore the pre-recorded
outgoing message 23
Ringer volume 13
S
Safety information 36
Set the answer delay 24
Set the answer machine language 22
Setting the recall time 30
Storing a quickdial entry 16
T
Take a call 12
Tone control 13
Helpline 0844 800 6503 (See page 32 for costs and hours of operation)
43
44
Helpline 0844 800 6503 (See page 32 for costs and hours of operation)
WALL MOUNTING TEMPLATE
Helpline 0844 800 6503 (See page 32 for costs and hours of operation)
45
Distributed by: Audioline GmbH, D-41460 Neuss
OCT 10 – ISSUE 1.